在之前《A2UI初探:为什么前端不再需要手写UI代码了?》和《A2UI二番战:AI生成UI的"三权分立"与生态融合》这两篇文章我们介绍了A2UI的基本原理和特征,现在,是时候卷起袖子进行实践了。
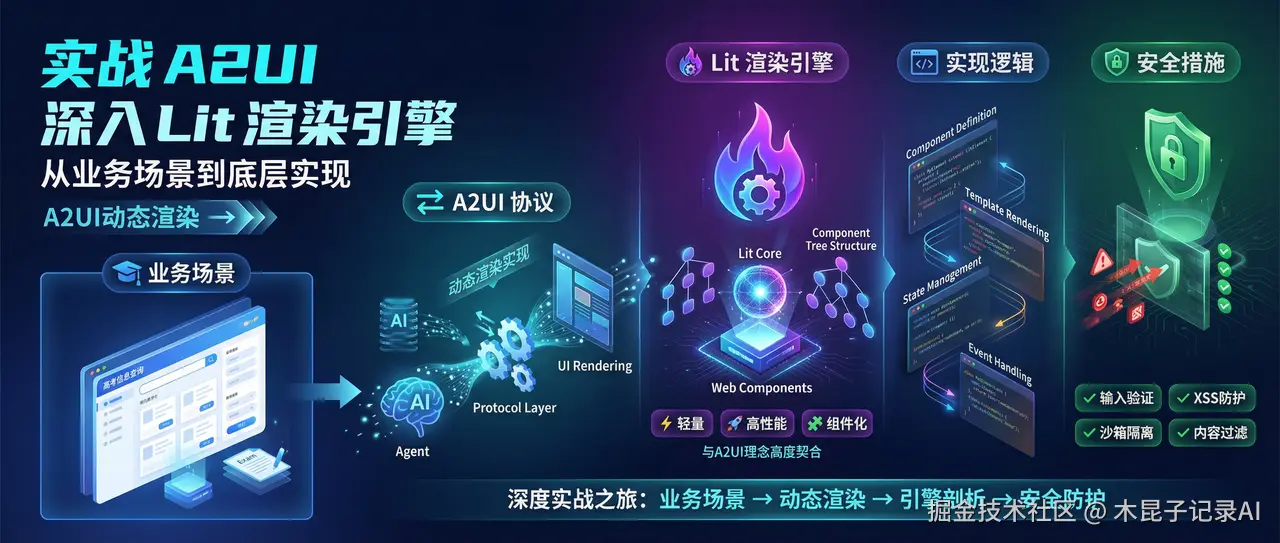 本文将带你进行一次深度实战之旅,依托高考 信息查询 的业务场景(本合集中之前AI Agent开发案例),演练通过A2UI实现动态渲染的具体做法,并深入探讨其背后的安全架构与前沿实践。
我们将以流行的Lit库作为实现载体,因为它轻量、高性能且基于Web Components,与A2UI的组件化理念高度契合。
这个A2UI系列文章,是组内前端大叔研究梳理,完整介绍了A2UI在AI应用中出现的逻辑和对应场景,它的设计理念、有了A2UI以后对前端工程师的影响,以及它与Vibe Coding的区别、与AG-UI的区别、与开发框架的关系等,最后分享一个真实的案例验证过程。
全景应用示例:基于高考信息查询Agent实战
1、业务背景说明
在我们正式开始介绍之前,先回顾下本公众号"AI Agent开发"的文章合集,针对高考信息查询这个业务需求开发Agent的过程做了详细介绍,本文在此基础上,来进行我们的实战练习。
原有"高考信息查询Agent"支持考生或者家长通过自然语言输入,查询历年高考信息,含考生人数、录取人数、复读人数、普通高校数量、本科录取人数、专科录取人数等。
我们现在引入CopilotKit框架升级该Agent,并搭配相应前端组件,根据用户输入的不同意图,由"高考信息查询Agent"返回相应结果,实现动态渲染。
2、实现流程描述
技术栈协同工作流:
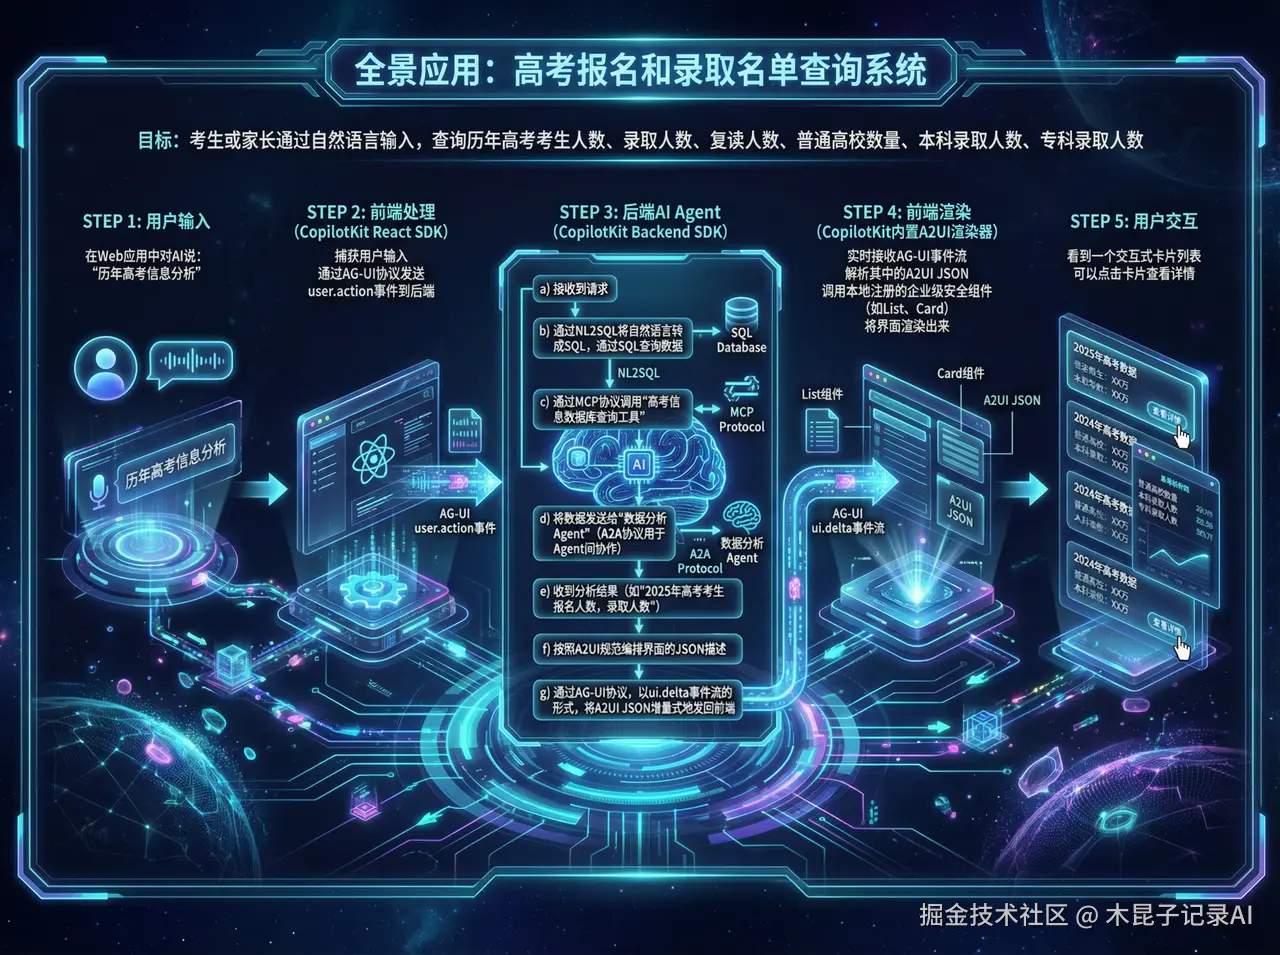 1. 用户:在Web应用中对AI说:"历年高考信息分析"。 2. 前端 (使用CopilotKit React SDK):捕获用户输入,通过 AG-UI协议 发送 user.action 事件到后端。 3. 后端AI Agent (使用CopilotKit Backend SDK):
-
- 接收到请求。
- 通过NL2SQL将自然语言转成SQL,通过SQL查询数据。
- 通过 MCP协议 调用"高考信息数据库查询工具",获取历年高考信息。
- 将数据发送给专业的"数据分析Agent"(A2A协议用于Agent间协作)。
- 收到分析结果(如"2025年高考考生报名人数,录取人数")。
- 决定生成一个包含年份、报名人数、查询详情的卡片列表界面。
- 按照 A2UI规范 编排这个界面的JSON描述。
- 通过 AG-UI协议,以 ui.delta 事件流的形式,将A2UI JSON 增量式地发回前端。
-
前端 (CopilotKit内置A2UI渲染器):实时接收AG-UI事件流,解析其中的A2UI JSON,调用本地注册的企业级安全组件(如List、Card),将界面渲染出来。5. 用户:看到一个交互式卡片列表,可以点击卡片查看详情。
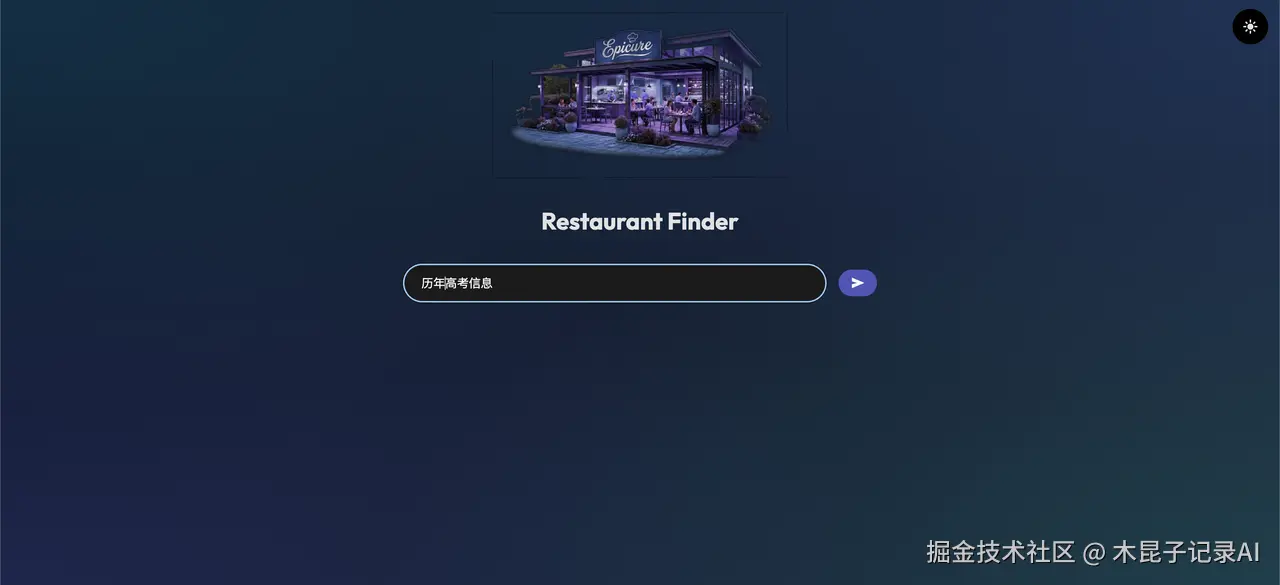
- 让我们从输入"历年高考信息"开始
- Agent返回历年高考信息卡片列表
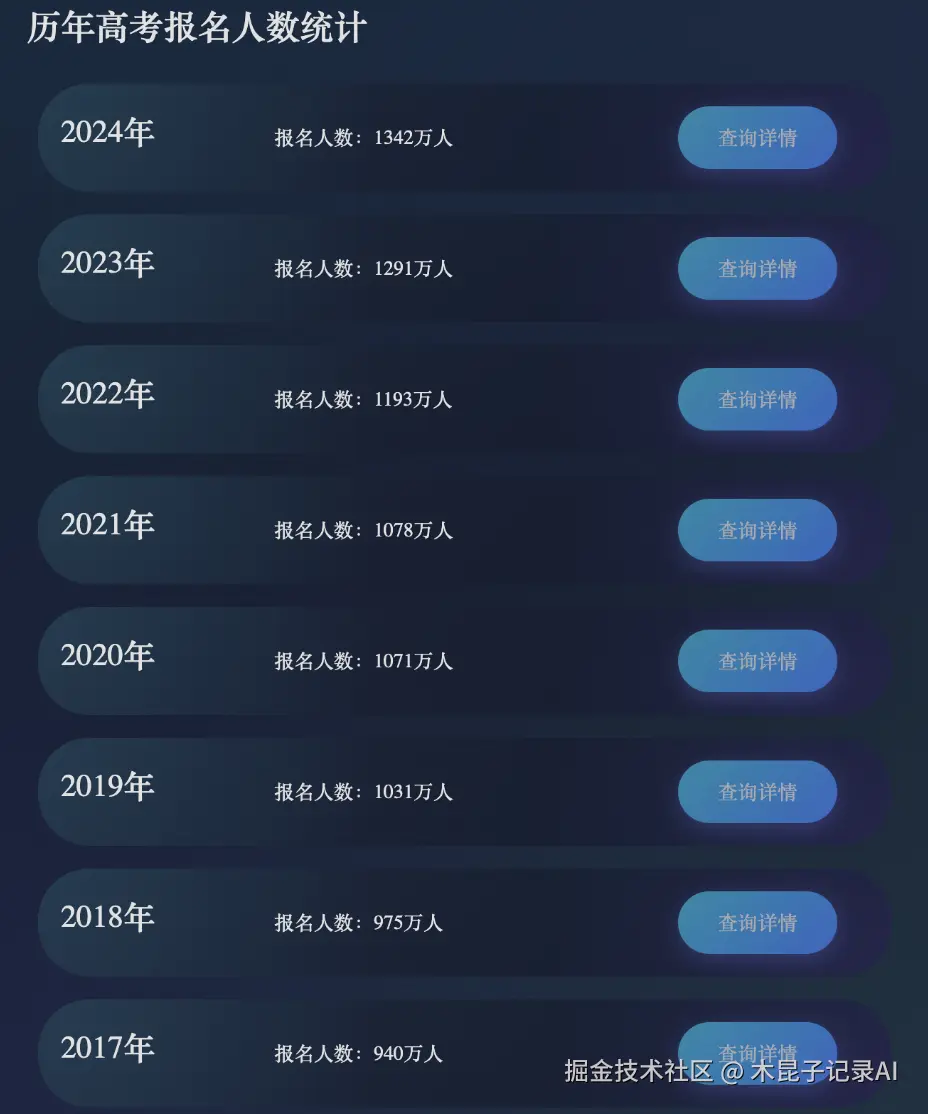
- 接口协议遵循"application/json+a2ui"规范,下面是接口返回的UI结构定义(surfaceUpdate)JSON
css
[    {        "id":"root-column",        "component":{            "Column":{                "children":{                    "explicitList":[                        "title-heading",                        "item-list"                    ]
                }
            }
        }
    },
    {
        "id":"title-heading",
        "component":{
            "Text":{
                "usageHint":"h1",
                "text":{
                    "path":"title"
                }
            }
        }
    },
    {
        "id":"item-list",
        "component":{
            "List":{
                "direction":"vertical",
                "children":{
                    "template":{
                        "componentId":"item-card-template",
                        "dataBinding":"/items"
                    }
                }
            }
        }
    },
    {
        "id":"item-card-template",
        "component":{
            "Card":{
                "child":"card-layout"
            }
        }
    },
    {
        "id":"card-layout",
        "component":{
            "Row":{
                "alignment":"center",
                "children":{
                    "explicitList":[
                        "template-year",
                        "template-count",
                        "template-query-button"
                    ]
                }
            }
        }
    },
    {
        "id":"template-year",
        "weight":1,
        "component":{
            "Text":{
                "usageHint":"h3",
                "text":{
                    "path":"year"
                }
            }
        }
    },
    {
        "id":"template-count",
        "weight":2,
        "component":{
            "Text":{
                "text":{
                    "path":"countText"
                }
            }
        }
    },
    {
        "id":"template-query-button",
        "weight":1,
        "component":{
            "Button":{
                "child":"btn-text",
                "primary":true,
                "action":{
                    "name":"query_year_detail",
                    "context":[
                        {
                            "key":"year",
                            "value":{
                                "path":"year"
                            }
                        }
                    ]
                }
            }
        }
    },
    {
        "id":"btn-text",
        "component":{
            "Text":{
                "text":{
                    "literalString":"查询详情"
                }
            }
        }
    }
]- 如果我们输入的是"2024年高考详细信息"Agent会返回如下渲染界面
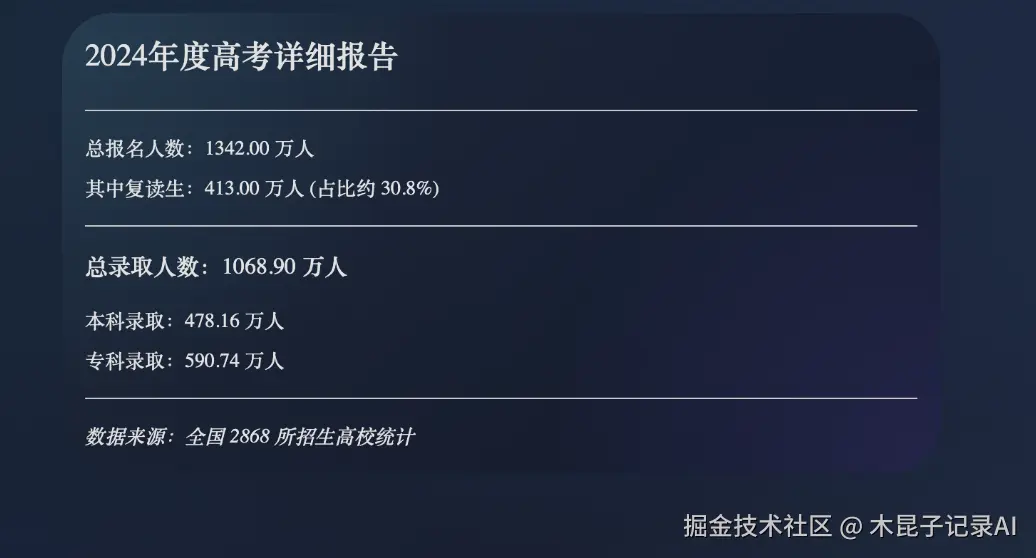
- 对应的A2UI协议JSON
css
[    {        "id":"detail-card",        "component":{            "Card":{                "child":"detail-column"            }        }    },    {        "id":"detail-column",        "component":{            "Column":{                "children":{                    "explicitList":[                        "detail-title",                        "div1",                        "candidates-info",                        "retake-info",                        "div2",                        "admission-total",                        "undergrad-info",                        "specialty-info",                        "div3",                        "uni-count"                    ]
                }
            }
        }
    },
    {
        "id":"detail-title",
        "component":{
            "Text":{
                "usageHint":"h2",
                "text":{
                    "path":"yearTitle"
                }
            }
        }
    },
    {
        "id":"candidates-info",
        "component":{
            "Text":{
                "text":{
                    "path":"candidatesCount"
                }
            }
        }
    },
    {
        "id":"retake-info",
        "component":{
            "Text":{
                "text":{
                    "path":"retakeCount"
                }
            }
        }
    },
    {
        "id":"admission-total",
        "component":{
            "Text":{
                "usageHint":"h4",
                "text":{
                    "path":"totalAdmission"
                }
            }
        }
    },
    {
        "id":"undergrad-info",
        "component":{
            "Text":{
                "text":{
                    "path":"undergradCount"
                }
            }
        }
    },
    {
        "id":"specialty-info",
        "component":{
            "Text":{
                "text":{
                    "path":"specialtyCount"
                }
            }
        }
    },
    {
        "id":"uni-count",
        "component":{
            "Text":{
                "usageHint":"caption",
                "text":{
                    "path":"universityCount"
                }
            }
        }
    },
    {
        "id":"div1",
        "component":{
            "Divider":{}
        }
    },
    {
        "id":"div2",
        "component":{
            "Divider":{}
        }
    },
    {
        "id":"div3",
        "component":{
            "Divider":{}
        }
    }
]
如果我们输入"历年高考人数变化情况",LLM识别到用户更想了解高考人数的趋势变化,这时候可能会以折线图或者其他展示形式的组件去渲染,前提是我们的"可信组件库"已经实现了这些组件。
3、关键模式解析
- literalString vs path:literalString代表静态文本,而path指向一个动态数据模型(如title),这是数据绑定的核心。2. 组件复合:title-heading、item-list、等布局组件通过explicitList管理子组件ID,形成清晰的层级。3. 根布局组件,组件类型:Column(垂直列布局)
json
{
    "id": "root-column",
    "component": {
        "Column": {
            "children": {
                "explicitList": [
                    "title-heading",
                    "item-list"
                ]
            }
        }
    }
}- 列表组件 - 核心部分
亮点设计:
- 采用模板化渲染(template + dataBinding)
- 垂直方向排列,适合移动端展示
css
{
    "id":"item-list",
    "component":{
        "List":{
            "direction":"vertical",
            "children":{
                "template":{
                    "componentId":"item-card-template",
                    "dataBinding":"/items"
                }
            }
        }
    }
}- 卡片模板架构
权重系统:通过weight属性控制各部分宽度比例
less
Card(卡片容器)
└── Row(水平布局)
    ├── 年份文本 (weight: 1)
    ├── 人数文本 (weight: 2)
└── 查询按钮 (weight: 1)- 按钮交互功能实现
交互流程:
- 用户点击"查询详情"按钮
- 触发query_year_detail动作
- 携带年份参数(如"2024年")
json
{
  "action":{
    "name":"query_year_detail",
    "context":[
      {
        "key":"year",
        "value":{"path":"year"}
      }
    ]
}
}- 完整渲染流程
-
初始化阶段:beginRendering创建画布
-
结构定义:surfaceUpdate定义组件树
-
数据注入:dataModelUpdate填充内容
-
交互就绪:状态变为input-required
Lit渲染引擎实现:四步构建安全UI
第1步:定义与注册"可信组件白名单"(Catalog)
这是安全的第一道防线。我们不是渲染任意JSON,而是只渲染Catalog中注册过的组件类型。
javascript
// catalog.js - 我们的安全组件库
import { LitElement, html, css } from'lit';
import { repeat } from'lit/directives/repeat.js';

// 1. 基础安全按钮组件
exportclassSafeButtonextendsLitElement {
static properties = {
    label: { type: String },
    variant: { type: String },
    icon: { type: String }
  };

render() {
    return html`
      <buttonclass="btn btn-${this.variant}" @click=${this._handleClick}>
        ${this.icon ? html`<i class="icon-${this.icon}"></i>` : ''}
        ${this.label}
      </button>
    `;
  }

// 点击事件不直接执行,而是派发一个自定义事件
_handleClick() {
    this.dispatchEvent(newCustomEvent('a2ui-action', {
      bubbles: true,
      composed: true,
      detail: {
        type: 'BUTTON_CLICK',
        id: this.id// 组件ID来自A2UI描述
      }
    }));
  }

static styles = css`...`; // 封装样式,防止污染
}
customElements.define('safe-button', SafeButton);

// 2. 绑定到数据模型的输入框组件
exportclassSafeTextFieldextendsLitElement {
static properties = {
    label: { type: String },
    value: { type: String },
    fieldPath: { type: String } // 对应A2UI中的 `path`
  };

constructor() {
    super();
    // 从全局状态管理器订阅数据变化
    window.A2UIState.subscribe(this.fieldPath, (newVal) => {
      if (this.value !== newVal) {
        this.value = newVal;
      }
    });
  }

_onInput(e) {
    const newValue = e.target.value;
    // 派发事件,通知状态管理器更新数据
    this.dispatchEvent(newCustomEvent('a2ui-model-update', {
      detail: {
        path: this.fieldPath,
        value: newValue
      }
    }));
  }

render() {
    return html`
      <label>${this.label}
        <input
          type="text"
          .value=${this.value || ''}
          @input=${this._onInput}
        >
      </label>
    `;
  }
}
customElements.define('safe-text-field', SafeTextField);

// 3. Catalog 映射表
exportconstA2UI_CATALOG = {
'Button': (descriptor, id) => html`<safe-button.id=${id}.label=${descriptor.label}.variant=${descriptor.variant}></safe-button>`,
'TextField': (descriptor, id) => {
    // 安全属性提取:只允许已知属性
    const safeProps = {};
    const allowedProps = ['label', 'placeholder', 'textFieldType', 'width'];
    allowedProps.forEach(prop => {
      if (descriptor[prop] !== undefined) safeProps[prop] = descriptor[prop];
    });
    // 特别处理数据绑定路径
    if (descriptor.value && descriptor.value.path) {
      safeProps.fieldPath = descriptor.value.path;
    }
    return html`<safe-text-field.id=${id}...=${safeProps}></safe-text-field>`;
  },
'DataTable': (descriptor, id) => { /* 实现复杂表格 */ },
'Header': (descriptor, id) => { /* 实现标题 */ },
// ... 注册更多组件
};
第2步:实现A2UI解析与渲染引擎
这个引擎负责将A2UI JSON转化为Lit模板,并管理组件实例。
ini
// a2ui-renderer.js
import { A2UI_CATALOG } from'./catalog.js';

exportclassA2UIRenderer {
constructor(rootElement) {
    this.root = rootElement;
    this.componentMap = newMap(); // id -> Lit TemplateResult
    this.dataModel = {}; // 维护当前数据状态
    this.subscriptions = newMap(); // 数据路径 -> 回调函数集合
  }

// 处理 surfaceUpdate 消息
applySurfaceUpdate(componentsDescriptorArray) {
    const updates = [];

    for (const desc of componentsDescriptorArray) {
      const { id, component } = desc;
      const componentType = Object.keys(component)[0];
      const componentConfig = component[componentType];

      if (!A2UI_CATALOG[componentType]) {
        console.warn(`[A2UI Security] 组件类型 "${componentType}" 不在白名单中,已跳过。`);
        continue; // 关键安全策略:忽略未注册组件
      }

      // 调用Catalog中的工厂函数,创建该组件的Lit模板
      const template = A2UI_CATALOG[componentType](componentConfig, id);
      this.componentMap.set(id, template);
      updates.push(id);
    }

    // 智能重渲染:找出受影响的根节点进行更新
    this._recomputeAndRender(updates);
  }

// 处理 dataModelUpdate 消息
applyDataModelUpdate(path, value) {
    // 使用JSON Patch风格路径,如 '/filters/searchKeyword'
    this._setDataByPath(this.dataModel, path, value);

    // 通知所有订阅了此路径的组件更新
    const callbacks = this.subscriptions.get(path) || [];
    callbacks.forEach(cb =>cb(value));
  }

// 辅助函数:根据路径设置对象值
_setDataByPath(obj, path, value) {
    const parts = path.split('/').filter(p => p);
    let current = obj;
    for (let i = 0; i < parts.length - 1; i++) {
      if (!current[parts[i]]) current[parts[i]] = {};
      current = current[parts[i]];
    }
    current[parts[parts.length - 1]] = value;
  }

// 订阅数据变化(供组件调用)
subscribe(path, callback) {
    if (!this.subscriptions.has(path)) {
      this.subscriptions.set(path, []);
    }
    this.subscriptions.get(path).push(callback);
    // 立即回调当前值
    const currentVal = this._getDataByPath(path);
    callback(currentVal);
  }

// 核心渲染函数(使用Lit的render函数)
_recomputeAndRender(updatedIds) {
    // 1. 找到需要更新的最顶层根ID(避免重复渲染子树)
    const rootsToUpdate = this._findRootComponentsToUpdate(updatedIds);

    // 2. 为每个需要更新的根节点重新渲染
    rootsToUpdate.forEach(rootId => {
      const rootTemplate = this.componentMap.get(rootId);
      if (rootTemplate) {
        const container = this.root.querySelector(`[data-a2ui-id="${rootId}"]`) || this._createContainer(rootId);
        // Lit的核心渲染API
        render(rootTemplate, container);
      }
    });
  }

// 根据A2UI的引用关系,计算依赖树,优化渲染范围
_findRootComponentsToUpdate(ids) {
    // 实现依赖分析算法,此处简化返回所有ID
    return ids;
  }
}
第3步:构建状态管理与事件总线
这是连接"静态UI"和"动态交互"的关键。
javascript
// state-event-bus.js
exportclassA2UIStateManager {
constructor() {
    this.state = {};
    this.eventHandlers = newMap(); // actionType -> handler function
  }

// 注册安全的动作处理器(由前端开发者控制)
registerActionHandler(actionType, handler) {
    // 关键:只有这里注册的action才能被A2UI事件触发
    this.eventHandlers.set(actionType, handler);
  }

// 处理来自UI组件的事件(如按钮点击、输入框变化)
asynchandleUIEvent(eventDetail) {
    const { action, payload } = eventDetail;

    if (!this.eventHandlers.has(action)) {
      console.error(`[A2UI Security] 未注册的动作类型: ${action}`);
      return;
    }

    const handler = this.eventHandlers.get(action);

    try {
      // 执行安全注册的处理器
      const result = awaithandler(payload);

      // 处理器可以返回新的A2UI指令或数据更新
      if (result && result.type === 'surfaceUpdate') {
        // 触发渲染器更新UI
        window.A2UIRenderer.applySurfaceUpdate(result.components);
      }
    } catch (error) {
      console.error(`[A2UI] 动作执行失败: ${action}`, error);
    }
  }
}

// 全局单例
window.A2UIState = newA2UIStateManager();

// 注册一些示例动作处理器
window.A2UIState.registerActionHandler('navigate', (payload) => {
console.log('导航到:', payload.route);
// 可以集成到你的路由系统,如React Router
});

window.A2UIState.registerActionHandler('updateFilter', (payload) => {
// 1. 更新本地状态
window.A2UIRenderer.applyDataModelUpdate(`/filters/${payload.field}`, payload.value);
// 2. 可选:触发后端API调用,获取新的筛选结果
fetchUsersWithFilters(window.A2UIRenderer.dataModel.filters);
});
第4步:集成与启动
最后,将所有部分连接起来。
ini
<!DOCTYPE html>
<html>
<head>
<scripttype="module"src="./catalog.js"></script>
<scripttype="module"src="./a2ui-renderer.js"></script>
<scripttype="module"src="./state-event-bus.js"></script>
</head>
<body>
<divid="a2ui-root"></div>

<scripttype="module">
    import { A2UI_CATALOG } from'./catalog.js';
    import { A2UIRenderer } from'./a2ui-renderer.js';

    // 初始化
    const rootEl = document.getElementById('a2ui-root');
    window.A2UIRenderer = newA2UIRenderer(rootEl);

    // 模拟接收来自AI Agent(通过AG-UI)的A2UI消息
    asyncfunctionsimulateAIStream() {
      // 第一批:渲染骨架
      const skeletonUpdate = [...]; // 包含Container, Header, loading状态的JSON
      window.A2UIRenderer.applySurfaceUpdate(skeletonUpdate);

      // 模拟网络延迟
      awaitnewPromise(resolve =>setTimeout(resolve, 300));

      // 第二批:更新数据(例如用户数)
      window.A2UIRenderer.applyDataModelUpdate('/userCount', 42);

      // 第三批:渲染复杂的表格和筛选栏
      const mainContentUpdate = [...]; // 包含DataTable, FilterBar等的JSON
      window.A2UIRenderer.applySurfaceUpdate(mainContentUpdate);

      // 第四批:填充表格数据
      const userData = [...];
      window.A2UIRenderer.applyDataModelUpdate('/users/list', userData);
    }

    simulateAIStream();
</script>
</body>
</html>
安全措施再加固
除了可信组件白名单机制,还需要多层防护:
- JSON Schema验证:在解析A2UI JSON之前,先用严格的JSON Schema验证其结构,过滤畸形数据。
- 属性值净化:对于所有字符串类型的属性值(如label, placeholder),进行HTML实体编码,防止HTML/脚本注入。
- 资源加载限制:对于image组件的src,限制只允许加载来自可信CDN或数据URI的图片。
- 事件速率限制:防止恶意脚本通过快速触发onClick事件进行DDoS攻击。
- CSP(内容安全策略)集成:即使组件被破坏,严格的CSP也能阻止任何脚本执行。
前端开发者的实践路线图
-
入门(1-2周):
-
- 在A2UI Composer(composer.copilotkit.ai)上拖拽组件,熟悉JSON结构。
- 运行官方Lit示例,了解基础渲染流程。
-
进阶(1-2月):
-
- 为你所在团队的设计系统,构建10-20个核心A2UI Catalog组件。
- 集成到现有React/Vue应用中的一个非核心功能模块进行试点。
-
精通(3-6月):
-
- 实现高性能、支持SSR的A2UI渲染引擎。
- 设计并实现一套完整的A2UI+AG-UI开发、调试、部署工作流。
- 主导将某个核心业务流的UI生成迁移到A2UI模式。
-
专家(长期):
-
- 研究如何将A2UI与你的后端LLM编排框架深度集成。
- 探索在AR/VR、车载系统等新兴平台上的A2UI渲染方案。
- 为开源A2UI生态贡献核心特性或工具。
结语:从执行者到规则制定者
通过这次深度实战,我们清晰地看到,A2UI并非一个遥远的"黑盒"技术。它是一套清晰、可实现的规范与模式。前端开发者的角色,正从UI细节的"手工执行者",转变为定义AI如何安全、高效构建UI的"规则制定者"和"系统架构师"。
我们不再仅仅关心"这个按钮的圆角是4px还是6px",而是思考:
- "如何设计一个SmartForm组件,能让AI根据数据模型自动生成最合适的表单布局?"
- "如何建立一套事件处理机制,既能满足复杂交互,又绝无安全漏洞?"
- "如何让同一份A2UI描述,在手机、桌面、大屏上都呈现最佳体验?"
这既是挑战,更是前所未有的机遇。 我们正在亲手编写人机交互新纪元的底层代码。当你理解了A2UI从JSON到像素的每一个字节的旅程,你便掌握了开启这扇未来之门的钥匙。
现在,代码世界静待你的重新定义。
本系列说明:完整介绍A2UI在AI应用中出现的逻辑和对应场景,它的设计理念、有了A2UI以后对前端工程师的影响,以及它与Vibe Coding的区别、与AG-UI的区别、与开发框架的关系等,最后分享一个真实的案例验证过程。
本文作者:一只大叔
本文原载:公众号"木昆子记录AI"