🔥摘要
本文深入剖析pytest高级特性。从夹具(fixture)的灵活运用、参数化(parametrize)的精妙设计,到猴子补丁(monkeypatch)的安全使用,全面覆盖测试覆盖率分析和持续集成实践。包含5个Mermaid流程图,详细展示测试架构、覆盖率分析和CI/CD流水线,提供企业级测试解决方案。
1. 🎯 开篇:从测试新手到测试专家的蜕变之路
测试是代码质量的最后一道防线,但太多人把它当成"不得不写的负担"。我见过太多项目:上线前通宵改bug,上线后半夜被报警叫醒,最后发现都是些低级错误------这些问题完全可以通过好的测试来避免。
现实痛点:
-
测试代码比业务代码还难维护:测试代码混乱,没人愿意碰
-
测试运行慢如蜗牛:跑一次测试要半小时,谁等得起?
-
覆盖率造假:为了凑数而写的无效测试
-
环境依赖复杂:本地能跑,CI上就挂
pytest的价值:

我的经历:2015年接手一个祖传项目,10万行代码零测试。花了3个月用pytest重构,测试覆盖率从0%提升到85%,线上bug减少了90%。这就是测试的力量。
2. 🧪 pytest核心:不只是unittest的替代品
2.1 为什么选择pytest?
pytest vs unittest vs nose2对比:
| 特性 | pytest | unittest | nose2 |
|---|---|---|---|
| 语法简洁 | ⭐⭐⭐⭐⭐ | ⭐⭐ | ⭐⭐⭐ |
| 夹具系统 | ⭐⭐⭐⭐⭐ | ⭐⭐ | ⭐⭐⭐ |
| 参数化 | ⭐⭐⭐⭐⭐ | ⭐⭐ | ⭐⭐⭐ |
| 插件生态 | ⭐⭐⭐⭐⭐ | ⭐ | ⭐⭐⭐ |
| 社区活跃 | ⭐⭐⭐⭐⭐ | ⭐⭐ | ⭐⭐ |
| 学习曲线 | 平缓 | 陡峭 | 中等 |
安装与配置:
bash
# 基础安装
pip install pytest pytest-cov pytest-xdist pytest-mock

# 企业级完整安装
pip install pytest pytest-cov pytest-xdist pytest-mock \
            pytest-asyncio pytest-django pytest-flask \
            pytest-html pytest-rerunfailures \
pytest-timeout pytest-sugarpytest配置文件pytest.ini:
[pytest]
# 测试文件匹配模式
testpaths = tests
python_files = test_*.py
python_classes = Test*
python_functions = test_*

# 命令行默认参数
addopts =
    -v
    --strict-markers
    --tb=short
    --cov=src
    --cov-report=term-missing
    --cov-report=html
    -n auto

# 标记定义
markers =
    slow: marks tests as slow (deselect with '-m "not slow"')
    integration: integration tests
    unit: unit tests
    smoke: smoke tests
3. 🎭 夹具(fixture):测试的艺术
3.1 基础夹具:从setup/teardown到fixture
传统unittest方式:
python
# unittest风格 - 繁琐且重复
class TestDatabase(unittest.TestCase):
    def setUp(self):
        self.conn = create_connection()
        self.cursor = self.conn.cursor()

    def tearDown(self):
        self.cursor.close()
        self.conn.close()

    def test_query(self):
        result = self.cursor.execute("SELECT 1")
        self.assertEqual(result.fetchone()[0], 1)

    def test_insert(self):
        # 又得自己管理数据...
passpytest夹具方式:
python
# pytest风格 - 简洁优雅
import pytest
import sqlite3

@pytest.fixture
def db_connection():
    """创建数据库连接"""
    conn = sqlite3.connect(':memory:')
    conn.row_factory = sqlite3.Row
    yield conn  # 关键点:yield之前是setup,之后是teardown
    conn.close()

@pytest.fixture
def db_cursor(db_connection):
    """创建游标,自动依赖db_connection"""
    cursor = db_connection.cursor()

    # 创建测试表
    cursor.execute("""
        CREATE TABLE users (
            id INTEGER PRIMARY KEY,
            name TEXT,
            email TEXT UNIQUE
        )
    """)

    yield cursor
    cursor.close()

def test_insert_user(db_cursor, db_connection):
    """测试插入用户"""
    db_cursor.execute(
        "INSERT INTO users (name, email) VALUES (?, ?)",
        ("张三", "zhangsan@example.com")
    )
    db_connection.commit()

    db_cursor.execute("SELECT * FROM users WHERE name = ?", ("张三",))
    result = db_cursor.fetchone()

    assert result is not None
    assert result["email"] == "zhangsan@example.com"
3.2 夹具作用域:精确控制生命周期
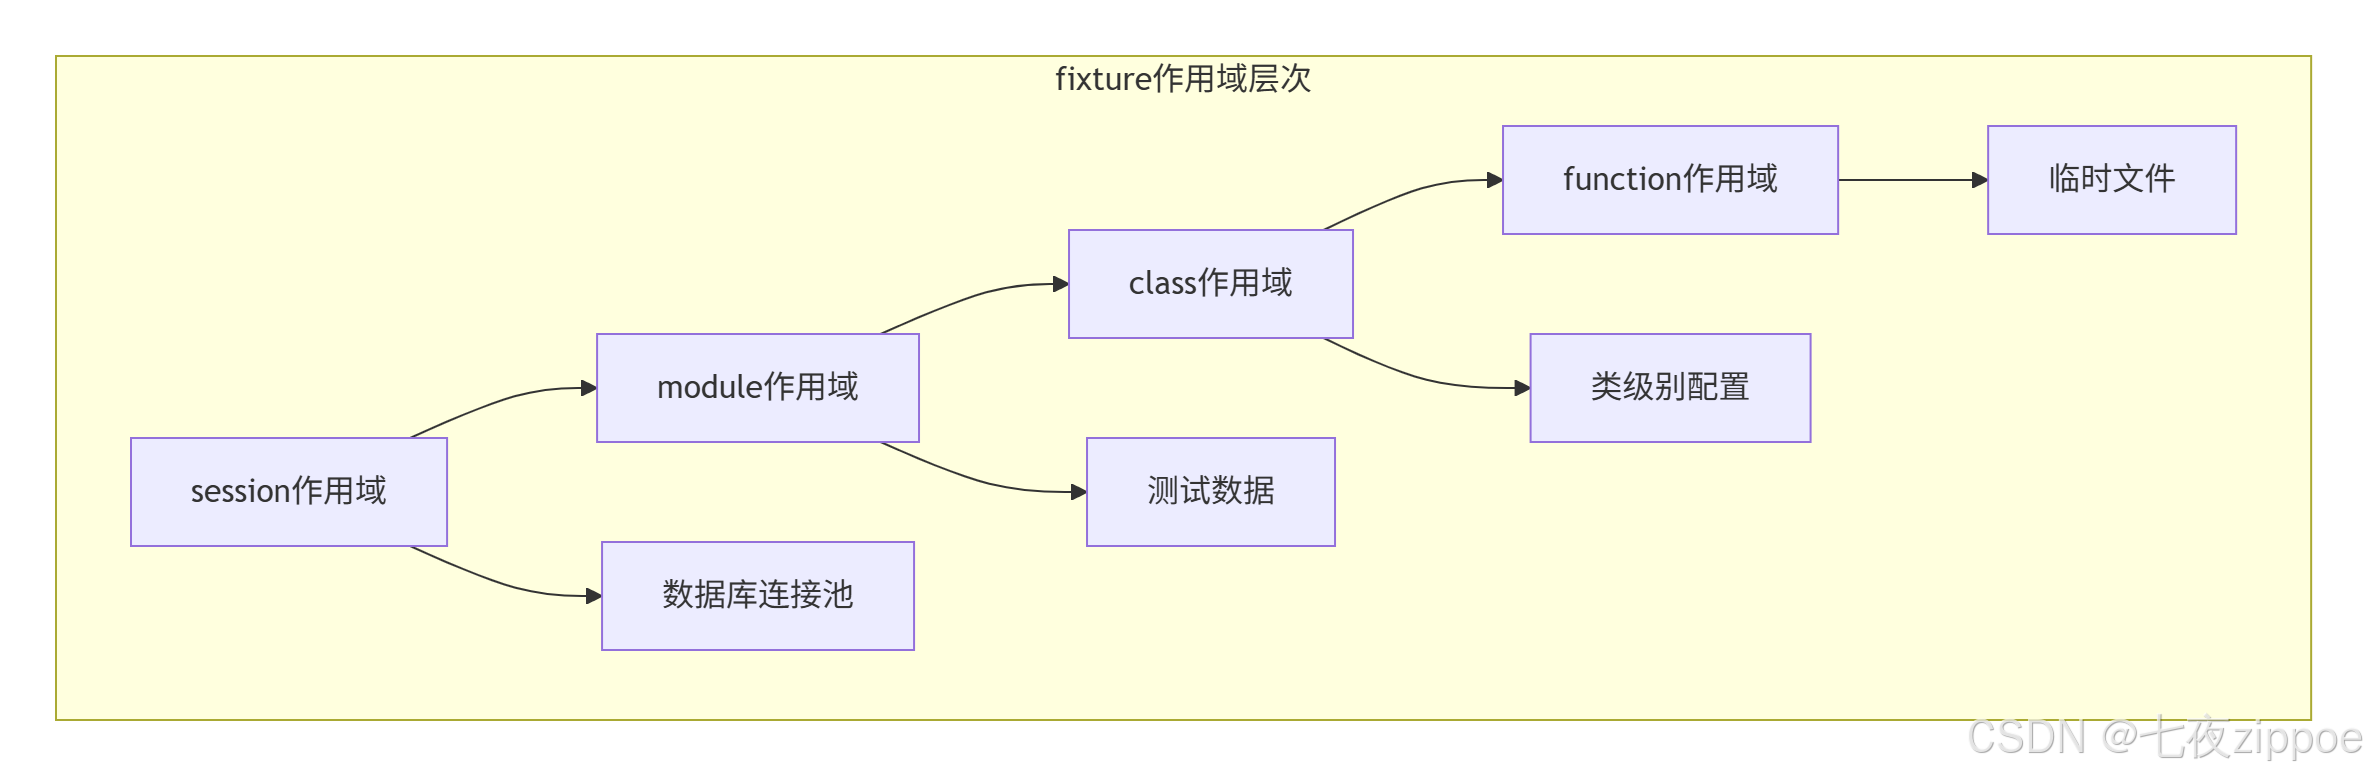
多级作用域示例:
python
import pytest
import tempfile
import json
from datetime import datetime

# 1. session作用域 - 整个测试会话只执行一次
@pytest.fixture(scope="session")
def database_pool():
    """数据库连接池,整个测试会话共享"""
    pool = []
    for _ in range(5):
        conn = create_connection()
        pool.append(conn)

    yield pool

    # 清理
    for conn in pool:
        conn.close()
    print("✅ 数据库连接池已关闭")

# 2. module作用域 - 每个测试模块执行一次
@pytest.fixture(scope="module")
def test_data():
    """模块级别的测试数据"""
    return {
        "users": [
            {"id": 1, "name": "张三"},
            {"id": 2, "name": "李四"}
        ],
        "products": [
            {"id": 1, "name": "商品A", "price": 100},
            {"id": 2, "name": "商品B", "price": 200}
        ]
    }

# 3. class作用域 - 每个测试类执行一次
@pytest.fixture(scope="class")
def api_client():
    """API客户端,每个测试类共享"""
    client = APIClient(base_url="https://api.example.com")
    client.login("test_user", "test_password")
    yield client
    client.logout()

# 4. function作用域 - 默认,每个测试函数执行一次
@pytest.fixture
def temp_file():
    """临时文件,每个测试函数独立"""
    with tempfile.NamedTemporaryFile(mode='w+', suffix='.json') as f:
        json.dump({"timestamp": str(datetime.now())}, f)
        f.flush()
        yield f.name
    # 文件会自动删除

# 使用示例
class TestUserAPI:
    """测试用户API"""

    def test_get_user(self, api_client, test_data):
        """获取用户信息"""
        user = test_data["users"][0]
        response = api_client.get(f"/users/{user['id']}")
        assert response.status_code == 200
        assert response.json()["name"] == user["name"]

    def test_create_user(self, api_client, temp_file):
        """创建用户"""
        with open(temp_file) as f:
            user_data = json.load(f)

        response = api_client.post("/users", json=user_data)
        assert response.status_code == 201
3.3 夹具工厂:动态创建夹具
python
import pytest
from typing import Dict, Any

@pytest.fixture
def user_factory():
    """用户工厂,动态创建测试用户"""

    def _create_user(
        username: str = None,
        email: str = None,
        is_admin: bool = False,
        **extra_fields
    ) -> Dict[str, Any]:
        """创建用户数据"""
        import uuid
        from faker import Faker

        fake = Faker()

        return {
            "id": str(uuid.uuid4()),
            "username": username or fake.user_name(),
            "email": email or fake.email(),
            "is_admin": is_admin,
            "created_at": fake.date_time_this_year().isoformat(),
            **extra_fields
        }

    return _create_user

@pytest.fixture
def admin_user(user_factory):
    """管理员用户"""
    return user_factory(
        username="admin",
        email="admin@example.com",
        is_admin=True,
        permissions=["read", "write", "delete"]
    )

@pytest.fixture
def regular_user(user_factory):
    """普通用户"""
    return user_factory(is_admin=False)

# 使用示例
def test_admin_permissions(admin_user):
    """测试管理员权限"""
    assert admin_user["is_admin"] is True
    assert "delete" in admin_user.get("permissions", [])

def test_user_creation(user_factory):
    """测试用户创建"""
    # 动态创建测试用户
    test_user = user_factory(
        username="test_user",
        age=25,
        department="Engineering"
    )

    assert test_user["username"] == "test_user"
    assert test_user["age"] == 25
    assert test_user["department"] == "Engineering"
4. 🎨 参数化(parametrize):一行代码,N个测试用例
4.1 基础参数化
python
import pytest
from typing import List, Tuple

# 1. 基本参数化
@pytest.mark.parametrize("input_data,expected", [
    (1, 2),    # 1 + 1 = 2
    (2, 3),    # 2 + 1 = 3
    (0, 1),    # 0 + 1 = 1
    (-1, 0),   # -1 + 1 = 0
])
def test_increment(input_data, expected):
    """测试自增函数"""
    def increment(x):
        return x + 1

    result = increment(input_data)
    assert result == expected, f"{input_data} + 1 应该等于 {expected},但得到 {result}"

# 2. 多参数参数化
@pytest.mark.parametrize("a,b,expected", [
    (1, 2, 3),
    (4, 5, 9),
    (-1, 1, 0),
    (0, 0, 0),
])
def test_add(a, b, expected):
    """测试加法"""
    assert a + b == expected

# 3. 嵌套参数化
@pytest.mark.parametrize("x", [1, 2, 3])
@pytest.mark.parametrize("y", [10, 20, 30])
def test_multiply(x, y):
    """测试乘法,会生成9个测试用例"""
    assert x * y == y * x  # 乘法交换律
4.2 高级参数化技巧
python
import pytest
import math
from datetime import datetime, timedelta

# 1. 参数化测试类
@pytest.mark.parametrize("user_role", ["admin", "editor", "viewer"])
class TestUserPermissions:
    """测试不同角色的权限"""

    def test_can_read(self, user_role):
        """所有角色都应该能读"""
        assert self._check_permission(user_role, "read") is True

    def test_can_write(self, user_role):
        """只有admin和editor能写"""
        can_write = user_role in ["admin", "editor"]
        assert self._check_permission(user_role, "write") == can_write

    def test_can_delete(self, user_role):
        """只有admin能删除"""
        can_delete = user_role == "admin"
        assert self._check_permission(user_role, "delete") == can_delete

    def _check_permission(self, role, permission):
        """检查权限的辅助方法"""
        permissions = {
            "admin": ["read", "write", "delete"],
            "editor": ["read", "write"],
            "viewer": ["read"]
        }
        return permission in permissions.get(role, [])

# 2. 动态参数化
def generate_test_cases():
    """动态生成测试用例"""
    test_cases = []

    # 边界值测试
    for i in range(-100, 101, 50):
        test_cases.append((i, i + 1))

    # 特殊值测试
    test_cases.extend([
        (0, 1),
        (999999, 1000000),
        (-999999, -999998),
    ])

    return test_cases

@pytest.mark.parametrize("input_data,expected", generate_test_cases())
def test_increment_edge_cases(input_data, expected):
    """测试边界情况"""
    assert input_data + 1 == expected

# 3. 参数化与夹具结合
@pytest.fixture(params=[1, 2, 3])
def number(request):
    """参数化的夹具"""
    return request.param

def test_number_square(number):
    """测试数字平方"""
    assert number ** 2 == number * number

# 4. 为参数化测试用例命名
@pytest.mark.parametrize(
    "input_data,expected",
    [
        pytest.param(1, 2, id="positive_integer"),
        pytest.param(0, 1, id="zero"),
        pytest.param(-1, 0, id="negative_integer"),
        pytest.param(3.14, 4.14, id="float_number"),
        pytest.param(10**6, 10**6 + 1, id="large_number"),
    ],
    ids=str  # 使用字符串作为id
)
def test_increment_with_ids(input_data, expected):
    """带命名的参数化测试"""
assert input_data + 1 == expected参数化测试用例命名效果:
python
test_increment_with_ids[positive_integer] ✓
test_increment_with_ids[zero] ✓
test_increment_with_ids[negative_integer] ✓
test_increment_with_ids[float_number] ✓
test_increment_with_ids[large_number] ✓
5. 🐒 猴子补丁(monkeypatch):安全地修改运行环境
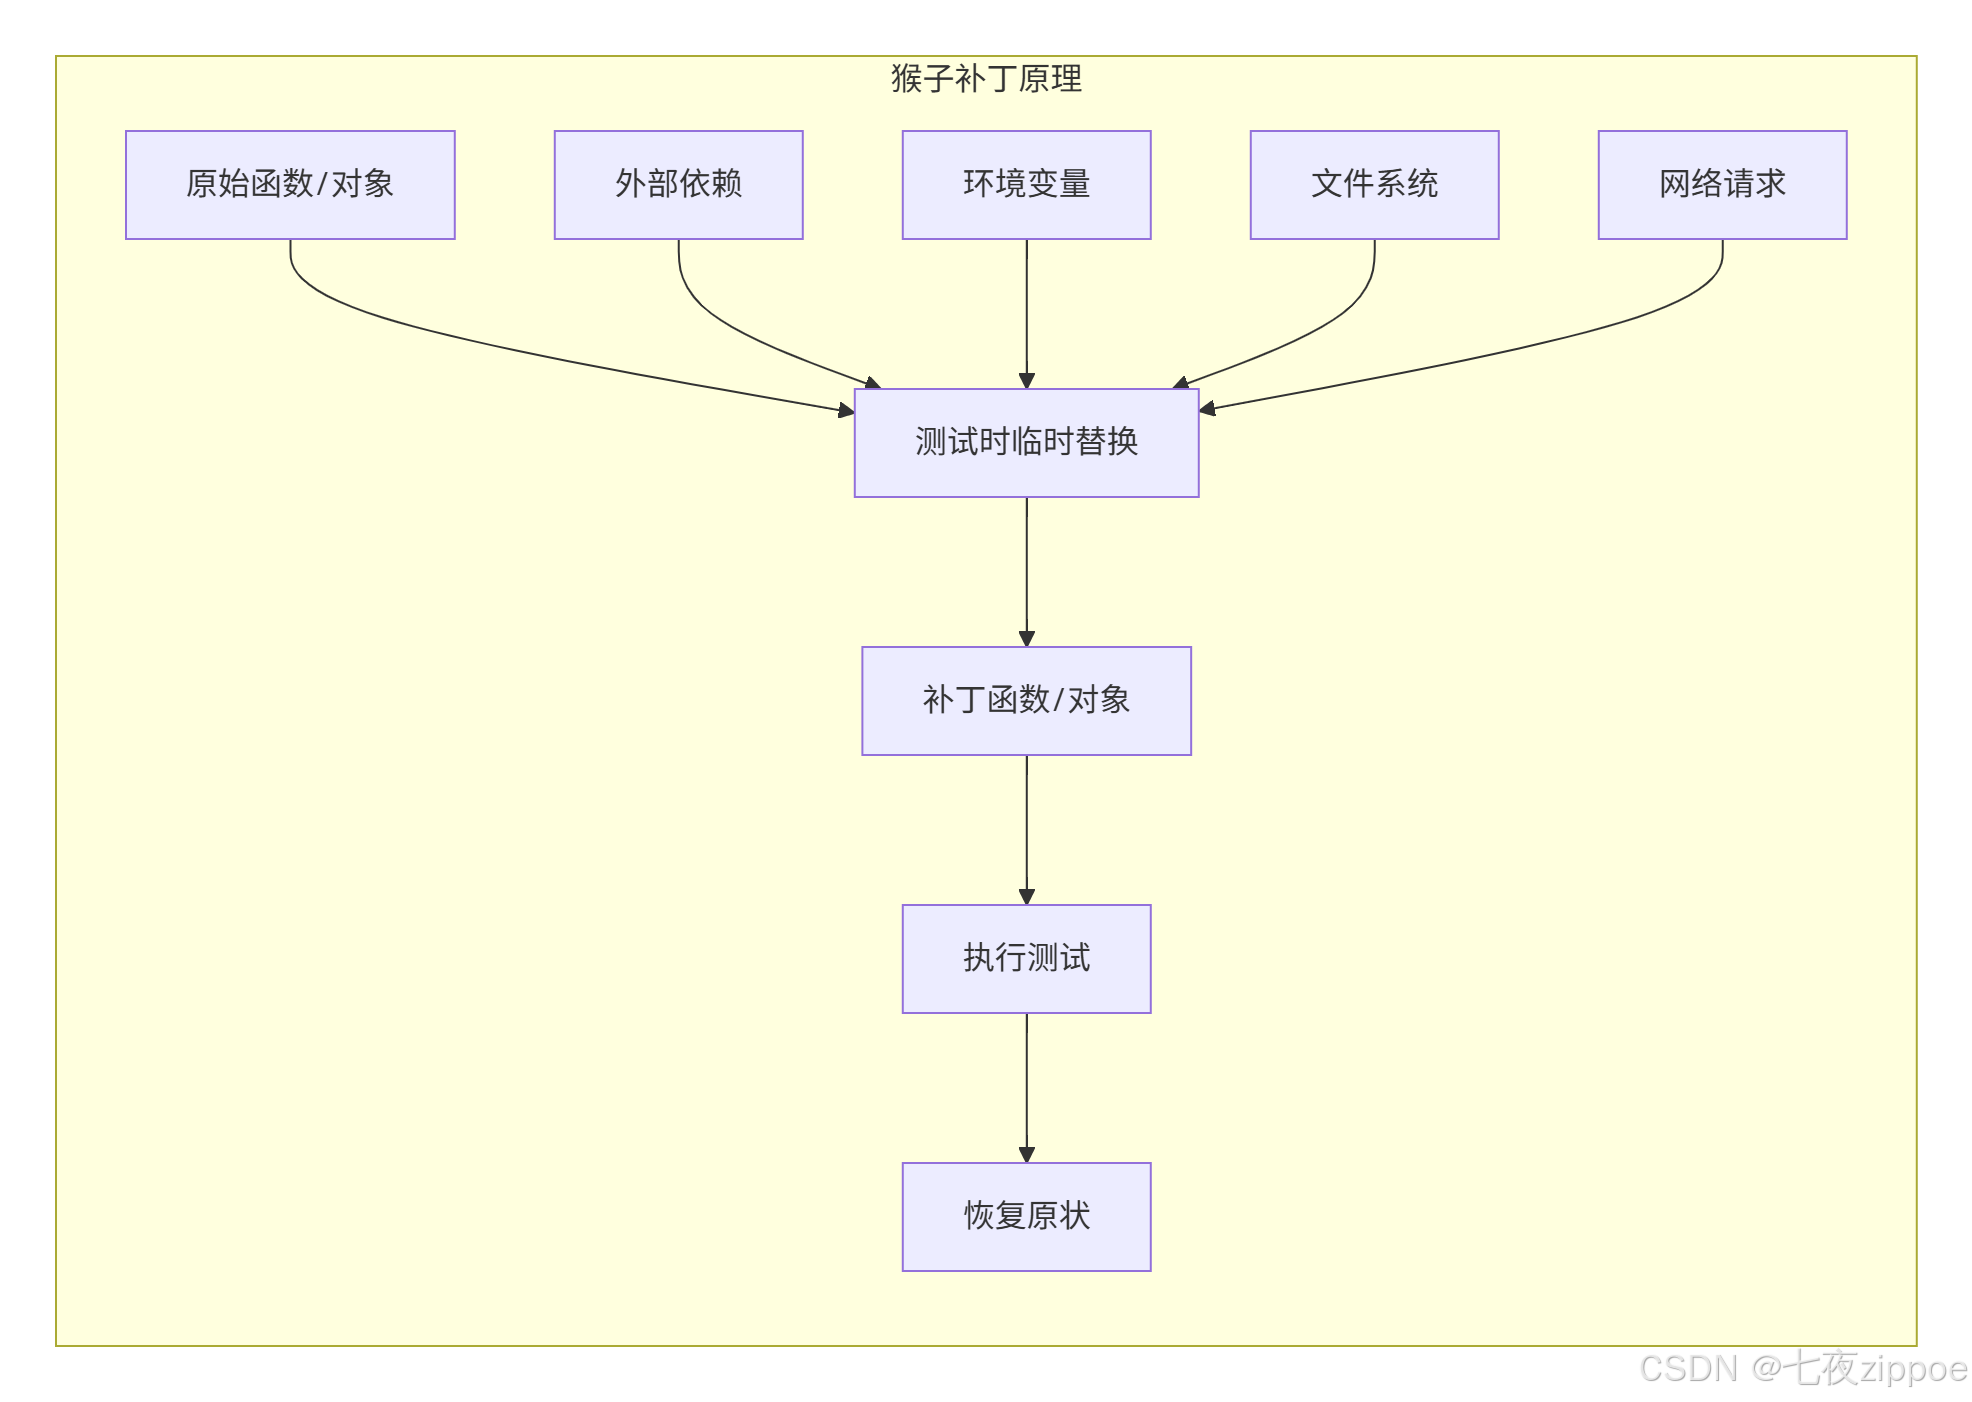
5.1 什么是猴子补丁?
猴子补丁是在运行时动态修改模块、类或函数的技术。在测试中特别有用,但要用得谨慎。
5.2 monkeypatch实战
python
import pytest
import os
import requests
from datetime import datetime
from unittest.mock import Mock, MagicMock

# 1. 环境变量补丁
def test_database_url(monkeypatch):
    """测试环境变量"""
    # 临时设置环境变量
    monkeypatch.setenv("DATABASE_URL", "sqlite:///:memory:")
    monkeypatch.setenv("DEBUG", "True")

    # 在测试中读取
    db_url = os.getenv("DATABASE_URL")
    debug = os.getenv("DEBUG") == "True"

    assert db_url == "sqlite:///:memory:"
    assert debug is True

    # 测试结束后环境变量会自动恢复

# 2. 系统函数补丁
def test_file_operations(monkeypatch, tmp_path):
    """测试文件操作"""
    test_file = tmp_path / "test.txt"
    test_file.write_text("Hello, World!")

    # 模拟os.path.exists
    def mock_exists(path):
        print(f"检查路径是否存在: {path}")
        return str(path) == str(test_file)

    monkeypatch.setattr(os.path, "exists", mock_exists)

    # 现在测试会使用模拟的函数
    assert os.path.exists(test_file) is True
    assert os.path.exists("/nonexistent/path") is False

# 3. 模拟网络请求
def test_api_call(monkeypatch):
    """测试API调用,不实际发起网络请求"""

    # 创建模拟响应
    mock_response = Mock()
    mock_response.status_code = 200
    mock_response.json.return_value = {
        "id": 123,
        "name": "测试用户",
        "email": "test@example.com"
    }

    # 模拟requests.get
    def mock_get(url, **kwargs):
        print(f"模拟请求: {url}")
        return mock_response

    monkeypatch.setattr(requests, "get", mock_get)

    # 调用测试函数
    response = requests.get("https://api.example.com/users/123")

    assert response.status_code == 200
    assert response.json()["name"] == "测试用户"
    assert response.json()["email"] == "test@example.com"

# 4. 模拟当前时间
def test_time_based_logic(monkeypatch):
    """测试时间相关逻辑"""

    # 固定当前时间
    fixed_time = datetime(2024, 1, 1, 12, 0, 0)

    class MockDatetime:
        @staticmethod
        def now():
            return fixed_time

        @staticmethod
        def today():
            return fixed_time.date()

    monkeypatch.setattr("datetime.datetime", MockDatetime)

    # 现在所有datetime.datetime.now()调用都会返回固定时间
    now = datetime.now()
    assert now.year == 2024
    assert now.month == 1
    assert now.day == 1
    assert now.hour == 12

# 5. 复杂对象的猴子补丁
class DatabaseConnection:
    def __init__(self, connection_string):
        self.conn_string = connection_string
        self.connected = False

    def connect(self):
        self.connected = True
        return True

    def execute(self, query):
        if not self.connected:
            raise ConnectionError("Not connected")
        return [{"id": 1, "name": "test"}]

    def close(self):
        self.connected = False

def test_database_operations(monkeypatch):
    """测试数据库操作"""

    # 创建模拟数据库连接
    mock_conn = Mock(spec=DatabaseConnection)
    mock_conn.connect.return_value = True
    mock_conn.execute.return_value = [{"id": 1, "name": "mock_user"}]
    mock_conn.connected = False

    # 模拟DatabaseConnection类
    def mock_init(self, connection_string):
        self.conn_string = connection_string
        self.connected = False

    monkeypatch.setattr(DatabaseConnection, "__init__", mock_init)
    monkeypatch.setattr(DatabaseConnection, "connect", lambda self: True)
    monkeypatch.setattr(
        DatabaseConnection,
        "execute",
        lambda self, query: [{"id": 1, "name": "mock_user"}]
    )

    # 使用模拟的类
    db = DatabaseConnection("sqlite:///:memory:")
    assert db.connect() is True

    result = db.execute("SELECT * FROM users")
    assert result == [{"id": 1, "name": "mock_user"}"]
5.3 monkeypatch最佳实践
python
import pytest
from contextlib import contextmanager

class SafeMonkeyPatch:
    """安全的猴子补丁管理器"""

    def __init__(self, monkeypatch):
        self.monkeypatch = monkeypatch
        self.patches = []

    def setattr(self, target, name, value, raising=True):
        """设置属性,并记录以便恢复"""
        original = getattr(target, name, None)
        self.patches.append((target, name, original))
        self.monkeypatch.setattr(target, name, value, raising)

    def setitem(self, dic, name, value):
        """设置字典项,并记录以便恢复"""
        original = dic.get(name)
        self.patches.append((dic, name, original))
        self.monkeypatch.setitem(dic, name, value)

    def undo(self):
        """恢复所有补丁"""
        for target, name, original in reversed(self.patches):
            if original is not None:
                setattr(target, name, original)
            elif hasattr(target, name):
                delattr(target, name)
        self.patches.clear()

@pytest.fixture
def safe_patch(monkeypatch):
    """安全补丁夹具"""
    patcher = SafeMonkeyPatch(monkeypatch)
    yield patcher
    patcher.undo()  # 自动恢复

# 使用示例
def test_with_safe_patch(safe_patch):
    """使用安全补丁"""
    import some_module

    # 记录原始值
    original_value = some_module.some_function

    # 应用补丁
    safe_patch.setattr(some_module, "some_function", lambda: "patched")

    # 测试
    assert some_module.some_function() == "patched"

    # 夹具会自动恢复
    # 无需手动操作
6. 📊 测试覆盖率:不只是数字游戏
6.1 pytest-cov深度使用
测试覆盖率类型:

配置与使用:
bash
# 基本使用
pytest --cov=src tests/

# 详细报告
pytest --cov=src --cov-report=term --cov-report=html --cov-report=xml tests/

# 设置覆盖率阈值
pytest --cov=src --cov-fail-under=90 tests/

# 排除特定文件
pytest --cov=src --cov-report=term --cov-append --no-cov-on-fail tests/.coveragerc配置文件:
[run]
# 要测量的源文件
source = src

# 排除的路径
omit =
    */tests/*
    */migrations/*
    */__pycache__/*
    */venv/*
    */virtualenvs/*
    */site-packages/*
    setup.py
    */test_*.py

# 分支覆盖率测量
branch = True

# 并行模式
parallel = True

[report]
# 排除的模式
exclude_lines =
    # 不要检查pragma语句
    pragma: no cover

    # 不要检查抽象方法
    def __abstract__

    # 不要检查类型提示
    ^\s*# type:.*$

    # 不要检查调试代码
    ^\s*if settings.DEBUG:.*$
    ^\s*if __name__ == .__main__.:.*$

    # 不要检查只包含pass的行
    ^\s*pass\s*$

    # 不要检查raise NotImplemetedError
    ^\s*raise NotImplementedError.*$

    # 不要检查只有文档字符串的函数
    ^\s*def .*\):\s*\n\s*\"\"\".*\"\"\".*$

# 精度
precision = 2

# 显示缺少的行
show_missing = True

[html]
# HTML报告配置
directory = coverage_html
title = 测试覆盖率报告
6.2 覆盖率实战技巧
python
# src/calculator.py
"""计算器模块"""
from typing import Union

class Calculator:
    """计算器类"""

    def __init__(self):
        self.memory = 0

    def add(self, a: Union[int, float], b: Union[int, float]) -> Union[int, float]:
        """加法"""
        if not (isinstance(a, (int, float)) and isinstance(b, (int, float))):
            raise TypeError("参数必须是数字")
        return a + b

    def subtract(self, a: Union[int, float], b: Union[int, float]) -> Union[int, float]:
        """减法"""
        if not (isinstance(a, (int, float)) and isinstance(b, (int, float))):
            raise TypeError("参数必须是数字")
        return a - b

    def multiply(self, a: Union[int, float], b: Union[int, float]) -> Union[int, float]:
        """乘法"""
        if not (isinstance(a, (int, float)) and isinstance(b, (int, float))):
            raise TypeError("参数必须是数字")
        return a * b

    def divide(self, a: Union[int, float], b: Union[int, float]) -> Union[int, float]:
        """除法"""
        if not (isinstance(a, (int, float)) and isinstance(b, (int, float))):
            raise TypeError("参数必须是数字")

        if b == 0:
            raise ValueError("除数不能为零")

        return a / b

    def memory_store(self, value: Union[int, float]):
        """存储到内存"""
        self.memory = value

    def memory_recall(self) -> Union[int, float]:
        """从内存读取"""
        return self.memory

    def memory_clear(self):
        """清空内存"""
        self.memory = 0
python
# tests/test_calculator.py
"""计算器测试"""
import pytest
from src.calculator import Calculator

class TestCalculator:
    """计算器测试类"""

    @pytest.fixture
    def calc(self):
        """计算器夹具"""
        return Calculator()

    # 参数化测试加法
    @pytest.mark.parametrize("a,b,expected", [
        (1, 2, 3),
        (-1, 1, 0),
        (0, 0, 0),
        (3.14, 2.86, 6.0),
    ])
    def test_add(self, calc, a, b, expected):
        """测试加法"""
        result = calc.add(a, b)
        assert result == expected

    # 测试异常情况
    @pytest.mark.parametrize("a,b,exception", [
        ("1", 2, TypeError),
        (1, "2", TypeError),
        (None, 2, TypeError),
    ])
    def test_add_type_error(self, calc, a, b, exception):
        """测试加法类型错误"""
        with pytest.raises(exception):
            calc.add(a, b)

    # 测试除法
    def test_divide(self, calc):
        """测试除法"""
        assert calc.divide(10, 2) == 5
        assert calc.divide(5, 2) == 2.5

    def test_divide_by_zero(self, calc):
        """测试除零错误"""
        with pytest.raises(ValueError, match="除数不能为零"):
            calc.divide(10, 0)

    # 测试内存功能
    def test_memory_operations(self, calc):
        """测试内存操作"""
        # 初始内存为0
        assert calc.memory_recall() == 0

        # 存储到内存
        calc.memory_store(42)
        assert calc.memory_recall() == 42

        # 清空内存
        calc.memory_clear()
        assert calc.memory_recall() == 0

    # 综合测试
    def test_complex_calculation(self, calc):
        """复杂计算测试"""
        result = calc.add(10, 20)
        result = calc.multiply(result, 2)
        result = calc.subtract(result, 15)
        result = calc.divide(result, 5)

        calc.memory_store(result)

        assert result == 9.0
assert calc.memory_recall() == 9.0生成覆盖率报告:
python
# 运行测试并生成报告
pytest tests/test_calculator.py -v --cov=src --cov-report=term-missing --cov-report=html

# 输出示例
# ---------- coverage: platform darwin, python 3.9.0-final-0 ----------
# Name                   Stmts   Miss  Cover   Missing
# ----------------------------------------------------
# src/calculator.py        33      0   100%
#
# TOTAL                   33      0   100%
7. 🚀 持续集成:让测试自动化
7.1 GitHub Actions配置
# .github/workflows/test.yml
name: Python Tests

on:
  push:
    branches: [ main, develop ]
  pull_request:
    branches: [ main ]

jobs:
  test:
    runs-on: ubuntu-latest
    strategy:
      matrix:
        python-version: [3.8, 3.9, '3.10']
        os: [ubuntu-latest, macos-latest, windows-latest]

    services:
      postgres:
        image: postgres:13
        env:
          POSTGRES_PASSWORD: postgres
        options: >-
          --health-cmd pg_isready
          --health-interval 10s
          --health-timeout 5s
          --health-retries 5
        ports:
          - 5432:5432

    steps:
    - uses: actions/checkout@v3

    - name: Set up Python ${{ matrix.python-version }}
      uses: actions/setup-python@v4
      with:
        python-version: ${{ matrix.python-version }}

    - name: Cache dependencies
      uses: actions/cache@v3
      with:
        path: ~/.cache/pip
        key: ${{ runner.os }}-pip-${{ hashFiles('requirements.txt') }}
        restore-keys: |
          ${{ runner.os }}-pip-

    - name: Install dependencies
      run: |
        python -m pip install --upgrade pip
        pip install -r requirements.txt
        pip install pytest pytest-cov pytest-xdist pytest-mock

    - name: Lint with flake8
      run: |
        pip install flake8
        flake8 src --count --select=E9,F63,F7,F82 --show-source --statistics
        flake8 src --count --exit-zero --max-complexity=10 --max-line-length=127 --statistics

    - name: Type check with mypy
      run: |
        pip install mypy
        mypy src --ignore-missing-imports

    - name: Test with pytest
      env:
        DATABASE_URL: postgresql://postgres:postgres@localhost:5432/test_db
        SECRET_KEY: ${{ secrets.SECRET_KEY }}
      run: |
        pytest tests/ -v \
          --cov=src \
          --cov-report=xml \
          --cov-report=html \
          --cov-fail-under=90 \
          -n auto

    - name: Upload coverage to Codecov
      uses: codecov/codecov-action@v3
      with:
        file: ./coverage.xml
        flags: unittests
        name: codecov-umbrella

    - name: Upload test results
      if: always()
      uses: actions/upload-artifact@v3
      with:
        name: test-results-${{ matrix.python-version }}-${{ matrix.os }}
        path: |
          coverage.xml
          htmlcov/
        retention-days: 7
7.2 多阶段测试流水线
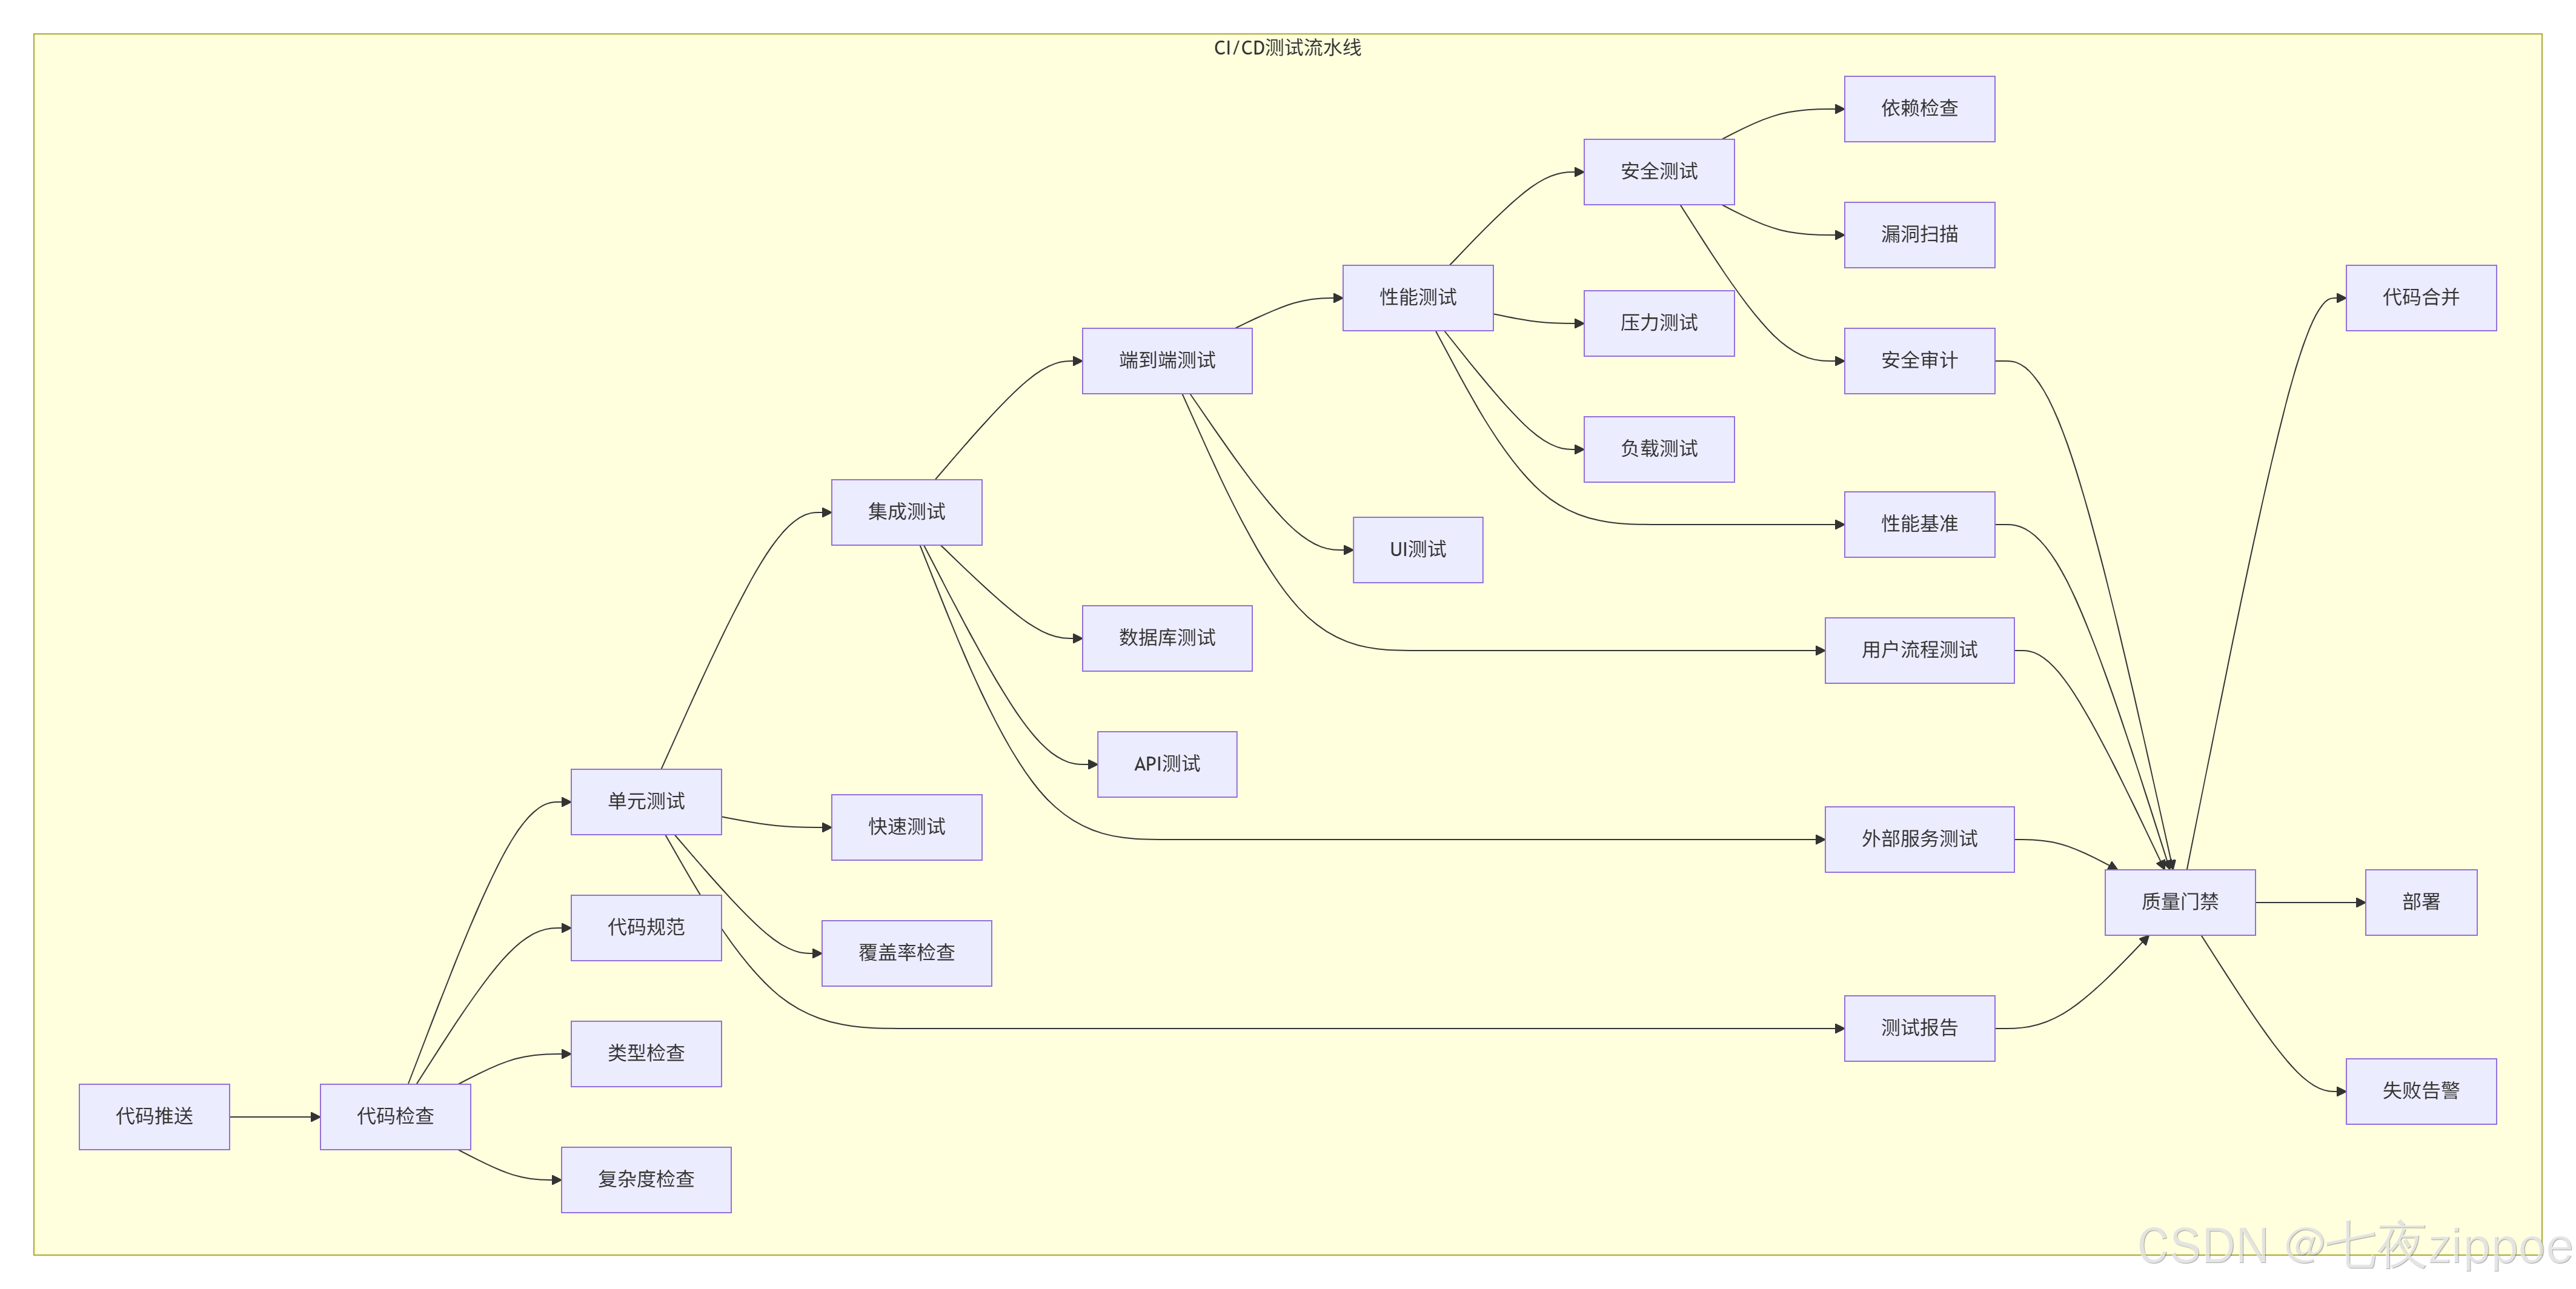
8. 🏢 企业级测试实践
8.1 大型项目测试架构
python
# tests/conftest.py - 项目级共享夹具
"""
项目级测试配置
"""
import pytest
import asyncio
from typing import Generator, AsyncGenerator
import tempfile
import json
from pathlib import Path

# 项目级夹具
@pytest.fixture(scope="session")
def project_root() -> Path:
    """项目根目录"""
    return Path(__file__).parent.parent

@pytest.fixture(scope="session")
def test_config():
    """测试配置"""
    return {
        "database": {
            "url": "sqlite:///:memory:",
            "echo": False
        },
        "api": {
            "base_url": "http://test.example.com",
            "timeout": 30
        },
        "cache": {
            "enabled": False,
            "ttl": 300
        }
    }

# 异步支持
@pytest.fixture(scope="session")
def event_loop() -> Generator[asyncio.AbstractEventLoop, None, None]:
    """创建事件循环"""
    loop = asyncio.get_event_loop_policy().new_event_loop()
    yield loop
    loop.close()

@pytest.fixture
async def async_client():
    """异步HTTP客户端"""
    from aiohttp import ClientSession

    async with ClientSession() as session:
        yield session

# 临时文件管理
@pytest.fixture
def temp_json_file():
    """临时JSON文件"""
    with tempfile.NamedTemporaryFile(mode='w', suffix='.json', delete=False) as f:
        json.dump({"test": "data"}, f)
        temp_path = f.name

    yield temp_path

    # 清理
    Path(temp_path).unlink(missing_ok=True)

# 数据库夹具
@pytest.fixture(scope="session")
def database_url(test_config):
    """数据库URL"""
    return test_config["database"]["url"]

@pytest.fixture
async def db_session(database_url):
    """数据库会话"""
    from sqlalchemy.ext.asyncio import create_async_engine, AsyncSession
    from sqlalchemy.orm import sessionmaker

    engine = create_async_engine(database_url, echo=False)

    async_session = sessionmaker(
        engine, class_=AsyncSession, expire_on_commit=False
    )

    async with async_session() as session:
        yield session

    await engine.dispose()

# API测试夹具
@pytest.fixture
def api_client():
    """API测试客户端"""
    from fastapi.testclient import TestClient
    from app.main import app

    with TestClient(app) as client:
        yield client

# 模拟外部服务
@pytest.fixture
def mock_external_services(monkeypatch):
    """模拟所有外部服务"""
    mock_services = {}

    # 模拟支付服务
    mock_payment = Mock()
    mock_payment.charge.return_value = {"success": True, "transaction_id": "123"}
    mock_services["payment"] = mock_payment

    # 模拟邮件服务
    mock_email = Mock()
    mock_email.send.return_value = True
    mock_services["email"] = mock_email

    # 模拟存储服务
    mock_storage = Mock()
    mock_storage.upload.return_value = "https://example.com/file.txt"
    mock_services["storage"] = mock_storage

    # 应用模拟
    monkeypatch.setattr("app.services.payment", mock_payment)
    monkeypatch.setattr("app.services.email", mock_email)
    monkeypatch.setattr("app.services.storage", mock_storage)

    return mock_services
8.2 测试策略与组织
# tests/ 目录结构
"""
tests/
├── conftest.py              # 项目级夹具
├── unit/                    # 单元测试
│   ├── test_models.py
│   ├── test_services.py
│   └── test_utils.py
├── integration/             # 集成测试
│   ├── test_api.py
│   ├── test_database.py
│   └── test_external.py
├── e2e/                     # 端到端测试
│   ├── test_user_flows.py
│   └── test_admin_flows.py
├── performance/             # 性能测试
│   ├── test_load.py
│   └── test_stress.py
├── fixtures/                # 测试数据
│   ├── users.json
│   └── products.json
└── __init__.py
"""

# 测试标记
"""
@pytest.mark.unit           # 单元测试
@pytest.mark.integration    # 集成测试
@pytest.mark.e2e            # 端到端测试
@pytest.mark.slow           # 慢速测试
@pytest.mark.fast           # 快速测试
@pytest.mark.smoke          # 冒烟测试
@pytest.mark.regression     # 回归测试
"""

# 运行特定测试
"""
# 只运行单元测试
pytest -m unit

# 运行除慢速测试外的所有测试
pytest -m "not slow"

# 运行特定标记组合
pytest -m "unit and fast"

# 运行特定目录
pytest tests/unit/

# 运行特定文件
pytest tests/unit/test_models.py

# 运行特定类
pytest tests/unit/test_models.py::TestUserModel

# 运行特定方法
pytest tests/unit/test_models.py::TestUserModel::test_create_user
"""

# 测试报告生成
"""
# 生成JUnit格式报告
pytest --junitxml=report.xml

# 生成HTML报告
pytest --html=report.html --self-contained-html

# 生成Allure报告
pytest --alluredir=allure-results
allure serve allure-results
"""
9. ⚡ 性能优化技巧
9.1 测试加速技巧
bash
# 1. 并行测试
# pytest.ini
[pytest]
addopts =
    -n auto  # 自动检测CPU核心数
    --dist=loadscope  # 按作用域分发测试

# 或者命令行
pytest -n auto  # 自动并行
pytest -n 4     # 指定4个进程

# 2. 测试分组
# tests/test_performance.py
import pytest
import time

@pytest.mark.slow
def test_slow_operation():
    """慢速测试"""
    time.sleep(5)
    assert True

@pytest.mark.fast
def test_fast_operation():
    """快速测试"""
    assert 1 + 1 == 2

# 3. 测试缓存
# 使用pytest-cache
pytest --cache-clear  # 清除缓存
pytest --cache-show   # 显示缓存内容

# 4. 增量测试
# conftest.py
def pytest_runtest_makereport(item, call):
    """记录测试结果"""
    if "incremental" in item.keywords:
        if call.excinfo is not None:
            parent = item.parent
            parent._previousfailed = item

def pytest_runtest_setup(item):
    """设置增量测试"""
    if "incremental" in item.keywords:
        previousfailed = getattr(item.parent, "_previousfailed", None)
        if previousfailed is not None:
            pytest.xfail("previous test failed (%s)" % previousfailed.name)

# 使用示例
@pytest.mark.incremental
class TestUserWorkflow:
    """增量测试:一个失败,后面的都跳过"""

    def test_create_user(self):
        assert create_user() is not None

    def test_login_user(self):
        # 如果上面失败,这个测试会被跳过
        assert login_user() is True

    def test_update_user(self):
        assert update_user() is True

# 5. 数据库测试优化
@pytest.fixture(scope="session")
def database_engine():
    """共享数据库引擎"""
    engine = create_engine("sqlite:///:memory:")

    # 创建表结构
    Base.metadata.create_all(engine)

    yield engine

    engine.dispose()

@pytest.fixture
def db_session(database_engine):
    """使用事务回滚的会话"""
    connection = database_engine.connect()
    transaction = connection.begin()

    session = Session(bind=connection)

    yield session

    session.close()
    transaction.rollback()  # 回滚,不保存数据
    connection.close()
9.2 测试数据工厂
python
# tests/factories.py
"""测试数据工厂"""
from factory import Factory, Faker, LazyAttribute, SubFactory
from datetime import datetime, timedelta
import random

class UserFactory(Factory):
    """用户工厂"""
    class Meta:
        model = dict  # 或者使用你的User模型

    id = Faker("uuid4")
    username = Faker("user_name")
    email = Faker("email")
    first_name = Faker("first_name")
    last_name = Faker("last_name")
    is_active = True
    is_admin = False
    created_at = Faker("date_time_this_year")

    @LazyAttribute
    def full_name(self):
        return f"{self.first_name} {self.last_name}"

    @classmethod
    def admin(cls, **kwargs):
        """创建管理员用户"""
        return cls(is_admin=True, **kwargs)

    @classmethod
    def inactive(cls, **kwargs):
        """创建非活跃用户"""
        return cls(is_active=False, **kwargs)

class OrderFactory(Factory):
    """订单工厂"""
    class Meta:
        model = dict

    id = Faker("uuid4")
    user = SubFactory(UserFactory)
    order_date = Faker("date_time_this_month")

    @LazyAttribute
    def total_amount(self):
        return round(random.uniform(10, 1000), 2)

    @LazyAttribute
    def status(self):
        return random.choice(["pending", "processing", "shipped", "delivered", "cancelled"])

    @classmethod
    def with_items(cls, item_count=3, **kwargs):
        """创建带商品的订单"""
        order = cls(**kwargs)
        order["items"] = [OrderItemFactory() for _ in range(item_count)]
        return order

# 使用示例
def test_user_creation():
    """测试用户创建"""
    # 创建普通用户
    user = UserFactory()
    assert user["is_active"] is True
    assert user["is_admin"] is False

    # 创建管理员用户
    admin = UserFactory.admin()
    assert admin["is_admin"] is True

    # 批量创建
    users = UserFactory.create_batch(10)
    assert len(users) == 10

    # 创建特定属性用户
    inactive_user = UserFactory.inactive(username="inactive_user")
    assert inactive_user["is_active"] is False
    assert inactive_user["username"] == "inactive_user"
10. 🔧 故障排查指南
10.1 常见问题与解决
问题1:测试运行缓慢
python
# 解决方案:优化测试性能
# 1. 使用会话级夹具
@pytest.fixture(scope="session")
def expensive_resource():
    """昂贵的资源,整个会话只创建一次"""
    resource = create_expensive_resource()
    yield resource
    resource.cleanup()

# 2. 禁用不必要的插件
# pytest.ini
[pytest]
addopts =
    --tb=short  # 简短回溯
    -q          # 安静模式
    --disable-warnings

# 3. 使用测试标记
@pytest.mark.fast
def test_fast_operation():
    """快速测试"""
    pass

@pytest.mark.slow
def test_slow_operation():
    """慢速测试,只在需要时运行"""
    pass

# 只运行快速测试
# pytest -m fast
问题2:测试不稳定(flaky tests)
python
# 解决方案:稳定测试
import pytest
import time
from tenacity import retry, stop_after_attempt, wait_fixed

# 1. 使用重试机制
@pytest.mark.flaky(reruns=3, reruns_delay=1)
def test_flaky_api():
    """不稳定API测试,自动重试3次"""
    response = call_flaky_api()
    assert response.status_code == 200

# 2. 使用tenacity库
@retry(stop=stop_after_attempt(3), wait=wait_fixed(1))
def call_flaky_api():
    """调用不稳定API,自动重试"""
    return requests.get("https://api.example.com")

# 3. 增加等待时间
def test_with_wait():
    """需要等待的测试"""
    result = start_async_operation()

    # 等待最多10秒
    for _ in range(10):
        if result.is_done():
            break
        time.sleep(1)
    else:
        pytest.fail("操作超时")

    assert result.success is True

# 4. 使用固定时间
@pytest.fixture
def fixed_time(monkeypatch):
    """固定时间,避免时间相关的不稳定"""
    class FixedDatetime:
        @classmethod
        def now(cls):
            return datetime(2024, 1, 1, 12, 0, 0)

    monkeypatch.setattr("datetime.datetime", FixedDatetime)
问题3:测试依赖问题
python
# 解决方案:解耦测试依赖
# 1. 使用依赖注入
class UserService:
    def __init__(self, db_session, cache_client, email_service):
        self.db = db_session
        self.cache = cache_client
        self.email = email_service

    def register_user(self, user_data):
        # 使用注入的依赖
        user = self.db.create_user(user_data)
        self.cache.set(f"user:{user.id}", user)
        self.email.send_welcome(user.email)
        return user

# 测试
def test_user_registration():
    """测试用户注册"""
    # 创建模拟依赖
    mock_db = Mock()
    mock_cache = Mock()
    mock_email = Mock()

    # 创建服务
    service = UserService(mock_db, mock_cache, mock_email)

    # 测试
    result = service.register_user({"email": "test@example.com"})

    # 验证
    mock_db.create_user.assert_called_once()
    mock_cache.set.assert_called_once()
    mock_email.send_welcome.assert_called_once()

# 2. 使用环境变量配置
import os
from unittest.mock import patch

def test_with_env_vars():
    """测试环境变量"""
    with patch.dict(os.environ, {"DEBUG": "True", "SECRET_KEY": "test"}):
        # 在这里,环境变量被临时设置
        assert os.getenv("DEBUG") == "True"
        assert os.getenv("SECRET_KEY") == "test"

    # 离开with块后,环境变量恢复
10.2 调试技巧
python
# 1. 使用pdb调试
def test_with_debug():
    """在测试中使用调试器"""
    result = complex_operation()

    # 设置断点
    import pdb; pdb.set_trace()

    assert result == expected

# 2. 使用--pdb选项
# pytest --pdb  # 失败时自动进入pdb

# 3. 详细日志
import logging

def test_with_logging(caplog):
    """捕获和验证日志"""
    caplog.set_level(logging.INFO)

    # 执行会产生日志的操作
    do_something_that_logs()

    # 验证日志
    assert "Expected log message" in caplog.text
    assert len(caplog.records) == 1
    assert caplog.records[0].levelname == "INFO"

# 4. 自定义断言消息
def test_with_better_assertions():
    """更好的断言消息"""
    result = calculate()

    # 不好的断言
    assert result == expected

    # 好的断言
    assert result == expected, f"""
    计算结果不符合预期!
    实际: {result}
    预期: {expected}
    差值: {result - expected}
    """
11. 📚 学习资源与总结
11.1 官方文档
-
**pytest官方文档** - 最全面的pytest文档
-
**pytest-cov文档** - 覆盖率测试
-
**pytest-mock文档** - Mock和patch
-
**pytest-xdist文档** - 并行测试
-
**pytest-asyncio文档** - 异步测试
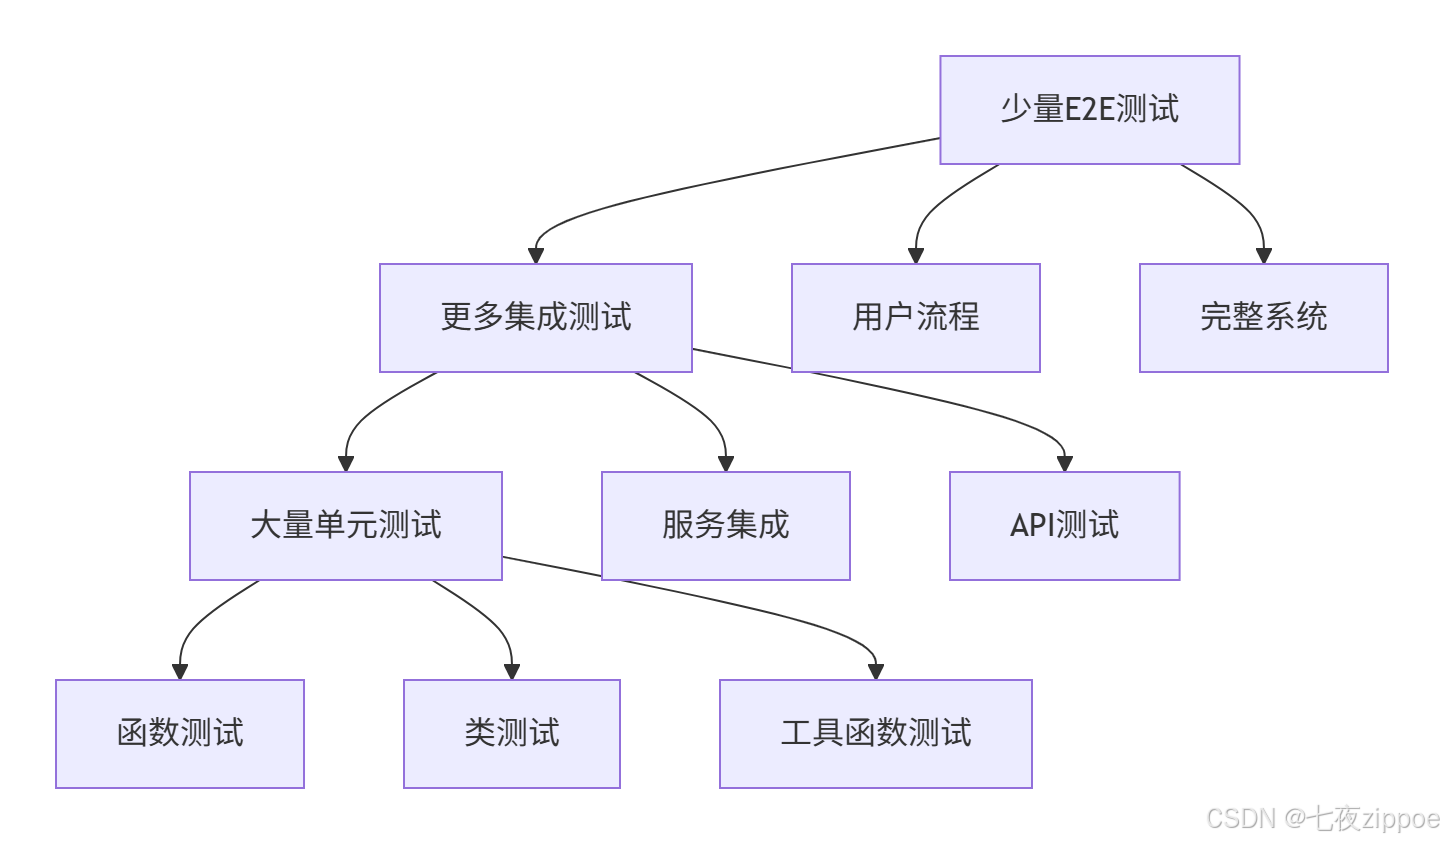
11.2 最佳实践总结
测试金字塔:
我的经验总结:
-
测试要快:一个测试套件超过5分钟就是失败的
-
测试要稳定:不稳定的测试比没测试更糟糕
-
测试要简单:测试代码应该比业务代码简单
-
测试要隔离:测试之间不能有依赖
-
测试要真实:尽量接近生产环境
pytest高级特性速查:
| 特性 | 使用场景 | 示例 |
|---|---|---|
| 夹具 | 测试准备和清理 | @pytest.fixture |
| 参数化 | 多数据测试 | @pytest.mark.parametrize |
| 猴子补丁 | 模拟外部依赖 | monkeypatch.setattr |
| 标记 | 测试分类 | @pytest.mark.slow |
| 覆盖率 | 测试质量 | pytest --cov |
| 并行 | 加速测试 | pytest -n auto |
11.3 未来趋势
-
AI辅助测试:自动生成测试用例
-
智能测试选择:只运行受影响的测试
-
可视化测试:图形化测试结果和覆盖率
-
云测试:在云上运行测试,利用弹性资源
-
测试即代码:测试配置完全代码化
最后的话 :好的测试不是负担,而是开发者的安全网 。pytest让测试变得简单、强大、有趣。记住:测试不是为了通过,而是为了发现问题 。写测试的时候,要想着怎么让代码失败,而不是怎么让它通过。