欢迎加入开源鸿蒙跨平台社区:https://openharmonycrossplatform.csdn.net
🎯 一、组件概述与应用场景
📋 1.1 qr_flutter 简介
二维码生成是移动应用中非常常见的功能,广泛应用于分享链接、添加好友、移动支付、活动签到等场景。在 Flutter for OpenHarmony 应用开发中,qr_flutter 是一个功能强大的二维码生成库,它基于纯 Dart 实现,无需原生代码支持,可以直接在所有 Flutter 支持的平台上运行,包括 OpenHarmony。
核心特性:
| 特性 | 说明 |
|---|---|
| 🎨 纯 Dart | 无需原生代码,跨平台兼容性极佳 |
| 🔧 高度可定制 | 支持自定义颜色、大小、边距、嵌入图标等 |
| 📱 多种格式 | 支持生成各种版本的 QR 码 |
| ⚡ 性能优异 | 优化的算法确保快速生成 |
| 🔌 易于集成 | 提供 Widget 组件,直接嵌入 UI 中 |
| ✅ 无需适配 | OpenHarmony 平台无需额外适配工作 |
💡 1.2 实际应用场景
分享链接:将网页链接、应用下载链接等生成二维码,方便用户扫码访问。
移动支付:生成付款码或收款码,支持微信、支付宝等支付场景。
活动签到:生成活动签到二维码,参会者扫码完成签到。
名片分享:将个人联系方式生成 vCard 格式二维码,方便交换名片。
WiFi 分享:生成 WiFi 连接二维码,扫码即可连接网络。
🏗️ 1.3 qr_flutter 与 qrcode_flutter 的区别
| 特性 | qr_flutter | qrcode_flutter |
|---|---|---|
| 主要功能 | 生成二维码 | 扫描二维码 |
| 实现方式 | 纯 Dart | 原生平台代码 |
| 平台适配 | 无需适配 | 需要各平台适配 |
| 使用场景 | 分享内容、生成付款码 | 扫码支付、扫码登录 |
| 权限需求 | 无 | 需要相机权限 |
📐 1.4 系统架构设计
┌─────────────────────────────────────────────────────────┐
│                    UI 展示层                             │
│  ┌─────────────┐  ┌─────────────┐  ┌─────────────┐     │
│  │ 二维码预览  │  │ 样式配置面板 │  │ 快捷模板组件 │     │
│  └─────────────┘  └─────────────┘  └─────────────┘     │
└─────────────────────────────────────────────────────────┘
                          │
                          ▼
┌─────────────────────────────────────────────────────────┐
│                    业务逻辑层                            │
│  ┌─────────────────────────────────────────────────┐   │
│  │           QRGeneratorService 二维码服务          │   │
│  │  • generateQR()  • customizeStyle()  • save()   │   │
│  └─────────────────────────────────────────────────┘   │
└─────────────────────────────────────────────────────────┘
                          │
                          ▼
┌─────────────────────────────────────────────────────────┐
│                    核心组件层                            │
│  ┌─────────────┐  ┌─────────────┐  ┌─────────────┐     │
│  │ QrImageView │  │ 数据编码器  │  │ 样式渲染器  │     │
│  └─────────────┘  └─────────────┘  └─────────────┘     │
└─────────────────────────────────────────────────────────┘
📦 二、项目配置与依赖安装
🔧 2.1 添加依赖配置
打开项目根目录下的 pubspec.yaml 文件,添加以下配置:
yaml
dependencies:
  flutter:
    sdk: flutter

  # qr_flutter - 二维码生成插件
  qr_flutter: ^4.0.0
配置说明:
qr_flutter是一个纯 Dart 库,直接从 pub.dev 获取即可- 版本
^4.0.0是当前最新的稳定版本 - 无需指定 git 仓库或特殊配置
⚠️ 重要提示:由于 qr_flutter 是纯 Dart 实现,OpenHarmony 平台无需任何额外配置。
📥 2.2 下载依赖
配置完成后,在项目根目录执行以下命令:
bash
flutter pub get🔐 2.3 权限配置
由于二维码生成是纯计算操作,不涉及任何系统资源访问,因此:
- ❌ 不需要相机权限
- ❌ 不需要存储权限(除非要保存到相册)
- ❌ 不需要网络权限(二维码生成本身不需要)
🔧 三、核心功能详解
🎨 3.1 基础二维码生成
创建一个基本的二维码非常简单,只需要提供数据和大小:
dart
QrImageView(
  data: 'https://example.com',
  version: QrVersions.auto,
  size: 200.0,
)
核心参数说明:
| 参数 | 类型 | 说明 |
|---|---|---|
| data | String | 要编码到二维码中的数据 |
| version | QrVersions | 二维码版本,auto 表示自动选择合适的版本 |
| size | double | 二维码的尺寸(宽高相等) |
📝 3.2 二维码版本说明
QR 码有多个版本(Version 1-40),版本越高,能存储的数据越多:
dart
// 自动选择版本(推荐)
version: QrVersions.auto

// 指定版本
version: QrVersions.one    // Version 1
version: QrVersions.two    // Version 2
version: QrVersions.three  // Version 3
// ...
version: QrVersions.forty  // Version 40
💡 建议 :大多数情况下使用
QrVersions.auto即可,库会根据数据长度自动选择合适的版本。
🎨 3.3 自定义颜色
qr_flutter 支持自定义二维码的前景色和背景色:
dart
QrImageView(
  data: 'https://example.com',
  version: QrVersions.auto,
  size: 200.0,
  color: Colors.white,           // 前景色(二维码图案颜色)
  backgroundColor: Colors.purple, // 背景色
)
颜色搭配建议:
- 前景色和背景色要有足够的对比度
- 避免使用相近的颜色
- 深色前景 + 浅色背景是最常见的搭配
🖼️ 3.4 嵌入图标/Logo
qr_flutter 支持在二维码中心嵌入图标,非常适合品牌展示:
dart
QrImageView(
  data: 'https://example.com',
  version: QrVersions.auto,
  size: 200.0,
  embeddedImage: const AssetImage('assets/logo.png'),
  embeddedImageStyle: const QrEmbeddedImageStyle(
    size: Size(40, 40),
    color: Colors.white,
  ),
)
嵌入图标注意事项:
- 图标不宜过大,建议不超过二维码尺寸的 20%
- 图标区域会覆盖部分二维码数据,但 QR 码有纠错机制
- 确保图标边缘清晰,避免模糊
🔧 3.5 自定义数据模块样式
可以自定义二维码中数据点(模块)的形状:
dart
QrImageView(
  data: 'https://example.com',
  version: QrVersions.auto,
  size: 200.0,
  eyeStyle: const QrEyeStyle(
    eyeShape: QrEyeShape.square,  // 定位点形状
    color: Colors.black,
  ),
  dataModuleStyle: const QrDataModuleStyle(
    dataModuleShape: QrDataModuleShape.circle,  // 圆形数据点
    color: Colors.black,
  ),
)
可选形状:
| 形状 | 说明 |
|---|---|
| square | 方形 |
| circle | 圆形 |
🛡️ 3.6 纠错等级设置
QR 码支持四种纠错等级,纠错等级越高,二维码越能容忍损坏:
dart
QrImageView(
  data: 'https://example.com',
  version: QrVersions.auto,
  size: 200.0,
  errorCorrectionLevel: QrErrorCorrectLevel.H,  // 高纠错等级
)
纠错等级说明:
| 等级 | 常量 | 可恢复数据量 | 适用场景 |
|---|---|---|---|
| L | QrErrorCorrectLevel.L | 7% | 清洁环境 |
| M | QrErrorCorrectLevel.M | 15% | 一般场景(默认) |
| Q | QrErrorCorrectLevel.Q | 25% | 可能脏污的环境 |
| H | QrErrorCorrectLevel.H | 30% | 嵌入图标、恶劣环境 |
💡 提示 :如果要在二维码中嵌入 Logo,建议使用
QrErrorCorrectLevel.H高纠错等级。
📝 四、完整示例代码
下面是一个完整的智能二维码生成系统示例:
dart
import 'dart:ui' as ui;
import 'package:flutter/material.dart';
import 'package:flutter/rendering.dart';
import 'package:qr_flutter/qr_flutter.dart';
void main() {
runApp(const QRGeneratorApp());
}
class QRGeneratorApp extends StatelessWidget {
const QRGeneratorApp({super.key});
@override
Widget build(BuildContext context) {
return MaterialApp(
title: '智能二维码生成系统',
debugShowCheckedModeBanner: false,
theme: ThemeData(
colorScheme: ColorScheme.fromSeed(seedColor: Colors.indigo),
useMaterial3: true,
),
home: const MainPage(),
);
}
}
class MainPage extends StatefulWidget {
const MainPage({super.key});
@override
State<MainPage> createState() => _MainPageState();
}
class _MainPageState extends State<MainPage> {
int _currentIndex = 0;
final List<Widget> _pages = [
const QRGeneratorPage(),
const QRTemplatesPage(),
const QRHistoryPage(),
];
@override
Widget build(BuildContext context) {
return Scaffold(
body: _pages[_currentIndex],
bottomNavigationBar: NavigationBar(
selectedIndex: _currentIndex,
onDestinationSelected: (index) {
setState(() => _currentIndex = index);
},
destinations: const [
NavigationDestination(icon: Icon(Icons.qr_code), label: '生成'),
NavigationDestination(icon: Icon(Icons.dashboard), label: '模板'),
NavigationDestination(icon: Icon(Icons.history), label: '历史'),
],
),
);
}
}
// ============ 二维码生成页面 ============
class QRGeneratorPage extends StatefulWidget {
const QRGeneratorPage({super.key});
@override
State<QRGeneratorPage> createState() => _QRGeneratorPageState();
}
class _QRGeneratorPageState extends State<QRGeneratorPage> {
final _textController = TextEditingController(text: 'https://flutter.dev');
final _qrKey = GlobalKey();
Color _qrColor = Colors.black;
Color _bgColor = Colors.white;
double _qrSize = 200.0;
int _errorLevel = QrErrorCorrectLevel.M;
QrDataModuleShape _moduleShape = QrDataModuleShape.square;
QrEyeShape _eyeShape = QrEyeShape.square;
final List<Color> _presetColors = [
Colors.black,
Colors.indigo,
Colors.purple,
Colors.teal,
Colors.orange,
Colors.red,
];
@override
void dispose() {
_textController.dispose();
super.dispose();
}
@override
Widget build(BuildContext context) {
return Scaffold(
appBar: AppBar(
title: const Text('二维码生成'),
centerTitle: true,
actions: [
IconButton(
icon: const Icon(Icons.save_alt),
onPressed: _saveToGallery,
tooltip: '保存到相册',
),
],
),
body: SingleChildScrollView(
padding: const EdgeInsets.all(16),
child: Column(
children: [
_buildQRPreview(),
const SizedBox(height: 24),
_buildInputSection(),
const SizedBox(height: 16),
_buildColorSection(),
const SizedBox(height: 16),
_buildStyleSection(),
const SizedBox(height: 16),
_buildSettingsSection(),
],
),
),
);
}
Widget _buildQRPreview() {
return Center(
child: RepaintBoundary(
key: _qrKey,
child: Container(
padding: const EdgeInsets.all(16),
decoration: BoxDecoration(
color: _bgColor,
borderRadius: BorderRadius.circular(16),
boxShadow: [
BoxShadow(
color: Colors.black.withOpacity(0.1),
blurRadius: 10,
offset: const Offset(0, 4),
),
],
),
child: _textController.text.isEmpty
? Container(
width: _qrSize,
height: _qrSize,
alignment: Alignment.center,
child: const Text('请输入内容'),
)
: QrImageView(
data: _textController.text,
version: QrVersions.auto,
size: _qrSize,
color: _qrColor,
backgroundColor: _bgColor,
errorCorrectionLevel: _errorLevel,
eyeStyle: QrEyeStyle(
eyeShape: _eyeShape,
color: _qrColor,
),
dataModuleStyle: QrDataModuleStyle(
dataModuleShape: _moduleShape,
color: _qrColor,
),
),
),
),
);
}
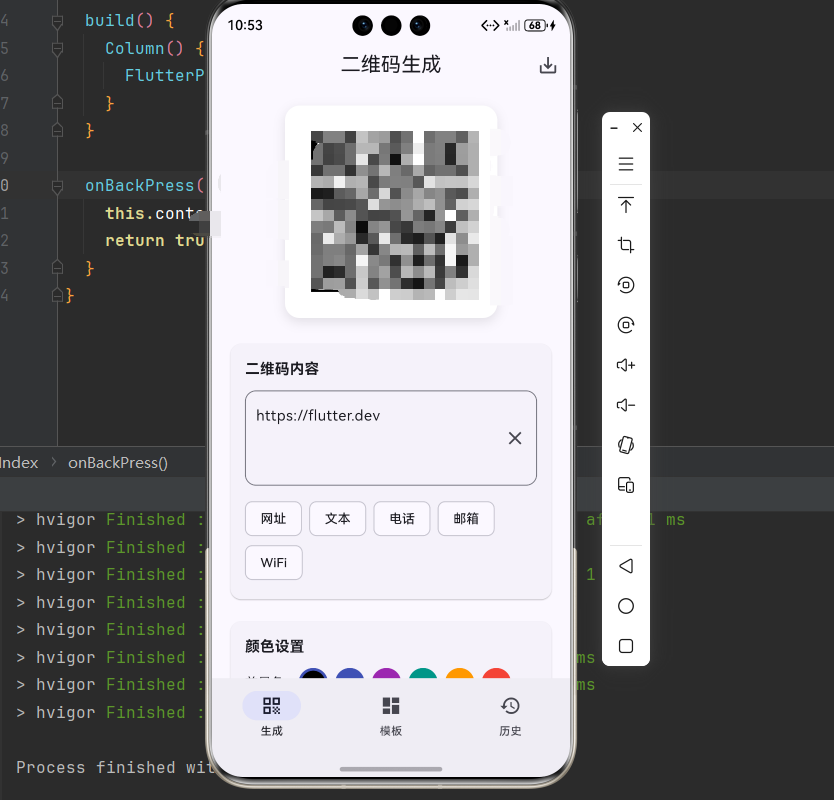
Widget _buildInputSection() {
return Card(
child: Padding(
padding: const EdgeInsets.all(16),
child: Column(
crossAxisAlignment: CrossAxisAlignment.start,
children: [
const Text(
'二维码内容',
style: TextStyle(fontSize: 16, fontWeight: FontWeight.bold),
),
const SizedBox(height: 12),
TextField(
controller: _textController,
decoration: InputDecoration(
hintText: '输入要生成二维码的内容',
border: OutlineInputBorder(
borderRadius: BorderRadius.circular(12),
),
suffixIcon: IconButton(
icon: const Icon(Icons.clear),
onPressed: () {
_textController.clear();
setState(() {});
},
),
),
maxLines: 3,
onChanged: (value) => setState(() {}),
),
const SizedBox(height: 12),
Wrap(
spacing: 8,
children: [
_buildQuickButton('网址', 'https://flutter.dev'),
_buildQuickButton('文本', 'Hello, Flutter!'),
_buildQuickButton('电话', 'tel:+8613800138000'),
_buildQuickButton('邮箱', 'mailto:test@example.com'),
_buildQuickButton('WiFi', 'WIFI:T:WPA;S:MyWiFi;P:password;;'),
],
),
],
),
),
);
}
Widget _buildQuickButton(String label, String value) {
return ActionChip(
label: Text(label),
onPressed: () {
_textController.text = value;
setState(() {});
},
);
}
Widget _buildColorSection() {
return Card(
child: Padding(
padding: const EdgeInsets.all(16),
child: Column(
crossAxisAlignment: CrossAxisAlignment.start,
children: [
const Text(
'颜色设置',
style: TextStyle(fontSize: 16, fontWeight: FontWeight.bold),
),
const SizedBox(height: 12),
Row(
children: [
const Text('前景色: '),
...List.generate(_presetColors.length, (index) {
final color = _presetColors[index];
final isSelected = _qrColor == color;
return GestureDetector(
onTap: () => setState(() => _qrColor = color),
child: Container(
width: 32,
height: 32,
margin: const EdgeInsets.only(left: 8),
decoration: BoxDecoration(
color: color,
shape: BoxShape.circle,
border: isSelected
? Border.all(color: Colors.indigo, width: 3)
: null,
),
child: isSelected
? const Icon(Icons.check, color: Colors.white, size: 18)
: null,
),
);
}),
],
),
const SizedBox(height: 12),
Row(
children: [
const Text('背景色: '),
const SizedBox(width: 8),
GestureDetector(
onTap: () => _showColorPicker(true),
child: Container(
width: 32,
height: 32,
decoration: BoxDecoration(
color: _bgColor,
shape: BoxShape.circle,
border: Border.all(color: Colors.grey),
),
),
),
const SizedBox(width: 24),
const Text('自定义前景色: '),
GestureDetector(
onTap: () => _showColorPicker(false),
child: Container(
width: 32,
height: 32,
decoration: BoxDecoration(
color: _qrColor,
shape: BoxShape.circle,
border: Border.all(color: Colors.grey),
),
),
),
],
),
],
),
),
);
}
Widget _buildStyleSection() {
return Card(
child: Padding(
padding: const EdgeInsets.all(16),
child: Column(
crossAxisAlignment: CrossAxisAlignment.start,
children: [
const Text(
'样式设置',
style: TextStyle(fontSize: 16, fontWeight: FontWeight.bold),
),
const SizedBox(height: 12),
Row(
children: [
const Text('数据点形状: '),
const SizedBox(width: 8),
SegmentedButton<QrDataModuleShape>(
segments: const [
ButtonSegment(value: QrDataModuleShape.square, label: Text('方形')),
ButtonSegment(value: QrDataModuleShape.circle, label: Text('圆形')),
],
selected: {_moduleShape},
onSelectionChanged: (selection) {
setState(() => _moduleShape = selection.first);
},
),
],
),
const SizedBox(height: 12),
Row(
children: [
const Text('定位点形状: '),
const SizedBox(width: 8),
SegmentedButton<QrEyeShape>(
segments: const [
ButtonSegment(value: QrEyeShape.square, label: Text('方形')),
ButtonSegment(value: QrEyeShape.circle, label: Text('圆形')),
],
selected: {_eyeShape},
onSelectionChanged: (selection) {
setState(() => _eyeShape = selection.first);
},
),
],
),
],
),
),
);
}
Widget _buildSettingsSection() {
return Card(
child: Padding(
padding: const EdgeInsets.all(16),
child: Column(
crossAxisAlignment: CrossAxisAlignment.start,
children: [
const Text(
'高级设置',
style: TextStyle(fontSize: 16, fontWeight: FontWeight.bold),
),
const SizedBox(height: 12),
Row(
children: [
const Text('尺寸: '),
Expanded(
child: Slider(
value: _qrSize,
min: 100,
max: 400,
divisions: 6,
label: '${_qrSize.toInt()}',
onChanged: (value) => setState(() => _qrSize = value),
),
),
Text('${_qrSize.toInt()}'),
],
),
const SizedBox(height: 8),
Row(
children: [
const Text('纠错等级: '),
const SizedBox(width: 8),
SegmentedButton<int>(
segments: const [
ButtonSegment(value: QrErrorCorrectLevel.L, label: Text('L')),
ButtonSegment(value: QrErrorCorrectLevel.M, label: Text('M')),
ButtonSegment(value: QrErrorCorrectLevel.Q, label: Text('Q')),
ButtonSegment(value: QrErrorCorrectLevel.H, label: Text('H')),
],
selected: {_errorLevel},
onSelectionChanged: (selection) {
setState(() => _errorLevel = selection.first);
},
),
],
),
],
),
),
);
}
void _showColorPicker(bool isBackground) {
showDialog(
context: context,
builder: (context) => AlertDialog(
title: Text(isBackground ? '选择背景色' : '选择前景色'),
content: Wrap(
spacing: 8,
runSpacing: 8,
children: Colors.primaries.map((color) {
return GestureDetector(
onTap: () {
setState(() {
if (isBackground) {
_bgColor = color;
} else {
_qrColor = color;
}
});
Navigator.pop(context);
},
child: Container(
width: 40,
height: 40,
decoration: BoxDecoration(
color: color,
borderRadius: BorderRadius.circular(8),
),
),
);
}).toList(),
),
actions: [
TextButton(
onPressed: () => Navigator.pop(context),
child: const Text('取消'),
),
],
),
);
}
Future<void> _saveToGallery() async {
if (_textController.text.isEmpty) {
ScaffoldMessenger.of(context).showSnackBar(
const SnackBar(content: Text('请先输入二维码内容')),
);
return;
}
try {
RenderRepaintBoundary boundary =
_qrKey.currentContext!.findRenderObject() as RenderRepaintBoundary;
ui.Image image = await boundary.toImage(pixelRatio: 3.0);
final byteData = await image.toByteData(format: ui.ImageByteFormat.png);
if (byteData != null && mounted) {
ScaffoldMessenger.of(context).showSnackBar(
const SnackBar(content: Text('二维码已准备好保存')),
);
}
} catch (e) {
if (mounted) {
ScaffoldMessenger.of(context).showSnackBar(
SnackBar(content: Text('保存失败: $e')),
);
}
}
}
}
// ============ 模板页面 ============
class QRTemplatesPage extends StatelessWidget {
const QRTemplatesPage({super.key});
@override
Widget build(BuildContext context) {
final templates = [
QRTemplate(
title: '网址链接',
icon: Icons.link,
color: Colors.blue,
template: 'https://',
),
QRTemplate(
title: 'WiFi 连接',
icon: Icons.wifi,
color: Colors.green,
template: 'WIFI:T:WPA;S:网络名称;P:密码;;',
),
QRTemplate(
title: '电话号码',
icon: Icons.phone,
color: Colors.orange,
template: 'tel:',
),
QRTemplate(
title: '电子邮件',
icon: Icons.email,
color: Colors.red,
template: 'mailto:',
),
QRTemplate(
title: '短信',
icon: Icons.sms,
color: Colors.purple,
template: 'sms:',
),
QRTemplate(
title: '地理位置',
icon: Icons.location_on,
color: Colors.teal,
template: 'geo:',
),
];
return Scaffold(
appBar: AppBar(
title: const Text('快捷模板'),
centerTitle: true,
),
body: GridView.builder(
padding: const EdgeInsets.all(16),
gridDelegate: const SliverGridDelegateWithFixedCrossAxisCount(
crossAxisCount: 2,
crossAxisSpacing: 16,
mainAxisSpacing: 16,
),
itemCount: templates.length,
itemBuilder: (context, index) {
final template = templates[index];
return _buildTemplateCard(context, template);
},
),
);
}
Widget _buildTemplateCard(BuildContext context, QRTemplate template) {
return Card(
child: InkWell(
onTap: () {
Navigator.push(
context,
MaterialPageRoute(
builder: (_) => TemplateDetailPage(template: template),
),
);
},
borderRadius: BorderRadius.circular(12),
child: Padding(
padding: const EdgeInsets.all(16),
child: Column(
mainAxisAlignment: MainAxisAlignment.center,
children: [
Container(
width: 56,
height: 56,
decoration: BoxDecoration(
color: template.color.withOpacity(0.1),
borderRadius: BorderRadius.circular(12),
),
child: Icon(template.icon, color: template.color, size: 28),
),
const SizedBox(height: 12),
Text(
template.title,
style: const TextStyle(
fontSize: 16,
fontWeight: FontWeight.w500,
),
),
],
),
),
),
);
}
}
class TemplateDetailPage extends StatefulWidget {
final QRTemplate template;
const TemplateDetailPage({super.key, required this.template});
@override
State<TemplateDetailPage> createState() => _TemplateDetailPageState();
}
class _TemplateDetailPageState extends State<TemplateDetailPage> {
late TextEditingController _controller;
@override
void initState() {
super.initState();
_controller = TextEditingController(text: widget.template.template);
}
@override
void dispose() {
_controller.dispose();
super.dispose();
}
@override
Widget build(BuildContext context) {
return Scaffold(
appBar: AppBar(
title: Text(widget.template.title),
centerTitle: true,
),
body: SingleChildScrollView(
padding: const EdgeInsets.all(16),
child: Column(
children: [
QrImageView(
data: _controller.text,
version: QrVersions.auto,
size: 200,
),
const SizedBox(height: 24),
TextField(
controller: _controller,
decoration: InputDecoration(
labelText: '内容',
border: OutlineInputBorder(
borderRadius: BorderRadius.circular(12),
),
),
maxLines: 3,
onChanged: (_) => setState(() {}),
),
],
),
),
);
}
}
class QRTemplate {
final String title;
final IconData icon;
final Color color;
final String template;
QRTemplate({
required this.title,
required this.icon,
required this.color,
required this.template,
});
}
// ============ 历史页面 ============
class QRHistoryPage extends StatefulWidget {
const QRHistoryPage({super.key});
@override
State<QRHistoryPage> createState() => _QRHistoryPageState();
}
class _QRHistoryPageState extends State<QRHistoryPage> {
final List<QRHistoryItem> _historyItems = [
QRHistoryItem(
content: 'https://flutter.dev',
createdAt: DateTime.now().subtract(const Duration(hours: 1)),
),
QRHistoryItem(
content: 'WIFI:T:WPA;S:MyWiFi;P:password;;',
createdAt: DateTime.now().subtract(const Duration(hours: 2)),
),
QRHistoryItem(
content: 'tel:+8613800138000',
createdAt: DateTime.now().subtract(const Duration(days: 1)),
),
];
@override
Widget build(BuildContext context) {
return Scaffold(
appBar: AppBar(
title: const Text('生成历史'),
centerTitle: true,
actions: [
IconButton(
icon: const Icon(Icons.delete_outline),
onPressed: () {
setState(() => _historyItems.clear());
},
),
],
),
body: _historyItems.isEmpty
? const Center(child: Text('暂无历史记录'))
: ListView.builder(
padding: const EdgeInsets.all(16),
itemCount: _historyItems.length,
itemBuilder: (context, index) {
final item = _historyItems[index];
return _buildHistoryItem(item);
},
),
);
}
Widget _buildHistoryItem(QRHistoryItem item) {
return Card(
margin: const EdgeInsets.only(bottom: 12),
child: ListTile(
leading: QrImageView(
data: item.content,
version: QrVersions.auto,
size: 50,
),
title: Text(
item.content,
maxLines: 1,
overflow: TextOverflow.ellipsis,
),
subtitle: Text(
'${item.createdAt.year}-${item.createdAt.month.toString().padLeft(2, '0')}-${item.createdAt.day.toString().padLeft(2, '0')} ${item.createdAt.hour.toString().padLeft(2, '0')}:${item.createdAt.minute.toString().padLeft(2, '0')}',
),
trailing: const Icon(Icons.chevron_right),
onTap: () {
Navigator.push(
context,
MaterialPageRoute(
builder: (_) => QRGeneratorPage(),
),
);
},
),
);
}
}
class QRHistoryItem {
final String content;
final DateTime createdAt;
QRHistoryItem({required this.content, required this.createdAt});
}🏆 五、最佳实践与注意事项
⚠️ 5.1 性能优化
图片尺寸:根据实际需要设置合适的二维码尺寸,避免过大导致性能问题。
缓存机制:对于重复生成的二维码,建议缓存结果避免重复计算。
异步处理:批量生成二维码时,使用异步方式避免阻塞 UI。
🔐 5.2 用户体验优化
实时预览:输入内容时实时更新二维码预览。
快捷模板:提供常用格式的快捷模板,提升用户效率。
历史记录:保存生成历史,方便用户再次使用。
📱 5.3 常见问题处理
内容过长:当内容过长时,二维码会变得复杂,建议使用短链接服务。
颜色对比度:确保前景色和背景色有足够对比度,否则扫码困难。
嵌入图标:嵌入图标时使用高纠错等级,确保二维码可被正确识别。
📌 六、总结
本文通过一个完整的智能二维码生成系统案例,深入讲解了 qr_flutter 组件的使用方法与最佳实践:
基础生成:掌握基本二维码生成的核心参数配置。
样式定制:学会自定义颜色、形状、嵌入图标等高级样式。
纠错等级:理解不同纠错等级的适用场景。
模板系统:构建快捷模板提升用户效率。
掌握这些技巧,你就能构建出专业级的二维码生成功能,满足各种业务场景需求。