前言
欢迎加入开源鸿蒙跨平台社区:https://openharmonycrossplatform.csdn.net
secure_application 目前在 OpenHarmony 上只用了 setWindowPrivacyMode 这一个安全 API。但 HarmonyOS 提供了一整套安全能力------生物识别、数据加密、应用访问控制等。把这些能力和 secure_application 结合起来,可以构建一个更完整的安全防护体系。
这篇探讨几种有价值的集成方案。
一、User Authentication Kit 生物识别联动
1.1 Kit 概述
User Authentication Kit 提供了统一的用户认证接口,支持:
| 认证方式 | API Level | 说明 |
|---|---|---|
| PIN 码 | API 9+ | 系统锁屏 PIN |
| 指纹 | API 9+ | 指纹传感器 |
| 面容 | API 9+ | 3D 面容识别 |
| 混合认证 | API 10+ | 多种方式组合 |
1.2 与 secure_application 的集成方案
typescript
// OpenHarmony 原生端:新增认证方法
import { userAuth } from '@kit.UserAuthenticationKit';

private async authenticateUser(result: MethodResult): Promise<void> {
  try {
    const authParam: userAuth.AuthParam = {
      challenge: new Uint8Array([1, 2, 3, 4]),
      authType: [userAuth.UserAuthType.FINGERPRINT, userAuth.UserAuthType.FACE],
      authTrustLevel: userAuth.AuthTrustLevel.ATL3,
    };

    const widgetParam: userAuth.WidgetParam = {
      title: '请验证身份以查看内容',
    };

    const userAuthInstance = userAuth.getUserAuthInstance(authParam, widgetParam);

    userAuthInstance.on('result', {
      onResult: (authResult: userAuth.UserAuthResult) => {
        if (authResult.result === userAuth.UserAuthResultCode.SUCCESS) {
          Log.i(TAG, "Biometric authentication success");
          result.success(true);
        } else {
          Log.i(TAG, "Biometric authentication failed: " + authResult.result);
          result.success(false);
        }
      }
    });

    userAuthInstance.start();
  } catch (err) {
    Log.e(TAG, "Authentication error: " + JSON.stringify(err));
    result.success(false);
  }
}
1.3 Dart 层调用
dart
// 在 onNeedUnlock 中调用原生认证
onNeedUnlock: (controller) async {
  if (Platform.isOhos) {
    final result = await MethodChannel('secure_application')
        .invokeMethod('authenticate');
    if (result == true) {
      controller?.authSuccess(unlock: true);
      return SecureApplicationAuthenticationStatus.SUCCESS;
    } else {
      controller?.authFailed();
      return SecureApplicationAuthenticationStatus.FAILED;
    }
  }
  // 其他平台使用 local_auth
  return null;
}
1.4 扩展 onMethodCall
typescript
onMethodCall(call: MethodCall, result: MethodResult): void {
  switch (call.method) {
    // ... 现有方法 ...
    case "authenticate":
      this.authenticateUser(result);
      break;
  }
}
📌 这是一个扩展方案,不在 secure_application 的标准实现中。需要 fork 插件或创建一个包装插件来添加这个功能。
二、Crypto Architecture Kit 数据加密
2.1 Kit 概述
Crypto Architecture Kit 提供了加密算法和密钥管理能力:
| 能力 | 说明 |
|---|---|
| 对称加密 | AES-128/256、3DES |
| 非对称加密 | RSA、ECC |
| 摘要算法 | SHA-256、SHA-512 |
| 密钥管理 | 密钥生成、存储、销毁 |
2.2 加密敏感数据
typescript
import { cryptoFramework } from '@kit.CryptoArchitectureKit';

class SecureDataManager {
  private symKey: cryptoFramework.SymKey | null = null;

  async generateKey(): Promise<void> {
    const symKeyGenerator = cryptoFramework.createSymKeyGenerator('AES256');
    this.symKey = await symKeyGenerator.generateSymKey();
  }

  async encrypt(plainText: string): Promise<Uint8Array> {
    if (this.symKey == null) await this.generateKey();

    const cipher = cryptoFramework.createCipher('AES256|GCM|PKCS7');
    const gcmParams: cryptoFramework.GcmParamsSpec = {
      iv: { data: new Uint8Array(12) },
      aad: { data: new Uint8Array(8) },
      tag: { data: new Uint8Array(16) },
      algName: 'GcmParamsSpec',
    };

    await cipher.init(cryptoFramework.CryptoMode.ENCRYPT_MODE, this.symKey!, gcmParams);
    const input: cryptoFramework.DataBlob = {
      data: new TextEncoder().encode(plainText),
    };
    const output = await cipher.doFinal(input);
    return output.data;
  }

  destroyKey(): void {
    this.symKey = null;
  }
}
2.3 与 secure_application 的配合
认证失败 → authFailed()
    │
    ├── Dart 层:清除内存中的明文数据
    └── 原生层:销毁加密密钥
            │
            └── 即使内存被转储,也无法解密数据
typescript
// 在 lock 事件中销毁密钥
case "lock":
  this.secureDataManager?.destroyKey();
  result.success(true);
  break;
三、App Control Kit 应用访问控制
3.1 应用间保护
typescript
import { appControl } from '@kit.AbilityKit';App Control Kit 可以控制哪些应用能访问你的应用数据。与 secure_application 配合,可以实现:
| 场景 | 保护方式 |
|---|---|
| 其他 App 尝试截屏 | setWindowPrivacyMode 阻止 |
| 其他 App 尝试读取数据 | 应用沙箱 + 权限控制 |
| 恶意 App 尝试注入 | 应用签名验证 |
3.2 应用沙箱机制
OpenHarmony 的应用沙箱自动隔离每个应用的数据:
/data/app/el1/bundle/com.example.myapp/    ← 只有本应用可访问
/data/app/el2/bundle/com.example.myapp/ ← 加密存储区域| 存储区域 | 加密级别 | 说明 |
|---|---|---|
| el1 | 设备级加密 | 设备启动后可访问 |
| el2 | 用户级加密 | 用户解锁后可访问 |
3.3 对 secure_application 的影响
应用沙箱是系统自动提供的,不需要 secure_application 做额外处理。但了解这个机制有助于理解 OpenHarmony 的整体安全架构。
四、PRIVACY_WINDOW 权限与系统安全策略
4.1 权限体系
json5
// module.json5 中声明
{
  "requestPermissions": [
    {
      "name": "ohos.permission.PRIVACY_WINDOW",
      "reason": "需要保护应用内容不被截屏"
    }
  ]
}
4.2 权限级别
| 权限 | 级别 | 授权方式 | 说明 |
|---|---|---|---|
| PRIVACY_WINDOW | system_basic | 静态声明 | 不需要用户动态授权 |
| MICROPHONE | user_grant | 动态申请 | 需要用户确认 |
| CAMERA | user_grant | 动态申请 | 需要用户确认 |
PRIVACY_WINDOW 是 system_basic 级别,只需要在 module.json5 中声明,不需要弹窗让用户确认。这对用户体验是好事------保护功能静默生效,不打扰用户。
4.3 权限与 API 版本的关系
| API 版本 | PRIVACY_WINDOW 是否必须 |
|---|---|
| API 9-11 | ✅ 必须声明 |
| API 12-19 | ⚠️ 部分设备需要 |
| API 20 | ❌ 可选(实测不声明也能用) |
💡 建议:无论是否必须,都在 README 中告知开发者声明这个权限,以确保最大兼容性。
五、多 Kit 联动架构
5.1 完整安全架构
┌─────────────────────────────────────────┐
│              Flutter Dart 层              │
│  SecureApplication + SecureGate          │
│  + Controller + AuthenticationEvents     │
├─────────────────────────────────────────┤
│           MethodChannel 通信层            │
├─────────────────────────────────────────┤
│          OpenHarmony 原生层               │
│  ┌─────────────┬──────────────────────┐ │
│  │ Window API  │ User Auth Kit        │ │
│  │ 隐私模式    │ 生物识别              │ │
│  ├─────────────┼──────────────────────┤ │
│  │ Ability Kit │ Crypto Kit           │ │
│  │ 生命周期    │ 数据加密              │ │
│  └─────────────┴──────────────────────┘ │
├─────────────────────────────────────────┤
│           OpenHarmony 系统层              │
│  应用沙箱 + 权限管理 + 安全启动          │
└─────────────────────────────────────────┘
5.2 各 Kit 的职责
| Kit | 职责 | 与 secure_application 的关系 |
|---|---|---|
| ArkUI Window | 截屏防护 | ✅ 已集成 |
| AbilityKit | 生命周期监听 | ✅ 已集成 |
| User Auth Kit | 生物识别 | ⚠️ 可扩展集成 |
| Crypto Kit | 数据加密 | ⚠️ 可扩展集成 |
| BasicServicesKit | 错误处理 | ✅ 已集成 |
5.3 集成优先级
| 集成项 | 价值 | 难度 | 优先级 |
|---|---|---|---|
| User Auth Kit 生物识别 | 高 | 中 | ✅ 推荐 |
| Crypto Kit 数据加密 | 中 | 高 | ⚠️ 按需 |
| App Control Kit | 低 | 低 | ❌ 系统自动 |
六、未来可能的 Kit 能力
6.1 OpenHarmony 安全能力演进
| 能力 | 当前状态 | 未来可能 |
|---|---|---|
| 窗口隐私模式 | ✅ 可用 | 更细粒度控制 |
| 生物识别 | ✅ 可用 | 更多认证方式 |
| 数据加密 | ✅ 可用 | 硬件级加密 |
| 安全键盘 | ⚠️ 部分可用 | 防键盘记录 |
| 安全剪贴板 | ❌ 不可用 | 防剪贴板窃取 |
| 水印保护 | ❌ 不可用 | 屏幕水印 |
6.2 对 secure_application 的影响
随着 OpenHarmony 安全能力的增强,secure_application 可以逐步集成更多原生安全特性,提供更全面的保护。
6.3 向后兼容策略
typescript
// 检查 API 能力后再调用
private checkCapability(capability: string): boolean {
  try {
    return canIUse(capability);
  } catch {
    return false;
  }
}

// 使用
if (this.checkCapability('SystemCapability.Security.UserAuth')) {
  // 使用生物识别
} else {
  // 降级到 PIN 码
}
七、安全集成最佳实践
7.1 设计原则
- 最小权限:只申请必要的权限
- 纵深防御:多层保护,不依赖单一机制
- 优雅降级:某个安全能力不可用时,降级到次优方案
- 用户透明:让用户知道哪些保护已启用
7.2 推荐的安全层次
第1层:setWindowPrivacyMode(截屏防护)
    ↓
第2层:SecureGate 模糊遮罩(视觉保护)
    ↓
第3层:User Auth Kit 生物识别(身份验证)
    ↓
第4层:Crypto Kit 数据加密(数据保护)
    ↓
第5层:安全审计日志(事后追溯)
7.3 不要过度安全
| 做法 | 推荐度 | 原因 |
|---|---|---|
| 截屏防护 + 模糊遮罩 | ✅ | 基本保护,用户无感 |
| + 生物识别 | ✅ | 增强安全,体验好 |
| + 数据加密 | ⚠️ | 按需,增加复杂度 |
| + 超时锁定 + 剪贴板清除 + 水印 | ❌ | 过度安全,影响体验 |
📌 安全和体验的平衡:安全措施越多,用户体验越差。根据应用的实际安全需求选择合适的保护级别。
总结
本文探讨了 secure_application 与 HarmonyOS 安全能力的深度集成:
- User Auth Kit:生物识别认证,替代 local_auth
- Crypto Kit:数据加密,认证失败时销毁密钥
- App Control Kit:应用沙箱,系统自动提供
- PRIVACY_WINDOW:API 20 中可选,建议声明
- 纵深防御:五层安全保护,按需选择
下一篇我们讲生产环境发布------如何打包、发布和维护 secure_application 插件。
如果这篇文章对你有帮助,欢迎点赞👍、收藏⭐、关注🔔,你的支持是我持续创作的动力!
相关资源:
- User Authentication Kit
- Crypto Architecture Kit
- OpenHarmony 权限列表
- 应用沙箱机制
- secure_application 源码
- local_auth 插件
- Flutter 安全最佳实践
- 开源鸿蒙跨平台社区
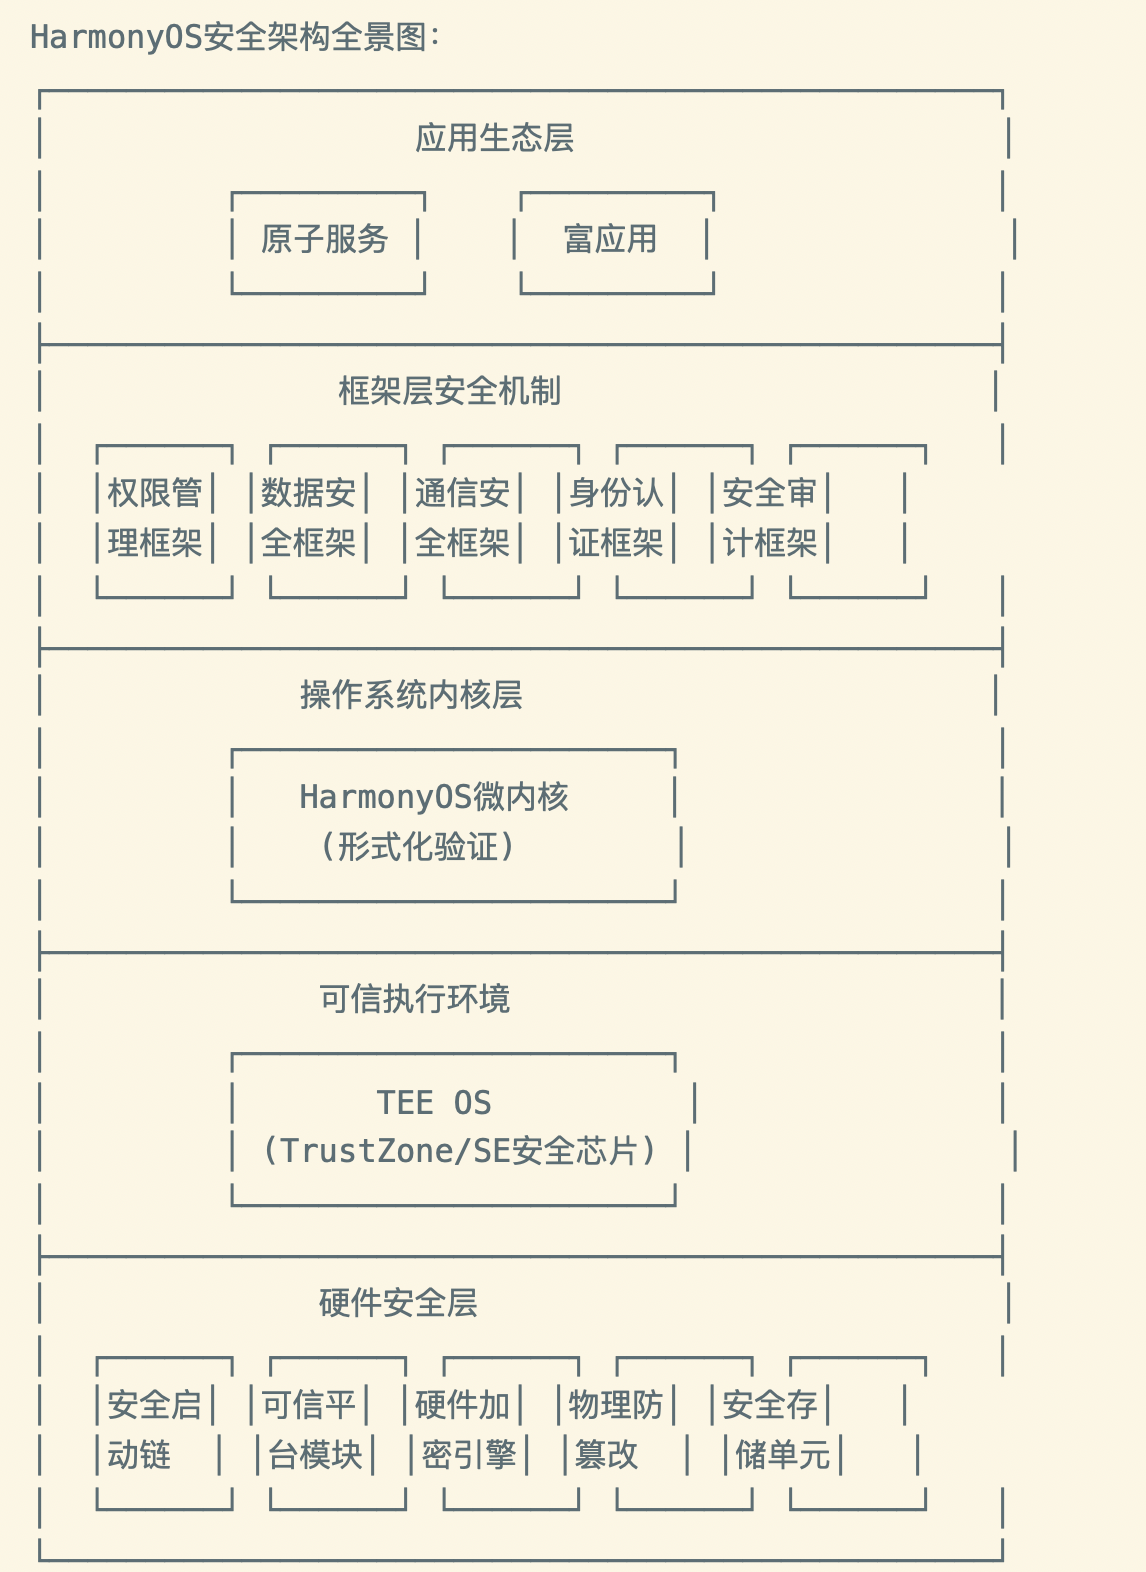
HarmonyOS 安全能力全景图