HAProxy 核心功能
一、核心知识点与实验讲解
(一)HAProxy 基础安装与负载均衡配置
1. 知识点讲解
-
HAProxy 是一款高性能的 TCP/HTTP 反向代理服务器,主打负载均衡与高可用,支持多种负载均衡算法、ACL 规则、SSL 加密等特性。
-
核心配置分为
frontend(前端,接收客户端请求)、backend(后端,定义应用服务器集群)、listen(整合前后端,简化配置)三种模式。 -
健康检查参数:
check inter 3s fall 3 rise 5表示每 3 秒检查一次,连续 3 次失败标记为不可用,连续 5 次成功恢复可用。
2. 实验环境
| 主机角色 | IP 地址 | 安装软件 |
|---|---|---|
| HAProxy 服务器(NAT+仅主机) | <172.25.254.100> | haproxy |
| Web 服务器 1(仅主机) | <192.168.0.10> | httpd |
| Web 服务器 2(仅主机) | <192.168.0.20> | httpd |
3. 操作步骤
步骤 1:安装 HAProxy
Bash
# 在 HAProxy 服务器执行
[root@haproxy ~]# dnf install haproxy.x86_64 -y
[root@haproxy ~]# systemctl enable --now haproxy  # 开机自启并启动服务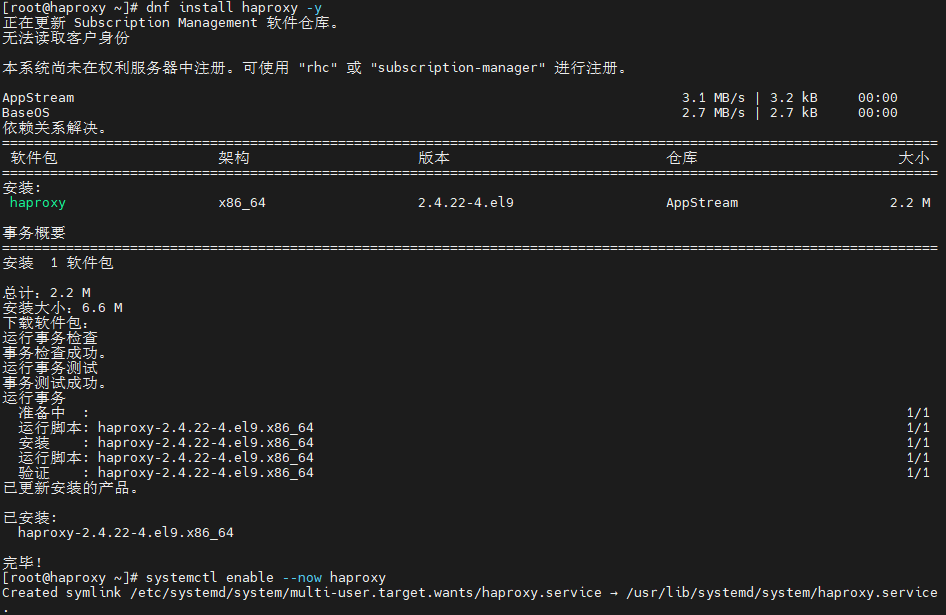
步骤 2:基础负载均衡配置(前后端分离模式)
Bash
[root@haproxy ~]# vim /etc/haproxy/haproxy.cfg
# 清空原有配置,添加以下内容
frontend webcluster
    bind            *:80  # 监听 80 端口
    mode            http  # HTTP 模式
    use_backend     webserver-80  # 转发至后端 webserver-80 集群

backend webserver-80
    server web1 192.168.0.10:80 check inter 3s fall 3 rise 5  # 节点 1 及健康检查
    server web2 192.168.0.20:80 check inter 3s fall 3 rise 5  # 节点 2 及健康检查

# 重启服务生效
[root@haproxy ~]# systemctl restart haproxy.service
步骤 3:测试负载均衡
Bash
# 在 HAProxy 服务器执行,验证请求轮询转发
[root@haproxy ~]# curl 172.25.254.100
webserver1 - 192.168.0.10
[root@haproxy ~]# curl 172.25.254.100
webserver2 - 192.168.0.20
4. 实验效果截图

(二)ACL 访问控制
1. 知识点讲解
-
ACL(Access Control List)是 HAProxy 核心特性,通过定义规则匹配请求特征(域名、IP、路径、请求头等),实现精准的请求转发或拒绝。
-
常用 ACL 匹配规则:
-
hdr_end(host) -i .com:匹配域名以 .com 结尾的请求; -
src 172.25.254.1:匹配客户端 IP 为 <172.25.254.1> 的请求; -
base_dir -i /zt:匹配请求路径以 /zt 开头的请求。
-
2. 实验目标
实现「.com 域名转发至 web1,其他域名转发至 web2」+「拒绝指定 IP 访问」的组合规则。
3. 操作步骤
步骤 1:配置本地域名解析(测试机)
Bash
# Linux 测试机配置
vim /etc/hosts
172.25.254.100  www.zt.com  www.zt.org
步骤 2:配置 HAProxy ACL 规则
Bash
[root@haproxy ~]# vim /etc/haproxy/haproxy.cfg
frontend webcluster
    bind            *:80
    mode            http
    # 定义 ACL 规则:匹配 .com 结尾域名
    acl com_domain hdr_end(host) -i .com
    # 定义 ACL 规则:匹配禁止的客户端 IP
    acl deny_ip src 172.25.254.1
    # 拒绝禁止 IP 的请求
    http-request deny if deny_ip
    # .com 域名转发至 web1,其他转发至 web2
    use_backend  webserver-80-web1 if com_domain
    default_backend webserver-80-web2

backend webserver-80-web1
    server web1 192.168.0.10:80 check inter 3s fall 3 rise 5

backend webserver-80-web2
    server web2 192.168.0.20:80 check inter 3s fall 3 rise 5

# 重启服务
[root@haproxy ~]# systemctl restart haproxy.service
步骤 3:测试 ACL 规则
Bash
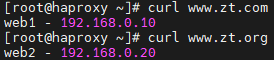
# 测试 .com 域名(转发至 web1)
curl www.zt.com
web1 - 192.168.0.10

# 测试 .org 域名(转发至 web2)
curl www.zt.org
webserver2 - 192.168.0.20

# 测试禁止 IP(返回 403)
curl 172.25.254.100
<html><body><h1>403 Forbidden</h1>
Request forbidden by administrative rules.
</body></html>
4. 实验效果截图

(三)全站加密(HTTPS 配置)
1. 知识点讲解
-
全站加密通过 HAProxy 终止 SSL/TLS 连接(SSL 卸载),客户端与 HAProxy 走 HTTPS,HAProxy 与后端 Web 节点走 HTTP,降低后端节点加密开销。
-
需先生成 SSL 证书(自签名或CA 签发),再配置 HAProxy 监听 443 端口并关联证书,同时实现 HTTP 自动跳转 HTTPS。
2. 操作步骤
步骤 1:生成自签名 SSL 证书
Bash
[root@haproxy ~]# mkdir /etc/haproxy/certs/ -p
# 生成密钥和证书,按需填写信息
[root@haproxy ~]# openssl req -newkey rsa:2048 -nodes -sha256  -keyout /etc/haproxy/certs/timinglee.org.key -x509 -days 365 -out /etc/haproxy/certs/timinglee.org.crt
# 合并密钥和证书为 PEM 格式(HAProxy 要求)
[root@haproxy ~]# cat /etc/haproxy/certs/timinglee.org.{key,crt} > /etc/haproxy/certs/timinglee.pem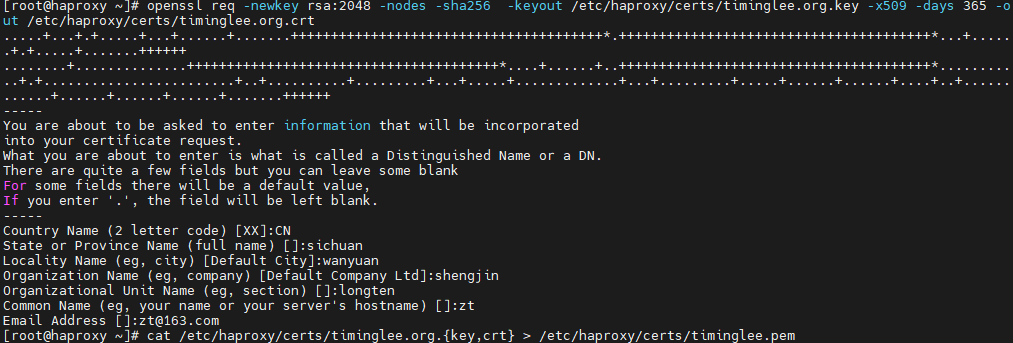
步骤 2:配置 HTTPS 监听与 HTTP 跳转
Bash
[root@haproxy ~]# vim /etc/haproxy/haproxy.cfg
# HTTP 前端:自动跳转 HTTPS
frontend webcluster-http
    bind        *:80
    redirect scheme https if ! { ssl_fc }  # 非 HTTPS 请求跳转至 HTTPS

# HTTPS 前端:处理加密请求
listen webcluster-https
    bind        *:443 ssl  crt /etc/haproxy/certs/timinglee.pem  # 关联 SSL 证书
    mode        http
    balance     roundrobin
    server haha 192.168.0.10:80  check inter 3s fall 3 rise 5
    server hehe 192.168.0.20:80  check inter 3s fall 3 rise 5

# 重启服务
[root@haproxy ~]# systemctl restart haproxy.service
步骤 3:测试全站加密
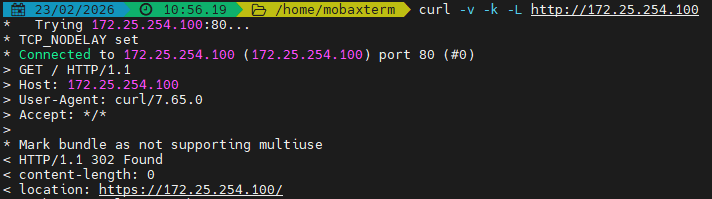
Bash
curl -v -k -L http://172.25.254.100
*   Trying 172.25.254.100:80...
* TCP_NODELAY set
* Connected to 172.25.254.100 (172.25.254.100) port 80 (#0)
> GET / HTTP/1.1
> Host: 172.25.254.100
> User-Agent: curl/7.65.0
> Accept: */*
>
* Mark bundle as not supporting multiuse
< HTTP/1.1 302 Found
< content-length: 0
< location: https://172.25.254.100/
...
4. 实验效果截图
(四)自定义错误页面与 SorryServer
1. 知识点讲解
-
SorryServer:后端所有 Web 节点宕机时,临时转发至备用服务器,提升用户体验;
-
自定义错误页面:当 SorryServer 也宕机时,替换 HAProxy 默认错误页面(如 503),展示自定义内容或跳转至指定网站。
2. 操作步骤
步骤 1:配置 SorryServer(备用服务器)
Bash
# 在 HAProxy 服务器安装 httpd 作为 SorryServer(也可单独部署)
[root@haproxy ~]# dnf install httpd -y
[root@haproxy ~]# vim /etc/httpd/conf/httpd.conf
Listen 8080  # 避免与 HAProxy 80 端口冲突
[root@haproxy ~]# echo "服务维护中,敬请谅解!" > /var/www/html/index.html
[root@haproxy ~]# systemctl enable --now httpd

# 配置 HAProxy 关联 SorryServer
[root@haproxy ~]# vim /etc/haproxy/haproxy.cfg
listen webcluster
    bind        *:80
    mode        tcp
    balance     roundrobin
    server haha 192.168.0.10:80  check inter 3s fall 3 rise 5
    server hehe 192.168.0.20:80  check inter 3s fall 3 rise 5
    server sorry 172.25.254.100:8080  backup  # backup 标记为备用节点

[root@haproxy ~]# systemctl restart haproxy.service
步骤 2:配置自定义 503 错误页面
Bash
# 关闭后端所有 Web 节点和 SorryServer,验证默认 503 页面
[root@web1 ~]# systemctl stop httpd
[root@web2 ~]# systemctl stop httpd
[root@haproxy ~]# systemctl stop httpd
[root@client ~]# curl 172.25.254.100
<html><body><h1>503 Service Unavailable</h1>
No server is available to handle this request.
</body></html>

# 创建自定义 503 页面
[root@haproxy ~]# mkdir /errorpage/html/ -p
[root@haproxy ~]# vim /errorpage/html/503.http
HTTP/1.0 503 Service Unavailable
Cache-Control: no-cache
Connection: close
Content-Type: text/html;charset=UTF-8

<html><body><h1>服务暂时不可用</h1>
<p>我们正在紧急维护,预计 10 分钟后恢复,请稍后重试~</p>
</body></html>

# 配置 HAProxy 加载自定义错误页面
[root@haproxy ~]# vim /etc/haproxy/haproxy.cfg
defaults
    mode                    http
    log                     global
    # 其他默认配置...
    errorfile 503           /errorpage/html/503.http  # 关联 503 错误页面

[root@haproxy ~]# systemctl restart haproxy.service
步骤 3:测试自定义错误页面
Bash
[root@client ~]# curl 172.25.254.100
<html><body><h1>服务暂时不可用</h1>
<p>我们正在紧急维护,预计 10 分钟后恢复,请稍后重试~</p>
</body></html>
4. 实验效果截图

(五)负载均衡算法
1. 知识点讲解
HAProxy 提供多种负载均衡算法,分为静态算法(权重固定,不支持热更新)、动态算法(权重可热更新)、混合算法(基于哈希匹配)三类,核心算法对比:
| 算法类型 | 算法名称 | 特点 |
|---|---|---|
| 静态算法 | static-rr | 静态加权轮询,权重配置后不可热更新,适合节点性能固定的场景 |
| 静态算法 | first | 优先调度第一个可用节点,直到其达到最大连接数,适合核心节点优先的场景 |
| 动态算法 | roundrobin | 动态加权轮询,权重可热更新,最常用的基础算法 |
| 动态算法 | leastconn | 最少连接数优先,适合长连接场景(如数据库) |
| 混合算法 | source | 基于客户端 IP 哈希,固定 IP 转发至固定节点,适合会话保持 |
| 混合算法 | uri | 基于请求 URI 哈希,相同 URI 转发至固定节点,适合静态资源缓存 |
2. 实验示例(static-rr roundrobin)
步骤 1:配置 static-rr 算法(静态加权轮询)
Bash
[root@haproxy ~]# vim /etc/haproxy/haproxy.cfg
listen webcluster
    bind        *:80
    balance     static-rr  # 静态加权轮询
    server haha 192.168.0.10:80 check inter 3s fall 3 rise 5 weight 2
    server hehe 192.168.0.20:80 check inter 3s fall 3 rise 5 weight 1

[root@haproxy ~]# systemctl restart haproxy.service

# 测试:web1 被转发 2 次,web2 被转发 1 次,循环往复
for i in {1..6}; do curl 172.25.254.100; done
webserver1 - 192.168.0.10
webserver1 - 192.168.0.10
webserver2 - 192.168.0.20
webserver1 - 192.168.0.10
webserver1 - 192.168.0.10
webserver2 - 192.168.0.20
步骤 2:配置 roundrobin 算法(动态加权轮询)
Bash
[root@haproxy ~]# vim /etc/haproxy/haproxy.cfg
listen webcluster
    bind        *:80
    balance     roundrobin  # 动态加权轮询
    server haha 192.168.0.10:80 check inter 3s fall 3 rise 5 weight 2
    server hehe 192.168.0.20:80 check inter 3s fall 3 rise 5 weight 1

[root@haproxy ~]# systemctl restart haproxy.service

# 热更新权重(成功)
[root@haproxy ~]# echo "set weight webcluster/haha 1" | socat stdio /var/lib/haproxy/stats
[root@haproxy ~]# echo "get weight webcluster/haha" | socat stdio /var/lib/haproxy/stats
1 (initial 2)

# 测试:权重更新后,web1 和 web2 轮询转发
for i in {1..6}; do curl 172.25.254.100; done
webserver1 - 192.168.0.10
webserver2 - 192.168.0.20
webserver1 - 192.168.0.10
webserver2 - 192.168.0.20
webserver1 - 192.168.0.10
webserver2 - 192.168.0.20