欢迎加入开源鸿蒙跨平台社区:https://openharmonycrossplatform.csdn.net
🎯 前言:为什么需要 Native Device Orientation?
在移动应用开发中,获取设备方向是一个常见需求。Flutter 提供了 MediaQuery.of(context).orientation,但它只能区分竖屏和横屏,无法区分横屏左转和横屏右转。
Flutter 内置方法的局限性:
- ❌ 只能判断屏幕是横向还是纵向
- ❌ 无法区分 landscapeLeft 和 landscapeRight
- ❌ 无法区分 portraitUp 和 portraitDown
- ❌ 基于屏幕尺寸判断,不够精确
实际场景需求:
- 场景一:相机应用需要根据设备方向正确旋转照片
- 场景二:视频播放器需要根据设备方向调整UI布局
- 场景三:游戏应用需要精确的设备方向控制
- 场景四:AR应用需要根据设备方向渲染3D场景
- 场景五:地图导航需要根据设备方向调整指南针
native_device_orientation 是解决这些问题的完美方案!它提供了:
- 📱 精确的方向检测:区分4个方向(portraitUp、portraitDown、landscapeLeft、landscapeRight)
- 🎯 传感器支持:可选择使用设备传感器获取更精确的方向
- 🔄 实时监听:支持方向变化的实时监听
- 🎨 便捷的Widget:提供开箱即用的方向感知Widget
- ⚡ 高性能:直接调用原生API,性能优异
🚀 核心能力一览
| 功能特性 | 详细说明 | OpenHarmony 支持 |
|---|---|---|
| 精确方向检测 | 区分4个精确方向 | ✅ |
| 传感器模式 | 使用设备传感器获取方向 | ✅ |
| UI模式 | 基于窗口方向获取 | ✅ |
| 实时监听 | 监听方向变化事件 | ✅ |
| 异步获取 | 异步获取当前方向 | ✅ |
| Widget封装 | 提供便捷的方向感知Widget | ✅ |
| 默认方向设置 | 可设置默认方向 | ✅ |
| 跨平台一致 | 所有平台行为一致 | ✅ |
方向类型说明
| 方向 | 说明 | 图示 |
|---|---|---|
| portraitUp | 竖屏正向(正常握持) | ⬆️ |
| portraitDown | 竖屏倒置(上下颠倒) | ⬇️ |
| landscapeLeft | 横屏左转(Home键在左) | ⬅️ |
| landscapeRight | 横屏右转(Home键在右) | ➡️ |
| unknown | 未知方向 | ❓ |
检测模式对比
| 模式 | 精确度 | 性能 | 电量消耗 | 适用场景 |
|---|---|---|---|---|
| UI模式 | 中 | ⭐⭐⭐⭐⭐ | 低 | 普通UI适配 |
| 传感器模式 | 高 | ⭐⭐⭐⭐ | 中 | 相机、AR、游戏等 |
⚠️ 重要提示
关于模拟器的限制:
- 🚨 鸿蒙模拟器可能无法正确检测方向变化:模拟器的方向检测功能可能受限,建议在真实设备上测试
- 📱 真机测试:为了获得最佳体验和准确的方向检测,强烈建议在真实的OpenHarmony设备上运行
- 🔄 传感器模式:在模拟器上,传感器模式可能无法正常工作
⚠️ 常见问题
-
问题:方向检测不准确或始终显示竖直
- 解决:这是模拟器的限制,请在真实设备上测试
-
问题:方向变化不及时
- 解决:使用 Stream 监听方式,而不是一次性获取
-
问题:安装时报错 9568289
- 解决:需要修改应用等级为 system_basic(见权限配置部分)
⚙️ 环境准备
第一步:添加依赖
📄 pubspec.yaml:
yaml
dependencies:
  flutter:
    sdk: flutter

  # 添加 native_device_orientation 依赖(OpenHarmony 适配版本)
  native_device_orientation:
    git:
      url: https://atomgit.com/openharmony-sig/fluttertpc_native_device_orientation.git
      ref: master
执行命令:
bash
flutter pub get第二步:配置权限
由于该插件需要访问设备传感器,需要配置相应权限。
2.1 在 entry 目录下的 module.json5 中添加权限
打开 ohos/entry/src/main/module.json5,在 module 对象中添加:
json
"requestPermissions": [
  {
    "name": "ohos.permission.INTERNET",
    "reason": "$string:network_reason",
    "usedScene": {
      "abilities": [
        "EntryAbility"
      ],
      "when": "inuse"
    }
  }
]
2.2 在 entry 目录下添加权限说明
打开 ohos/entry/src/main/resources/base/element/string.json,添加:
json
{
  "string": [
    {
      "name": "network_reason",
      "value": "使用网络"
    }
  ]
}
2.3 应用等级配置(可选)
如果安装时遇到错误 9568289,需要修改应用等级为 system_basic。参考 官方文档。
第三步:导入包
在 Dart 文件中导入:
dart
import 'package:flutter/material.dart';
import 'package:native_device_orientation/native_device_orientation.dart';
📚 基础用法:三种使用方式
方式1:使用 NativeDeviceOrientedWidget(推荐)
最简单的方式,自动处理方向变化:
dart
NativeDeviceOrientedWidget(
  portraitUp: (context) {
    return const Center(
      child: Text(
        '竖屏正向 ⬆️',
        style: TextStyle(fontSize: 24),
      ),
    );
  },
  portraitDown: (context) {
    return const Center(
      child: Text(
        '竖屏倒置 ⬇️',
        style: TextStyle(fontSize: 24),
      ),
    );
  },
  landscapeLeft: (context) {
    return const Center(
      child: Text(
        '横屏左转 ⬅️',
        style: TextStyle(fontSize: 24),
      ),
    );
  },
  landscapeRight: (context) {
    return const Center(
      child: Text(
        '横屏右转 ➡️',
        style: TextStyle(fontSize: 24),
      ),
    );
  },
  fallback: (context) {
    return const Center(
      child: Text(
        '未知方向 ❓',
        style: TextStyle(fontSize: 24),
      ),
    );
  },
)核心要点:
- 为每个方向提供不同的UI构建器
fallback是必需的,用于处理未知方向- 自动监听方向变化并更新UI
方式2:使用 NativeDeviceOrientationReader
更灵活的方式,手动读取方向:
dart
NativeDeviceOrientationReader(
  builder: (context) {
    final orientation = NativeDeviceOrientationReader.orientation(context);

    return Center(
      child: Text(
        '当前方向: ${_getOrientationText(orientation)}',
        style: const TextStyle(fontSize: 24),
      ),
    );
  },
)

String _getOrientationText(NativeDeviceOrientation orientation) {
  switch (orientation) {
    case NativeDeviceOrientation.portraitUp:
      return '竖屏正向 ⬆️';
    case NativeDeviceOrientation.portraitDown:
      return '竖屏倒置 ⬇️';
    case NativeDeviceOrientation.landscapeLeft:
      return '横屏左转 ⬅️';
    case NativeDeviceOrientation.landscapeRight:
      return '横屏右转 ➡️';
    default:
      return '未知方向 ❓';
  }
}
方式3:直接使用 API
最灵活的方式,完全控制:
dart
// 异步获取当前方向
final orientation = await NativeDeviceOrientationCommunicator()
    .orientation(useSensor: false);

print('当前方向: $orientation');

// 监听方向变化
NativeDeviceOrientationCommunicator()
    .onOrientationChanged(useSensor: false)
    .listen((orientation) {
  print('方向变化: $orientation');
});
🎨 进阶用法:传感器模式
示例4:使用传感器模式
传感器模式可以提供更精确的方向检测:
dart
class SensorOrientationDemo extends StatefulWidget {
  const SensorOrientationDemo({super.key});

  @override
  State<SensorOrientationDemo> createState() => _SensorOrientationDemoState();
}

class _SensorOrientationDemoState extends State<SensorOrientationDemo> {
  bool useSensor = false;

  @override
  Widget build(BuildContext context) {
    return Scaffold(
      appBar: AppBar(
        title: const Text('传感器模式演示'),
        actions: [
          const Center(child: Text('传感器模式:')),
          Switch(
            value: useSensor,
            onChanged: (val) => setState(() => useSensor = val),
          ),
        ],
      ),
      body: NativeDeviceOrientedWidget(
        useSensor: useSensor,  // 启用传感器模式
        portraitUp: (context) => _buildOrientationCard(
          '竖屏正向 ⬆️',
          Colors.blue,
          useSensor ? '使用传感器检测' : '使用UI检测',
        ),
        landscapeLeft: (context) => _buildOrientationCard(
          '横屏左转 ⬅️',
          Colors.green,
          useSensor ? '使用传感器检测' : '使用UI检测',
        ),
        landscapeRight: (context) => _buildOrientationCard(
          '横屏右转 ➡️',
          Colors.orange,
          useSensor ? '使用传感器检测' : '使用UI检测',
        ),
        fallback: (context) => _buildOrientationCard(
          '未知方向 ❓',
          Colors.grey,
          '无法检测',
        ),
      ),
    );
  }

  Widget _buildOrientationCard(String title, Color color, String subtitle) {
    return Container(
      color: color.withOpacity(0.2),
      child: Center(
        child: Column(
          mainAxisAlignment: MainAxisAlignment.center,
          children: [
            Text(
              title,
              style: TextStyle(
                fontSize: 32,
                fontWeight: FontWeight.bold,
                color: color,
              ),
            ),
            const SizedBox(height: 16),
            Text(
              subtitle,
              style: TextStyle(
                fontSize: 16,
                color: color.withOpacity(0.7),
              ),
            ),
          ],
        ),
      ),
    );
  }
}传感器模式优势:
- 更精确的方向检测
- 可以检测到微小的角度变化
- 适合相机、AR等对方向敏感的应用
注意事项:
- 传感器模式会增加电量消耗
- 某些设备可能不支持传感器模式
- 建议根据实际需求选择模式
示例5:实时监听方向变化
使用 Stream 实时监听方向变化:
dart
class OrientationStreamDemo extends StatefulWidget {
const OrientationStreamDemo({super.key});
@override
State<OrientationStreamDemo> createState() => _OrientationStreamDemoState();
}
class _OrientationStreamDemoState extends State<OrientationStreamDemo> {
NativeDeviceOrientation _currentOrientation = NativeDeviceOrientation.portraitUp;
final List<String> _orientationHistory = [];
@override
void initState() {
super.initState();
_listenToOrientationChanges();
}
void _listenToOrientationChanges() {
NativeDeviceOrientationCommunicator()
.onOrientationChanged(useSensor: false)
.listen((orientation) {
setState(() {
_currentOrientation = orientation;
_orientationHistory.insert(
0,
'${DateTime.now().toString().substring(11, 19)}: ${_getOrientationName(orientation)}',
);
if (_orientationHistory.length > 10) {
_orientationHistory.removeLast();
}
});
});
}
String _getOrientationName(NativeDeviceOrientation orientation) {
switch (orientation) {
case NativeDeviceOrientation.portraitUp:
return '竖屏正向';
case NativeDeviceOrientation.portraitDown:
return '竖屏倒置';
case NativeDeviceOrientation.landscapeLeft:
return '横屏左转';
case NativeDeviceOrientation.landscapeRight:
return '横屏右转';
default:
return '未知';
}
}
@override
Widget build(BuildContext context) {
return Scaffold(
appBar: AppBar(
title: const Text('方向变化监听'),
),
body: Column(
children: [
Container(
padding: const EdgeInsets.all(24),
color: Colors.blue.withOpacity(0.1),
child: Column(
children: [
const Text(
'当前方向',
style: TextStyle(fontSize: 16, color: Colors.grey),
),
const SizedBox(height: 8),
Text(
_getOrientationName(_currentOrientation),
style: const TextStyle(
fontSize: 32,
fontWeight: FontWeight.bold,
),
),
],
),
),
const Padding(
padding: EdgeInsets.all(16),
child: Text(
'方向变化历史',
style: TextStyle(fontSize: 18, fontWeight: FontWeight.bold),
),
),
Expanded(
child: ListView.builder(
itemCount: _orientationHistory.length,
itemBuilder: (context, index) {
return ListTile(
leading: CircleAvatar(
child: Text('${index + 1}'),
),
title: Text(_orientationHistory[index]),
);
},
),
),
],
),
);
}
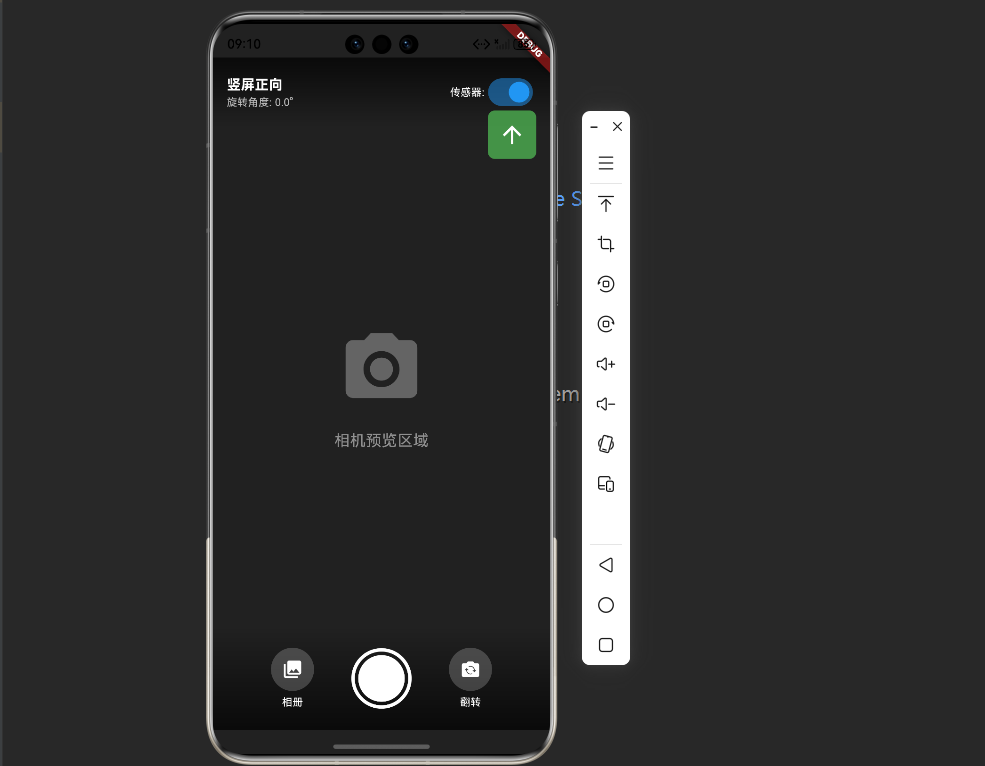
}🎯 完整示例:方向感知相机界面
下面是一个完整的示例,展示如何在相机应用中使用方向检测:
dart
import 'package:flutter/material.dart';
import 'package:native_device_orientation/native_device_orientation.dart';

void main() {
  runApp(const MyApp());
}

class MyApp extends StatelessWidget {
  const MyApp({super.key});

  @override
  Widget build(BuildContext context) {
    return MaterialApp(
      title: '方向感知相机',
      theme: ThemeData(
        colorScheme: ColorScheme.fromSeed(seedColor: Colors.blue),
        useMaterial3: true,
      ),
      home: const OrientationAwareCameraPage(),
    );
  }
}

class OrientationAwareCameraPage extends StatefulWidget {
  const OrientationAwareCameraPage({super.key});

  @override
  State<OrientationAwareCameraPage> createState() =>
      _OrientationAwareCameraPageState();
}

class _OrientationAwareCameraPageState
    extends State<OrientationAwareCameraPage> {
  bool useSensor = true;
  NativeDeviceOrientation? _lastOrientation;

  @override
  Widget build(BuildContext context) {
    return Scaffold(
      backgroundColor: Colors.black,
      body: NativeDeviceOrientedWidget(
        useSensor: useSensor,
        portraitUp: (context) => _buildCameraUI(
          NativeDeviceOrientation.portraitUp,
          '竖屏正向',
          0,
        ),
        portraitDown: (context) => _buildCameraUI(
          NativeDeviceOrientation.portraitDown,
          '竖屏倒置',
          180,
        ),
        landscapeLeft: (context) => _buildCameraUI(
          NativeDeviceOrientation.landscapeLeft,
          '横屏左转',
          270,
        ),
        landscapeRight: (context) => _buildCameraUI(
          NativeDeviceOrientation.landscapeRight,
          '横屏右转',
          90,
        ),
        fallback: (context) => _buildCameraUI(
          NativeDeviceOrientation.unknown,
          '未知方向',
          0,
        ),
      ),
    );
  }

  Widget _buildCameraUI(
    NativeDeviceOrientation orientation,
    String orientationName,
    double rotation,
  ) {
    // 记录方向变化
    if (_lastOrientation != orientation) {
      _lastOrientation = orientation;
      print('方向变化: $orientationName (旋转角度: $rotation°)');
    }

    return Stack(
      children: [
        // 模拟相机预览
        Container(
          color: Colors.grey[900],
          child: Center(
            child: Column(
              mainAxisAlignment: MainAxisAlignment.center,
              children: [
                Icon(
                  Icons.camera_alt,
                  size: 100,
                  color: Colors.white.withOpacity(0.3),
                ),
                const SizedBox(height: 20),
                Text(
                  '相机预览区域',
                  style: TextStyle(
                    color: Colors.white.withOpacity(0.5),
                    fontSize: 18,
                  ),
                ),
              ],
            ),
          ),
        ),

        // 顶部信息栏
        Positioned(
          top: 0,
          left: 0,
          right: 0,
          child: SafeArea(
            child: Container(
              padding: const EdgeInsets.all(16),
              decoration: BoxDecoration(
                gradient: LinearGradient(
                  begin: Alignment.topCenter,
                  end: Alignment.bottomCenter,
                  colors: [
                    Colors.black.withOpacity(0.7),
                    Colors.transparent,
                  ],
                ),
              ),
              child: Row(
                mainAxisAlignment: MainAxisAlignment.spaceBetween,
                children: [
                  Column(
                    crossAxisAlignment: CrossAxisAlignment.start,
                    children: [
                      Text(
                        orientationName,
                        style: const TextStyle(
                          color: Colors.white,
                          fontSize: 16,
                          fontWeight: FontWeight.bold,
                        ),
                      ),
                      Text(
                        '旋转角度: $rotation°',
                        style: TextStyle(
                          color: Colors.white.withOpacity(0.7),
                          fontSize: 12,
                        ),
                      ),
                    ],
                  ),
                  Row(
                    children: [
                      const Text(
                        '传感器:',
                        style: TextStyle(color: Colors.white, fontSize: 12),
                      ),
                      Switch(
                        value: useSensor,
                        onChanged: (val) => setState(() => useSensor = val),
                        activeColor: Colors.blue,
                      ),
                    ],
                  ),
                ],
              ),
            ),
          ),
        ),

        // 底部控制栏(始终保持正向)
        Positioned(
          bottom: 0,
          left: 0,
          right: 0,
          child: SafeArea(
            child: Transform.rotate(
              angle: -rotation * 3.14159 / 180,  // 保持控制栏正向
              child: Container(
                padding: const EdgeInsets.all(24),
                decoration: BoxDecoration(
                  gradient: LinearGradient(
                    begin: Alignment.bottomCenter,
                    end: Alignment.topCenter,
                    colors: [
                      Colors.black.withOpacity(0.7),
                      Colors.transparent,
                    ],
                  ),
                ),
                child: Row(
                  mainAxisAlignment: MainAxisAlignment.spaceEvenly,
                  children: [
                    _buildControlButton(Icons.photo_library, '相册'),
                    _buildCaptureButton(),
                    _buildControlButton(Icons.flip_camera_ios, '翻转'),
                  ],
                ),
              ),
            ),
          ),
        ),

        // 方向指示器
        Positioned(
          right: 16,
          top: 100,
          child: _buildOrientationIndicator(orientation),
        ),
      ],
    );
  }

  Widget _buildControlButton(IconData icon, String label) {
    return Column(
      mainAxisSize: MainAxisSize.min,
      children: [
        Container(
          width: 50,
          height: 50,
          decoration: BoxDecoration(
            color: Colors.white.withOpacity(0.2),
            shape: BoxShape.circle,
          ),
          child: Icon(icon, color: Colors.white),
        ),
        const SizedBox(height: 4),
        Text(
          label,
          style: const TextStyle(color: Colors.white, fontSize: 12),
        ),
      ],
    );
  }

  Widget _buildCaptureButton() {
    return Container(
      width: 70,
      height: 70,
      decoration: BoxDecoration(
        shape: BoxShape.circle,
        border: Border.all(color: Colors.white, width: 4),
      ),
      child: Container(
        margin: const EdgeInsets.all(4),
        decoration: const BoxDecoration(
          color: Colors.white,
          shape: BoxShape.circle,
        ),
      ),
    );
  }

  Widget _buildOrientationIndicator(NativeDeviceOrientation orientation) {
    IconData icon;
    Color color;

    switch (orientation) {
      case NativeDeviceOrientation.portraitUp:
        icon = Icons.arrow_upward;
        color = Colors.green;
        break;
      case NativeDeviceOrientation.portraitDown:
        icon = Icons.arrow_downward;
        color = Colors.red;
        break;
      case NativeDeviceOrientation.landscapeLeft:
        icon = Icons.arrow_back;
        color = Colors.blue;
        break;
      case NativeDeviceOrientation.landscapeRight:
        icon = Icons.arrow_forward;
        color = Colors.orange;
        break;
      default:
        icon = Icons.help_outline;
        color = Colors.grey;
    }

    return Container(
      padding: const EdgeInsets.all(12),
      decoration: BoxDecoration(
        color: color.withOpacity(0.8),
        borderRadius: BorderRadius.circular(8),
      ),
      child: Icon(icon, color: Colors.white, size: 32),
    );
  }
}完整示例说明:
- 方向感知UI:根据设备方向动态调整界面布局
- 传感器模式切换:支持在UI模式和传感器模式之间切换
- 控制栏保持正向:使用 Transform.rotate 保持控制栏始终正向
- 方向指示器:实时显示当前设备方向
- 模拟相机界面:展示实际应用场景
📊 API 详解
NativeDeviceOrientationCommunicator
1. orientation() - 异步获取方向
dart
Future<NativeDeviceOrientation> orientation({
  bool useSensor = false,
  NativeDeviceOrientation defaultOrientation = NativeDeviceOrientation.portraitUp,
}) async参数说明:
useSensor:是否使用传感器模式(默认 false)defaultOrientation:无法获取方向时的默认值
使用示例:
dart
// UI模式
final orientation = await NativeDeviceOrientationCommunicator()
    .orientation(useSensor: false);

// 传感器模式
final orientation = await NativeDeviceOrientationCommunicator()
    .orientation(useSensor: true);

// 设置默认方向
final orientation = await NativeDeviceOrientationCommunicator()
    .orientation(
      useSensor: false,
      defaultOrientation: NativeDeviceOrientation.landscapeLeft,
    );
2. onOrientationChanged() - 监听方向变化
dart
Stream<NativeDeviceOrientation> onOrientationChanged({
  bool useSensor = false,
})使用示例:
dart
// 监听方向变化
NativeDeviceOrientationCommunicator()
    .onOrientationChanged(useSensor: false)
    .listen((orientation) {
  print('方向变化: $orientation');
});

// 使用 StreamBuilder
StreamBuilder<NativeDeviceOrientation>(
  stream: NativeDeviceOrientationCommunicator()
      .onOrientationChanged(useSensor: false),
  builder: (context, snapshot) {
    if (!snapshot.hasData) {
      return const CircularProgressIndicator();
    }

    final orientation = snapshot.data!;
    return Text('当前方向: $orientation');
  },
)
🎨 Widget API
NativeDeviceOrientedWidget
自动处理方向变化的便捷Widget:
dart
NativeDeviceOrientedWidget({
  required WidgetBuilder fallback,        // 必需:默认构建器
  WidgetBuilder? landscape,               // 横屏(不区分左右)
  WidgetBuilder? landscapeLeft,           // 横屏左转
  WidgetBuilder? landscapeRight,          // 横屏右转
  WidgetBuilder? portrait,                // 竖屏(不区分上下)
  WidgetBuilder? portraitUp,              // 竖屏正向
  WidgetBuilder? portraitDown,            // 竖屏倒置
  bool useSensor = false,                 // 是否使用传感器
})优先级规则:
- 具体方向(如 portraitUp)优先于通用方向(如 portrait)
- 如果没有匹配的构建器,使用 fallback
NativeDeviceOrientationReader
手动读取方向的Widget:
dart
NativeDeviceOrientationReader({
  required WidgetBuilder builder,
  bool useSensor = false,
})

// 在 builder 中读取方向
final orientation = NativeDeviceOrientationReader.orientation(context);
💡 最佳实践
1. 根据场景选择模式
dart
// ✅ 普通UI适配:使用UI模式
NativeDeviceOrientedWidget(
  useSensor: false,  // UI模式,性能好,电量消耗低
  // ...
)

// ✅ 相机/AR应用:使用传感器模式
NativeDeviceOrientedWidget(
  useSensor: true,  // 传感器模式,更精确
  // ...
)
2. 合理使用 fallback
dart
// ✅ 始终提供 fallback
NativeDeviceOrientedWidget(
  portraitUp: (context) => const PortraitUI(),
  landscapeLeft: (context) => const LandscapeUI(),
  fallback: (context) => const DefaultUI(),  // 必需
)
3. 避免频繁重建
dart
// ❌ 错误:每次都创建新Widget
NativeDeviceOrientedWidget(
  portraitUp: (context) => MyComplexWidget(),  // 每次重建
)

// ✅ 正确:使用 const 或缓存
NativeDeviceOrientedWidget(
  portraitUp: (context) => const MyComplexWidget(),  // 复用
)
4. 处理方向转换动画
dart
AnimatedSwitcher(
  duration: const Duration(milliseconds: 300),
  child: NativeDeviceOrientedWidget(
    key: ValueKey(orientation),  // 触发动画
    portraitUp: (context) => const PortraitUI(),
    landscapeLeft: (context) => const LandscapeUI(),
    fallback: (context) => const DefaultUI(),
  ),
)
5. 及时取消监听
dart
class MyWidget extends StatefulWidget {
  @override
  State<MyWidget> createState() => _MyWidgetState();
}

class _MyWidgetState extends State<MyWidget> {
  late StreamSubscription<NativeDeviceOrientation> _subscription;

  @override
  void initState() {
    super.initState();
    _subscription = NativeDeviceOrientationCommunicator()
        .onOrientationChanged()
        .listen((orientation) {
      // 处理方向变化
    });
  }

  @override
  void dispose() {
    _subscription.cancel();  // 取消监听
    super.dispose();
  }

  @override
  Widget build(BuildContext context) {
    return Container();
  }
}
🐛 常见问题与解决方案
问题1:方向检测不准确或始终显示竖直
现象:
- 方向显示错误
- 无论如何旋转设备都显示竖直
- 横屏左右识别不准
原因:
- 在鸿蒙模拟器上,方向检测功能可能受限
- 模拟器无法完全模拟真实设备的传感器行为
解决方案:
dart
// 1. 在真实设备上测试(推荐)
// 模拟器的方向检测功能有限,建议使用真机测试

// 2. 尝试使用传感器模式
NativeDeviceOrientedWidget(
  useSensor: true,  // 启用传感器
  // ...
)

// 3. 检查权限配置是否正确
// 确保已按照上述步骤配置了所需权限
问题2:方向变化延迟
现象:
- 旋转设备后UI更新慢
- 方向变化不及时
解决方案:
dart
// 使用 Stream 监听而不是一次性获取
NativeDeviceOrientationCommunicator()
    .onOrientationChanged(useSensor: false)
    .listen((orientation) {
  // 实时更新
});
问题3:某些方向无法检测
现象:
- portraitDown 无法检测
- 某些方向始终返回 unknown
解决方案:
dart
// 1. 检查设备是否支持该方向
// 2. 使用传感器模式
// 3. 提供 fallback 处理

NativeDeviceOrientedWidget(
  useSensor: true,
  portraitDown: (context) => const PortraitDownUI(),
  fallback: (context) => const DefaultUI(),  // 兜底方案
)
问题4:电量消耗过高
现象:
- 使用传感器模式后电量消耗明显增加
解决方案:
dart
// 1. 仅在需要时启用传感器模式
// 2. 页面不可见时停止监听

class MyWidget extends StatefulWidget {
  @override
  State<MyWidget> createState() => _MyWidgetState();
}

class _MyWidgetState extends State<MyWidget> with WidgetsBindingObserver {
  bool _useSensor = false;

  @override
  void initState() {
    super.initState();
    WidgetsBinding.instance.addObserver(this);
  }

  @override
  void dispose() {
    WidgetsBinding.instance.removeObserver(this);
    super.dispose();
  }

  @override
  void didChangeAppLifecycleState(AppLifecycleState state) {
    setState(() {
      // 应用在后台时关闭传感器
      _useSensor = state == AppLifecycleState.resumed;
    });
  }

  @override
  Widget build(BuildContext context) {
    return NativeDeviceOrientedWidget(
      useSensor: _useSensor,
      // ...
    );
  }
}
📈 与 MediaQuery 对比
| 特性 | MediaQuery.orientation | native_device_orientation |
|---|---|---|
| 区分横竖屏 | ✅ | ✅ |
| 区分横屏左右 | ❌ | ✅ |
| 区分竖屏上下 | ❌ | ✅ |
| 传感器支持 | ❌ | ✅ |
| 实时监听 | ✅ | ✅ |
| 性能 | ⭐⭐⭐⭐⭐ | ⭐⭐⭐⭐ |
| 精确度 | 低 | 高 |
| 适用场景 | 普通UI适配 | 相机、AR、游戏等 |
🎓 总结
通过本文,你已经掌握了:
✅ native_device_orientation 的核心概念和优势
✅ 三种使用方式(Widget、Reader、直接API)
✅ UI模式和传感器模式的区别
✅ 实时监听方向变化的方法
✅ 完整的方向感知相机界面实现
✅ 最佳实践和常见问题解决方案
native_device_orientation 让设备方向检测变得精确而简单!通过区分4个精确方向,可以实现更专业的UI适配和交互体验。无论是相机应用、AR应用还是游戏应用,都能满足你的需求。