一、负载均衡
是一种服务或基于硬件设备等实现的高可用反向代理技术,负载均
衡将特定的业务(web服务、网络流量等)分担给指定的一个或多个后端特定的服务器或设备,从而提高了
公司业务的并发处理能力、保证了业务的高可用性、方便了业务后期的水平动态扩展
1、四层负载
1、通过ip+port决定负载均衡的去向。
2、对流量请求进行NAT处理,转发至后台服务器。
3、记录tcp、udp流量分别是由哪台服务器处理,后续该请求连接的流量都通过该服务器处理。
4、支持四层的软件
- lvs:重量级四层负载均衡器。
- Nginx:轻量级四层负载均衡器,可缓存。(nginx四层是通过upstream模块)
- Haproxy:模拟四层转发。
5、四层负载均衡在传输层及以下,四层类似于路由器,四层无法识别DDos攻击(因为它拆不了包)
6、LVS,四层快,且在内核里,开销少
2、七层负载
1、通过虚拟url或主机ip进行流量识别,根据应用层信息进行解析,决定是否需要进行负载均衡。
2、代理后台服务器与客户端建立连接,如nginx可代理前后端,与前端客户端tcp连接,与后端服务器建立 tcp连接
3、七层负载均衡在应用层及以下,没有四层就没有七层,七层类似于代理服务器
4、支持7层代理的软件:
- Nginx:基于http协议(nginx七层是通过proxy_pass)
- Haproxy:七层代理,会话保持、标记、路径转移等。
四层负载和七层负载的区别
四层的负载均衡,就是通过发布三层的IP地址(VIP),然后加四层的端口号,来决定哪些流量需要做负 载均衡,对需要处理的流量进行NAT处理,转发至后台服务器,并记录下这个TCP或者UDP的流量是由哪 台服务器处理的,后续这个连接的所有流量都同样转发到同一台服务器处理
七层的负载均衡,就是在四层的基础上(没有四层是绝对不可能有七层的),再考虑应用层的特征,比同一个Web服务器的负载均衡,除了根据VIP加80端口辨别是否需要处理的流量,还可根据七层的 URL、浏览器类别、语言来决定是否要进行负载均衡。
二、Haproxy基础配置
是一个具备并发、高性能的TCP和HTTP负载均衡器
1、软件安装
https://github.com/haproxy/wiki/wiki/Packages
2、安装软件包
dnf install haproxy -y
1、Haproxy实验环境
(1)在haproxy主机中
双网卡
NAT模式:172.25.254.100
仅主机:192.168.0.100
cpp
# 1、设定网络
[root@haproxy ~]# vmset.sh eth0 172.25.254.100 haproxy
[root@haproxy ~]# vmset.sh eth1 192.168.0.100 haproxy noroute

# 2、配置内核路由功能
[root@haproxy ~]# echo net.ipv4.ip_forward=1 >> /etc/sysctl.conf
[root@haproxy ~]# sysctl -p
net.ipv4.ip_forward = 1
(2)在webserver1中
单网卡
仅主机:192.168.0.10
cpp
[root@webserver11 ~]# vmset.sh eth0 192.168.0.10 webserver1 noroute
[root@webserver11 ~]# dnf install httpd -y
[root@webserver11 ~]# echo webserver1 - 192.168.0.10 > /var/www/html/index.html
[root@webserver11 ~]# systemctl enable --now httpd
(3)在webserver2这
单网卡
仅主机:192.168.0.20
cpp
[root@webserver2 ~]# vmset.sh eth0 192.168.0.20 webserver2 noroute
[root@webserver2 ~]# dnf install httpd -y
[root@webserver2 ~]# echo webserver2 - 192.168.0.20 > /var/www/html/index.html
[root@webserver2 ~]# systemctl enable --now httpd
(4)测试环境
cpp
# 1、在haproxy中访问
[root@haproxy ~]# curl 192.168.0.10
webserver1 - 192.168.0.10
[root@haproxy ~]# curl 192.168.0.20
webserver2 - 192.168.0.20
三、Haproxy的安装及配置参数
1、安装
cpp
# 在调度器(双网卡主机中)
[root@haproxy ~]# dnf install haproxy.x86_64 -y
[root@haproxy ~]# systemctl enable --now haproxy.service
Created symlink /etc/systemd/system/multi-user.target.wants/haproxy.service → /usr/lib/systemd/system/haproxy.service.
2、haproxy的参数详解实验
-
global:全局配置段
-
proxies:代理配置段
(1)实现最基本的负载
cpp
# 1、设定vim中tab的空格个数
[root@haproxy ~]# vim ~/.vimrc
set ts=4 ai

# 2、前后端分开设定
[root@haproxy ~]# vim /etc/haproxy/haproxy.cfg
frontend webcluster
    bind            *:80
    mode            http
    use_backend     webserver-80

backend webserver-80
    server web1 192.168.0.10:80 check inter 3s fall 3 rise 5
    server web2 192.168.0.20:80 check inter 3s fall 3 rise 5
[root@haproxy ~]# systemctl restart haproxy.service
Job for haproxy.service failed because the control process exited with error code.
See "systemctl status haproxy.service" and "journalctl -xeu haproxy.service" for details.
[root@haproxy ~]# systemctl status haproxy.service
× haproxy.service - HAProxy Load Balancer
     Loaded: loaded (/usr/lib/systemd/system/haproxy.service; enabled; preset: disabled)
     Active: failed (Result: exit-code) since Fri 2026-01-23 14:53:47 CST; 4s ago
   Duration: 11min 35.724s
    Process: 27092 ExecStartPre=/usr/sbin/haproxy -f $CONFIG -f $CFGDIR -c -q $OPTIONS (code=exited, status=>
    Process: 27094 ExecStart=/usr/sbin/haproxy -Ws -f $CONFIG -f $CFGDIR -p $PIDFILE $OPTIONS (code=exited, >
   Main PID: 27094 (code=exited, status=1/FAILURE)
        CPU: 11ms

1月 23 14:53:47 haproxy systemd[1]: Starting HAProxy Load Balancer...
1月 23 14:53:47 haproxy haproxy[27094]: [NOTICE]   (27094) : haproxy version is 2.4.22-f8e3218
1月 23 14:53:47 haproxy haproxy[27094]: [NOTICE]   (27094) : path to executable is /usr/sbin/haproxy
1月 23 14:53:47 haproxy haproxy[27094]: [ALERT]    (27094) : Starting frontend webcluster: cannot bind socke>
1月 23 14:53:47 haproxy haproxy[27094]: [ALERT]    (27094) : [/usr/sbin/haproxy.main()] Some protocols faile>
1月 23 14:53:47 haproxy systemd[1]: haproxy.service: Main process exited, code=exited, status=1/FAILURE
1月 23 14:53:47 haproxy systemd[1]: haproxy.service: Failed with result 'exit-code'.
1月 23 14:53:47 haproxy systemd[1]: Failed to start HAProxy Load Balancer.

# 这就可能是80端口被httpd占用,所有我们就需要关闭httpd
[root@haproxy ~]# systemctl stop httpd
[root@haproxy ~]# systemctl restart haproxy.service

# 3、测试:
[root@haproxy ~]# curl 172.25.254.100
webserver1 - 192.168.0.10
[root@haproxy ~]# curl 172.25.254.100
webserver2 - 192.168.0.20

# 4、用listen方式书写负载均衡

listen webcluster
    bind    *:80
    mode    http
    server ha


    ha 192.168.0.10:80 check inter 3s fall 3 rise 5
    server hehe 192.168.0.20:80 check inter 3s fall 3 rise 5
[root@haproxy ~]# systemctl restart haproxy.service

# 5、测试:
[root@haproxy ~]# curl 172.25.254.100
webserver1 - 192.168.0.10
[root@haproxy ~]# curl 172.25.254.100
webserver2 - 192.168.0.20
(2)log 127.0.0.1 local2
指定日志发送到192.168.0.10
cpp
# 1、在192.168.0.10开启接受日志的端口
[root@webserver11 ~]# vim /etc/rsyslog.conf
module(load="imudp") # needs to be done just once
input(type="imudp" port="514")
[root@webserver11 ~]# systemctl restart rsyslog.service

# 2、测试接受日志端口是否开启
[root@webserver11 ~]# netstat -antlupe | grep rsyslog
udp        0      0 0.0.0.0:514             0.0.0.0:*                           0          48456      6231/rsyslogd
udp6       0      0 :::514                  :::*                                0          48457      6231/rsyslogd

# 3、在haproxy主机中设定日志发送消息
[root@haproxy ~]# vim /etc/haproxy/haproxy.cfg
log         192.168.0.10 local2
[root@haproxy ~]# systemctl restart haproxy.service

# 4、验证
[2026-01-23 15:55.26]  ~
[莫子.mozi] ⮞ curl 172.25.254.100
webserver1 - 192.168.0.10
[2026-01-23 15:55.38]  ~
[莫子.mozi] ⮞ curl 172.25.254.100
webserver2 - 192.168.0.20

[root@webserver11 ~]# cat /var/log/messages
Jan 23 15:55:38 192.168.0.100 haproxy[38498]: 172.25.254.1:53986 [23/Jan/2026:15:55:38.073] webcluster webcluster/haha 0/0/0/1/1 200 273 - - ---- 1/1/0/0/0 0/0 "GET / HTTP/1.1"
Jan 23 15:55:50 192.168.0.100 haproxy[38498]: 172.25.254.1:53988 [23/Jan/2026:15:55:50.636] webcluster webcluster/hehe 0/0/0/1/1 200 273 - - ---- 1/1/0/0/0 0/0 "GET / HTTP/1.1"
(3)实现haproxy的多进程
cpp
# 1、默认haproxy是单进程
[root@haproxy ~]# pstree -p | grep haproxy
           |-haproxy(38496)---haproxy(38498)-+-{haproxy}(38499)
           |                                 |-{haproxy}(38500)
           |                                 `-{haproxy}(38501)
[root@haproxy ~]# vim /etc/haproxy/haproxy.cfg

    nbproc      2

# 2、验证
[root@haproxy ~]# systemctl restart haproxy.service
[root@haproxy ~]# pstree -p | grep haproxy
           |-haproxy(39356)-+-haproxy(39358)
           |                `-haproxy(39359)
cpp
# 多进程CPU绑定
[root@haproxy ~]# vim /etc/haproxy/haproxy.cfg
    nbproc      2
    cpu-map    1 0
    cpu-map    2 1
[root@haproxy ~]# systemctl restart haproxy.service
cpp
# 1、为不同进程准备不同套接字
[root@haproxy ~]# vim /etc/haproxy/haproxy.cfg
   # stats socket /var/lib/haproxy/stats
    stats socket /var/lib/haproxy/haproxy1 mode 600 level admin process 1
    stats socket /var/lib/haproxy/haproxy2 mode 660 level admin process 1
[root@haproxy ~]# systemctl restart haproxy.service

# 2、效果
[root@haproxy ~]# ll /var/lib/haproxy/
总用量 0
srw------- 1 root root 0  1月 23 16:07 haproxy1
srw-rw---- 1 root root 0  1月 23 16:07 haproxy2
(4)haproxy实现多线程
注意:多线程不能和单线程同时启动
cpp
# 1、查看当前haproxy的进程信息
[root@haproxy ~]# pstree -p | grep haproxy
           |-haproxy(41638)-+-haproxy(41640)
           |                `-haproxy(41641)

# 2、查看haproxy子进程的线程信息
[root@haproxy ~]# cat /proc/41640/status | grep Threads
Threads:        1

# 3、启动多线程
[root@haproxy ~]# vim /etc/haproxy/haproxy.cfg
	#nbproc     2
    #cpu-map    1 0
    #cpu-map    2 1
    nbthread    2
    # turn on stats unix socket
    stats socket /var/lib/haproxy/stats
    #stats socket /var/lib/haproxy/haproxy1  mode 600 level admin process 1
    #stats socket /var/lib/haproxy/haporxy2  mode 660 level admin process 1
[root@haproxy ~]# systemctl restart haproxy.service
[root@haproxy ~]# pstree -p | grep haproxy
           |-haproxy(42968)---haproxy(42970)---{haproxy}(42971)

# 4、查看效果展示
[root@haproxy ~]# cat /proc/42970/status | grep Threads
Threads:        2
四、proxies代理配置参数
1、透传消息
cpp
# 1、透传取消情况下
[root@haproxy ~]# vim /etc/haproxy/haproxy.cfg
    #option forwardfor       except 127.0.0.0/8
[root@haproxy ~]# systemctl restart haproxy.service

# 2、验证:
[2026-01-24 10:09.43]  ~
[莫子.mozi] ⮞ curl 192.168.0.100
webserver1 - 192.168.0.10
[root@webserver1 ~]# cat /etc/httpd/logs/access_log
192.168.0.100 - - [24/Jan/2026:10:09:55 +0800] "GET / HTTP/1.1" 200 26 "-" "curl/8.12.1" "-"

# 3、开启透传
[root@haproxy ~]# vim /etc/haproxy/haproxy.cfg
    option forwardfor       except 127.0.0.0/8
[root@haproxy ~]# systemctl restart haproxy.service

# 4、设定webserver1采集日志的模式
[root@webserver1 ~]# vim /etc/httpd/conf/httpd.conf
 LogFormat "%h %l %u %t \"%r\" %>s %b \"%{Referer}i\" \"%{User-Agent}i\" \"%{X-Forwarded-For}i\"" combined
[root@webserver1 ~]# systemctl restart httpd

# 5、验证
[2026-01-24 10:15.22]  ~
[莫子.mozi] ⮞ curl 192.168.0.100
webserver1 - 192.168.0.10
[root@webserver1 ~]# cat /etc/httpd/logs/access_log
192.168.0.100 - - [24/Jan/2026:10:15:23 +0800] "GET / HTTP/1.1" 200 26 "-" "curl/8.12.1" "192.168.0.1"
五、socat热更新工具
热更新:
在服务或软件不停止的情况下更新软件或服务的工作方式,完成对软件不停工更新,典型的热更新设备,usb,在使用usb进行插拔时,电脑系统是不需要停止工作的,这种设备叫热插拔设备。
1、安装socat
cpp
[root@haproxy ~]# dnf install socat-1.7.4.1-6.el9.x86_64  -y

# 1、查看帮助
[root@haproxy ~]# socat -h
2、利用socat查看haproxy信息
cpp
# 1、查看集群状态
[root@haproxy ~]# echo "show servers state" |socat stdio /var/lib/haproxy/stats
1
# be_id be_name srv_id srv_name srv_addr srv_op_state srv_admin_state srv_uweight srv_iweight srv_time_since_last_change srv_check_status srv_check_result srv_check_health srv_check_state srv_agent_state bk_f_forced_id srv_f_forced_id srv_fqdn srv_port srvrecord srv_use_ssl srv_check_port srv_check_addr srv_agent_addr srv_agent_port
2 webcluster 1 haha 192.168.0.10 2 0 1 1 876 6 3 7 6 0 0 0 - 80 - 0 0 - - 0
2 webcluster 2 hehe 192.168.0.20 2 0 1 1 874 6 3 7 6 0 0 0 - 80 - 0 0 - - 0

# 2、查看集群权重
[root@haproxy ~]# echo "get weight webcluster/haha" | socat stdio /var/lib/haproxy/stats
1 (initial 1)

[root@haproxy ~]# echo "get weight webcluster/hehe" | socat stdio /var/lib/haproxy/stats
1 (initial 1)
3、利用socat更改haproxy信息
cpp
# 直接更改报错
[root@haproxy ~]# echo "set weight webcluster/haha 2" | socat stdio /var/lib/haproxy/stats
Permission denied

# 对socket进行授权,修改配置文件
[root@haproxy ~]# vim /etc/haproxy/haproxy.cfg
stats socket /var/lib/haproxy/stats mode 600 level admin
[root@haproxy ~]# rm -rf /var/lib/haproxy/
[root@haproxy ~]# systemctl restart haproxy.service
[root@haproxy ~]# ll /var/lib/haproxy/stats
srw------- 1 root root 0  1月 25 10:04 /var/lib/haproxy/stats

# 1、执行权重修改(haha)
[root@haproxy ~]# vim /etc/haproxy/haproxy.cfg
    server haha 192.168.0.10:80 check inter 3s fall 3 rise 5 weight 2
    server hehe 192.168.0.20:80 check inter 3s fall 3 rise 5 weight 1
[root@haproxy ~]# systemctl restart haproxy.service
[root@haproxy ~]# echo "get weight webcluster/haha" | socat stdio /var/lib/haproxy/stats
2 (initial 2)

[root@haproxy ~]# echo "set weight webcluster/haha 1" | socat stdio /var/lib/haproxy/stats

[root@haproxy ~]# echo "get weight webcluster/haha" | socat stdio /var/lib/haproxy/stats
1 (initial 2)

# 2、执行权重修改(hehe)
[root@haproxy ~]# echo "get weight webcluster/hehe" | socat stdio /var/lib/haproxy/stats
1 (initial 1)

[root@haproxy ~]# echo "set weight webcluster/hehe 4" | socat stdio /var/lib/haproxy/stats

[root@haproxy ~]# echo "get weight webcluster/hehe" | socat stdio /var/lib/haproxy/stats
4 (initial 1)

# 测试:
[2026-01-25 09:46.55]  ~
[莫子.mozi] ⮞ for i in {1..10};do curl 172.25.254.100;done
webserver2 - 192.168.0.20
webserver2 - 192.168.0.20
webserver2 - 192.168.0.20
webserver2 - 192.168.0.20
webserver1 - 192.168.0.10
webserver2 - 192.168.0.20
webserver2 - 192.168.0.20
webserver2 - 192.168.0.20
webserver2 - 192.168.0.20
webserver1 - 192.168.0.10
六、Haproxy算法
haproxy通过固定参数balance指明对后端服务器的调度算法
balance参数可以配置在listen里
-
静态算法
-
static-rr:基于权重的轮询调度
-
first:自上而下进行调度
-
-
动态算法
-
rounfrobin:基于权重的轮询动态调度算法
-
leastconn:支持权重的运行时调整和慢启动
-
1、static-rr(静)
cpp
[root@haproxy ~]# vim /etc/haproxy/haproxy.cfg
listen webcluster
    bind    *:80
    balance static-rr
    mode    http
    server haha 192.168.0.10:80 check inter 3s fall 3 rise 5 weight 2
    server hehe 192.168.0.20:80 check inter 3s fall 3 rise 5 weight 1
[root@haproxy ~]# systemctl restart haproxy.service

# 测试
[2026-01-25 10:09.38]  ~
[莫子.mozi] ⮞ for i in {1..10};do curl 172.25.254.100;done
webserver1 - 192.168.0.10
webserver1 - 192.168.0.10
webserver2 - 192.168.0.20
webserver1 - 192.168.0.10
webserver1 - 192.168.0.10
webserver2 - 192.168.0.20
webserver1 - 192.168.0.10
webserver1 - 192.168.0.10
webserver2 - 192.168.0.20
webserver1 - 192.168.0.10

# 检测热更新,发现现在是不支持更改的
[root@haproxy ~]# echo "get weight webcluster/haha" | socat stdio /var/lib/haproxy/stats
2 (initial 2)

[root@haproxy ~]# echo "get weight webcluster/hehe" | socat stdio /var/lib/haproxy/stats
1 (initial 1)

[root@haproxy ~]# echo "set weight webcluster/haha 1" | socat stdio /var/lib/haproxy/stats
Backend is using a static LB algorithm and only accepts weights '0%' and '100%'.
2、first(静)
cpp
[root@haproxy ~]# vim /etc/haproxy/haproxy.cfg
listen webcluster
    bind    *:80
    balance first
    server hehe 192.168.0.20:80 maxconn 1 check inter 3s fall 3 rise 5 weight 1
    server haha 192.168.0.10:80 check inter 3s fall 3 rise 5 weight 2

[root@haproxy ~]# systemctl restart haproxy.service

# 测试,在一个shell中执行持续访问并观察
[2026-01-25 10:52.39]  ~
[莫子.mozi] ⮞ while true;do curl 172.25.254.100;done
webserver2 - 192.168.0.20
webserver2 - 192.168.0.20
webserver2 - 192.168.0.20
webserver2 - 192.168.0.20
webserver2 - 192.168.0.20
webserver2 - 192.168.0.20
webserver2 - 192.168.0.20
webserver2 - 192.168.0.20
webserver2 - 192.168.0.20
webserver2 - 192.168.0.20

.......

# 在其他shell中建立其他访问并观察(需要并发执行,前面那个shell不要关闭,才会出现10信息)
[2026-01-25 11:19.34]  ~
[莫子.mozi] ⮞ while true;do curl 172.25.254.100;d
webserver2 - 192.168.0.20
webserver2 - 192.168.0.20
webserver2 - 192.168.0.20
webserver2 - 192.168.0.20
webserver2 - 192.168.0.20
webserver2 - 192.168.0.20
webserver2 - 192.168.0.20
webserver2 - 192.168.0.20
webserver2 - 192.168.0.20
webserver2 - 192.168.0.20
webserver2 - 192.168.0.20
webserver2 - 192.168.0.20
webserver1 - 192.168.0.10   # 在此处出现10信息
webserver2 - 192.168.0.20
3、roundrobin(动)
cpp
[root@haproxy ~]# vim /etc/haproxy/haproxy.cfg
listen webcluster
    bind    *:80
    balance roundrobin
    server haha 192.168.0.10:80 check inter 3s fall 3 rise 5 weight 2
    server hehe 192.168.0.20:80 check inter 3s fall 3 rise 5 weight 1
[root@haproxy ~]# systemctl restart haproxy.service

# 测试:
[2026-01-25 11:21.41]  ~
[莫子.mozi] ⮞ for i in {1..10};do curl 172.25.254.100;done                                    webserver1 - 192.168.0.10
webserver1 - 192.168.0.10
webserver2 - 192.168.0.20
webserver1 - 192.168.0.10
webserver1 - 192.168.0.10
webserver2 - 192.168.0.20
webserver1 - 192.168.0.10
webserver1 - 192.168.0.10
webserver2 - 192.168.0.20
webserver1 - 192.168.0.10

# 动态权重更新(调整)
[root@haproxy ~]# echo "set weight webcluster/haha 1" | socat stdio /var/lib/haproxy/stats
[root@haproxy ~]# echo "get weight webcluster/haha" | socat stdio /var/lib/haproxy/stats
1 (initial 2)

# 测试:
[2026-01-25 11:27.38]  ~
[莫子.mozi] ⮞ for i in {1..10};do curl 172.25.254.100;done
webserver2 - 192.168.0.20
webserver1 - 192.168.0.10
webserver2 - 192.168.0.20
webserver1 - 192.168.0.10
webserver2 - 192.168.0.20
webserver1 - 192.168.0.10
webserver2 - 192.168.0.20
webserver1 - 192.168.0.10
webserver2 - 192.168.0.20
webserver1 - 192.168.0.10
4、leastconn(动)
cpp
[root@haproxy ~]# vim /etc/haproxy/haproxy.cfg
listen webcluster
    bind    *:80
    balance leastconn
    server haha 192.168.0.10:80 check inter 3s fall 3 rise 5 weight 2
    server hehe 192.168.0.20:80 check inter 3s fall 3 rise 5 weight 1
[root@haproxy ~]# systemctl restart haproxy.service

# 测试:
[2026-01-25 11:28.16]  ~
[莫子.mozi] ⮞ for i in {1..10};do curl 172.25.254.100;done
webserver1 - 192.168.0.10
webserver2 - 192.168.0.20
webserver1 - 192.168.0.10
webserver2 - 192.168.0.20
webserver1 - 192.168.0.10
webserver2 - 192.168.0.20
webserver1 - 192.168.0.10
webserver2 - 192.168.0.20
webserver1 - 192.168.0.10
webserver2 - 192.168.0.20
5、混合算法
既可以作为静态算法,也可以作为动态算法
(1)source
- map-base取模法
cpp
# 默认静态算法
[root@haproxy ~]# vim /etc/haproxy/haproxy.cfg
listen webcluster
    bind    *:80
    balance source
    server haha 192.168.0.10:80 check inter 3s fall 3 rise 5 weight 2
    server hehe 192.168.0.20:80 check inter 3s fall 3 rise 5 weight 1
[root@haproxy ~]# systemctl restart haproxy.service

# 测试:
[2026-01-25 11:40.29]  ~
[莫子.mozi] ⮞ for i in {1..10};do curl 172.25.254.100;done
webserver2 - 192.168.0.20
webserver2 - 192.168.0.20
webserver2 - 192.168.0.20
webserver2 - 192.168.0.20
webserver2 - 192.168.0.20
webserver2 - 192.168.0.20
webserver2 - 192.168.0.20
webserver2 - 192.168.0.20
webserver2 - 192.168.0.20
webserver2 - 192.168.0.20

# source动态算法(hash一致性)
[root@haproxy ~]# vim /etc/haproxy/haproxy.cfg
listen webcluster
    bind    *:80
    balance source
    hash-type   consistent
    server haha 192.168.0.10:80 check inter 3s fall 3 rise 5 weight 2
    server hehe 192.168.0.20:80 check inter 3s fall 3 rise 5 weight 1
[root@haproxy ~]# systemctl restart haproxy.service

# 测试:
[莫子.mozi] ➤ for i in {1..10}; do curl 172.25.254.100; done
webserver2 - 192.168.0.20
webserver2 - 192.168.0.20
webserver2 - 192.168.0.20
webserver2 - 192.168.0.20
webserver2 - 192.168.0.20
webserver2 - 192.168.0.20
webserver2 - 192.168.0.20
webserver2 - 192.168.0.20
webserver2 - 192.168.0.20
webserver2 - 192.168.0.20
(2)uri
基于对用户请求的URI的左半部分或整个uri做bash,在对hash结果对总权重进行取模
cpp
# 准备实验环境
[root@webserver1 ~]# echo RS1 - 192.168.0.10 > /var/www/html/index1.html
[root@webserver1 ~]# echo RS1 - 192.168.0.10 > /var/www/html/index2.html
[root@webserver2 ~]# echo RS2 - 192.168.0.20 > /var/www/html/index1.html
[root@webserver2 ~]# echo RS2 - 192.168.0.20 > /var/www/html/index2.html

# 设定uri算法
[root@haproxy ~]# vim /etc/haproxy/haproxy.cfg
listen webcluster
    bind    *:80
    balance uri
    hash-type   consistent
    server haha 192.168.0.10:80 check inter 3s fall 3 rise 5 weight 2
    server hehe 192.168.0.20:80 check inter 3s fall 3 rise 5 weight 1
[root@haproxy ~]# systemctl restart haproxy.service

# 测试:

[2026-01-25 14:52.02]  ~
[莫子.mozi] ⮞ for i in {1..10};do curl 172.25.254.100/index.html;done
webserver1 - 192.168.0.10
webserver1 - 192.168.0.10
webserver1 - 192.168.0.10
webserver1 - 192.168.0.10
webserver1 - 192.168.0.10
webserver1 - 192.168.0.10
webserver1 - 192.168.0.10
webserver1 - 192.168.0.10
webserver1 - 192.168.0.10
webserver1 - 192.168.0.10

[2026-01-25 14:52.19]  ~
[莫子.mozi] ⮞ for i in {1..10};do curl 172.25.254.100/index2.html;done
RS2 - 192.168.0.20
RS2 - 192.168.0.20
RS2 - 192.168.0.20
RS2 - 192.168.0.20
RS2 - 192.168.0.20
RS2 - 192.168.0.20
RS2 - 192.168.0.20
RS2 - 192.168.0.20
RS2 - 192.168.0.20
RS2 - 192.168.0.20
(3)url_param
cpp
# 准备实验环境
[root@webserver1 ~]# echo RS1 - 192.168.0.10 > /var/www/html/index1.html
[root@webserver1 ~]# echo RS1 - 192.168.0.10 > /var/www/html/index2.html
[root@webserver2 ~]# echo RS2 - 192.168.0.20 > /var/www/html/index1.html
[root@webserver2 ~]# echo RS2 - 192.168.0.20 > /var/www/html/index2.html

# 设定uri算法
[root@haproxy ~]# vim /etc/haproxy/haproxy.cfg
listen webcluster
    bind    *:80
    balance url_param name
    hash-type   consistent
    server haha 192.1
    68.0.10:80 check inter 3s fall 3 rise 5 weight 2
    server hehe 192.168.0.20:80 check inter 3s fall 3 rise 5 weight 1
[root@haproxy ~]# systemctl restart haproxy.service

# 测试:
[2026-01-25 14:56.03]  ~
[莫子.mozi] ⮞ for i in {1..10};do curl 172.25.254.100/index.html?name=timinglee;done
webserver2 - 192.168.0.20
webserver2 - 192.168.0.20
webserver2 - 192.168.0.20
webserver2 - 192.168.0.20
webserver2 - 192.168.0.20
webserver2 - 192.168.0.20
webserver2 - 192.168.0.20
webserver2 - 192.168.0.20
webserver2 - 192.168.0.20
webserver2 - 192.168.0.20

[2026-01-25 14:56.21]  ~
[莫子.mozi] ⮞ for i in {1..10};do curl 172.25.254.100/index.html?name=redhat;done
webserver1 - 192.168.0.10
webserver1 - 192.168.0.10
webserver1 - 192.168.0.10
webserver1 - 192.168.0.10
webserver1 - 192.168.0.10
webserver1 - 192.168.0.10
webserver1 - 192.168.0.10
webserver1 - 192.168.0.10
webserver1 - 192.168.0.10
webserver1 - 192.168.0.10
(4)hdr
cpp
[root@haproxy ~]# vim /etc/haproxy/haproxy.cfg
listen webcluster
bind *:80
balance hdr(user-agent)
hash-type consistent
server haha 192.1
68.0.10:80 check inter 3s fall 3 rise 5 weight 2
server hehe 192.168.0.20:80 check inter 3s fall 3 rise 5 weight 1
[root@haproxy ~]# systemctl restart haproxy.service
# 测试:
[2026-01-25 15:00.57] ~
[莫子.mozi] ⮞ curl -A "lee" 172.25.254.100
webserver2 - 192.168.0.20
[2026-01-25 15:01.07] ~
[莫子.mozi] ⮞ curl -A "lee1" 172.25.254.100
webserver1 - 192.168.0.10
[2026-01-25 15:01.10] ~
[莫子.mozi] ⮞ curl -A "lee2" 172.25.254.100
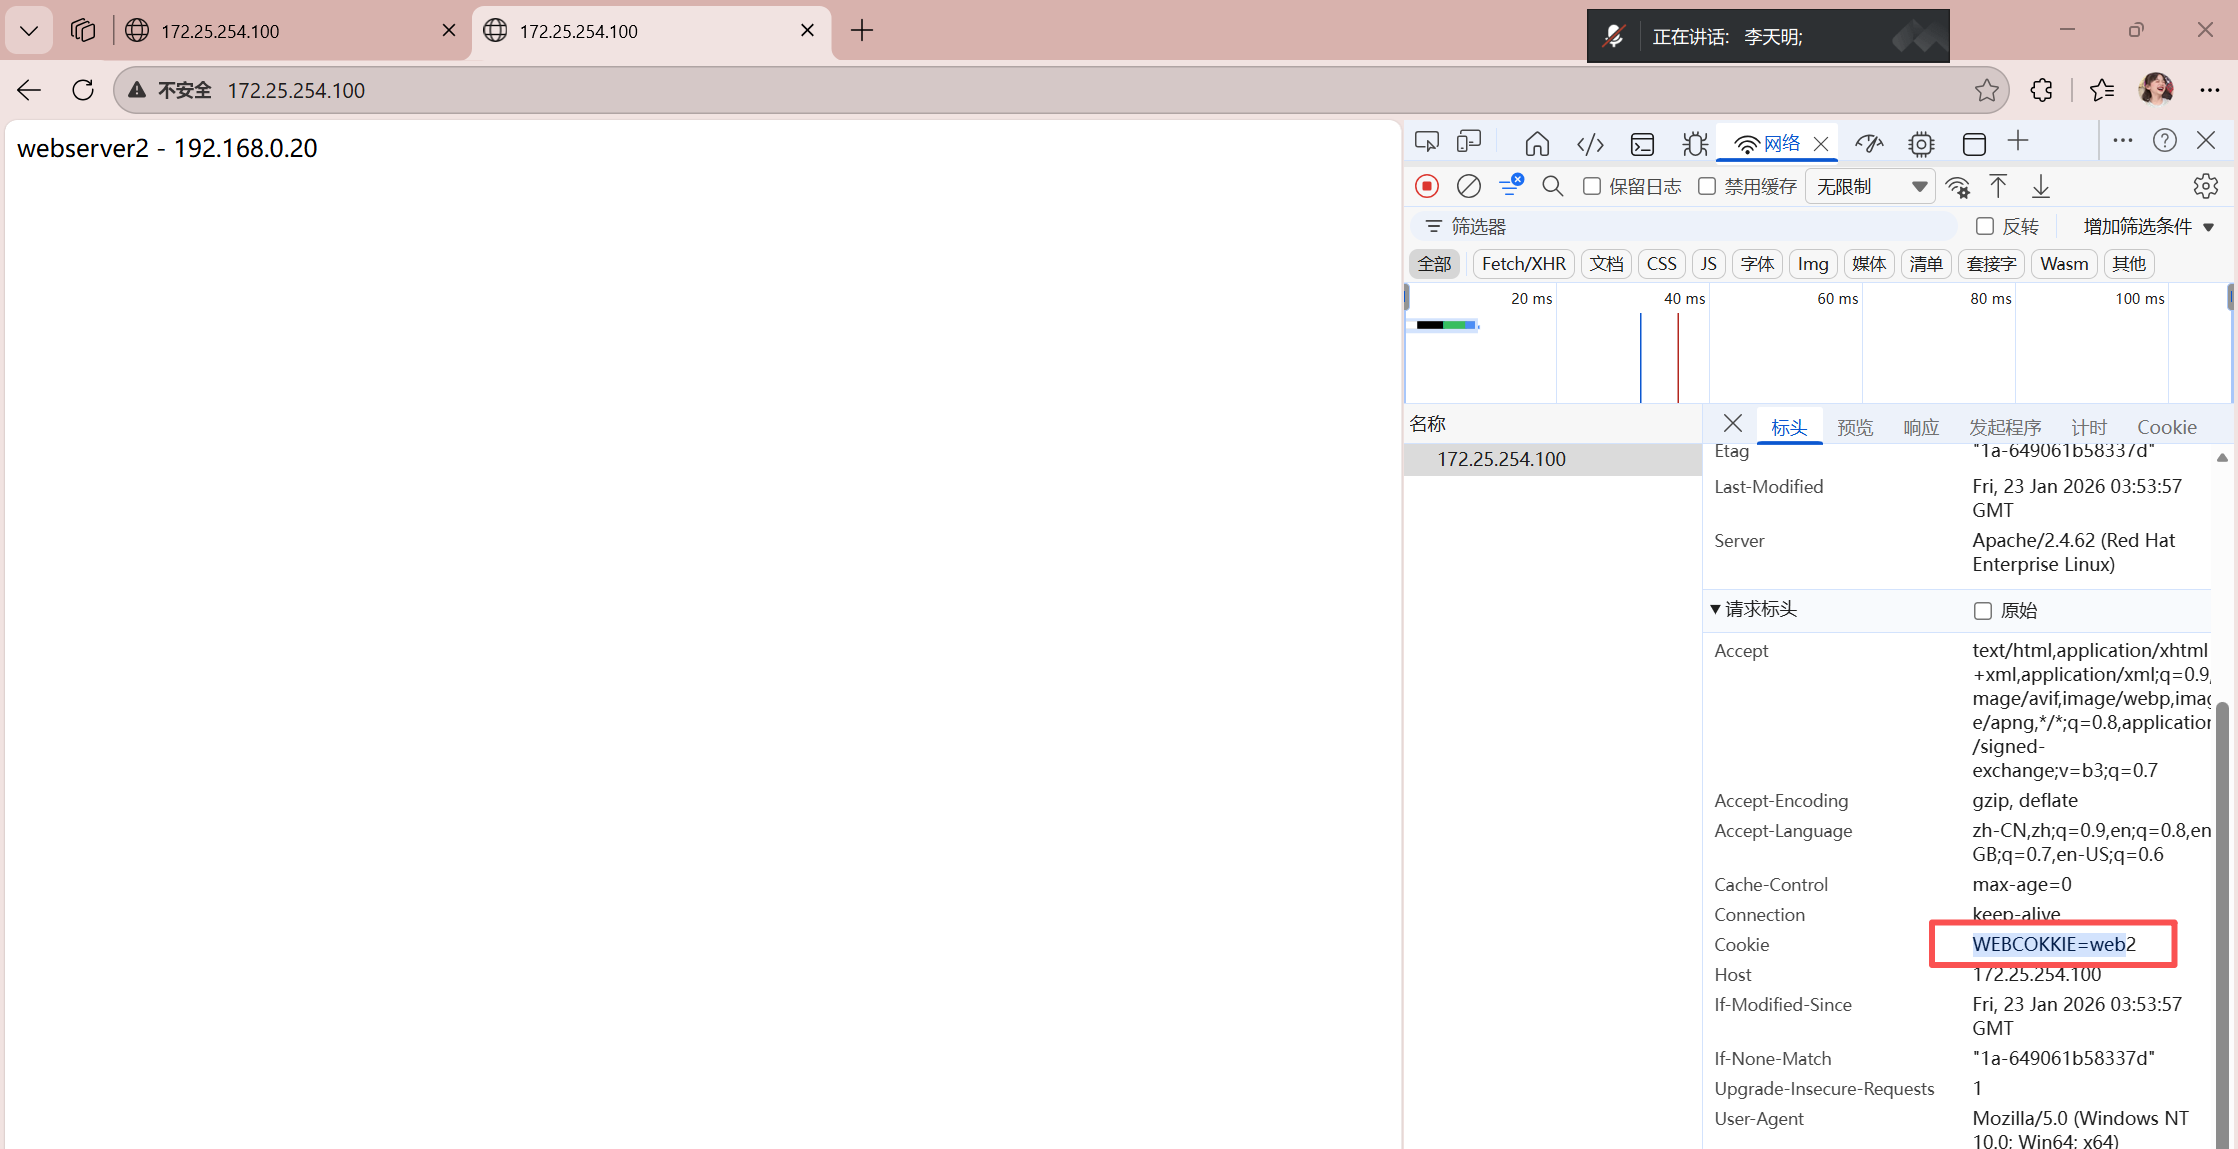
webserver2 - 192.168.0.20七、基于cookie的会话保持
如果在haproxy中设定算法为source,在同一台客户端主机中,无论使用什么浏览器访问的最终服务器是同一个
可以使用cookie值进行优化,让同一台客户端中同一个浏览器中访问的是同一个服务器
不同浏览器访问的是不同的服务
cpp
# 配置基于cookie的会话保持方法
[root@haproxy ~]# vim /etc/haproxy/haproxy.cfg
listen webcluster
    bind    *:80
    balance roundrobin
    hash-type   consistent
    cookie  WEBCOKKIE insert nocache indirect
    server haha 192.168.0.10:80 cookie web1 check inter 3s fall 3 rise 5 weight 2
    server hehe 192.168.0.20:80 cookie web2 check inter 3s fall 3 rise 5 weight 1
[root@haproxy ~]# systemctl restart haproxy.service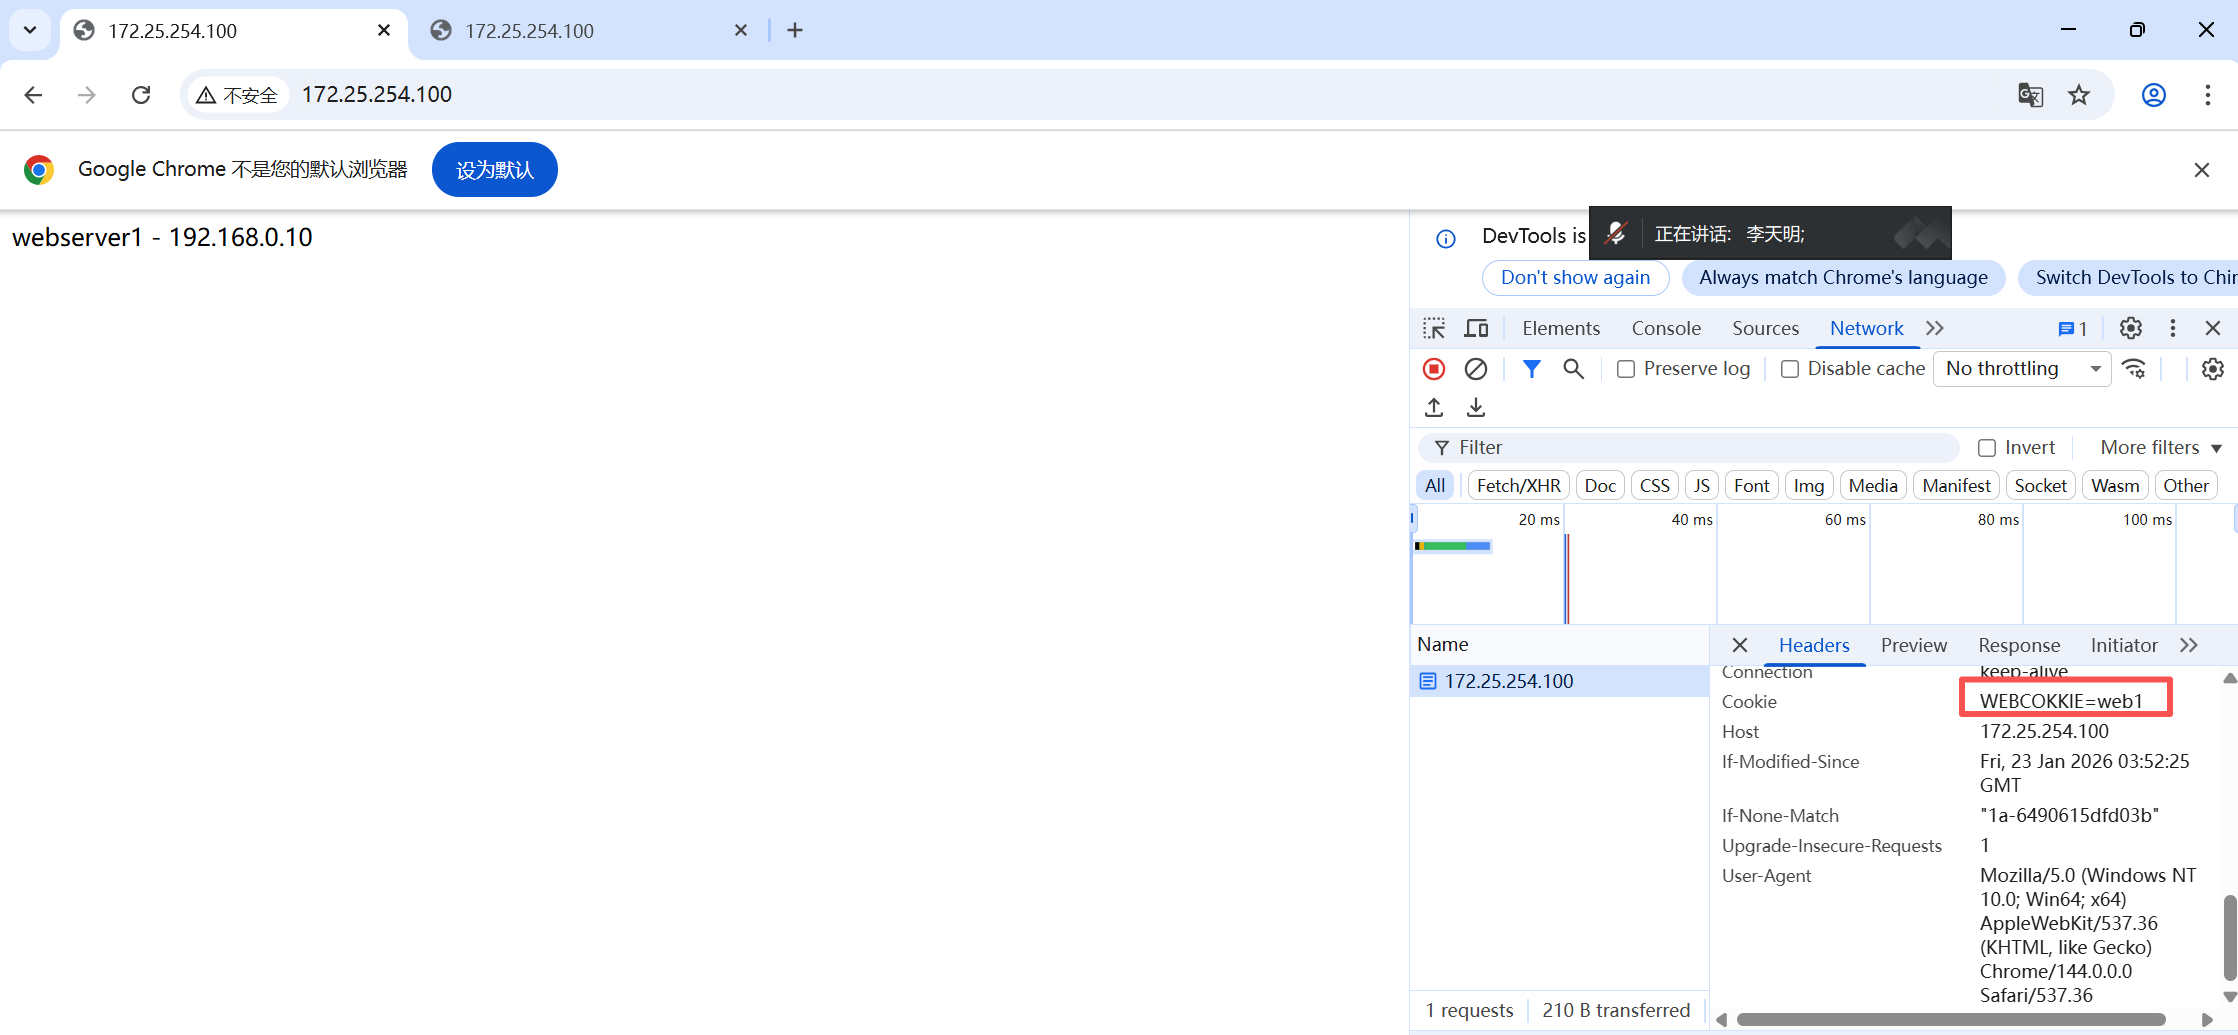
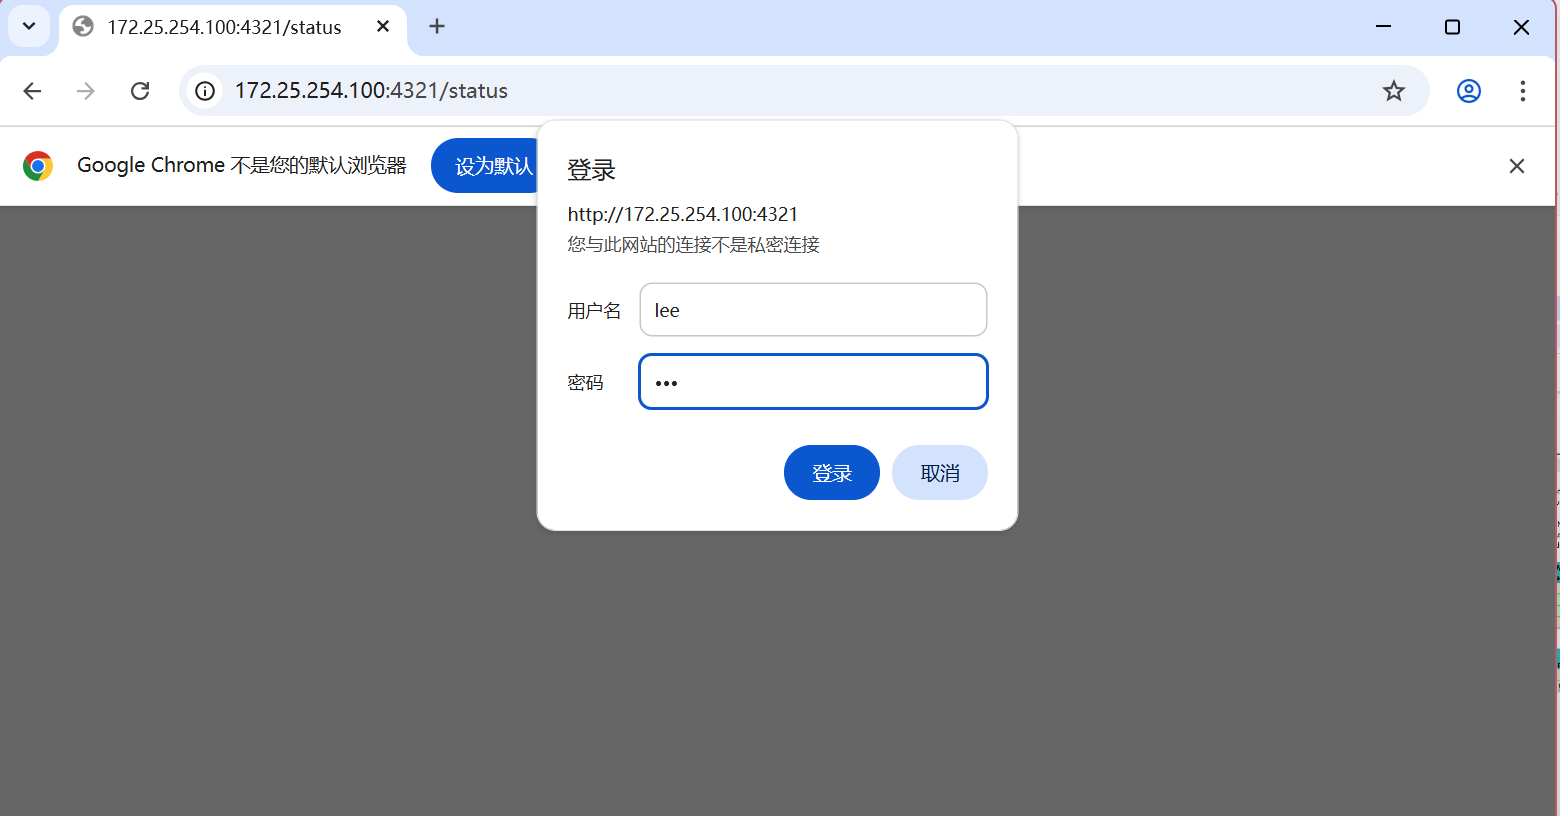
八、Haproxy状态页
cpp
[root@haproxy ~]# vim /etc/haproxy/haproxy.cfg
listen stats
    mode        http
    bind        0.0.0.0:4321
    stats       enable
    log         global
    #stats      refresh 1   (开启1秒自动刷新)
    stats   uri /status
    stats   auth lee:lee

[root@haproxy ~]# systemctl restart haproxy.service
登陆测试:
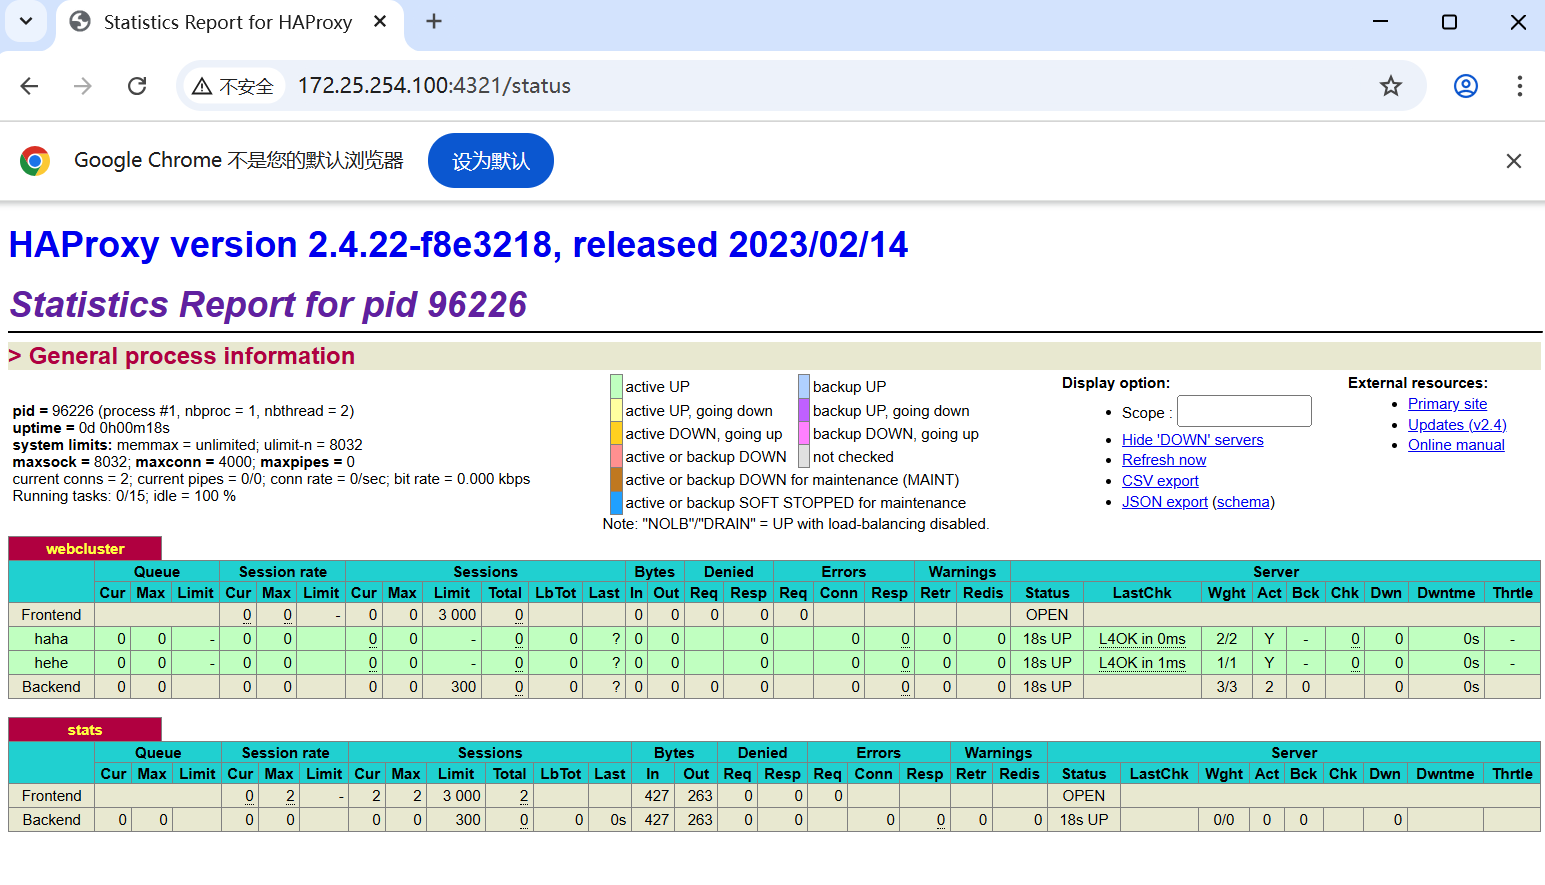
也可以进行模拟设备下线
cpp
# 在haha(webserver1)设置下线
[root@webserver1 ~]# systemctl stop httpd
九、IP透传
web服务器中需要记录客户端的真实IP地址
1、七层IP透传
cpp
# 1、实验环境
[root@haproxy ~]# vim /etc/haproxy/haproxy.cfg
listen webcluster
    bind    *:80
    balance roundrobin
    server haha 192.168.0.10:80 check inter 3s fall 3 rise 5 weight 1
    server hehe 192.168.0.20:80 check inter 3s fall 3 rise 5 weight 1
[root@haproxy ~]# systemctl restart haproxy.service

# 2、测试环境
[2026-01-26 09:35.34]  ~
[莫子.mozi] ⮞ for i in {1..5}
> do curl 172.25.254.100;done
webserver1 - 192.168.0.10
webserver2 - 192.168.0.20
webserver1 - 192.168.0.10
webserver2 - 192.168.0.20
webserver1 - 192.168.0.10

# 3、在rs主机中默认是未开启透传功能的
[root@webserver1 ~]# cat /etc/httpd/logs/access_log
192.168.0.100 - - [26/Jan/2026:10:07:14 +0800] "GET / HTTP/1.1" 200 26 "-" "curl/8.12.1" "-"
192.168.0.100 - - [26/Jan/2026:10:07:14 +0800] "GET / HTTP/1.1" 200 26 "-" "curl/8.12.1" "-"
192.168.0.100 - - [26/Jan/2026:10:07:14 +0800] "GET / HTTP/1.1" 200 26 "-" "curl/8.12.1" "-"

# 4、开启IP透传
[root@haproxy ~]# vim /etc/haproxy/haproxy.cfg
defaults
    mode                    http
    log                     global
    option                  httplog
    option                  dontlognull
    option http-server-close
    option forwardfor       except 127.0.0.0/8  # 加上forwardfor
[root@haproxy ~]# systemctl restart haproxy.service

# 5、在rs中设定采集透传IP
[root@webserver2 ~]# vim /etc/httpd/conf/httpd.conf
LogFormat "%h %l %u %t \"%r\" %>s %b \"%{Referer}i\" \"%{User-Agent}i\" \"%{X-Forwarded-For}i\"" combined
[root@webserver2 ~]# systemctl restart httpd

# 6、测试效果
[2026-01-26 10:07.14]  ~
[莫子.mozi] ⮞ for i in {1..5}; do curl 172.25.254.100;done
webserver1 - 192.168.0.10
webserver2 - 192.168.0.20
webserver1 - 192.168.0.10
webserver2 - 192.168.0.20
webserver1 - 192.168.0.10
[root@webserver2 ~]# cat /etc/httpd/logs/access_log
192.168.0.100 - - [26/Jan/2026:10:11:04 +0800] "GET / HTTP/1.1" 200 26 "-" "curl/8.12.1" "172.25.254.1"
192.168.0.100 - - [26/Jan/2026:10:11:04 +0800] "GET / HTTP/1.1" 200 26 "-" "curl/8.12.1" "172.25.254.1"
2、四层IP透传
cpp
# 1、环境设置
# 在RS中把apache停止
[root@webserver1 ~]# systemctl disable --now httpd
Removed "/etc/systemd/system/multi-user.target.wants/httpd.service".
[root@webserver2 ~]# systemctl disable --now httpd
Removed "/etc/systemd/system/multi-user.target.wants/httpd.service".

# 2、部署nginx
[root@webserver1 ~]# dnf install nginx -y
[root@webserver2 ~]# dnf install nginx -y
[root@webserver1 ~]# echo RS1 - 192.168.0.10 > /usr/share/nginx/html/index.html
[root@webserver2 ~]# echo RS2 - 192.168.0.20 > /usr/share/nginx/html/index.html
[root@webserver1 ~]# systemctl enable --now nginx
Created symlink /etc/systemd/system/multi-user.target.wants/nginx.service → /usr/lib/systemd/system/nginx.service.
[root@webserver2 ~]# systemctl enable --now nginx
Created symlink /etc/systemd/system/multi-user.target.wants/nginx.service → /usr/lib/systemd/system/nginx.service.

# 3、测试环境:
[2026-01-26 10:11.04]  ~
[莫子.mozi] ⮞ for i in {1..5}; do curl 172.25.254.100;done
RS1 - 192.168.0.10
RS2 - 192.168.0.20
RS1 - 192.168.0.10
RS2 - 192.168.0.20
RS1 - 192.168.0.10

# 4、启用nginx四层访问控制
[root@webserver1 ~]# vim /etc/nginx/nginx.conf
server {
        listen       80 proxy_protocol;
        listen       [::]:80;
        server_name  _;
        root         /usr/share/nginx/html;

        # Load configuration files for the default server block.
        include /etc/nginx/default.d/.conf;

        error_page 404 /404.html;
        location = /404.html {
        }

        error_page 500 502 503 504 /50x.html;
        location = /50x.html {
        }
[root@webserver1 ~]# systemctl restart nginx.service
[root@webserver2 ~]# vim /etc/nginx/nginx.conf
server {
        listen       80 proxy_protocol;
        listen       [::]:80;
        server_name  _;
        root         /usr/share/nginx/html;

        # Load configuration files for the default server block.
        include /etc/nginx/default.d/.conf;

        error_page 404 /404.html;
        location = /404.html {
        }

        error_page 500 502 503 504 /50x.html;
        location = /50x.html {
        }
[root@webserver2 ~]# systemctl restart nginx.service

# 5、测试(当mode为http,并且取消send-proxy):
[2026-01-26 10:41.52]  ~
[莫子.mozi] ⮞ for i in {1..5}; do curl 172.25.254.100;done
<html><body><h1>502 Bad Gateway</h1>
The server returned an invalid or incomplete response.
</body></html>
<html><body><h1>502 Bad Gateway</h1>
The server returned an invalid or incomplete response.
</body></html>
<html><body><h1>502 Bad Gateway</h1>
The server returned an invalid or incomplete response.
</body></html>
<html><body><h1>502 Bad Gateway</h1>
The server returned an invalid or incomplete response.
</body></html>
<html><body><h1>502 Bad Gateway</h1>
The server returned an invalid or incomplete response.
</body></html>

# 6、设定haproxy访问四层
[root@haproxy ~]# vim /etc/haproxy/haproxy.cfg
listen webcluster
    bind    *:80
    mode    tcp			#四层访问
    balance roundrobin
    server haha 192.168.0.10:80 send-proxy check inter 3s fall 3 rise 5 weight 1
    server hehe 192.168.0.20:80 send-proxy check inter 3s fall 3 rise 5 weight 1
[root@haproxy ~]# systemctl restart haproxy.service

# 四层访问
[2026-01-26 10:42.33]  ~
[莫子.mozi] ⮞ for i in {1..5}; do curl 172.25.254.100;done
RS1 - 192.168.0.10
RS2 - 192.168.0.20
RS1 - 192.168.0.10
RS2 - 192.168.0.20
RS1 - 192.168.0.10

# 7、设置四层IP透传
[root@webserver1 ~]# vim /etc/nginx/nginx.conf
http {
    log_format  main  '$remote_addr - $remote_user [$time_local] "$request" '
                        ' "$proxy_protocol_addr"'	# 采集透传消息
                      '$status $body_bytes_sent "$http_referer" '
                      '"$http_user_agent" "$http_x_forwarded_for"';
[root@webserver1 ~]# systemctl restart nginx.service
[root@webserver2 ~]# vim /etc/nginx/nginx.conf
http {
    log_format  main  '$remote_addr - $remote_user [$time_local] "$request" '
                        ' "$proxy_protocol_addr"'	# 采集透传消息
                      '$status $body_bytes_sent "$http_referer" '
                      '"$http_user_agent" "$http_x_forwarded_for"';
[root@webserver2 ~]# systemctl restart nginx.service

# 8、测试:
[2026-01-26 10:42.59]  ~
[莫子.mozi] ⮞ for i in {1..5}; do curl 172.25.254.100;done
RS2 - 192.168.0.20
RS1 - 192.168.0.10
RS2 - 192.168.0.20
RS1 - 192.168.0.10
RS2 - 192.168.0.20
[root@webserver1 ~]# cat /var/log/nginx/access.log
192.168.0.100 - - [26/Jan/2026:10:55:08 +0800] "GET / HTTP/1.1"  "172.25.254.1"200 19 "-" "curl/8.12.1" "-"
192.168.0.100 - - [26/Jan/2026:10:55:08 +0800] "GET / HTTP/1.1"  "172.25.254.1"200 19 "-" "curl/8.12.1" "-"

[root@webserver2 ~]# cat /etc/httpd/logs/access_log
192.168.0.100 - - [26/Jan/2026:10:11:04 +0800] "GET / HTTP/1.1" 200 26 "-" "curl/8.12.1" "172.25.254.1"
192.168.0.100 - - [26/Jan/2026:10:11:04 +0800] "GET / HTTP/1.1" 200 26 "-" "curl/8.12.1" "172.25.254.1"
十、Haproxy的四层负载
1、环境设定
cpp
# 1、部署mariadb数据库
[root@webserver1 ~]# dnf install mariadb-server mariadb -y
[root@webserver1 ~]# vim /etc/my.cnf.d/mariadb-server.cnf
[mysqld]
server_id=10	# 设定数据库所在主机的id标识为10
datadir=/var/lib/mysql
socket=/var/lib/mysql/mysql.sock
log-error=/var/log/mariadb/mariadb.log
pid-file=/run/mariadb/mariadb.pid
[root@webserver1 ~]# systemctl start mariadb.service

[root@webserver2 ~]# dnf install mariadb-server mariadb -y
[root@webserver2 ~]# vim /etc/my.cnf.d/mariadb-server.cnf
[mysqld]
server_id=20	# 设定数据库所在主机的id标识为20
datadir=/var/lib/mysql
socket=/var/lib/mysql/mysql.sock
log-error=/var/log/mariadb/mariadb.log
pid-file=/run/mariadb/mariadb.pid
[root@webserver2 ~]# systemctl start mariadb.service

# 2、建立登录远程用户并授权,一开始直接远程登陆是无法实现(会报错)
[root@webserver1 ~]# mysql -h 192.168.0.10
ERROR 1130 (HY000): Host 'webserver11' is not allowed to connect to this MariaDB server
[root@webserver1 ~]# mysql
Welcome to the MariaDB monitor.  Commands end with ; or \g.
Your MariaDB connection id is 5
Server version: 10.5.27-MariaDB MariaDB Server

Copyright (c) 2000, 2018, Oracle, MariaDB Corporation Ab and others.

Type 'help;' or '\h' for help. Type '\c' to clear the current input statement.

MariaDB [(none)]> create user 'lee'@'%' identified by 'lee';
Query OK, 0 rows affected (0.001 sec)
MariaDB [(none)]> grant all on *.* to lee@'%';
Query OK, 0 rows affected (0.000 sec)

MariaDB [(none)]> show grants for lee@'%';
+-------------------------------------------------------------------------------------------------------------+
| Grants for lee@%                                                                                            |
+-------------------------------------------------------------------------------------------------------------+
| GRANT ALL PRIVILEGES ON *.* TO `lee`@`%` IDENTIFIED BY PASSWORD '*9BB439A3A652A9DAD3718215F77A7AA06108A267' |
+-------------------------------------------------------------------------------------------------------------+
1 row in set (0.000 sec)

# 测试:
[root@webserver1 ~]# mysql -ulee -plee -h 192.168.0.10
Welcome to the MariaDB monitor.  Commands end with ; or \g.
Your MariaDB connection id is 5
Server version: 10.5.27-MariaDB MariaDB Server

Copyright (c) 2000, 2018, Oracle, MariaDB Corporation Ab and others.

Type 'help;' or '\h' for help. Type '\c' to clear the current input statement.

MariaDB [(none)]>

[root@webserver2 ~]# mysql -ulee -plee -h 192.168.0.20
Welcome to the MariaDB monitor.  Commands end with ; or \g.
Your MariaDB connection id is 4
Server version: 10.5.27-MariaDB MariaDB Server

Copyright (c) 2000, 2018, Oracle, MariaDB Corporation Ab and others.

Type 'help;' or '\h' for help. Type '\c' to clear the current input statement.

MariaDB [(none)]>
2、四层负载操作
cpp
[root@haproxy ~]# vim /etc/haproxy/haproxy.cfg
listen mariadbcluster
    bind    *:6663
    mode    tcp
    balance roundrobin
    server haha 192.168.0.10:3306 check inter 3s fall 3 rise 5 weight 1
    server hehe 192.168.0.20:3306 check inter 3s fall 3 rise 5 weight 1
[root@haproxy ~]# systemctl restart haproxy.service

# 检测端口
[root@haproxy ~]# netstat -antlupe | grep haproxy
tcp        0      0 0.0.0.0:6663            0.0.0.0:*               LISTEN      0          77284      16004/haproxy
tcp        0      0 0.0.0.0:4321            0.0.0.0:*               LISTEN      0          77285      16004/haproxy
tcp        0      0 0.0.0.0:80              0.0.0.0:*               LISTEN      0          77283      16004/haproxy

# 测试
[root@localhost ~]#  mysql -ulee -plee -h192.168.0.100 -P 6663
Welcome to the MariaDB monitor.  Commands end with ; or \g.
Your MariaDB connection id is 3
Server version: 10.5.27-MariaDB MariaDB Server

Copyright (c) 2000, 2018, Oracle, MariaDB Corporation Ab and others.

Type 'help;' or '\h' for help. Type '\c' to clear the current input statement.

MariaDB [(none)]> select @@server_id
    -> ;
+-------------+
| @@server_id |
+-------------+
|          10 |
+-------------+
1 row in set (0.001 sec)

MariaDB [(none)]>
3、backup参数
cpp
[root@haproxy ~]# vim /etc/haproxy/haproxy.cfg
listen mariadbcluster
    bind        *:6663
    mode        tcp
    balance     roundrobin
    server haha 192.168.0.10:3306  check inter 3s fall 3 rise 5 weight 1
    server hehe 192.168.0.20:3306  check inter 3s fall 3 rise 5 weight 1 backup
[root@haproxy ~]# systemctl restart haproxy.service

# 测试:
[root@localhost ~]#  mysql -ulee -plee -h192.168.0.100 -P 6663
Welcome to the MariaDB monitor.  Commands end with ; or \g.
Your MariaDB connection id is 6
Server version: 10.5.27-MariaDB MariaDB Server

Copyright (c) 2000, 2018, Oracle, MariaDB Corporation Ab and others.

Type 'help;' or '\h' for help. Type '\c' to clear the current input statement.

MariaDB [(none)]> select @@server_id
    -> ;
+-------------+
| @@server_id |
+-------------+
|          10 |
+-------------+
1 row in set (0.001 sec)

# 1、关闭10的mariadb并等待1分钟,标识haproxy没有完成故障转换,需要等待
[root@webserver1 ~]# systemctl stop mariadb.service
[root@localhost ~]#  mysql -ulee -plee -h192.168.0.100 -P 6663
Welcome to the MariaDB monitor.  Commands end with ; or \g.
Your MariaDB connection id is 6
Server version: 10.5.27-MariaDB MariaDB Server

Copyright (c) 2000, 2018, Oracle, MariaDB Corporation Ab and others.

Type 'help;' or '\h' for help. Type '\c' to clear the current input statement.

MariaDB [(none)]> select @@server_id
    -> ;
+-------------+
| @@server_id |
+-------------+
|          20 |
+-------------+
1 row in set (0.006 sec)

# 2、还原故障主机等待片刻
[root@webserver1 ~]# systemctl enable --now  mariadb.service
[root@localhost ~]#  mysql -ulee -plee -h192.168.0.100 -P 6663
Welcome to the MariaDB monitor.  Commands end with ; or \g.
Your MariaDB connection id is 3
Server version: 10.5.27-MariaDB MariaDB Server

Copyright (c) 2000, 2018, Oracle, MariaDB Corporation Ab and others.

Type 'help;' or '\h' for help. Type '\c' to clear the current input statement.

MariaDB [(none)]> select @@server_id
    -> ;
+-------------+
| @@server_id |
+-------------+
|          10 |
+-------------+
1 row in set (0.001 sec)
十一、自定义Haproxy错误界面
1、sorryserver的设定
正常的所有服务器如果出现宕机,那么客户将被定向到指定的主机中,这个当业务主机出问题时被临时访问的主机叫做sorryserver
cpp
# 1、在新主机中安装apache(可以用haproxy主机代替)
[root@haproxy ~]# dnf install httpd -y
[root@haproxy ~]# vim /etc/httpd/conf/httpd.conf
Listen 8080
[root@haproxy ~]# systemctl enable --now httpd
[root@haproxy ~]# echo "李哥在,没意外" > /var/www/html/index.html
[root@haproxy ~]# curl 192.168.0.100:8080
李哥在,没意外

# 2、配置errorserver上线
[root@haproxy ~]# vim /etc/haproxy/haproxy.cfg
listen webcluster
    bind    *:80
    mode    tcp
    balance roundrobin
    server haha 192.168.0.10:80 check inter 3s fall 3 rise 5 weight 1
    server hehe 192.168.0.20:80 check inter 3s fall 3 rise 5 weight 1
    server wuwu 192.168.0.100:8080 backup
[root@haproxy ~]# systemctl restart haproxy.service

# 3、测试
[root@webserver1 ~]# systemctl stop httpd.service
[root@webserver2 ~]# systemctl stop httpd.service
[2026-01-26 14:23.43]  ~
[莫子.mozi] ⮞ curl 172.25.254.100
李哥在,没意外

[root@webserver1 ~]# systemctl enable --now httpd
[root@webserver2 ~]# systemctl enable --now httpd
[2026-01-26 14:24.54]  ~
[莫子.mozi] ⮞ curl 172.25.254.100
webserver2 - 192.168.0.20

[2026-01-26 14:24.59]  ~
[莫子.mozi] ⮞ curl 172.25.254.100
webserver1 - 192.168.0.10
2、自定义错误页面
当所有主机包括sorryserver都宕机了,那么haproxy会提供一个默认访问的错误页面,这个错误页面跟报错代码有关,这个页面可以通过定义来设置
cpp
# 1、出现的错误页面
[root@haproxy ~]# systemctl stop httpd.service
[root@webserver1 ~]# systemctl stop httpd.service
[root@webserver2 ~]# systemctl stop httpd.service

# 2、所有后端web服务都宕机(注意mode需要为http)
[2026-01-26 14:31.18]  ~
[莫子.mozi] ⮞ curl 172.25.254.100
<html><body><h1>503 Service Unavailable</h1>
No server is available to handle this request.
</body></html>

[root@haproxy ~]# mkdir /errorpage/html -p
[root@haproxy ~]# vim /errorpage/html/503.http
HTTP/1.0 503 Service Unavailable
Cache-Control: no-cache
Connection: close
Content-Type: text/html;charset=UTF-8

<html><body><h1>什么动物生气最安静</h1>
大猩猩!!
</body></html>
[root@haproxy ~]# vim /etc/haproxy/haproxy.cfg
defaults
    mode                    http
    log                     global
    option                  httplog
    option                  dontlognull
    option http-server-close
    option forwardfor       except 127.0.0.0/8
    option                  redispatch
    retries                 3
    timeout http-request    10s
    timeout queue           1m
    timeout connect         10s
    timeout client          1m
    timeout server          1m
    timeout http-keep-alive 10s
    timeout check           10s
    maxconn                 3000
    errorfile   503         /errorpage/html/503.http  # 添加
[root@haproxy ~]# systemctl restart haproxy.service

# 3、测试:
[2026-01-26 14:46.33]  ~
[莫子.mozi] ⮞ curl 172.25.254.100
<html><body><h1>什么动物生气最安静</h1>
大猩猩!!
</body></html>
3、从定向错误到指定网站
cpp
[root@haproxy ~]# vim /etc/haproxy/haproxy.cfg
defaults
    mode                    http
    log                     global
    option                  httplog
    option                  dontlognull
    option http-server-close
    option forwardfor       except 127.0.0.0/8
    option                  redispatch
    retries                 3
    timeout http-request    10s
    timeout queue           1m
    timeout connect         10s
    timeout client          1m
    timeout server          1m
    timeout http-keep-alive 10s
    timeout check           10s
    maxconn                 3000
    #errorfile  503         /errorpage/html/503.http
    errorloc    503         http://www.baidu.com # 添加
[root@haproxy ~]# systemctl restart haproxy.service

# 在浏览器中测试,就可以直接访问百度
十二、Haproxy ACL访问控制
1、实验素材
cpp
# 在浏览器或者curl主机中设定本地解析
在windows中设定解析
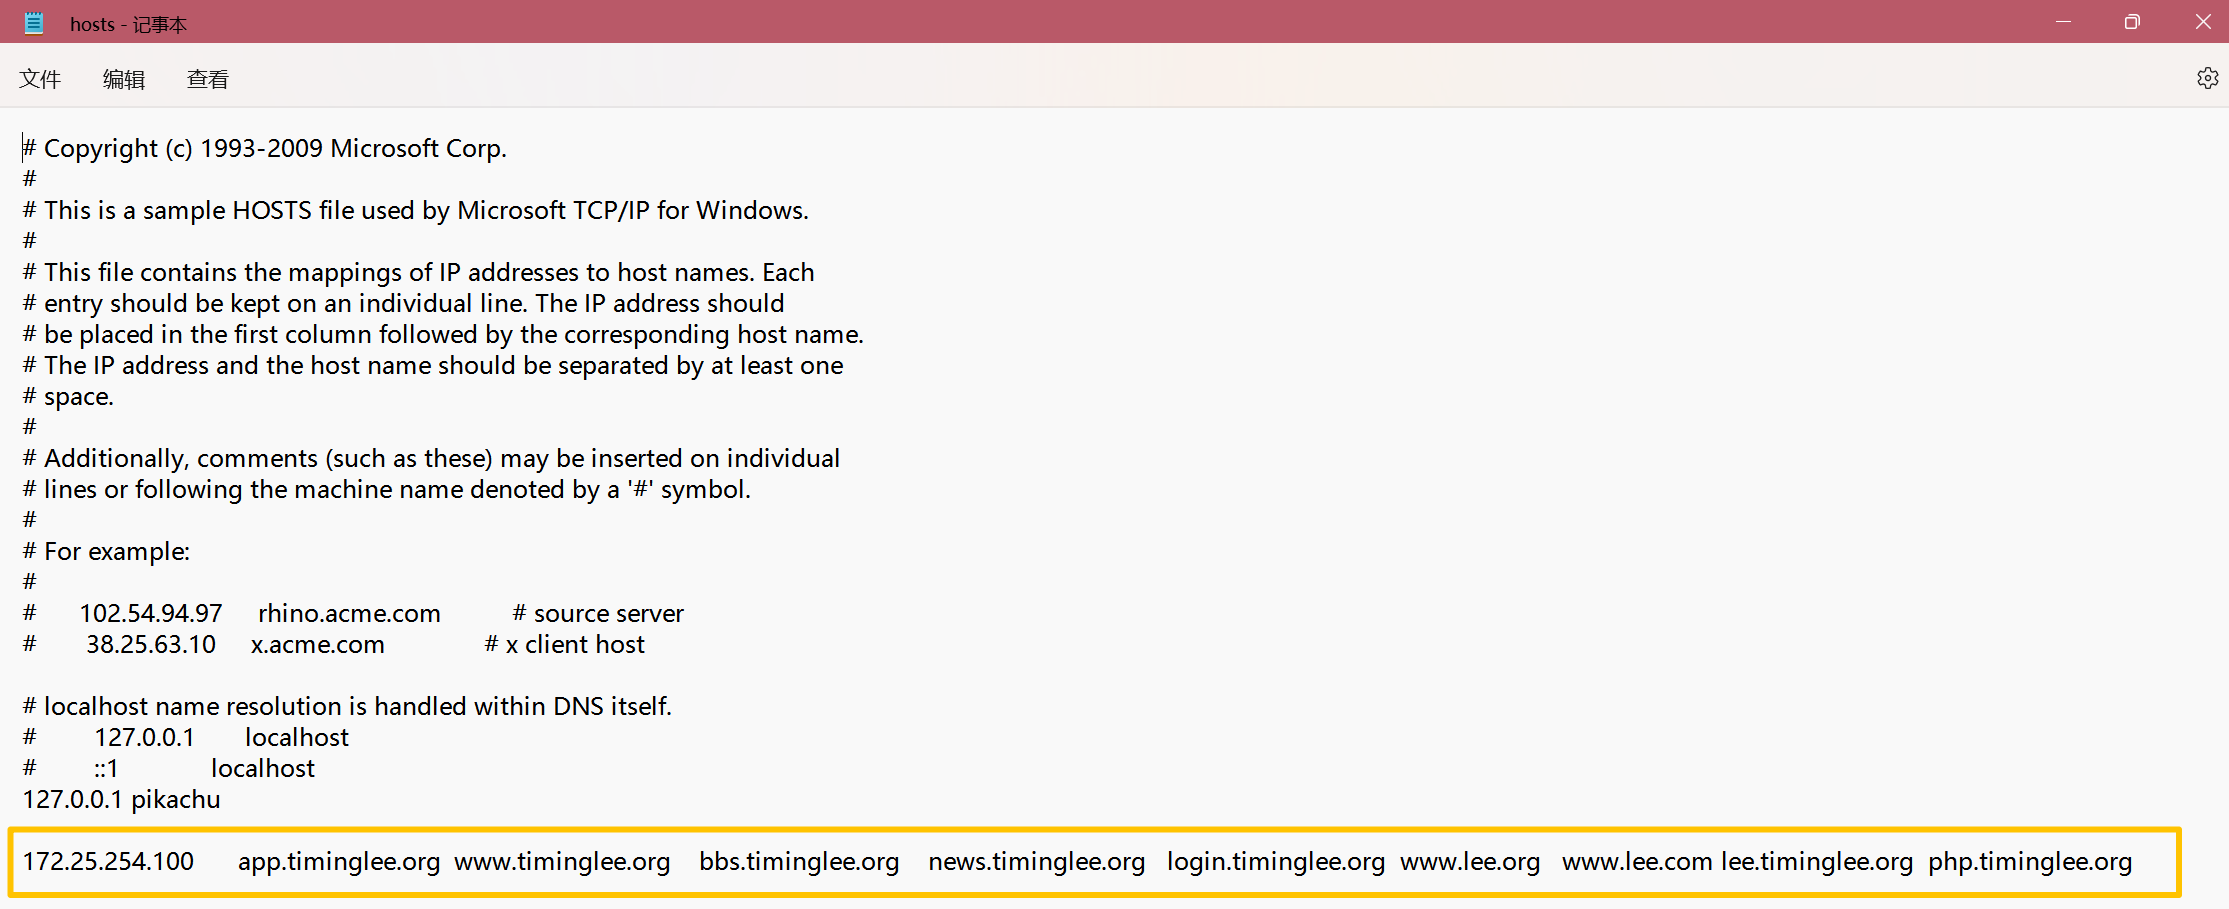
cpp
# 在linus设定解析
[2026-01-26 14:54.11]  ~
[莫子.mozi] ⮞ vim /etc/hosts
172.25.254.100  www.timinglee.org     bbs.timinglee.org    news.timinglee.org   login.timinglee.org  www.lee.org   www.lee.com

# 测试:
[2026-01-26 16:15.24]  ~
[莫子.mozi] ⮞ ping  bbs.timinglee.org

Pinging www.timinglee.org [172.25.254.100] with 32 bytes of data:
Reply from 172.25.254.100: bytes=32 time<1ms TTL=64
Reply from 172.25.254.100: bytes=32 time<1ms TTL=64
2、设定基础的haproxy实验配置
cpp
[root@haproxy ~]# vim /etc/haproxy/haproxy.cfg
frontend webcluster
    bind            *:80
    mode            http
    use_backend     webserver-80-web1

backend webserver-80-web1
    server web1 192.168.0.10:80 check inter 3s fall 3 rise 5

backend webserver-80-web2
    server web2 192.168.0.20:80 check inter 3s fall 3 rise 5
[root@haproxy ~]# systemctl restart haproxy.service
3、基础acl示例
cpp
# 1、在访问的网址中,所有以.com结尾的访问10,其他访问20
[root@haproxy ~]# vim /etc/haproxy/haproxy.cfg
frontend    webcluster
    bind            *:80
    mode            http

    acl test hdr_end(host) -i .com	# acl列表
    use_backend webserver-80-web1 if test
    default_backend webserver-80-web2

backend webserver-80-web1
    server web1 192.168.0.10:80 check inter 3s fall 3 rise 5

backend webserver-80-web2
    server web2 192.168.0.20:80 check inter 3s fall 3 rise 5

[root@haproxy ~]# systemctl restart haproxy.service

# 测试:
[2026-01-26 16:19.43]  ~
[莫子.mozi] ⮞ curl www.lee.com
webserver1 - 192.168.0.10

[2026-01-26 16:19.47]  ~
[莫子.mozi] ⮞ curl www.lee.org
webserver2 - 192.168.0.20

# 2、基于访问头部
[root@haproxy ~]# vim /etc/haproxy/haproxy.cfg
frontend    webcluster
    bind            *:80
    mode            http

    acl test hdr_end(host) -i .com
    acl head hdr_beg(host) -i bbs.

    use_backend webserver-80-web1 if head
    default_backend webserver-80-web2

backend webserver-80-web1
    server web1 192.168.0.10:80 check inter 3s fall 3 rise 5

backend webserver-80-web2
    server web2 192.168.0.20:80 check inter 3s fall 3 rise 5

[root@haproxy ~]# systemctl restart haproxy.service

# 测试:
[2026-01-26 16:19.52]  ~
[莫子.mozi] ⮞ curl bbs.timinglee.org
webserver1 - 192.168.0.10

[2026-01-26 16:22.21]  ~
[莫子.mozi] ⮞ curl www.lee.org
webserver2 - 192.168.0.20


# 3、base参数acl
[root@haproxy ~]# vim /etc/haproxy/haproxy.cfg
frontend    webcluster
    bind            *:80
    mode            http

    acl test hdr_end(host) -i .com
    acl head hdr_beg(host) -i bbs.
    acl pathdir base_dir -i /lee

    use_backend webserver-80-web1 if pathdir
    default_backend webserver-80-web2

backend webserver-80-web1
    server web1 192.168.0.10:80 check inter 3s fall 3 rise 5

backend webserver-80-web2
    server web2 192.168.0.20:80 check inter 3s fall 3 rise 5

[root@haproxy ~]# systemctl restart haproxy.service

[root@webserver1 ~]# mkdir -p /var/www/html/lee/
[root@webserver1 ~]# mkdir -p /var/www/html/lee/test/
[root@webserver1 ~]# echo lee - 192.168.0.10 > /var/www/html/lee/index.html
[root@webserver1 ~]# echo lee/test - 192.168.0.10 > /var/www/html/lee/test/index.html

[root@webserver2 ~]# mkdir -p /var/www/html/lee/
[root@webserver2 ~]# mkdir -p /var/www/html/lee/test/
[root@webserver2 ~]#  echo lee - 192.168.0.20 > /var/www/html/lee/index.html
[root@webserver2 ~]#  echo lee - 192.168.0.20 > /var/www/html/lee/test/index.html

# 测试:
[2026-01-26 16:26.21]  ~
[莫子.mozi] ⮞ curl 172.25.254.100/lee/
lee - 192.168.0.10

[2026-01-26 16:26.23]  ~
[莫子.mozi] ⮞ curl 172.25.254.100/lee/test/
lee/test - 192.168.0.10

[2026-01-26 16:26.25]  ~
[莫子.mozi] ⮞ curl 172.25.254.100/index.html
webserver2 - 192.168.0.20

# 4、acl禁止列表黑名单
[root@haproxy ~]# vim /etc/haproxy/haproxy.cfg
frontend    webcluster
    bind            *:80
    mode            http

    acl test hdr_end(host) -i .com
    acl head hdr_beg(host) -i bbs.
    acl pathdir base_dir -i /lee
    acl invalid_src src 172.25.254.1
    http-request deny if invalid_src

    use_backend webserver-80-web1 if test
    default_backend webserver-80-web2

backend webserver-80-web1
    server web1 192.168.0.10:80 check inter 3s fall 3 rise 5

backend webserver-80-web2
    server web2 192.168.0.20:80 check inter 3s fall 3 rise 5

[root@haproxy ~]# systemctl restart haproxy.service

# 测试:
[2026-01-26 16:30.18]  ~
[莫子.mozi] ⮞ curl 172.25.254.100
<html><body><h1>403 Forbidden</h1>
Request forbidden by administrative rules.
</body></html>

# 5、acl禁止列表白名单
[root@haproxy ~]# vim /etc/haproxy/haproxy.cfg
frontend    webcluster
    bind            *:80
    mode            http

    acl test hdr_end(host) -i .com
    acl head hdr_beg(host) -i bbs.
    acl pathdir base_dir -i /lee
    acl invalid_src src 172.25.254.1
    http-request deny if ! invalid_src

    use_backend webserver-80-web1 if test
    default_backend webserver-80-web2

backend webserver-80-web1
    server web1 192.168.0.10:80 check inter 3s fall 3 rise 5

backend webserver-80-web2
    server web2 192.168.0.20:80 check inter 3s fall 3 rise 5

[root@haproxy ~]# systemctl restart haproxy.service

# 测试:
[2026-01-26 16:31.37]  ~
[莫子.mozi] ⮞ curl 172.25.254.100
webserver2 - 192.168.0.20
十三、Haproxy全站加密
1、制作证书
cpp
[root@haproxy ~]# mkdir /etc/haproxy/certs
[root@haproxy ~]# openssl req -newkey rsa:2048 -nodes -sha256 -keyout /etc/haproxy/certs/timinglee.org.key -x509 -days 365 -out /etc/haproxy/certs/timinglee.org.crt
Country Name (2 letter code) [XX]:CN
State or Province Name (full name) []:shanxi
Locality Name (eg, city) [Default City]:xian
Organization Name (eg, company) [Default Company Ltd]:timinglee
Organizational Unit Name (eg, section) []:linux
Common Name (eg, your name or your server's hostname) []:www.timinglee.org
Email Address []:admin@timinglee.org
[root@haproxy ~]# ls /etc/haproxy/certs/
timinglee.org.crt  timinglee.org.key

[root@haproxy ~]# cat /etc/haproxy/certs/timinglee.org.{key,crt} > /etc/haproxy/certs/timinglee.pem
2、全站加密
cpp
[root@haproxy ~]# vim /etc/haproxy/haproxy.cfg
frontend webcluster-http
    bind    *:80
    redirect scheme https if ! { ssl_fc }

listen webcluster-https
    bind    *:443 ssl crt /etc/haproxy/certs/timinglee.pem
    mode    http
    balance roundrobin
    server haha 192.168.0.10:80 check inter 3s fall 3 rise 5 weight 1
    server hehe 192.168.0.20:80 check inter 3s fall 3 rise 5 weight 1
    #server wuwu 192.168.0.100:8080 backup
[root@haproxy ~]# systemctl restart haproxy.service

# 测试:
[2026-01-26 16:32.16]  ~
[莫子.mozi] ⮞ curl -v -k -L http://172.25.254.100
*   Trying 172.25.254.100:80...
* Connected to 172.25.254.100 (172.25.254.100) port 80
* using HTTP/1.x
> GET / HTTP/1.1
> Host: 172.25.254.100
> User-Agent: curl/8.12.1
> Accept: */
>
* Request completely sent off
< HTTP/1.1 302 Found
< content-length: 0
< location: https://172.25.254.100/     # 转换信息体现
< cache-control: no-cache
* Ignoring the response-body
* setting size while ignoring
<
* Connection #0 to host 172.25.254.100 left intact
* Clear auth, redirects to port from 80 to 443
* Issue another request to this URL: 'https://172.25.254.100/'
*   Trying 172.25.254.100:443...
* ALPN: curl offers http/1.1
* TLSv1.3 (OUT), TLS handshake, Client hello (1):
* TLSv1.3 (IN), TLS handshake, Server hello (2):
* TLSv1.3 (IN), TLS handshake, Encrypted Extensions (8):
* TLSv1.3 (IN), TLS handshake, Certificate (11):
* TLSv1.3 (IN), TLS handshake, CERT verify (15):
* TLSv1.3 (IN), TLS handshake, Finished (20):
* TLSv1.3 (OUT), TLS change cipher, Change cipher spec (1):
* TLSv1.3 (OUT), TLS handshake, Finished (20):
* SSL connection using TLSv1.3 / TLS_AES_256_GCM_SHA384 / X25519 / RSASSA-PSS
* ALPN: server did not agree on a protocol. Uses default.
* Server certificate:
*  subject: C=CN; ST=shanxi; L=xian; O=timinglee; OU=linux; CN=www.timinglee.org; emailAddress=admin@timinglee.org
*  start date: Jan 26 08:39:12 2026 GMT
*  expire date: Jan 26 08:39:12 2027 GMT
*  issuer: C=CN; ST=shanxi; L=xian; O=timinglee; OU=linux; CN=www.timinglee.org; emailAddress=admin@timinglee.org
*  SSL certificate verify result: self-signed certificate (18), continuing anyway.
*   Certificate level 0: Public key type RSA (2048/112 Bits/secBits), signed using sha256WithRSAEncryption
* Connected to 172.25.254.100 (172.25.254.100) port 443
* using HTTP/1.x
> GET / HTTP/1.1
> Host: 172.25.254.100
> User-Agent: curl/8.12.1
> Accept: */
>
* Request completely sent off
* TLSv1.3 (IN), TLS handshake, Newsession Ticket (4):
* TLSv1.3 (IN), TLS handshake, Newsession Ticket (4):
< HTTP/1.1 200 OK
< date: Mon, 26 Jan 2026 08:44:43 GMT
< server: Apache/2.4.62 (Red Hat Enterprise Linux)
< last-modified: Fri, 23 Jan 2026 03:52:25 GMT
< etag: "1a-6490615dfd03b"
< accept-ranges: bytes
< content-length: 26
< content-type: text/html; charset=UTF-8
<
webserver1 - 192.168.0.10
* Connection #1 to host 172.25.254.100 left intact