引言
本文缘起自笔者开发一个基于 PIXI.js 的在线动画编辑器时,想系统学习 Canvas 相关知识,却发现缺少合适的中文入门资料,于是萌生了撰写这份"速通指北"的想法,欢迎感兴趣的朋友订阅我的 《Canvas 指北》专栏。
参考内容:
- HTML Canvas Tutorial
- Canvas API - Web API | MDN
- Canvas API - 《阮一峰 Web API 教程》
- 《从 0 到 1:HTML5 Canvas动画开发》
第3章:描边与填充
在上一章中,我们学习了如何绘制线条并控制其样式。本章将正式介绍 Canvas 中两个核心的渲染操作:描边(stroke) 和 填充(fill) 。你会学到如何设置颜色、应用填充规则(包括路径方向的影响),以及如何清除画布。
3.1 描边基础
描边是指绘制路径的轮廓。
3.1.1 描边颜色:strokeStyle
设置描边使用的颜色,可以是颜色名、十六进制、rgb/rgba 等。
js
ctx.strokeStyle = 'red';
ctx.strokeStyle = '#00ff00';
ctx.strokeStyle = 'rgba(0,0,255,0.5)';
3.1.2 执行描边:stroke()
对当前路径进行描边:
js
ctx.moveTo(10, 10);
ctx.lineTo(100, 10);
ctx.strokeStyle = 'blue';
ctx.stroke();
3.2 填充基础
填充是指用颜色或图案填充路径的内部区域。
3.2.1 填充颜色:fillStyle
与 strokeStyle 类似,fillStyle 接受颜色值、渐变或图案(渐变和图案将在后续章节介绍)。
js
ctx.fillStyle = 'green';
ctx.fillStyle = '#ff8800';
ctx.fillStyle = 'rgba(255,0,0,0.3)';
3.2.2 执行填充:fill()
js
ctx.rect(50, 50, 100, 80); // 矩形路径(rect 是直接添加矩形路径的方法)
ctx.fillStyle = 'yellow';
ctx.fill();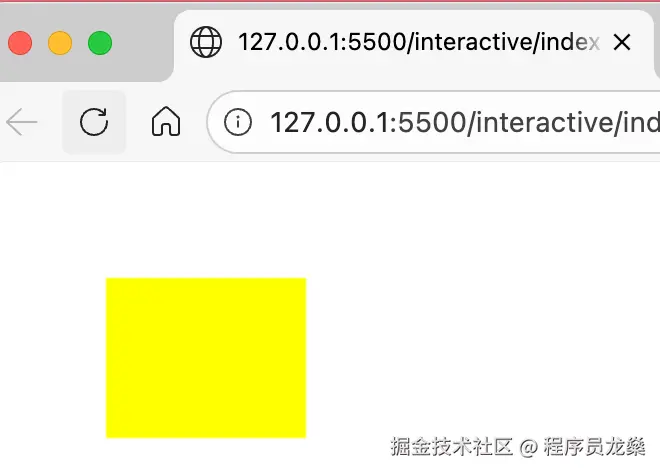 注意: 填充时会自动闭合路径(即使你没有调用
 closePath),它会从当前点画一条直线到子路径起点,然后填充内部。
3.3 同时使用描边与填充
你可以先填充再描边,或者反过来。顺序通常不影响视觉效果(除非使用半透明颜色)。
js
ctx.rect(30, 30, 100, 80);
ctx.fillStyle = 'lightblue';
ctx.fill();
ctx.strokeStyle = 'navy';
ctx.lineWidth = 3;
ctx.stroke();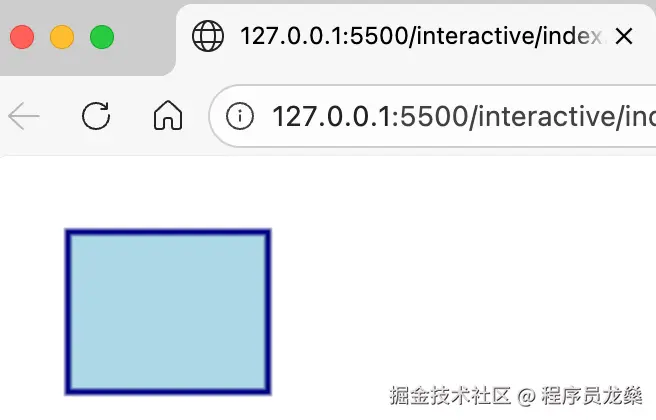
3.4 填充规则:nonzero 与 evenodd
填充规则决定了当路径自交或包含多个子路径时,哪些区域算作"内部"。fill() 方法接受一个可选的 fillRule 参数,默认为 "nonzero"。
3.4.1 非零环绕规则 ("nonzero")
从待测点向任意方向发射一条射线(通常取水平向右),统计射线与路径的交点,并根据路径穿过射线时的方向进行计数:
- 顺时针穿过 → 计数器 +1
- 逆时针穿过 → 计数器 -1
若最终计数不为零,则点在内部。
方向的影响:路径的方向由绘制时点的顺序决定。当两个子路径重叠时:
- 同向(如都是顺时针):重叠区计数叠加(+2),仍被填充。
- 反向(一顺一逆):重叠区计数抵消(0),成为空洞。
下面示例用两个重叠矩形演示 nonzero 规则:
html
<canvas id="nonzeroDemo" width="300" height="250"></canvas>
<script>
  const canvas = document.getElementById('nonzeroDemo');
  const ctx = canvas.getContext('2d');

  // 两个矩形同向(均为顺时针)
  ctx.beginPath();
  ctx.moveTo(50, 50); ctx.lineTo(200, 50); ctx.lineTo(200, 180); ctx.lineTo(50, 180); ctx.closePath();
  ctx.moveTo(120, 80); ctx.lineTo(270, 80); ctx.lineTo(270, 210); ctx.lineTo(120, 210); ctx.closePath();
  ctx.fillStyle = 'rgba(255,100,100,0.7)';
  ctx.fill('nonzero');          // 默认规则
  ctx.strokeStyle = 'red';
  ctx.stroke();

  // 标注
  ctx.font = '14px sans-serif';
  ctx.fillStyle = 'black';
  ctx.fillText('同向(均顺时针)', 50, 230);
</script>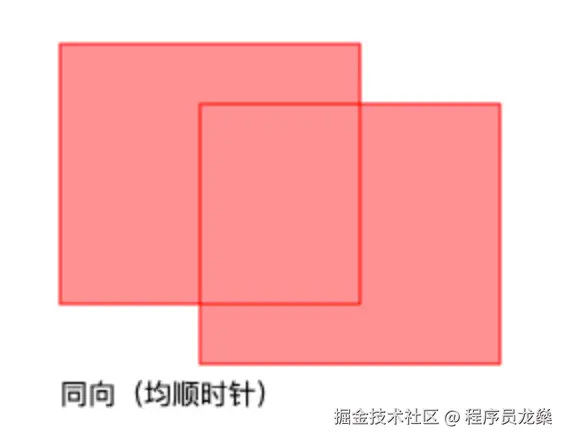
若将第二个矩形改为逆时针(改变点的顺序),重叠区域将变为空洞:
html
<canvas id="nonzeroReverse" width="300" height="250"></canvas>
<script>
  const canvas = document.getElementById('nonzeroReverse');
  const ctx = canvas.getContext('2d');

  // 第一个顺时针,第二个逆时针
  ctx.beginPath();
  ctx.moveTo(50, 50); ctx.lineTo(200, 50); ctx.lineTo(200, 180); ctx.lineTo(50, 180); ctx.closePath(); // 顺
  ctx.moveTo(120, 80); ctx.lineTo(120, 210); ctx.lineTo(270, 210); ctx.lineTo(270, 80); ctx.closePath(); // 逆
  ctx.fillStyle = 'rgba(100,100,255,0.7)';
  ctx.fill('nonzero');
  ctx.strokeStyle = 'blue';
  ctx.stroke();

  ctx.fillText('反向(顺+逆)', 50, 230);
</script>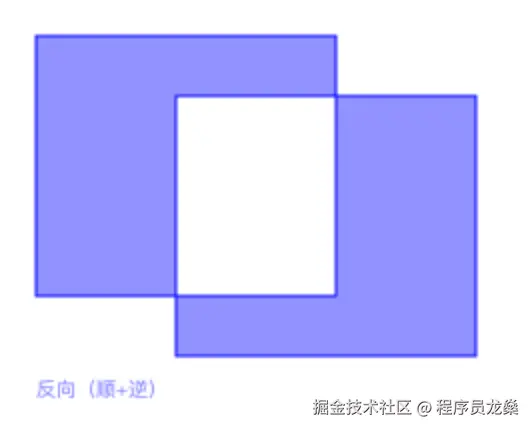
nonzero 规则的设计初衷之一,就是让开发者可以通过控制路径的方向(顺时针/逆时针),来决定重叠区域是"合并填充"还是"挖成空洞"。
3.4.2 奇偶规则 ("evenodd")
该规则忽略路径方向,只统计射线与路径的交点个数:
奇数 → 内部
偶数 → 外部
对于同样的两个重叠矩形,无论它们方向如何,重叠区域交点数为 2(偶数),因此都是空洞。
html
<canvas id="evenoddCompare" width="600" height="250"></canvas>
<script>
  const canvas = document.getElementById('evenoddCompare');
  const ctx = canvas.getContext('2d');

  // 左侧:两个矩形同向(均为顺时针)
  ctx.save();
  ctx.translate(0, 0);
  ctx.beginPath();
  ctx.moveTo(50, 50); ctx.lineTo(200, 50); ctx.lineTo(200, 180); ctx.lineTo(50, 180); ctx.closePath();
  ctx.moveTo(120, 80); ctx.lineTo(270, 80); ctx.lineTo(270, 210); ctx.lineTo(120, 210); ctx.closePath();
  ctx.fillStyle = 'rgba(100,255,100,0.7)';
  ctx.fill('evenodd');
  ctx.strokeStyle = 'green';
  ctx.stroke();
  ctx.restore();

  // 右侧:两个矩形反向(第一个顺时针,第二个逆时针)
  ctx.save();
  ctx.translate(300, 0);
  ctx.beginPath();
  ctx.moveTo(50, 50); ctx.lineTo(200, 50); ctx.lineTo(200, 180); ctx.lineTo(50, 180); ctx.closePath(); // 顺时针
  ctx.moveTo(120, 80); ctx.lineTo(120, 210); ctx.lineTo(270, 210); ctx.lineTo(270, 80); ctx.closePath(); // 逆时针
  ctx.fillStyle = 'rgba(100,255,100,0.7)';
  ctx.fill('evenodd');
  ctx.strokeStyle = 'green';
  ctx.stroke();
  ctx.restore();

  // 标注
  ctx.font = '14px sans-serif';
  ctx.fillStyle = 'black';
  ctx.fillText('同向 (evenodd)', 50, 230);
  ctx.fillText('反向 (evenodd)', 350, 230);
</script>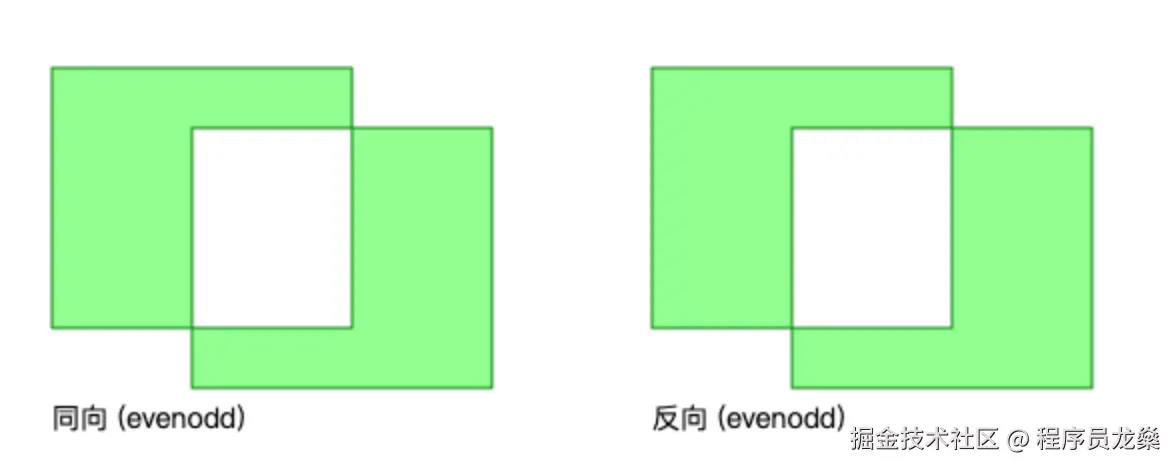
3.4.3 在 fill() 中指定规则
js
ctx.fill('nonzero');   // 默认
ctx.fill('evenodd');
也可以在 isPointInPath 中指定规则进行命中检测(参见第四章)。
第4章:路径
在上一章中,我们为了对比演示绘制多条独立线条时,每次都使用了 beginPath()。你可能已经隐约感觉到它的作用------它帮助我们开始一条新的路径,避免之前绘制的图形被重复描边。本章将正式介绍 Canvas 中的核心概念:路径。你会学到什么是路径,如何构建和闭合路径,以及如何判断点是否位于路径内。
4.1 什么是路径
路径(Path)是 Canvas 2D API 中定义图形轮廓的一系列绘图命令的集合。你可以把它想象成一支画笔在画布上移动时留下的轨迹记录------它记录了所有 moveTo、lineTo、arc 等操作,但并没有真正绘制出可见的图形。
- 路径只是一个抽象的轮廓,要让它显示出来,必须调用
fill()(填充)或stroke()(描边)------这两个方法将在下一章详细讲解。 - 路径可以包含多个子路径(
subpath),每个子路径通常由一次moveTo开始。 - 路径可用于重复渲染与命中检测;如果需要显式复用一组路径数据,通常使用
Path2D。命中检测时,isPointInPath用于填充区域,isPointInStroke用于描边(线条)区域。
为什么要使用路径?
- 构建复杂图形:可以先描述图形的线段与曲线,再统一执行渲染,结构更清晰。
- 性能优化 :将多个图形片段合并到同一路径后一次性
fill()或stroke(),通常比每画一小段就立即绘制更高效(具体收益取决于场景与状态切换次数)。 - 交互判定 :可结合
isPointInPath(填充区)与isPointInStroke(描边区)实现点击选中等交互。
4.2 路径的基本操作
4.2.1 开始新路径:beginPath()
beginPath() 的作用是清空当前路径,让你可以开始定义一个新的图形。如果不调用它,后续的路径命令会追加到现有路径上,导致绘制时出现意外的重叠或重复。下面通过颜色覆盖的对比示例,让你直观感受它的重要性。
❌ 错误示例: 忘记 beginPath(),颜色被覆盖
html
<canvas id="badPath" width="300" height="120"></canvas>
<script>
  const canvas = document.getElementById('badPath');
  const ctx = canvas.getContext('2d');

  // 第一条线(红色)
  ctx.strokeStyle = 'red';
  ctx.moveTo(20, 20);
  ctx.lineTo(130, 20);
  ctx.stroke();

  // 想画第二条线(蓝色),但没有 beginPath()
  ctx.strokeStyle = 'blue';
  ctx.moveTo(20, 50);
  ctx.lineTo(130, 50);
  ctx.stroke();  // 结果:两条线都变成了蓝色(蓝色覆盖了第一条红色线)
</script>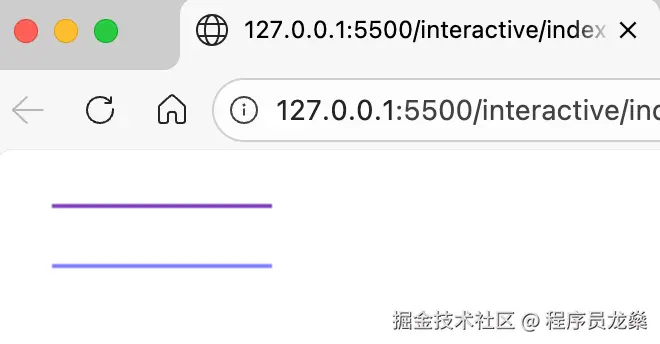
结果: 左边两条线最终都是蓝色------因为第二次 stroke() 时,路径中包含了第一条线,所以它也被用蓝色重新描了一遍,蓝色覆盖在原来的红色之上。
✅ 正确示例: 每次新图形前调用 beginPath(),颜色独立
html
<canvas id="goodPath" width="300" height="120"></canvas>
<script>
  const canvas = document.getElementById('goodPath');
  const ctx = canvas.getContext('2d');

  // 第一条线(红色)
  ctx.beginPath();
  ctx.strokeStyle = 'red';
  ctx.moveTo(170, 20);
  ctx.lineTo(280, 20);
  ctx.stroke();

  // 第二条线(蓝色),新路径
  ctx.beginPath();
  ctx.strokeStyle = 'blue';
  ctx.moveTo(170, 50);
  ctx.lineTo(280, 50);
  ctx.stroke();  // 两条线颜色独立,互不干扰
</script>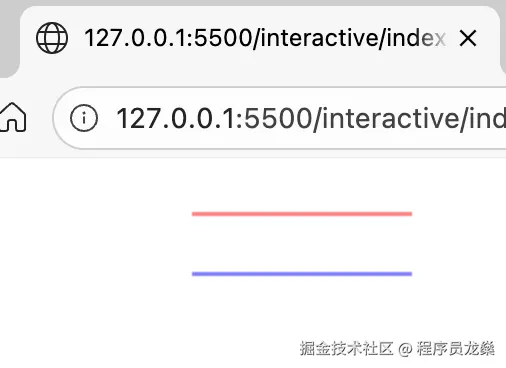
结果: 右边两条线红蓝分明,互不影响。
4.2.2 闭合路径:closePath()
closePath()会从当前点绘制一条直线回到当前子路径的起点(即最近一次 moveTo 的位置),并闭合该子路径。它与直接用 lineTo 回到起点的区别在于:
- 如果路径已经闭合,
closePath不会重复添加线段; - 它会标记该子路径为闭合,影响后续填充时的边界处理(在填充时,闭合与未闭合的效果通常相同,但描边时闭合会明确连接起点和终点)。
下面通过一个对比示例,直观展示使用 closePath() 与不闭合(即缺少最后一条边)的区别。
html
<canvas id="closeCompare" width="320" height="150"></canvas>
<script>
  const canvas = document.getElementById('closeCompare');
  const ctx = canvas.getContext('2d');

  // 左侧:不闭合(只有两条边)
  ctx.beginPath();
  ctx.moveTo(30, 20);
  ctx.lineTo(100, 60);
  ctx.lineTo(30, 100);
  // 没有 closePath(),也没有手动 lineTo 回起点
  ctx.stroke();

  // 右侧:使用 closePath() 闭合
  ctx.beginPath();
  ctx.moveTo(190, 20);
  ctx.lineTo(260, 60);
  ctx.lineTo(190, 100);
  ctx.closePath(); // 自动绘制从 (190,100) 回到 (190,20) 的直线
  ctx.stroke();
</script>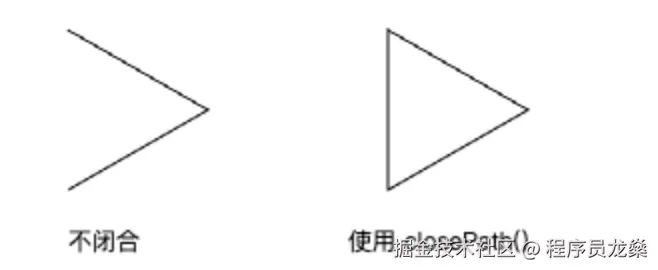
如果不使用 closePath(),而是用 lineTo(起点)手动闭合,视觉效果与 closePath() 相同,但 closePath() 更简洁,并且会标记路径为闭合状态。对于大多数描边场景,手动闭合也完全可行。但在涉及填充或复杂路径操作时,建议使用 closePath() 以确保正确的闭合标记。
4.3 子路径
一个路径可以包含多个子路径。每次调用 moveTo 都会开始一个新的子路径,后续的 lineTo 会附加到这个子路径上。
示例:绘制两个独立的三角形(同一个路径中的两个子路径)
html
<canvas id="subPath" width="320" height="150"></canvas>
<script>
  const canvas = document.getElementById('subPath');
  const ctx = canvas.getContext('2d');

  ctx.beginPath();

  // 第一个三角形(子路径1)
  ctx.moveTo(20, 20);
  ctx.lineTo(80, 60);
  ctx.lineTo(20, 100);
  ctx.closePath();

  // 第二个三角形(子路径2)
  ctx.moveTo(120, 20);
  ctx.lineTo(180, 60);
  ctx.lineTo(120, 100);
  ctx.closePath();

  ctx.stroke(); // 一次描边画出两个三角形
</script>
这样,一个路径包含多个子路径,所有子路径会同时被描边或填充。
4.4 Path2D 对象
Canvas 2D API 提供了 Path2D 对象,用于缓存和复用路径。你可以先创建一个 Path2D 实例,然后用它来构建路径,最后直接传入 fill、stroke 或 isPointInPath 等方法。
html
<canvas id="path2D" width="320" height="200"></canvas>
<script>
  const canvas = document.getElementById('path2D');
  const ctx = canvas.getContext('2d');

  const triangle = new Path2D();
  triangle.moveTo(80, 30);
  triangle.lineTo(220, 80);
  triangle.lineTo(80, 170);
  triangle.closePath();

  // 绘制
  ctx.fillStyle = 'orange';
  ctx.fill(triangle);
  ctx.stroke(triangle);

  // 检测点击
  ctx.isPointInPath(triangle, x, y); // 传入 Path2D 对象
</script>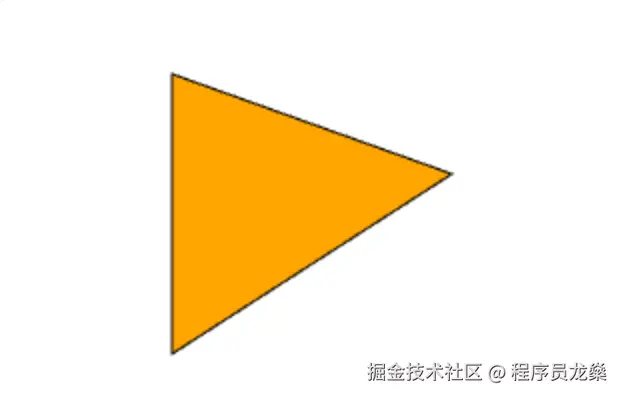
这样,我们就不必重复构建路径了。Path2D 在现代浏览器中已得到良好支持(不支持 IE),如果项目需要兼容旧浏览器,请查阅 Can I use 确认。
4.5 路径检测:isPointInPath
isPointInPath(x, y, fillRule) 方法用于判断指定点是否位于当前路径内部。它非常有用,例如实现鼠标点击选中图形。
参数:
x, y:检测点的坐标(相对于画布)。fillRule(可选):填充规则,默认"nonzero",可选"evenodd"。用于处理自交或嵌套路径的判定,参见 3.4 章节。
返回值:布尔值 true 或 false。
4.5.1 基础示例:点击检测三角形
下面代码演示如何用 isPointInPath 检测鼠标点击是否在三角形内。
html
<canvas id="hitCanvas" width="300" height="200"></canvas>
<script>
  const canvas = document.getElementById('hitCanvas');
  const ctx = canvas.getContext('2d');

  // 绘制一个三角形(填充为橙色,便于视觉参考)
  ctx.beginPath();
  ctx.moveTo(80, 30);
  ctx.lineTo(220, 80);
  ctx.lineTo(80, 170);
  ctx.closePath();
  ctx.fillStyle = 'orange';
  ctx.fill();

  // 点击检测
  canvas.addEventListener('click', (e) => {
    const rect = canvas.getBoundingClientRect();
    const x = e.clientX - rect.left;
    const y = e.clientY - rect.top;

    // isPointInPath 基于当前路径,所以需要重新构建路径
    ctx.beginPath();
    ctx.moveTo(80, 30);
    ctx.lineTo(220, 80);
    ctx.lineTo(80, 170);
    ctx.closePath();

    if (ctx.isPointInPath(x, y)) {
      console.log('点在三角形内!');
    } else {
      console.log('点在三角形外');
    }
  });
</script>
分别点击三角形区域和外部空白区域,可以得到如下图中的日志: 
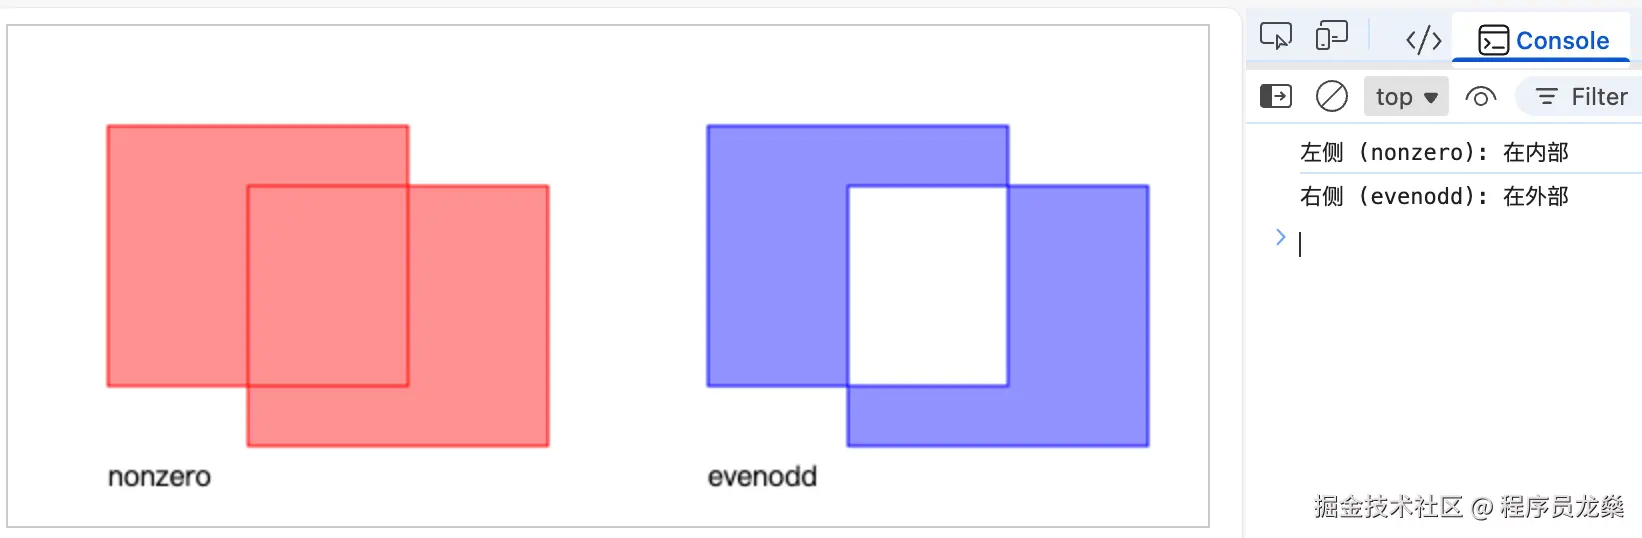
4.5.2 填充规则对比示例:自交路径
下面我们构建一个自交路径 (两个部分重叠的矩形),分别用 nonzero 和 evenodd 规则填充,并演示点击检测时结果的差异。
html
<canvas id="fillRuleCanvas" width="600" height="250" style="border:1px solid #ccc"></canvas>
<script>
  const canvas = document.getElementById('fillRuleCanvas');
  const ctx = canvas.getContext('2d');

  // 定义一个自交路径:两个矩形(均为顺时针方向)
  const path = new Path2D();
  // 矩形1 (50,50) 到 (200,180)
  path.moveTo(50, 50);
  path.lineTo(200, 50);
  path.lineTo(200, 180);
  path.lineTo(50, 180);
  path.closePath();
  // 矩形2 (120,80) 到 (270,210)
  path.moveTo(120, 80);
  path.lineTo(270, 80);
  path.lineTo(270, 210);
  path.lineTo(120, 210);
  path.closePath();

  // 左侧:使用 nonzero 填充(默认)
  ctx.save();
  ctx.translate(0, 0);
  ctx.fillStyle = 'rgba(255,100,100,0.7)';
  ctx.fill(path, 'nonzero');
  ctx.strokeStyle = 'red';
  ctx.stroke(path);
  ctx.restore();

  // 右侧:使用 evenodd 填充(平移 300 像素)
  ctx.save();
  ctx.translate(300, 0);
  ctx.fillStyle = 'rgba(100,100,255,0.7)';
  ctx.fill(path, 'evenodd');
  ctx.strokeStyle = 'blue';
  ctx.stroke(path);
  ctx.restore();

  // 标注
  ctx.font = '14px sans-serif';
  ctx.fillStyle = 'black';
  ctx.fillText('nonzero', 50, 230);
  ctx.fillText('evenodd', 350, 230);

  // 点击检测
  canvas.addEventListener('click', (e) => {
    const rect = canvas.getBoundingClientRect();
    let x = e.clientX - rect.left;
    let y = e.clientY - rect.top;

    if (x < 300) {
      // 左侧区域,使用 nonzero 规则检测
      // 需要重建路径(相对原始坐标)
      ctx.beginPath();
      ctx.moveTo(50, 50);
      ctx.lineTo(200, 50);
      ctx.lineTo(200, 180);
      ctx.lineTo(50, 180);
      ctx.closePath();
      ctx.moveTo(120, 80);
      ctx.lineTo(270, 80);
      ctx.lineTo(270, 210);
      ctx.lineTo(120, 210);
      ctx.closePath();

      const inNonzero = ctx.isPointInPath(x, y, 'nonzero');
      console.log(`左侧 (nonzero): ${inNonzero ? '在内部' : '在外部'}`);
    } else {
      // 右侧区域,点击坐标需转换到左侧坐标系(因为路径定义在原始坐标)
      const xLocal = x - 300;
      ctx.beginPath();
      ctx.moveTo(50, 50);
      ctx.lineTo(200, 50);
      ctx.lineTo(200, 180);
      ctx.lineTo(50, 180);
      ctx.closePath();
      ctx.moveTo(120, 80);
      ctx.lineTo(270, 80);
      ctx.lineTo(270, 210);
      ctx.lineTo(120, 210);
      ctx.closePath();

      const inEvenodd = ctx.isPointInPath(xLocal, y, 'evenodd');
      console.log(`右侧 (evenodd): ${inEvenodd ? '在内部' : '在外部'}`);
    }
  });
</script>
分别点击左侧的重叠区域和右侧的重叠区域,可以得到如下图中的日志:
4.6 扩展:isPointInStroke
类似地,isPointInStroke(x, y) 判断点是否在描边路径上(即轮廓线上)。这在某些交互(如点击线条)中很有用。它不支持填充规则参数,因为描边不涉及内部填充规则。
javascript
ctx.lineWidth = 10;
ctx.beginPath();
ctx.moveTo(20, 20);
ctx.lineTo(100, 100);
ctx.stroke();

// 检测点 (60,60) 是否在描边路径上
if (ctx.isPointInStroke(60, 60)) {
  console.log('点在线上');
}
第5章:矩形与多边形
矩形是 Canvas 中最基础的形状,除了用路径绘制,Canvas 还提供了专门的矩形绘制 API。本章将介绍这些便捷方法,并在此基础上扩展,通过三角函数绘制正多边形和五角星。
5.1 矩形绘制
Canvas 提供了三个直接绘制矩形的方法,无需手动构建路径。
5.1.1 填充矩形:fillRect(x, y, width, height)
直接绘制一个填充矩形,参数分别为左上角坐标、宽度和高度。
js
ctx.fillStyle = 'orange';
ctx.fillRect(30, 30, 150, 100);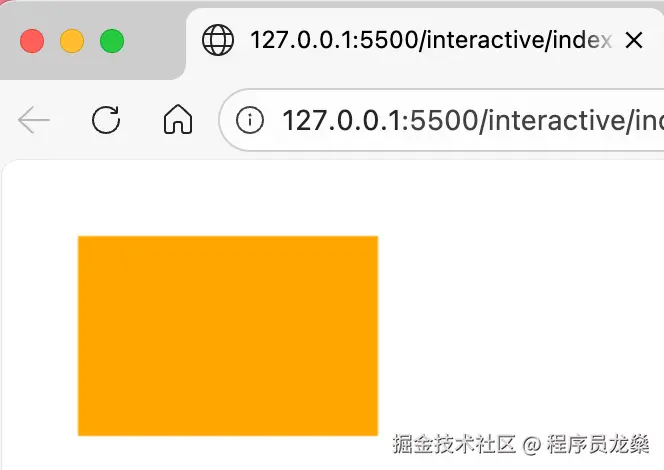
5.1.2 描边矩形:strokeRect(x, y, width, height)
绘制一个矩形边框(仅描边),使用当前的 strokeStyle 和线条样式。
js~~~~
ctx.strokeStyle = 'navy';
ctx.lineWidth = 4;
ctx.strokeRect(30, 30, 150, 100);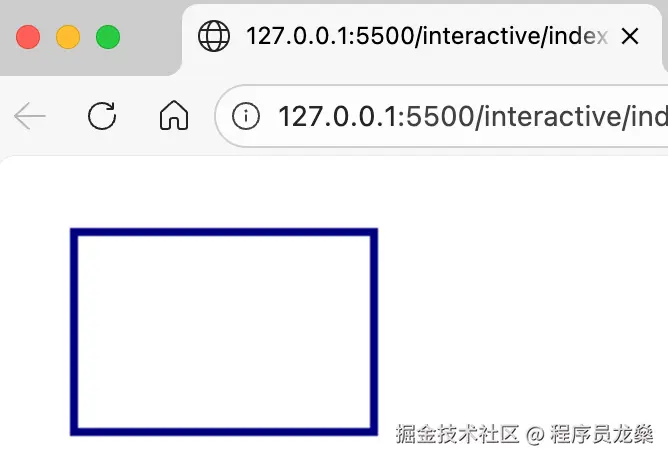
5.1.3 矩形路径:rect(x, y, width, height)
将矩形路径添加到当前路径中,之后可以调用 fill() 或 stroke() 进行渲染。适合需要同时描边和填充,或与其他路径组合的场景。
js
ctx.beginPath();
ctx.rect(30, 30, 150, 100);
ctx.fillStyle = 'lightblue';
ctx.fill();
ctx.strokeStyle = 'blue';
ctx.stroke();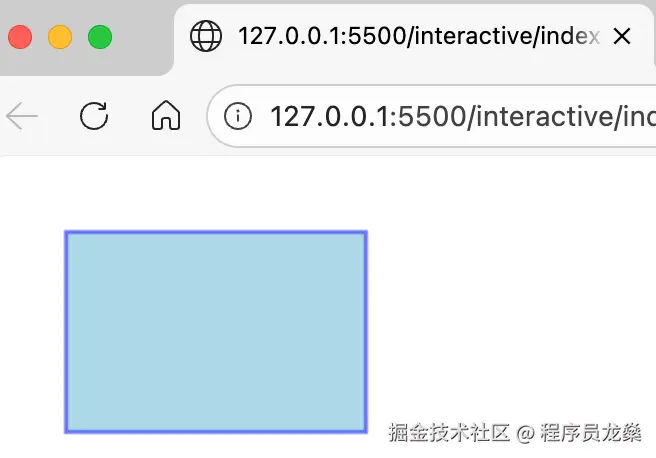
5.2 清空矩形区域:clearRect(x, y, width, height)
clearRect 将指定矩形区域内的所有像素变为透明(即清除内容),常用于动画中清空画布或部分区域。
html
<canvas id="clearDemo" width="300" height="150"></canvas>
<script>
const canvas = document.getElementById('clearDemo');
const ctx = canvas.getContext('2d');
// 先画一些内容
ctx.fillStyle = 'red';
ctx.fillRect(20, 20, 100, 100);
ctx.fillStyle = 'blue';
ctx.fillRect(100, 50, 100, 100);
// 等待 1 秒后清空中间区域
setTimeout(() => {
ctx.clearRect(50, 30, 120, 90);
}, 1000);
</script>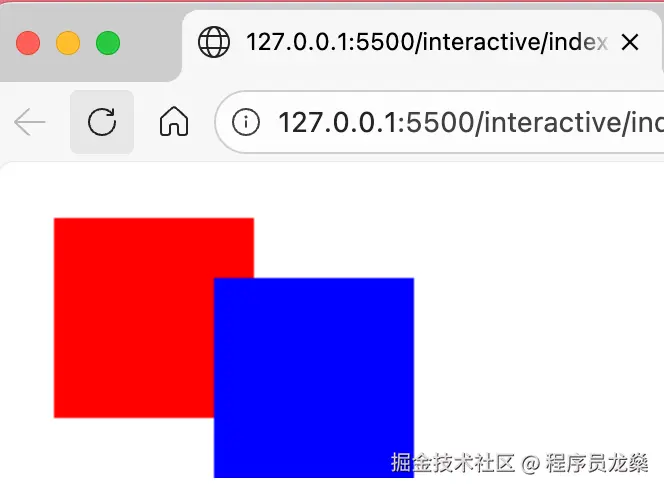 等待一秒后:
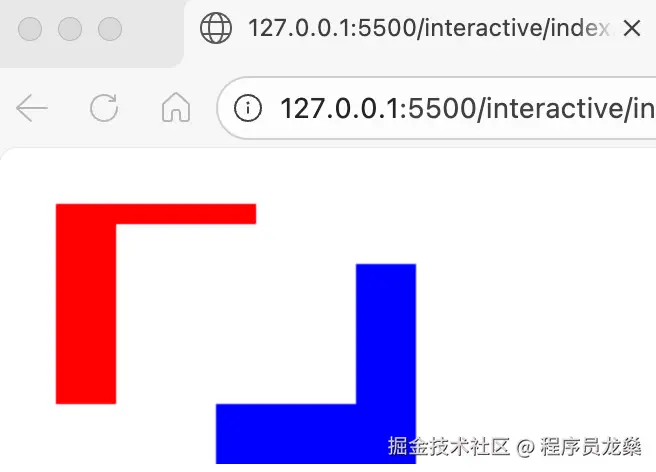
利用这一特性,可以通过:
js
cxt.clearRect(0, 0, ctx.width, ctx.height);清空整个画布。
5.3 绘制正多边形
通过三角函数可以计算出正多边形各个顶点的坐标,然后使用路径绘制。正多边形的顶点均匀分布在圆周上,每个顶点对应角度为 (i * 2π) / sides,其中 sides 表示多边形的边数。
html
<script>
  const canvas = document.getElementById('polygonDemo');
  const ctx = canvas.getContext('2d');

  /**
   *
   * 绘制多边形
   * @param {CanvasRenderingContext2D} ctx
   * @param {number} cx 中心点x坐标
   * @param {number} cy 中心点y坐标
   * @param {number} r 外接圆半径(顶点到中心的距离)
   * @param {number} sides 多边形边数
   * @param {number} rotation 旋转角度(弧度),用于调整多边形的朝向
   */
  function drawPolygon(ctx, cx, cy, r, sides, rotation = 0) {
    ctx.beginPath();
    for (let i = 0; i < sides; i++) {
      const angle = rotation + (i * 2 * Math.PI) / sides;
      const x = cx + r * Math.cos(angle);
      const y = cy + r * Math.sin(angle);
      if (i === 0) ctx.moveTo(x, y);
      else ctx.lineTo(x, y);
    }
    ctx.closePath();
  }

  // 绘制三个正多边形
  ctx.fillStyle = 'rgba(255,100,100,0.5)';
  ctx.strokeStyle = 'red';
  ctx.lineWidth = 2;

  // 三角形
  drawPolygon(ctx, 80, 100, 60, 3, -Math.PI/2);
  ctx.fill();
  ctx.stroke();

  // 四边形
  drawPolygon(ctx, 210, 88, 60, 4, -Math.PI/4);
  ctx.fill();
  ctx.stroke();

  // 五边形
  drawPolygon(ctx, 80, 220, 60, 5, -Math.PI/2);
  ctx.fill();
  ctx.stroke();

  // 六边形
  drawPolygon(ctx, 210, 220, 60, 6);
  ctx.fill();
  ctx.stroke();
</script>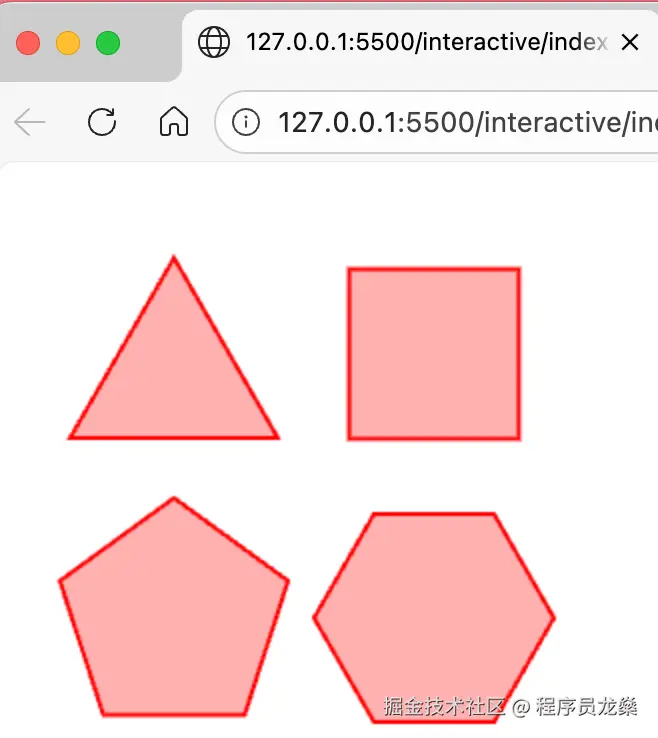
5.4 绘制五角星
五角星可以看作由内、外两圈顶点交替连接而成:外圈顶点在半径为 r1 的圆上,内圈顶点在半径为 r2 的圆上,每两个外顶点之间插入一个内顶点。
html
<canvas id="starDemo" width="500" height="200"></canvas>
<script>
  const canvas = document.getElementById('starDemo');
  const ctx = canvas.getContext('2d');

  /**
   * 绘制星形
   * @param {CanvasRenderingContext2D} ctx
   * @param {number} cx 中心点x坐标
   * @param {number} cy 中心点y坐标
   * @param {number} r1 外半径
   * @param {number} r2 内半径
   * @param {number} points 星形点数
   * @param {number} rotation 旋转角度(弧度),用于调整星形的朝向
   */
  function drawStar(ctx, cx, cy, r1, r2, points = 5, rotation = 0) {
    ctx.beginPath();
    for (let i = 0; i < points * 2; i++) {
      const radius = i % 2 === 0 ? r1 : r2;
      const angle = rotation + (i * Math.PI) / points; // 计算当前顶点的角度
      const x = cx + radius * Math.cos(angle); // 计算当前顶点的x坐标
      const y = cy + radius * Math.sin(angle); // 计算当前顶点的y坐标
      if (i === 0) ctx.moveTo(x, y); // 如果是第一个顶点,则移动到当前顶点
      else ctx.lineTo(x, y); // 否则绘制线段到当前顶点
    }
    ctx.closePath();
  }

  ctx.fillStyle = 'gold';
  ctx.strokeStyle = 'orange';
  ctx.lineWidth = 2;

  // 五角星
  drawStar(ctx, 120, 100, 50, 25, 5, -Math.PI / 2);
  ctx.fill();
  ctx.stroke();

  // 七角星
  drawStar(ctx, 300, 100, 50, 20, 7, -Math.PI / 2);
  ctx.fillStyle = 'lightblue';
  ctx.fill();
  ctx.stroke();
</script>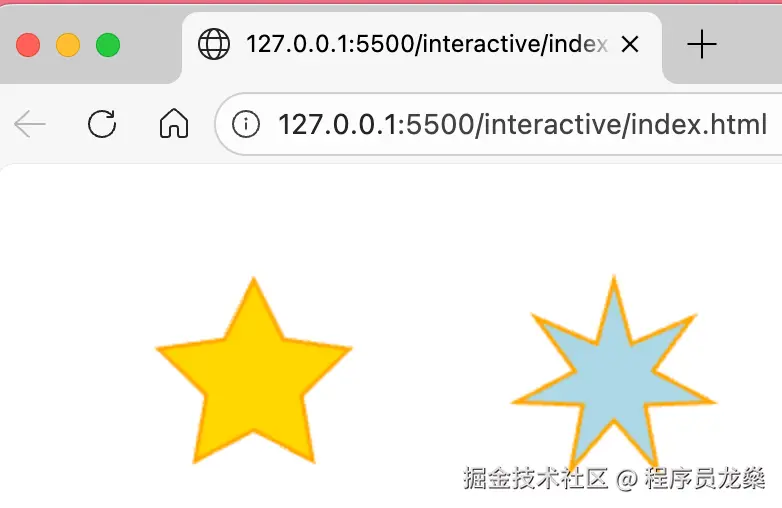
第6章:圆形与弧线
圆形和弧线是 Canvas 中常用的基本图形。本章将介绍两种绘制圆弧的方法:arc 和 arcTo,以及它们在实际开发中的应用技巧。
6.1 角度与弧度
在圆中,如果一段圆弧的长度恰好等于圆的半径,那么这段圆弧所对的圆心角的大小就是 1 弧度。
-
因为整个圆的周长 = 2π × 半径,所以整个圆(360°)对应的弧度是 2π。
-
由此可得:
- 180° = π 弧度
- 90° = π/2 弧度
- 60° = π/3 弧度
- 45° = π/4 弧度
- 30° = π/6 弧度
为什么用弧度? JavaScript 的三角函数(Math.sin, Math.cos 等)都采用弧度制,且弧度在微积分、物理模拟和图形学公式中更加自然简洁。虽然一开始可能不习惯,但只要记住几个常用转换,很快就能上手。
-
角度转弧度:弧度 = 角度 × π / 180
-
弧度转角度:角度 = 弧度 × 180 / π 例如,30° 转换为弧度:30 × π/180 = π/6 ≈ 0.5236。 例如,30° 转换为弧度:30 × π/180 = π/6 ≈ 0.5236。
6.2 绘制圆弧:arc()
arc() 是最常用的圆弧绘制方法,通过圆心、半径和起止角度定义一段圆弧。
js
ctx.arc(x, y, radius, startAngle, endAngle, counterclockwise);-
x, y:圆心坐标
-
radius:半径
-
startAngle, endAngle:起始角和结束角(弧度)
-
counterclockwise:可选,
false表示顺时针(默认),true表示逆时针
起点方向:0 弧度位于 X 轴正方向(右侧)。
基础示例:绘制一个完整的圆
js
ctx.beginPath();
ctx.arc(100, 75, 50, 0, Math.PI * 2);
ctx.strokeStyle = 'blue';
ctx.stroke();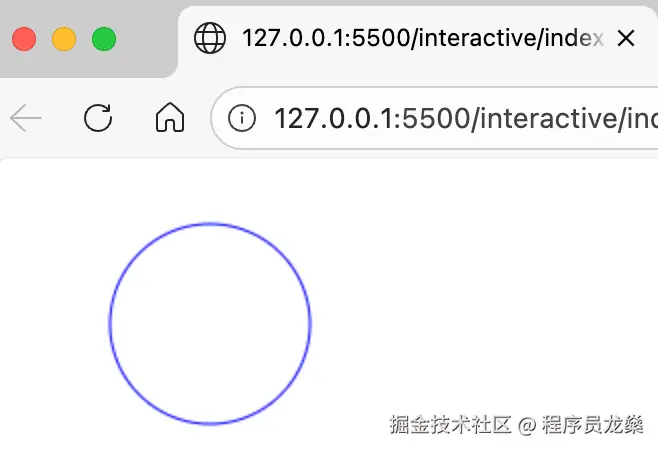
绘制半圆:
js
ctx.beginPath();
ctx.arc(100, 75, 50, 0, Math.PI);       // 上半圆(顺时针从 0 到 π)
ctx.stroke();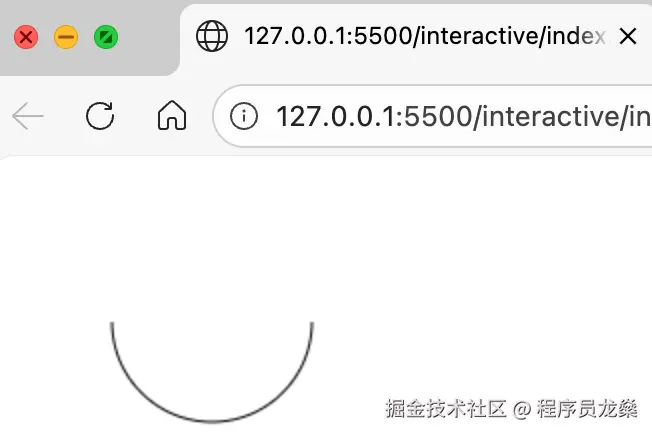
绘制扇形: 扇形需要连接圆心与圆弧起点、终点,形成一个封闭路径。 在绘制扇形时,moveTo(圆心) 的作用至关重要,它决定了最终绘制的是扇形 还是弓形。
有 moveTo 时,arc 执行时,由于当前点(圆心)与圆弧起点不同,它会自动添加一条从圆心到圆弧起点的直线,然后再绘制圆弧。
js
  // ========== 左侧:有 moveTo(扇形) ==========
  ctx.beginPath();
  ctx.moveTo(120, 120);                // 将画笔移动到圆心
  ctx.arc(120, 120, 80, 0, Math.PI/2); // 圆心 (120,120),半径80,从0°到90°(顺时针)
  ctx.closePath();                      // 从圆弧终点回到圆心
  ctx.fillStyle = 'gold';
  ctx.fill();
  ctx.strokeStyle = 'orange';
  ctx.lineWidth = 2;
  ctx.stroke();

  // ========== 右侧:无 moveTo(弓形) ==========
  ctx.beginPath();
  ctx.arc(380, 120, 80, 0, Math.PI/2); // 直接画圆弧,圆心 (380,120),参数同上
  ctx.closePath();                      // 从圆弧终点连接到圆弧起点(形成弦)
  ctx.fillStyle = 'lightblue';
  ctx.fill();
  ctx.strokeStyle = 'blue';
  ctx.stroke();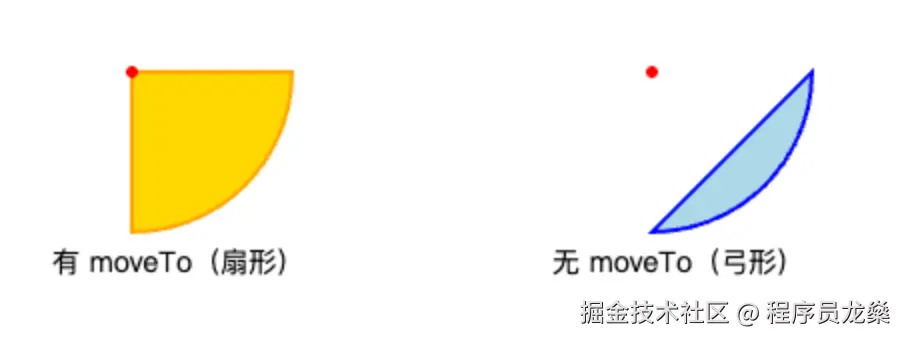
6.3 绘制圆弧:arcTo()
arcTo() 通过两条切线绘制一段圆弧,常用于创建圆角路径或连接两条直线。
js
ctx.arcTo(x1, y1, x2, y2, radius);- (x1, y1):第一个控制点
- (x2, y2):第二个控制点
- radius:圆弧半径
工作原理:
理解 arcTo()方法的一种方式是想象两条直线段:一条从起始点到第一个控制点,另一条从第一个控制点到第二个控制点。如果没有 arcTo()方法,这两条线段会形成一个尖角:arcTo() 方法在这个角落创建一个圆弧,并使其平滑连接。换句话说,这个圆弧与两条线段都相切。详见:CanvasRenderingContext2D:arcTo() 方法
特殊情况: 如果路径为空(没有当前点),Canvas 会隐式地将当前点设置为 (x1, y1),然后继续执行。此时 P0 与 (x1, y1) 重合,第一条射线退化为一个点,无法形成夹角,因此不会绘制圆弧,而是直接添加一条从 (x1, y1) 到 (x2, y2) 的直线。
html
<canvas id="arcToCompare" width="500" height="200"></canvas>
<script>
  const canvas = document.getElementById('arcToCompare');
  const ctx = canvas.getContext('2d');

  // 左侧:有 moveTo(正常圆角)
  ctx.beginPath();
  ctx.moveTo(50, 50);
  ctx.arcTo(180, 50, 180, 150, 40);
  ctx.lineTo(180, 150);
  ctx.strokeStyle = 'red';
  ctx.lineWidth = 3;
  ctx.stroke();

  // 右侧:无 moveTo(变成直线)
  ctx.beginPath();
  // 没有 moveTo,路径为空,arcTo 隐式将当前点设为 (330,50)
  ctx.arcTo(330, 50, 330, 150, 40);
  ctx.lineTo(330, 150);
  ctx.strokeStyle = 'blue';
  ctx.stroke();
</script>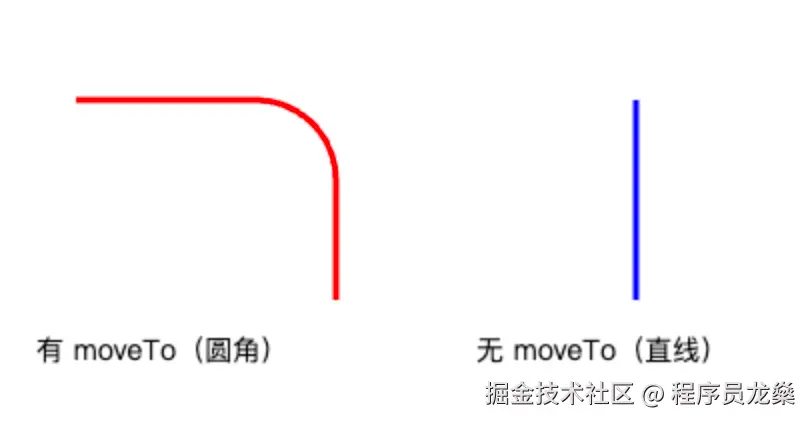
绘制圆角矩形:
js
function roundedRect(ctx, x, y, w, h, r) {
  ctx.beginPath();
  ctx.moveTo(x + r, y);                     // 起点
  ctx.arcTo(x + w, y, x + w, y + h, r);     // 右上角
  ctx.arcTo(x + w, y + h, x, y + h, r);     // 右下角
  ctx.arcTo(x, y + h, x, y, r);              // 左下角
  ctx.arcTo(x, y, x + w, y, r);              // 左上角
  ctx.closePath();
}

// 使用示例
roundedRect(ctx, 50, 50, 200, 100, 20);
ctx.fillStyle = 'lightblue';
ctx.fill();
ctx.strokeStyle = 'navy';
ctx.stroke();
🚀 下篇预告:图形样式篇
在下一篇中,你将学到:
- 如何绘制贝塞尔曲线(二次和三次),创造光滑流畅的自由曲线;
- 文本的渲染与样式控制,包括字体、对齐、度量等;
- 图片的加载与绘制技巧,以及图像合成与裁剪;
- 线性渐变、径向渐变的设计与使用,让图形拥有丰富的色彩过渡;
- 阴影效果的实现,为图形添加立体感和深度。
掌握这些,你的画布将拥有专业级的视觉效果,为创作惊艳的作品打下坚实基础。