在前面的文章中,我们深入学习了 Vue3 的响应式系统、组件渲染、生命周期等核心机制。今天,我们将探索 Vue Router 是如何与 Vue 的响应式系统无缝集成的。理解路由的实现原理,将帮助我们更好地处理页面导航、路由守卫等复杂场景。
前言:路由的核心挑战
Vue Router 作为 Vue 的官方路由管理器,其最精妙的设计之一就是与 Vue 响应式系统的无缝集成。Vue 作为单页应用(SPA),在路由管理中,面临的核心挑战是:在URL变化时,不刷新页面,而是动态切换组件: 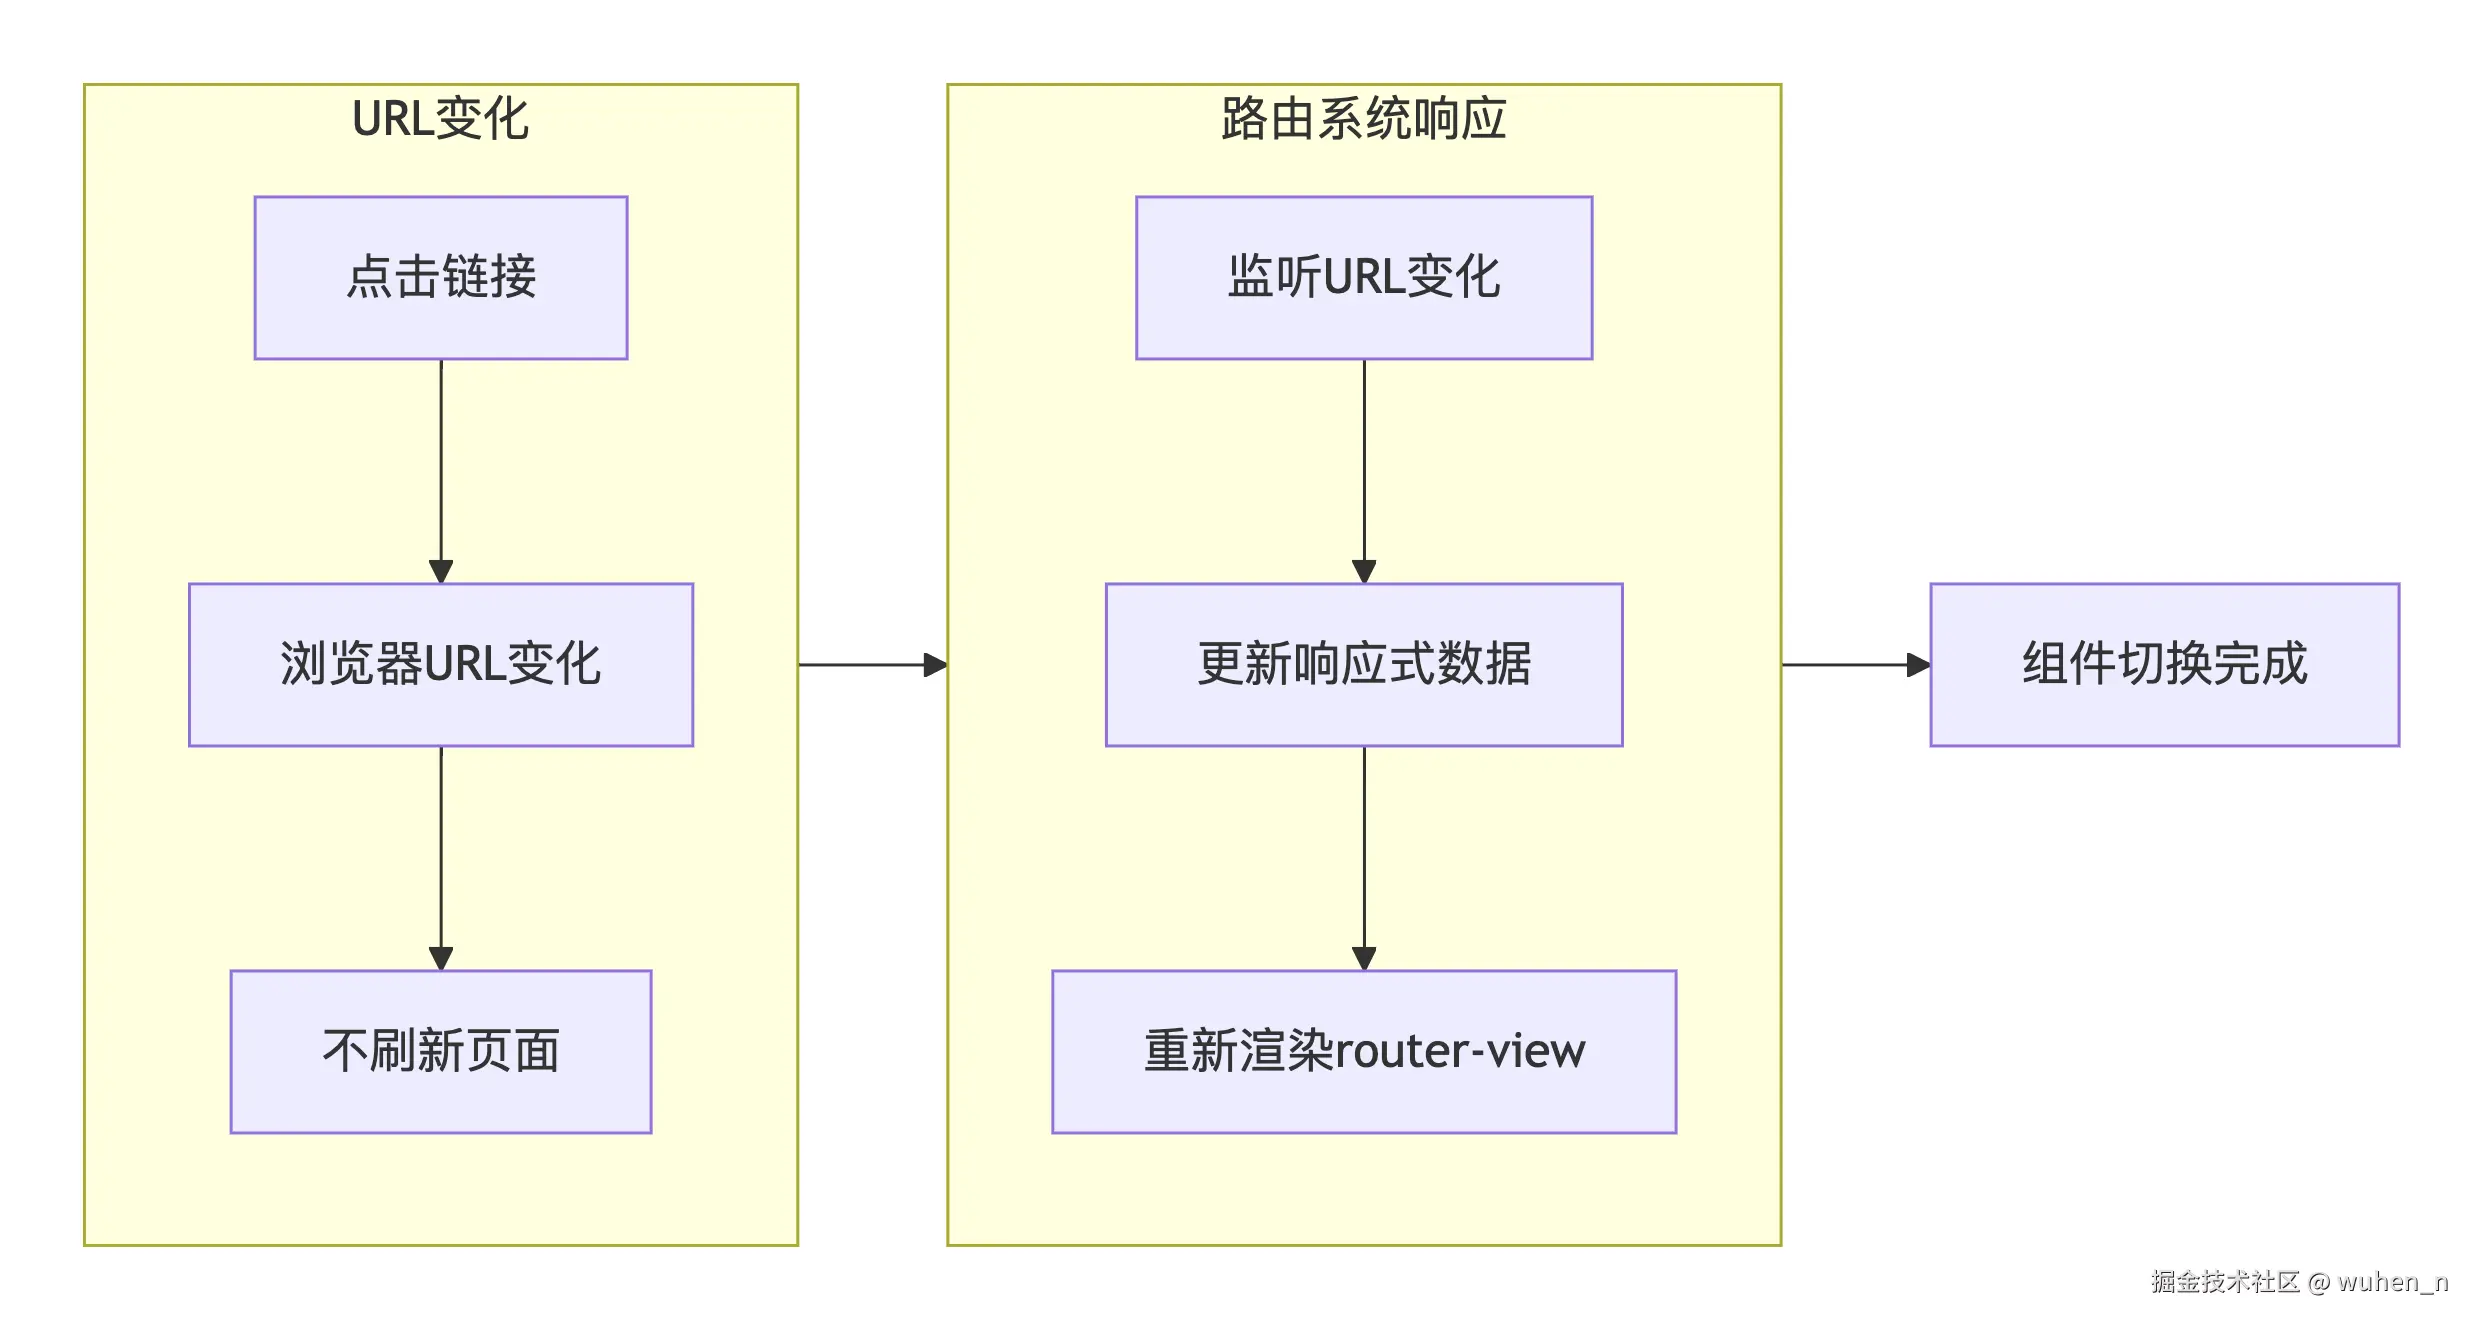 同时,也面临诸多问题:
- 如何监听URL变化而不刷新页面?
- 如何让路由变化触发组件重新渲染?
- 如何管理路由历史?
Vue Router 响应式设计总览
响应式数据的核心
Vue Router 实现响应式导航的核心是:将当前路由状态(currentRoute)作为响应式数据。当路由发生变化时,依赖这个响应式数据的组件(如 router-view)会自动重新渲染:
javascript
// 简化的核心代码
const currentRoute = shallowRef(initialRoute);
整体架构
Vue Router 的响应式集成主要包含三个层次:
- 数据层:
currentRoute响应式对象 - 视图层:
router-view组件监听路由变化 - 交互层:
router-link组件和编程式导航
currentRoute:路由响应式数据的实现
核心响应式设计
在 Vue Router 4 中,当前路由状态被设计为一个 shallowRef 响应式对象:
javascript
import { shallowRef } from 'vue'

function createRouter(options) {
  // 初始化路由状态
  const START_LOCATION_NORMALIZED = {
    path: '/',
    matched: [],
    meta: {},
    // ... 其他路由属性
  }

  // 核心响应式数据
  const currentRoute = shallowRef(START_LOCATION_NORMALIZED)

  const router = {
    // 暴露当前路由为只读属性
    get currentRoute() {
      return currentRoute.value
    },
    // ... 其他方法
  }

  return router
}
为什么使用 shallowRef 而不是 ref?因为路由对象结构较深,shallowRef 只代理 .value 的变更,内部属性变更不需要触发响应式,这样可以获得更好的性能。
路由响应式数据的使用
Vue Router 通过依赖注入将响应式路由数据提供给所有组件:
javascript
install(app) {
  // 注册路由实例
  app.provide(routerKey, router)
  app.provide(routeLocationKey, reactive(this.currentRoute))

  // 注册全局组件
  app.component('RouterLink', RouterLink)
  app.component('RouterView', RouterView)

  // 在原型上挂载 $router 和 $route
  app.config.globalProperties.$router = router
  app.config.globalProperties.$route = reactive(this.currentRoute)
}
这样,我们在组件中就可以通过 $route 或 useRoute() 访问响应式路由数据:
html
<script setup>
import { useRoute } from 'vue-router'

// 返回一个响应式对象,当路由变化时会自动更新
const route = useRoute()

console.log(route.path) // 当前路径
console.log(route.params) // 路由参数
</script>

<template>
  <div>当前路径: {{ $route.path }}</div>
</template>
路由变化时如何触发更新
当路由发生变化时,Vue Router 会更新 currentRoute.value,从而触发所有依赖的重新渲染:
javascript
// 路由导航的核心逻辑
async function navigate(to, from) {
  // ... 执行导航守卫、解析组件等

  // 更新当前路由(触发响应式更新)
  currentRoute.value = to

  // 调用 afterEach 钩子
  callAfterEachGuards(to, from)
}
router-view 组件的渲染原理
router-view 的作用
router-view 是一个函数式组件,它的核心职责是:根据当前路由的匹配结果,渲染对应的组件:
html
<template>
  <div id="app">
    <!-- 路由匹配的组件会在这里渲染 -->
    <router-view></router-view>
  </div>
</template>
router-view 的源码实现
javascript
const RouterView = defineComponent({
  name: 'RouterView',
  setup(props, { attrs, slots }) {
    // 注入路由实例和当前路由
    const injectedRoute = inject(routeLocationKey)
    const router = inject(routerKey)

    // 获取深度(用于嵌套路由)
    const depth = inject(viewDepthKey, 0)
    const matchedRouteRef = computed(() => {
      // 获取当前深度对应的匹配记录
      const matched = injectedRoute.matched[depth]
      return matched
    })

    // 提供下一层的 depth
    provide(viewDepthKey, depth + 1)

    return () => {
      const match = matchedRouteRef.value
      const component = match?.components?.default

      if (!component) {
        return slots.default?.() || null
      }

      // 渲染匹配到的组件
      return h(component, {
        ...attrs,
        ref: match.instances?.default,
      })
    }
  }
})
嵌套路由的处理
router-view 通过 depth 参数支持嵌套路由:
html
<template>
  <div>
    <h1>用户中心</h1>
    <!-- 默认 depth = 1,会渲染子路由组件 -->
    <router-view></router-view>
  </div>
</template>
每个嵌套的 router-view 都会通过 provide/inject 获得递增的深度值,从而从 matched 数组中取出对应的组件记录。
路由钩子的实现机制
钩子函数分类
Vue Router 提供了三类导航守卫:
- 全局守卫:beforeEach、beforeResolve、afterEach
- 路由独享守卫:beforeEnter
- 组件内守卫:beforeRouteEnter、beforeRouteUpdate、beforeRouteLeave
钩子执行流程源码简析
javascript
async function navigate(to, from) {
  const guards = []

  // 收集所有需要执行的守卫,并按顺序执行
  // 1. 执行 beforeRouteLeave(从最深的路由记录开始)
  const leaveGuards = extractLeaveGuards(from.matched)
  guards.push(...leaveGuards)

  // 2. 执行全局 beforeEach
  guards.push(router.beforeEachGuards)

  // 3. 执行 beforeRouteUpdate(如果组件复用)
  const updateGuards = extractUpdateGuards(from.matched, to.matched)
  guards.push(...updateGuards)

  // 4. 执行路由配置的 beforeEnter
  const enterGuards = extractEnterGuards(to.matched)
  guards.push(...enterGuards)

  // 5. 执行全局 beforeResolve
  guards.push(router.beforeResolveGuards)

  // 串行执行所有守卫
  for (const guard of guards) {
    const result = await guard(to, from)
    // 如果守卫返回 false 或重定向路径,中断导航
    if (result === false || typeof result === 'string') {
      return result
    }
  }

  // 6. 执行全局 afterEach(不阻塞导航)
  callAfterEachGuards(to, from)
}
组件内守卫的实现
组件内守卫通过 Vue 的生命周期钩子集成:
javascript
// 组件内守卫的注册
export default {
  beforeRouteEnter(to, from, next) {
    // 在渲染前调用,不能访问 this
    // 可以通过 next 回调访问组件实例
    next(vm => {
      // 通过 `vm` 访问组件实例
    })
  },
  beforeRouteUpdate(to, from, next) {
    // 路由改变但组件复用时调用
    // 可以访问 this
  },
  beforeRouteLeave(to, from, next) {
    // 离开路由时调用
    // 可以访问 this
  }
}
Hash模式 vs History模式
两种模式的本质区别
Vue Router 支持两种路由模式:
| 模式 | 创建方式 | URL格式 | 服务器配置 | 原理 |
|---|---|---|---|---|
| Hash | createWebHashHistory() | /#/home | 不需要 | 监听 hashchange 事件 + pushState |
| History | createWebHistory() | /home | 需要 | HTML5 History API |
Hash模式的实现
javascript
// hash.js - Hash模式实现
function createWebHashHistory(base = '') {
  // Hash模式本质上是在 History 模式基础上加了 '#' 前缀
  return createWebHistory(base ? base : '#')
}

// 处理 Hash 路径
function getHashLocation() {
  const hash = window.location.hash.slice(1) // 去掉开头的 '#'
  return hash || '/' // 空 hash 返回根路径
}

// 监听 hash 变化
window.addEventListener('hashchange', () => {
  const to = getHashLocation()
  // 更新路由状态
  changeLocation(to)
})
注:在 Vue Router 4 中,Hash 模式也统一使用 History API 进行导航,
hashchange仅作为兜底监听。
History模式的实现
javascript
// html5.js - History模式实现
function createWebHistory(base = '') {
  // 创建状态管理器
  const historyState = useHistoryState()
  const currentLocation = ref(createCurrentLocation(base))

  // 监听 popstate 事件
  window.addEventListener('popstate', (event) => {
    const to = createCurrentLocation(base)
    currentLocation.value = to
    // 触发路由更新
  })

  function push(to) {
    // 调用 history.pushState
    window.history.pushState({}, '', to)
    currentLocation.value = to
  }

  function replace(to) {
    window.history.replaceState({}, '', to)
    currentLocation.value = to
  }

  return {
    location: currentLocation,
    push,
    replace
  }
}
History模式的服务器配置
History 模式需要服务器配置支持,否则刷新页面会 404。Nginx 配置示例:
bash
location / {
  try_files $uri $uri/ /index.html;
}
createRouter核心逻辑源码简析
createRouter的整体结构
javascript
function createRouter(options) {
  // 1. 创建路由匹配器
  const matcher = createRouterMatcher(options.routes)

  // 2. 创建响应式路由状态
  const currentRoute = shallowRef(START_LOCATION)

  // 3. 根据模式创建 history 实例
  const history = options.history

  // 4. 定义路由方法
  const router = {
    // 响应式路由
    currentRoute,

    // 导航方法
    push(to) {
      return pushWithRedirect(to)
    },

    replace(to) {
      return push(to, true)
    },

    // 后退
    back() {
      history.go(-1)
    },

    // 前进
    forward() {
      history.go(1)
    },

    // 插件安装方法
    install(app) {
      // 提供路由实例
      app.provide(routerKey, router)
      app.provide(routeLocationKey, reactive(currentRoute))

      // 注册全局组件
      app.component('RouterLink', RouterLink)
      app.component('RouterView', RouterView)

      // 挂载到全局属性
      app.config.globalProperties.$router = router
      app.config.globalProperties.$route = reactive(currentRoute)

      // 初始化路由
      if (currentRoute.value === START_LOCATION) {
        // 解析初始路径
        history.replace(history.location)
      }
    }
  }

  return router
}
createRouterMatcher的实现
路由匹配器负责将配置的路由表拍平,建立父子关系:
javascript
function createRouterMatcher(routes) {
  const matchers = []

  // 递归添加路由记录
  function addRoute(record, parent) {
    // 标准化路由记录
    const normalizedRecord = normalizeRouteRecord(record)

    // 创建匹配器
    const matcher = createRouteRecordMatcher(normalizedRecord, parent)

    // 处理子路由
    if (normalizedRecord.children) {
      for (const child of normalizedRecord.children) {
        addRoute(child, matcher)
      }
    }

    matchers.push(matcher)
  }

  // 初始化所有路由
  routes.forEach(route => addRoute(route))

  // 解析路径,返回匹配的路由记录
  function resolve(location) {
    const matched = []
    let path = location.path

    // 找到匹配的 matcher
    for (const matcher of matchers) {
      if (path.startsWith(matcher.path)) {
        matched.push(matcher.record)
      }
    }

    return {
      path,
      matched
    }
  }

  return {
    addRoute,
    resolve
  }
}
手写简易路由实现
javascript
// 简易路由实现
import { ref, shallowRef, reactive, computed, provide, inject } from 'vue'

const ROUTER_KEY = '__router__'
const ROUTE_KEY = '__route__'

// 创建路由
function createRouter(options) {
  // 1. 创建匹配器
  const matcher = createMatcher(options.routes)

  // 2. 响应式路由状态
  const currentRoute = shallowRef({
    path: '/',
    matched: []
  })

  // 3. 处理历史模式
  const history = options.history

  // 4. 监听 popstate
  window.addEventListener('popstate', () => {
    const path = window.location.pathname
    const matched = matcher.match(path)
    currentRoute.value = { path, matched }
  })

  // 5. 导航方法
  function push(path) {
    window.history.pushState({}, '', path)
    const matched = matcher.match(path)
    currentRoute.value = { path, matched }
  }

  const router = {
    currentRoute,
    push,
    install(app) {
      app.provide(ROUTER_KEY, router)
      app.provide(ROUTE_KEY, reactive(currentRoute))

      app.component('RouterLink', {
        props: { to: String },
        setup(props, { slots }) {
          const router = inject(ROUTER_KEY)
          return () => (
            h('a', {
              href: props.to,
              onClick: (e) => {
                e.preventDefault()
                router.push(props.to)
              }
            }, slots.default?.())
          )
        }
      })

      app.component('RouterView', {
        setup() {
          const route = inject(ROUTE_KEY)
          const depth = inject('depth', 0)
          provide('depth', depth + 1)

          return () => {
            const component = route.value.matched[depth]?.component
            return component ? h(component) : null
          }
        }
      })
    }
  }

  return router
}

// 简易匹配器
function createMatcher(routes) {
  const records = []

  function normalize(route, parent) {
    const record = {
      path: parent ? parent.path + route.path : route.path,
      component: route.component,
      parent
    }

    records.push(record)

    if (route.children) {
      route.children.forEach(child => normalize(child, record))
    }
  }

  routes.forEach(route => normalize(route))

  return {
    match(path) {
      return records.filter(record => path.startsWith(record.path))
    }
  }
}
性能优化与最佳实践
路由懒加载
javascript
const routes = [
  {
    path: '/dashboard',
    // 使用动态导入实现懒加载
    component: () => import('./views/Dashboard.vue')
  }
]
避免不必要的响应式开销
javascript
// 如果只需要一次性值,可以不用解构
const route = useRoute()
// ❌ 避免:每次路由变化都会重新计算
const id = computed(() => route.params.id)

// ✅ 推荐:直接在需要的地方使用
watch(() => route.params.id, (newId) => {
  // 只在变化时执行
})
路由守卫的最佳实践
javascript
// 全局前置守卫:适合做权限验证
router.beforeEach((to, from, next) => {
  if (to.meta.requiresAuth && !isLoggedIn()) {
    next('/login')
  } else {
    next()
  }
})

// 组件内守卫:适合做数据预加载
beforeRouteEnter(to, from, next) {
  fetchData(to.params.id).then(data => {
    next(vm => vm.data = data)
  })
}
结语
Vue Router 与响应式系统的集成是 Vue 生态中最精妙的设计之一,理解这些原理不仅帮助我们更好地使用 Vue Router,也为处理复杂路由场景(如权限控制、动态路由、嵌套路由等)提供了理论基础。在实际开发中,合理利用路由响应式特性和导航守卫,可以构建出既高效又易维护的单页应用。
对于文章中错误的地方或有任何疑问,欢迎在评论区留言讨论!