前言
在 Spring Boot 项目中,直接注入 RedisTemplate 往往会把业务逻辑绑死在 Redis 上;当你想切换本地缓存或升级缓存架构时,业务代码就需要大面积改动。
本文基于 Spring Cache 抽象与条件装配,落地一套可插拔缓存方案:一行配置即可在 Caffeine 与 Redis 之间切换,业务代码零改动,并透明支持多租户缓存隔离。同时,针对多租户场景下容易被忽略的"数据隔离"问题,我们将通过装饰器模式,在框架底层透明地解决,确保业务开发人员无需操心 Key 的租户前缀。
核心概念
Spring Cache 抽象
Spring Cache 是 Spring 框架提供的缓存抽象层,核心接口有两个:
CacheManager:缓存管理器,负责创建和管理Cache实例。Cache:缓存操作接口,提供get、put、evict、clear等方法。
⚠️ 关键点:业务代码只依赖
CacheManager和Cache接口,不直接引用 Caffeine 或 Redis 的实现类。这是实现无缝切换的基础。
整体架构设计
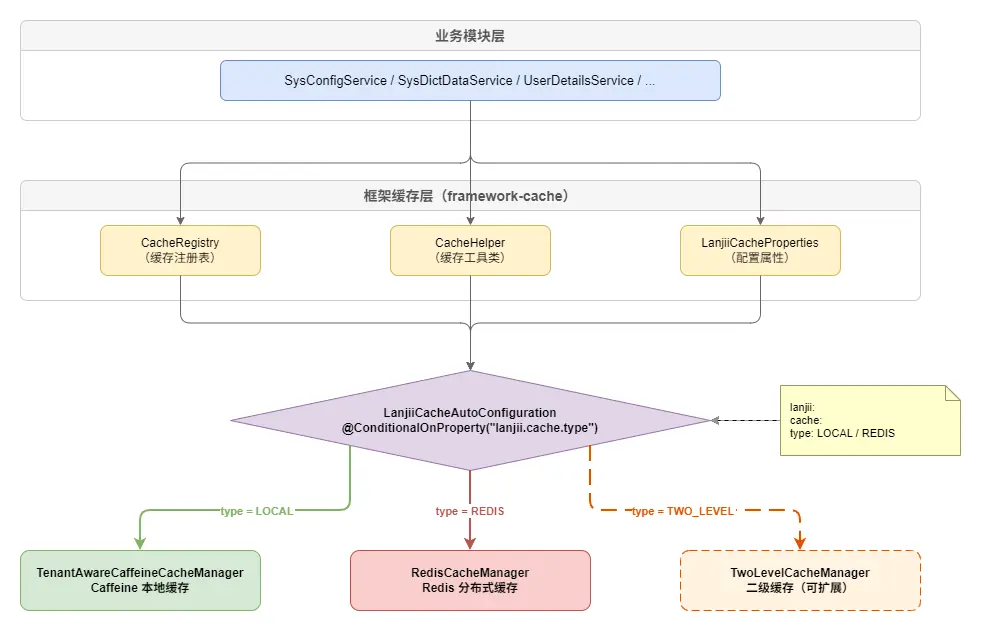
切换缓存只需修改配置文件中的 lanjii.cache.type 值:
yaml
lanjii:
  cache:
    type: LOCAL   # 切换为 REDIS 即可启用 Redis 缓存
实现步骤
第一步:引入依赖
在缓存框架模块的 pom.xml 中同时引入 Caffeine 和 Redis 依赖:
xml
<dependencies>
<!-- 内部依赖 -->
<dependency>
<groupId>com.lanjii</groupId>
<artifactId>framework-context</artifactId>
</dependency>
<!-- Spring Cache -->
<dependency>
<groupId>org.springframework.boot</groupId>
<artifactId>spring-boot-starter-cache</artifactId>
</dependency>
<!-- Caffeine -->
<dependency>
<groupId>com.github.ben-manes.caffeine</groupId>
<artifactId>caffeine</artifactId>
</dependency>
<!-- Jackson (序列化) -->
<dependency>
<groupId>com.fasterxml.jackson.core</groupId>
<artifactId>jackson-databind</artifactId>
</dependency>
<dependency>
<groupId>com.fasterxml.jackson.datatype</groupId>
<artifactId>jackson-datatype-jsr310</artifactId>
</dependency>
<!-- Redis -->
<dependency>
<groupId>org.springframework.boot</groupId>
<artifactId>spring-boot-starter-data-redis</artifactId>
</dependency>
</dependencies>⚠️ 两个依赖同时存在于 classpath,但通过条件装配只会激活其中一个
CacheManager。
第二步:定义缓存配置属性
通过 @ConfigurationProperties 将 YAML 配置映射为 Java 对象:
java
package com.lanjii.framework.cache.properties;
import lombok.Data;
import org.springframework.boot.context.properties.ConfigurationProperties;
import java.time.Duration;
@Data
@ConfigurationProperties(prefix = "lanjii.cache")
public class LanjiiCacheProperties {
/**
* 缓存类型:LOCAL(Caffeine)或 REDIS
*/
private CacheType type = CacheType.LOCAL;
/**
* 是否允许缓存 Null 值(防止缓存穿透)
*/
private boolean cacheNullValues = true;
/**
* 默认过期时间,默认 1 小时
*/
private Duration defaultTtl = Duration.ofHours(1);
/**
* 默认最大容量(仅 Local 模式有效),默认 1000
*/
private long defaultMaxSize = 1000L;
public enum CacheType {
LOCAL, // 本地缓存 (Caffeine)
REDIS // 分布式缓存 (Redis)
}
}各字段说明:
type:核心切换开关,LOCAL表示使用 Caffeine,REDIS表示使用 Redis。默认LOCAL。cacheNullValues:是否允许缓存空值。设为true可防止缓存穿透(大量请求查询不存在的 key 直接打到数据库)。defaultTtl:全局默认过期时间。支持 Spring 的 Duration 格式,如1h、30m、7d。defaultMaxSize:Caffeine 本地缓存的最大条目数。超过后按 W-TinyLFU 算法淘汰。Redis 模式下此配置无效。
第三步:定义缓存元数据(CacheDef)
每个缓存实例都有自己的 TTL(过期时间)、最大容量、是否需要租户隔离等属性。我们用一个 CacheDef 类来封装这些元数据:
arduino
package com.lanjii.framework.cache.core;
import java.time.Duration;
public class CacheDef {
private final String name; // 缓存名称
private final Duration ttl; // 过期时间
private final long maxSize; // 最大容量(仅 Local 模式)
private final boolean tenantIsolated; // 是否按租户隔离
private CacheDef(String name, Duration ttl, long maxSize, boolean tenantIsolated) {
this.name = name;
this.ttl = ttl;
this.maxSize = maxSize;
this.tenantIsolated = tenantIsolated;
}
// 快捷工厂方法
public static CacheDef of(String name, Duration ttl) {
return new CacheDef(name, ttl, 1000L, true);
}
public static CacheDef of(String name, Duration ttl, long maxSize) {
return new CacheDef(name, ttl, maxSize, true);
}
public static CacheDef of(String name, Duration ttl, boolean tenantIsolated) {
return new CacheDef(name, ttl, 1000L, tenantIsolated);
}
public static CacheDef of(String name, Duration ttl, long maxSize, boolean tenantIsolated) {
return new CacheDef(name, ttl, maxSize, tenantIsolated);
}
// getter 省略
}CacheDef 采用静态工厂方法而非 Builder 模式,因为缓存定义通常是常量,参数固定,工厂方法更简洁。
第四步:缓存注册表(CacheRegistry)
CacheRegistry 作为缓存定义的中央注册表,业务模块在启动时将自己的 CacheDef 注册进来:
arduino
package com.lanjii.framework.cache.core;
import java.util.*;
import java.util.concurrent.ConcurrentHashMap;
public class CacheRegistry {
private final Map<String, CacheDef> cacheDefMap = new ConcurrentHashMap<>();
/** 注册单个缓存定义 */
public void register(CacheDef cacheDef) {
cacheDefMap.put(cacheDef.getName(), cacheDef);
}
/** 批量注册 */
public void registerAll(CacheDef... cacheDefs) {
for (CacheDef cacheDef : cacheDefs) {
register(cacheDef);
}
}
/** 根据名称获取缓存定义 */
public Optional<CacheDef> get(String name) {
return Optional.ofNullable(cacheDefMap.get(name));
}
/** 获取所有已注册的缓存定义 */
public Collection<CacheDef> getAll() {
return cacheDefMap.values();
}
}使用 ConcurrentHashMap 保证线程安全,因为多个业务模块可能在 @PostConstruct 阶段并发注册。
第五步:真正实现"一行切换"的关键------条件装配
这是实现"一键切换"的关键。通过 @ConditionalOnProperty 注解,Spring Boot 会根据配置值决定创建哪个 CacheManager:
kotlin
package com.lanjii.framework.cache.config;
import com.lanjii.framework.cache.core.CacheRegistry;
import com.lanjii.framework.cache.properties.LanjiiCacheProperties;
import org.springframework.boot.autoconfigure.AutoConfiguration;
import org.springframework.boot.autoconfigure.condition.ConditionalOnMissingBean;
import org.springframework.boot.autoconfigure.condition.ConditionalOnProperty;
import org.springframework.boot.context.properties.EnableConfigurationProperties;
import org.springframework.cache.CacheManager;
import org.springframework.cache.annotation.EnableCaching;
import org.springframework.context.annotation.Bean;
@AutoConfiguration
@EnableCaching
@EnableConfigurationProperties(LanjiiCacheProperties.class)
public class LanjiiCacheAutoConfiguration {
/** 缓存注册表,供业务模块注入 */
@Bean
@ConditionalOnMissingBean
public CacheRegistry cacheRegistry() {
return new CacheRegistry();
}
/** LOCAL 模式 ------ Caffeine CacheManager(默认) */
@Bean
@ConditionalOnProperty(name = "lanjii.cache.type", havingValue = "LOCAL", matchIfMissing = true)
public CacheManager caffeineCacheManager(CacheRegistry cacheRegistry, LanjiiCacheProperties properties) {
return new TenantAwareCaffeineCacheManager(cacheRegistry, properties);
}
}注意 matchIfMissing = true:如果配置文件中没有写 lanjii.cache.type,默认走 LOCAL 模式。这样即使不额外配置缓存类型,系统也能先以本地缓存方式跑起来。
Redis 的配置放在单独的类中:
ini
package com.lanjii.framework.cache.config;
import com.fasterxml.jackson.annotation.JsonTypeInfo;
import com.fasterxml.jackson.databind.ObjectMapper;
import com.fasterxml.jackson.databind.SerializationFeature;
import com.fasterxml.jackson.datatype.jsr310.JavaTimeModule;
import com.lanjii.framework.cache.core.CacheDef;
import com.lanjii.framework.cache.core.CacheRegistry;
import com.lanjii.framework.cache.properties.LanjiiCacheProperties;
import com.lanjii.framework.context.tenant.TenantContext;
import org.springframework.boot.autoconfigure.condition.ConditionalOnClass;
import org.springframework.boot.autoconfigure.condition.ConditionalOnProperty;
import org.springframework.cache.CacheManager;
import org.springframework.context.annotation.Bean;
import org.springframework.context.annotation.Configuration;
import org.springframework.data.redis.cache.RedisCacheManager;
import org.springframework.data.redis.connection.RedisConnectionFactory;
import org.springframework.data.redis.serializer.GenericJackson2JsonRedisSerializer;
import org.springframework.data.redis.serializer.RedisSerializationContext;
import java.util.HashMap;
import java.util.Map;
@Configuration
@ConditionalOnProperty(name = "lanjii.cache.type", havingValue = "REDIS")
public class RedisCacheConfiguration {
@Bean
@ConditionalOnClass(RedisConnectionFactory.class)
public CacheManager redisCacheManager(CacheRegistry cacheRegistry,
LanjiiCacheProperties properties,
RedisConnectionFactory connectionFactory) {
// 1. 配置 JSON 序列化(支持 Java 8 时间类型 + 类型信息)
ObjectMapper objectMapper = new ObjectMapper();
objectMapper.registerModule(new JavaTimeModule());
objectMapper.disable(SerializationFeature.WRITE_DATES_AS_TIMESTAMPS);
objectMapper.activateDefaultTyping(
objectMapper.getPolymorphicTypeValidator(),
ObjectMapper.DefaultTyping.NON_FINAL,
JsonTypeInfo.As.PROPERTY
);
GenericJackson2JsonRedisSerializer serializer =
new GenericJackson2JsonRedisSerializer(objectMapper);
// 2. 默认缓存配置
org.springframework.data.redis.cache.RedisCacheConfiguration defaultConfig =
org.springframework.data.redis.cache.RedisCacheConfiguration.defaultCacheConfig()
.entryTtl(properties.getDefaultTtl())
.serializeValuesWith(
RedisSerializationContext.SerializationPair.fromSerializer(serializer))
.computePrefixWith(cacheName -> {
// 多租户前缀:tenantId:cacheName::
Long tenantId = TenantContext.getTenantId();
String prefix = (tenantId != null) ? tenantId.toString() : "0";
return prefix + ":" + cacheName + "::";
});
if (!properties.isCacheNullValues()) {
defaultConfig = defaultConfig.disableCachingNullValues();
}
// 3. 为每个已注册的缓存设置独立的 TTL
Map<String, org.springframework.data.redis.cache.RedisCacheConfiguration> configMap = new HashMap<>();
for (CacheDef cacheDef : cacheRegistry.getAll()) {
configMap.put(cacheDef.getName(), defaultConfig.entryTtl(cacheDef.getTtl()));
}
return RedisCacheManager.builder(connectionFactory)
.cacheDefaults(defaultConfig)
.withInitialCacheConfigurations(configMap)
.build();
}
}Redis 配置中的几个关键设计点:
GenericJackson2JsonRedisSerializer:使用 JSON 序列化而非 Java 默认序列化,这样 Redis 中的数据人类可读,便于调试。同时注册了JavaTimeModule以正确序列化LocalDateTime等 Java 8 时间类型。activateDefaultTyping:在 JSON 中保留类型信息(@class字段),反序列化时能还原为正确的 Java 类型。computePrefixWith:Redis key 格式为{tenantId}:{cacheName}::{key},通过租户 ID 前缀实现多租户数据隔离。- 双重条件装配 :
@ConditionalOnProperty确保只在type=REDIS时生效;@ConditionalOnClass确保 classpath 中有 Redis 依赖时才创建 Bean。
序列化陷阱与安全警示:
⚠️ 高危预警 :
activateDefaultTyping是一个"双刃剑"配置。
- 好处 :它会在 JSON 中自动嵌入
@class字段(如{"@class":"com.example.User", "id":1}),这使得反序列化时能自动恢复出多态对象或泛型集合,开发极其便利。- 风险 :如果 Redis 端口对外暴露,或者攻击者能控制 Redis 中的数据,他们可以构造恶意 JSON(如指向
Runtime.exec的类),在反序列化时触发远程代码执行(RCE)。生产建议:
- 内部系统:如果 Redis 仅在内网且有密码保护,可以使用此方案,开发效率最高。
- 公网系统 :绝对禁止 开启
activateDefaultTyping。替代方案是使用@JsonTypeInfo注解在特定的 DTO 类上显式声明类型信息,或者自定义RedisSerializer手动处理泛型转换。
Redis Key 设计规范:
本项目采用冒号分隔的命名空间设计:
css
{tenantId}:{cacheName}::{key}
# 示例:1001:userInfo::admin
这样设计的好处:在 Redis GUI 工具中可以按写入时间、租户、缓存名称三个维度展开观察,排查问题非常直观。
第六步:难点攻克------本地缓存的多租户隔离
这一步是整个方案的技术难点,也是市面上大多数缓存教程没有覆盖的地方。
问题在哪里?
Spring 原生的 CaffeineCacheManager 是全局单例的,所有租户共享同一批缓存空间。在多租户 SaaS 场景下,如果租户 A 和租户 B 的用户恰好有相同的 key(如用户名 admin),就会发生数据串读------A 租户查到了 B 租户的缓存数据。
Redis 模式相对容易处理(通过 computePrefixWith 在 key 上添加租户前缀),但本地缓存没有类似的官方支持,需要自己动手解决。
解决思路:装饰器模式
对 CaffeineCacheManager 返回的 Cache 实例进行包装,用 TenantAwareCache 装饰器在每次 key 操作时自动注入租户前缀,业务层完全无感知:
csharp
业务层调用 cache.get("admin")
      ↓
TenantAwareCache 拦截,生成 tenantKey = "1001:admin"
      ↓
实际操作底层 Caffeine:caffeineCache.get("1001:admin")
本地缓存模式下,所有租户数据都在同一个 JVM 内存中,需要通过 Key 前缀来隔离:
这一段代码只需要重点关注 3 件事:
- 如何根据
CacheDef动态创建缓存 - 如何判断当前缓存是否需要租户隔离
- 如何在 key 层自动追加租户前缀
typescript
package com.lanjii.framework.cache.config;
import com.github.benmanes.caffeine.cache.Caffeine;
import com.lanjii.framework.cache.core.CacheDef;
import com.lanjii.framework.cache.core.CacheRegistry;
import com.lanjii.framework.cache.properties.LanjiiCacheProperties;
import com.lanjii.framework.context.tenant.TenantContext;
import org.springframework.cache.Cache;
import org.springframework.cache.caffeine.CaffeineCacheManager;
import java.util.concurrent.Callable;
public class TenantAwareCaffeineCacheManager extends CaffeineCacheManager {
private final CacheRegistry cacheRegistry;
private final LanjiiCacheProperties properties;
public TenantAwareCaffeineCacheManager(CacheRegistry cacheRegistry,
LanjiiCacheProperties properties) {
this.cacheRegistry = cacheRegistry;
this.properties = properties;
this.setAllowNullValues(properties.isCacheNullValues());
}
@Override
public Cache getCache(String name) {
Cache delegate = super.getCache(name);
// 缓存不存在时,根据 CacheRegistry 或默认值动态创建
if (delegate == null) {
delegate = createAndRegisterCache(name);
}
if (delegate == null) {
return null;
}
// 需要租户隔离的缓存,包装为 TenantAwareCache
CacheDef cacheDef = cacheRegistry.get(name).orElse(null);
if (cacheDef != null && cacheDef.isTenantIsolated()) {
return new TenantAwareCache(delegate);
}
return delegate;
}
/** 动态创建并注册缓存 */
private synchronized Cache createAndRegisterCache(String name) {
Cache existing = super.getCache(name);
if (existing != null) {
return existing; // 双重检查
}
CacheDef cacheDef = cacheRegistry.get(name).orElse(null);
Caffeine<Object, Object> builder = Caffeine.newBuilder();
if (cacheDef != null) {
builder.expireAfterWrite(cacheDef.getTtl())
.maximumSize(cacheDef.getMaxSize());
} else {
builder.expireAfterWrite(properties.getDefaultTtl())
.maximumSize(properties.getDefaultMaxSize());
}
this.registerCustomCache(name, builder.build());
return super.getCache(name);
}
/** 租户感知的 Cache 装饰器,对所有 Key 自动添加租户前缀 */
static class TenantAwareCache implements Cache {
private final Cache delegate;
TenantAwareCache(Cache delegate) {
this.delegate = delegate;
}
private Object createTenantKey(Object key) {
Long tenantId = TenantContext.getTenantId();
String prefix = (tenantId != null) ? tenantId.toString() : "0";
return prefix + ":" + key;
}
@Override public String getName() { return delegate.getName(); }
@Override public Object getNativeCache() { return delegate.getNativeCache(); }
@Override public ValueWrapper get(Object key) { return delegate.get(createTenantKey(key)); }
@Override public <T> T get(Object key, Class<T> type) { return delegate.get(createTenantKey(key), type); }
@Override public <T> T get(Object key, Callable<T> valueLoader) { return delegate.get(createTenantKey(key), valueLoader); }
@Override public void put(Object key, Object value) { delegate.put(createTenantKey(key), value); }
@Override public void evict(Object key) { delegate.evict(createTenantKey(key)); }
@Override public boolean evictIfPresent(Object key) { return delegate.evictIfPresent(createTenantKey(key)); }
@Override public void clear() { delegate.clear(); }
@Override public boolean invalidate() { return delegate.invalidate(); }
@Override public ValueWrapper putIfAbsent(Object key, Object value) { return delegate.putIfAbsent(createTenantKey(key), value); }
}
}这里使用了装饰器模式 :TenantAwareCache 包装了原始的 Cache,在每次操作时自动给 Key 加上 {tenantId}: 前缀,从而实现同一缓存空间内的多租户数据隔离。
⚠️ 注意
isTenantIsolated是CacheDef中的可选项。对于字典数据、系统配置这类全局共享数据 (所有租户共用同一份),应设置为false,跳过租户前缀包装,避免缓存被重复存储 N 份浪费内存。
多租户使用注意事项:
⚠️ 在使用多租户缓存隔离时,请务必注意以下几点:
TenantContext必须提前设置 :整套租户隔离机制依赖TenantContext.getTenantId()获取当前租户 ID。你需要在请求链路的入口处(通常是 Filter 或 Interceptor)设置好租户上下文,否则所有缓存操作都会落入0:默认命名空间,导致不同租户的数据混在一起。clear()会清除所有租户的数据 :TenantAwareCache.clear()调用的是底层 Caffeine 缓存的clear(),会清空该缓存名下所有租户 的数据,而不仅仅是当前租户。如果只想清除当前租户的缓存,应该逐个evict已知的 key。- 非多租户项目可跳过 :如果你的项目不涉及多租户,将所有
CacheDef的tenantIsolated设为false即可,框架会跳过租户前缀逻辑,零额外开销。
第七步:缓存辅助工具(CacheHelper)
CacheHelper 封装了 Spring Cache 接口未覆盖的扩展能力:
java
package com.lanjii.framework.cache.helper;
import com.lanjii.framework.cache.core.CacheDef;
import com.lanjii.framework.cache.core.CacheRegistry;
import com.lanjii.framework.context.tenant.TenantContext;
import lombok.RequiredArgsConstructor;
import org.springframework.cache.Cache;
import org.springframework.cache.CacheManager;
import org.springframework.stereotype.Component;
import java.util.Collection;
import java.util.Collections;
import java.util.stream.Collectors;
@Component
@RequiredArgsConstructor
public class CacheHelper {
private final CacheManager cacheManager;
private final CacheRegistry cacheRegistry;
/**
* 获取指定缓存的所有值(仅 Local 模式可用)
* Redis 模式需使用 SCAN 命令另行实现
*/
@SuppressWarnings("unchecked")
public <T> Collection<T> getAllValues(String cacheName, Class<T> type) {
Cache cache = cacheManager.getCache(cacheName);
if (cache == null) return Collections.emptyList();
Object nativeCache = cache.getNativeCache();
if (nativeCache instanceof com.github.benmanes.caffeine.cache.Cache) {
var caffeineCache = (com.github.benmanes.caffeine.cache.Cache<Object, Object>) nativeCache;
CacheDef cacheDef = cacheRegistry.get(cacheName).orElse(null);
boolean tenantIsolated = cacheDef == null || cacheDef.isTenantIsolated();
if (tenantIsolated) {
Long tenantId = TenantContext.getTenantId();
String tenantPrefix = (tenantId != null ? tenantId.toString() : "0") + ":";
return caffeineCache.asMap().entrySet().stream()
.filter(entry -> entry.getKey().toString().startsWith(tenantPrefix))
.map(entry -> (T) entry.getValue())
.collect(Collectors.toList());
} else {
return (Collection<T>) caffeineCache.asMap().values();
}
}
throw new UnsupportedOperationException("getAllValues is only supported in LOCAL mode");
}
/** 清空指定缓存 */
public void clearAll(String cacheName) {
Cache cache = cacheManager.getCache(cacheName);
if (cache != null) cache.clear();
}
/** 获取缓存实例 */
public Cache getCache(String cacheName) {
return cacheManager.getCache(cacheName);
}
}⚠️
getAllValues方法在 Redis 模式下不可用。如果需要遍历 Redis 缓存数据,应使用RedisTemplate配合SCAN命令实现,避免使用KEYS *造成阻塞。
第八步:别忘了让 Spring Boot 识别这套缓存框架
在 META-INF/spring/org.springframework.boot.autoconfigure.AutoConfiguration.imports 中注册自动配置类:
arduino
com.lanjii.framework.cache.config.LanjiiCacheAutoConfigurationSpring Boot 3.x 使用此文件替代了旧版的 spring.factories。
业务模块接入
框架层搭建完成后,业务模块的接入非常简单,分为三步。
1. 声明缓存常量
ini
package com.lanjii.sys.config;
import com.lanjii.framework.cache.core.CacheDef;
import java.time.Duration;
public interface SystemCacheConstants {
/** 字典数据缓存(全租户共享) */
CacheDef DICT_DATA = CacheDef.of("dictData", Duration.ofHours(24), false);
/** 系统配置缓存(全租户共享) */
CacheDef SYS_CONFIG = CacheDef.of("sysConfig", Duration.ofDays(7), false);
/** 用户会话缓存(全租户共享) */
CacheDef USER_SESSION = CacheDef.of("userSession", Duration.ofHours(24), false);
/** 用户信息缓存(租户隔离) */
CacheDef USER_INFO = CacheDef.of("userInfo", Duration.ofHours(24));
/** 验证码缓存(租户隔离) */
CacheDef CAPTCHA = CacheDef.of("captcha", Duration.ofMinutes(5));
}注意 tenantIsolated 参数的使用:
false:如字典数据、系统配置,属于全局共享数据,不需要按租户隔离。true(默认):如用户信息、验证码,每个租户的数据相互独立。
2. 启动时注册缓存
kotlin
package com.lanjii.sys.config;
import com.lanjii.framework.cache.core.CacheRegistry;
import jakarta.annotation.PostConstruct;
import lombok.RequiredArgsConstructor;
import org.springframework.context.annotation.Configuration;
@Configuration
@RequiredArgsConstructor
public class SystemCacheConfig {
private final CacheRegistry cacheRegistry;
@PostConstruct
public void registerCaches() {
cacheRegistry.registerAll(
SystemCacheConstants.DICT_DATA,
SystemCacheConstants.SYS_CONFIG,
SystemCacheConstants.USER_SESSION,
SystemCacheConstants.USER_INFO,
SystemCacheConstants.CAPTCHA
);
}
}3. 在 Service 中使用缓存
以系统配置服务为例:
arduino
@Service("sysConfigService")
@RequiredArgsConstructor
public class SysConfigServiceImpl extends BaseServiceImpl<SysConfigDao, SysConfig>
implements SysConfigService {
private final CacheManager cacheManager;
private final CacheHelper cacheHelper;
private Cache getConfigCache() {
return cacheManager.getCache(SystemCacheConstants.SYS_CONFIG.getName());
}
/** 根据配置键获取配置(先查缓存,再查数据库) */
public SysConfig getConfigByKey(String configKey) {
Cache cache = getConfigCache();
// 1. 先从缓存获取
SysConfig config = cache.get(configKey, SysConfig.class);
if (config != null) {
return config;
}
// 2. 缓存未命中,查询数据库
config = getOne(new LambdaQueryWrapper<SysConfig>()
.eq(SysConfig::getConfigKey, configKey));
// 3. 写入缓存
if (config != null) {
cache.put(configKey, config);
}
return config;
}
/** 更新配置时清除缓存 */
@Override
public void updateByIdNew(Long id, SysConfigDTO dto) {
SysConfig originalConfig = getById(id);
// ... 省略校验逻辑
updateById(entity);
getConfigCache().evict(originalConfig.getConfigKey()); // 清除旧缓存
}
/** 手动清空全部配置缓存 */
@Override
public void clearCache() {
cacheHelper.clearAll(SystemCacheConstants.SYS_CONFIG.getName());
}
}可以看到,Service 层代码 只使用了 CacheManager 和 Cache 接口,完全不关心底层是 Caffeine 还是 Redis。切换缓存类型时,这里的代码无需做任何修改。
架构模式切换
这套方案的强大之处在于,你可以根据项目的实际部署需求,灵活选择架构模式,而无需改动代码。
模式一:轻量级单机模式 (Local)
适合单体应用 、私有化部署的小型环境 或对延迟极度敏感的场景。此时应用完全独立,不依赖任何外部缓存组件。
yaml
lanjii:
  cache:
    type: LOCAL
模式二:分布式集群模式 (Redis)
适合微服务架构 、多实例部署 或需要数据持久化的场景。此时通过 Redis 实现多节点间的数据共享。
yaml
lanjii:
  cache:
    type: REDIS
源码与在线体验
完整源码 :gitee.com/leven2018/l...
欢迎 Star ⭐ 和 Fork,项目包含本文涉及的所有代码(MCP 集成、多模型动态切换、RAG 知识库等)。
在线体验 :http://106.54.167.194/admin/index
总结
通过这套架构,我们成功实现了:
- 彻底解耦 :业务代码只认识
CacheManager,完全不知道底层是 Caffeine 还是 Redis。 - 一键切换:只需改一行配置,就能在单元测试(Local)和生产环境(Redis)之间无缝切换。
- 多租户安全:通过装饰器模式和 Key 前缀策略,在本地和分布式环境下都实现了透明的数据隔离。