前言
- 本篇记录我第一次使用mcuboot的记录。这里只是快速的使用起来,很多细节还没有理解到位,请酌情参考。
- 本次使用到的工具为Clion,结合AI工具来帮助理解。
- 本次使用的开发板为正点原子探索者,主控STM32F407ZGT6,其他的也支持。
- 本次使用的烧录器为Jlink。
使用Clion打开Zephyr的项目工程
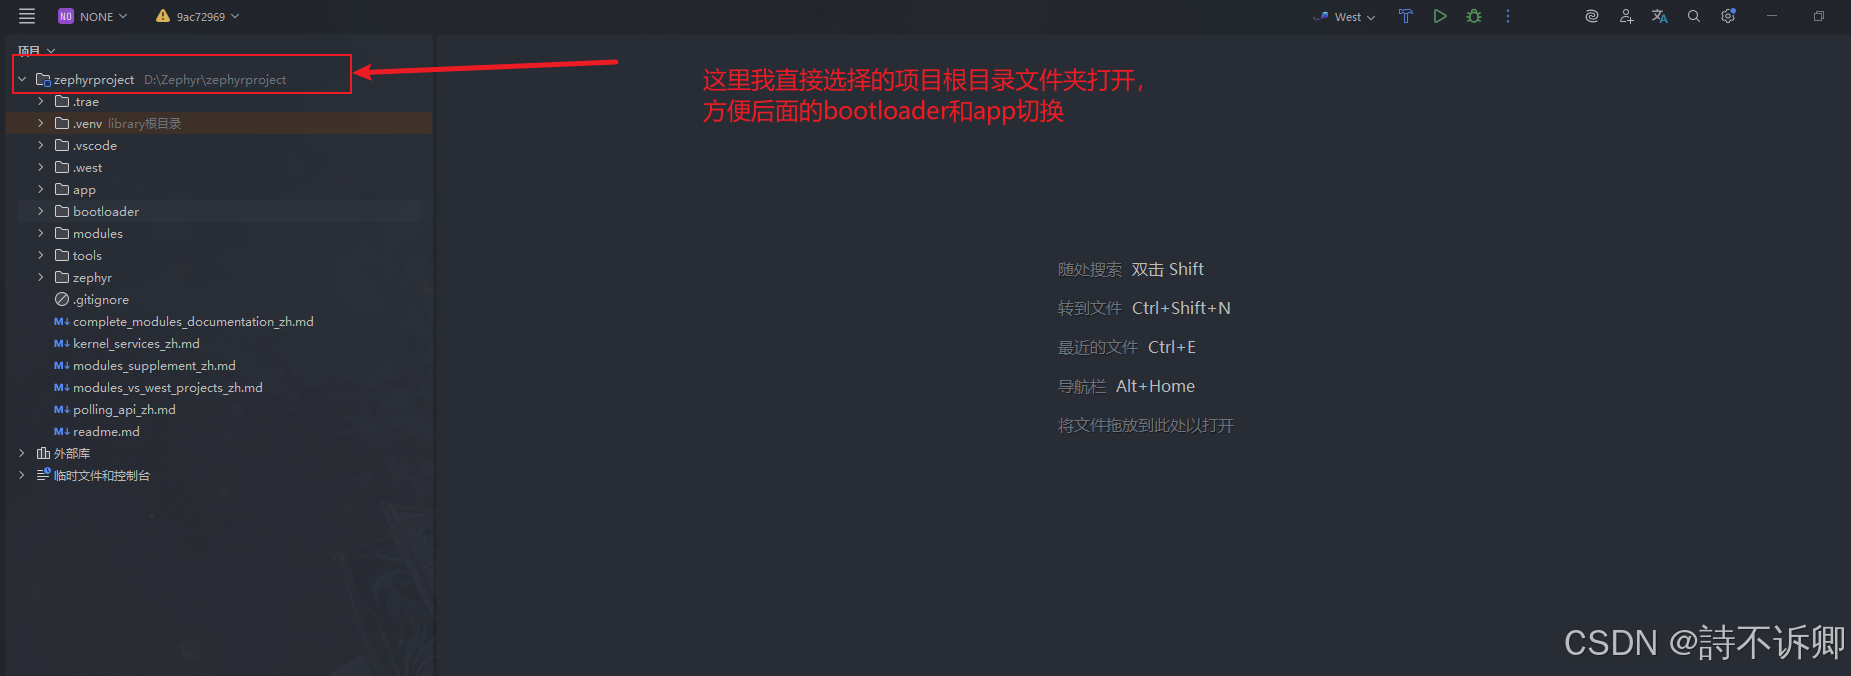
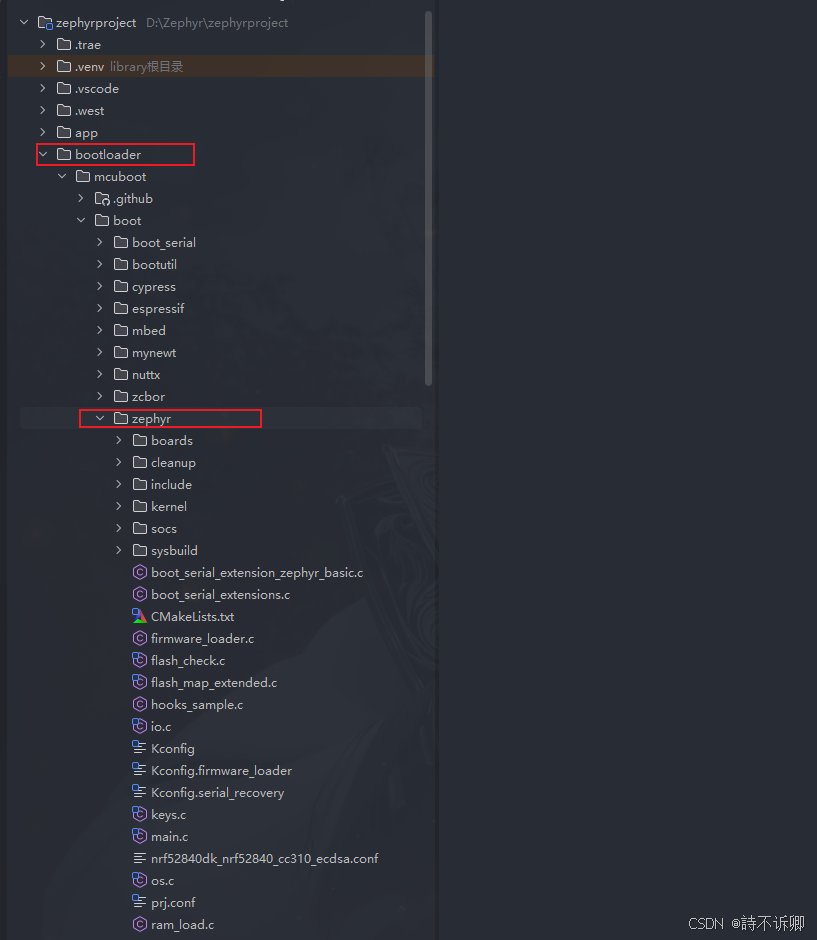
找到mcuboot提供的zephyr项目工程
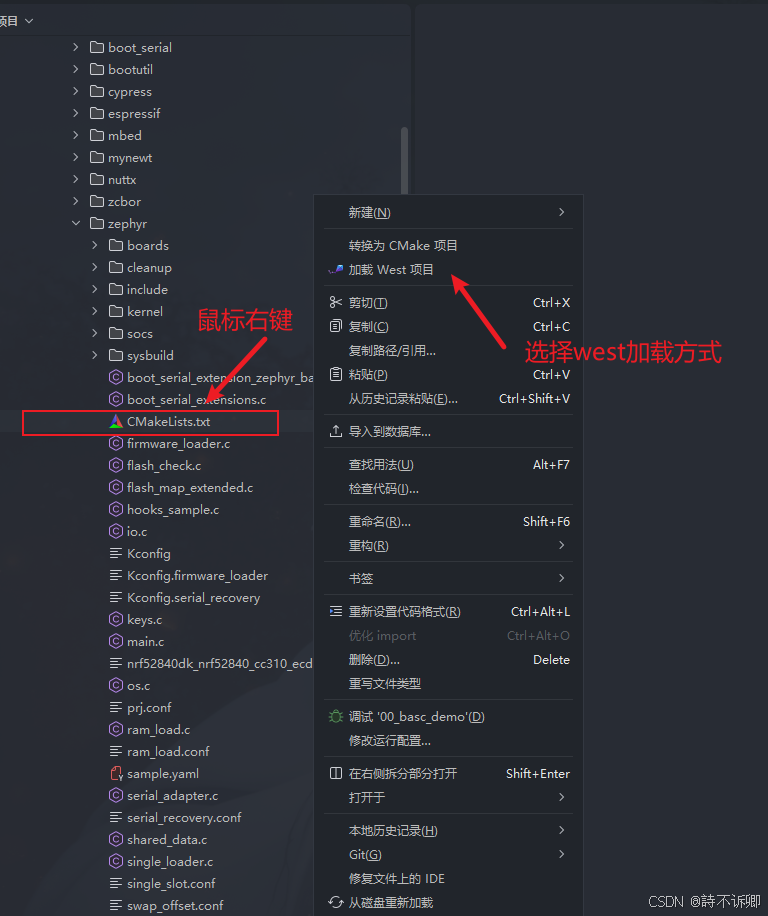
加载项目工程
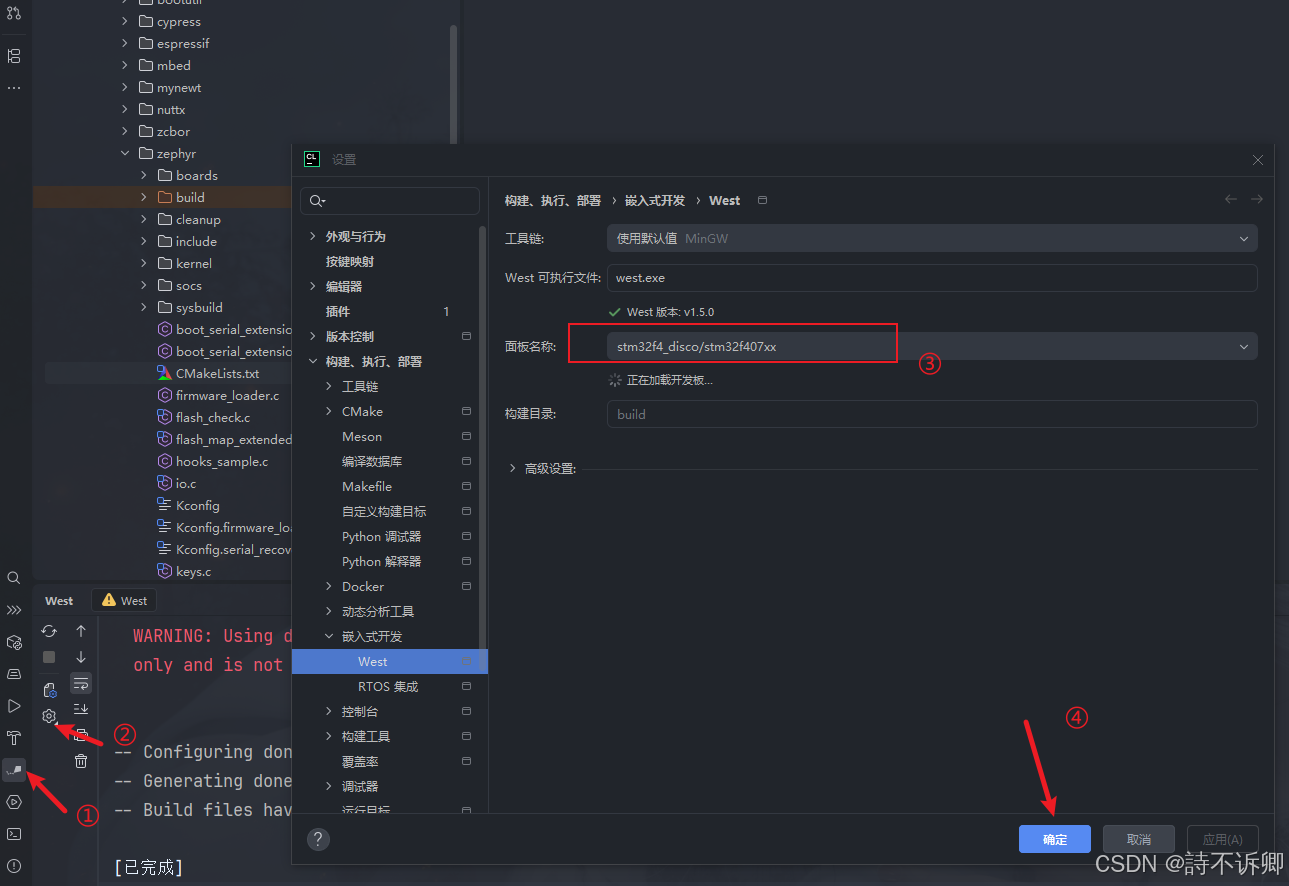
选择我们需要的开发板
我这里选择的是官方提供的,如果没有的话,需要自己去适配
在boards目录下,添加我们自己开发板的信息
- 这里可以参考已有的文件进行编写。
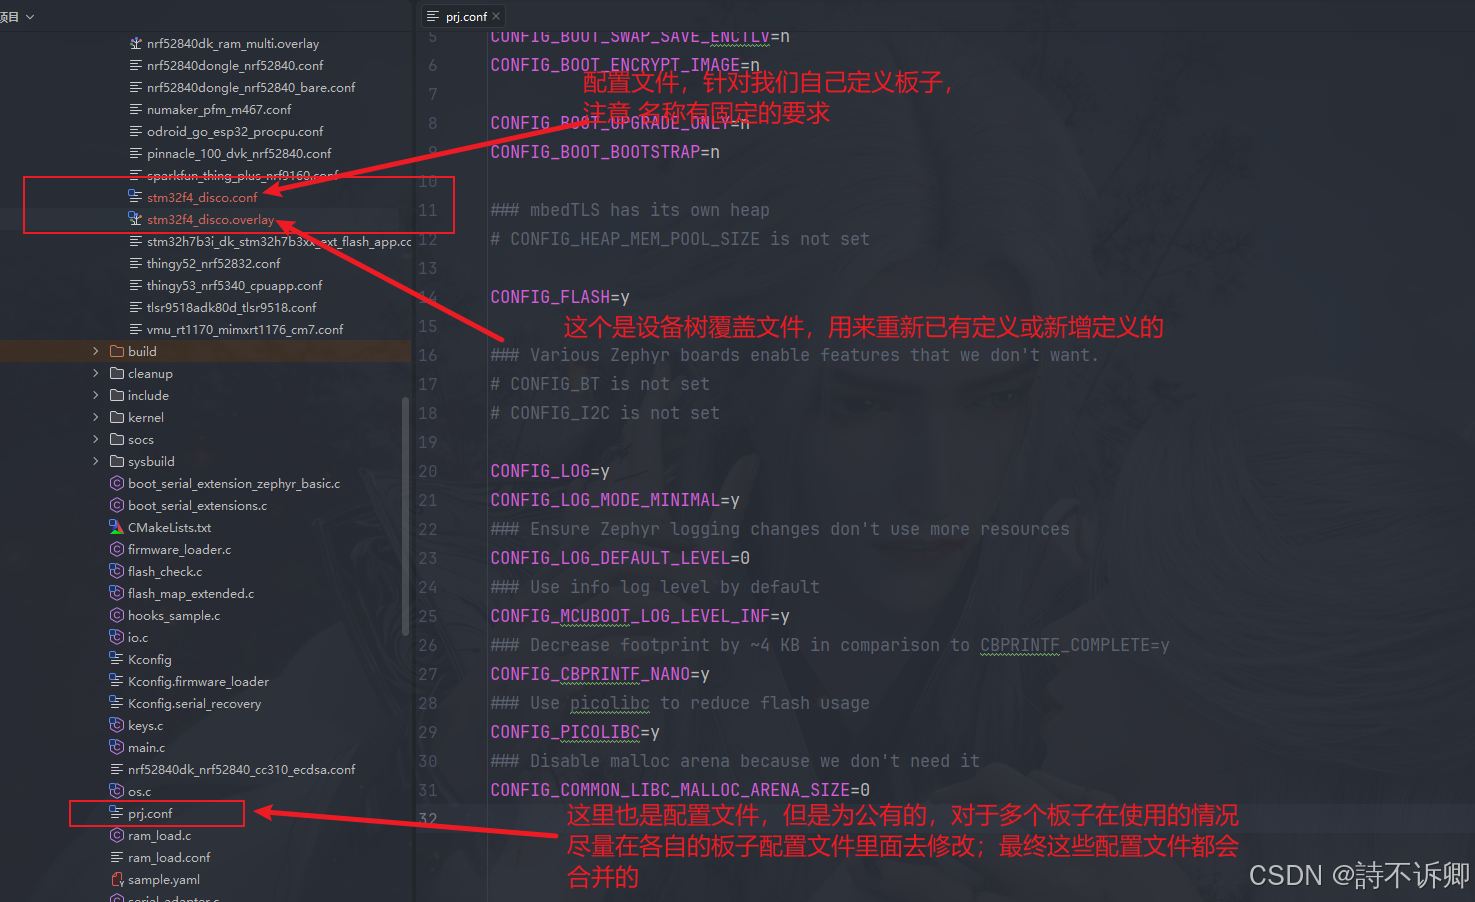
stm32f4_disco.overlay的编写
bash
/ {
	chosen {
		zephyr,console = &usart1;
		zephyr,shell = &usart1;
		zephyr,code-partition = &boot_partition;
	};

	aliases {
		usart1 = &usart1;
	};

};

&usart1 {
	pinctrl-0 = <&usart1_tx_pa9 &usart1_rx_pa10>;
	pinctrl-names = "default";
	current-speed = <115200>;
	status = "okay";
};

// 扇区分布
//Sector 0:  16 KB   (0x0800_0000 - 0x0800_3FFF)    ← 最小擦除单位
//Sector 1:  16 KB   (0x0800_4000 - 0x0800_7FFF)
//Sector 2:  16 KB   (0x0800_8000 - 0x0800_BFFF)
//Sector 3:  16 KB   (0x0800_C000 - 0x0800_FFFF)
//Sector 4:  64 KB   (0x0801_0000 - 0x0801_FFFF)
//Sector 5:  128 KB  (0x0802_0000 - 0x0803_FFFF)    ← Slot 0 起始
//Sector 6:  128 KB  (0x0804_0000 - 0x0805_FFFF)    ← Slot 1 起始
//Sector 7:  128 KB  (0x0806_0000 - 0x0807_FFFF)    ← Scratch 起始
&flash0 {
	status = "okay";

	partitions {
		compatible = "fixed-partitions";
		#address-cells = <1>;
		#size-cells = <1>;

		boot_partition: partition@0 {
			label = "mcuboot";
			reg = <0x00000000 DT_SIZE_K(128)>;
			read-only;
		};

		slot0_partition: partition@20000 {
			label = "image-0";
			reg = <0x00020000 DT_SIZE_K(128)>;
		};

		slot1_partition: partition@40000 {
			label = "image-1";
			reg = <0x00040000 DT_SIZE_K(128)>;
		};

		scratch_partition: partition@60000 {
			label = "image-scratch";
			reg = <0x00060000 DT_SIZE_K(128)>;
		};


	};
};
stm32f4_disco.conf的编写
bash
# 禁用自动计算,手动设置最大镜像扇区数(根据你的分区大小调整)
CONFIG_BOOT_MAX_IMG_SECTORS_AUTO=n
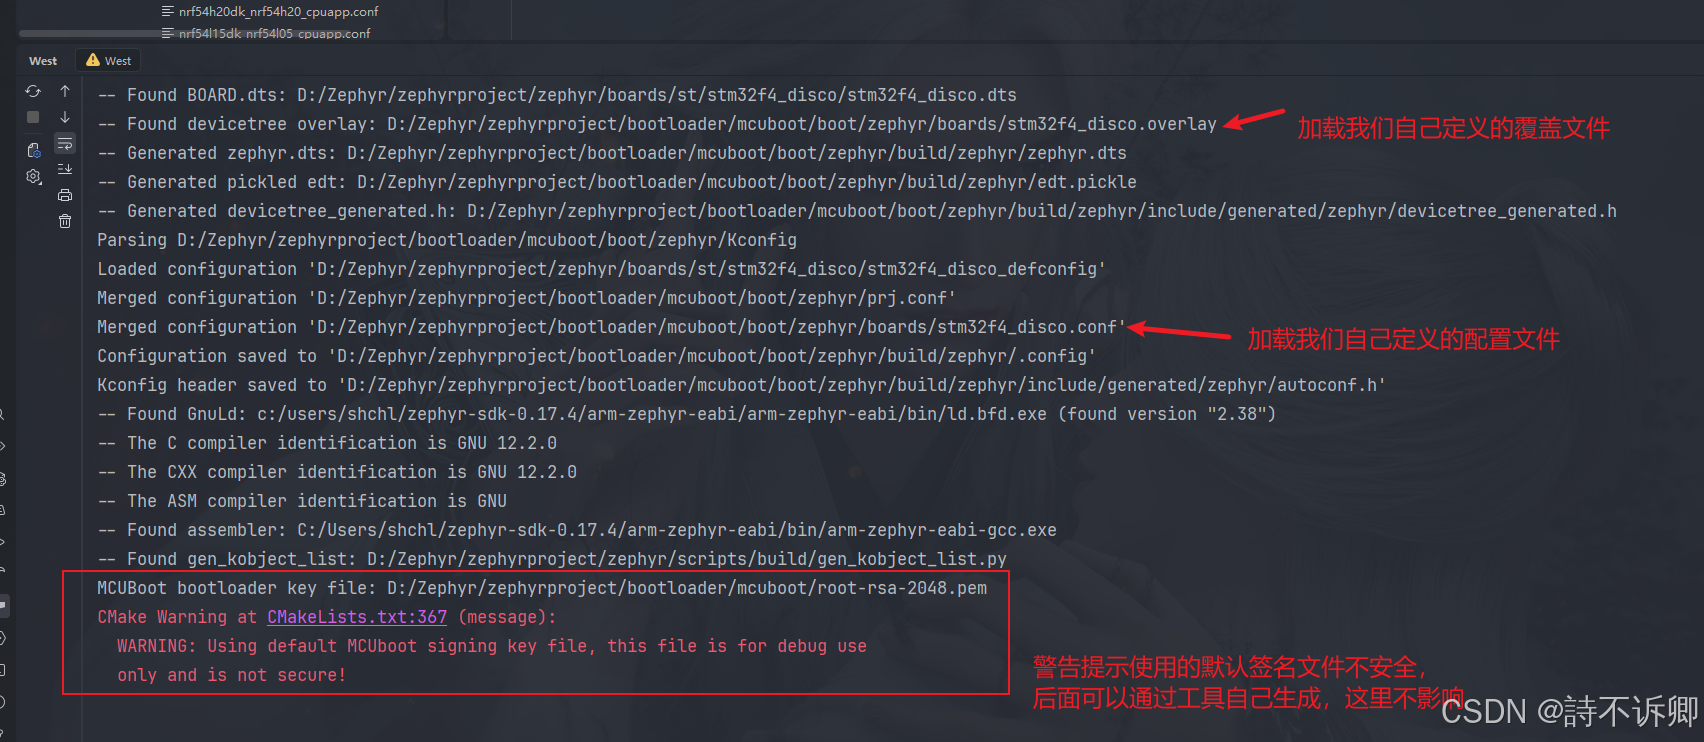
CONFIG_BOOT_MAX_IMG_SECTORS=16bootloader工程进行编译
注意:如果你的配置文件不生效的话,需要通过清除缓存重新编译来解决此问题
观察日志输出
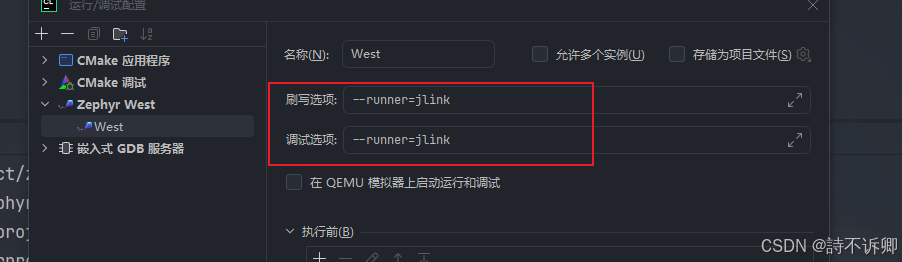
bootloader工程进行烧录
注意:我这里使用的jlink烧录,需要在烧录时,配置一下参数
烧录结果
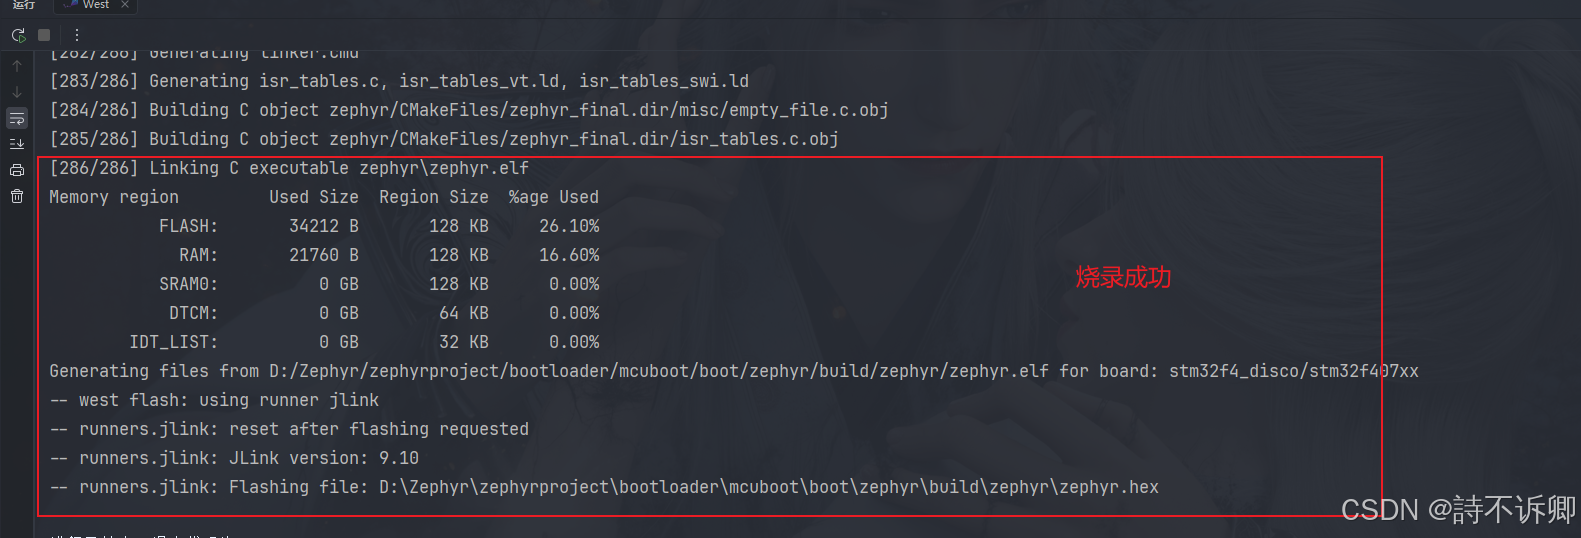
控制台输出

创建app固件程序
打开自己创建的工程,或使用示例工程
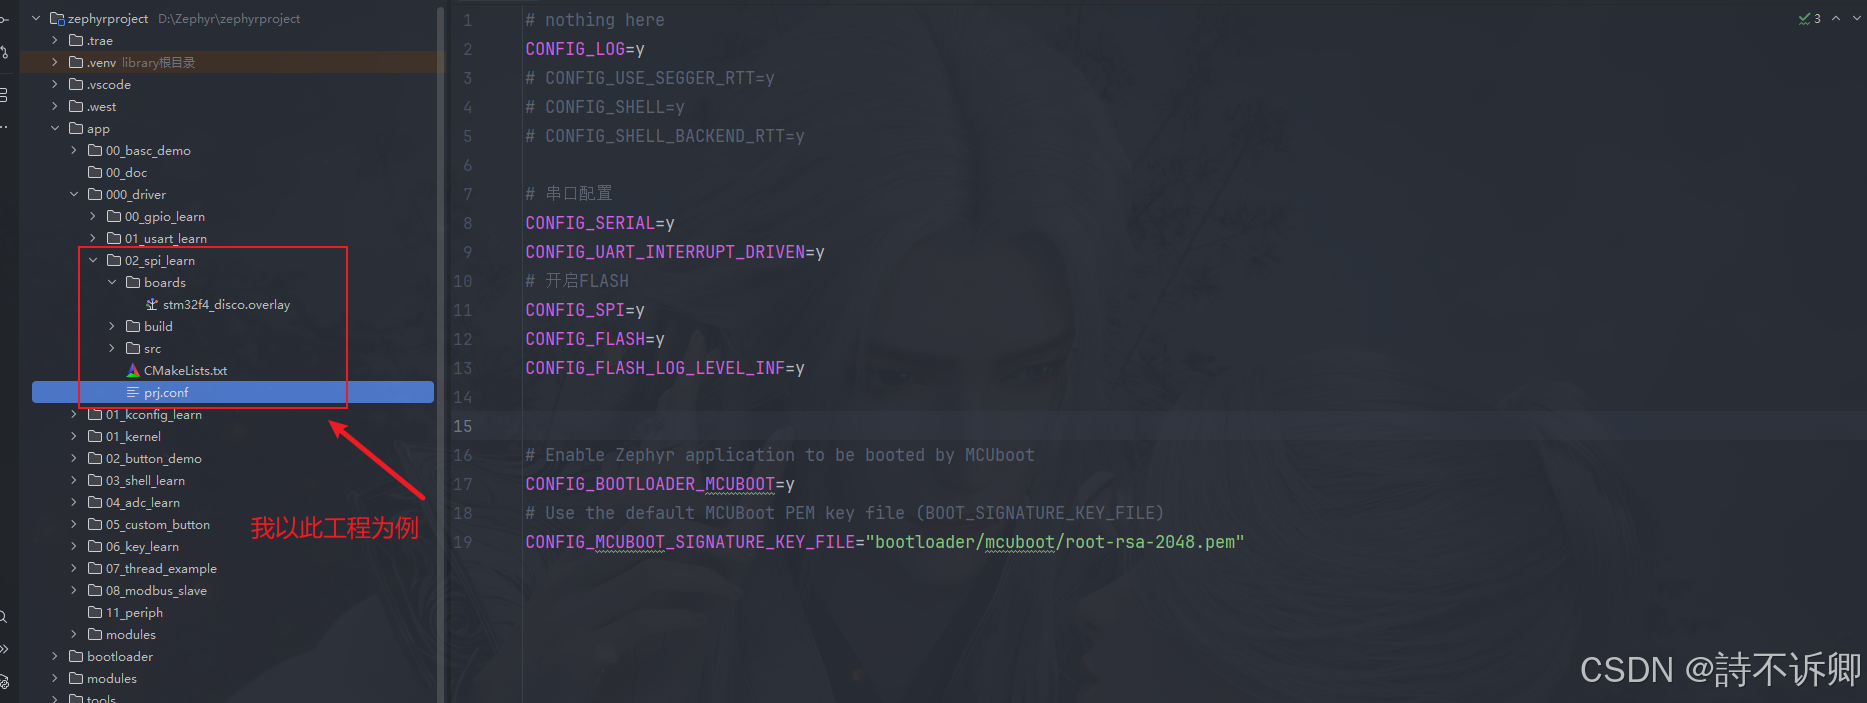
编写对应的配置
prj.conf文件编写
bash
# nothing here
CONFIG_LOG=y
# CONFIG_USE_SEGGER_RTT=y
# CONFIG_SHELL=y
# CONFIG_SHELL_BACKEND_RTT=y

# 串口配置
CONFIG_SERIAL=y
CONFIG_UART_INTERRUPT_DRIVEN=y
# 开启FLASH
CONFIG_SPI=y
CONFIG_FLASH=y
CONFIG_FLASH_LOG_LEVEL_INF=y


# Enable Zephyr application to be booted by MCUboot
CONFIG_BOOTLOADER_MCUBOOT=y
# Use the default MCUBoot PEM key file (BOOT_SIGNATURE_KEY_FILE)
CONFIG_MCUBOOT_SIGNATURE_KEY_FILE="bootloader/mcuboot/root-rsa-2048.pem"
设备树覆盖文件编写
注意:flash0里面的分区要和bootloader里面的保持一致
bash
/ {
	chosen {
		zephyr,console = &usart1;
		zephyr,shell = &usart1;
		zephyr,code-partition = &slot0_partition;

	};


	aliases {

		usart1 = &usart1;
		w25q128 = &w25q128;
	};

};

&usart1 {
	pinctrl-0 = <&usart1_tx_pa9 &usart1_rx_pa10>;
	pinctrl-names = "default";
	current-speed = <115200>;
	status = "okay";
};

&spi1 {
	status = "okay";
	// clk、mosi、miso
	pinctrl-0 = <&spi1_sck_pb3 &spi1_miso_pb4 &spi1_mosi_pb5>;
	pinctrl-names = "default";
	cs-gpios = <&gpiob 14 GPIO_ACTIVE_LOW>;
	w25q128: w25q128@0 {
		compatible = "jedec,spi-nor";
		size = <DT_SIZE_M(128)>; /* 128 Mbits */
		reg = <0>;
		spi-max-frequency = <4000000>;
		status = "okay";
		jedec-id = [ef 40 18];
	};
};

&flash0 {
	status = "okay";

	partitions {
		compatible = "fixed-partitions";
		#address-cells = <1>;
		#size-cells = <1>;


		boot_partition: partition@0 {
			label = "mcuboot";
			reg = <0x00000000 DT_SIZE_K(128)>;
			read-only;
		};

		slot0_partition: partition@20000 {
			label = "image-0";
			reg = <0x00020000 DT_SIZE_K(128)>;
		};

		slot1_partition: partition@40000 {
			label = "image-1";
			reg = <0x00040000 DT_SIZE_K(128)>;
		};
		scratch_partition: partition@60000 {
			label = "image-scratch";
			reg = <0x00060000 DT_SIZE_K(128)>;
		};


	};
};
编写测试main函数
c
/*
 * Copyright (c) 2025 Embeint Inc
 *
 * SPDX-License-Identifier: Apache-2.0
 */

#include <zephyr/kernel.h>
#include <zephyr/device.h>
#include <zephyr/net_buf.h>
#include <zephyr/logging/log.h>
#include <zephyr/drivers/flash.h>
#include <stdio.h>
#include <string.h>
// SPI测试
LOG_MODULE_REGISTER(test, LOG_LEVEL_DBG);
#define SPI_FLASH_TEST_REGION_OFFSET 0xff000
#define SPI_FLASH_SECTOR_SIZE        4096

const uint8_t erased[] = { 0xff, 0xff, 0xff, 0xff };

void single_sector_test(const struct device *flash_dev)
{

	const uint8_t expected[] = { 0x55, 0xaa, 0x66, 0x99 };
	const size_t len = sizeof(expected);
	uint8_t buf[sizeof(expected)];
	int rc;

	LOG_DBG("\nPerform test on single sector");
	/* Write protection needs to be disabled before each write or
	 * erase, since the flash component turns on write protection
	 * automatically after completion of write and erase
	 * operations.
	 */
	LOG_DBG("\nTest 1: Flash erase\n");

	/* Full flash erase if SPI_FLASH_TEST_REGION_OFFSET = 0 and
	 * SPI_FLASH_SECTOR_SIZE = flash size
	 */
	rc = flash_erase(flash_dev, SPI_FLASH_TEST_REGION_OFFSET,
			 SPI_FLASH_SECTOR_SIZE);
	if (rc != 0) {
		LOG_DBG("Flash erase failed! %d\n", rc);
	} else {
		/* Check erased pattern */
		memset(buf, 0, len);
		rc = flash_read(flash_dev, SPI_FLASH_TEST_REGION_OFFSET, buf, len);
		if (rc != 0) {
			LOG_DBG("Flash read failed! %d\n", rc);
			return;
		}
		if (memcmp(erased, buf, len) != 0) {
			LOG_DBG("Flash erase failed at offset 0x%x got 0x%x\n",
				SPI_FLASH_TEST_REGION_OFFSET, *(uint32_t *)buf);
			return;
		}
		LOG_DBG("Flash erase succeeded!\n");
	}
	LOG_DBG("\nTest 2: Flash write\n");

	LOG_DBG("Attempting to write %zu bytes\n", len);
	rc = flash_write(flash_dev, SPI_FLASH_TEST_REGION_OFFSET, expected, len);
	if (rc != 0) {
		LOG_DBG("Flash write failed! %d\n", rc);
		return;
	}

	memset(buf, 0, len);
	rc = flash_read(flash_dev, SPI_FLASH_TEST_REGION_OFFSET, buf, len);
	if (rc != 0) {
		LOG_DBG("Flash read failed! %d\n", rc);
		return;
	}

	if (memcmp(expected, buf, len) == 0) {
		LOG_DBG("Data read matches data written. Good!!\n");
	} else {
		const uint8_t *wp = expected;
		const uint8_t *rp = buf;
		const uint8_t *rpe = rp + len;

		LOG_DBG("Data read does not match data written!!\n");
		while (rp < rpe) {
			LOG_DBG("%08x wrote %02x read %02x %s\n",
			       (uint32_t)(SPI_FLASH_TEST_REGION_OFFSET + (rp - buf)),
			       *wp, *rp, (*rp == *wp) ? "match" : "MISMATCH");
			++rp;
			++wp;
		}
	}
}

int main(void)
{
	const struct device *flash_dev = DEVICE_DT_GET(DT_ALIAS(w25q128));

	if (!device_is_ready(flash_dev)) {
		LOG_ERR("%s: device not ready.\n", flash_dev->name);
		return 0;
	}

	LOG_DBG("\n%s SPI flash testing\n", flash_dev->name);
	LOG_DBG("==========================\n");

	while (1)
	{
		LOG_DBG("Testing123...\n");
		k_sleep(K_MSEC(5000));
	}
	//single_sector_test(flash_dev);

	return 0;
}
编译并烧录(这里通过编译出来的固件就可以直接烧录)
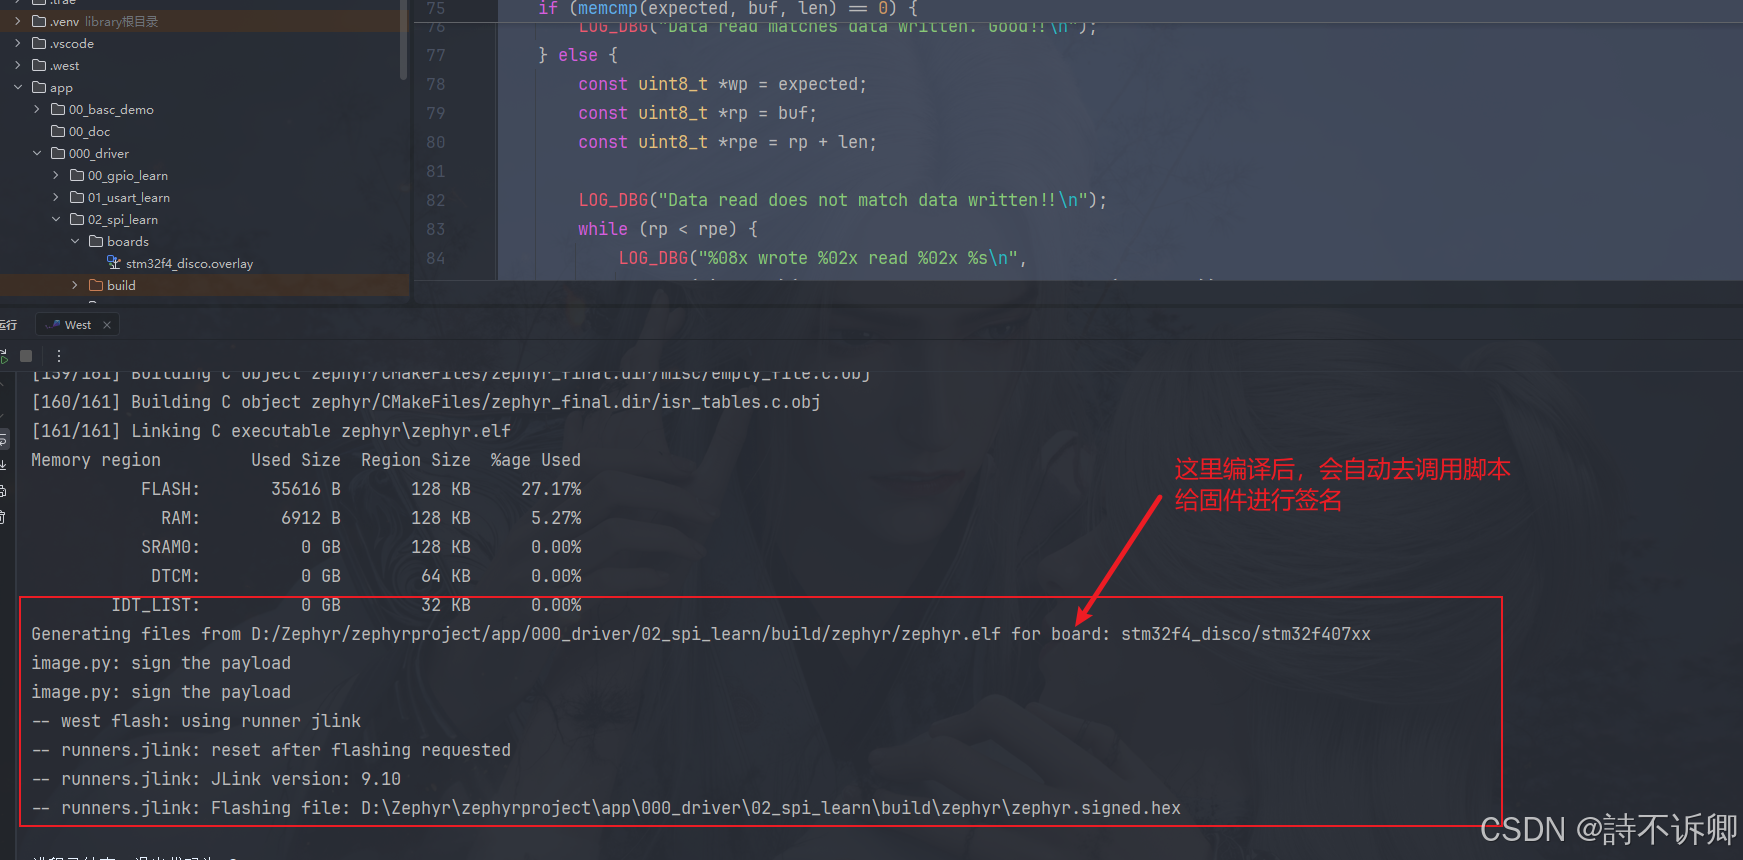
控制台运行情况

总结
- mcuboot的使用和集成,借助ide工具还是非常的方便。
- 第一次接触mcuboot的时候,在网上查找的东西,不能很直观的让人快速的使用起来。这里提供一个参考思路。
- 个人观点:先跑起来,然后慢慢去理解其中的细节。