一、前提准备
- 确保 IDEA 已配置 JDK 17+(Servlet 6.0 要求)。
- 已配置 Tomcat 10+(Jakarta EE 适配版本,Servlet 6.0 需 Tomcat 10.1+)。
- 项目依赖已正确引入(Thymeleaf 3.1.2 + Servlet 6.0,参考之前的 pom.xml)。
XML
<!-- Thymeleaf依赖 -->
        <dependency>
            <groupId>org.thymeleaf</groupId>
            <artifactId>thymeleaf</artifactId>
            <version>3.1.2.RELEASE</version>
        </dependency>

        <!-- lombok依赖 -->
        <dependency>
            <groupId>org.projectlombok</groupId>
            <artifactId>lombok</artifactId>
            <version>1.18.32</version>
        </dependency>

        <!-- druid -->
        <dependency>
            <groupId>com.alibaba</groupId>
            <artifactId>druid</artifactId>
            <version>1.2.16</version>
        </dependency>

        <!-- mysql驱动 -->
        <dependency>
            <groupId>mysql</groupId>
            <artifactId>mysql-connector-java</artifactId>
            <version>8.0.28</version>
</dependency>- 创建工程

二、核心配置步骤
步骤 1:配置 Thymeleaf 模板路径(关键)
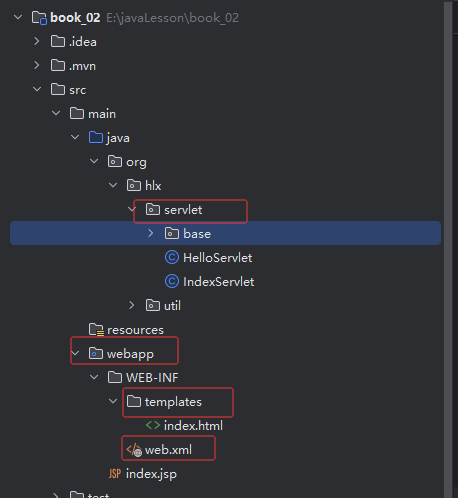
Thymeleaf 的模板文件默认放在 src/main/webapp/WEB-INF/templates/ 下(需手动创建目录),这一步要确保 Thymeleaf 工具类的模板解析器配置正确:
步骤 2:编写 Servlet 并映射访问路径
以「首页页面」为例,编写 Servlet 并通过 @WebServlet 注解配置访问路径(替代 web.xml 配置,更简洁):
java
package org.hlx.servlet;
import jakarta.servlet.ServletException;
import jakarta.servlet.annotation.WebServlet;
import jakarta.servlet.http.HttpServlet;
import jakarta.servlet.http.HttpServletRequest;
import jakarta.servlet.http.HttpServletResponse;
import org.hlx.servlet.base.CustomTemplateEngine;
import java.io.IOException;
/**
* @author : HLX
* @ClassName :IndexServlet
* @date : 2026/3/7 15:41
* @Version :1.0
* @Description: TODO
* @modyified By :
*/
@WebServlet(name = "index", value = "/index")
public class IndexServlet extends HttpServlet {
@Override
protected void doGet(HttpServletRequest req, HttpServletResponse resp) throws ServletException, IOException {
CustomTemplateEngine customTemplateEngine= CustomTemplateEngine.getInstance(req);
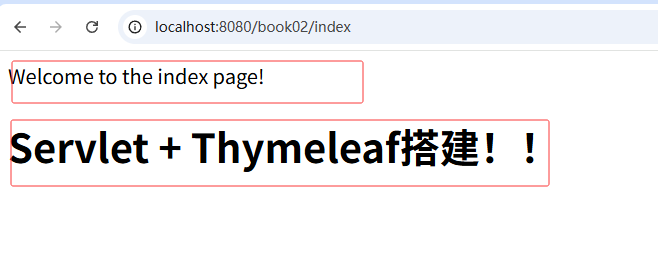
req.setAttribute("hello", "Servlet + Thymeleaf搭建!!");
customTemplateEngine.processTemplate("index", req, resp);
}
@Override
protected void doPost(HttpServletRequest req, HttpServletResponse resp) throws ServletException, IOException {
doGet(req, resp);
}
}步骤 3:创建 Thymeleaf 模板文件
在 src/main/webapp/WEB-INF/templates/ 下创建index.html(对应 Servlet 中的模板名 index):
html
<!DOCTYPE html>
<html lang="en" xmlns:th="http://www.thymeleaf.org">
<head>
    <meta charset="UTF-8">
    <title>Title</title>
</head>
<body>
Welcome to the index page!<p/>
<h1 th:text="${hello}">Hello</h1>
</body>
</html>
步骤 4:配置 IDEA 项目部署(关键)
- 打开 IDEA → Run → Edit Configurations → 选择 Tomcat 10+ 配置。
- 切换到 Deployment 选项卡:
- 点击
+→ 选择 Artifact → 选择你的项目(格式为xxx:war exploded,必须是「解压后的 war 包」)。 - 设置 Application context (项目访问根路径):建议设为
/(方便访问),或自定义如/book02。
- 点击
- 切换到 Server 选项卡:
- 确保 URL 是
http://localhost:8080/(对应 Application context 为/),或http://localhost:8080/book02/(对应自定义路径)。 - 勾选 After launch(启动后自动打开浏览器)。
- 确保 URL 是
四、常见问题排查(访问失败必看)
问题 1:404 错误(页面找不到)
- 检查 Servlet 注解
@WebServlet("/index")是否拼写正确。 - 检查 Thymeleaf 模板路径:
/WEB-INF/templates/index.html是否存在(目录名、文件名大小写一致)。 - 检查 Tomcat 部署的 Application context 是否正确(比如配置了
/book02,访问时必须加这个前缀)。
问题 2:500 错误(页面渲染失败)
- 检查 Thymeleaf 工具类的
resolver.setPrefix("/WEB-INF/templates/")是否以/开头,且路径正确。 - 检查 Servlet 中
ThymeleafUtil.process("book/list", ...)的模板名是否和模板文件路径匹配(book/list对应templates/book/list.html)。 - 检查 Thymeleaf 模板中的表达式是否正确(比如
${books}是否为 null,可加非空判断:th:if="${not #lists.isEmpty(books)}")。
问题 3:静态资源(CSS/JS)404
- 静态资源放在
src/main/webapp/static/下,访问路径为/static/xxx(比如/static/lib/bootstrap-3.4.1/css/bootstrap.min.css)。 - 确保 Tomcat 部署的是
war exploded包,静态资源会被正确加载。
总结
- 核心路径对应关系 :
- Servlet 注解路径:
@WebServlet("/book/list")→ 访问 URL:http://localhost:8080/book/list。 - Thymeleaf 模板名:
book/list→ 模板文件路径:/WEB-INF/templates/book/list.html。
- Servlet 注解路径:
- 关键配置 :
- Thymeleaf 模板解析器必须正确设置
prefix(/WEB-INF/templates/)和suffix(.html)。 - Tomcat 部署需选择
war exploded包,并配置正确的 Application context。
- Thymeleaf 模板解析器必须正确设置
- 访问规则 :
- 最终访问 URL =
Tomcat地址 + Application context + Servlet映射路径。
- 最终访问 URL =