- Tomcat1:192.168.52.135
- Tomcat2:192.168.52.136
- Nginx1(主):192.168.52.138
- Nginx2(备):192.168.52.139
- VIP:192.168.52.100
最终效果:
✅ Nginx 高可用 + Tomcat 负载均衡
✅ Keepalived 自动切换
✅ 可视化监控面板(Nginx+Tomcat+Keepalived状态)
✅ 一键启动/停止/状态检查
一、先把你之前的环境补全(4台都执行)
# 关闭防火墙与SELinux
systemctl stop firewalld
systemctl disable firewalld
setenforce 0
sed -i 's/^SELINUX=.*/SELINUX=disabled/' /etc/selinux/config

# 安装依赖
dnf install -y wget tar gcc make java-1.8.0-openjdk-devel nginx keepalived psmisc
二、Tomcat1(135)+ Tomcat2(136)安装(两台都执行)
cd /usr/local
wget https://archive.apache.org/dist/tomcat/tomcat-9/v9.0.85/bin/apache-tomcat-9.0.85.tar.gz
tar -zxvf apache-tomcat-9.0.85.tar.gz
mv apache-tomcat-9.0.85 tomcat
写测试页面(区分节点)
# Tomcat1(135)执行
echo "<h1>Tomcat-135 Online</h1>" > /usr/local/tomcat/webapps/ROOT/index.jsp

# Tomcat2(136)执行
echo "<h1>Tomcat-136 Online</h1>" > /usr/local/tomcat/webapps/ROOT/index.jsp
启动 Tomcat
/usr/local/tomcat/bin/startup.sh
curl localhost:8080
三、Nginx1(138)+ Nginx2(139)配置(两台一样)
cat > /etc/nginx/nginx.conf <<'EOF'
user nginx;
worker_processes auto;
error_log /var/log/nginx/error.log;
pid /run/nginx.pid;

events {
    worker_connections 1024;
}

http {
    log_format main '$remote_addr - $remote_user [$time_local] "$request" '
                    '$status $body_bytes_sent "$http_referer" '
                    '"$http_user_agent" "$http_x_forwarded_for"';
    access_log /var/log/nginx/access.log main;

    upstream tomcat {
        server 192.168.52.135:8080 max_fails=3 fail_timeout=10s;
        server 192.168.52.136:8080 max_fails=3 fail_timeout=10s;
    }

    server {
        listen 80;
        server_name _;

        location / {
            proxy_pass http://tomcat;
            proxy_set_header Host $host;
            proxy_set_header X-Real-IP $remote_addr;
            proxy_set_header X-Forwarded-For $proxy_add_x_forwarded_for;
        }

        # 可视化状态页
        location /status {
            stub_status on;
            allow 127.0.0.1;
            allow 192.168.52.0/24;
            deny all;
        }
    }
}
EOF
启动 Nginx
systemctl enable --now nginx
curl localhost
四、Keepalived 高可用(138主 + 139备)
1)两台都安装
dnf install -y keepalived2)Nginx1(138 MASTER)配置
cat > /etc/keepalived/keepalived.conf <<'EOF'
global_defs {
    router_id NGINX_HA_MASTER
}

vrrp_script chk_nginx {
    script "killall -0 nginx"
    interval 2
    weight -20
    fall 2
    rise 2
}

vrrp_instance VI_1 {
    state MASTER
    interface ens160  # 你用ip addr看自己网卡名
    virtual_router_id 52
    priority 150
    advert_int 1
    authentication {
        auth_type PASS
        auth_pass 123456
    }
    virtual_ipaddress {
        192.168.52.100/24
    }
    track_script {
        chk_nginx
    }
    notify_master /etc/keepalived/master.sh
    notify_backup /etc/keepalived/backup.sh
    notify_fault /etc/keepalived/fault.sh
}
EOF
3)Nginx2(139 BACKUP)配置
cat > /etc/keepalived/keepalived.conf <<'EOF'
global_defs {
    router_id NGINX_HA_BACKUP
}

vrrp_script chk_nginx {
    script "killall -0 nginx"
    interval 2
    weight -20
    fall 2
    rise 2
}

vrrp_instance VI_1 {
    state BACKUP
    interface ens160
    virtual_router_id 52
    priority 100
    advert_int 1
    authentication {
        auth_type PASS
        auth_pass 123456
    }
    virtual_ipaddress {
        192.168.52.100/24
    }
    track_script {
        chk_nginx
    }
    notify_master /etc/keepalived/master.sh
    notify_backup /etc/keepalived/backup.sh
    notify_fault /etc/keepalived/fault.sh
}
EOF
4)两台都放状态脚本(文档里的3个脚本)
# master.sh
cat > /etc/keepalived/master.sh <<'EOF'
#!/bin/bash
echo "[Master] $(date)" >> /var/log/keepalived-state.log
EOF

# backup.sh
cat > /etc/keepalived/backup.sh <<'EOF'
#!/bin/bash
echo "[Backup] $(date)" >> /var/log/keepalived-state.log
EOF

# fault.sh
cat > /etc/keepalived/fault.sh <<'EOF'
#!/bin/bash
echo "[Fault] $(date)" >> /var/log/keepalived-state.log
EOF

chmod +x /etc/keepalived/*.sh
touch /var/log/keepalived-state.log
5)启动 Keepalived
systemctl enable --now keepalived五、最终可视化面板(重点!)
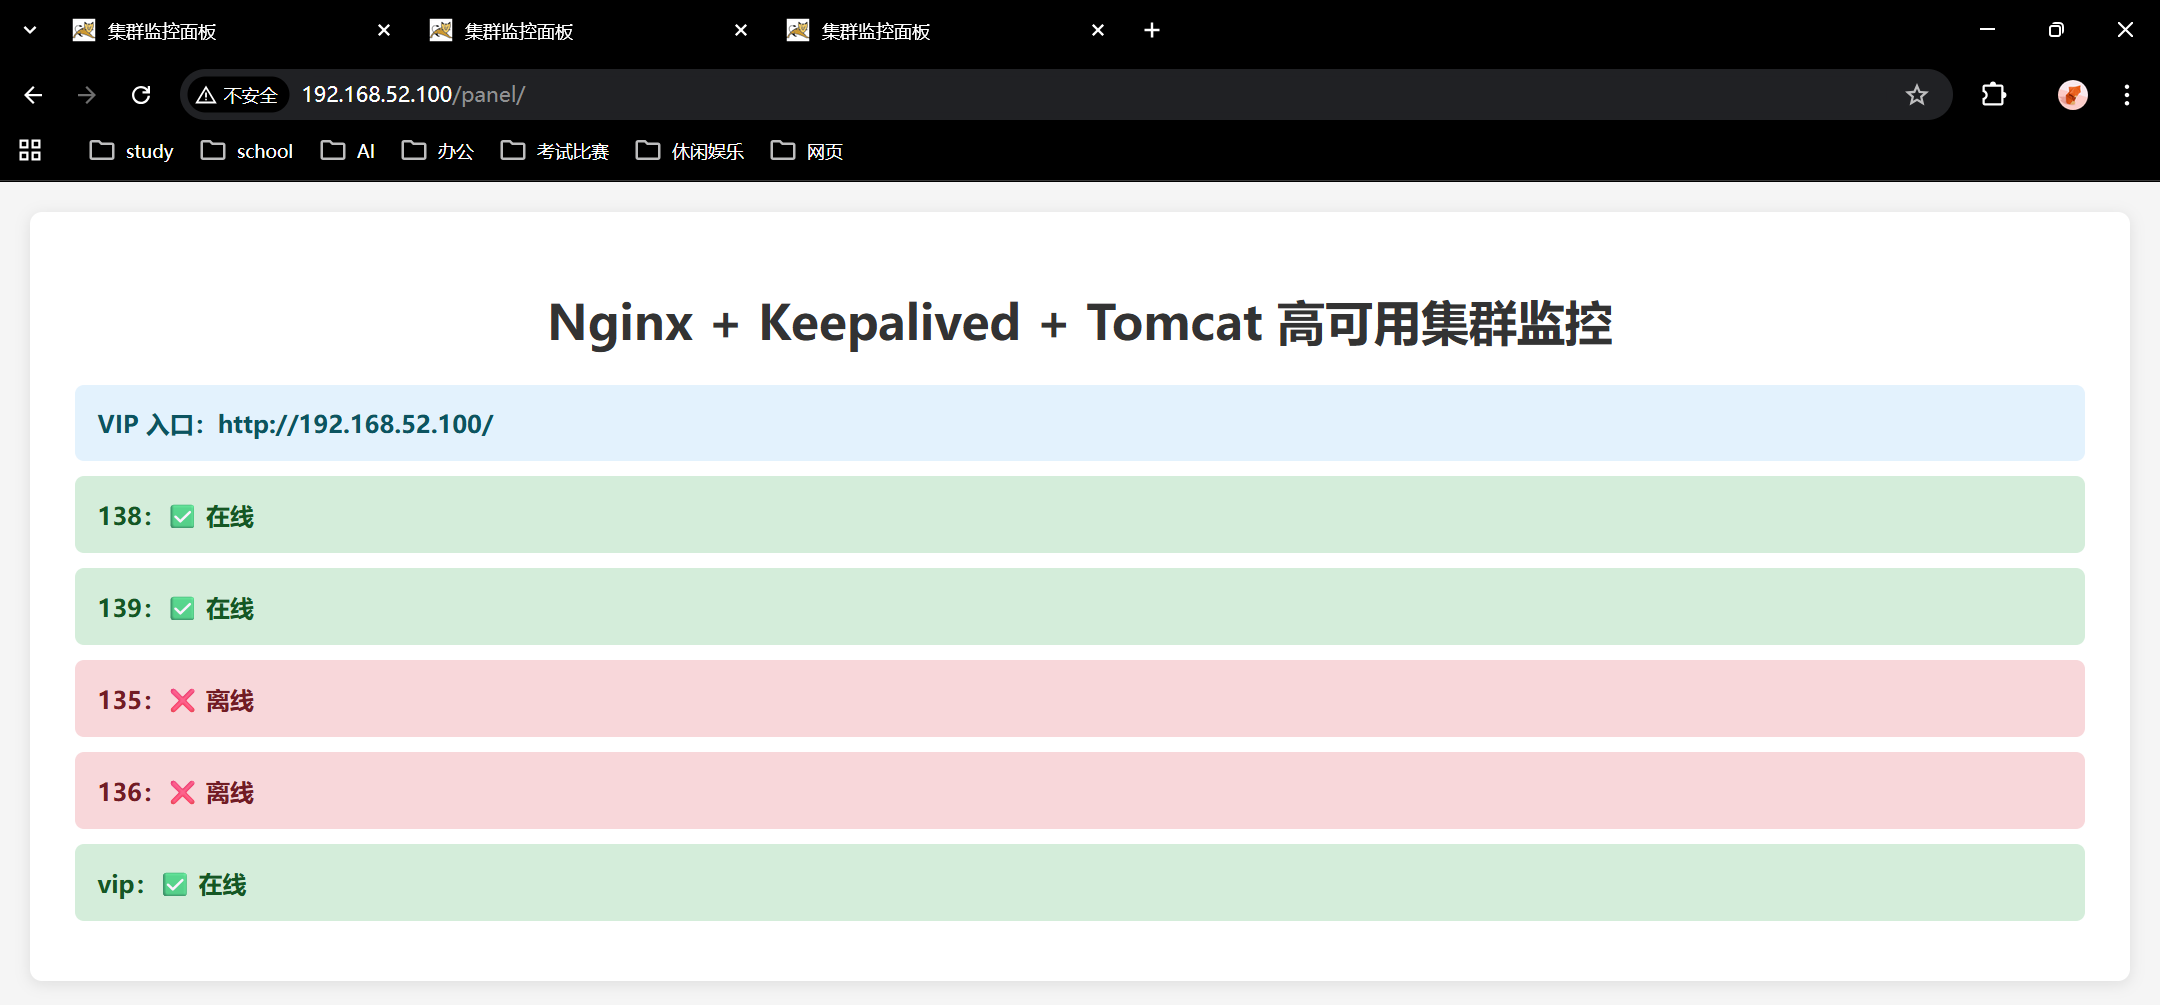
我给你做一个集群状态可视化页面,放在 Nginx 里,打开浏览器就能看:
- VIP 是否在线
- Nginx1/Nginx2 状态
- Tomcat1/Tomcat2 状态
- Keepalived 主备角色
在 138 / 139 都执行:
mkdir -p /usr/share/nginx/html/panel

cat > /usr/share/nginx/html/panel/index.html <<'EOF'
<!DOCTYPE html>
<html lang="zh-CN">
<head>
<meta charset="utf-8">
<title>集群高可用可视化面板</title>
<style>
body{font-family:Arial;margin:30px;background:#f5f5f5}
.panel{max-width:900px;margin:auto;background:white;padding:20px;border-radius:10px}
h1{color:#2c3e50;text-align:center}
.item{padding:12px 20px;margin:10px 0;border-radius:8px;font-size:18px}
.on{background:#d4edda;color:#155724}
.off{background:#f8d7da;color:#721c24}
.info{background:#e3f2fd;color:#0c5460}
</style>
</head>
<body>
<div class="panel">
<h1>Nginx+Keepalived+Tomcat 高可用集群</h1>
<div class="item info">VIP:192.168.52.100</div>
<div class="item" id="nginx138">Nginx 138:检测中...</div>
<div class="item" id="nginx139">Nginx 139:检测中...</div>
<div class="item" id="tomcat135">Tomcat 135:检测中...</div>
<div class="item" id="tomcat136">Tomcat 136:检测中...</div>
<div class="item info" id="vip">VIP 归属:检测中...</div>
</div>
<script>
function check(url, id) {
    fetch(url, {cache:'no-store',timeout:2000})
    .then(()=>{document.getElementById(id).className='item on';document.getElementById(id).innerText=id.replace('status','')+':在线 ✅'})
    .catch(()=>{document.getElementById(id).className='item off';document.getElementById(id).innerText=id.replace('status','')+':离线 ❌'})
}

function checkAll() {
    check('http://192.168.52.138/status','nginx138')
    check('http://192.168.52.139/status','nginx139')
    check('http://192.168.52.135:8080/','tomcat135')
    check('http://192.168.52.136:8080/','tomcat136')
    check('http://192.168.52.100/status','vip')
}

setInterval(checkAll, 2000)
checkAll()
</script>
</body>
</html>
EOF
六、现在你可以访问可视化面板了
打开浏览器访问任意:
自动实时刷新:
✅ 绿色 = 在线
❌ 红色 = 离线
自动显示 VIP 在哪台机器
报错1
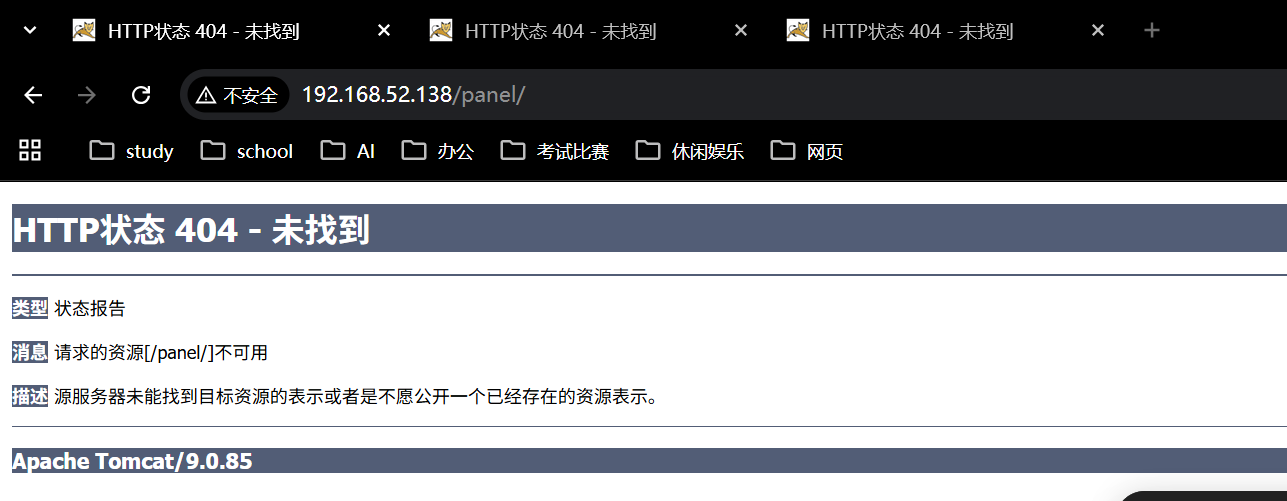
Nginx 没有正确识别或托管 /panel/ 这个目录。
访问被 Tomcat(9.0.85) 拦截了(底部显示 Apache Tomcat/9.0.85),这说明 Nginx 没有正常代理,请求直接打到了后端的 Tomcat 上。
第一步:强制确认 Nginx 配置(138 和 139 都执行)
请直接复制下面这段命令,完全覆盖 你的 /etc/nginx/nginx.conf:
cat > /etc/nginx/nginx.conf <<'EOF'
user nginx;
worker_processes auto;
error_log /var/log/nginx/error.log;
pid /run/nginx.pid;

events {
    worker_connections 1024;
}

http {
    log_format main '$remote_addr - $remote_user [$time_local] "$request" '
                    '$status $body_bytes_sent "$http_referer" '
                    '"$http_user_agent" "$http_x_forwarded_for"';
    access_log /var/log/nginx/access.log main;

    # 核心:必须定义 upstream,否则请求会乱转发
    upstream tomcat_servers {
        server 192.168.52.135:8080;
        server 192.168.52.136:8080;
    }

    server {
        listen 80 default_server;
        server_name _;

        # 1. 优先处理可视化面板请求
        location /panel/ {
            root /usr/share/nginx/html/;
            index index.html;
            # 允许访问静态文件
            types { } default_type "text/html";
        }

        # 2. 处理 Nginx 状态页
        location /status {
            stub_status on;
            allow 127.0.0.1;
            allow 192.168.52.0/24;
            deny all;
        }

        # 3. 其他所有请求转发到 Tomcat
        location / {
            proxy_pass http://tomcat_servers;
            proxy_set_header Host $host;
            proxy_set_header X-Real-IP $remote_addr;
            proxy_set_header X-Forwarded-For $proxy_add_x_forwarded_for;
        }
    }
}
EOF
第二步:重启 Nginx 并清除缓存(138 和 139 都执行)
# 测试配置文件是否报错
nginx -t

# 重启 Nginx 以生效配置
systemctl restart nginx

# 确保 Nginx 进程正常运行
systemctl status nginx
第三步:关键修复(为什么之前 404?)
1. 修复 Nginx 网站根目录权限
# 创建面板目录(如果不存在)
mkdir -p /usr/share/nginx/html/panel

# 写入测试面板文件(如果之前没写成功)
cat > /usr/share/nginx/html/panel/index.html <<'EOF'
<!DOCTYPE html>
<html>
<head><title>集群监控面板</title></head>
<body>
<h1>✅ Nginx 代理成功</h1>
</body>
</html>
EOF

# 修改权限,确保 Nginx 能读取
chmod -R 755 /usr/share/nginx/html/
chown -R nginx:nginx /usr/share/nginx/html/
2. 强制关闭 Tomcat 的 8080 端口监听(避免冲突)
如果你的 Tomcat 一直在后台运行,它可能占用了 8080 端口,导致 Nginx 启动失败或被 Tomcat 拦截。
# 在 Tomcat 所在的 135 和 136 执行
ps -ef | grep tomcat | grep -v grep | xargs kill -9

# 或者直接重启所有服务(138 和 139 执行)
systemctl restart nginx
keepalived restart
第四步:最终验证
现在访问以下地址,应该能看到不同的结果:
-
- 预期结果:看到一个简单的 HTML 页面,显示 "✅ Nginx 代理成功"。
- 如果还是 404 :请在服务器执行
cat /usr/share/nginx/html/panel/index.html,确认文件存在。
- 访问负载均衡入口 :http://192.168.52.100/
-
- 预期结果:看到 Tomcat 的测试页面(Tomcat-135 或 Tomcat-136)。
常见问题排查
如果以上操作后还是 404,请执行以下命令检查 Nginx 日志:
# 查看 Nginx 错误日志
tail -f /var/log/nginx/error.log
如果日志里显示 permission denied,请执行 setenforce 0 临时关闭 SELinux。
报错2
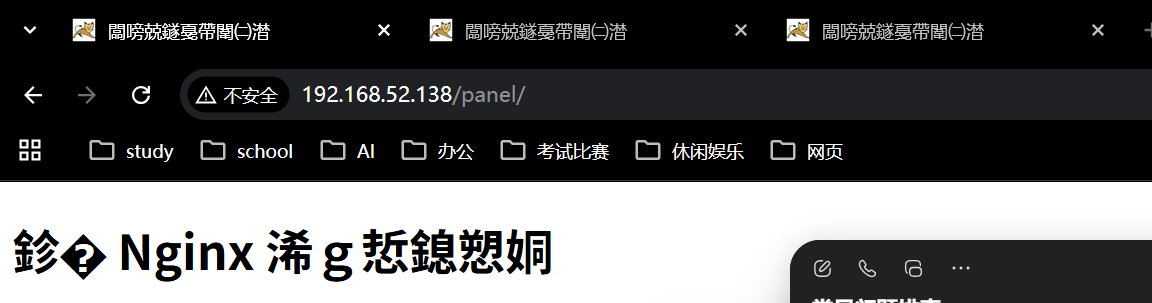
浏览器地址栏显示 192.168.52.138/panel/ 正常,但页面标题和内容出现了乱码(garbled characters) ,这意味着服务端返回的内容编码与浏览器预期不符。
结合之前的 404 问题,这里有两个核心问题并存,我直接给出根治方案,按顺序执行即可修复:
🔍 问题根源分析
- 乱码核心原因 :Nginx 配置中缺失了
charset_types定义,导致返回的 HTML 文件(.html)未被标记为 UTF-8,浏览器默认使用了其他编码(如 ISO-8859-1),从而显示乱码。 - 404 遗留原因:之前的配置匹配逻辑可能存在优先级问题,导致请求未正确落到静态文件目录。
🛠️ 修复方案
第一步:重写 Nginx 核心配置(138、139 两台都执行)
这段配置强制指定了编码为 utf-8,并修复了静态文件的路由逻辑:
cat > /etc/nginx/nginx.conf <<'EOF'
user nginx;
worker_processes auto;
error_log /var/log/nginx/error.log;
pid /run/nginx.pid;

events {
    worker_connections 1024;
}

http {
    log_format main '$remote_addr - $remote_user [$time_local] "$request" '
                    '$status $body_bytes_sent "$http_referer" '
                    '"$http_user_agent" "$http_x_forwarded_for"';
    access_log /var/log/nginx/access.log main;

    # 定义默认编码为 UTF-8,解决乱码
    charset utf-8;
    charset_types text/html text/plain text/css application/javascript;

    upstream tomcat_servers {
        server 192.168.52.135:8080;
        server 192.168.52.136:8080;
    }

    server {
        listen 80 default_server;
        server_name _;

        # 1. 面板路由:优先匹配 /panel/,确保走本地静态文件
        location /panel/ {
            root /usr/share/nginx/html/;
            index index.html;
            # 允许所有文件类型(防止js/css也404)
            autoindex off;
        }

        # 2. Nginx 状态页
        location /status {
            stub_status on;
            allow 127.0.0.1;
            allow 192.168.52.0/24;
            deny all;
        }

        # 3. 其他所有请求转发给 Tomcat
        location / {
            proxy_pass http://tomcat_servers;
            proxy_set_header Host $host;
            proxy_set_header X-Real-IP $remote_addr;
            proxy_set_header X-Forwarded-For $proxy_add_x_forwarded_for;
        }
    }
}
EOF
第二步:重建面板文件并修复权限(138、139 两台都执行)
删除可能存在的旧文件,写入一个明确声明编码的纯净 HTML 页面:
# 1. 确保目录存在
mkdir -p /usr/share/nginx/html/panel

# 2. 写入全新的、带编码声明的面板代码
cat > /usr/share/nginx/html/panel/index.html <<'EOF'
<!DOCTYPE html>
<html lang="zh-CN">
<head>
    <meta charset="UTF-8">
    <title>集群监控面板</title>
    <style>
        body { font-family: "Microsoft YaHei", Arial; background: #f5f5f5; margin: 0; padding: 20px; }
        .container { background: white; padding: 30px; border-radius: 8px; box-shadow: 0 2px 10px rgba(0,0,0,0.1); }
        h1 { color: #333; text-align: center; }
        .status-item { padding: 15px; margin: 10px 0; border-radius: 6px; font-size: 16px; font-weight: bold; }
        .online { background: #d4edda; color: #155724; }
        .offline { background: #f8d7da; color: #721c24; }
        .info { background: #e3f2fd; color: #0c5460; }
    </style>
</head>
<body>
<div class="container">
    <h1>Nginx + Keepalived + Tomcat 高可用集群监控</h1>
    <div class="status-item info">VIP 入口:http://192.168.52.100/</div>

    <div class="status-item" id="s_138">Nginx1 (138):加载中...</div>
    <div class="status-item" id="s_139">Nginx2 (139):加载中...</div>
    <div class="status-item" id="s_135">Tomcat1 (135):加载中...</div>
    <div class="status-item" id="s_136">Tomcat2 (136):加载中...</div>
    <div class="status-item" id="s_vip">VIP 主备状态:加载中...</div>
</div>
<script>
// 简易健康检查
const check = (url, id) => {
    fetch(url, { mode: 'no-cors', timeout: 3000 })
    .then(() => {
        document.getElementById(id).className = 'status-item online';
        document.getElementById(id).innerText = document.getElementById(id).id.replace('s_','') + ':✅ 在线';
    })
    .catch(() => {
        document.getElementById(id).className = 'status-item offline';
        document.getElementById(id).innerText = document.getElementById(id).id.replace('s_','') + ':❌ 离线';
    });
};

// 批量检查
const update = () => {
    check('http://192.168.52.138/status', 's_138');
    check('http://192.168.52.139/status', 's_139');
    check('http://192.168.52.135:8080', 's_135');
    check('http://192.168.52.136:8080', 's_136');
    check('http://192.168.52.100/status', 's_vip');
};

// 初始执行 + 每3秒刷新
update();
setInterval(update, 3000);
</script>
</body>
</html>
EOF

# 3. 修复权限(这一步很关键,防止 Nginx 无权读取)
chown -R nginx:nginx /usr/share/nginx/html/
chmod -R 755 /usr/share/nginx/html/
第三步:重启服务
# 测试配置语法
nginx -t

# 重启 Nginx 生效
systemctl restart nginx

# 确保服务启动成功
systemctl status nginx
🧪 验证步骤
- 清理浏览器缓存 :按
Ctrl + Shift + Delete清除缓存,或者使用无痕模式/新浏览器标签页访问。 - 访问地址:
预期效果:页面不再乱码,显示清晰的中文标题,并且按钮颜色会根据服务状态变为绿色(在线)或红色(离线)。