前言
正如前面所说,Prism框架是一个基于 WPF 的复合应用程序开发框架。Prism 实现了多项有助于编写结构良好且易于维护的 XAML 应用程序的设计模式,包括 MVVM、依赖注入、命令、事件聚合器等。
在后续的文章中,我们需要用到Prism框架里MVVM部分的知识,所以这里单独拿出来进行讲解。
在我前面的文章中,介绍过CommunityToolkit.MVVM包的使用,Prism的使用基本类似。
所以这里我不做详细介绍,只介绍如何使用,细节方面可以参考前面的文章:https://www.cnblogs.com/zhaotianff/p/16870550.html
ViewModelBase
在MvvmLight中,ViewModel一般都会继承自ViewModelBase类,在CommunityToolkit.Mvvm中,具有相同功能的类是ObservableObject。
在Prism中,这个类是BindableBase。BindableBase主要用于简化 MVVM 模式中 ViewModel 的属性变更通知实现,它封装了 WPF 中INotifyPropertyChanged接口的核心逻辑,让你无需重复编写属性变更通知的样板代码。
BindableBase主要封装了以下接口
 1  /// <summary>
 2  /// 值更改事件.
 3  /// </summary>
 4  public event PropertyChangedEventHandler PropertyChanged;
 5
 6  /// <summary>
 7  /// 属性赋值及通知
 8  /// </summary>
 9  protected virtual bool SetProperty<T>(ref T storage, T value, Action onChanged, [CallerMemberName] string propertyName = null);
10
11  /// <summary>
12  /// 引发PropertyChanged事件.
13  /// </summary>
14  protected void RaisePropertyChanged([CallerMemberName] string propertyName = null);
15
16  /// <summary>
17  /// 引发PropertyChanged事件.
18  /// </summary>
19  protected virtual void OnPropertyChanged(PropertyChangedEventArgs args);
BindableBase使用示例
我们在界面上放置一个TextBox,然后绑定到一个属性,用于实时显示时间
MainWindow.xaml
1 <Grid>
2     <TextBox Text="{Binding CurrentTime}" HorizontalAlignment="Center" VerticalAlignment="Center" Margin="0,0,0,80" Width="200"></TextBox>
3 </Grid>
MainWindowViewModel.cs
 1 public class MainWindowViewModel : Prism.Mvvm.BindableBase
 2 {
 3     private string currentDate;
 4
 5     public string CurrentDate
 6     {
 7         get => currentDate;
 8         set => SetProperty(ref currentDate, value);
 9     }
10
11     public MainWindowViewModel()
12     {
13           CurrentDate = DateTime.Now.ToString();
14     }
15 }
DelegateCommand
DelegateCommand是ICommand接口的封装类,在MVVMLight和CommunityToolkit.MVVM包中,具有相同功能的类是RelayCommand。
它们的使用方法是一样的
例如我们在界面上放置一个按钮和一个文本框,只有当文本框输入值后,单击按钮,才可以显示文本框的值
MainWindow.xaml
1 <StackPanel>
2     <TextBox Text="{Binding MsgContent,UpdateSourceTrigger=PropertyChanged}" Width="200" HorizontalAlignment="Left" ></TextBox>
3     <Button Content="显示消息" Command="{Binding ShowMessageCommand}" ></Button>
4 </StackPanel>注意:需要设置UpdateSourceTrigger=PropertyChanged,否则在文本框编辑完成后不会马上更新绑定的属性值。
MainWindowViewModel.cs
 1   public class MainWindowViewModel : BindableBase
 2   {
 3       private string msgContent;
 4
 5       public string MsgContent
 6       {
 7           get => msgContent;
 8           set
 9           {
10               SetProperty(ref msgContent, value);
11               //需要手动调用RaiseCanExecuteChanged
12               ShowMessageCommand.RaiseCanExecuteChanged();
13           }
14       }
15
16       public DelegateCommand ShowMessageCommand { get; private set; }
17
18       public MainWindowViewModel()
19       {
20           ShowMessageCommand = new DelegateCommand(ShowMessage, CanShowMessageExecute);
21       }
22
23       private void ShowMessage()
24       {
25           System.Windows.MessageBox.Show(MsgContent);
26       }
27
28       public bool CanShowMessageExecute()
29       {
30           return !string.IsNullOrEmpty(MsgContent);
31       }
32   }
注意:Prism中的DelegateCommand和CommunityToolkit.MVVM包中的RelayCommand在属性更新后,需要手动通知命令的CanExecute更改。
在MVVMLight中没有这一步操作
1 set
2 {
3     SetProperty(ref msgContent, value);
4     //需要手动调用RaiseCanExecuteChanged
5     ShowMessageCommand.RaiseCanExecuteChanged();
6 }
说明:
Prism没有提供代码生成器,所以无法使用源码生成器来快速生成属性、命令。
CompositeCommand
Prism还提供了一种组合式Command。
CompositeCommand 是 Prism 提供的一种特殊 ICommand 实现,它可以包含多个子命令(ICommand),当执行 CompositeCommand 时,会自动遍历并执行所有已注册的子命令;
同时它也会聚合所有子命令的 CanExecute 状态(默认只要有一个子命令 CanExecute=false,组合命令整体就 CanExecute=false)。
使用方法和DelegateCommand基本一致,区别如下
DelegateCommand
 1 //定义命令
 2 public DelegateCommand ShowMessageCommand { get; private set; }
 3
 4 //绑定回调
 5 ShowMessageCommand = new DelegateCommand(ShowMessage, CanShowMessageExecute);
 6
 7 //命令的回调函数
 8  private void ShowMessage(){ }
12
13 //命令CanExecute回调
14  public bool CanShowMessageExecute()
15  {
16      return true
17  }
CompositeCommand
CompositeCommand需要通过RegisterCommand函数注册需要绑定的子命令
 1 //定义  CompositeCommand
 2 public CompositeCommand CompositeCommand { get; private set; }
 3
 4 //定义 CompositeCommand 绑定的子命令
 5 public DelegateCommand Command1 { get; private set; }
 6 public DelegateCommand Command2 { get; private set; }
 7
 8 //绑定子命令回调
 9 Command1 = new DelegateCommand(Function1, CanCommand1Execute);
10 Command2 = new DelegateCommand(Function2, CanCommand2Execute);
11
12 //注册CompositeCommand
13 CompositeCommand = new CompositeCommand();
14 CompositeCommand.RegisterCommand(Command1);
15 CompositeCommand.RegisterCommand(Command2);
16
17 /// <summary>
18 /// Command1 CanExecute回调
19 /// </summary>
20 /// <returns></returns>
21 private bool CanCommand1Execute()
22 {
23     return true;
24 }
25
26 /// <summary>
27 /// Command2 CanExecute回调
28 /// </summary>
29 /// <returns></returns>
30 private bool CanCommand2Execute()
31 {
32     return true;
33 }
自动绑定ViewModel
在前面介绍MVVM中的Ioc时,介绍过ViewModelLocator这种模式
https://www.cnblogs.com/zhaotianff/p/19002271
ViewModelLocator这种模式可以将ViewModel的绑定进行简化。
在Prism中,提供了ViewModelLocator.AutoWireViewModel附加属性,可以自动将ViewModel和View进行绑定。
使用方法如下:
1、创建界面在Views文件夹下,创建ViewModel在ViewModels文件夹下
ProjectRoot
--ViewModels
MainWindowViewModel.cs
--Views
MainWindow.xaml
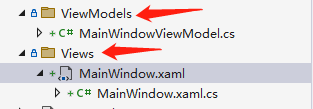
因为这里是通过反射来查找的,所以名称不能错。 ViewModelLocator.AutoWireViewModel只能查找同级命名空间下的ViewModel。
注意:
1、Views和ViewModels文件夹都是带s结尾的
2、ViewModel的命名要跟View保持一致。例如View的命名是MainWindow,则ViewModel的命名是MainWindowViewModel;View的命名是StudentView,则ViewModel的命名是StudentViewModel。
2、引入prism命名空间
1 xmlns:prism="http://prismlibrary.com/"3、设置 ViewModelLocator.AutoWireViewModel=true
 1 <Window x:Class="_12_Prism_MVVM_Usage.Views.MainWindow"
 2         xmlns="http://schemas.microsoft.com/winfx/2006/xaml/presentation"
 3         xmlns:x="http://schemas.microsoft.com/winfx/2006/xaml"
 4         xmlns:d="http://schemas.microsoft.com/expression/blend/2008"
 5         xmlns:mc="http://schemas.openxmlformats.org/markup-compatibility/2006"
 6         xmlns:prism="http://prismlibrary.com/"
 7         xmlns:local="clr-namespace:_12_Prism_MVVM_Usage"
 8         mc:Ignorable="d"
 9         prism:ViewModelLocator.AutoWireViewModel="True"
10         Title="MainWindow" Height="450" Width="800">
11     <StackPanel>
12          ......
13     </StackPanel>
14 </Window>
这样ViewModel就会自动绑定到对应的View上。
此外,AutoWireViewModel除了可以自动绑定ViewModel,它还会自动判断ViewModel的构造函数,并注入相应的实例。
可以参考上一篇文章,关于Prism中的依赖注入
https://www.cnblogs.com/zhaotianff/p/19506441
说明:这种模式是实现Prism构造函数注入的核心。
如何配置View和ViewModel自动绑定
上一节我们介绍了使用ViewModelLocator.AutoWireViewModel附加属性来实现View和ViewModel的自动绑定。
View和ViewModel的路径是固定的,必须要满足要求才能实现自动绑定。
我们可以通过下面的方式进行配置
例如我想把View和ViewModel放在同一个文件夹
 1  /// <summary>
 2  /// 重写ConfigureViewModelLocator函数,自定义使用ViewModelLocator.AutoWireViewModel时View和ViewModel的自动绑定规则
 3  /// </summary>
 4  protected override void ConfigureViewModelLocator()
 5  {
 6      base.ConfigureViewModelLocator();
 7
 8      ViewModelLocationProvider.SetDefaultViewTypeToViewModelTypeResolver((viewType) =>
 9      {
10          var viewName = viewType.FullName;
11          var viewAssemblyName = viewType.GetTypeInfo().Assembly.FullName;
12          //配置View和ViewModel在同一个路径下
13          var viewModelName = $"{viewName}ViewModel, {viewAssemblyName}";
14          return Type.GetType(viewModelName);
15      });
16 }例如我想View和ViewModel文件夹不加s后缀
 1 protected override void ConfigureViewModelLocator()
 2 {
 3     base.ConfigureViewModelLocator();
 4     ViewModelLocationProvider.SetDefaultViewTypeToViewModelTypeResolver((viewType) =>
 5     {
 6         var viewName = viewType.Name;                                      //MainWindow
 7         var viewFullName = viewType.FullName;                              //ConfigureViewViewModelBinding.View.MainWindow
 8         var viewAssemblyName = viewType.GetTypeInfo().Assembly.FullName;   //ConfigureViewViewModelBinding, Version=1.0.0.0, Culture=neutral, PublicKeyToken=null
 9         var viewModelName = $"{viewFullName.Replace($".{viewName}",$"Model.{viewName}")}ViewModel, {viewAssemblyName}"; //移除ViewModels文件夹的s后缀
10         return Type.GetType(viewModelName);
11     });
12 }
ViewModel通信
这里我们需要用到Prism提供的IEventAggregator服务,它可以实现模块间的无耦合通信。
IEventAggregator是一个事件聚合器,它可以发布/订阅消息。
所有的消息都是继承自PubSubEvent类型,而PubSubEvent又继承自EventBase类型,在EventBase类型的内部维护了一个订阅列表
如下所示
1   public abstract class EventBase
2   {
3       private readonly List<IEventSubscription> _subscriptions = new List<IEventSubscription>();
4 }简单点来说,就是当我们将消息进行注册/订阅(Subscribe)时,将这个消息和一个回调函数进行绑定。当接收到这个消息时,执行这个绑定的回调函数。
这里我通过向另外一个窗口发送选中的列表对象来进行演示。
1、定义列表使用的数据模型
1 //如果需要动态修改值,需要定义成可通知类型
2 public class Student
3  {
4      public int Id { get; set; }
5
6      public string Name { get; set; }
7
8      public int Score { get; set; }
9  }
2、然后我们在A窗口上定义一个ListBox,当A窗口上的ListBox选中项进行切换时,在B窗口中进行显示。
Window1.xaml
 1  <Grid>
 2      <ListBox ItemsSource="{Binding Students}">
 3          <i:Interaction.Triggers>
 4              <i:EventTrigger EventName="SelectionChanged">
 5                  <i:InvokeCommandAction Command="{Binding OnStudentSelectionChangedCommand}" CommandParameter="{Binding RelativeSource={RelativeSource Mode=FindAncestor,AncestorType=ListBox},Path=SelectedItem}"></i:InvokeCommandAction>
 6              </i:EventTrigger>
 7          </i:Interaction.Triggers>
 8          <ListBox.ItemTemplate>
 9              <DataTemplate>
10                  <WrapPanel>
11                      <TextBlock Text="{Binding Id}" FontSize="15" FontWeight="Bold" Margin="5"></TextBlock>
12                      <TextBlock Text="{Binding Name}" FontWeight="Bold" Margin="5"></TextBlock>
13                      <TextBlock Text="{Binding Score}" FontWeight="Bold" Foreground="Red" Margin="5"></TextBlock>
14                  </WrapPanel>
15              </DataTemplate>
16          </ListBox.ItemTemplate>
17      </ListBox>
18  </Grid>
Window2.xaml
1  <StackPanel>
2      <TextBlock Margin="5" Text="{Binding Id}"></TextBlock>
3      <TextBlock Text="{Binding Name}"></TextBlock>
4      <TextBlock Text="{Binding Score}"></TextBlock>
5  </StackPanel>
3、接下来我们定义消息事件
我们只需要定义一个类继承自PubSubEvent/PubSubEvent<T>即可
1     public class MyEvent : PubSubEvent
2     {
3
4     }
5
6     public class MyEvent2 : PubSubEvent<string>
7     {
8
9     }
这里Prism提供了泛型版本,也提供了不带参数的版本,根据实际情况选择。
例如我们需要传递一个字符串,就把Student更换为string类型,这里我们传递的是一个Student对象。
1 public class SelectStudentEvent :PubSubEvent<Student>
2 {
3 }
4、在Window2 ViewModel中注册消息订阅
前面我们提到过,Bootstrapper会帮我们自动初始化 Prism 的关键服务。
其中就包括EventAggregator,所以我们直接通过构造函数注入IEventAggregator即可。
 1 public Window2ViewModel(IEventAggregator eventAggregator)
 2 {
 3     this.eventAggregator = eventAggregator;
 4
 5     //订阅事件
 6     this.eventAggregator.GetEvent<SelectStudentEvent>().Subscribe(OnSelectStudent);
 7 }
 8
 9 private void OnSelectStudent(Student student)
10  {
11      //在这里处理接收的数据
12  }
5、在Window1 ViewModel中当ListBox选择项切换时,发送消息事件
 1  public Window1ViewModel(IEventAggregator eventAggregator)
 2  {
 3      //注入EventAggregator
 4      this.eventAggregator = eventAggregator;
 5  }
 6
 7  private void OnStudentSelectionChanged(Student student)
 8  {
 9      //发送消息
10      eventAggregator.GetEvent<SelectStudentEvent>().Publish(student);
11  }
这样我们就实现了ViewModel通信,运行效果如下:

完整的代码可以参考示例代码,文中只贴出了关键步骤的代码。
示例代码
https://github.com/zhaotianff/WPF-MVVM-Beginner/tree/main/13_Prism_MVVM_Usage