欢迎加入开源鸿蒙跨平台社区 :https://openharmonycrossplatform.csdn.net
📋 前言
,通讯录管理是许多社交、办公类应用的核心功能。无论是获取联系人列表、添加新联系人、还是搜索特定联系人,都需要与系统通讯录进行交互。react-native-contacts 是 React Native 生态中最流行的通讯录管理库,提供了跨平台的通讯录读写能力,让开发者能够轻松实现丰富的联系人管理功能。
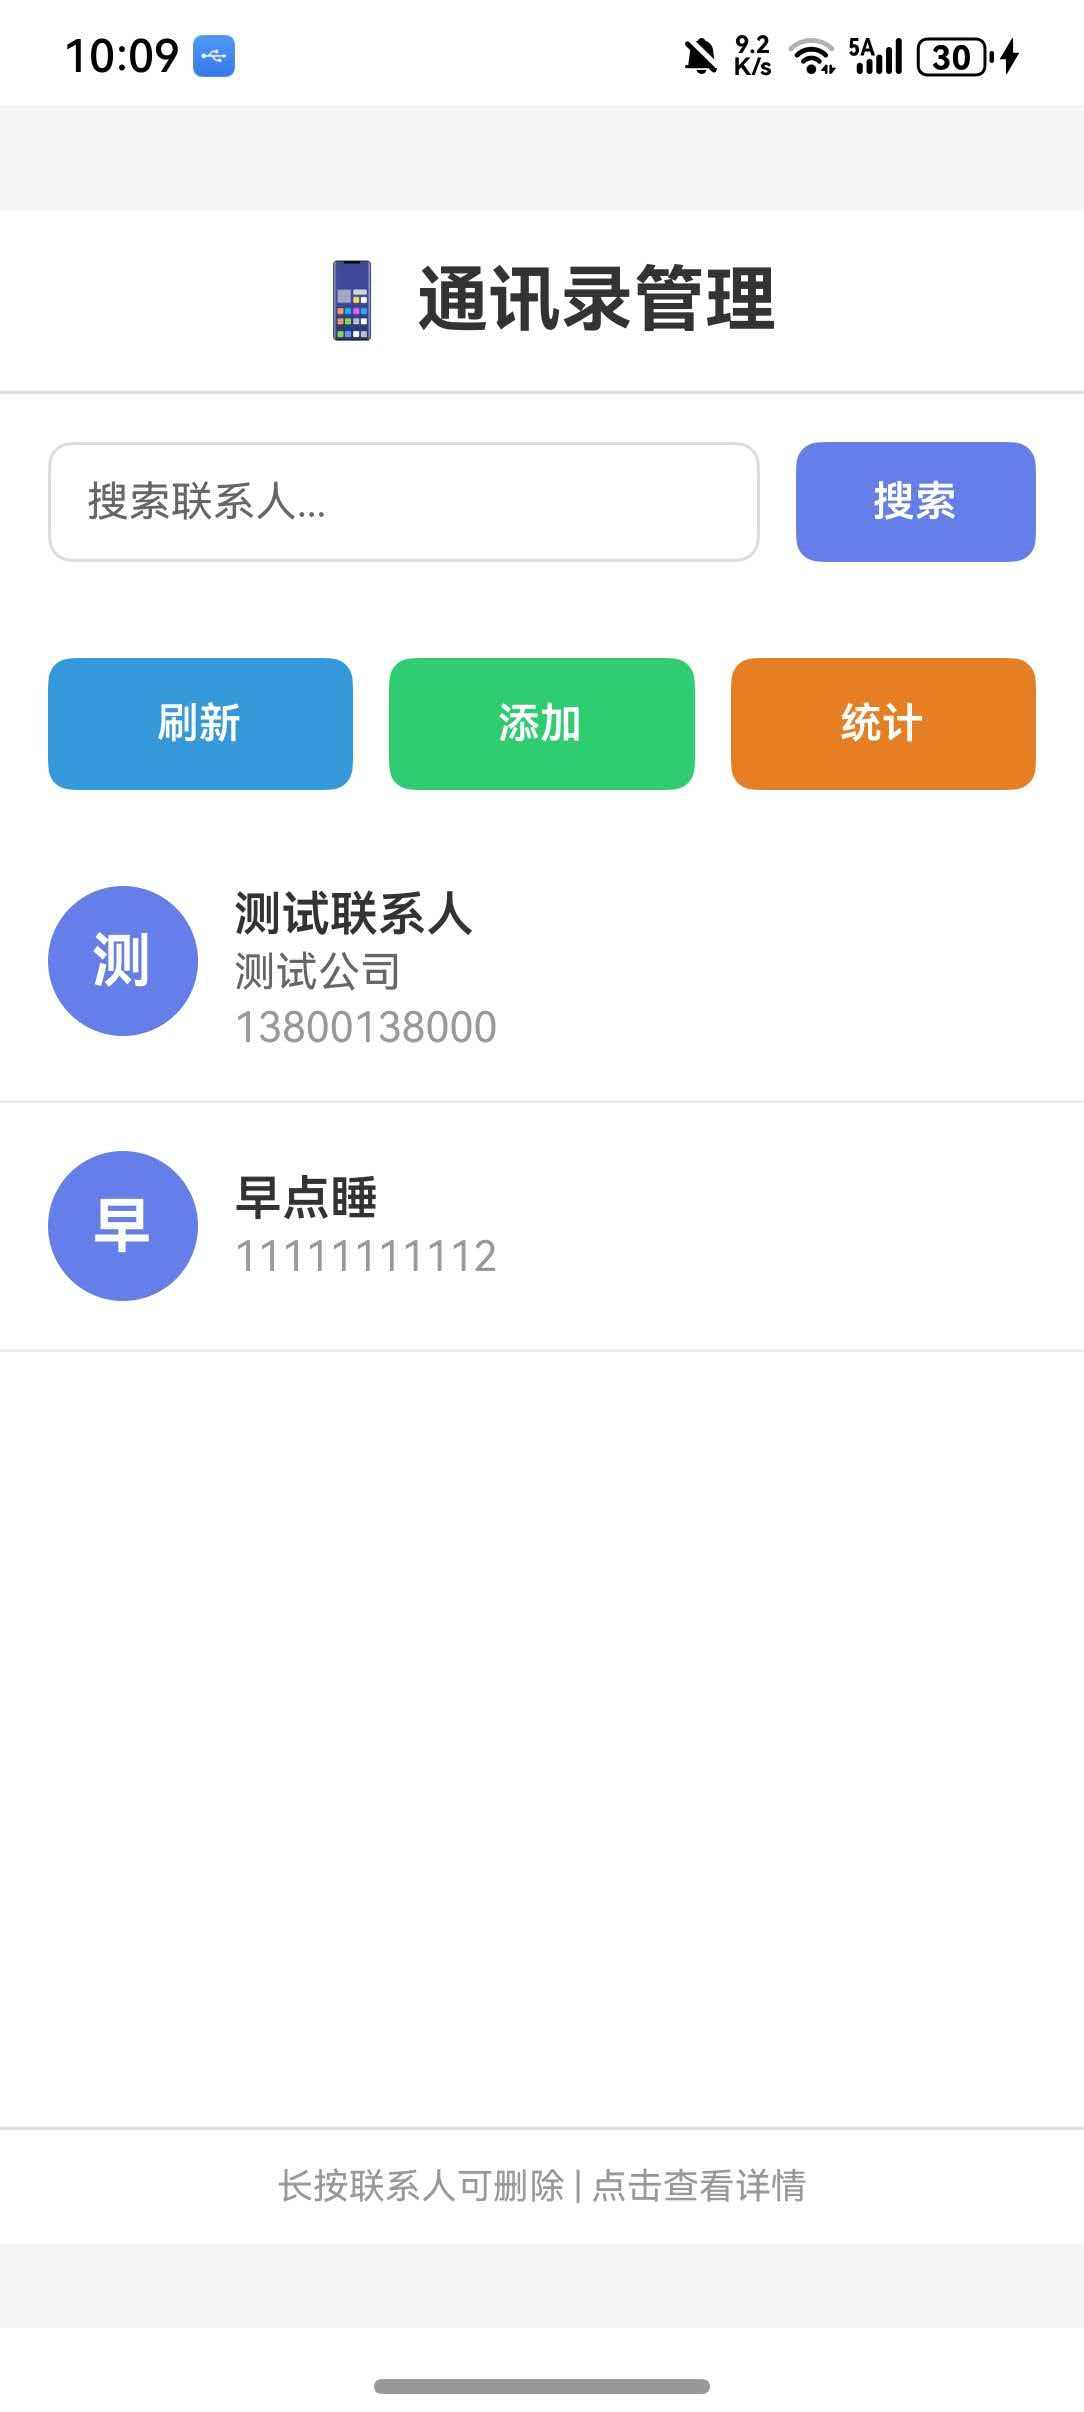
🎯 库简介
基本信息
- 库名称 :
react-native-contacts - 版本信息 :
<= 7.0.7-0.0.3+@react-native-oh-tpl/react-native-contacts: 支持 RN 0.72 版本(已废弃)7.0.8+@react-native-ohos/react-native-contacts: 支持 RN 0.72 版本8.0.7+@react-native-ohos/react-native-contacts: 支持 RN 0.77 版本
- 官方仓库: https://github.com/morenoh149/react-native-contacts
- 鸿蒙仓库: https://atomgit.com/openharmony-sig/rntpc_react-native-contacts
- 主要功能 :
- 📖 读取通讯录联系人
- ✏️ 添加、更新、删除联系人
- 🔍 按姓名、电话、邮箱搜索联系人
- 📷 获取联系人头像
- 🔐 权限管理
- 📱 跨平台一致性表现
为什么需要 react-native-contacts?
| 特性 | React Native 原生 API | react-native-contacts |
|---|---|---|
| 读取通讯录 | ❌ 不支持 | ✅ 支持 |
| 添加联系人 | ❌ 不支持 | ✅ 支持 |
| 更新联系人 | ❌ 不支持 | ✅ 支持 |
| 删除联系人 | ❌ 不支持 | ✅ 支持 |
| 搜索联系人 | ❌ 不支持 | ✅ 支持 |
| 获取联系人头像 | ❌ 不支持 | ✅ 支持 |
| HarmonyOS 支持 | ❌ 不支持 | ✅ 完全支持 |
支持的功能
| 功能 | 说明 | HarmonyOS 支持 |
|---|---|---|
| getAll | 获取所有联系人 | ✅ |
| getAllWithoutPhotos | 获取所有联系人(无头像) | ✅ |
| getContactById | 根据 ID 获取联系人 | ✅ |
| getCount | 获取联系人数量 | ✅ |
| getPhotoForId | 获取联系人头像 | ✅ |
| addContact | 添加联系人 | ✅ |
| updateContact | 更新联系人 | ✅ |
| deleteContact | 删除联系人 | ✅ |
| openContactForm | 打开新建联系人表单 | ⚠️ 部分支持 |
| openExistingContact | 打开现有联系人编辑 | ⚠️ 部分支持 |
| viewExistingContact | 查看现有联系人 | ⚠️ 部分支持 |
| getContactsMatchingString | 按姓名搜索 | ✅ |
| getContactsByPhoneNumber | 按电话搜索 | ✅ |
| getContactsByEmailAddress | 按邮箱搜索 | ✅ |
| checkPermission | 检查权限 | ✅ |
| requestPermission | 请求权限 | ✅ |
💡 提示:通讯录操作需要用户授权,请确保在使用前请求并检查权限。
兼容性验证
在以下环境验证通过:
- RNOH : 0.72.90; SDK : HarmonyOS 6.0.0 (API Version 20); IDE : DevEco Studio 6.0.2; ROM: 6.0.0
📦 安装步骤
1. 安装依赖
在项目根目录执行以下命令,本文基于 RN 0.72 版本开发:
bash
# RN 0.72 版本
npm install @react-native-ohos/react-native-contacts@7.0.8-rc.1
2. 验证安装
安装完成后,检查 package.json 文件,应该能看到新增的依赖:
json
{
  "dependencies": {
    "@react-native-ohos/react-native-contacts": "7.0.8-rc.1",
    // ... 其他依赖
  }
}
🔧 HarmonyOS 平台配置 ⭐
由于 HarmonyOS 暂不支持 AutoLink,需要手动配置原生端代码。本文提供 HAR 包引入 和 源码引入 两种方式,可根据实际需求选择。
1. 在工程根目录的 oh-package.json5 添加 overrides 字段
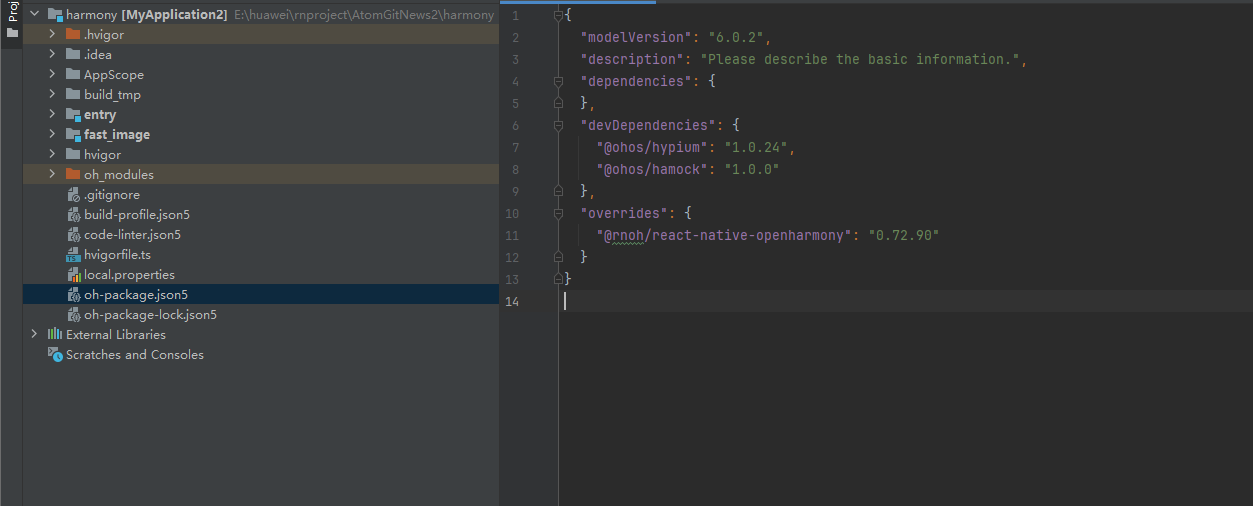
打开 harmony/oh-package.json5,添加以下配置:
json5
{
  // ... 其他配置
  "overrides": {
    "@rnoh/react-native-openharmony": "0.72.90"
  }
}
方式一:HAR 包引入(推荐)📦
HAR 包引入方式简单快捷,适合大多数场景。
💡 提示 :HAR 包位于三方库安装路径的
harmony文件夹下。
2.1 在 entry/oh-package.json5 添加依赖
打开 harmony/entry/oh-package.json5,添加以下依赖:
json5
"dependencies": {
  "@rnoh/react-native-openharmony": "0.72.90",
  + "@react-native-ohos/react-native-contacts": "file:../../node_modules/@react-native-ohos/react-native-contacts/harmony/contacts.har"
}
2.2 同步依赖
点击 DevEco Studio 右上角的 sync 按钮,或者在终端执行:
bash
cd harmony/entry
ohpm install
2.3 配置 CMakeLists.txt
打开 harmony/entry/src/main/cpp/CMakeLists.txt,添加以下配置:
c
project(rnapp)
cmake_minimum_required(VERSION 3.4.1)
set(CMAKE_SKIP_BUILD_RPATH TRUE)
set(RNOH_APP_DIR "${CMAKE_CURRENT_SOURCE_DIR}")
set(NODE_MODULES "${CMAKE_CURRENT_SOURCE_DIR}/../../../../../node_modules")
+ set(OH_MODULES "${CMAKE_CURRENT_SOURCE_DIR}/../../../oh_modules")
set(RNOH_CPP_DIR "${CMAKE_CURRENT_SOURCE_DIR}/../../../../../../react-native-harmony/harmony/cpp")
set(LOG_VERBOSITY_LEVEL 1)
set(CMAKE_ASM_FLAGS "-Wno-error- unused-command-line-argument -Qunused-arguments")
set(CMAKE_CXX_FLAGS "-fstack-protector-strong -Wl,-z,relro,-z,now,-z,noexecstack -s -fPIE -pie")
set(WITH_HITRACE_SYSTRACE 1)
add_compile_definitions(WITH_HITRACE_SYSTRACE)

add_subdirectory("${RNOH_CPP_DIR}" ./rn)

# 添加 Contacts 模块(HAR方式)
+ add_subdirectory("${OH_MODULES}/@react-native-ohos/react-native-contacts/src/main/cpp" ./contacts)

file(GLOB GENERATED_CPP_FILES "./generated/*.cpp")

add_library(rnoh_app SHARED
    ${GENERATED_CPP_FILES}
    "./PackageProvider.cpp"
    "${RNOH_CPP_DIR}/RNOHAppNapiBridge.cpp"
)
target_link_libraries(rnoh_app PUBLIC rnoh)

# 链接 Contacts 库
+ target_link_libraries(rnoh_app PUBLIC rnoh_contacts)
2.4 修改 PackageProvider.cpp
打开 harmony/entry/src/main/cpp/PackageProvider.cpp,添加:
cpp
#include "RNOH/PackageProvider.h"
#include "generated/RNOHGeneratedPackage.h"
+ #include "ContactsPackage.h"

using namespace rnoh;

std::vector<std::shared_ptr<Package>> PackageProvider::getPackages(Package::Context ctx) {
    return {
        std::make_shared<RNOHGeneratedPackage>(ctx),
        + std::make_shared<ContactsPackage>(ctx),
    };
}
2.5 在 ArkTs 侧引入 ContactsPackage
打开 harmony/entry/src/main/ets/RNPackagesFactory.ts,添加:
typescript
import type { RNPackageContext, RNPackage } from 'rnoh/ts';
+ import { ContactsPackage } from '@react-native-ohos/react-native-contacts/ts';

export function createRNPackages(ctx: RNPackageContext): RNPackage[] {
  return [
    // ... 其他包
    + new ContactsPackage(ctx),
  ];
}
方式二:源码引入 📁
源码引入方式适合需要调试或修改原生代码的场景。
2.1 复制源码到 harmony 工程根目录
把 <RN工程>/node_modules/@react-native-ohos/react-native-contacts/harmony 目录下的源码 contacts 复制到 harmony(鸿蒙壳工程)工程根目录下。
bash
# 复制源码目录
cp -r node_modules/@react-native-ohos/react-native-contacts/harmony/contacts harmony/
2.2 在 build-profile.json5 添加模块
打开 harmony/build-profile.json5,添加以下模块:
json5
modules: [
  // ... 其他模块
  + {
  +   name: 'contacts',
  +   srcPath: './contacts',
  + }
]
💡 提示 :如果存在
build-profile.template.json5文件,也需要同步添加上述模块配置。
2.3 在 entry/oh-package.json5 添加依赖
打开 harmony/entry/oh-package.json5,添加以下依赖:
json5
"dependencies": {
  "@rnoh/react-native-openharmony": "0.72.90",
  + "contacts": "file:../contacts"
}
2.4 同步依赖
点击 DevEco Studio 右上角的 sync 按钮,或者在终端执行:
bash
cd harmony/entry
ohpm install
2.5 配置 CMakeLists.txt
打开 harmony/entry/src/main/cpp/CMakeLists.txt,添加以下配置:
cmake
# 添加 Contacts 模块(源码方式)
+ add_subdirectory("../../contacts/src/main/cpp" ./contacts)

# 链接 Contacts 库
+ target_link_libraries(rnoh_app PUBLIC rnoh_contacts)
2.6 修改 PackageProvider.cpp
打开 harmony/entry/src/main/cpp/PackageProvider.cpp,添加:
cpp
+ #include "ContactsPackage.h"

using namespace rnoh;

std::vector<std::shared_ptr<Package>> PackageProvider::getPackages(Package::Context ctx) {
    return {
        std::make_shared<RNOHGeneratedPackage>(ctx),
        + std::make_shared<ContactsPackage>(ctx),
    };
}
2.7 在 ArkTs 侧引入 ContactsPackage
打开 harmony/entry/src/main/ets/RNPackagesFactory.ts,添加:
typescript
+ import { ContactsPackage } from 'contacts/ts';

export function createRNPackages(ctx: RNPackageContext): RNPackage[] {
  return [
    // ... 其他包
    + new ContactsPackage(ctx),
  ];
}
🔐 权限配置(重要,仅开发使用)⭐⭐⭐
通讯录操作需要敏感权限,必须在 module.json5 中声明。同时,由于通讯录权限属于 system_basic 级别,还需要修改签名配置。
⚠️ 权限等级说明
在 HarmonyOS 系统中,权限分为三个等级:
| 等级 | 说明 |
|---|---|
normal |
普通权限,普通应用可直接申请 |
system_basic |
系统基础权限,需要系统签名或特殊配置 |
system_core |
系统核心权限,仅系统应用可使用 |
🚨 重要提示 :通讯录权限(
READ_CONTACTS、WRITE_CONTACTS)属于system_basic级别权限。默认的应用权限等级是normal,只能使用normal等级的权限。如果直接安装包含system_basic权限的应用,会报错 9568289。
1. 添加权限声明
打开 harmony/entry/src/main/module.json5,在 module 中添加:
json5
{
  "module": {
    // ... 其他配置
    "requestPermissions": [
      {
        "name": "ohos.permission.READ_CONTACTS",
        "reason": "$string:read_contacts_reason",
        "usedScene": {
          "abilities": [
            "EntryAbility"
          ],
          "when": "always"
        }
      },
      {
        "name": "ohos.permission.WRITE_CONTACTS",
        "reason": "$string:write_contacts_reason",
        "usedScene": {
          "abilities": [
            "EntryAbility"
          ],
          "when": "always"
        }
      }
    ]
  }
}
2. 添加权限说明字符串
打开 harmony/entry/src/main/resources/base/element/string.json,添加:
json
{
  "string": [
    {
      "name": "read_contacts_reason",
      "value": "用于读取联系人信息,方便您快速选择联系人"
    },
    {
      "name": "write_contacts_reason",
      "value": "用于保存联系人信息,方便您管理通讯录"
    }
  ]
}
3. 修改签名配置(解决 9568289 错误)⭐
由于通讯录权限属于 system_basic 级别,需要修改签名模板文件。
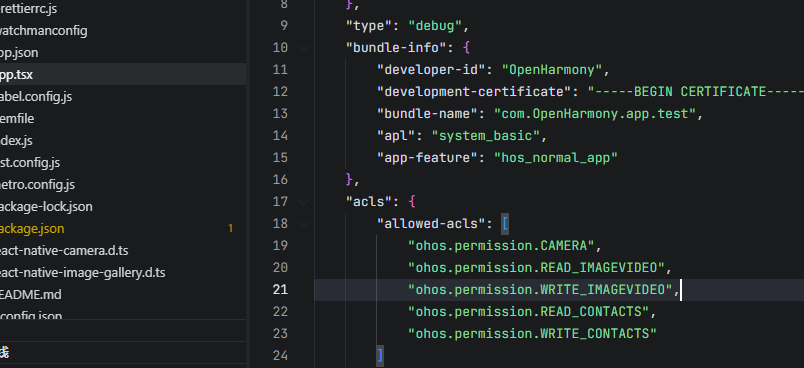
步骤 1:修改 Debug 签名模板
找到 SDK 目录下的签名模板文件:
{SDK路径}/openharmony/toolchains/lib/UnsgnedDebugProfileTemplate.json例如:d:\DevEco Studio\sdk\default\openharmony\toolchains\lib\UnsgnedDebugProfileTemplate.json
打开文件,修改以下内容:
1. 将 APL 等级从 normal 改为 system_basic:
json
"bundle-info": {
    ...
    "apl": "system_basic",
    ...
}
2. 在 acls 中添加允许的权限:
json
"acls": {
    "allowed-acls": [
        "ohos.permission.READ_CONTACTS",
        "ohos.permission.WRITE_CONTACTS"
    ]
}
3. 在 permissions 中添加受限权限:
json
"permissions": {
    "restricted-permissions": [
        "ohos.permission.READ_CONTACTS",
        "ohos.permission.WRITE_CONTACTS"
    ]
}
完整的修改后的文件示例:
json
{
    "version-name": "2.0.0",
    "version-code": 2,
    "uuid": "fe686e1b-3770-4824-a938-961b140a7c98",
    "validity": {
        "not-before": 1610519532,
        "not-after": 1705127532
    },
    "type": "debug",
    "bundle-info": {
        "developer-id": "OpenHarmony",
        "development-certificate": "...",
        "bundle-name": "com.OpenHarmony.app.test",
        "apl": "system_basic",
        "app-feature": "hos_normal_app"
    },
    "acls": {
        "allowed-acls": [
            "ohos.permission.READ_CONTACTS",
            "ohos.permission.WRITE_CONTACTS"
        ]
    },
    "permissions": {
        "restricted-permissions": [
            "ohos.permission.READ_CONTACTS",
            "ohos.permission.WRITE_CONTACTS"
        ]
    },
    "debug-info": {
        "device-ids": [...],
        "device-id-type": "udid"
    },
    "issuer": "pki_internal"
}
步骤 2:修改 Release 签名模板(可选)
如果需要发布应用,同样修改 UnsgnedReleasedProfileTemplate.json 文件。
步骤 3:在 DevEco Studio 中重新签名
- 打开 DevEco Studio
- 点击 File > Project Structure > Project > Signing Configs
- 取消勾选 "Automatically generate signature"
- 重新勾选 "Automatically generate signature"
- 等待自动签名完成
- 点击 OK
步骤 4:重新运行应用
签名完成后,重新运行应用即可正常安装。
⚠️ 注意 :修改签名模板后必须重新签名才能生效。如果仍然报错,请尝试清理项目后重新构建。
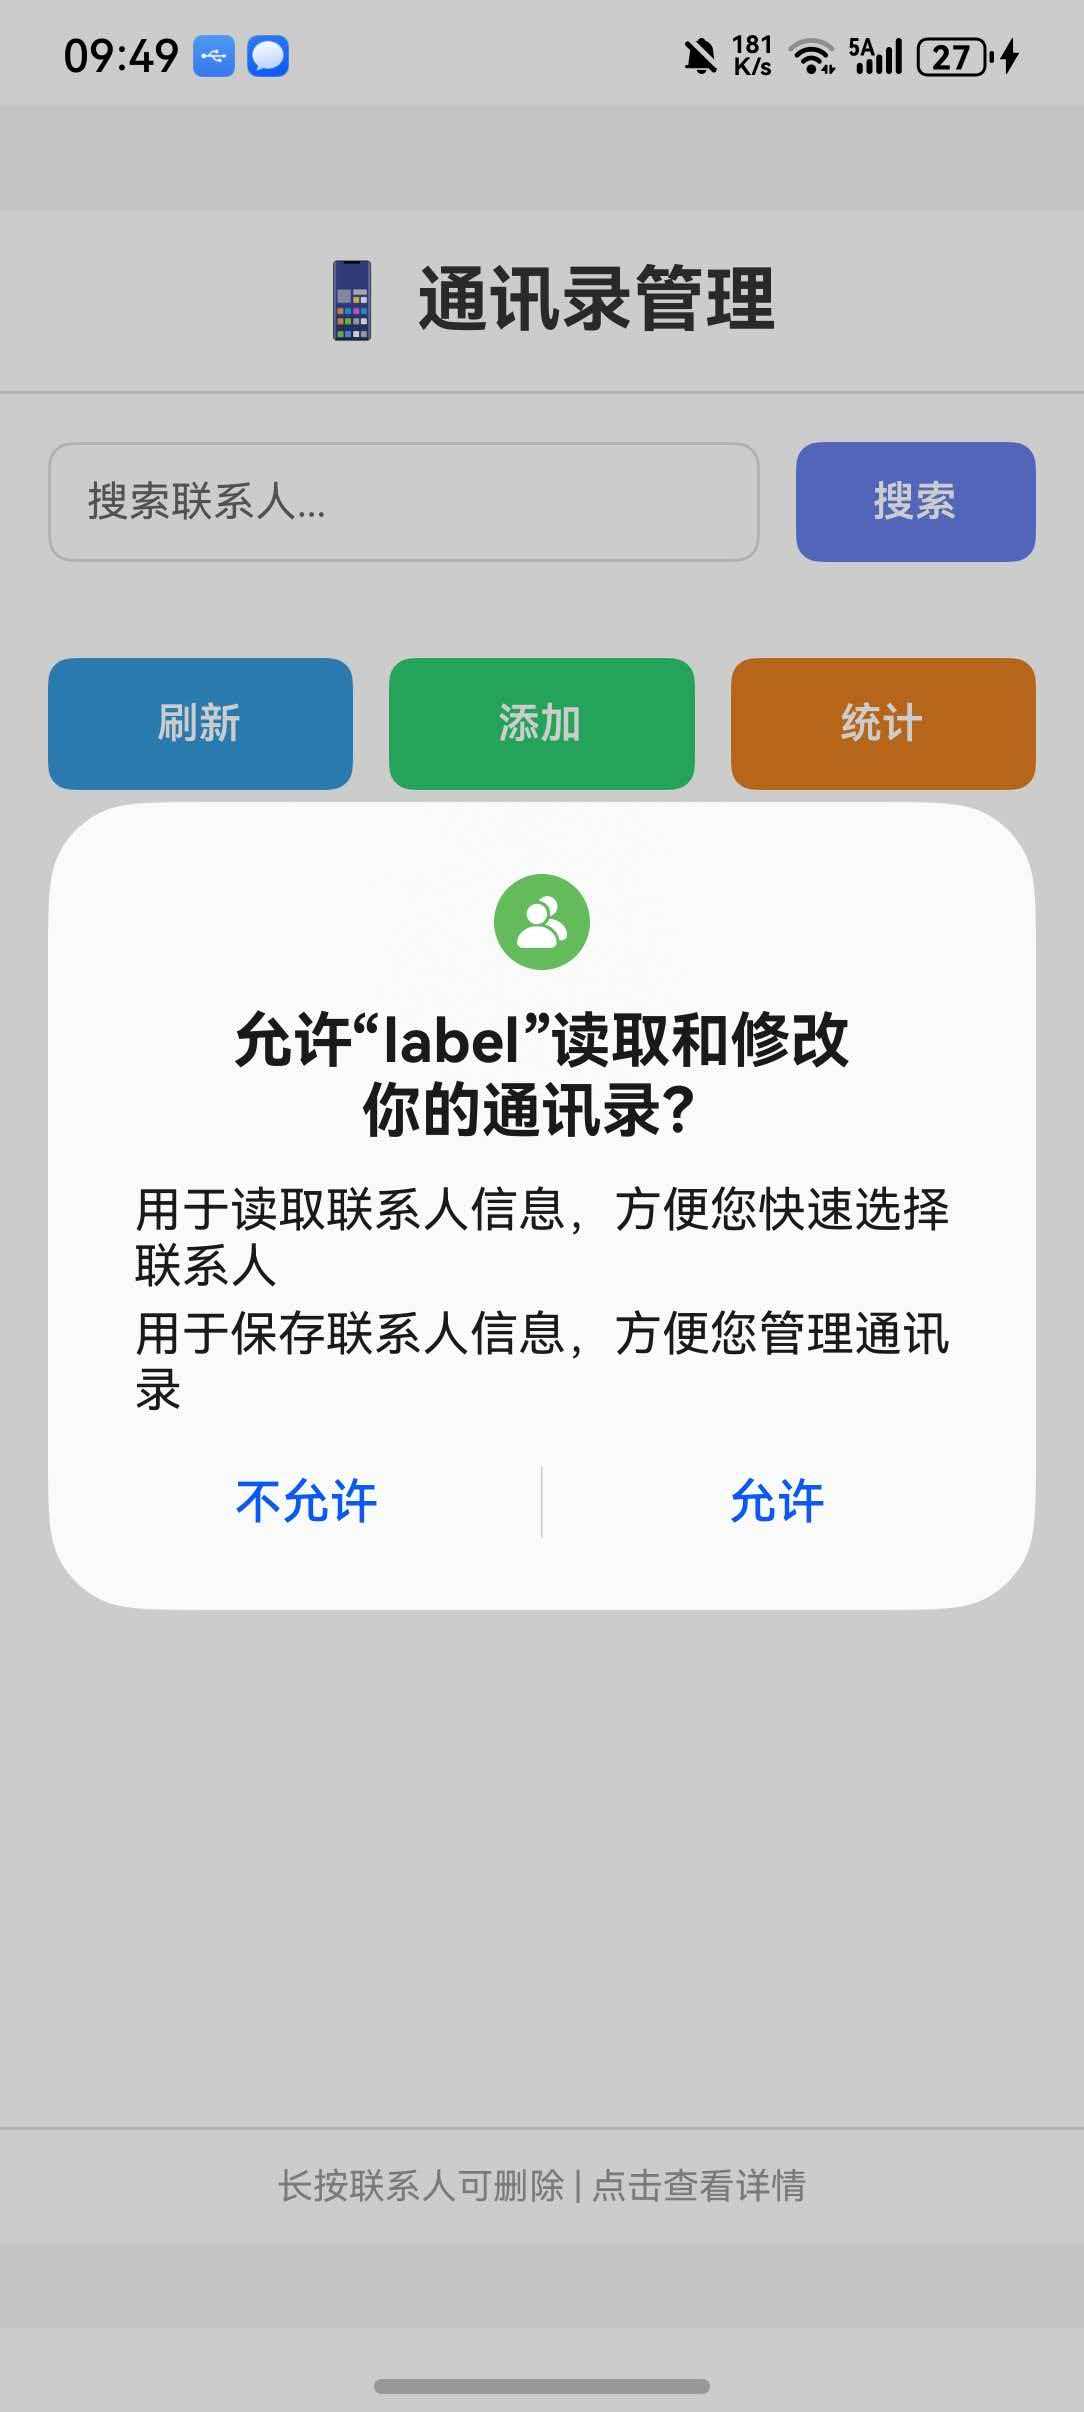
📖 API 详解
🔷 权限管理
1. requestPermission - 请求权限 ⭐
请求通讯录访问权限。
typescript
import Contacts from 'react-native-contacts';

const requestPermission = async () => {
  try {
    const permission = await Contacts.requestPermission();
    // permission: 'authorized' | 'denied' | 'undefined'
    console.log('权限状态:', permission);
  } catch (error) {
    console.error('请求权限失败:', error);
  }
};返回值:
| 值 | 说明 |
|---|---|
authorized |
已授权 |
denied |
已拒绝 |
undefined |
未确定 |
2. checkPermission - 检查权限
检查当前通讯录访问权限状态。
typescript
const checkPermission = async () => {
  try {
    const permission = await Contacts.checkPermission();
    console.log('当前权限状态:', permission);
  } catch (error) {
    console.error('检查权限失败:', error);
  }
};
🔷 获取联系人
3. getAll - 获取所有联系人 ⭐
获取通讯录中所有联系人。
typescript
const getAllContacts = async () => {
  try {
    const contacts = await Contacts.getAll();
    console.log('联系人列表:', contacts);
    return contacts;
  } catch (error) {
    console.error('获取联系人失败:', error);
  }
};
Contact 对象结构(测试的时候发现,联系人中的姓名被完整的放在了prefix字段中) :
测试返回的json:
json
[
  {
    "recordID": "9",
    "company": "测试公司",
    "middleName": "",
    "imAddresses": null,
    "note": null,
    "emailAddresses": [
      {
        "label": "work",
        "email": "test@example.com"
      }
    ],
    "suffix": "",
    "urlAddresses": [
      null
    ],
    "phoneNumbers": [
      {
        "label": "mobile",
        "number": "13800138000"
      }
    ],
    "displayName": "测试联系人",
    "backTitle": "",
    "familyName": null,
    "givenName": null,
    "jobTitle": "工程师2",
    "hasThumbnail": false,
    "thumbnailPath": null,
    "postalAddresses": null,
    "isStarred": false,
    "prefix": "是是是2",
    "department": "",
    "birthday": null
  },
  {
    "recordID": "10",
    "company": null,
    "middleName": "",
    "imAddresses": null,
    "note": null,
    "emailAddresses": null,
    "suffix": "",
    "urlAddresses": [
      null
    ],
    "phoneNumbers": [
      {
        "label": "",
        "number": "11111111112"
      }
    ],
    "displayName": null,
    "backTitle": "",
    "familyName": null,
    "givenName": null,
    "jobTitle": null,
    "hasThumbnail": false,
    "thumbnailPath": null,
    "postalAddresses": null,
    "isStarred": false,
    "prefix": "早点睡",
    "department": "",
    "birthday": null
  }
]| 字段 | 类型 | 说明 |
|---|---|---|
recordID |
string | 联系人 ID |
displayName |
string | 显示名称 |
givenName |
string | 名 |
familyName |
string | 姓 |
middleName |
string | 中间名 |
prefix |
string | 姓名(HarmonyOS完整姓名存放处) |
company |
string | 公司 |
jobTitle |
string | 职位 |
department |
string | 部门 |
phoneNumbers |
PhoneNumber\[\] | 电话号码列表 |
emailAddresses |
EmailAddress\[\] | 邮箱地址列表 |
postalAddresses |
PostalAddress\[\] | 邮政地址列表 |
birthday |
Birthday | 生日 |
note |
string | 备注 |
hasThumbnail |
boolean | 是否有头像 |
thumbnailPath |
string | 头像路径 |
isStarred |
boolean | 是否收藏 |
PhoneNumber 结构:
| 字段 | 类型 | 说明 |
|---|---|---|
label |
string | 标签 |
number |
string | 电话号码 |
EmailAddress 结构:
| 字段 | 类型 | 说明 |
|---|---|---|
label |
string | 标签 |
email |
string | 邮箱地址 |
4. getAllWithoutPhotos - 获取联系人(无头像)
与 getAll 类似,但不返回头像数据,性能更好。
typescript
const getAllContactsWithoutPhotos = async () => {
  try {
    const contacts = await Contacts.getAllWithoutPhotos();
    console.log('联系人列表:', contacts);
  } catch (error) {
    console.error('获取联系人失败:', error);
  }
};
5. getContactById - 根据 ID 获取联系人
根据联系人 ID 获取单个联系人详情。
typescript
const getContactById = async (contactId: string) => {
  try {
    const contact = await Contacts.getContactById(contactId);
    if (contact) {
      console.log('联系人详情:', contact);
    } else {
      console.log('联系人不存在');
    }
  } catch (error) {
    console.error('获取联系人失败:', error);
  }
};
6. getCount - 获取联系人数量
获取通讯录中联系人的总数。
typescript
const getContactCount = async () => {
  try {
    const count = await Contacts.getCount();
    console.log('联系人数量:', count);
  } catch (error) {
    console.error('获取数量失败:', error);
  }
};
7. getPhotoForId - 获取联系人头像
根据联系人 ID 获取头像路径。
typescript
const getContactPhoto = async (contactId: string) => {
  try {
    const photoUrl = await Contacts.getPhotoForId(contactId);
    console.log('头像路径:', photoUrl);
  } catch (error) {
    console.error('获取头像失败:', error);
  }
};
🔷 搜索联系人
8. getContactsMatchingString - 按姓名搜索 ⭐
根据姓名字符串搜索联系人。
typescript
const searchByName = async (name: string) => {
  try {
    const contacts = await Contacts.getContactsMatchingString(name);
    console.log('搜索结果:', contacts);
  } catch (error) {
    console.error('搜索失败:', error);
  }
};
9. getContactsByPhoneNumber - 按电话搜索
根据电话号码搜索联系人。
typescript
const searchByPhone = async (phoneNumber: string) => {
  try {
    const contacts = await Contacts.getContactsByPhoneNumber(phoneNumber);
    console.log('搜索结果:', contacts);
  } catch (error) {
    console.error('搜索失败:', error);
  }
};
10. getContactsByEmailAddress - 按邮箱搜索
根据邮箱地址搜索联系人。
typescript
const searchByEmail = async (email: string) => {
  try {
    const contacts = await Contacts.getContactsByEmailAddress(email);
    console.log('搜索结果:', contacts);
  } catch (error) {
    console.error('搜索失败:', error);
  }
};
🔷 联系人操作
11. addContact - 添加联系人 ⭐
添加新联系人到通讯录。
typescript
const addNewContact = async () => {
  try {
    const newContact = {
      givenName: '张',
      familyName: '三',
      displayName: '张三',
      prefix: '张三',
      company: '测试公司',
      jobTitle: '工程师',
      phoneNumbers: [
        {
          label: 'mobile',
          number: '13800138000',
        },
      ],
      emailAddresses: [
        {
          label: 'work',
          email: 'zhangsan@example.com',
        },
      ],
    };

    const contact = await Contacts.addContact(newContact);
    console.log('添加成功:', contact);
  } catch (error) {
    console.error('添加失败:', error);
  }
};
12. updateContact - 更新联系人
更新现有联系人信息。
typescript
const updateContact = async (contactId: string) => {
  try {
    await Contacts.updateContact({
      recordID: contactId,
      givenName: '李',
      familyName: '四',
      displayName: '李四',
      prefix: '李四',
      phoneNumbers: [
        {
          label: 'mobile',
          number: '13900139000',
        },
      ],
    });
    console.log('更新成功');
  } catch (error) {
    console.error('更新失败:', error);
  }
};
13. deleteContact - 删除联系人
从通讯录删除联系人。
typescript
const deleteContact = async (contactId: string) => {
  try {
    await Contacts.deleteContact({
      recordID: contactId,
    } as any);
    console.log('删除成功');
  } catch (error) {
    console.error('删除失败:', error);
  }
};
🔷 联系人界面
14. openContactForm - 打开新建联系人表单
打开系统联系人新建界面。
typescript
const openNewContactForm = async () => {
  try {
    const newContact = {
      givenName: '王',
      familyName: '五',
      prefix: '王五',
      phoneNumbers: [
        {
          label: 'mobile',
          number: '13700137000',
        },
      ],
    };

    const contact = await Contacts.openContactForm(newContact);
    console.log('新建联系人:', contact);
  } catch (error) {
    console.error('操作失败:', error);
  }
};
⚠️ HarmonyOS 注意:此功能在 HarmonyOS 上部分支持,可能存在兼容性问题。
15. openExistingContact - 打开现有联系人编辑
打开现有联系人进行编辑。
typescript
const openContactForEdit = async (contactId: string) => {
  try {
    const contact = await Contacts.openExistingContact({
      recordID: contactId,
    });
    console.log('编辑后的联系人:', contact);
  } catch (error) {
    console.error('操作失败:', error);
  }
};
16. viewExistingContact - 查看现有联系人
以只读模式查看联系人详情。
typescript
const viewContact = async (contactId: string) => {
  try {
    await Contacts.viewExistingContact({
      recordID: contactId,
    });
  } catch (error) {
    console.error('操作失败:', error);
  }
};
完整代码示例
typescript
import React, { useState, useEffect } from 'react';
import {
  View,
  Text,
  StyleSheet,
  ScrollView,
  SafeAreaView,
  TouchableOpacity,
  FlatList,
  Alert,
  TextInput,
  Image,
} from 'react-native';
import Contacts from 'react-native-contacts';

interface ContactItem {
  recordID: string;
  displayName: string | null;
  givenName: string | null;
  familyName: string | null;
  middleName: string | null;
  prefix: string | null;
  company: string | null;
  jobTitle: string | null;
  phoneNumbers: { label: string; number: string }[];
  emailAddresses: { label: string; email: string }[];
  thumbnailPath: string | null;
}

function ContactsDemo() {
  const [contacts, setContacts] = useState<ContactItem[]>([]);
  const [searchText, setSearchText] = useState('');
  const [loading, setLoading] = useState(false);

  useEffect(() => {
    checkAndRequestPermission();
  }, []);

  const checkAndRequestPermission = async () => {
    try {
      const permission = await Contacts.checkPermission();
      if (permission === 'undefined' || permission === 'denied') {
        const newPermission = await Contacts.requestPermission();
        if (newPermission === 'authorized') {
          loadContacts();
        } else {
          Alert.alert('提示', '需要通讯录权限才能使用此功能');
        }
      } else if (permission === 'authorized') {
        loadContacts();
      }
    } catch (error: any) {
      Alert.alert('错误', `权限检查失败: ${error.message}`);
    }
  };

  const loadContacts = async () => {
    setLoading(true);
    try {
      const contactList = await Contacts.getAll();
      setContacts(contactList as ContactItem[]);
    } catch (error: any) {
      Alert.alert('错误', `加载联系人失败: ${error.message}`);
    } finally {
      setLoading(false);
    }
  };

  const searchContacts = async () => {
    if (!searchText.trim()) {
      loadContacts();
      return;
    }

    setLoading(true);
    try {
      const results = await Contacts.getContactsMatchingString(searchText);
      setContacts(results as ContactItem[]);
    } catch (error: any) {
      Alert.alert('错误', `搜索失败: ${error.message}`);
    } finally {
      setLoading(false);
    }
  };

  const addNewContact = async () => {
    try {
      const newContact = {
        givenName: '测试',
        familyName: '联系人',
        displayName: '测试联系人',
        prefix: '测试联系人',
        company: '测试公司',
        jobTitle: '工程师',
        phoneNumbers: [
          {
            label: 'mobile',
            number: '13800138000',
          },
        ],
        emailAddresses: [
          {
            label: 'work',
            email: 'test@example.com',
          },
        ],
      };

      const contact = await Contacts.addContact(newContact);
      Alert.alert('成功', '联系人添加成功');
      loadContacts();
    } catch (error: any) {
      Alert.alert('错误', `添加失败: ${error.message}`);
    }
  };

  const deleteContact = async (contactId: string) => {
    Alert.alert(
      '确认删除',
      '确定要删除此联系人吗?',
      [
        { text: '取消', style: 'cancel' },
        {
          text: '删除',
          style: 'destructive',
          onPress: async () => {
            try {
              await Contacts.deleteContact({ recordID: contactId } as any);
              Alert.alert('成功', '联系人已删除');
              loadContacts();
            } catch (error: any) {
              Alert.alert('错误', `删除失败: ${error.message}`);
            }
          },
        },
      ]
    );
  };

  const getContactCount = async () => {
    try {
      const count = await Contacts.getCount();
      Alert.alert('联系人数量', `通讯录中共有 ${count} 个联系人`);
    } catch (error: any) {
      Alert.alert('错误', `获取数量失败: ${error.message}`);
    }
  };

  const getContactName = (contact: ContactItem): string => {
    const displayName = contact.displayName && contact.displayName.trim() !== ''
      ? contact.displayName
      : null;
    const parts: string[] = [];
    if (contact.familyName && contact.familyName.trim() !== '') parts.push(contact.familyName);
    if (contact.givenName && contact.givenName.trim() !== '') parts.push(contact.givenName);
    if (contact.middleName && contact.middleName.trim() !== '') parts.push(contact.middleName);

    if (displayName) {
      return displayName;
    }
    if (parts.length > 0) {
      return parts.join('');
    }
    if (contact.prefix && contact.prefix.trim() !== '') {
      return contact.prefix;
    }
    return '未知联系人';
  };

  const getContactInitial = (contact: ContactItem): string => {
    const name = getContactName(contact);
    return name !== '未知联系人' ? name[0] : '?';
  };

  const renderContactItem = ({ item }: { item: ContactItem }) => (
    <TouchableOpacity
      style={styles.contactItem}
      onPress={() => showContactDetail(item)}
      onLongPress={() => deleteContact(item.recordID)}
    >
      <View style={styles.avatarContainer}>
        {item.thumbnailPath ? (
          <Image source={{ uri: item.thumbnailPath }} style={styles.avatar} />
        ) : (
          <View style={styles.avatarPlaceholder}>
            <Text style={styles.avatarText}>
              {getContactInitial(item)}
            </Text>
          </View>
        )}
      </View>
      <View style={styles.contactInfo}>
        <Text style={styles.contactName}>
          {getContactName(item)}
        </Text>
        {item.company && (
          <Text style={styles.contactCompany}>{item.company}</Text>
        )}
        {item.phoneNumbers && item.phoneNumbers.length > 0 && (
          <Text style={styles.contactPhone}>
            {item.phoneNumbers[0].number}
          </Text>
        )}
      </View>
    </TouchableOpacity>
  );

  const showContactDetail = (contact: ContactItem) => {
    const phones = contact.phoneNumbers && contact.phoneNumbers.length > 0
      ? contact.phoneNumbers.map(p => `${p.label}: ${p.number}`).join('\n')
      : '无';
    const emails = contact.emailAddresses && contact.emailAddresses.length > 0
      ? contact.emailAddresses.map(e => `${e.label}: ${e.email}`).join('\n')
      : '无';

    Alert.alert(
      getContactName(contact),
      `公司: ${contact.company || '无'}\n\n电话:\n${phones}\n\n邮箱:\n${emails}`
    );
  };

  return (
    <SafeAreaView style={styles.container}>
      <View style={styles.header}>
        <Text style={styles.title}>📱 通讯录管理</Text>
      </View>

      <View style={styles.searchContainer}>
        <TextInput
          style={styles.searchInput}
          placeholder="搜索联系人..."
          value={searchText}
          onChangeText={setSearchText}
          onSubmitEditing={searchContacts}
        />
        <TouchableOpacity style={styles.searchButton} onPress={searchContacts}>
          <Text style={styles.searchButtonText}>搜索</Text>
        </TouchableOpacity>
      </View>

      <View style={styles.buttonRow}>
        <TouchableOpacity style={[styles.button, styles.buttonBlue]} onPress={loadContacts}>
          <Text style={styles.buttonText}>刷新</Text>
        </TouchableOpacity>
        <TouchableOpacity style={[styles.button, styles.buttonGreen]} onPress={addNewContact}>
          <Text style={styles.buttonText}>添加</Text>
        </TouchableOpacity>
        <TouchableOpacity style={[styles.button, styles.buttonOrange]} onPress={getContactCount}>
          <Text style={styles.buttonText}>统计</Text>
        </TouchableOpacity>
      </View>

      <View style={styles.listContainer}>
        {loading ? (
          <View style={styles.loadingContainer}>
            <Text style={styles.loadingText}>加载中...</Text>
          </View>
        ) : (
          <FlatList
            data={contacts}
            keyExtractor={(item) => item.recordID}
            renderItem={renderContactItem}
            ListEmptyComponent={
              <View style={styles.emptyContainer}>
                <Text style={styles.emptyText}>暂无联系人</Text>
              </View>
            }
          />
        )}
      </View>

      <View style={styles.footer}>
        <Text style={styles.footerText}>
          长按联系人可删除 | 点击查看详情
        </Text>
      </View>
    </SafeAreaView>
  );
}

const styles = StyleSheet.create({
  container: {
    flex: 1,
    backgroundColor: '#f5f5f5',
  },
  header: {
    padding: 16,
    backgroundColor: '#fff',
    borderBottomWidth: 1,
    borderBottomColor: '#e0e0e0',
  },
  title: {
    fontSize: 24,
    fontWeight: 'bold',
    textAlign: 'center',
    color: '#333',
  },
  searchContainer: {
    flexDirection: 'row',
    padding: 16,
    backgroundColor: '#fff',
    gap: 12,
  },
  searchInput: {
    flex: 1,
    height: 40,
    borderWidth: 1,
    borderColor: '#ddd',
    borderRadius: 8,
    paddingHorizontal: 12,
    fontSize: 14,
  },
  searchButton: {
    width: 80,
    height: 40,
    backgroundColor: '#667eea',
    borderRadius: 8,
    justifyContent: 'center',
    alignItems: 'center',
  },
  searchButtonText: {
    color: '#fff',
    fontWeight: '600',
  },
  buttonRow: {
    flexDirection: 'row',
    padding: 16,
    gap: 12,
    backgroundColor: '#fff',
  },
  button: {
    flex: 1,
    height: 44,
    borderRadius: 8,
    justifyContent: 'center',
    alignItems: 'center',
  },
  buttonBlue: {
    backgroundColor: '#3498db',
  },
  buttonGreen: {
    backgroundColor: '#2ecc71',
  },
  buttonOrange: {
    backgroundColor: '#e67e22',
  },
  buttonText: {
    color: '#fff',
    fontWeight: '600',
    fontSize: 14,
  },
  listContainer: {
    flex: 1,
    backgroundColor: '#fff',
  },
  contactItem: {
    flexDirection: 'row',
    padding: 16,
    borderBottomWidth: 1,
    borderBottomColor: '#f0f0f0',
    backgroundColor: '#fff',
  },
  avatarContainer: {
    marginRight: 12,
  },
  avatar: {
    width: 50,
    height: 50,
    borderRadius: 25,
  },
  avatarPlaceholder: {
    width: 50,
    height: 50,
    borderRadius: 25,
    backgroundColor: '#667eea',
    justifyContent: 'center',
    alignItems: 'center',
  },
  avatarText: {
    color: '#fff',
    fontSize: 20,
    fontWeight: 'bold',
  },
  contactInfo: {
    flex: 1,
    justifyContent: 'center',
  },
  contactName: {
    fontSize: 16,
    fontWeight: '600',
    color: '#333',
  },
  contactCompany: {
    fontSize: 14,
    color: '#666',
    marginTop: 2,
  },
  contactPhone: {
    fontSize: 14,
    color: '#999',
    marginTop: 2,
  },
  loadingContainer: {
    flex: 1,
    justifyContent: 'center',
    alignItems: 'center',
  },
  loadingText: {
    fontSize: 16,
    color: '#666',
  },
  emptyContainer: {
    flex: 1,
    justifyContent: 'center',
    alignItems: 'center',
    paddingVertical: 40,
  },
  emptyText: {
    fontSize: 16,
    color: '#999',
  },
  footer: {
    padding: 12,
    backgroundColor: '#fff',
    borderTopWidth: 1,
    borderTopColor: '#e0e0e0',
  },
  footerText: {
    fontSize: 12,
    color: '#999',
    textAlign: 'center',
  },
});

export default ContactsDemo;
⚠️ 常见问题
1. 权限被拒绝
问题:调用通讯录 API 时提示权限被拒绝。
解决方案:
- 确保在
module.json5中正确配置了权限 - 检查是否使用了 ACL 签名
- 引导用户在系统设置中手动开启权限
2. 联系人数据不完整
问题:获取的联系人缺少某些字段。
解决方案:
- 使用
getAll()而不是getAllWithoutPhotos()获取完整数据 - 检查联系人是否真的有对应的数据
3. 添加联系人失败
问题 :调用 addContact 时失败。
解决方案:
- 确保已获取
WRITE_CONTACTS权限 - 检查联系人数据格式是否正确
- 确保必填字段(如
prefix)不为空(HarmonyOS完整姓名存放处)
4. 搜索无结果
问题:调用搜索方法返回空数组。
解决方案:
- 确认搜索关键词是否正确
- 检查通讯录中是否有匹配的联系人
- 尝试使用不同的搜索方法
📚 参考资料
📝 总结
react-native-contacts 是一个功能强大的通讯录管理库,在 HarmonyOS 平台上得到了良好的支持。通过本文的介绍,你可以:
- ✅ 掌握 HarmonyOS 平台的集成配置
- ✅ 理解权限管理的重要性
- ✅ 学会使用各种联系人操作 API
- ✅ 实现完整的通讯录管理功能
希望本文能帮助你在 HarmonyOS 项目中顺利集成通讯录功能!
📌 提示:如果在集成过程中遇到问题,欢迎在评论区留言讨论!