
本文介绍了一个基于 Vue 3 和 CesiumJS 的 DJI 无人机航线规划工具的开发过程,重点讲解 3D 地图可视化、坐标系统转换、KMZ 航线文件生成等核心技术实现。
前言
随着无人机技术的普及,自动化航线规划成为行业应用的关键需求。本文分享了一个DJI 航线生成器的开发经验,这是一个基于 Web 的无人机航线规划工具,支持生成符合 WPML 1.0.6 标准的 KMZ 航线文件,可直接导入大疆司空 2 和 Matrice 系列无人机。
一、项目背景与技术选型
1.1 业务需求
在电力巡检、安防监控、测绘等领域,无人机自动化作业需要:
-
可视化的航线规划界面
-
精确的地理坐标系统
-
符合行业标准的航线文件
-
支持多种航线类型(巡逻、面状扫描等)
1.2 技术选型
经过对比分析,我们选择了以下技术栈:
前端框架:
-
Vue 3.5:Composition API 提供更好的代码组织
-
Vite 5.4:快速的开发服务器和构建工具
地图引擎:
-
CesiumJS 1.135:强大的 3D 地球引擎,支持地形、影像等多种数据
-
Vue-Cesium 3.2:Cesium 的 Vue 封装,简化集成
底图服务:
- 高德地图/天地图:国内覆盖好,更新及时(需注意坐标系问题)
工具库:
-
JSZip:KMZ 文件压缩/解压
-
UnoCSS:原子化 CSS,提升开发效率
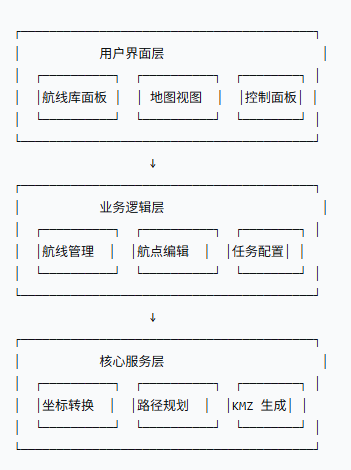
二、系统架构设计
2.1 整体架构
三、核心技术实现
3.1 坐标系统转换
问题背景
项目面临的最大挑战是坐标系不一致:
-
高德地图使用 GCJ-02(火星坐标系)
-
DJI 设备使用 WGS84(GPS 坐标系)
-
两者在中国境内存在 100-700 米偏移
解决方案
我们实现了完整的坐标转换流程:
javascript
// utils/coordTransform.js

/**
 * GCJ-02 转 WGS84
 * @param {number} lng - 经度
 * @param {number} lat - 纬度
 * @returns {Object} - {lng, lat}
 */
export function gcj02ToWgs84(lng, lat) {
  if (!isChinaArea(lng, lat)) {
    return { lng, lat }
  }

  let dLat = transformLat(lng - 105.0, lat - 35.0)
  let dLng = transformLng(lng - 105.0, lat - 35.0)

  const radLat = lat / 180.0 * Math.PI
  let magic = Math.sin(radLat)
  magic = 1 - 0.190284675272 * magic * magic
  magic = Math.sqrt(magic)

  const dLngFactor = (dLng * 180.0) / ((6378137.0 * Math.PI) * magic)
  const dLatFactor = (dLat * 180.0) / ((6378137.0 * Math.PI) / magic)

  return {
    lng: lng - dLngFactor,
    lat: lat - dLatFactor
  }
}

/**
 * WGS84 转 GCJ-02
 */
export function wgs84ToGcj02(lng, lat) {
  if (!isChinaArea(lng, lat)) {
    return { lng, lat }
  }

  const dLat = transformLat(lng - 105.0, lat - 35.0)
  const dLng = transformLng(lng - 105.0, lat - 35.0)

  return {
    lng: lng + dLng,
    lat: lat + dLat
  }
}数据流设计:
-
前端存储:统一使用 GCJ-02(与高德地图一致)
-
地图显示:直接使用 GCJ-02(无偏移)
-
KMZ 导出:转换为 WGS84(DJI 标准)
这样确保了:
-
✅ 前端点击位置和显示位置完全一致
-
✅ 导入 DJI 设备后位置准确无偏移
3.2 Cesium 地图集成
3.2.1 基础配置
html
<!-- MapViewer.vue -->
<template>
  <div class="map-viewer">
    <vc-viewer
      ref="viewerRef"
      :base-layer-provider="tiandituProvider"
      :zoom-out-on-double-click="false"
      :selection-indicator="false"
      :focus-button-indicator="false"
      @ready="onViewerReady"
      @click="onMapClick"
    >
      <!-- 天地图影像 -->
      <vc-imagery-provider-tianditu
        :api-key="tiandituKey"
        :type="'img'"
        :token="tiandituKey"
      />

      <!-- 天地图注记 -->
      <vc-imagery-provider-tianditu
        :api-key="tiandituKey"
        :type="'cva'"
        :token="tiandituKey"
      />
    </vc-viewer>
  </div>
</template>

<script setup>
import { ref } from 'vue'

const viewerRef = ref(null)
const tiandituKey = 'your_tianditu_api_key'

const onViewerReady = ({ viewer }) => {
  // 配置相机
  viewer.scene.camera.percentageChanged = 0.01
  viewer.scene.camera.changed.addEventListener(() => {
    // 相机移动回调
  })

  // 禁用默认交互
  viewer.scene.screenSpaceCameraController.enableRotate = true
  viewer.scene.screenSpaceCameraController.enableTilt = true
}

const onMapClick = (position) => {
  // 处理地图点击
  const cartesian = viewer.camera.pickEllipsoid(position)
  const cartographic = Cesium.Cartographic.fromCartesian(cartesian)
  const lng = Cesium.Math.toDegrees(cartographic.longitude)
  const lat = Cesium.Math.toDegrees(cartographic.latitude)

  // 添加航点逻辑...
}
</script>
3.2.2 航点可视化
使用 Cesium Entity API 实现航点、航线、视锥的可视化:
javascript
// 添加航点标记
viewer.entities.add({
  position: Cesium.Cartesian3.fromDegrees(lng, lat, height),
  billboard: {
    image: '/images/plane.png',
    scale: 0.5,
    rotation: Cesium.Math.toRadians(yaw), // 飞行器偏航角
    heightReference: Cesium.HeightReference.CLAMP_TO_GROUND
  }
})

// 添加航线路径
viewer.entities.add({
  polyline: {
    positions: positionArray,
    width: 3,
    material: new Cesium.PolylineGlowMaterialProperty({
      glowPower: 0.2,
      color: Cesium.Color.fromCssColorString('#3b82f6')
    })
  }
})

// 添加视锥体(相机视角范围)
import { FrustumVisualization } from '@/utils/FrustumVisualization'

const frustum = new FrustumVisualization(viewer)
frustum.update({
  position: { lng, lat, height },
  heading: gimbalYaw,  // 云台偏航角
  pitch: gimbalPitch,  // 云台俯仰角
  zoom: cameraZoom
})
3.3 S 形扫描路径生成算法
面状航线的核心是自动生成 S 形扫描路径,算法流程如下:
javascript
// utils/routePlanner.js

/**
 * 生成 S 形扫描路径
 * @param {Array} polygon - 多边形顶点 [{lng, lat}, ...]
 * @param {Object} options - 配置参数
 * @returns {Array} - 航点列表
 */
export function generateScanPath(polygon, options) {
  const {
    scanSpacing = 20,      // 扫描间距(米)
    scanDirection = 0,     // 航线方向(度)
    borderShrink = 0,      // 边界内缩(米)
    overlapRate = 0.8      // 重叠率
  } = options

  // 1. 坐标投影:经纬度 -> 平面坐标(米)
  const projectedPolygon = polygon.map(point =>
    projectToPlane(point.lng, point.lat)
  )

  // 2. 多边形收缩(根据边距参数)
  const shrunkPolygon = shrinkPolygon(projectedPolygon, borderShrink)

  // 3. 坐标旋转(根据方向角)
  const rotatedPolygon = rotatePolygon(shrunkPolygon, scanDirection)

  // 4. 计算边界框
  const bbox = calculateBoundingBox(rotatedPolygon)

  // 5. 生成扫描线
  const scanLines = []
  for (let y = bbox.minY; y <= bbox.maxY; y += scanSpacing) {
    const line = {
      start: { x: bbox.minX, y },
      end: { x: bbox.maxX, y }
    }
    scanLines.push(line)
  }

  // 6. 计算扫描线与多边形的交点
  const intersections = scanLines.map(line =>
    intersectLineWithPolygon(line, rotatedPolygon)
  )

  // 7. S 形连接交点
  const waypoints = connectInSPattern(intersections)

  // 8. 反向旋转,恢复原坐标系
  const restoredWaypoints = waypoints.map(point =>
    rotatePoint(point, -scanDirection)
  )

  // 9. 坐标还原:平面坐标 -> 经纬度
  const result = restoredWaypoints.map(point => {
    const { lng, lat } = projectFromPlane(point.x, point.y)
    return { lng, lat, height: options.flightHeight }
  })

  return result
}

/**
 * S 形连接交点
 */
function connectInSPattern(intersections) {
  const waypoints = []

  for (let i = 0; i < intersections.length; i++) {
    const points = intersections[i]

    // 偶数行:从左到右
    if (i % 2 === 0) {
      points.sort((a, b) => a.x - b.x)
    }
    // 奇数行:从右到左
    else {
      points.sort((a, b) => b.x - a.x)
    }

    waypoints.push(...points)
  }

  return waypoints
}算法关键点:
-
坐标投影:使用 Web Mercator 投影,将经纬度转换为平面坐标
-
多边形收缩:使用向量法向内收缩边界
-
扫描线生成:等间距平行线
-
交点计算:射线法判断交点
-
S 形连接:减少无人机转弯次数,提高效率
3.4 KMZ 文件生成
KMZ 文件是符合 DJI WPML 1.0.6 标准的压缩文件,包含:
-
wpmz/template.kml:任务配置 -
wpmz/waylines.wpml:航线定义
3.4.1 下载文件
javascript
<script setup>
import { KmzGenerator } from '@/utils/kmzGenerator'

const generateAndDownload = async () => {
  const generator = new KmzGenerator()

  const mission = {
    droneEnumValue: 99,  // Matrice 4T
    payloadEnumValue: 85,
    flightSpeed: 10,
    flightHeight: 60,
    takeoffHeight: 20,
    finishAction: 1,  // 返航
    lostConnectionAction: 0,  // 返航
    heightMode: 'relative_to_takeoff',
    polygon: routePoints.value
  }

  const waypoints = routePoints.value.map(point => ({
    lng: point.lng,
    lat: point.lat,
    height: point.height,
    speed: point.speed,
    gimbalPitch: point.gimbalPitch,
    gimbalYaw: point.gimbalYaw,
    actionType: point.actionType,
    fileName: point.fileName,
    hoverTime: point.hoverTime
  }))

  const kmzBlob = await generator.generate(mission, waypoints)

  // 触发下载
  const url = URL.createObjectURL(kmzBlob)
  const link = document.createElement('a')
  link.href = url
  link.download = 'mission.kmz'
  link.click()
  URL.revokeObjectURL(url)
}
</script>
3.5 相机视角可视化
为了直观展示无人机的拍摄范围,我们实现了**视锥体(Frustum)**可视化:
javascript
// utils/FrustumVisualization.js

import * as Cesium from 'cesium'

export class FrustumVisualization {
  constructor(viewer) {
    this.viewer = viewer
    this.entity = null
  }

  /**
   * 更新视锥体
   * @param {Object} config - 配置参数
   */
  update(config) {
    const {
      position,    // {lng, lat, height}
      heading,     // 云台偏航角(度)
      pitch,       // 云台俯仰角(度)
      zoom         // 变焦倍率
    } = config

    // 计算相机参数
    const fov = this.calculateFov(zoom)
    const aspectRatio = 4 / 3  // 4:3 画幅

    // 计算视锥体角点
    const corners = this.calculateFrustumCorners(
      position,
      heading,
      pitch,
      fov,
      aspectRatio
    )

    // 更新或创建视锥体 Entity
    if (this.entity) {
      this.viewer.entities.remove(this.entity)
    }

    this.entity = this.viewer.entities.add({
      // 视锥体线框
      polylineVolume: {
        positions: this.createFrustumOutline(corners),
        shape: this.createCrossShape(),
        material: Cesium.Color.fromCssColorString('#3b82f6').withAlpha(0.5),
        cornerType: Cesium.CornerType.ROUNDED
      },

      // 地面投影
      polygon: {
        hierarchy: Cesium.Cartesian3.fromDegreesArray([
          corners.bottomLeft.lng, corners.bottomLeft.lat,
          corners.bottomRight.lng, corners.bottomRight.lat,
          corners.topRight.lng, corners.topRight.lat,
          corners.topLeft.lng, corners.topLeft.lat
        ]),
        material: Cesium.Color.fromCssColorString('#3b82f6').withAlpha(0.2),
        outline: true,
        outlineColor: Cesium.Color.fromCssColorString('#3b82f6')
      }
    })
  }

  /**
   * 计算视场角
   */
  calculateFov(zoom) {
    // 基准焦距(1x 变焦)
    const baseFocalLength = 24  // mm
    const sensorWidth = 13.2    // M3T 传感器宽度

    // 当前焦距
    const focalLength = baseFocalLength * zoom

    // 视场角公式:FOV = 2 * arctan(sensorSize / (2 * focalLength))
    const fovRadians = 2 * Math.atan(sensorWidth / (2 * focalLength))

    return Cesium.Math.toDegrees(fovRadians)
  }

  /**
   * 计算视锥体角点
   */
  calculateFrustumCorners(position, heading, pitch, fov, aspectRatio) {
    // 假设拍摄距离(根据高度和俯仰角估算)
    const distance = position.height / Math.sin(Cesium.Math.toRadians(-pitch))

    // 视锥体半角
    const halfFov = fov / 2
    const halfHeightFov = Math.atan(Math.tan(Cesium.Math.toRadians(halfFov)) / aspectRatio)

    // 计算角点偏移
    const corners = {
      topLeft: this.offsetPosition(position, heading, pitch, -halfFov, halfHeightFov, distance),
      topRight: this.offsetPosition(position, heading, pitch, halfFov, halfHeightFov, distance),
      bottomLeft: this.offsetPosition(position, heading, pitch, -halfFov, -halfHeightFov, distance),
      bottomRight: this.offsetPosition(position, heading, pitch, halfFov, -halfHeightFov, distance)
    }

    return corners
  }

  /**
   * 偏移位置
   */
  offsetPosition(position, heading, pitch, yawOffset, pitchOffset, distance) {
    const finalHeading = Cesium.Math.toRadians(heading + yawOffset)
    const finalPitch = Cesium.Math.toRadians(pitch + pitchOffset)

    const dx = distance * Math.cos(finalPitch) * Math.sin(finalHeading)
    const dy = distance * Math.cos(finalPitch) * Math.cos(finalHeading)
    const dz = distance * Math.sin(finalPitch)

    return {
      lng: position.lng + Cesium.Math.toDegrees(dx / 6378137),
      lat: position.lat + Cesium.Math.toDegrees(dy / 6378137),
      height: position.height - dz
    }
  }
}
四、性能优化
4.1 组件通信优化
使用 Vue 3 的 provide/inject 和响应式系统优化组件通信:
javascript
<!-- index.vue -->
<script setup>
import { provide, reactive, ref } from 'vue'

// 共享状态
const sharedState = reactive({
  currentWaypointIndex: -1,
  routePoints: [],
  cameraConfig: {
    zoom: 1,
    aircraftYaw: 0,
    gimbalPitch: -90,
    gimbalYaw: 0
  }
})

// 提供给子组件
provide('sharedState', sharedState)
provide('updateWaypoint', updateWaypoint)
provide('updateCameraConfig', updateCameraConfig)

function updateWaypoint(index, data) {
  sharedState.routePoints[index] = {
    ...sharedState.routePoints[index],
    ...data
  }
}

function updateCameraConfig(config) {
  Object.assign(sharedState.cameraConfig, config)
}
</script>
4.2 Cesium 渲染优化
javascript
// 1. 使用 Entity Pool 管理大量航点
class EntityPool {
  constructor(viewer) {
    this.viewer = viewer
    this.pool = []
    this.active = new Map()
  }

  acquire(id, config) {
    if (this.active.has(id)) {
      this.update(id, config)
      return
    }

    let entity
    if (this.pool.length > 0) {
      entity = this.pool.pop()
      this.configureEntity(entity, config)
    } else {
      entity = this.viewer.entities.add(config)
    }

    this.active.set(id, entity)
  }

  release(id) {
    const entity = this.active.get(id)
    if (entity) {
      this.active.delete(id)
      this.pool.push(entity)
    }
  }
}

// 2. 视锥体更新使用 nextTick 避免渲染警告
import { nextTick } from 'vue'

const updateFrustum = async () => {
  await nextTick()
  frustumVisualization.update(cameraConfig)
}

// 3. 限制最大缩放级别(避免地图无数据)
viewer.scene.screenSpaceCameraController.maximumZoomDistance = 20000
4.3 路径计算优化
使用 Web Worker 处理复杂计算,避免阻塞主线程:
javascript
// workers/pathPlanning.worker.js

self.onmessage = function(e) {
  const { type, data } = e.data

  if (type === 'GENERATE_SCAN_PATH') {
    const waypoints = generateScanPath(data.polygon, data.options)
    self.postMessage({ type: 'SCAN_PATH_READY', waypoints })
  }
}
javascript
// 主线程使用
const worker = new Worker(new URL('./workers/pathPlanning.worker.js', import.meta.url))

worker.postMessage({
  type: 'GENERATE_SCAN_PATH',
  data: { polygon, options }
})

worker.onmessage = function(e) {
  if (e.data.type === 'SCAN_PATH_READY') {
    routePoints.value = e.data.waypoints
  }
}
五、难点与解决方案
5.1 AI 目标识别配置
问题:Matrice 4T 支持 AI 目标识别,需要特殊配置
解决方案:在 KMZ 中添加 AI 参数
5.2 高度模式处理
问题:三种高度模式(海拔、相对起飞点、相对地形)需要不同处理
六、总结与展望
6.1 技术亮点
-
坐标系统转换:完美解决 GCJ-02 和 WGS84 的偏移问题
-
3D 可视化:基于 Cesium 实现航点、航线、视锥的实时可视化
-
路径规划算法:S 形扫描路径自动生成,支持参数调节
-
KMZ 文件生成:符合 WPML 1.0.6 标准,兼容 DJI 设备
6.2 待完善功能
-
更多航线类型(带状、斜面、几何体)
-
3D 地形跟随
-
多机协同航线
-
实时天气集成
-
航线仿真模拟
6.3 性能优化方向
-
使用 WebAssembly 加速路径计算
-
增量式 KMZ 生成
-
离线地图支持
-
PWA 支持