文章目录
- [1. 编译](#1. 编译)
- [2. 配置](#2. 配置)
- [3. 启动](#3. 启动)
- [4. 停止](#4. 停止)
- [5. 工作流程](#5. 工作流程)
- [6. 参考资料](#6. 参考资料)
1. 编译
有两个下载途径:
笔者从官方网址下载了 ethercat-stable-1.6 版本,接下来开始进行编译:
bash
$ sudo apt install autoconf libtool
$ cd ethercat-stable-1.6
$ ./bootstrap
$ ./configure --host=arm-linux --prefix=`pwd`/_install --with-linux-dir=/home/lxj/NanoPiNeoCore/linux-4.14.336-rt --with-systemdsystemunitdir=`pwd`/_install
$ make all && make ARCH=arm CROSS_COMPILE=arm-linux- modules
其中,路径 /home/lxj/NanoPiNeoCore/linux-4.14.336-rt 下已经移植好 PREEMPT_RT 补丁的 NanoPi Neo Core 的 Linux 内核源码,其移植过程可参考博文 Linux RT 内核 (5) - 移植 PREEMPT_RT 内核补丁。
接下来将编译好的 EtherCAT IgH 相关文件拷贝到 NanoPi Neo Core 机器:
bash
$ scp master/ec_master.ko root@192.168.1.230:/lib/modules/4.14.111/kernel/drivers/ethercat
$ scp devices/ec_generic.ko root@192.168.1.230:/lib/modules/4.14.111/kernel/drivers/net
$ scp -r _install/* root@192.168.1.230:/usr/local
$ scp examples/user/.libs/ec_user_example root@192.168.1.230:/root
2. 配置
登录 NanoPi Neo Core 设备,运行下列命令:
bash
# mv /lib/modules/4.14.111 /lib/modules/4.14.336-rt159
# depmod -a
# ifconfig
eth0: flags=4163<UP,BROADCAST,RUNNING,MULTICAST>  mtu 1500
        inet 192.168.1.230  netmask 255.255.255.0  broadcast 192.168.1.255
        ether 02:81:61:14:3e:35  txqueuelen 1000  (Ethernet)
        RX packets 323  bytes 398646 (398.6 KB)
        RX errors 0  dropped 0  overruns 0  frame 0
        TX packets 141  bytes 15144 (15.1 KB)
        TX errors 0  dropped 0 overruns 0  carrier 0  collisions 0
        device interrupt 41

lo: flags=73<UP,LOOPBACK,RUNNING>  mtu 65536
        inet 127.0.0.1  netmask 255.0.0.0
        loop  txqueuelen 1000  (Local Loopback)
        RX packets 560  bytes 42896 (42.8 KB)
        RX errors 0  dropped 0  overruns 0  frame 0
        TX packets 560  bytes 42896 (42.8 KB)
        TX errors 0  dropped 0 overruns 0  carrier 0  collisions 0
# mv /usr/local/ethercat.service /lib/systemd/system/ethercat.service
接着是编辑 EtherCAT IgH 相关的配置文件:
- 编辑
/usr/local/sbin/ethercatctl
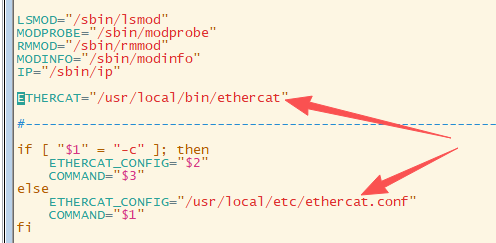
- 编辑
/usr/local/etc/ethercat.conf
- 编辑
/usr/local/etc/init.d/ethercat

- 编辑
/usr/local/etc/sysconfig/ethercat

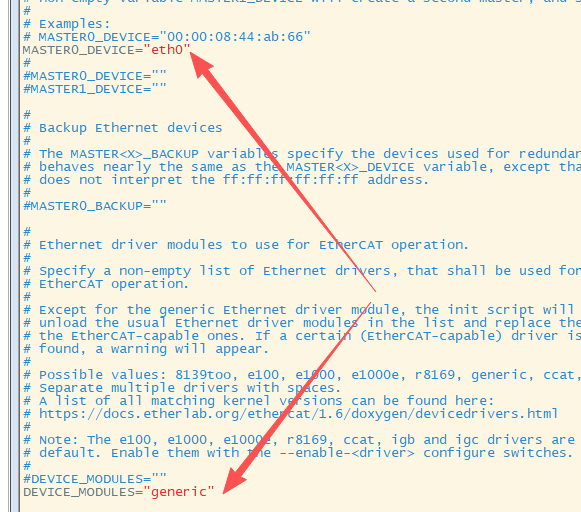
注:/usr/local/etc/ethercat.conf 中 MASTER0_DEVICE 和 MASTER1_DEVICE 都指定的话,表示是双主站。
c
MASTER0_DEVICE=
#MASTER1_DEVICE=
3. 启动
然后我们启动 EtherCAT:
bash
# uname -a
Linux NanoPi-NEO-Core 4.14.336-rt159 #2 SMP PREEMPT RT Tue Mar 24 17:46:38 CST 2026 armv7l armv7l armv7l GNU/Linux
# systemctl start ethercat.service
# dmesg
[12430.776862] EtherCAT: Master driver 1.6.8 unknown
[12430.777900] EtherCAT: 1 master waiting for devices.
[12430.806201] ec_generic: EtherCAT master generic Ethernet device module 1.6.8 unknown
[12430.806263] EtherCAT: Accepting 02:81:61:14:3E:35 as main device for master 0.
[12430.806304] ec_generic: Binding socket to interface 2 (eth0).
[12430.908359] EtherCAT 0: Starting EtherCAT-IDLE thread.
[12430.908518] EtherCAT 0: Link state of ecm0 changed to UP.
[12430.928436] EtherCAT WARNING 0: 1 datagram TIMED OUT!
[12431.928321] EtherCAT WARNING 0: 50 datagrams TIMED OUT!
# lsmod
Module                  Size  Used by
ec_generic             16384  0
ec_master             262144  1 ec_generic
# ls /dev/EtherCAT* -l
crw------- 1 root root 246, 0 Sep 19 17:04 /dev/EtherCAT0
运行用户空间程序 ec_user_example 来启动 EtherCAT Master 到 OPERATION 状态:
c
# cp /usr/local/lib/libethercat.so.1 /usr/lib
# ./ec_user_example
Configuring PDOs...
Activating master...
Using priority 99.
Starting RT task with dt=1000000 ns.
Link is up.

// ec_master.ko 的变化
// - 停止 EtherCAT-IDLE 线程,切换到了 EtherCAT-OP 线程
# ps -ef | grep -v grep | grep "EtherCAT"
root       712     2  0 17:16 ?        00:00:00 [EtherCAT-OP]
# dmesg
[ 1199.794149] EtherCAT: Requesting master 0...
[ 1199.794170] EtherCAT: Successfully requested master 0.
[ 1199.794582] EtherCAT 0: Domain0: Logical address 0x00000000, 11 byte, expected working counter 5.
[ 1199.794591] EtherCAT 0:   Datagram domain0-0-main: Logical offset 0x00000000, 11 byte, type LRW.
[ 1199.794661] EtherCAT 0: Master thread exited.
[ 1199.794677] EtherCAT 0: Starting EtherCAT-OP thread.
[ 1200.568372] EtherCAT WARNING 0: 39 datagrams TIMED OUT!
[ 1201.018370] EtherCAT WARNING: Datagram c9cccd8c (domain0-0-main) was SKIPPED 1009 times.
[ 1201.568370] EtherCAT WARNING 0: 50 datagrams TIMED OUT!
[ 1202.028375] EtherCAT WARNING: Datagram c9cccd8c (domain0-0-main) was SKIPPED 1010 times.
[ 1202.568374] EtherCAT WARNING 0: 50 datagrams TIMED OUT!

# ethercat version
IgH EtherCAT master 1.6.8 unknown
# ethercat master
Master0
  Phase: Operation
  Active: yes
  Slaves: 0
  Ethernet devices:
    Main: 02:81:61:14:3e:35 (attached)
      Link: UP
      Tx frames:   487004
      Tx bytes:    29220240
      Rx frames:   0
      Rx bytes:    0
      Tx errors:   0
      Tx frame rate [1/s]:   1000   1000    999
      Tx rate [KByte/s]:     58.6   58.6   58.5
      Rx frame rate [1/s]:      0      0      0
      Rx rate [KByte/s]:      0.0    0.0    0.0
    Common:
      Tx frames:   487004
      Tx bytes:    29220240
      Rx frames:   0
      Rx bytes:    0
      Lost frames: 487004
      Tx frame rate [1/s]:   1000   1000    999
      Tx rate [KByte/s]:     58.6   58.6   58.5
      Rx frame rate [1/s]:      0      0      0
      Rx rate [KByte/s]:      0.0    0.0    0.0
      Loss rate [1/s]:       1000   1000    999
      Frame loss [%]:       100.0  100.0  100.0
  Distributed clocks:
    Reference clock:   None
    DC reference time: 0
    Application time:  0
                       2000-01-01 00:00:00.000000000
4. 停止
bash
# systemctl stop ethercat.service
# dmesg
[12711.095780] EtherCAT 0: Master thread exited.
[12711.095817] EtherCAT 0: Releasing main device 02:81:61:14:3E:35.
[12711.198391] ec_generic: Unloading.
[12711.268191] EtherCAT: Master module cleaned up.
# lsmod
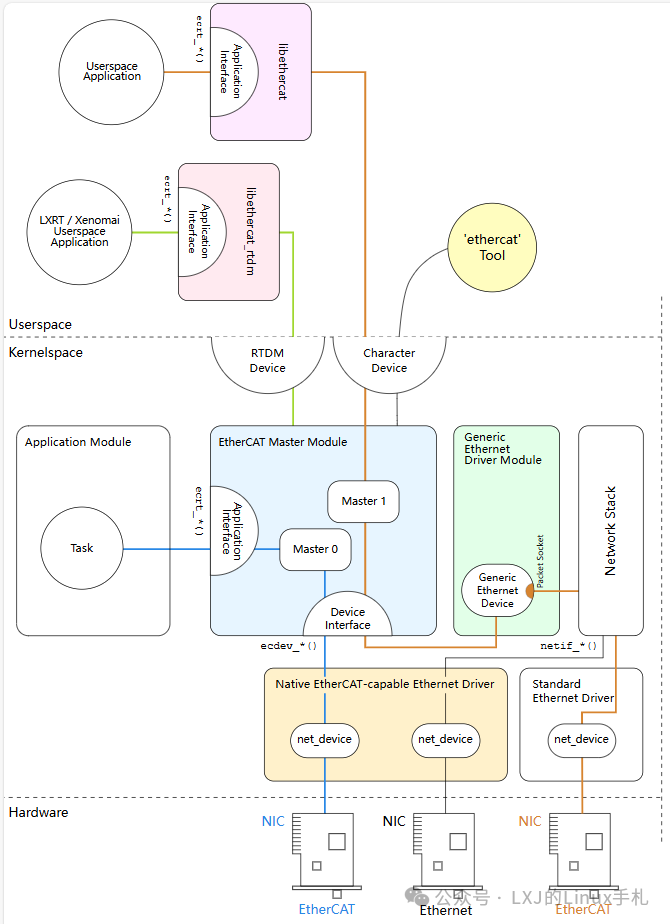
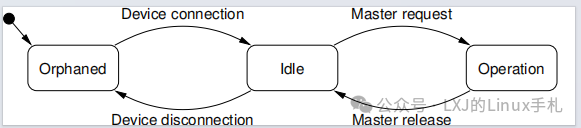
Module Size Used by5. 工作流程
笔者测试使用的是走内核网络协议栈的模式,即下图中的橙色线路。另外一种方式需要修改网卡驱动,跳过内核网络协议栈,即下图中的蓝色线路。下图来自编译 ethercat-stable-1.6/documentation 生成的文档 architecture.pdf。