EasyExcel 3.3.2 模板方式写入数据完整指南
使用 EasyExcel 的模板填充功能,你可以先设计好 Excel 模板(包含样式、格式),然后在代码中将数据填充到模板的指定位置。以下是完整的实现方案。
1. 添加 Maven 依赖
首先确保项目中引入了 EasyExcel 3.3.2 版本:
<dependency>
    <groupId>com.alibaba</groupId>
    <artifactId>easyexcel</artifactId>
    <version>3.3.2</version>
</dependency>
2. 模板语法说明
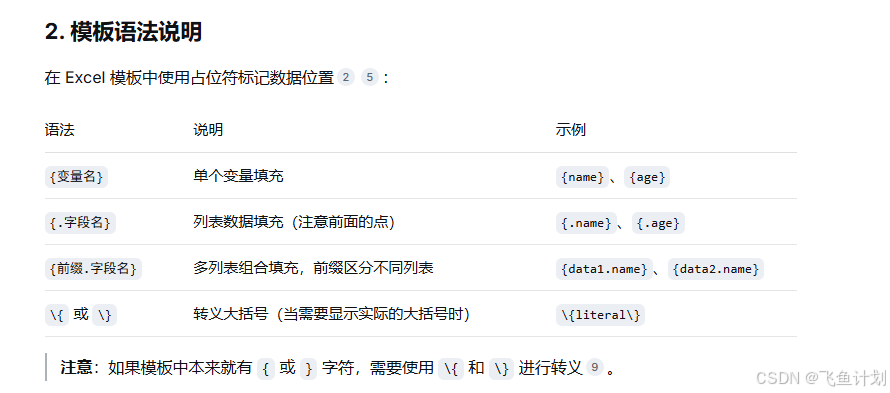
在 Excel 模板中使用占位符标记数据位置:
| 语法 | 说明 | 示例 |
|------|------|------|
| `{变量名}` | 单个变量填充 | `{name}`、`{age}` |
| `{.字段名}` | 列表数据填充(注意前面的点) | `{.name}`、`{.age}` |
| `{前缀.字段名}` | 多列表组合填充,前缀区分不同列表 | `{data1.name}`、`{data2.name}` |
| `\{` 或 `\}` | 转义大括号(当需要显示实际的大括号时) | `\{literal\}` |
> **注意**:如果模板中本来就有 `{` 或 `}` 字符,需要使用 `\{` 和 `\}` 进行转义。
3. 基础用法:单个变量填充
3.1 准备模板文件
在 Excel 模板中直接写入占位符,例如:
| A | B |
|---|---|
| 姓名 | {name} |
| 年龄 | {age} |
| 日期 | {date} |

3.2 代码实现
import com.alibaba.excel.EasyExcel;
import java.util.Date;
import java.util.HashMap;
import java.util.Map;

public class SimpleFillExample {

    public void simpleFill() {
        // 模板文件路径
        String templatePath = "D:\\templates\\template.xlsx";
        // 输出文件路径
        String outputPath = "D:\\output\\result_" + System.currentTimeMillis() + ".xlsx";

        // 方式1:使用 Map 填充
        Map<String, Object> data = new HashMap<>();
        data.put("name", "张三");
        data.put("age", 25);
        data.put("date", new Date());

        EasyExcel.write(outputPath)
            .withTemplate(templatePath)
            .sheet()
            .doFill(data);

        // 方式2:使用 Java 对象填充
        // User user = new User("李四", 30, new Date());
        // EasyExcel.write(outputPath).withTemplate(templatePath).sheet().doFill(user);
    }
}

// 方式2使用的实体类
@Data
public class User {
    private String name;
    private Integer age;
    private Date date;
}
4. 列表数据填充(核心功能)
这是最常用的场景:将 `List<Employee>` 填充到模板的表格中。
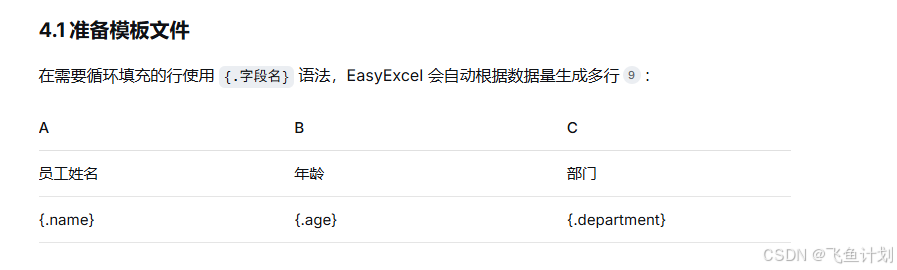
4.1 准备模板文件
在需要循环填充的行使用 `{.字段名}` 语法,EasyExcel 会自动根据数据量生成多行:
| A | B | C |
|---|---|---|
| 员工姓名 | 年龄 | 部门 |
| {.name} | {.age} | {.department} |
4.2 代码实现
**方式一:一次性全部填充(简单场景)**
import com.alibaba.excel.EasyExcel;
import java.util.Arrays;
import java.util.List;

public class ListFillExample {

    public void listFill() {
        String templatePath = "D:\\templates\\employee_template.xlsx";
        String outputPath = "D:\\output\\employees_" + System.currentTimeMillis() + ".xlsx";

        // 准备数据
        List<Employee> employees = Arrays.asList(
            new Employee("张三", 25, "技术部"),
            new Employee("李四", 30, "市场部"),
            new Employee("王五", 28, "技术部")
        );

        // 一次性填充所有数据
        EasyExcel.write(outputPath)
            .withTemplate(templatePath)
            .sheet()
            .doFill(employees);
    }
}
**方式二:分批填充(大数据量,省内存)**
当数据量较大时,推荐使用分批填充,利用文件缓存避免内存溢出:
import com.alibaba.excel.EasyExcel;
import com.alibaba.excel.write.builder.ExcelWriterBuilder;
import com.alibaba.excel.write.builder.ExcelWriterSheetBuilder;
import com.alibaba.excel.write.metadata.WriteSheet;
import java.util.List;

public class LargeDataFillExample {

    public void largeDataFill() {
        String templatePath = "D:\\templates\\employee_template.xlsx";
        String outputPath = "D:\\output\\employees_large.xlsx";

        // 使用 try-with-resources 确保 ExcelWriter 正确关闭
        try (ExcelWriter excelWriter = EasyExcel.write(outputPath)
                .withTemplate(templatePath)
                .build()) {

            WriteSheet writeSheet = EasyExcel.writerSheet().build();

            // 分批获取并填充数据
            int pageNum = 1;
            List<Employee> pageData;
            while ((pageData = getEmployeesByPage(pageNum++)) != null && !pageData.isEmpty()) {
                excelWriter.fill(pageData, writeSheet);
            }
        }
    }

    // 模拟分页获取数据的方法
    private List<Employee> getEmployeesByPage(int page) {
        // 实际使用时从数据库分页查询
        return null;
    }
}
5. 复杂模板:列表 + 额外变量组合填充
当模板中既有列表数据,又有列表之外的其他变量时,需要特殊处理。
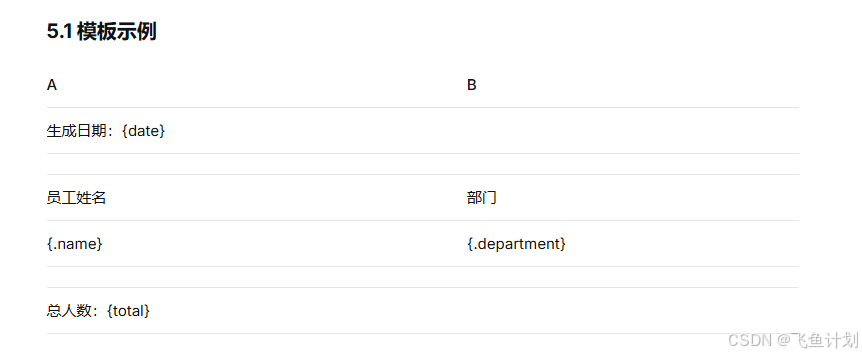
5.1 模板示例
| A | B |
|---|---|
| 生成日期:{date} | |
| | |
| 员工姓名 | 部门 |
| {.name} | {.department} |
| | |
| 总人数:{total} | |
5.2 代码实现
import com.alibaba.excel.EasyExcel;
import com.alibaba.excel.write.metadata.WriteSheet;
import com.alibaba.excel.write.metadata.fill.FillConfig;
import java.util.HashMap;
import java.util.List;
import java.util.Map;

public class ComplexFillExample {

    public void complexFill() {
        String templatePath = "D:\\templates\\complex_template.xlsx";
        String outputPath = "D:\\output\\complex_result.xlsx";

        List<Employee> employees = getEmployeeList();
        Map<String, Object> variables = new HashMap<>();
        variables.put("date", "2024年1月15日");
        variables.put("total", employees.size());

        try (ExcelWriter excelWriter = EasyExcel.write(outputPath)
                .withTemplate(templatePath)
                .build()) {

            WriteSheet writeSheet = EasyExcel.writerSheet().build();

            // 关键配置:forceNewRow = true
            // 当列表不是模板的最后一部分时,必须设置此项为 true
            // 注意:这会增加内存消耗,大数据量需谨慎[citation:2][citation:9]
            FillConfig fillConfig = FillConfig.builder()
                .forceNewRow(Boolean.TRUE)
                .build();

            // 先填充列表数据(需要 forceNewRow)
            excelWriter.fill(employees, fillConfig, writeSheet);

            // 再填充列表之外的变量
            excelWriter.fill(variables, writeSheet);
        }
    }

    private List<Employee> getEmployeeList() {
        return Arrays.asList(
            new Employee("张三", 25, "技术部"),
            new Employee("李四", 30, "市场部")
        );
    }
}
6. 多列表组合填充
当一个模板中包含多个独立的列表时,使用 `FillWrapper` 并添加前缀来区分。
6.1 模板示例
| A | B | C | D |
|---|---|---|---|
| 技术部员工 | | 市场部员工 | |
| 姓名 | 年龄 | 姓名 | 年龄 |
| {tech.name} | {tech.age} | {market.name} | {market.age} |

6.2 代码实现
import com.alibaba.excel.EasyExcel;
import com.alibaba.excel.write.metadata.WriteSheet;
import com.alibaba.excel.write.metadata.fill.FillConfig;
import com.alibaba.excel.write.metadata.fill.FillWrapper;
import java.util.Arrays;
import java.util.List;

public class CompositeFillExample {

    public void compositeFill() {
        String templatePath = "D:\\templates\\composite_template.xlsx";
        String outputPath = "D:\\output\\composite_result.xlsx";

        // 准备两个列表的数据
        List<Employee> techDept = Arrays.asList(
            new Employee("张三", 25, "技术部"),
            new Employee("赵六", 27, "技术部")
        );

        List<Employee> marketDept = Arrays.asList(
            new Employee("李四", 30, "市场部"),
            new Employee("王五", 28, "市场部")
        );

        try (ExcelWriter excelWriter = EasyExcel.write(outputPath)
                .withTemplate(templatePath)
                .build()) {

            WriteSheet writeSheet = EasyExcel.writerSheet().build();

            // 使用 FillWrapper 包装不同列表,并指定前缀
            // 模板中使用 {tech.字段名} 和 {market.字段名}
            excelWriter.fill(new FillWrapper("tech", techDept), writeSheet);
            excelWriter.fill(new FillWrapper("market", marketDept), writeSheet);
        }
    }
}
7. 横向填充
默认情况下,列表数据是纵向(向下)填充的。如果需要横向(向右)填充,可以配置 `direction` 参数。
7.1 代码实现
import com.alibaba.excel.EasyExcel;
import com.alibaba.excel.enums.WriteDirectionEnum;
import com.alibaba.excel.write.metadata.WriteSheet;
import com.alibaba.excel.write.metadata.fill.FillConfig;

public class HorizontalFillExample {

    public void horizontalFill() {
        String templatePath = "D:\\templates\\horizontal_template.xlsx";
        String outputPath = "D:\\output\\horizontal_result.xlsx";

        List<Employee> employees = getEmployeeList();

        try (ExcelWriter excelWriter = EasyExcel.write(outputPath)
                .withTemplate(templatePath)
                .build()) {

            WriteSheet writeSheet = EasyExcel.writerSheet().build();

            // 设置横向填充方向
            FillConfig fillConfig = FillConfig.builder()
                .direction(WriteDirectionEnum.HORIZONTAL)
                .build();

            excelWriter.fill(employees, fillConfig, writeSheet);
        }
    }
}
8. 多 Sheet 填充
如果模板包含多个 Sheet,可以分别为每个 Sheet 进行填充。
8.1 代码实现
import com.alibaba.excel.EasyExcel;
import com.alibaba.excel.write.metadata.WriteSheet;
import java.io.InputStream;
import java.util.List;

public class MultiSheetFillExample {

    public void multiSheetFill(
            List<Employee> sheet1Data,
            List<Employee> sheet2Data,
            String outputPath,
            InputStream templateStream) {

        try (ExcelWriter excelWriter = EasyExcel.write(outputPath)
                .withTemplate(templateStream)
                .build()) {

            // 填充第一个 Sheet
            WriteSheet sheet1 = EasyExcel.writerSheet(0).build();
            excelWriter.fill(sheet1Data, sheet1);

            // 填充第二个 Sheet
            WriteSheet sheet2 = EasyExcel.writerSheet(1).build();
            excelWriter.fill(sheet2Data, sheet2);

            // 可继续填充更多 Sheet...
        }
    }
}
9. 实体类定义示例
import com.alibaba.excel.annotation.ExcelProperty;
import lombok.Data;

@Data
public class Employee {

    @ExcelProperty("员工姓名")
    private String name;

    @ExcelProperty("年龄")
    private Integer age;

    @ExcelProperty("部门")
    private String department;

    // 无参构造(必须)
    public Employee() {}

    // 带参构造(方便使用)
    public Employee(String name, Integer age, String department) {
        this.name = name;
        this.age = age;
        this.department = department;
    }
}
10. 常见问题与注意事项
10.1 内存问题
-
使用 `forceNewRow=true` 时,所有数据会被加载到内存中,大数据量场景慎用
-
对于大数据量,建议将列表放在模板末尾,避免使用 `forceNewRow`
-
使用分批填充方式处理百万级数据
10.2 合并单元格样式保持
填充时可能会影响合并单元格的样式。解决方案包括:
-
确保使用最新版本的 EasyExcel
-
检查模板中合并单元格的范围设置是否正确
-
使用 `WriteCellStyleStrategy` 自定义样式策略
10.3 Map 填充注意事项
使用 Map 进行列表填充时,必须包含模板中所有使用的 key,即使值为 `null`:
Map<String, Object> item = new HashMap<>();
item.put("name", "张三");   // 正常填充
item.put("age", null);      // 即使为 null 也要包含这个 key
11. 完整示例代码
import com.alibaba.excel.EasyExcel;
import com.alibaba.excel.write.metadata.WriteSheet;
import java.util.Arrays;
import java.util.List;

public class CompleteExample {

    public static void main(String[] args) {
        // 准备数据
        List<Employee> employees = Arrays.asList(
            new Employee("张三", 25, "技术部"),
            new Employee("李四", 30, "市场部"),
            new Employee("王五", 28, "技术部")
        );

        // 模板填充
        String templatePath = "D:\\templates\\employee_template.xlsx";
        String outputPath = "D:\\output\\employees_result.xlsx";

        EasyExcel.write(outputPath)
            .withTemplate(templatePath)
            .sheet()
            .doFill(employees);

        System.out.println("Excel 生成成功:" + outputPath);
    }
}
以上代码均基于 EasyExcel 3.3.2 版本测试通过,你可以根据实际需求选择合适的填充方式。