背景
Qt中的表格控件或树状图控件都提供了单元格基础的一些样式修改,可以通过qss设置,但是如果需要更加特性化的内容就需要实现代理QStyledItemDelegate
实现
继承QStyledItemDelegate,并按需要重写6个函数
def paint(self, painter: QPainter, option: QStyleOptionViewItem, index: QModelIndex)
这个函数是用于绘制单元格的背景,可以通过painter绘制点线面,还可以绘制控件样式,可以根据index单独控制某个单元格的背景。像以下代码就是在(1, 1)绘制了一张图片,(2, 2)绘制了一个进度条,(3, 2)绘制了一个按钮。
python
    def paint(self, painter: QPainter, option: QStyleOptionViewItem, index: QModelIndex):
        # 绘制单元格背景,不单止可以绘制线条、图片、还可以绘制进度条、按钮等控件
        if index.row() == 1 and index.column() == 1:
            rect: QRectF = option.rect
            pixmap = QPixmap("ico.png")
            pixmap = pixmap.scaled(rect.width(), rect.height(), Qt.KeepAspectRatio)
            painter.drawPixmap(rect.x(), rect.y(), pixmap.width(), pixmap.height(), pixmap)
        elif index.row() == 2 and index.column() == 2:
            progressBarStyled = QStyleOptionProgressBar()
            progressBarStyled.rect = option.rect
            progressBarStyled.minimum = 0
            progressBarStyled.maximum = 100
            progressBarStyled.progress = int(index.data())
            progressBarStyled.text = f"{int(index.data())}%"
            progressBarStyled.state = option.state
            progressBarStyled.textVisible = True
            progressBarStyled.direction = option.direction
            QApplication.style().drawControl(QStyle.CE_ProgressBar, progressBarStyled, painter)
            return

        elif index.row() == 3 and index.column() == 2:
            btnStyled = QStyleOptionButton()
            btnStyled.rect = option.rect
            btnStyled.state = option.state
            btnStyled.text = f"click"
            btnStyled.direction = option.direction
            QApplication.style().drawControl(QStyle.CE_PushButton, btnStyled, painter)
            return

        return super().paint(painter, option, index)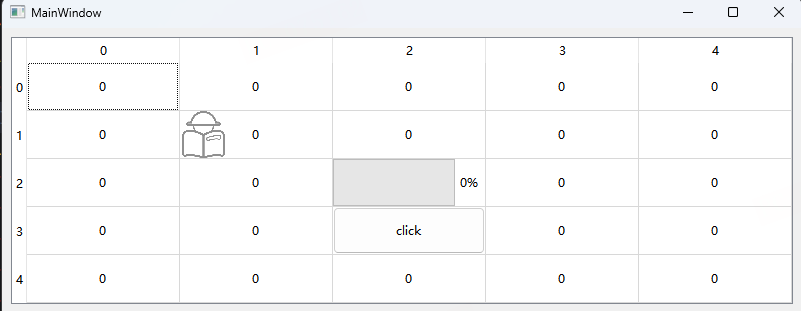
def editorEvent(self, event: QEvent, model, option, index)
那么绘制出来的按钮如何触发点击事件呢,就是重写这个editorEvent函数,像以下代码就是判断了当这个单元格被按下时触发clicked信号发出
python
    def editorEvent(self, event: QEvent, model, option, index):
        # 单元格事件处理
        if index.row() == 3 and index.column() == 2:
            if event.type() == QEvent.MouseButtonPress:
                model.setData(index, "click")
                self.clicked.emit("click")
                return True
        return super().editorEvent(event, model, option, index)
def createEditor(self, parent, option, index)
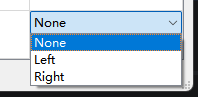
那么如果需要双击进入编辑单元格模式时显示控件编辑,即有可能需要是下拉框选择内容,就可以通过重写这个函数实现
python
    def createEditor(self, parent, option, index):
        # 创建单元格编辑器,即双击单元格编辑时创建的编辑器
        if index.row() == 0 and index.column() == 0:
            spinBox = QDoubleSpinBox(parent)
            spinBox.setSingleStep(0.1)
            spinBox.setRange(0, 100)
            return spinBox
        if index.row() == 4 and index.column() == 4:
            combobox = QComboBox(parent)
            combobox.addItems(["None", "Left", "Right"])
            return combobox
        return super().createEditor(parent, option, index)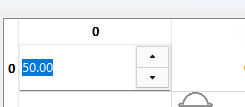
def updateEditorGeometry(self, editor, option, index)
如果需要修改由createEditor创建出来的控件的位置大小,可以通过重写这个函数实现,代码实现的是将(4, 4)内的下拉框位置大小修改为单元格的一半
python
    def updateEditorGeometry(self, editor, option, index):
        # 更新单元格编辑器的几何形状,即设置编辑器的位置和大小
        if index.row() == 4 and index.column() == 4:
            rect = option.rect
            editor.setGeometry(rect.x(), rect.y(), rect.width(), rect.height() / 2)
            return
        return super().updateEditorGeometry(editor, option, index)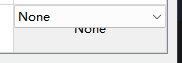
def setEditorData(self, editor, index)
Qt原本已经实现了单元格的数据添加到单元格编辑控件里面了,即如果双击单元格后显示的是一个doubleSpinBox的话,单元格显示的是80,那么SpinBox里显示的数据也是80。如果需要自定义值,例如一定要保证这个SpinBox的值一直是80,那么就可以重写这个函数实现。
python
def setEditorData(self, editor, index):
# 设置单元格数据编辑器的数据
if index.row() == 0 and index.column() == 0:
editor.setValue(50)
return
return super().setEditorData(editor, index)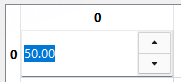 一直是保持50
def setModelData(self, editor, model, index)
Qt原本也实现了编辑器控件修改后的值会直接添加到单元格中。即双击后显示的SpinBox值修改成100后,单元格恢复成查看模式时显示的就是100。如果需要保证单元格显示的值一直不变,那么就可以通过重写这个函数实现
python
def setModelData(self, editor, model, index):
# 通过编辑器修改值后,设置显示到单元格中的数据
if index.row() == 0 and index.column() == 0:
model.setData(index, 80)
return
return super().setModelData(editor, model, index) 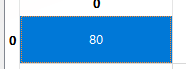 代码就是实现了不管编辑成什么数值,显示的都是80.
所以最后两个函数可以按需求确认是否需要重新实现
完整代码
python
from PyQt5.QtWidgets import *
from PyQt5.QtGui import *
from PyQt5.QtCore import *

class StyledItemDelegate(QStyledItemDelegate):

    clicked = pyqtSignal(str)

    def __init__(self, parent=None):
        super().__init__(parent)

    def paint(self, painter: QPainter, option: QStyleOptionViewItem, index: QModelIndex):
        # 绘制单元格背景,不单止可以绘制线条、图片、还可以绘制进度条、按钮等控件
        if index.row() == 1 and index.column() == 1:
            rect: QRectF = option.rect
            pixmap = QPixmap("ico.png")
            pixmap = pixmap.scaled(rect.width(), rect.height(), Qt.KeepAspectRatio)
            painter.drawPixmap(rect.x(), rect.y(), pixmap.width(), pixmap.height(), pixmap)
        elif index.row() == 2 and index.column() == 2:
            progressBarStyled = QStyleOptionProgressBar()
            progressBarStyled.rect = option.rect
            progressBarStyled.minimum = 0
            progressBarStyled.maximum = 100
            progressBarStyled.progress = int(index.data())
            progressBarStyled.text = f"{int(index.data())}%"
            progressBarStyled.state = option.state
            progressBarStyled.textVisible = True
            progressBarStyled.direction = option.direction
            QApplication.style().drawControl(QStyle.CE_ProgressBar, progressBarStyled, painter)
            return

        elif index.row() == 3 and index.column() == 2:
            btnStyled = QStyleOptionButton()
            btnStyled.rect = option.rect
            btnStyled.state = option.state
            btnStyled.text = f"click"
            btnStyled.direction = option.direction
            QApplication.style().drawControl(QStyle.CE_PushButton, btnStyled, painter)
            return

        return super().paint(painter, option, index)

    def editorEvent(self, event: QEvent, model, option, index):
        # 单元格事件处理
        if index.row() == 3 and index.column() == 2:
            if event.type() == QEvent.MouseButtonPress:
                model.setData(index, "click")
                self.clicked.emit("click")
                return True
        return super().editorEvent(event, model, option, index)

    def createEditor(self, parent, option, index):
        # 创建单元格编辑器,即双击单元格编辑时创建的编辑器
        if index.row() == 0 and index.column() == 0:
            spinBox = QDoubleSpinBox(parent)
            spinBox.setSingleStep(0.1)
            spinBox.setRange(0, 100)
            return spinBox
        if index.row() == 4 and index.column() == 4:
            combobox = QComboBox(parent)
            combobox.addItems(["None", "Left", "Right"])
            return combobox
        return super().createEditor(parent, option, index)

    def updateEditorGeometry(self, editor, option, index):
        # 更新单元格编辑器的几何形状,即设置编辑器的位置和大小
        if index.row() == 4 and index.column() == 4:
            rect = option.rect
            editor.setGeometry(rect.x(), rect.y(), rect.width(), rect.height() / 2)
            return
        return super().updateEditorGeometry(editor, option, index)

    def setEditorData(self, editor, index):
        # 设置单元格数据编辑器的数据
        if index.row() == 0 and index.column() == 0:
            editor.setValue(50)
            return
        return super().setEditorData(editor, index)

    def setModelData(self, editor, model, index):
        # 通过编辑器修改值后,设置显示到单元格中的数据
        if index.row() == 0 and index.column() == 0:
            model.setData(index, 80)
            return
        return super().setModelData(editor, model, index)