写在前面 :本文旨在从零手写 mini-webpack,帮助读者理解 Webpack 的核心原理与设计思想。为聚焦关键流程,部分实现做了简化处理(如 Tree Shaking 采用正则匹配、loader 链执行简化、代码分割仅处理单入口等),并非生产级实现。完整代码已上传至 GitHub,欢迎查阅交流:my-mini-webpack。
一、准备工作
- 准备一个项目文件
mini-webpack-1.0
tex
mini-webpack-1.0\
├── src\
│   ├── const.js
│   ├── info.js
│   └── main.js
├── mini-webpack.js
├── package-lock.json
└── package.json- 初始化项目并安装必要依赖
bash
npm init -y ; npm install @babel/parser @babel/traverse @babel/core @babel/preset-env-
准备三个文件:
- const.js
jsexport const name = '我的世界'- info.js
jsimport { name } from './const.js' export default `欢迎来到${name}`- main.js
jsimport info from './info.js' console.log('main:', info)
二、手写mini-webpack 1.0
【步骤】:
- 读取文件
- 构建AST
- 收集依赖
- ES6 → ES5
- 生成依赖图
- 打包
- 输出文件
(1)读取文件代码:
js
const fs = require('fs')
// 读取文件内容
function readFile(filePath) {
const content = fs.readFileSync(filePath, 'utf-8')
return content
}
console.log(readFile('./src/main.js'))根目录下运行:node .\mini-webpack.js
bash
# 控制台输出:
import info from './info.js'
console.log('main:', info)(2)构建AST
js
const parser = require('@babel/parser')  // 解析器

// 转成AST
function parse(content) {
  const AST = parser.parse(content, { sourceType: 'module'})
  return AST
}
const content = readFile('./src/main.js')
console.log(parse(content));
bash
# 控制台输出AST抽象语法树:
Node {
  type: 'File',
  start: 0,
  end: 58,
  loc: SourceLocation {
    start: Position { line: 1, column: 0, index: 0 },
    end: Position { line: 3, column: 26, index: 58 },
    filename: undefined,
    identifierName: undefined
  },
  errors: [],
  program: Node {
    type: 'Program',
    start: 0,
    end: 58,
    loc: SourceLocation {
      start: [Position],
      end: [Position],
      filename: undefined,
      identifierName: undefined
    },
    sourceType: 'module',
    interpreter: null,
    body: [ [Node], [Node] ],
    directives: [],
    extra: { topLevelAwait: false }
  },
  comments: []
}
(3)收集依赖
js
const traverse = require('@babel/traverse').default;  // 遍历器

// 遍历AST,收集依赖模块
function getDependencies(AST) {
  const dependencies = []
  traverse(AST, {
    ImportDeclaration({ node }) {
      dependencies.push(node.source.value)  // 将依赖模块路径添加到dependencies数组中
    }
  })
  return dependencies
}

// 测试一下:
const content = readFile('./src/main.js')
const AST = parse(content)
const dependencies = getDependencies(AST)
console.log(dependencies);
bash
# 控制台输出:
[ './info.js' ]
输出解释:因为 读取的是
./src/main.js,这个文件依赖了'./info.js'模块
(4) ES6 → ES5
js
const babel = require('@babel/core')  // 编译器

// ES6 → ES5
function transformToES5(AST) {
  const { code } = babel.transformFromAstSync(AST, null, { presets: ['@babel/preset-env'] })
  return code
}

// 测试一下:
const content = readFile('./src/main.js')
const AST = parse(content)
const es5Code = transformToES5(AST)
console.log(es5Code);
bash
# 控制台输出:
"use strict";

var _info = _interopRequireDefault(require("./info.js"));
function _interopRequireDefault(e) { return e && e.__esModule ? e : { "default": e }; }
console.log('main:', _info["default"]);
(5)生成依赖图谱
- 构建一个辅助函数,专门用来解析模块,返回该模块的信息:
js
// 每个模块都有一个ID,用于标识该模块,并且初始模块ID为零
function parseModule(filePath, ID=0) {
  const content = readFile(filePath)
  const AST = parse(content)
  const dependencies = getDependencies(AST)
  const code = transformToES5(AST)
  return {
    ID,
    code,
    filePath,
    dependencies,
  }
}

// 测试一下:
const mainModule = parseModule('./src/main.js')
console.log(mainModule)
bash
# 控制台输出:
{
  ID: 0,
  code: '"use strict";\n' +
    '\n' +
    'var _info = _interopRequireDefault(require("./info.js"));\n' +
    'function _interopRequireDefault(e) { return e && e.__esModule ? e : { "default": e }; }\n' +
    `console.log('main:', _info["default"]);`,
  filePath: './src/main.js',
  dependencies: [ './info.js' ]
}
- parseModule解析模块,返回这个模块的:ID、代码、模块的路径、模块的依赖包
- 这里传入一个ID,方便后面进行处理
遍历所有依赖,生成依赖图谱(也就是一个对象数组罢了)
js
// 构建依赖图
function buildDependencyGraph() {
  const mainModule = parseModule('./src/main.js') // 解析入口模块
  const graph = [mainModule] // 依赖图谱
  let moduleID = 1

  // 遍历依赖图中的模块,递归处理依赖
  for (const module of graph) {
    const dirname = path.dirname(module.filePath)
    module.mapping = {} // 给当前模块多加一个mapping属性,存储依赖模块的相对路径到ID的映射

    // 遍历当前模块的依赖
    module.dependencies.forEach((dependencyFilePath) => {
      const absolutePath = path.join(dirname, dependencyFilePath)
      const childModule = parseModule(absolutePath, moduleID)

      module.mapping[dependencyFilePath] = moduleID
      graph.push(childModule)
      moduleID++
    })
  }

  return graph // 返回构建好的依赖图
}

// 测试一下:
console.log(buildDependencyGraph())
bash
# 控制台输出:
[
  {
    ID: 0,
    code: '"use strict";\n' +
      '\n' +
      'var _info = _interopRequireDefault(require("./info.js"));\n' +
      'function _interopRequireDefault(e) { return e && e.__esModule ? e : { "default": e }; }\n' +
      `console.log('main:', _info["default"]);`,
    filePath: './src/main.js',
    dependencies: [ './info.js' ],
    mapping: { './info.js': 1 }
  },
  {
    ID: 1,
    code: '"use strict";\n' +
      '\n' +
      'Object.defineProperty(exports, "__esModule", {\n' +
      '  value: true\n' +
      '});\n' +
      'exports["default"] = void 0;\n' +
      'var _const = require("./const.js");\n' +
      'var _default = exports["default"] = "\\u6B22\\u8FCE\\u6765\\u5230".concat(_const.name);',
    filePath: 'src\\info.js',
    dependencies: [ './const.js' ],
    mapping: { './const.js': 2 }
  },
  {
    ID: 2,
    code: '"use strict";\n' +
      '\n' +
      'Object.defineProperty(exports, "__esModule", {\n' +
      '  value: true\n' +
      '});\n' +
      'exports.name = void 0;\n' +
      "var name = exports.name = '我的世界';",
    filePath: 'src\\const.js',
    dependencies: [],
    mapping: {}
  }
]
(6)打包
js
// 打包模块
function bundle(graph) {
  let modules = ''
  /**
   * 构建模块映射表
   * 遍历依赖图中的每个模块,生成一个字符串形式的模块映射
   * 格式为:
   * {
   *   ID: [
   *     	function(require, module, exports) { 代码 },
   *     	{ '依赖相对路径': 模块ID, ... }
   *   	],
   *   ...
   * }
   * 作用:为后续的模块加载和执行提供映射关系
   */
  graph.forEach(mod => {
    modules += `
      ${mod.ID}: [
        	function(require, module, exports) {${mod.code} },
        	${JSON.stringify(mod.mapping)}
      ],
    `
  })

  const result = `
    (function(modules) {
        function require(id) {
            const [fn, mapping] = modules[id];
            function localRequire(relativePath) {
                return require(mapping[relativePath])
            }
            const module = {exports: {}}
            fn(localRequire, module, module.exports)
            return module.exports
        }
        require(0)
    })({${modules}})
  `
  return result
}
解释一下:
-
【构建模块映射表】:这一步是将原本是:
js{ ID: 0, code: '"use strict";\n' + '\n' + 'var _info = _interopRequireDefault(require("./info.js"));\n' + 'function _interopRequireDefault(e) { return e && e.__esModule ? e : { "default": e }; }\n' + `console.log('main:', _info["default"]);`, filePath: './src/main.js', dependencies: [ './info.js' ], mapping: { './info.js': 1 } },这样的对象结构变成:
js0: [ function(require, module, exports) { "use strict"; var _info = _interopRequireDefault(require("./info.js")); function _interopRequireDefault(e) {return e && e.__esModule ? e : { "default": e};} console.log('main:', _info["default"]); }, {"./info.js":1} ], -
【result】部分:
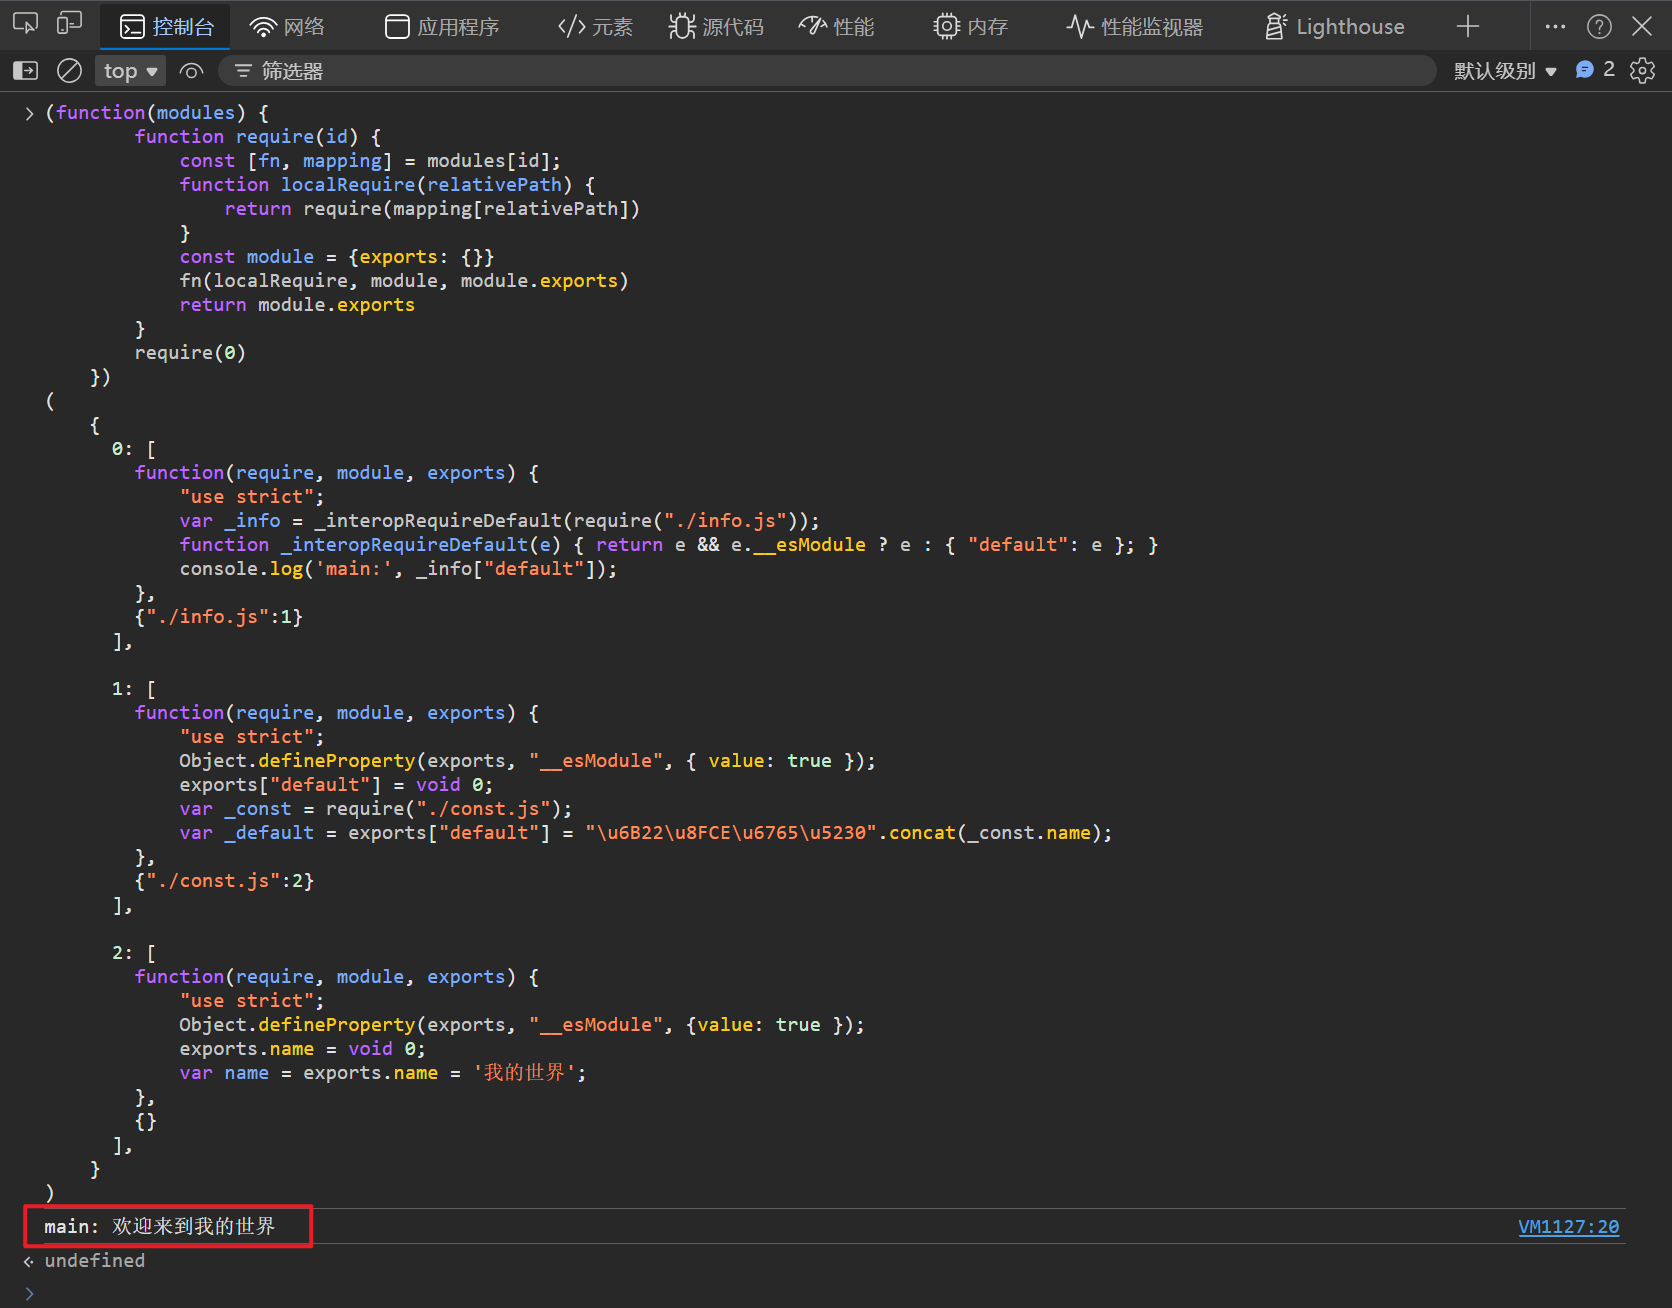
js(function(modules) { /** * require函数作用:根据模块ID,拿到对应的代码和映射关系 * 比方:require(0) → 拿到ID为零的模块,他的代码以及,他的代码所依赖的那个模块的路径和ID的映射 * ID:0 → fn(){ ...require("./info.js") } 这个ID为零的模块依赖了一个叫做./info.js的模块 * 而mapping:{"./info.js": 1} 就说明了,这个模块他对应的ID是1,那么接下来就需要去require(1) * ...重复上述步骤 */ function require(id) { const [fn, mapping] = modules[id]; function require(id) { const [fn, mapping] = modules[id]; /** * localRequire作用:根据相对路径,拿到对应的模块ID,递归调用require函数,加载依赖模块 * 为啥需要这个函数呢? * * 首先咱们看一下【构建模块映射表】的结果(随便取一个模块): * { * ID: 0, * code: 'fn(require, module, exports) { * ... * var _info = _interopRequireDefault(require("./info.js")); * ... * }', * mapping: { './info.js': 1 } * } * 可以看到,fn函数第一个参数是 require,这个函数在后面使用到了:require("./info.js") * 他存在的意义是:传入一个相对路径,然后加载对应的模块: * * 1. 传入相对路径:"./info.js" * 2. 然后根据mapping,找到对应的模块ID * 3. 递归调用require函数,根据模块ID加载依赖模块 */ function localRequire(relativePath) { return require(mapping[relativePath]) } const module = { exports: {} } // 把 localRequire 、module、exports传递进去 fn(localRequire, module, module.exports) return module.exports } require(0) })({${modules}})
打包完成之后
bash
# 控制台输出:
(function(modules) {
        function require(id) {
            const [fn, mapping] = modules[id];
            function localRequire(relativePath) {
                return require(mapping[relativePath])
            }
            const module = {exports: {}}
            fn(localRequire, module, module.exports)
            return module.exports
        }
        require(0)
    })
(
    {
      0: [
        function(require, module, exports) {
        	"use strict";
			var _info = _interopRequireDefault(require("./info.js"));
			function _interopRequireDefault(e) { return e && e.__esModule ? e : { "default": e }; }
			console.log('main:', _info["default"]);
		},
        {"./info.js":1}
      ],

      1: [
        function(require, module, exports) {
        	"use strict";
			Object.defineProperty(exports, "__esModule", { value: true });
			exports["default"] = void 0;
			var _const = require("./const.js");
			var _default = exports["default"] = "\u6B22\u8FCE\u6765\u5230".concat(_const.name);
		},
        {"./const.js":2}
      ],

      2: [
        function(require, module, exports) {
        	"use strict";
			Object.defineProperty(exports, "__esModule", {value: true });
			exports.name = void 0;
			var name = exports.name = '我的世界';
		},
        {}
      ],
	}
)
控制台输出的打包结果可以直接放到
浏览器控制台或者node环境中运行,结果会输出:
(7)输出文件
js
// 写入dist目录
function run() {
  const graph = buildDependencyGraph()
  const bundleCode = bundle(graph)

  // 直接创建dist目录(如果不存在),recursive: true 确保自动创建父目录
  fs.mkdirSync('./dist', { recursive: true })
  fs.writeFileSync('./dist/bundle.js', bundleCode)
  console.log('build success ✔')
}

// 执行一下:
run()
bash
# 控制台输出:
build success ✔
(8)配置 npm命令
- 打开根目录下的:
package.json文件 - 在
scripts配置下,增加一行命令:"build": "node mini-webpack.js"并保存 - 控制台输入:
npm run build - 输出跟webpack一样的提示:build success ✔
- 此时根目录下就会多一个dist 文件夹,内部有一个
bundle.js就是打包完成后的代码
至此:基础版本的 mini-webpack书写完毕
三、进阶
mini-webpack 1.0简单的实现了webpack的核心流程,但它还缺少了:
- 可配置性 :支持
webpack.config.js - Loader 机制:处理非 JS 资源(CSS、图片等)
- Plugin 机制:在构建流程中注入自定义逻辑
- Tree Shaking:消除未使用的导出,减小打包体积
- 热更新(HMR):开发环境下实时更新模块,无需刷新页面
- 代码分割:动态导入,按需加载
- 准备一个项目文件
mini-webpack-2.0
tex
mini-webpack-2.0/
├── src/
│   ├── main.js
│   ├── info.js
│   ├── const.js
|   |------ rubish.js
│   └── style.css
├── loaders/
│   └── css-loader.js
├── plugins/
│   └── time-plugin.js
├── mini-webpack.js
|------ compiler.js
├── webpack.config.js
├── package.json
└── package-lock.json- 初始化项目并安装必要依赖
bash
npm init -y
npm install @babel/parser @babel/traverse @babel/core @babel/preset-env terser-
准备示例文件(沿用 1.0 的文件,并增加
style.css和async-module.js)。- style.css
cssbody { background: #f0f0f0; }- const.js更新
jsexport const name = '我的世界'; export const version = '2.0'; // const.js被使用了,但是内部的version未被使用,将被 tree shaking 掉- main.js更新
jsimport info from './info.js'; import './style.css'; console.log('main:', info);- rubish.js
js// 整个模块都没有被使用过 export default tools = () => console.log('这个模块不会被使用,会被 tree shaking 掉');- time-plugin.js
js// Plugin 的本质就是一个带有apply方法的类,他作用webpack构建的整个生命周期 // 这个Plugin就是记录webpack整个打包构建过程所花的时间 class TimePlugin { apply(compiler) { compiler.hooks.beforeRun.tap('TimePlugin', () => { this.startTime = Date.now(); }); compiler.hooks.afterCompile.tap('TimePlugin', () => { const ms = Date.now() - this.startTime; console.log('\x1b[32m%s\x1b[0m', ` 构建完成,耗时 \x1b[1m${ms}ms\x1b[0m`); // 有颜色的输出 }); } } module.exports = TimePlugin; -
创建配置文件:webpack.config.js
js
const path = require('path');
const TimePlugin = require('./plugins/time-plugin');

module.exports = {
  entry: './src/main.js',
  output: {
    path: path.resolve(__dirname, 'dist'),
    filename: 'bundle.js'
  },
  module: {
    rules: [
      { test: /\.css$/, use: ['css-loader'] }
    ]
  },
  plugins: [new TimePlugin()],
  mode: 'production'
};
四、mini-webpack 2.0
当我们在控制台输入npm run build后,Node 启动 Webpack,读取 webpack.config.js 配置文件开启,webpack 整体构建流程:
【步骤】:
- 启动阶段:读取配置文件
- 从入口构建依赖图谱:递归解析模块,生成依赖图
- 模块翻译:用 Loader 处理非 JS 文件
- 模块合并为 Chunks:根据入口和动态导入拆分代码块
- 优化压缩 + Tree Shaking:删除未使用代码,压缩体积
- 打包构建:代码打包并输出到文件
- Compiler :Compiler 是打包流程的总调度 。调用
compiler.run()一键启动构建,内部自动按顺序驱动所有步骤
(1)读取配置文件
js
const path = require('path');

function loadConfig(configPath = './webpack.config.js') {
  const configFile = path.resolve(configPath);
  return require(configFile);
}

// 测试
console.log('配置加载完成', loadConfig());根目录下运行:node .\mini-webpack.js
bash
# 控制台输出:
配置加载完成 {
  entry: './src/main.js',
  output: {
    path: 'D:\\Code\\AllCode\\手写mini-webpack\\mini-webpack-2.0\\dist',
    filename: 'bundle.js'
  },
  module: { rules: [ [Object] ] },
  plugins: [],
  mode: 'development'
}
(2)从入口构建依赖图谱
js
// 解析模块
function parseModule(filePath, ID) {
  const content = fs.readFileSync(filePath, 'utf-8'); 			// 读取文件
  const ast = parser.parse(content, { sourceType: 'module' }); 	 // 转AST
  const dependencies = [];  		                            // 收集依赖
  traverse(ast, {
    ImportDeclaration({ node }) {
      dependencies.push(node.source.value);
    },
  });
  const {code} = babel.transformFromAstSync(ast, null, { presets: ['@babel/preset-env'] }); // 转ES5
  return {ID, filePath, dependencies, code, mapping: {}};
}


// 构建依赖图
function buildGraph(entryPath) {
  let ID = 0;
  const entryModule = parseModule(entryPath, ID++);
  const graph = [entryModule];

  for (const module of graph) {
    const dirname = path.dirname(module.filePath)
    module.mapping = {}
    module.dependencies.forEach((dependencyFilePath) => {
      const absolutePath = path.join(dirname, dependencyFilePath)
      const childModule = parseModule(absolutePath, ID)
      module.mapping[dependencyFilePath] = ID
      graph.push(childModule)
      ID++
    })
  }
  return graph;
}

// 测试一下
const config = loadConfig()
const graph = buildGraph(config.entry)
console.log(graph)
根目录下运行:
node .\mini-webpack.js发现会报错,原因是:在 入口文件(main.js)中,引入了css文件,而Babel 解析器只能解析 JavaScript 代码,无法解析 CSS 语法,
所以为了演示顺利,需要将main.js中的css导入部分先注释掉再运行
bash
# 控制台输出(部分示例):
[
 {
    ID: 0,
    filePath: './src/main.js',
    dependencies: [ './info.js' ],
    code: '"use strict";\n' +
      '\n' +
      'var _info = _interopRequireDefault(require("./info.js"));\n' +
      'function _interopRequireDefault(e) { return e && e.__esModule ? e : { "default": e }; }\n' +
      "// import './style.css';\n" +
      `console.log('main:', _info["default"]);`,
    mapping: { './info.js': 1 }
  },
  ...
](3)模块翻译
刚刚发现了一个问题:Babel 解析器由于只能解析js部分的内容,遇到css直接撂挑子不干了,所以需要一个翻译器,将非 JS 文件,就交给 Loader 处理成Bable能看懂的JS文件
在根目录下,创建loader文件夹,写一个css-loader.js
js
// loaders/css-loader.js
module.exports = function (source) {
  const cleanedCSS = source.replace(/\n/g, ' ').replace(/\s+/g, ' ').trim(); // 清理 CSS 内容
  return `
    const style = document.createElement('style');
    style.innerHTML = '${cleanedCSS}';
    document.head.appendChild(style);
  `;
}
继续在mini-webpack.js中:
js
// loader翻译器
function runLoaders(filePath, source, rules) {
  // 1. 找到匹配的 loader 规则
  const rule = rules.find(r => r.test.test(filePath));
  if (!rule) return source;

  // 2. 处理 loader 数组
  const loaders = Array.isArray(rule.use) ? rule.use : [rule.use];

  // 3. 从右向左执行 loader
  // 因为 loader 的处理是管道式的,后写的 loader 先拿到原始内容,前写的 loader 后处理。
  return loaders.reverse().reduce((result, loader) => {
    const loaderPath = path.resolve('./loaders', loader + '.js');
    const loaderFn = require(loaderPath);
    return loaderFn(result);
  }, source);
}

//测试一下loader
const config = loadConfig()
const source = fs.readFileSync('./src/style.css', 'utf-8')
const result = runLoaders('./src/style.css', source, config.module.rules)
console.log(result)
bash
# 控制台输出(可见,这里将css直接处理成了js):
const style = document.createElement('style');
style.innerHTML = 'body { background: #f0f0f0; }';
document.head.appendChild(style);此时需要更新一下parseModule,让他支持导入css模块
js
// 解析模块
function parseModule(filePath, ID, rules) {
  let content = fs.readFileSync(filePath, 'utf-8'); 			  // 读取文件
  const config = loadConfig();                                    // 读取用户配置
  const rules = config.module.rules;                              // 读取用户配置的loader规则
  content = runLoaders(filePath, content, rules);                 // 执行loader翻译器
  const ast = parser.parse(content, { sourceType: 'module' }); 	  // 转AST
  const dependencies = [];  		                              // 收集依赖
  traverse(ast, {
    ImportDeclaration({ node }) {
      dependencies.push(node.source.value);
    },
  });
  const { code } = babel.transformFromAstSync(ast, null, { presets: ['@babel/preset-env'] });
  return { ID, filePath, dependencies, code, mapping: {} };
}


// 构建依赖图
function buildGraph(entryPath, rules) {
  let ID = 0;
  const entryModule = parseModule(entryPath, ID++, rules); // 将ruler传递下去
  const graph = [entryModule];

  for (const module of graph) {
    const dirname = path.dirname(module.filePath)
    module.mapping = {}
    module.dependencies.forEach((dependencyFilePath) => {
      const absolutePath = path.join(dirname, dependencyFilePath)
      const childModule = parseModule(absolutePath, ID, rules)
      module.mapping[dependencyFilePath] = ID
      graph.push(childModule)
      ID++
    })
  }
  return graph;
}

// 测试一下:
const config = loadConfig();
const rules = config.rules;
const graph = buildGraph(config.entry, rules);
console.log(graph);
bash
# 控制台输出(部分示例,有删改):
[
	{
        ID: 0,
        filePath: './src/main.js',
        dependencies: [ './info.js', './style.css' ],
        code: '简化掉....',
        mapping: { './info.js': 1, './style.css': 2 }
     },
	{
        ID: 1,
        filePath: 'src\\info.js',
        dependencies: [ './const.js' ],
        code: '',
        mapping: { './const.js': 3 }
    },
    {
        ID: 2,
        filePath: 'src\\style.css',
        dependencies: [],
        code: '"use strict";\n' +
          '\n' +
          "var style = document.createElement('style');\n" +
          "style.innerHTML = 'body { background: #f0f0f0; }';\n" +
          'document.head.appendChild(style);',
        mapping: {}
  	},
  	...
]
css模块也被引入进来了,并且已经被loader处理成了js模块
(4)模块合并为chunk
说明 :真实 webpack 会根据入口配置和
splitChunks选项,将模块分割为多个 chunk(例如公共模块提取、多入口分离、动态导入的异步 chunk)。本示例为了简化,只生成一个主 chunk(所有模块合并输出到一个文件)。
js
// 模块合并和代码分割
function createChunks(graph) {
  const mainChunk = {
    id: 0,
    name: 'main',
    modules: graph,
    async: false
  };
  return [mainChunk];
}

// 测试一下:
const config = loadConfig();
const rules = config.rules;
const graph = buildGraph(config.entry, rules);
const chunks = createChunks(graph);
console.log(chunks);
bash
# 控制台输出:
[
  { id: 0, name: 'main', modules: [ [Object], [Object], [Object], [Object] ],async: false}
]
(5)优化压缩
-
TreeShaking
【说明】:
-
为了简化,这里我们使用的是正则标记出所有
export和import的模块,找到未被使用的模块,直接通过正则删除掉,这种实现忽略了很多复杂情况(如多行导出、导出别名、注释干扰等),但足以展示 Tree Shaking 的原理。 -
真实 Webpack 使用 AST 进行精确分析,支持更复杂的语法和边界情况,但原理相同:收集使用,移除未使用。
-
js
function treeShaking(graph) {
  // 1. 拼接所有源码,正则提取被使用的导出名
  const allSource = graph.map(m => m.filePath.endsWith('.js') ? fs.readFileSync(m.filePath, 'utf-8') : '').join('\n');
  const usedNames = new Set();
  for (const m of allSource.matchAll(/import\s*(?:\{([^}]+)\}|(\w+))\s+from/g)) {
    (m[1] ? m[1].split(',') : [m[2]]).forEach(n => usedNames.add(n.trim()));
  }

  // 2. 遍历模块,正则删除未被引用的 export 声明行
  const exportRe = /^export\s+(?:const|let|var|function|class)\s+(\w+)[^\n]*/gm;
  graph.forEach(mod => {
    if (!mod.filePath.endsWith('.js')) return;
    const source = fs.readFileSync(mod.filePath, 'utf-8');
    const newSource = source.replace(exportRe, (_, name) => usedNames.has(name) ? _ : '');
    if (newSource !== source) {
      mod.code = babel.transformFromAstSync(parser.parse(newSource, { sourceType: 'module' }), null, { presets: ['@babel/preset-env'] }).code;
    }
  });
  return graph;
}

// 测试一下:
const config = loadConfig();
const rules = config.rules;
const graph = buildGraph(config.entry, rules);
const treeShakeGraph = treeShake(graph);
console.log(treeShakeGraph);
bash
# 控制台输出(部分示例):
[
 ...
  {
    ID: 3,
    filePath: 'src\\const.js',
    dependencies: [],
    code: '"use strict";\n' +
      '\n' +
      'Object.defineProperty(exports, "__esModule", {\n' +
      '  value: true\n' +
      '});\n' +
      'exports.name = void 0;\n' +
      "var name = exports.name = '我的世界';",
    mapping: {}
  }
]
这里发现:
js// const.js export const name = '我的世界'; export const version = '2.0'; // 未被使用,将被 tree shaking 掉这里的version已经没有出现在依赖图谱中了,同样rubish.js也没有出现在依赖图谱中,被TreeShaking掉了
- 代码压缩
js
// 生产环境就直接引入 terser 进行代码压缩
async function optimizeGraph(graph, mode) {
  if (mode === 'production') {
    const { minify } = require('terser');
    for (const module of graph) {
      const result = await minify(module.code);
      module.code = result.code;
    }
  }
  return graph;
}


// 测试一下:
(async () => {
  const config = loadConfig();
  const rules = config.rules;
  const graph = buildGraph(config.entry, rules);
  const graphAfterTreeShaking = treeShake(graph);
  const optimizedGraph = await optimizeGraph(graphAfterTreeShaking, config.mode);
  console.log(optimizedGraph);
})();
bash
# 控制台输出(部分示例):
[
  {
    ID: 0,
    filePath: './src/main.js',
    dependencies: [ './info.js', './style.css' ],
    code: '"use strict";var _info=_interopRequireDefault(require("./info.js"));function _interopRequireDefault(e){return e&&e.__esModule?e:{default:e}}require("./style.css"),console.log("main:",_info.default);',
    mapping: { './info.js': 1, './style.css': 2 }
  },
  ...
]
可以看到代码成功被压缩了:删掉了换行,多余的空格等
(6)打包构建
js
function bundle(graph) {
  let modules = ''
  graph.forEach(mod => {
    modules += `
      ${mod.ID}: [
        function(require, module, exports) {${mod.code} },
        ${JSON.stringify(mod.mapping)}
      ],
    `
  })

  const result = `
    (function(modules) {
        function require(id) {
            const [fn, mapping] = modules[id];
            function localRequire(relativePath) {
                return require(mapping[relativePath])
            }
            const module = {exports: {}}
            fn(localRequire, module, module.exports)
            return module.exports
        }
        require(0)
    })({${modules}})
  `
  return result
}(7)Compiler
Compiler 是打包流程的总调度 。调用
compiler.run()一键启动构建,内部自动按顺序驱动所有步骤,并在关键节点触发钩子(hooks),让插件有机会介入处理,这使得Plugin运行在整个打包构建生命周期对应真实 Webpack 中,
npx webpack本质上就是创建 Compiler 并调用run()。
js
// compiler.js - 编译器 & 钩子系统

const fs = require('fs');
const path = require('path');

// ======================== Hook(简易 Tapable) ========================

class Hook {
  constructor() { this.taps = []; }
  tap(_, fn) { this.taps.push(fn); }
  call(...args) { this.taps.forEach(fn => fn(...args)); }
}

// ======================== Compiler ========================

class Compiler {
  constructor(config, buildSteps) {
    this.config = config;
    this.buildSteps = buildSteps;

    // 生命周期钩子
    this.hooks = {
      beforeRun: new Hook(),     // 构建开始前
      afterCompile: new Hook(),  // 编译完成后
      emit: new Hook(),          // 输出文件前
      done: new Hook(),          // 全部完成
    };

    // 注册插件
    (config.plugins || []).forEach(plugin => plugin.apply(this));
  }

  async run() {
    // 1. 构建前
    this.hooks.beforeRun.call(this);

    // 2. 构建依赖图 → TreeShaking → 压缩 → 分 chunk → 打包
    const graph = this.buildSteps.buildGraph(this.config.entry, this.config.module.rules);
    this.buildSteps.treeShake(graph);
    const optimizedGraph = await this.buildSteps.optimizeGraph(graph, this.config.mode);
    const chunks = this.buildSteps.createChunks(optimizedGraph);
    const bundleCode = this.buildSteps.bundle(chunks);

    // 3. 编译完成
    this.hooks.afterCompile.call(this);

    // 4. 输出文件
    this.hooks.emit.call(this);
    if (bundleCode) {
      const { path: outputPath, filename } = this.config.output;
      fs.mkdirSync(outputPath, { recursive: true });
      fs.writeFileSync(path.join(outputPath, filename), bundleCode);
    }

    // 5. 全部完成
    this.hooks.done.call(this);
  }
}

module.exports = Compiler;
(8)启动构建
js
// 入口
async function build () {
  const config = loadConfig();
  const compiler = new Compiler(config, { buildGraph, treeShake, optimizeGraph, createChunks, bundle });
  await compiler.run();
};

build();
(9)配置 npm命令
- 打开根目录下的:
package.json文件 - 在
scripts配置下,增加一行命令:"build": "node mini-webpack.js"并保存 - 控制台输入:
npm run build - 输出跟webpack一样的提示:build success ✔
- 此时根目录下就会多一个dist 文件夹,内部有一个
bundle.js就是打包完成后的代码
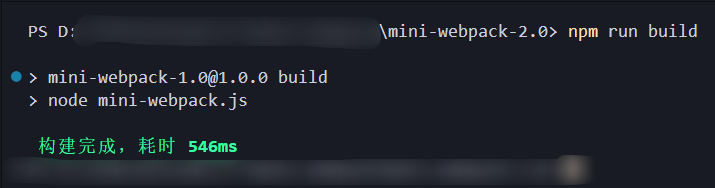
五、热更新机制
HMR 的本质就是一件事:用新模块代码替换旧模块代码,尽量不刷新页面。整个机制分两端、四个步骤。
两端协作
- 服务端(Dev Server):负责发现变化、编译变化、通知变化
- 浏览器端(HMR Runtime):负责拉取更新、替换模块、决定是否刷新
四个步骤
- 监听 + 增量编译
- 生成更新清单
- 通知浏览器拉取代码
1. 监听+增量编译
文件一改,Dev Server 不是从头编译所有模块,而是只重新编译变化的模块和它的下游依赖 ,其余模块直接用缓存。编译完后根据变更内容算出一个新的 Hash,作为这次更新的版本号。
2. 生成更新清单
编译完成后,Webpack 在内存中生成两个东西:
- manifest(更新清单):一个 JSON 清单,记录这次 Hash 是什么、哪些模块ID变了
- hot-update chunk 文件:每个变更模块对应的新代码
- 清单:
json
{
  "c": { "0": true, "2": true },   // 模块ID=0 和 ID=2 发生了变化
  "h": "abc123def456"               // 本次编译的 hash
}- 新代码
js
webpackHotUpdate("main", {
  0: function(module, exports, require) {
    console.log('我是更新后的代码');
  }
});
3. 通知浏览器拉取代码
Dev Server 通过 WebSocket 给浏览器发一条轻量消息,只包含新 Hash:
json
{ "type": "hash", "data": "abc123def456" }浏览器端 HMR Runtime收到后,通过 HTTP 请求 按需拉取更新清单和模块代码:
GET /abc123def456.hot-update.json           → 知道模块0和2变了
GET /0.abc123def456.hot-update.js           → 拉模块0的新代码
GET /2.abc123def456.hot-update.js           → 拉模块2的新代码
之所以不用 WebSocket 直接发代码,是因为代码量大,WebSocket 保持长连接只适合传轻量信号,具体数据走 HTTP 更合理。
4. 模块替换+冒泡
浏览器拿到新模块代码后:
- 先调旧模块的
dispose清理副作用(定时器、事件监听等) - 把新代码写入模块缓存
- 从变更模块开始往上冒泡 问:"你能接受这个变化吗?"
- 有人接(accept)→ 执行回调,局部更新,完事
- 没人接,一路问到入口模块都没人管 → 没办法安全替换,整页刷新
5. 错误处理
- 如果热替换过程中出现运行时错误,Webpack 会保留旧模块的代码继续运行
- 控制台会显示错误信息,并在下次成功更新后自动恢复
全流程:文件变化 → 增量编译(只编变更模块) → 算Hash → 生成更新清单(内存中) → WebSocket推Hash → 浏览器HTTP拉新代码 → 替换模块 → accept冒泡 → 局部更新或整页刷新
六、总结
本文从零实现了一个mini-webpack,基本复刻了Webpack的核心流程:
从命令 npm run build 触发开始,Webpack 首先读取并合并配置文件,创建唯一的 Compiler 实例,初始化内置钩子与Plugin系统;随后从入口模块出发,递归解析依赖,通过 Loader 将各类非 JS 资源转化为标准模块,构建出完整的依赖图谱;在此基础上进行 Tree Shaking 、作用域提升、代码压缩等优化,并按入口与分割规则将模块聚合为多个 Chunk ;最终通过 Plugin 对 Chunk 进行二次加工(如生成 HTML、抽离 CSS),根据输出配置将每个 Chunk 写入文件系统,完成打包。整个流程由 Compiler 统一调度,Plugin通过钩子贯穿各个阶段,实现了高度可扩展的工程化闭环
在开发阶段,Webpack 的 热更新(HMR) 机制通过文件监听、增量编译、Hash 版本控制、WebSocket 通信、模块级替换与 accept 冒泡机制,实现了修改代码后无需刷新页面即可看到更新的开发体验
构建的本质,是让混沌归于有序,让分散凝为整体。删繁就简之后,剩下的才配叫价值。