1 简单控件的使用
控件是界面组成的主要元素,Android 系统提供各类控件用于显示输入框、图片、文字等信息,按使用复杂程度可分为简单控件和列表控件,其中简单控件包含 TextView、Button、EditText、ImageView、RadioButton、CheckBox、Toast,掌握其使用可独立搭建注册界面。
1.1 TextView 控件
用于显示文本信息,可在 XML 布局文件中通过属性控制其样式,核心属性如下:
| 属性名称 | 功能描述 |
|---|---|
| android:layout_width | 设置 TextView 控件的宽度 |
| android:layout_height | 设置 TextView 控件的高度 |
| android:id | 设置 TextView 控件的唯一标识 |
| android:background | 设置 TextView 控件的背景 |
| android:layout_margin | 设置当前控件与屏幕边界 / 周围控件 / 布局的距离 |
| android:padding | 设置 TextView 控件与控件内内容的距离 |
| android:text | 设置文本内容 |
| android:textColor | 设置文字显示的颜色 |
| android:textSize | 设置文字大小,推荐单位为 sp |
| android:gravity | 设置文本内容的位置 |
| android:maxLength | 设置文本最大长度,超出部分不显示 |
| android:lines | 设置文本的行数,超出部分不显示 |
| android:maxLines | 设置文本的最大行数,超出部分不显示 |
| android:ellipsize | 设置文本超出规定范围的显示方式 |
| android:drawableTop | 在文本的顶部显示图像 |
| android:lineSpacingExtra | 设置文本的行间距 |
| android:textStyle | 设置文本样式,如 bold(粗体)、italic(斜体)、normal(正常) |
案例:实现文本居中且为斜体显示
- 创建名为 TextView 的应用程序,包名 cn.edu.textview;
- 在 res/layout/activity_main.xml 中放置 TextView 控件,配置
gravity="center"、textStyle="italic"等属性。
1.2 EditText 控件
表示编辑框,是 TextView 的子类,支持用户输入信息,除继承 TextView 的属性外,独有常用属性如下:
| 属性名称 | 功能描述 |
|---|---|
| android:hint | 控件内容为空时显示的提示文本 |
| android:textColorHint | 提示文本的颜色 |
| android:password | 输入内容显示为 "." |
| android:phoneNumber | 限制输入内容仅为数字 |
| android:maxLines | 设置文本的最大行数 |
| android:scrollHorizontally | 文本超出宽度时是否显示横拉条 |
| android:editable | 设置控件是否可编辑 |
案例:实现姓名输入编辑框
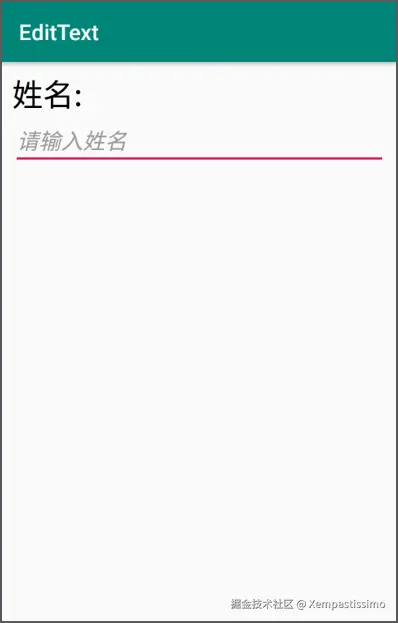
- 创建名为 EditText 的应用程序,包名 cn.edu.edittext;
- 在 activity_main.xml 中放置 TextView(标题)和 EditText(输入框),配置
hint="请输入姓名"、maxLines="2"等属性。
1.3 Button 控件
表示按钮,继承 TextView 控件,可显示文本 / 图片,支持点击操作,点击时有动态背景切换效果。
点击事件设置方式(三种)
- 布局文件指定 onClick 属性
xml
<Button
    ......
android:onClick="click" />- 匿名内部类方式
java
btn.setOnClickListener(new View.OnClickListener() {
    @Override
    public void onClick(View view) {
        // 点击事件实现代码
    }
});- Activity 实现 OnClickListener 接口
java
public class Activity extends AppCompatActivity implements View.OnClickListener{
    @Override
    protected void onCreate(Bundle savedInstanceState) {
        ......
        btn.setOnClickListener(this);
    }
    @Override
    public void onClick(View view) {
        // 点击事件实现代码
    }
}注意:前两种适合按钮数量少的场景,按钮较多时推荐第三种方式。
案例:三种方式实现按钮点击后文本变化
- 创建名为 Button 的应用程序,包名 cn.edu.button;
- 在布局中放置 3 个 Button 控件;
- 在 MainActivity 中分别通过三种方式实现点击事件,点击后按钮文本发生变化。
1.4 ImageView 控件
表示图片控件,继承自 View,可加载各类图片资源,常用属性如下:
| 属性名称 | 功能描述 |
|---|---|
| android:layout_width | 设置 ImageView 控件的宽度 |
| android:layout_height | 设置 ImageView 控件的高度 |
| android:id | 设置 ImageView 控件的唯一标识 |
| android:background | 设置 ImageView 控件的背景 |
| android:layout_margin | 设置当前控件与屏幕边界 / 周围控件的距离 |
| android:src | 设置需要显示的图片资源 |
| android:scaleType | 缩放 / 移动图片以适配控件宽高 |
| android:tint | 将图片渲染成指定颜色 |
案例:显示图片资源
- 创建名为 ImageView 的应用程序,包名 cn.edu.imageview;
- 将图片导入 drawable-hdpi 文件夹;
- 在布局中放置 2 个 ImageView 控件并配置图片资源属性。
1.5 RadioButton 控件
表示单选按钮,是 Button 的子类,有 "选中 / 未选中" 两种状态,由android:checked属性指定(true 为选中,false 为未选中),需与 RadioGroup 配合使用实现单选功能。
布局语法格式
xml
xml
<RadioGroup
        android:属性名称 ="属性值"
        ......>
    <RadioButton
          android:属性名称 ="属性值"
                    ...... />
    ......
</RadioGroup>案例:实现性别单选功能
- 创建名为 RadioButton 的应用程序,包名 cn.edu.radiobutton;
- 在布局中放置 1 个 RadioGroup(内含 2 个 RadioButton:男 / 女)和 1 个 TextView(显示选中结果);
- 在 MainActivity 中设置 RadioGroup 的监听事件,点击单选按钮后,下方 TextView 显示选中的文本信息。
1.6 CheckBox 控件
表示复选框,是 Button 的子类,用于实现多选功能,通过android:checked属性指定状态(true 选中,false 未选中)。
案例:统计用户兴趣爱好
- 创建名为 CheckBox 的应用程序,包名 cn.edu.checkbox;
- 在布局中放置 2 个 TextView(标题 / 结果)和 3 个 CheckBox(羽毛球 / 篮球 / 乒乓球);
- 在 MainActivity 中实现 CheckBox 的点击事件,勾选后界面显示选中的兴趣爱好信息。
1.7 Toast 类
Android 系统的轻量级信息提醒机制,显示在应用界面最上层,一段时间后自动消失,不打断操作、不获取焦点。
核心使用代码
java
Toast.makeText(Context,Text,Time).show();参数说明
- Context:当前组件的上下文环境(应用程序环境信息);
- Text:提示的字符串信息;
- Time:显示时长,可选
Toast.LENGTH_SHORT(短时间)、Toast.LENGTH_LONG(长时间)。
示例:提示 WIFI 断开
java
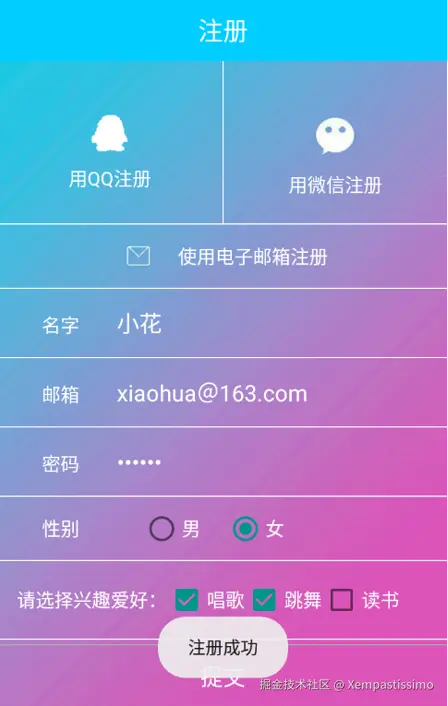
Toast.makeText(MainActivity.this, "WIFI已断开", Toast.LENGTH_SHORT).show();1.8 实战演练 --- 实现注册界面效果
实现步骤:
- 创建名为 Register 的应用程序,包名 cn.edu.register;
- 将注册界面图片导入 drawable-hdpi 文件夹;
- 创建样式:分割线、文本、输入框样式;
- 放置界面控件:9 个 TextView、8 个 View、1 个 ImageView、3 个 EditText、2 个 RadioButton、3 个 CheckBox、1 个 Button;
- 去掉默认标题栏:修改 theme 属性值;
- 实现注册功能:获取界面控件、设置单选按钮点击事件;
- 运行程序:输入注册信息,点击 "提交" 按钮,提示注册成功。
2 列表控件的使用
核心目标:掌握 ListView 控件使用以搭建购物商城界面,掌握 RecyclerView 控件使用以搭建仿今日头条推荐列表界面。
2.1 ListView 控件的使用
以列表形式展示数据,可根据列表高度自适应屏幕显示,常用属性如下:
| 属性名称 | 功能描述 |
|---|---|
| android:listSelector | 条目被点击后修改背景颜色 |
| android:divider | 设置分割线的颜色 |
| android:dividerHeight | 设置分割线的高度 |
| android:scrollbars | 是否显示滚动条 |
| android:fadingEdge | 去掉上下边的黑色阴影 |
布局中添加 ListView 示例
xml
<?xml version="1.0" encoding="utf-8"?>
<RelativeLayout
        ......>
   <ListView
        android:id="@+id/lv"
        android:layout_width="match_parent"
        android:layout_height="match_parent"
        android:listSelector="#fefefefe"
        android:scrollbars="none">
   </ListView>
</RelativeLayout>
2.2 常用数据适配器(Adapter)
数据与视图之间的桥梁,将复杂数据转换为用户可接受的呈现形式,是 ListView 加载数据的核心,常用适配器均基于 BaseAdapter 实现:
- BaseAdapter:抽象类,自定义适配器时需继承,重写 4 个抽象方法实现数据适配:
| 方法名称 | 功能描述 |
|---|---|
| public int getCount() | 获取列表条目的总数 |
| public Object getItem(int position) | 根据位置获取条目的对象 |
| public long getItemId(int position) | 根据位置获取条目的 id |
| public View getView(int position, View convertView, ViewGroup parent) | 获取对应位置的条目视图,convertView 复用旧视图,parent 加载 XML 布局 |
- SimpleAdapter:继承 BaseAdapter,封装了 4 个抽象方法,构造方法:
java
public SimpleAdapter(Context context, List<? extends Map<String, ?>> data,int resource, String[] from, int[] to)- context:上下文对象;
- data:数据集合,每一项对应 ListView 一个条目的数据;
- resource:条目布局的资源 id;
- from:Map 集合中的 key 值;
- to:条目布局中对应的控件。
- ArrayAdapter:BaseAdapter 的子类,常用于适配 TextView 控件,有多个构造方法,核心参数为上下文、条目布局 id、TextView 控件 id、待适配数据(数组 / List)。
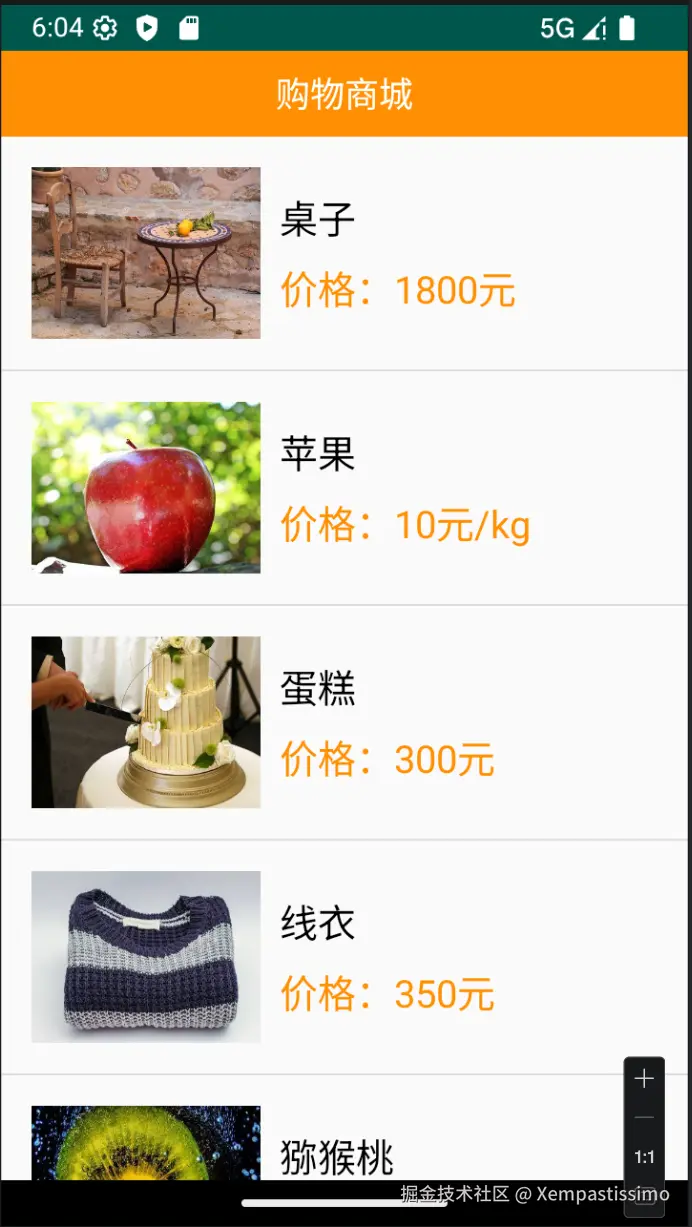
2.3 实战演练 --- 购物商城(ListView 实现)
实现步骤
- 创建名为 ListView 的应用程序,包名 cn.edu.listview;
- 将商品图片导入 drawable-hdpi 文件夹;
- 放置界面控件:1 个 TextView(标题)、1 个 ListView(商品列表);
- 创建列表条目布局文件 list_item.xml;
- 在 MainActivity 中自定义 MyBaseAdapter,实现 ListView 数据适配,显示商品名称和价格。
实现代码
- MainActivity.java
java
package cn.edu.listview;

import android.app.Activity;
import android.os.Bundle;
import android.view.View;
import android.view.ViewGroup;
import android.widget.BaseAdapter;
import android.widget.ImageView;
import android.widget.ListView;
import android.widget.TextView;


public class MainActivity extends Activity {
    private ListView mListView;
    //商品名称与价格数据集合
    private String[] titles = {"桌子", "苹果", "蛋糕", "线衣", "猕猴桃", "围巾"};
    private String[] prices = {"1800元", "10元/kg", "300元", "350元", "10元/kg",
            "280元"};
    //图片数据集合
    private int[] icons = {R.drawable.table, R.drawable.apple, R.drawable.cake,
            R.drawable.wireclothes, R.drawable.kiwifruit, R.drawable.scarf};

    protected void onCreate(Bundle savedInstanceState) {
        super.onCreate(savedInstanceState);
        setContentView(R.layout.activity_main);
        mListView = findViewById(R.id.lv); //初始化ListView控件
        MyBaseAdapter mAdapter = new MyBaseAdapter(); //创建一个Adapter的实例
        mListView.setAdapter(mAdapter);                  //设置Adapter
    }

    class MyBaseAdapter extends BaseAdapter {
        @Override
        public int getCount() {   //获取条目的总数
            return titles.length; //返回条目的总数
        }

        @Override
        public Object getItem(int position) {
            return titles[position]; //返回条目的数据对象
        }

        @Override
        public long getItemId(int position) {
            return position; //返回条目的Id
        }
        //获取条目的视图
        @Override
        public View getView(int position, View convertView, ViewGroup parent) {
            ViewHolder holder = null;
            if (convertView == null) {
                //将list_item.xml文件找出来并转换成View对象
                convertView = View.inflate(MainActivity.this, R.layout.list_item, null);
                //找到list_item.xml中创建的TextView
                holder = new ViewHolder();
                holder.title =  convertView.findViewById(R.id.title);
                holder.price = convertView.findViewById(R.id.price);
                holder.iv = convertView.findViewById(R.id.iv);
                convertView.setTag(holder);
            } else {
                holder = (ViewHolder) convertView.getTag();
            }
            holder.title.setText(titles[position]);
            holder.price.setText(prices[position]);
            holder.iv.setBackgroundResource(icons[position]);
            return convertView;
        }
        class ViewHolder {
            TextView title, price;
            ImageView iv;
        }
    }
}- cn/edu/listview/ExampleInstrumentedTest.java
java
package cn.edu.listview;

import android.content.Context;
import android.support.test.InstrumentationRegistry;
import android.support.test.runner.AndroidJUnit4;

import org.junit.Test;
import org.junit.runner.RunWith;

import static org.junit.Assert.*;

/**
 * Instrumented test, which will execute on an Android device.
 *
 * @see <a href="http://d.android.com/tools/testing">Testing documentation</a>
 */
@RunWith(AndroidJUnit4.class)
public class ExampleInstrumentedTest {
    @Test
    public void useAppContext() {
        // Context of the app under test.
        Context appContext = InstrumentationRegistry.getTargetContext();

        assertEquals("cn.edu.listview", appContext.getPackageName());
    }
}- cn/edu/listview/ExampleUnitTest.java
java
package cn.edu.listview;

import org.junit.Test;

import static org.junit.Assert.*;

/**
 * Example local unit test, which will execute on the development machine (host).
 *
 * @see <a href="http://d.android.com/tools/testing">Testing documentation</a>
 */
public class ExampleUnitTest {
    @Test
    public void addition_isCorrect() {
        assertEquals(4, 2 + 2);
    }
}- res/layout/activity_main.xml
xml
<?xml version="1.0" encoding="utf-8"?>
<LinearLayout xmlns:android="http://schemas.android.com/apk/res/android"
    android:layout_width="match_parent"
    android:layout_height="match_parent"
    android:orientation="vertical">
    <TextView
        android:layout_width="match_parent"
        android:layout_height="45dp"
        android:text="购物商城"
        android:textSize="18sp"
        android:textColor="#FFFFFF"
        android:background="#FF8F03"
        android:gravity="center"/>
    <ListView
        android:id="@+id/lv"
        android:layout_width="match_parent"
        android:layout_height="wrap_content"
        />
</LinearLayout>- res/layout/list_item.xml
xml
<?xml version="1.0" encoding="utf-8"?>
<RelativeLayout
    xmlns:android="http://schemas.android.com/apk/res/android"
    android:layout_width="match_parent"
    android:layout_height="match_parent"
    android:padding="16dp">
    <ImageView
        android:id="@+id/iv"
        android:layout_width="120dp"
        android:layout_height="90dp"
        android:layout_centerVertical="true"/>
    <RelativeLayout
        android:layout_width="wrap_content"
        android:layout_height="wrap_content"
        android:layout_marginLeft="10dp"
        android:layout_toRightOf="@+id/iv"
        android:layout_centerVertical="true">
        <TextView
            android:id="@+id/title"
            android:layout_width="wrap_content"
            android:layout_height="wrap_content"
            android:text="桌子"
            android:textSize="20sp"
            android:textColor="#000000" />
        <TextView
            android:id="@+id/tv_price"
            android:layout_width="wrap_content"
            android:layout_height="wrap_content"
            android:text="价格:"
            android:textSize="20sp"
            android:layout_marginTop="10dp"
            android:layout_below="@+id/title"
            android:textColor="#FF8F03" />
        <TextView
            android:id="@+id/price"
            android:layout_width="wrap_content"
            android:layout_height="wrap_content"
            android:text="1000"
            android:textSize="20sp"
            android:layout_below="@+id/title"
            android:layout_toRightOf="@+id/tv_price"
            android:textColor="#FF8F03"
            android:layout_marginTop="10dp"/>
    </RelativeLayout>
</RelativeLayout>- res/values/colors.xml
xml
<?xml version="1.0" encoding="utf-8"?>
<resources>
    <color name="colorPrimary">#008577</color>
    <color name="colorPrimaryDark">#00574B</color>
    <color name="colorAccent">#D81B60</color>
</resources>- res/values/strings.xml
xml
<resources>
    <string name="app_name">ListView</string>
</resources>- res/values/styles.xml
xml
<resources>

    <!-- Base application theme. -->
    <style name="AppTheme" parent="Theme.AppCompat.Light.DarkActionBar">
        <!-- Customize your theme here. -->
        <item name="colorPrimary">@color/colorPrimary</item>
        <item name="colorPrimaryDark">@color/colorPrimaryDark</item>
        <item name="colorAccent">@color/colorAccent</item>
    </style>

</resources>- 在res/drawable下放入图片资源
大致效果
ListView 优化
卡顿原因 :滑动时不断创建条目对象、反复执行 findViewById () 初始化控件。优化方式:
- 使用 ViewHolder 类,减少 findViewById () 调用;
- 复用 convertView,避免重复创建条目对象,减少内存消耗和屏幕渲染。
3.2.4 RecyclerView 控件的使用
与 ListView 类似,以列表形式展示数据,通过适配器加载数据,功能更强大,核心优势:
- 展示效果:支持横向 / 竖向列表、瀑布流、GridView 效果;
- 适配器:强制使用 ViewHolder 类,代码编写更规范;
- 复用效果:控件自身实现条目对象复用,无需手动处理;
- 动画效果:通过 setItemAnimator () 方法为条目添加动画。
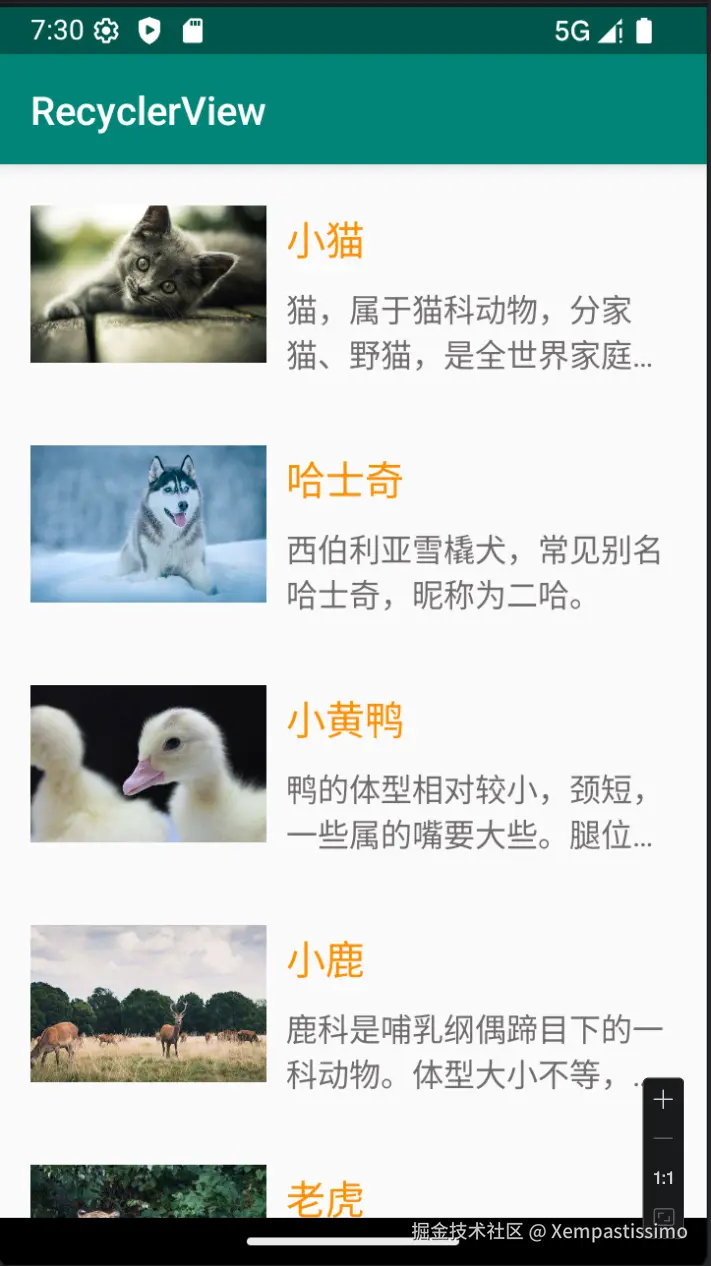
案例 --- 显示动物列表
- 创建名为 RecyclerView 的应用程序,包名cn.edu.recyclerview;
- 导入图片资源到 drawable-hdpi;
- 添加 recyclerview-v7 库依赖;
- 布局中放置 1个RecyclerView 控件;
- 创建条目布局 recycler_item.xml(1个ImageView、2个TextView);
- 在 MainActivity 中实现数据适配,将动物信息显示到列表。
代码实现
- cn/edu/recyclerview/MainActivity.java
java
package cn.edu.recyclerview;
import android.os.Bundle;
import android.support.v7.app.AppCompatActivity;
import android.support.v7.widget.LinearLayoutManager;
import android.support.v7.widget.RecyclerView;
import android.view.LayoutInflater;
import android.view.View;
import android.view.ViewGroup;
import android.widget.ImageView;
import android.widget.TextView;
public class MainActivity extends AppCompatActivity {
    private RecyclerView mRecyclerView;
    private HomeAdapter mAdapter;
    private String[] names = {"小猫", "哈士奇", "小黄鸭", "小鹿", "老虎"};
    private int[] icons = {R.drawable.cat, R.drawable.siberianhusky,
            R.drawable.yellowduck, R.drawable.fawn, R.drawable.tiger};
    private String[] introduces = {
            "猫,属于猫科动物,分家猫、野猫,是全世界家庭中较为广泛的宠物。",
            "西伯利亚雪橇犬,常见别名哈士奇,昵称为二哈。",
            "鸭的体型相对较小,颈短,一些属的嘴要大些。腿位于身体后方,因而步态蹒跚。",
            "鹿科是哺乳纲偶蹄目下的一科动物。体型大小不等,为有角的反刍类。",
            "虎,大型猫科动物;毛色浅黄或棕黄色,满有黑色横纹;头圆、耳短,耳背面黑色,中央有一白斑甚显著;四肢健壮有力;尾粗长,具黑色环纹,尾端黑色。"
    };
    @Override
    protected void onCreate(Bundle savedInstanceState) {
        super.onCreate(savedInstanceState);
        setContentView(R.layout.activity_main);
        mRecyclerView = findViewById(R.id.id_recyclerview);
        mRecyclerView.setLayoutManager(new LinearLayoutManager(this));
        mAdapter = new HomeAdapter();
        mRecyclerView.setAdapter(mAdapter);
    }
    class HomeAdapter extends RecyclerView.Adapter<HomeAdapter.MyViewHolder> {
        @Override
        public MyViewHolder onCreateViewHolder(ViewGroup parent, int viewType) {
            MyViewHolder holder = new MyViewHolder(LayoutInflater.from(MainActivity.this).inflate(
                    R.layout.recycler_item, parent, false));
            return holder;
        }

        @Override
        public void onBindViewHolder(MyViewHolder holder, int position) {
            holder.name.setText(names[position]);
            holder.iv.setImageResource(icons[position]);
            holder.introduce.setText(introduces[position]);
        }
        @Override
        public int getItemCount() {
            return names.length;
        }
        class MyViewHolder extends RecyclerView.ViewHolder {
            TextView name;
            ImageView iv;
            TextView introduce;
            public MyViewHolder(View view) {
                super(view);
                name = view.findViewById(R.id.name);
                iv = view.findViewById(R.id.iv);
                introduce = view.findViewById(R.id.introduce);
            }
        }
    }
}- cn/edu/recyclerview/ExampleInstrumentedTest.java
java
package cn.edu.recyclerview;

import android.content.Context;
import android.support.test.InstrumentationRegistry;
import android.support.test.runner.AndroidJUnit4;

import org.junit.Test;
import org.junit.runner.RunWith;

import static org.junit.Assert.*;

/**
 * Instrumented test, which will execute on an Android device.
 *
 * @see <a href="http://d.android.com/tools/testing">Testing documentation</a>
 */
@RunWith(AndroidJUnit4.class)
public class ExampleInstrumentedTest {
    @Test
    public void useAppContext() {
        // Context of the app under test.
        Context appContext = InstrumentationRegistry.getTargetContext();

        assertEquals("cn.edu.recyclerview", appContext.getPackageName());
    }
}- cn/edu/recyclerview/ExampleUnitTest.java
java
package cn.edu.recyclerview;

import org.junit.Test;

import static org.junit.Assert.*;

/**
 * Example local unit test, which will execute on the development machine (host).
 *
 * @see <a href="http://d.android.com/tools/testing">Testing documentation</a>
 */
public class ExampleUnitTest {
    @Test
    public void addition_isCorrect() {
        assertEquals(4, 2 + 2);
    }
}- res/layout/activity_main.xml
xml
<?xml version="1.0" encoding="utf-8"?>
<RelativeLayout xmlns:android="http://schemas.android.com/apk/res/android"
    android:layout_width="match_parent"
    android:layout_height="match_parent">
    <android.support.v7.widget.RecyclerView
        android:id="@+id/id_recyclerview"
        android:layout_width="match_parent"
        android:layout_height="match_parent">
    </android.support.v7.widget.RecyclerView>
</RelativeLayout>- res/layout/recycler_item.xml
xml
<?xml version="1.0" encoding="utf-8"?>
<LinearLayout xmlns:android="http://schemas.android.com/apk/res/android"
    android:layout_width="match_parent"
    android:layout_height="wrap_content"
    android:padding="16dp"
    android:gravity="center"
    android:orientation="horizontal">
    <ImageView
        android:id="@+id/iv"
        android:layout_width="120dp"
        android:layout_height="90dp"
        android:src="@drawable/siberiankusky"/>
    <RelativeLayout
        android:layout_width="wrap_content"
        android:layout_height="wrap_content"
        android:layout_marginLeft="10dp"
        android:layout_marginTop="5dp">
        <TextView
            android:id="@+id/name"
            android:layout_width="wrap_content"
            android:layout_height="wrap_content"
            android:textSize="20sp"
            android:textColor="#FF8F03"
            android:text="哈士奇"/>
        <TextView
            android:id="@+id/introduce"
            android:layout_width="wrap_content"
            android:layout_height="wrap_content"
            android:textSize="16sp"
            android:layout_marginTop="10dp"
            android:layout_below="@+id/name"
            android:textColor="#FF716C6D"
            android:maxLines="2"
            android:ellipsize="end"
            android:text="西伯利亚雪橇犬,常见别名哈士奇,昵称为二哈。"/>
    </RelativeLayout>
</LinearLayout>- res/values/colors.xml
xml
<?xml version="1.0" encoding="utf-8"?>
<resources>
    <color name="colorPrimary">#008577</color>
    <color name="colorPrimaryDark">#00574B</color>
    <color name="colorAccent">#D81B60</color>
</resources>- res/values/strings.xml
xml
<resources>
    <string name="app_name">RecyclerView</string>
</resources>- res/values/styles.xml
xml
<resources>

    <!-- Base application theme. -->
    <style name="AppTheme" parent="Theme.AppCompat.Light.DarkActionBar">
        <!-- Customize your theme here. -->
        <item name="colorPrimary">@color/colorPrimary</item>
        <item name="colorPrimaryDark">@color/colorPrimaryDark</item>
        <item name="colorAccent">@color/colorAccent</item>
    </style>

</resources>- 在资源目录下放入相关资源文件。
效果预览
2.5 实战演练 --- 仿今日头条推荐列表(RecyclerView 实现)
实现步骤
- 创建名为 HeadLine 的应用程序,包名 cn.edu.headline;
- 导入界面图片到 drawable-hdpi;
- 添加 recyclerview-v7 库依赖;
- 创建样式:文本、图片样式;
- 添加颜色值:浅灰色、深灰色;
- 去掉默认标题栏:修改 theme 为
@style/Theme.AppCompat.NoActionBar; - 搭建界面:标题栏、推荐列表界面、列表条目界面;
- 封装实体类:创建 NewsBean 类,定义新闻信息属性字段;
- 编写适配器:创建 NewsAdapter,实现加载条目视图、绑定数据、获取条目总数 / 类型;
- 显示列表数据:创建 setData () 方法加载新闻数据,将数据设置到适配器;
- 运行程序,查看仿今日头条推荐列表效果。
具体代码实现
- cn/edu/headline/MainActivity.java
java
package cn.edu.headline;

import android.os.Bundle;
import android.support.v7.app.AppCompatActivity;
import android.support.v7.widget.LinearLayoutManager;
import android.support.v7.widget.RecyclerView;

import java.util.ArrayList;
import java.util.List;

public class MainActivity extends AppCompatActivity {
    private String[] titles = {"各地餐企齐行动,杜绝餐饮浪费",
            "花菜有人焯水,有人直接炒,都错了,看饭店大厨如何做",
            "睡觉时,双脚突然蹬一下,有踩空感,像从高楼坠落,是咋回事?",
            "实拍外卖小哥砸开小吃店的卷帘门救火,灭火后淡定继续送外卖",
            "还没成熟就被迫提前采摘,8毛一斤却没人要,果农无奈:不摘不行",
            "大会、大展、大赛一起来,北京电竞"好嗨哟""};
    private String[] names = {"央视新闻客户端", "味美食记", "民富康健康", "生活小记",
            "禾木报告", "燕鸣"};
    private String[] comments = {"9884评", "18评", "78评", "678评", "189评",
            "304评"};
    private String[] times = {"6小时前", "刚刚", "1小时前", "2小时前", "3小时前",
            "4个小时前"};
    private int[] icons1 = {R.drawable.food, R.drawable.takeout,
            R.drawable.e_sports};
    private int[] icons2 = {R.drawable.sleep1, R.drawable.sleep2, R.drawable.sleep3,
            R.drawable.fruit1,R.drawable.fruit2, R.drawable.fruit3};
    //新闻类型,1表示置顶新闻或只有1张图片的新闻,2表示包含3张图片的新闻
    private int[] types = {1, 1, 2, 1, 2, 1};
    private RecyclerView mRecyclerView;
    private NewsAdapter mAdapter;
    private List<NewsBean> NewsList;
    @Override
    protected void onCreate(Bundle savedInstanceState) {
        super.onCreate(savedInstanceState);
        setContentView(R.layout.activity_main);
        setData();
        mRecyclerView = findViewById(R.id.rv_list);
        mRecyclerView.setLayoutManager(new LinearLayoutManager(this));
        mAdapter = new NewsAdapter(MainActivity.this, NewsList);
        mRecyclerView.setAdapter(mAdapter);
    }
    private void setData() {
        NewsList = new ArrayList<NewsBean>();
        NewsBean bean;
        for (int i = 0; i < titles.length; i++) {
            bean = new NewsBean();
            bean.setId(i + 1);
            bean.setTitle(titles[i]);
            bean.setName(names[i]);
            bean.setComment(comments[i]);
            bean.setTime(times[i]);
            bean.setType(types[i]);
            switch (i) {
                case 0: //置顶新闻的图片设置
                    List<Integer> imgList0 = new ArrayList<>();
                    bean.setImgList(imgList0);
                    break;
                case 1://设置第2个条目的图片数据
                    List<Integer> imgList1 = new ArrayList<>();
                    imgList1.add(icons1[i - 1]);
                    bean.setImgList(imgList1);
                    break;
                case 2://设置第3个条目的图片数据
                    List<Integer> imgList2 = new ArrayList<>();
                    imgList2.add(icons2[i - 2]);
                    imgList2.add(icons2[i - 1]);
                    imgList2.add(icons2[i]);
                    bean.setImgList(imgList2);
                    break;
                case 3://设置第4个条目的图片数据
                    List<Integer> imgList3 = new ArrayList<>();
                    imgList3.add(icons1[i - 2]);
                    bean.setImgList(imgList3);
                    break;
                case 4://设置第5个条目的图片数据
                    List<Integer> imgList4 = new ArrayList<>();
                    imgList4.add(icons2[i - 1]);
                    imgList4.add(icons2[i]);
                    imgList4.add(icons2[i + 1]);
                    bean.setImgList(imgList4);
                    break;
                case 5://设置第6个条目的图片数据
                    List<Integer> imgList5 = new ArrayList<>();
                    imgList5.add(icons1[i - 3]);
                    bean.setImgList(imgList5);
                    break;
            }
            NewsList.add(bean);
        }
    }
}- cn/edu/headline/NewsAdapter.java
java
package cn.edu.headline;

import android.content.Context;
import android.support.annotation.NonNull;
import android.support.v7.widget.RecyclerView;
import android.view.LayoutInflater;
import android.view.View;
import android.view.ViewGroup;
import android.widget.ImageView;
import android.widget.TextView;

import java.util.List;

public class NewsAdapter extends RecyclerView.Adapter<RecyclerView.ViewHolder> {
    private Context mContext;
    private List<NewsBean> NewsList;
    public NewsAdapter(Context context,List<NewsBean> NewsList) {
        this.mContext = context;
        this.NewsList=NewsList;
    }
    @Override
    public RecyclerView.ViewHolder onCreateViewHolder(@NonNull ViewGroup parent,
                                                      int viewType) {
        View itemView=null;
        RecyclerView.ViewHolder holder=null;
        if (viewType == 1){
            itemView = LayoutInflater.from(mContext).inflate(R.layout.
                    list_item_one, parent, false);
            holder= new MyViewHolder1(itemView);
        }else if (viewType == 2){
            itemView = LayoutInflater.from(mContext).inflate(R.layout.
                    list_item_two, parent, false);
            holder= new MyViewHolder2(itemView);
        }
        return holder;
    }
    @Override
    public int getItemViewType(int position) {
        return NewsList.get(position).getType();
    }
    @Override
    public void onBindViewHolder(@NonNull RecyclerView.ViewHolder holder,
                                 int position) {
        NewsBean bean=NewsList.get(position);
        if (holder instanceof MyViewHolder1){
            if (position==0) {
                ((MyViewHolder1) holder).iv_top.setVisibility(View.VISIBLE);
                ((MyViewHolder1) holder).iv_img.setVisibility(View.GONE);
            } else {
                ((MyViewHolder1) holder).iv_top.setVisibility(View.GONE);
                ((MyViewHolder1) holder).iv_img.setVisibility(View.VISIBLE);
            }
            ((MyViewHolder1) holder).title.setText(bean.getTitle());
            ((MyViewHolder1) holder).name.setText(bean.getName());
            ((MyViewHolder1) holder).comment.setText(bean.getComment());
            ((MyViewHolder1) holder).time.setText(bean.getTime());
            if (bean.getImgList().size()==0)return;
            ((MyViewHolder1) holder).iv_img.setImageResource(bean.getImgList()
                    .get(0));
        }else if (holder instanceof MyViewHolder2){
            ((MyViewHolder2) holder).title.setText(bean.getTitle());
            ((MyViewHolder2) holder).name.setText(bean.getName());
            ((MyViewHolder2) holder).comment.setText(bean.getComment());
            ((MyViewHolder2) holder).time.setText(bean.getTime());
            ((MyViewHolder2) holder).iv_img1.setImageResource(bean.getImgList()
                    .get(0));
            ((MyViewHolder2) holder).iv_img2.setImageResource(bean.getImgList()
                    .get(1));
            ((MyViewHolder2) holder).iv_img3.setImageResource(bean.getImgList()
                    .get(2));
        }
    }
    @Override
    public int getItemCount() {
        return NewsList.size();
    }
    class MyViewHolder1 extends RecyclerView.ViewHolder {
        ImageView iv_top,iv_img;
        TextView title,name,comment,time;
        public MyViewHolder1(View view) {
            super(view);
            iv_top = view.findViewById(R.id.iv_top);
            iv_img = view.findViewById(R.id.iv_img);
            title = view.findViewById(R.id.tv_title);
            name = view.findViewById(R.id.tv_name);
            comment = view.findViewById(R.id.tv_comment);
            time = view.findViewById(R.id.tv_time);
        }
    }
    class MyViewHolder2 extends RecyclerView.ViewHolder {
        ImageView iv_img1,iv_img2,iv_img3;
        TextView title,name,comment,time;
        public MyViewHolder2(View view) {
            super(view);
            iv_img1 = view.findViewById(R.id.iv_img1);
            iv_img2 = view.findViewById(R.id.iv_img2);
            iv_img3 = view.findViewById(R.id.iv_img3);
            title = view.findViewById(R.id.tv_title);
            name = view.findViewById(R.id.tv_name);
            comment = view.findViewById(R.id.tv_comment);
            time = view.findViewById(R.id.tv_time);
        }
    }
}- cn/edu/headline/NewsBean.java
java
package cn.edu.headline;
import java.util.List;
public class NewsBean {
    private int id;                   //新闻id
    private String title;            //新闻标题
    private List<Integer> imgList; //新闻图片
    private String name;             //用户名
    private String comment;         //用户评论
    private String time;             //新闻发布时间
    private int type;                 //新闻类型
    public int getId() {
        return id;
    }
    public void setId(int id) {
        this.id = id;
    }
    public String getTitle() {
        return title;
    }
    public void setTitle(String title) {
        this.title = title;
    }
    public String getName() {
        return name;
    }
    public void setName(String name) {
        this.name = name;
    }
    public String getComment() {
        return comment;
    }
    public void setComment(String comment) {
        this.comment = comment;
    }
    public String getTime() {
        return time;
    }
    public void setTime(String time) {
        this.time = time;
    }
    public List<Integer> getImgList() {
        return imgList;
    }
    public void setImgList(List<Integer> imgList) {
        this.imgList = imgList;
    }
    public int getType() {
        return type;
    }
    public void setType(int type) {
        this.type = type;
    }
}- cn/edu/headline/ExampleInstrumentedTest.java
java
package cn.edu.headline;

import android.content.Context;
import android.support.test.InstrumentationRegistry;
import android.support.test.runner.AndroidJUnit4;

import org.junit.Test;
import org.junit.runner.RunWith;

import static org.junit.Assert.*;

/**
 * Instrumented test, which will execute on an Android device.
 *
 * @see <a href="http://d.android.com/tools/testing">Testing documentation</a>
 */
@RunWith(AndroidJUnit4.class)
public class ExampleInstrumentedTest {
    @Test
    public void useAppContext() {
        // Context of the app under test.
        Context appContext = InstrumentationRegistry.getTargetContext();

        assertEquals("cn.edu.headline", appContext.getPackageName());
    }
}- cn/edu/headline/ExampleUnitTest.java
java
package cn.edu.headline;

import org.junit.Test;

import static org.junit.Assert.*;

/**
 * Example local unit test, which will execute on the development machine (host).
 *
 * @see <a href="http://d.android.com/tools/testing">Testing documentation</a>
 */
public class ExampleUnitTest {
    @Test
    public void addition_isCorrect() {
        assertEquals(4, 2 + 2);
    }
}- res/layout/activity_main.xml
xml
<?xml version="1.0" encoding="utf-8"?>
<LinearLayout xmlns:android="http://schemas.android.com/apk/res/android"
    android:layout_width="match_parent"
    android:layout_height="match_parent"
    android:background="@color/light_gray_color"
    android:orientation="vertical">
    <include layout="@layout/title_bar" />
    <LinearLayout
        android:layout_width="match_parent"
        android:layout_height="40dp"
        android:background="@android:color/white"
        android:orientation="horizontal">
        <TextView
            style="@style/tvStyle"
            android:text="推荐"
            android:textColor="@android:color/holo_red_dark" />
        <TextView
            style="@style/tvStyle"
            android:text="抗疫"
            android:textColor="@color/gray_color" />
        <TextView
            style="@style/tvStyle"
            android:text="小视频"
            android:textColor="@color/gray_color" />
        <TextView
            style="@style/tvStyle"
            android:text="北京"
            android:textColor="@color/gray_color" />
        <TextView
            style="@style/tvStyle"
            android:text="视频"
            android:textColor="@color/gray_color" />
        <TextView
            style="@style/tvStyle"
            android:text="热点"
            android:textColor="@color/gray_color" />
        <TextView
            style="@style/tvStyle"
            android:text="娱乐"
            android:textColor="@color/gray_color" />
    </LinearLayout>
    <View
        android:layout_width="match_parent"
        android:layout_height="1dp"
        android:background="#eeeeee" />
    <android.support.v7.widget.RecyclerView
        android:id="@+id/rv_list"
        android:layout_width="match_parent"
        android:layout_height="match_parent" />
</LinearLayout>- res/layout/list_item_one.xml
xml
<?xml version="1.0" encoding="utf-8"?>
<RelativeLayout
    xmlns:android="http://schemas.android.com/apk/res/android"
    android:layout_width="match_parent"
    android:layout_height="90dp"
    android:layout_marginBottom="8dp"
    android:background="@android:color/white"
    android:padding="8dp">
    <LinearLayout
        android:id="@+id/ll_info"
        android:layout_width="wrap_content"
        android:layout_height="wrap_content"
        android:orientation="vertical">
        <TextView
            android:id="@+id/tv_title"
            android:layout_width="280dp"
            android:layout_height="wrap_content"
            android:maxLines="2"
            android:textColor="#3c3c3c"
            android:textSize="16sp" />
        <RelativeLayout
            android:layout_width="match_parent"
            android:layout_height="match_parent">
            <ImageView
                android:id="@+id/iv_top"
                android:layout_width="20dp"
                android:layout_height="20dp"
                android:layout_alignParentBottom="true"
                android:src="@drawable/top" />
            <LinearLayout
                android:layout_width="match_parent"
                android:layout_height="wrap_content"
                android:layout_alignParentBottom="true"
                android:layout_toRightOf="@id/iv_top"
                android:orientation="horizontal">
                <TextView
                    android:id="@+id/tv_name"
                    style="@style/tvInfo" />
                <TextView
                    android:id="@+id/tv_comment"
                    style="@style/tvInfo" />
                <TextView
                    android:id="@+id/tv_time"
                    style="@style/tvInfo" />
            </LinearLayout>
        </RelativeLayout>
    </LinearLayout>
    <ImageView
        android:id="@+id/iv_img"
        android:layout_width="match_parent"
        android:layout_height="90dp"
        android:layout_toRightOf="@id/ll_info"
        android:padding="3dp" />
</RelativeLayout>- res/layout/list_item_two.xml
xml
<?xml version="1.0" encoding="utf-8"?>
<RelativeLayout
    xmlns:android="http://schemas.android.com/apk/res/android"
    android:layout_width="match_parent"
    android:layout_height="wrap_content"
    android:layout_marginBottom="8dp"
    android:background="@android:color/white">
    <TextView
        android:id="@+id/tv_title"
        android:layout_width="match_parent"
        android:layout_height="wrap_content"
        android:maxLines="2"
        android:padding="8dp"
        android:textColor="#3c3c3c"
        android:textSize="16sp" />
    <LinearLayout
        android:id="@+id/ll_img"
        android:layout_width="match_parent"
        android:layout_height="wrap_content"
        android:layout_below="@id/tv_title"
        android:orientation="horizontal">
        <ImageView
            android:id="@+id/iv_img1"
            style="@style/ivImg"/>
        <ImageView
            android:id="@+id/iv_img2"
            style="@style/ivImg"/>
        <ImageView
            android:id="@+id/iv_img3"
            style="@style/ivImg"/>
    </LinearLayout>
    <LinearLayout
        android:layout_width="wrap_content"
        android:layout_height="wrap_content"
        android:layout_below="@id/ll_img"
        android:orientation="vertical"
        android:padding="8dp">
        <LinearLayout
            android:layout_width="match_parent"
            android:layout_height="wrap_content"
            android:orientation="horizontal">
            <TextView
                android:id="@+id/tv_name"
                style="@style/tvInfo" />
            <TextView
                android:id="@+id/tv_comment"
                style="@style/tvInfo" />
            <TextView
                android:id="@+id/tv_time"
                style="@style/tvInfo" />
        </LinearLayout>
    </LinearLayout>
</RelativeLayout>- res/layout/title_bar.xml
xml
<?xml version="1.0" encoding="utf-8"?>
<LinearLayout xmlns:android="http://schemas.android.com/apk/res/android"
    android:layout_width="match_parent"
    android:layout_height="50dp"
    android:background="#d33d3c"
    android:orientation="horizontal"
    android:paddingLeft="10dp"
    android:paddingRight="10dp">
    <TextView
        android:layout_width="wrap_content"
        android:layout_height="wrap_content"
        android:layout_gravity="center"
        android:text="仿今日头条"
        android:textColor="@android:color/white"
        android:textSize="22sp" />
    <EditText
        android:layout_width="match_parent"
        android:layout_height="35dp"
        android:layout_gravity="center_vertical"
        android:layout_marginStart="15dp"
        android:layout_marginLeft="5dp"
        android:layout_marginRight="15dp"
        android:background="@drawable/search_bg"
        android:gravity="center_vertical"
        android:textColor="@android:color/black"
        android:hint="搜你想搜的"
        android:textColorHint="@color/gray_color"
        android:textSize="14sp"
        android:paddingLeft="30dp" />
</LinearLayout>- res/values/colors.xml
xml
<?xml version="1.0" encoding="utf-8"?>
<resources>
    <color name="colorPrimary">#008577</color>
    <color name="colorPrimaryDark">#00574B</color>
    <color name="colorAccent">#D81B60</color>
    <color name="light_gray_color">#eeeeee</color>
    <color name="gray_color">#828282</color>
</resources>- res/values/strings.xml
xml
<resources>
    <string name="app_name">HeadLine</string>
</resources>- res/values/styles.xml
xml
<resources>

    <!-- Base application theme. -->
    <style name="AppTheme" parent="Theme.AppCompat.Light.DarkActionBar">
        <!-- Customize your theme here. -->
        <item name="colorPrimary">@color/colorPrimary</item>
        <item name="colorPrimaryDark">@color/colorPrimaryDark</item>
        <item name="colorAccent">@color/colorAccent</item>
    </style>
    <style name="tvStyle" >
        <item name="android:layout_width">wrap_content</item>
        <item name="android:layout_height">match_parent</item>
        <item name="android:padding">10dp</item>
        <item name="android:gravity">center</item>
        <item name="android:textSize">15sp</item>
    </style>
    <style name="tvInfo" >
        <item name="android:layout_width">wrap_content</item>
        <item name="android:layout_height">wrap_content</item>
        <item name="android:layout_marginLeft">8dp</item>
        <item name="android:layout_gravity">center_vertical</item>
        <item name="android:textSize">14sp</item>
        <item name="android:textColor">@color/gray_color</item>
    </style>
    <style name="ivImg" >
        <item name="android:layout_width">0dp</item>
        <item name="android:layout_height">90dp</item>
        <item name="android:layout_weight">1</item>
        <!--ll_info为布局文件list_item_one.xml中的id -->
        <item name="android:layout_toRightOf">@id/ll_info</item>
    </style>
</resources>
项目分析
在正式编写代码前,我们需要完成项目创建、资源导入、依赖添加、主题修改、资源定义等前期工作,这是 Android 项目开发的标准流程,也是保证项目正常运行的基础。
创建 Android 项目
-
打开 Android Studio,选择「Start a new Android Studio Project」;
-
选择「Empty Activity」模板,点击 Next;
-
配置项目参数:
- Name:HeadLine
- Package name:cn.edu.headline
- Save location:自定义项目存储路径
- Language:Java
- Minimum SDK:API 19 (Android 4.4)
-
点击 Finish,完成项目创建。
项目创建完成后,Android Studio 会自动生成基础代码结构,包含默认的 MainActivity、布局文件、资源文件等。
导入图片资源
今日头条列表需要展示新闻图片、置顶标识、搜索框背景等图片,我们需要将图片资源导入项目的drawable-hdpi目录:
- 在项目视图中切换到「Project」模式;
- 找到
app/src/main/res/drawable-hdpi文件夹; - 将准备好的图片(
top.png置顶图标、search_bg.png搜索框背景、food.png/takeout.png/e_sports.png/sleep1.png等新闻图片)复制粘贴到该目录下; - 确保图片名称为小写字母、无中文、无特殊字符,符合 Android 资源命名规范。
本项目用到的图片资源:
- 置顶图标:
top - 搜索框背景:
search_bg - 新闻图片:
food、takeout、e_sports、sleep1、sleep2、sleep3、fruit1、fruit2、fruit3
添加 RecyclerView 依赖
RecyclerView 是 Android 支持库中的控件,默认不包含在基础框架中,必须手动添加依赖才能使用。
传统 Gradle 配置(Android Studio 3.x 版本)
打开项目的app/build.gradle文件(Module 级别),在dependencies节点下添加 RecyclerView 依赖:
gradle
dependencies {
    // 基础依赖
    implementation fileTree(dir: 'libs', include: ['*.jar'])
    implementation 'com.android.support:appcompat-v7:28.0.0'
    implementation 'com.android.support.constraint:constraint-layout:1.1.3'

    // 核心:添加RecyclerView-v7依赖
    implementation 'com.android.support:recyclerview-v7:28.0.0'

    testImplementation 'junit:junit:4.12'
    androidTestImplementation 'com.android.support.test:runner:1.0.2'
    androidTestImplementation 'com.android.support.test.espresso:espresso-core:3.0.2'
}
AndroidX 兼容配置(Android Studio 4.0 + 版本)
如果你的项目使用 AndroidX(默认配置),则使用 AndroidX 的 RecyclerView 依赖:
gradle
dependencies {
    // AndroidX基础依赖
    implementation 'androidx.appcompat:appcompat:1.6.1'
    implementation 'androidx.constraintlayout:constraintlayout:2.1.4'

    // AndroidX RecyclerView依赖
    implementation 'androidx.recyclerview:recyclerview:1.3.2'

    testImplementation 'junit:junit:4.13.2'
    androidTestImplementation 'androidx.test.ext:junit:1.1.5'
    androidTestImplementation 'androidx.test.espresso:espresso-core:3.5.1'
}
添加完成后,点击右上角「Sync Now」同步项目,等待依赖下载完成即可。
隐藏系统默认标题栏
今日头条使用自定义标题栏,需要隐藏系统自带的 ActionBar / 标题栏,修改项目主题:
- 打开
app/src/main/res/values/styles.xml文件; - 修改 AppTheme 的父主题为
Theme.AppCompat.NoActionBar:
xml
<style name="AppTheme" parent="Theme.AppCompat.Light.NoActionBar">
    <item name="colorPrimary">@color/colorPrimary</item>
    <item name="colorPrimaryDark">@color/colorPrimaryDark</item>
    <item name="colorAccent">@color/colorAccent</item>
</style>- 打开
AndroidManifest.xml文件,确认 Application 节点使用该主题:
xml
<application
    android:allowBackup="true"
    android:icon="@mipmap/ic_launcher"
    android:label="@string/app_name"
    android:roundIcon="@mipmap/ic_launcher_round"
    android:supportsRtl="true"
    android:theme="@style/AppTheme">
    <activity android:name=".MainActivity">
        <intent-filter>
            <action android:name="android.intent.action.MAIN" />
            <category android:name="android.intent.category.LAUNCHER" />
        </intent-filter>
    </activity>
</application>
修改完成后,运行项目即可看到系统标题栏已隐藏。
定义颜色资源
为了统一管理界面颜色,避免硬编码,我们在res/values/colors.xml中定义项目所需颜色:
xml
<?xml version="1.0" encoding="utf-8"?>
<resources>
    <!-- 系统默认颜色 -->
    <color name="colorPrimary">#008577</color>
    <color name="colorPrimaryDark">#00574B</color>
    <color name="colorAccent">#D81B60</color>

    <!-- 项目自定义颜色 -->
    <color name="light_gray_color">#eeeeee</color>  <!-- 浅灰色:列表背景 -->
    <color name="gray_color">#828282</color>        <!-- 深灰色:辅助文字 -->
</resources>颜色说明:
light_gray_color:用于主界面背景,区分列表条目白色背景;gray_color:用于新闻发布者、评论数、时间等辅助文字,提升 UI 层次感。
定义样式资源
为了复用控件属性 ,减少重复代码,我们在res/values/styles.xml中定义三种核心样式:
xml
<resources>
    <!-- 应用基础主题 -->
    <style name="AppTheme" parent="Theme.AppCompat.Light.NoActionBar">
        <item name="colorPrimary">@color/colorPrimary</item>
        <item name="colorPrimaryDark">@color/colorPrimaryDark</item>
        <item name="colorAccent">@color/colorAccent</item>
    </style>

    <!-- 1. 顶部频道栏文字样式 -->
    <style name="tvStyle" >
        <item name="android:layout_width">wrap_content</item>
        <item name="android:layout_height">match_parent</item>
        <item name="android:padding">10dp</item>
        <item name="android:gravity">center</item>
        <item name="android:textSize">15sp</item>
    </style>

    <!-- 2. 新闻信息栏文字样式(发布者、评论、时间) -->
    <style name="tvInfo" >
        <item name="android:layout_width">wrap_content</item>
        <item name="android:layout_height">wrap_content</item>
        <item name="android:layout_marginLeft">8dp</item>
        <item name="android:layout_gravity">center_vertical</item>
        <item name="android:textSize">14sp</item>
        <item name="android:textColor">@color/gray_color</item>
    </style>

    <!-- 3. 三图条目图片样式 -->
    <style name="ivImg" >
        <item name="android:layout_width">0dp</item>
        <item name="android:layout_height">90dp</item>
        <item name="android:layout_weight">1</item>
        <item name="android:layout_toRightOf">@id/ll_info</item>
    </style>
</resources>样式作用:
tvStyle:统一顶部频道栏(推荐、抗疫、小视频等)文字的大小、间距、对齐方式;tvInfo:统一所有新闻条目底部信息文字的样式,避免重复编写属性;ivImg:统一三图条目的图片大小、权重,实现三等分布局。
样式复用是 Android 开发的最佳实践,能大幅减少 XML 代码量,提升维护效率。
定义字符串资源
在res/values/strings.xml中定义应用名称,遵循 Android 资源管理规范:
xml
<resources>
    <string name="app_name">HeadLine</string>
</resources>至此,项目前期准备工作全部完成,接下来进入核心环节:布局资源编写与控件解析。
项目布局资源全解析(XML 文件 + 控件用法)
Android 的界面开发基于XML 布局文件 ,布局文件负责定义界面的结构和控件位置,Java 代码负责逻辑处理。本项目共包含5 个核心布局文件,分别对应不同的界面模块,我们将逐个解析布局结构、所用控件、控件属性及用法。
布局文件总览
表格
| 布局文件名 | 作用 | 核心控件 |
|---|---|---|
activity_main.xml |
主界面布局(标题栏 + 频道栏 + RecyclerView) | LinearLayout、TextView、RecyclerView、View |
title_bar.xml |
自定义标题栏 | LinearLayout、TextView、EditText |
list_item_one.xml |
单图 / 置顶新闻条目布局 | RelativeLayout、LinearLayout、ImageView、TextView |
list_item_two.xml |
三图新闻条目布局 | RelativeLayout、LinearLayout、ImageView、TextView |
核心布局控件基础
在解析布局前,先介绍本项目用到的核心布局容器 和基础控件,这是理解布局的基础:
核心布局容器
-
LinearLayout(线性布局)
-
作用:按照 水平(horizontal) 或 垂直(vertical) 方向依次排列子控件;
-
核心属性:
android:orientation:排列方向(horizontal/vertical);android:layout_weight:权重,用于平分剩余空间;android:gravity:子控件对齐方式;
-
本项目用途:标题栏、频道栏、信息栏、三图布局。
-
-
RelativeLayout(相对布局)
-
作用:以相对位置排列子控件(相对于父容器、相对于其他控件);
-
核心属性:
android:layout_below:位于某控件下方;android:layout_toRightOf:位于某控件右侧;android:layout_alignParentBottom:与父容器底部对齐;
-
本项目用途:新闻条目布局,灵活控制控件位置。
-
核心界面控件
-
TextView(文本控件)
- 作用:显示文字内容;
- 核心属性:
text(文字)、textSize(文字大小)、textColor(文字颜色)、maxLines(最大行数)、gravity(文字对齐); - 本项目用途:标题、频道、新闻标题、信息栏文字。
-
ImageView(图片控件)
- 作用:显示图片资源;
- 核心属性:
src(图片资源)、layout_width/height(宽高)、visibility(可见性); - 本项目用途:新闻图片、置顶图标。
-
EditText(输入框控件)
- 作用:接收用户输入;
- 核心属性:
hint(提示文字)、background(背景)、padding(内边距); - 本项目用途:标题栏搜索框。
-
View(基础视图控件)
- 作用:绘制分割线、占位符;
- 本项目用途:频道栏与列表之间的分割线。
-
RecyclerView(列表控件)
- 作用:展示大量列表数据,支持复用、多布局;
- 核心属性:
id(唯一标识)、layout_width/height(宽高); - 本项目用途:新闻推荐列表。
自定义标题栏布局:title_bar.xml
布局代码
xml
    <?xml version="1.0" encoding="utf-8"?>
    <LinearLayout xmlns:android="http://schemas.android.com/apk/res/android"
        android:layout_width="match_parent"
        android:layout_height="50dp"
        android:background="#d33d3c"
        android:orientation="horizontal"
        android:paddingLeft="10dp"
        android:paddingRight="10dp">

        <!-- 应用标题 -->
        <TextView
            android:layout_width="wrap_content"
            android:layout_height="wrap_content"
            android:layout_gravity="center"
            android:text="仿今日头条"
            android:textColor="@android:color/white"
            android:textSize="22sp" />

        <!-- 搜索框 -->
        <EditText
            android:layout_width="match_parent"
            android:layout_height="35dp"
            android:layout_gravity="center_vertical"
            android:layout_marginStart="15dp"
            android:layout_marginLeft="5dp"
            android:layout_marginRight="15dp"
            android:background="@drawable/search_bg"
            android:gravity="center_vertical"
            android:textColor="@android:color/black"
            android:hint="搜你想搜的"
            android:textColorHint="@color/gray_color"
            android:textSize="14sp"
            android:paddingLeft="30dp" />
    </LinearLayout>
3.3.2 布局解析
-
根布局 :
LinearLayout,水平方向,高度固定 50dp,背景色为今日头条红色(#d33d3c),左右内边距 10dp; -
TextView 控件:
- 作用:显示「仿今日头条」标题;
- 属性:
layout_gravity="center"垂直居中,白色文字,22sp 字号;
- EditText 控件:
-
作用:搜索框,模拟今日头条搜索功能;
-
核心属性:
background="@drawable/search_bg":设置自定义搜索框背景;hint="搜你想搜的":默认提示文字;textColorHint="@color/gray_color":提示文字颜色为深灰色;paddingLeft="30dp":左内边距,避免文字紧贴背景图标;
- 布局复用 :该布局通过
<include>标签引入主界面,实现模块化开发。
主界面布局:activity_main.xml
布局代码
xml
<?xml version="1.0" encoding="utf-8"?>
<LinearLayout xmlns:android="http://schemas.android.com/apk/res/android"
    android:layout_width="match_parent"
    android:layout_height="match_parent"
    android:background="@color/light_gray_color"
    android:orientation="vertical">

    <!-- 引入自定义标题栏 -->
    <include layout="@layout/title_bar" />

    <!-- 顶部频道栏 -->
    <LinearLayout
        android:layout_width="match_parent"
        android:layout_height="40dp"
        android:background="@android:color/white"
        android:orientation="horizontal">
        <TextView
            style="@style/tvStyle"
            android:text="推荐"
            android:textColor="@android:color/holo_red_dark" />
        <TextView
            style="@style/tvStyle"
            android:text="抗疫"
            android:textColor="@color/gray_color" />
        <TextView
            style="@style/tvStyle"
            android:text="小视频"
            android:textColor="@color/gray_color" />
        <TextView
            style="@style/tvStyle"
            android:text="北京"
            android:textColor="@color/gray_color" />
        <TextView
            style="@style/tvStyle"
            android:text="视频"
            android:textColor="@color/gray_color" />
        <TextView
            style="@style/tvStyle"
            android:text="热点"
            android:textColor="@color/gray_color" />
        <TextView
            style="@style/tvStyle"
            android:text="娱乐"
            android:textColor="@color/gray_color" />
    </LinearLayout>

    <!-- 分割线 -->
    <View
        android:layout_width="match_parent"
        android:layout_height="1dp"
        android:background="#eeeeee" />

    <!-- 核心:新闻列表RecyclerView -->
    <android.support.v7.widget.RecyclerView
        android:id="@+id/rv_list"
        android:layout_width="match_parent"
        android:layout_height="match_parent" />
</LinearLayout>
布局解析
-
根布局 :垂直方向 LinearLayout,全屏宽高,背景为浅灰色(
light_gray_color); -
标题栏引入 :
<include layout="@layout/title_bar" />,复用标题栏布局; -
频道栏:
- 水平 LinearLayout,白色背景,高度 40dp;
- 7 个 TextView,全部使用
@style/tvStyle样式,统一外观; - 「推荐」文字为红色(选中状态),其余为深灰色;
-
分割线:View 控件,高度 1dp,浅灰色背景,分隔频道栏和列表;
-
RecyclerView 控件:
- 核心列表控件,
id="@+id/rv_list"(Java 代码中绑定的唯一标识); - 宽高全屏,填充剩余所有空间;
- 注意:使用 support 库时标签为
android.support.v7.widget.RecyclerView,AndroidX 为androidx.recyclerview.widget.RecyclerView。
- 核心列表控件,
控件用法总结
- include 标签:模块化布局,减少代码冗余,适合复用标题栏、底部栏;
- View 分割线:轻量级分割线,比 ImageView 更高效;
- 样式复用 :频道栏 TextView 统一使用
tvStyle,无需重复编写宽高、间距; - RecyclerView:仅需定义 id 和宽高,具体布局、数据由 Java 代码控制。
单图 / 置顶新闻条目布局:list_item_one.xml
该布局对应新闻类型 1,用于展示置顶新闻或单张图片新闻,是项目中最常用的条目布局。
布局代码
xml
<?xml version="1.0" encoding="utf-8"?>
<RelativeLayout
    xmlns:android="http://schemas.android.com/apk/res/android"
    android:layout_width="match_parent"
    android:layout_height="90dp"
    android:layout_marginBottom="8dp"
    android:background="@android:color/white"
    android:padding="8dp">

    <!-- 左侧文字信息区域 -->
    <LinearLayout
        android:id="@+id/ll_info"
        android:layout_width="wrap_content"
        android:layout_height="wrap_content"
        android:orientation="vertical">

        <!-- 新闻标题 -->
        <TextView
            android:id="@+id/tv_title"
            android:layout_width="280dp"
            android:layout_height="wrap_content"
            android:maxLines="2"
            android:textColor="#3c3c3c"
            android:textSize="16sp" />

        <!-- 底部信息栏(置顶图标+发布者+评论+时间) -->
        <RelativeLayout
            android:layout_width="match_parent"
            android:layout_height="match_parent">
            <!-- 置顶图标 -->
            <ImageView
                android:id="@+id/iv_top"
                android:layout_width="20dp"
                android:layout_height="20dp"
                android:layout_alignParentBottom="true"
                android:src="@drawable/top" />
            <!-- 信息文字 -->
            <LinearLayout
                android:layout_width="match_parent"
                android:layout_height="wrap_content"
                android:layout_alignParentBottom="true"
                android:layout_toRightOf="@id/iv_top"
                android:orientation="horizontal">
                <TextView
                    android:id="@+id/tv_name"
                    style="@style/tvInfo" />
                <TextView
                    android:id="@+id/tv_comment"
                    style="@style/tvInfo" />
                <TextView
                    android:id="@+id/tv_time"
                    style="@style/tvInfo" />
            </LinearLayout>
        </RelativeLayout>
    </LinearLayout>

    <!-- 右侧新闻图片 -->
    <ImageView
        android:id="@+id/iv_img"
        android:layout_width="match_parent"
        android:layout_height="90dp"
        android:layout_toRightOf="@id/ll_info"
        android:padding="3dp" />
</RelativeLayout>
布局解析
-
根布局:RelativeLayout,固定高度 90dp,白色背景,底部外边距 8dp(分隔条目),内边距 8dp;
-
左侧信息区域(ll_info) :
- 垂直 LinearLayout,包含新闻标题和底部信息栏;
- 新闻标题(tv_title) :宽度 280dp,最大显示 2 行(
maxLines="2"),黑色文字,16sp 字号,避免文字过长撑开布局; - 置顶图标(iv_top) :20dp×20dp,与父容器底部对齐,默认显示置顶图标;
- 信息文字 :发布者、评论数、时间,统一使用
tvInfo样式,水平排列;
-
右侧图片(iv_img) :
- 位于左侧信息区域右侧(
layout_toRightOf="@id/ll_info"); - 高度 90dp,与条目高度一致,内边距 3dp,避免图片紧贴边框;
- 位于左侧信息区域右侧(
-
核心逻辑:
- 置顶新闻:隐藏图片(
iv_img),显示置顶图标(iv_top); - 单图新闻:隐藏置顶图标,显示新闻图片;
- 该逻辑由 Java 代码中的
setVisibility()控制。
- 置顶新闻:隐藏图片(
3.5.3 所用控件与属性
| 控件 | ID | 作用 | 核心属性 |
|---|---|---|---|
| RelativeLayout | - | 条目根容器 | 固定高度、外边距、内边距 |
| LinearLayout | ll_info | 左侧文字容器 | 垂直排列 |
| TextView | tv_title | 新闻标题 | maxLines="2"、文字大小 / 颜色 |
| ImageView | iv_top | 置顶图标 | 底部对齐、图片资源 |
| TextView | tv_name/tv_comment/tv_time | 信息文字 | 样式复用 |
| ImageView | iv_img | 新闻单图 | 右侧布局、宽高 |
三图新闻条目布局:list_item_two.xml
该布局对应新闻类型 2,用于展示包含三张图片的新闻,还原今日头条三图条目样式。
布局代码
xml
<?xml version="1.0" encoding="utf-8"?>
<RelativeLayout
    xmlns:android="http://schemas.android.com/apk/res/android"
    android:layout_width="match_parent"
    android:layout_height="wrap_content"
    android:layout_marginBottom="8dp"
    android:background="@android:color/white">

    <!-- 新闻标题 -->
    <TextView
        android:id="@+id/tv_title"
        android:layout_width="match_parent"
        android:layout_height="wrap_content"
        android:maxLines="2"
        android:padding="8dp"
        android:textColor="#3c3c3c"
        android:textSize="16sp" />

    <!-- 三张新闻图片 -->
    <LinearLayout
        android:id="@+id/ll_img"
        android:layout_width="match_parent"
        android:layout_height="wrap_content"
        android:layout_below="@id/tv_title"
        android:orientation="horizontal">
        <ImageView
            android:id="@+id/iv_img1"
            style="@style/ivImg"/>
        <ImageView
            android:id="@+id/iv_img2"
            style="@style/ivImg"/>
        <ImageView
            android:id="@+id/iv_img3"
            style="@style/ivImg"/>
    </LinearLayout>

    <!-- 底部信息栏 -->
    <LinearLayout
        android:layout_width="wrap_content"
        android:layout_height="wrap_content"
        android:layout_below="@id/ll_img"
        android:orientation="vertical"
        android:padding="8dp">
        <LinearLayout
            android:layout_width="match_parent"
            android:layout_height="wrap_content"
            android:orientation="horizontal">
            <TextView
                android:id="@+id/tv_name"
                style="@style/tvInfo" />
            <TextView
                android:id="@+id/tv_comment"
                style="@style/tvInfo" />
            <TextView
                android:id="@+id/tv_time"
                style="@style/tvInfo" />
        </LinearLayout>
    </LinearLayout>
</RelativeLayout>
布局解析
-
根布局 :RelativeLayout,高度自适应(
wrap_content),白色背景,底部外边距 8dp; -
新闻标题:全屏宽度,最大 2 行,内边距 8dp,与单图条目标题样式一致;
-
三图区域(ll_img) :
-
水平 LinearLayout,位于标题下方(
layout_below="@id/tv_title"); -
3 个 ImageView,统一使用
ivImg样式:- 宽度 0dp,权重 1,实现三等分屏幕宽度;
- 高度 90dp,保证图片大小统一;
-
-
底部信息栏 :与单图条目完全一致,复用
tvInfo样式,保证 UI 统一性; -
布局优势:高度自适应,三张图片自动平分宽度,UI 简洁美观。
控件用法总结
- 权重适配 :
layout_weight="1"是实现多控件平分宽度的核心属性; - 相对定位 :
layout_below实现控件上下排列,无需固定高度; - 样式复用:图片和文字全部使用样式,保证全项目 UI 统一;
- 自适应高度 :根布局使用
wrap_content,适配不同长度的标题。
布局资源总结
本项目所有布局均采用模块化、复用化设计,核心特点:
- 根布局选择:标题栏 / 频道栏用 LinearLayout(线性排列),条目布局用 RelativeLayout(灵活定位);
- 控件复用:TextView、ImageView 全部使用样式,减少重复代码;
- 适配优化:使用 dp 作为尺寸单位,sp 作为文字单位,适配不同屏幕;
- 视觉优化:添加内边距、外边距、分割线,提升 UI 层次感;
- 唯一 ID:所有需要 Java 代码绑定的控件都设置了唯一 id,方便 findViewById。
数据模型封装:NewsBean 实体类
在 Android 开发中,** 实体类(Bean)** 用于封装业务数据,是连接数据和界面的核心模型。本项目的新闻数据包含多个字段,我们创建NewsBean类统一封装。
实体类作用
- 封装新闻的所有属性(id、标题、图片、发布者、评论数、时间、类型);
- 提供 get/set 方法,供 Java 代码读取和修改数据;
- 作为 RecyclerView 列表的数据源,统一数据格式。
NewsBean 代码实现
java
package cn.edu.headline;
import java.util.List;

public class NewsBean {
    // 新闻ID
    private int id;
    // 新闻标题
    private String title;
    // 新闻图片集合(支持多张图片)
    private List<Integer> imgList;
    // 发布者名称
    private String name;
    // 评论数量
    private String comment;
    // 发布时间
    private String time;
    // 新闻类型(1=单图/置顶,2=三图)
    private int type;

    // get和set方法
    public int getId() {
        return id;
    }

    public void setId(int id) {
        this.id = id;
    }

    public String getTitle() {
        return title;
    }

    public void setTitle(String title) {
        this.title = title;
    }

    public String getName() {
        return name;
    }

    public void setName(String name) {
        this.name = name;
    }

    public String getComment() {
        return comment;
    }

    public void setComment(String comment) {
        this.comment = comment;
    }

    public String getTime() {
        return time;
    }

    public void setTime(String time) {
        this.time = time;
    }

    public List<Integer> getImgList() {
        return imgList;
    }

    public void setImgList(List<Integer> imgList) {
        this.imgList = imgList;
    }

    public int getType() {
        return type;
    }

    public void setType(int type) {
        this.type = type;
    }
}
核心字段解析
private int id:新闻唯一标识,用于区分不同新闻;private String title:新闻标题字符串;private List<Integer> imgList:核心字段,存储新闻图片的资源 ID(int 类型),使用 List 集合支持多张图片;private String name/comment/time:辅助信息,字符串类型;private int type:多类型核心字段,1 代表单图 / 置顶条目,2 代表三图条目,适配器通过该字段加载不同布局。
实体类规范
- 所有字段私有化(private),保证数据安全性;
- 提供公共的 get/set 方法,外部类只能通过方法访问数据;
- 字段命名见名知意,符合 Java 驼峰命名规范;
- 集合类型用于存储多张图片,扩展性强。
核心组件:RecyclerView 适配器(NewsAdapter)深度解析
RecyclerView 的核心工作原理 是:适配器(Adapter)+ 视图持有者(ViewHolder)+ 布局管理器(LayoutManager) 。其中适配器是连接数据和列表的桥梁,负责:
- 创建列表条目视图;
- 绑定数据到视图控件;
- 处理多类型条目布局;
- 返回条目数量。
本项目的适配器NewsAdapter实现了多类型条目适配,是整个项目的核心,我们将逐行解析代码逻辑。
RecyclerView 适配器基础概念
- ViewHolder:视图持有者,缓存条目布局中的控件,避免重复 findViewById,提升性能;
- onCreateViewHolder() :创建条目视图,加载 XML 布局,返回 ViewHolder;
- onBindViewHolder() :绑定数据到 ViewHolder 中的控件,刷新界面;
- getItemCount() :返回列表总条目数;
- getItemViewType() :返回条目类型,实现多布局适配。
NewsAdapter 完整代码
java
package cn.edu.headline;

import android.content.Context;
import android.support.annotation.NonNull;
import android.support.v7.widget.RecyclerView;
import android.view.LayoutInflater;
import android.view.View;
import android.view.ViewGroup;
import android.widget.ImageView;
import android.widget.TextView;

import java.util.List;

public class NewsAdapter extends RecyclerView.Adapter<RecyclerView.ViewHolder> {
    // 上下文对象
    private Context mContext;
    // 新闻数据源
    private List<NewsBean> NewsList;

    // 构造方法:传入上下文和数据源
    public NewsAdapter(Context context,List<NewsBean> NewsList) {
        this.mContext = context;
        this.NewsList=NewsList;
    }

    // 1. 创建条目视图,根据类型加载不同布局
    @NonNull
    @Override
    public RecyclerView.ViewHolder onCreateViewHolder(@NonNull ViewGroup parent, int viewType) {
        View itemView=null;
        RecyclerView.ViewHolder holder=null;
        // 类型1:加载单图/置顶条目布局
        if (viewType == 1){
            itemView = LayoutInflater.from(mContext).inflate(R.layout.list_item_one, parent, false);
            holder= new MyViewHolder1(itemView);
        }
        // 类型2:加载三图条目布局
        else if (viewType == 2){
            itemView = LayoutInflater.from(mContext).inflate(R.layout.list_item_two, parent, false);
            holder= new MyViewHolder2(itemView);
        }
        return holder;
    }

    // 2. 获取条目类型(根据NewsBean中的type字段)
    @Override
    public int getItemViewType(int position) {
        return NewsList.get(position).getType();
    }

    // 3. 绑定数据到控件
    @Override
    public void onBindViewHolder(@NonNull RecyclerView.ViewHolder holder, int position) {
        // 获取当前位置的新闻数据
        NewsBean bean=NewsList.get(position);
        // 判断ViewHolder类型,对应不同条目
        if (holder instanceof MyViewHolder1){
            MyViewHolder1 holder1 = (MyViewHolder1) holder;
            // 置顶新闻:第一个条目,显示置顶图标,隐藏图片
            if (position==0) {
                holder1.iv_top.setVisibility(View.VISIBLE);
                holder1.iv_img.setVisibility(View.GONE);
            }
            // 单图新闻:隐藏置顶图标,显示图片
            else {
                holder1.iv_top.setVisibility(View.GONE);
                holder1.iv_img.setVisibility(View.VISIBLE);
            }
            // 设置文字数据
            holder1.title.setText(bean.getTitle());
            holder1.name.setText(bean.getName());
            holder1.comment.setText(bean.getComment());
            holder1.time.setText(bean.getTime());
            // 设置图片数据(判断图片集合是否为空)
            if (bean.getImgList().size()==0)return;
            holder1.iv_img.setImageResource(bean.getImgList().get(0));
        }
        // 三图条目
        else if (holder instanceof MyViewHolder2){
            MyViewHolder2 holder2 = (MyViewHolder2) holder;
            // 设置文字数据
            holder2.title.setText(bean.getTitle());
            holder2.name.setText(bean.getName());
            holder2.comment.setText(bean.getComment());
            holder2.time.setText(bean.getTime());
            // 设置三张图片
            holder2.iv_img1.setImageResource(bean.getImgList().get(0));
            holder2.iv_img2.setImageResource(bean.getImgList().get(1));
            holder2.iv_img3.setImageResource(bean.getImgList().get(2));
        }
    }

    // 4. 返回列表总条目数
    @Override
    public int getItemCount() {
        return NewsList.size();
    }

    // 视图持有者1:单图/置顶条目
    class MyViewHolder1 extends RecyclerView.ViewHolder {
        ImageView iv_top,iv_img;
        TextView title,name,comment,time;
        public MyViewHolder1(View view) {
            super(view);
            // 绑定控件
            iv_top = view.findViewById(R.id.iv_top);
            iv_img = view.findViewById(R.id.iv_img);
            title = view.findViewById(R.id.tv_title);
            name = view.findViewById(R.id.tv_name);
            comment = view.findViewById(R.id.tv_comment);
            time = view.findViewById(R.id.tv_time);
        }
    }

    // 视图持有者2:三图条目
    class MyViewHolder2 extends RecyclerView.ViewHolder {
        ImageView iv_img1,iv_img2,iv_img3;
        TextView title,name,comment,time;
        public MyViewHolder2(View view) {
            super(view);
            // 绑定控件
            iv_img1 = view.findViewById(R.id.iv_img1);
            iv_img2 = view.findViewById(R.id.iv_img2);
            iv_img3 = view.findViewById(R.id.iv_img3);
            title = view.findViewById(R.id.tv_title);
            name = view.findViewById(R.id.tv_name);
            comment = view.findViewById(R.id.tv_comment);
            time = view.findViewById(R.id.tv_time);
        }
    }
}
适配器核心方法逐行解析
成员变量与构造方法
java
运行
kotlin
private Context mContext;       // 上下文:用于加载布局、获取资源
private List<NewsBean> NewsList; // 数据源:新闻集合

// 构造方法:外部传入上下文和数据,初始化适配器
public NewsAdapter(Context context,List<NewsBean> NewsList) {
    this.mContext = context;
    this.NewsList=NewsList;
}- 上下文
Context是 Android 核心组件,用于加载 XML 布局; - 数据源
List<NewsBean>是列表的所有数据,适配器从该集合中获取数据。
获取条目类型:getItemViewType ()
java
运行
arduino
@Override
public int getItemViewType(int position) {
    return NewsList.get(position).getType();
}- 重写该方法,返回当前位置新闻的
type字段; - RecyclerView 根据返回值(1/2)判断加载哪种布局;
- 这是实现多类型条目的核心方法。
创建条目视图:onCreateViewHolder ()
java
@Override
public RecyclerView.ViewHolder onCreateViewHolder(@NonNull ViewGroup parent, int viewType) {
    View itemView=null;
    RecyclerView.ViewHolder holder=null;
    // 根据viewType加载不同布局
    if (viewType == 1){
        // 加载单图布局
        itemView = LayoutInflater.from(mContext).inflate(R.layout.list_item_one, parent, false);
        holder= new MyViewHolder1(itemView);
    }else if (viewType == 2){
        // 加载三图布局
        itemView = LayoutInflater.from(mContext).inflate(R.layout.list_item_two, parent, false);
        holder= new MyViewHolder2(itemView);
    }
    return holder;
}-
LayoutInflater:布局加载器,将 XML 布局转换为 View 对象;
-
inflate () 参数:
- 第一个参数:布局资源 ID;
- 第二个参数:父容器;
- 第三个参数:是否附加到父容器(必须为 false,RecyclerView 自动管理);
-
根据
viewType创建对应的 ViewHolder,返回给 RecyclerView。
绑定数据:onBindViewHolder ()
这是适配器最核心的方法,负责将数据设置到控件上:
- 获取数据 :通过 position 获取当前新闻对象
NewsBean; - 判断 ViewHolder 类型:区分单图 / 三图条目;
- 置顶逻辑:第一个条目显示置顶图标,隐藏图片;
- 设置文字 :调用 TextView 的
setText()方法; - 设置图片 :调用 ImageView 的
setImageResource()方法,传入图片资源 ID; - 判空处理:避免图片集合为空导致崩溃。
视图持有者(ViewHolder)
适配器定义了两个内部类 ViewHolder,分别对应两种条目:
- MyViewHolder1 :绑定
list_item_one.xml中的所有控件; - MyViewHolder2 :绑定
list_item_two.xml中的所有控件; - ViewHolder 的作用:缓存控件,只在创建时 findViewById 一次,后续直接使用,避免重复查找控件,大幅提升列表滑动性能。
RecyclerView 多类型实现原理总结
- 实体类中定义
type字段标记条目类型; - 适配器重写
getItemViewType()返回类型; onCreateViewHolder()根据类型加载不同布局;onBindViewHolder()根据类型绑定不同数据;- 两个 ViewHolder 分别管理两种布局的控件。
这是 Android 开发中多类型列表的标准实现方案,适用于所有复杂列表场景。
主界面逻辑实现:MainActivity
MainActivity 是项目的主控制器,负责:
- 初始化控件;
- 构造新闻数据源;
- 配置 RecyclerView;
- 绑定适配器,显示列表数据。
MainActivity 完整代码
java
package cn.edu.headline;

import android.os.Bundle;
import android.support.v7.app.AppCompatActivity;
import android.support.v7.widget.LinearLayoutManager;
import android.support.v7.widget.RecyclerView;

import java.util.ArrayList;
import java.util.List;

public class MainActivity extends AppCompatActivity {
    // 新闻标题数组
    private String[] titles = {"各地餐企齐行动,杜绝餐饮浪费",
            "花菜有人焯水,有人直接炒,都错了,看饭店大厨如何做",
            "睡觉时,双脚突然蹬一下,有踩空感,像从高楼坠落,是咋回事?",
            "实拍外卖小哥砸开小吃店的卷帘门救火,灭火后淡定继续送外卖",
            "还没成熟就被迫提前采摘,8毛一斤却没人要,果农无奈:不摘不行",
            "大会、大展、大赛一起来,北京电竞"好嗨哟""};
    // 发布者数组
    private String[] names = {"央视新闻客户端", "味美食记", "民富康健康", "生活小记",
            "禾木报告", "燕鸣"};
    // 评论数数组
    private String[] comments = {"9884评", "18评", "78评", "678评", "189评",
            "304评"};
    // 发布时间数组
    private String[] times = {"6小时前", "刚刚", "1小时前", "2小时前", "3小时前",
            "4个小时前"};
    // 单图图片数组
    private int[] icons1 = {R.drawable.food, R.drawable.takeout,
            R.drawable.e_sports};
    // 三图图片数组
    private int[] icons2 = {R.drawable.sleep1, R.drawable.sleep2, R.drawable.sleep3,
            R.drawable.fruit1,R.drawable.fruit2, R.drawable.fruit3};
    // 新闻类型数组
    private int[] types = {1, 1, 2, 1, 2, 1};

    // RecyclerView控件
    private RecyclerView mRecyclerView;
    // 适配器
    private NewsAdapter mAdapter;
    // 新闻数据源集合
    private List<NewsBean> NewsList;

    @Override
    protected void onCreate(Bundle savedInstanceState) {
        super.onCreate(savedInstanceState);
        // 加载主界面布局
        setContentView(R.layout.activity_main);
        // 构造新闻数据
        setData();
        // 初始化RecyclerView
        mRecyclerView = findViewById(R.id.rv_list);
        // 设置布局管理器:线性垂直布局
        mRecyclerView.setLayoutManager(new LinearLayoutManager(this));
        // 初始化适配器
        mAdapter = new NewsAdapter(MainActivity.this, NewsList);
        // 绑定适配器到RecyclerView
        mRecyclerView.setAdapter(mAdapter);
    }

    // 构造新闻数据源
    private void setData() {
        NewsList = new ArrayList<NewsBean>();
        NewsBean bean;
        // 循环遍历数组,封装NewsBean对象
        for (int i = 0; i < titles.length; i++) {
            bean = new NewsBean();
            bean.setId(i + 1);
            bean.setTitle(titles[i]);
            bean.setName(names[i]);
            bean.setComment(comments[i]);
            bean.setTime(times[i]);
            bean.setType(types[i]);
            // 为不同位置的新闻设置图片集合
            switch (i) {
                case 0: // 置顶新闻:无图片
                    List<Integer> imgList0 = new ArrayList<>();
                    bean.setImgList(imgList0);
                    break;
                case 1:// 单图新闻
                    List<Integer> imgList1 = new ArrayList<>();
                    imgList1.add(icons1[i - 1]);
                    bean.setImgList(imgList1);
                    break;
                case 2:// 三图新闻
                    List<Integer> imgList2 = new ArrayList<>();
                    imgList2.add(icons2[i - 2]);
                    imgList2.add(icons2[i - 1]);
                    imgList2.add(icons2[i]);
                    bean.setImgList(imgList2);
                    break;
                case 3:// 单图新闻
                    List<Integer> imgList3 = new ArrayList<>();
                    imgList3.add(icons1[i - 2]);
                    bean.setImgList(imgList3);
                    break;
                case 4:// 三图新闻
                    List<Integer> imgList4 = new ArrayList<>();
                    imgList4.add(icons2[i - 1]);
                    imgList4.add(icons2[i]);
                    imgList4.add(icons2[i + 1]);
                    bean.setImgList(imgList4);
                    break;
                case 5:// 单图新闻
                    List<Integer> imgList5 = new ArrayList<>();
                    imgList5.add(icons1[i - 3]);
                    bean.setImgList(imgList5);
                    break;
            }
            // 将Bean对象添加到集合
            NewsList.add(bean);
        }
    }
}
核心逻辑解析
数据定义
- 使用数组定义所有新闻数据(标题、发布者、评论、时间、图片、类型);
- 数组长度一致(6 条数据),通过下标一一对应;
- 图片分为单图数组
icons1和三图数组icons2,方便适配不同条目。
onCreate () 生命周期方法
Activity 创建时执行的核心逻辑:
setContentView(R.layout.activity_main):加载主界面布局;setData():调用方法构造新闻数据源;findViewById(R.id.rv_list):绑定 RecyclerView 控件;setLayoutManager():必须设置布局管理器,RecyclerView 才能显示(线性布局);new NewsAdapter():创建适配器,传入上下文和数据;setAdapter():将适配器绑定到 RecyclerView,显示列表。
setData () 构造数据源
-
创建
List<NewsBean>集合存储所有新闻; -
循环遍历数组,创建
NewsBean对象,设置所有属性; -
使用
switch语句为不同位置的新闻设置图片集合:- 第 0 条:置顶新闻,空图片集合;
- 第 1/3/5 条:单图新闻,添加 1 张图片;
- 第 2/4 条:三图新闻,添加 3 张图片;
-
最后将 Bean 对象添加到集合,完成数据源构造。
RecyclerView 配置核心要点
-
必须设置布局管理器:RecyclerView 没有默认布局管理器,不设置则列表不显示;
LinearLayoutManager:线性垂直 / 水平布局;GridLayoutManager:网格布局;StaggeredGridLayoutManager:瀑布流布局;
-
适配器与数据源绑定:适配器必须持有数据源,才能显示数据;
-
控件初始化 :通过
findViewById绑定 RecyclerView,id 与 XML 一致。
3 自定义 View
核心目标:掌握自定义 View 的 3 个核心方法,能够在界面中绘制一个圆形图案。
3.1 自定义 View 的背景
Android 系统提供的控件多为 View 的子类,实际开发中若系统控件无法满足样式 / 功能需求,可通过自定义 View实现,最简单的方式是创建类继承 View(或其子类),并重写构造方法。
3.2 自定义 View 的基础实现
构造方法重写(两种)
运行
java
public class Customview extends View{
    // Java代码中创建对象时使用
    public Customview(Context context) {
        super(context);
    }
    // XML布局中引入自定义控件时使用
    public Customview(Context context, AttributeSet attrs) {
        super(context, attrs);
    }
}
自定义 View 的 3 个核心方法
| 方法名称 | 功能 |
|---|---|
| onMeasure() | 用于测量控件尺寸 |
| onDraw() | 用于绘制图像 / 样式 |
| onLayout() | 用于指定布局中子控件的位置 |