Tauri 2.10 + NSIS 打包踩坑实录:解决 Windows 系统 NSIS 下载失败的方法(附资源包)
🎯 问题背景
最近在使用 Tauri 2.10 框架进行 Windows 应用打包时,遇到了一个棘手的 NSIS 下载失败问题。错误信息如下:
Warn Failed to add bundler type to the binary: __TAURI_BUNDLE_TYPE variable not found in binary. Make sure tauri crate and tauri-cli are up to date. Updater plugin may not be able to update this package. This shouldn't normally happen, please report it to https://github.com/tauri-apps/tauri/issues Info Verifying NSIS package Downloading https://github.com/tauri-apps/binary-releases/releases/download/nsis-3.11/nsis-3.11.zip
Error failed to verify TLS certificate: invalid peer certificate: UnknownIssuer
failed to bundle project `io: invalid peer certificate: UnknownIssuer`
Error failed to bundle project `io: invalid peer certificate: UnknownIssuer`
ELIFECYCLE  Command failed with exit code 1.
这个错误导致 Tauri 无法自动下载 NSIS 打包工具,影响了应用的正常打包流程。经过多方尝试,我总结出了一套完整的解决方案。
🔍 问题分析
根本原因
Tauri 在打包 Windows 安装程序时,需要依赖 NSIS(Nullsoft Scriptable Install System)工具。默认情况下,Tauri 会从 GitHub Releases 自动下载两个关键文件:
- NSIS 3.11 主程序 (
nsis-3.11.zip) - Tauri NSIS 插件 (
nsis_tauri_utils.dll)
但在某些网络环境下,特别是企业内网或特殊网络配置的环境,会出现 TLS 证书验证失败的问题。
错误表现
- 网络连接正常,但下载失败
- 错误提示涉及证书验证(
UnknownIssuer) - 自动重试多次仍失败
- 影响整个打包流程
📦 解决方案:离线部署 NSIS
方法一:手动部署(推荐)
首先我们来看下 tauri配置文件tauri.conf.json中的NSIS打包配置:
xml
"bundle": {
    "active": true,
    "targets": [
      "nsis"
    ],
然后找到github上tauri-bundler的源码查看下一下:
https://github.com/tauri-apps/tauri/blob/dev/crates/tauri-bundler/src/bundle/
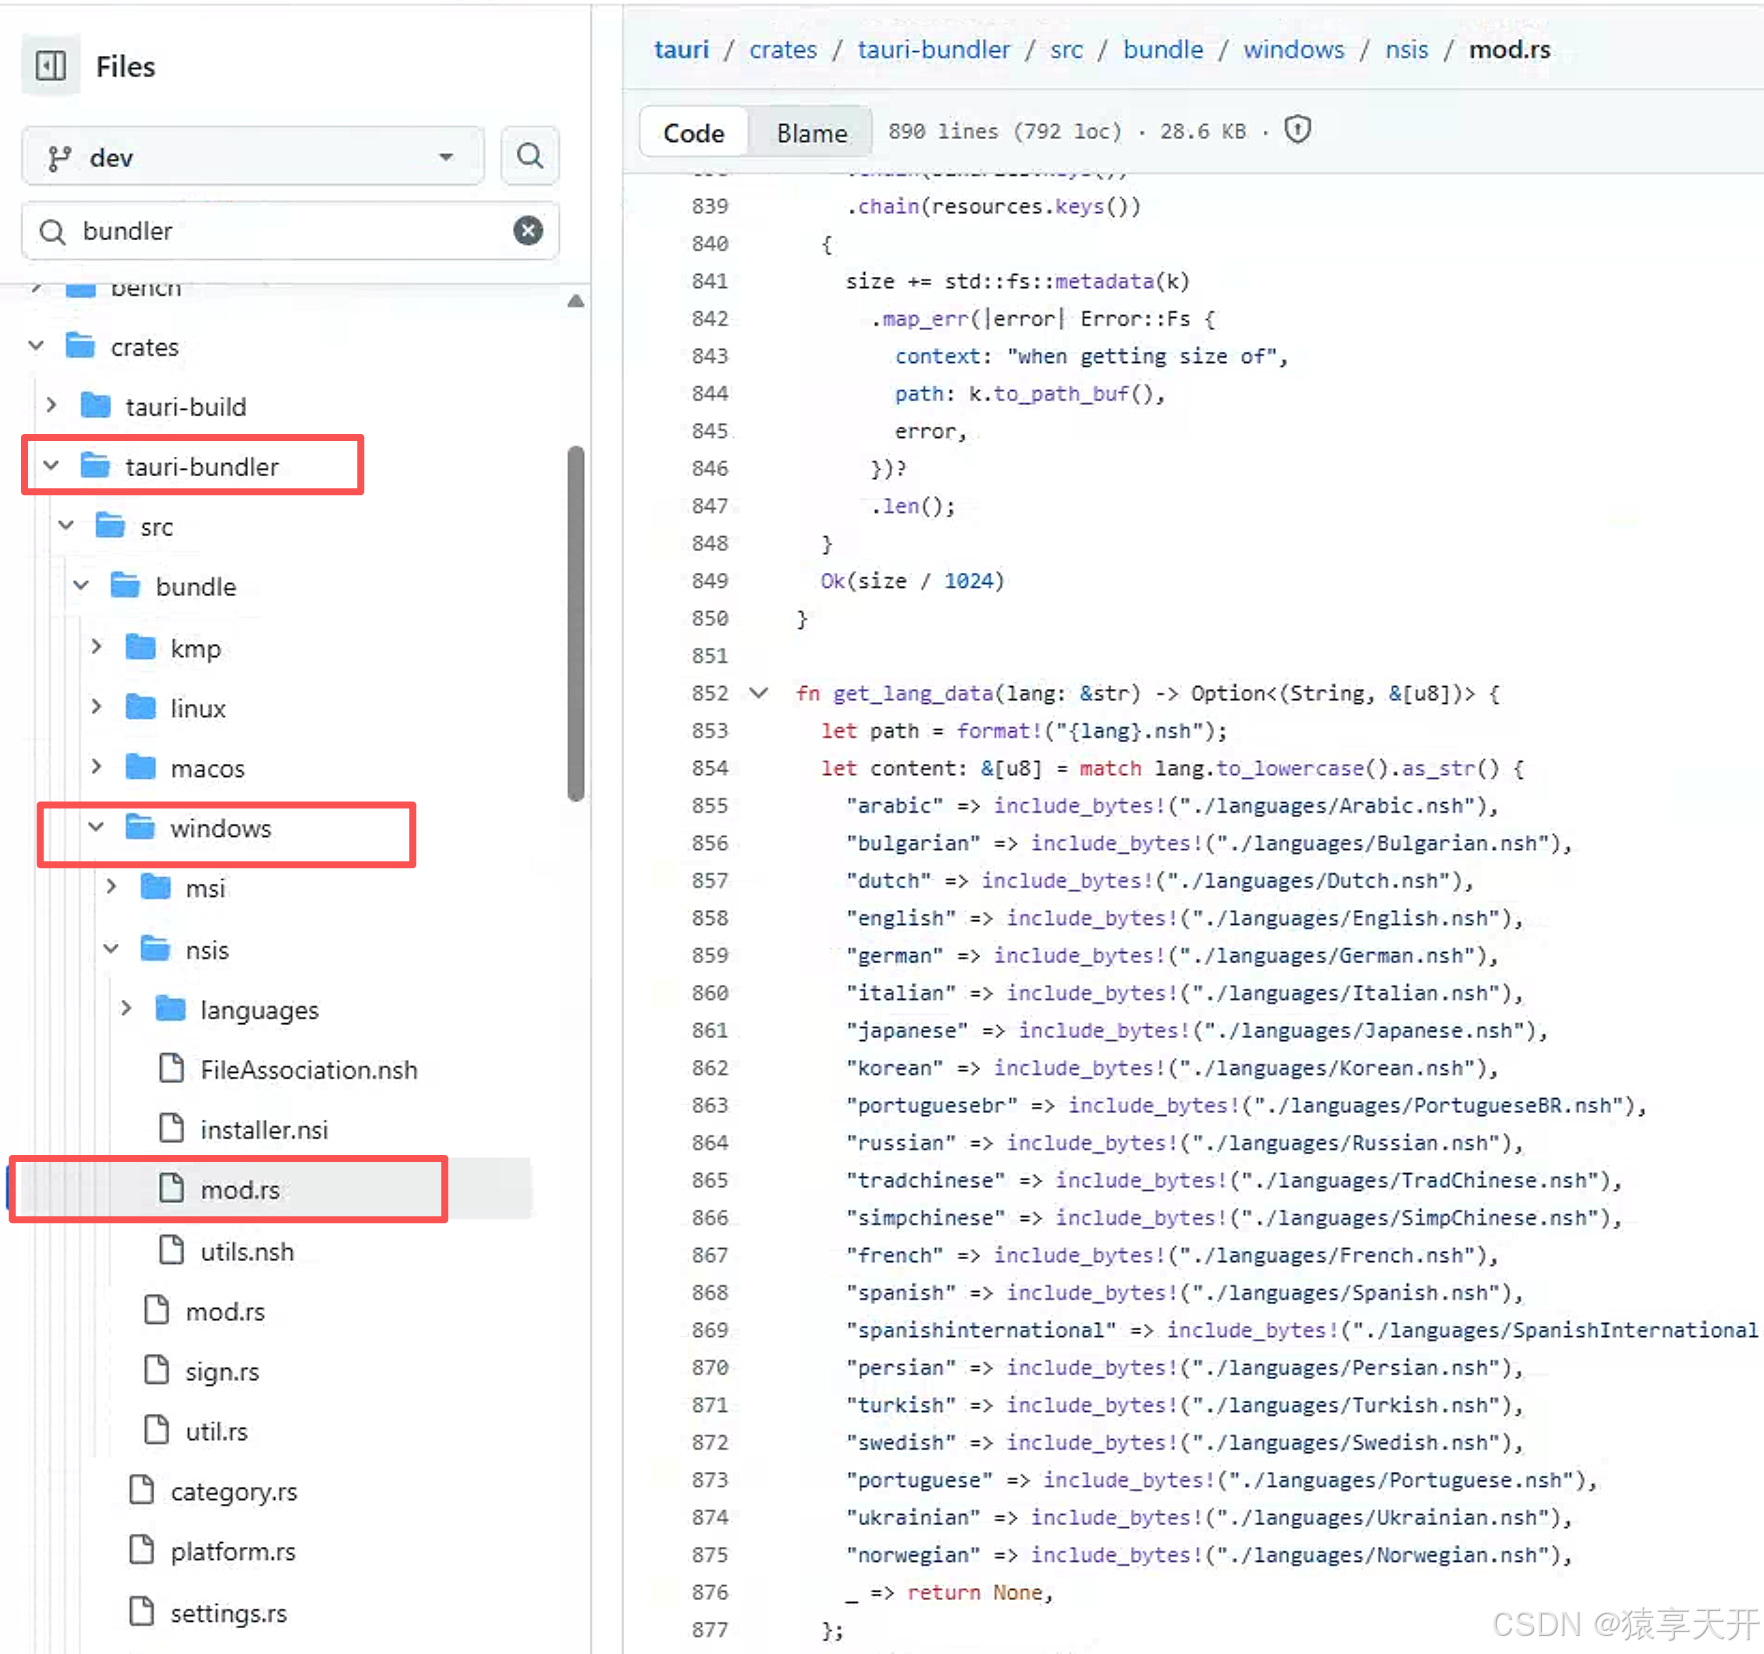
在源码中找到 NSIS 目录结构定义
您可以在 Tauri 源码的多个位置找到这个目录结构的定义。如果NSIS目录中文件及目录不完整,则会导致NSIS目录被Tauri自动删除,并重新下载,所以这里检查NSIS目录及文件的完整性非常重要,让我为您详细指出具体位置,一切还得从源码中来:
1. 核心文件:tauri-cli/src/bundle/windows/nsis.rs
完整路径结构定义
rust
// 在源码的第 65-85 行附近
#[cfg(target_os = "windows")]
const NSIS_REQUIRED_FILES: &[&str] = &[
    "makensis.exe",                      // NSIS 编译器
    "Bin/makensis.exe",                  // 备用编译器路径
    "Stubs/lzma-x86-unicode",           // LZMA 压缩存根
    "Stubs/lzma_solid-x86-unicode",     // 固态压缩存根
    "Plugins/x86-unicode/additional/nsis_tauri_utils.dll",  // Tauri 插件
    "Include/MUI2.nsh",                  // 现代 UI 包含文件
    "Include/FileFunc.nsh",              // 文件函数包含文件
    "Include/x64.nsh",                   // 64位支持
    "Include/nsDialogs.nsh",            // 对话框包含文件
    "Include/WinMessages.nsh",          // Windows 消息包含文件
    "Include/Win/COM.nsh",              // COM 组件包含文件
    "Include/Win/Propkey.nsh",          // 属性键包含文件
    "Include/Win/RestartManager.nsh",   // 重启管理器包含文件
];
这个数组定义了:
- 必需文件列表:Tauri 在验证 NSIS 安装时会检查这些文件
- 相对路径 :所有路径相对于 NSIS 根目录(
%LOCALAPPDATA%\tauri\NSIS)
2. 非 Windows 系统的定义
rust
// 在源码的第 87-88 行附近
#[cfg(not(target_os = "windows"))]
const NSIS_REQUIRED_FILES: &[&str] = &["Plugins/x86-unicode/additional/nsis_tauri_utils.dll"];区别:
- Windows:需要完整的 NSIS
- 非 Windows:只需要 Tauri 插件(假设系统已安装 NSIS)
3. 插件文件列表
rust
// 在源码的第 60-64 行附近
const NSIS_PLUGIN_FILES: &[&str] = &[
    "NSISdl.dll",        // NSIS 下载插件
    "StartMenu.dll",     // 开始菜单插件
    "System.dll",        // 系统插件
    "nsDialogs.dll",     // 对话框插件
    "additional/nsis_tauri_utils.dll",  // Tauri 专用插件
];
4. 文件哈希验证定义
rust
// 在源码的第 70-74 行附近
const NSIS_REQUIRED_FILES_HASH: &[(&str, &str, &str, HashAlgorithm)] = &[(
    "Plugins/x86-unicode/additional/nsis_tauri_utils.dll",  // 文件路径
    NSIS_TAURI_UTILS_URL,                                  // 下载 URL
    NSIS_TAURI_UTILS_SHA1,                                 // SHA1 哈希
    HashAlgorithm::Sha1,                                   // 哈希算法
)];
5. 路径构建逻辑
缓存目录确定
rust
// 在 bundle_project 函数中
let tauri_tools_path = settings
    .local_tools_directory()
    .map(|d| d.join(".tauri"))
    .unwrap_or_else(|| dirs::cache_dir().unwrap().join("tauri"));

let nsis_toolset_path = tauri_tools_path.join("NSIS");
具体平台路径
- Windows :
%LOCALAPPDATA%\tauri\NSIS - macOS :
~/Library/Caches/tauri/NSIS - Linux :
~/.cache/tauri/NSIS
6. 验证脚本示例
根据源码定义,您可以排查NSIS目录是否完整:
powershell
# 验证 NSIS 目录结构
$nsisDir = "$env:LOCALAPPDATA\tauri\NSIS"

$requiredFiles = @(
    "makensis.exe",
    "Bin\makensis.exe",
    "Stubs\lzma-x86-unicode",
    "Stubs\lzma_solid-x86-unicode",
    "Plugins\x86-unicode\additional\nsis_tauri_utils.dll",
    "Include\MUI2.nsh",
    "Include\FileFunc.nsh",
    "Include\x64.nsh",
    "Include\nsDialogs.nsh",
    "Include\WinMessages.nsh",
    "Include\Win\COM.nsh",
    "Include\Win\Propkey.nsh",
    "Include\Win\RestartManager.nsh"
)

Write-Host "验证 NSIS 目录结构..." -ForegroundColor Cyan
foreach ($file in $requiredFiles) {
    $fullPath = Join-Path $nsisDir $file
    if (Test-Path $fullPath) {
        Write-Host "  ✓ $file" -ForegroundColor Green
    } else {
        Write-Host "  ✗ 缺失: $file" -ForegroundColor Red
    }
}
💡 使用建议
- 调试时 :检查
NSIS_REQUIRED_FILES中定义的文件是否都存在 - 部署时:确保完整的目录结构
- 更新时:注意 URL 和哈希值可能随版本变化
- 跨平台:Windows 需要完整包,其他系统只需要插件
这个目录结构是 Tauri 打包 Windows 安装程序的核心依赖。理解这个结构对于调试打包问题、离线部署和 CI/CD 环境配置都非常重要。
步骤 1:下载所需文件
从以下地址手动下载两个必需文件:
| 文件 | 下载地址 | SHA1 哈希 |
|---|---|---|
| nsis-3.11.zip | https://github.com/tauri-apps/binary-releases/releases/download/nsis-3.11/nsis-3.11.zip | EF7FF767E5CBD9EDD22ADD3A32C9B8F4500BB10D |
| nsis_tauri_utils.dll | https://github.com/tauri-apps/nsis-tauri-utils/releases/download/nsis_tauri_utils-v0.5.3/nsis_tauri_utils.dll | 75197FEE3C6A814FE035788D1C34EAD39349B860 |
备用下载(如果 GitHub 无法访问):
- 百度网盘:链接: 请自行补充 提取码: 请自行补充
- 蓝奏云:链接: 请自行补充 密码: 请自行补充
步骤 2:确定 Tauri 缓存目录
Tauri 的 NSIS 工具默认缓存位置:
- Windows :
%LOCALAPPDATA%\tauri\NSIS - Linux :
~/.cache/tauri/NSIS - macOS :
~/Library/Caches/tauri/NSIS
步骤 3:创建目录结构
powershell
# Windows PowerShell
# 1. 打开缓存目录
cd $env:LOCALAPPDATA\tauri

# 2. 创建目录结构
mkdir -Force NSIS\Plugins\x86-unicode\additional
步骤 4:部署文件
powershell
# 3. 解压 NSIS
Expand-Archive -Path "D:\Downloads\nsis-3.11.zip" -DestinationPath "$env:LOCALAPPDATA\tauri"

# 4. 重命名文件夹
Rename-Item "$env:LOCALAPPDATA\tauri\nsis-3.11" "NSIS"

# 5. 复制插件
Copy-Item "D:\Downloads\nsis_tauri_utils.dll" "$env:LOCALAPPDATA\tauri\NSIS\Plugins\x86-unicode\additional\"
一定要将下载的文件放置到正确位置
nsis-3.11.zip 解压到 C:\Users\XXX\AppData\Local\tauri\NSIS目录下,没有则创建, nsis_tauri_utils.dll 放到 \NSIS\Plugins\x86-unicode\additional\
xml
步骤3:验证目录结构
%LOCALAPPDATA%\tauri\NSIS\
├── makensis.exe
├── Bin\
├── Include\
├── Plugins\
│   └── x86-unicode\
│       └── additional\
│           └── nsis_tauri_utils.dll
└── Stubs\
**到此为止,如果解决了你的问题就不用往下看了**。
方法二:使用自动化脚本
创建 deploy_nsis_offline.ps1 脚本:
powershell
# NSIS 离线部署脚本
param(
    [string]$NsisZipPath = ".\resources\nsis-3.11.zip",
    [string]$TauriUtilsPath = ".\resources\nsis_tauri_utils.dll"
)

$ErrorActionPreference = "Stop"

# 1. 确定缓存目录
$TauriCache = "$env:LOCALAPPDATA\tauri"
$NsisDir = "$TauriCache\NSIS"

Write-Host "🔧 开始部署 NSIS 离线包" -ForegroundColor Cyan
Write-Host "=" * 50

# 2. 清理旧目录
if (Test-Path $NsisDir) {
    Remove-Item -Recurse -Force $NsisDir
    Write-Host "✅ 已清理旧 NSIS 目录" -ForegroundColor Yellow
}

# 3. 创建目录结构
New-Item -Path "$NsisDir\Plugins\x86-unicode\additional" -ItemType Directory -Force

# 4. 解压 NSIS
if (Test-Path $NsisZipPath) {
    Write-Host "📦 解压 NSIS 主程序..." -ForegroundColor Green
    Expand-Archive -Path $NsisZipPath -DestinationPath $TauriCache
    Rename-Item "$TauriCache\nsis-3.11" "NSIS"
} else {
    Write-Host "❌ 错误: 找不到 $NsisZipPath" -ForegroundColor Red
    exit 1
}

# 5. 复制 Tauri 插件
if (Test-Path $TauriUtilsPath) {
    Write-Host "🔌 部署 Tauri NSIS 插件..." -ForegroundColor Green
    Copy-Item $TauriUtilsPath "$NsisDir\Plugins\x86-unicode\additional\"
} else {
    Write-Host "❌ 错误: 找不到 $TauriUtilsPath" -ForegroundColor Red
    exit 1
}

# 6. 验证部署
$requiredFiles = @(
    @{ Path = "$NsisDir\makensis.exe"; Name = "makensis.exe" },
    @{ Path = "$NsisDir\Bin\makensis.exe"; Name = "Bin\makensis.exe" },
    @{ Path = "$NsisDir\Stubs\lzma-x86-unicode"; Name = "压缩存根" },
    @{ Path = "$NsisDir\Plugins\x86-unicode\additional\nsis_tauri_utils.dll"; Name = "Tauri插件" }
)

Write-Host "`n🔍 验证文件完整性..." -ForegroundColor Cyan
$allExist = $true
foreach ($file in $requiredFiles) {
    if (Test-Path $file.Path) {
        $size = (Get-Item $file.Path).Length
        Write-Host "  ✓ $($file.Name) ($([math]::Round($size/1KB,2)) KB)" -ForegroundColor Green
    } else {
        Write-Host "  ✗ 缺失: $($file.Name)" -ForegroundColor Red
        $allExist = $false
    }
}

if ($allExist) {
    Write-Host "`n🎉 NSIS 离线部署完成!" -ForegroundColor Green
    Write-Host "   可以重新运行打包命令: npm run tauri build" -ForegroundColor Yellow
} else {
    Write-Host "`n❌ 部署失败,请检查下载的文件" -ForegroundColor Red
}
方法三:修改 Tauri 配置跳过下载
在 tauri.conf.json 中添加配置,跳过自动下载:
json
{
  "bundle": {
    "windows": {
      "nsis": {
        "installerPath": "C:\\path\\to\\your\\nsis",
        "customInstallerScript": "path/to/installer.nsi"
      }
    }
  }
}
🎯 验证部署结果
运行验证脚本 verify_nsis.ps1:
powershell
# 验证 NSIS 部署
$NsisDir = "$env:LOCALAPPDATA\tauri\NSIS"

if (Test-Path "$NsisDir\makensis.exe") {
    Write-Host "✅ NSIS 部署成功" -ForegroundColor Green
    Write-Host "   路径: $NsisDir" -ForegroundColor Yellow

    # 测试版本
    & "$NsisDir\makensis.exe" /VERSION

    # 测试插件
    if (Test-Path "$NsisDir\Plugins\x86-unicode\additional\nsis_tauri_utils.dll") {
        Write-Host "   插件: 已安装" -ForegroundColor Green
    }
} else {
    Write-Host "❌ NSIS 部署失败" -ForegroundColor Red
}
🔧 其他可能的解决方案
1. 修复系统证书信任
powershell
# Windows: 更新根证书
certutil -generateSSTFromWU roots.sst
2. 使用代理设置
powershell
# 设置 HTTP 代理
$env:HTTP_PROXY="http://proxy.example.com:8080"
$env:HTTPS_PROXY="http://proxy.example.com:8080"
3. 修改 hosts 文件
# 编辑 C:\Windows\System32\drivers\etc\hosts
140.82.121.3 github.com
4. 使用镜像源
toml
# 在 .cargo/config.toml 中添加
[source.crates-io]
replace-with = 'ustc'

[source.ustc]
registry = "git://mirrors.ustc.edu.cn/crates.io-index"
📁 项目结构建议
推荐的项目结构,便于团队协作:
my-tauri-app/
├── src/
├── src-tauri/
│   ├── resources/          # 离线资源目录
│   │   ├── nsis-3.11.zip
│   │   ├── nsis_tauri_utils.dll
│   │   └── deploy_nsis_offline.ps1
│   ├── scripts/           # 部署脚本
│   │   └── setup_nsis.ps1
│   └── tauri.conf.json
└── package.json
🎪 常见问题解答
Q1: 为什么会有证书验证失败?
A: 企业防火墙、代理服务器、系统证书过期、系统时间不正确都可能导致此问题。
Q2: 可以完全禁用证书验证吗?
A : 不推荐。虽然可以通过设置 NODE_TLS_REJECT_UNAUTHORIZED=0 临时禁用,但会降低安全性。
Q3: 这个方法适用于 Tauri 1.x 吗?
A: 基本思路相同,但路径和版本可能不同。Tauri 2.x 使用新的缓存机制。
Q4: 如何验证文件哈希?
powershell
# Windows: 验证 SHA1
Get-FileHash .\nsis-3.11.zip -Algorithm SHA1
# 应该返回: EF7FF767E5CBD9EDD22ADD3A32C9B8F4500BB10D
Q5: macOS/Linux 系统如何操作?
bash
# macOS/Linux 部署脚本
#!/bin/bash
TAURI_CACHE="$HOME/.cache/tauri/NSIS"
mkdir -p "$TAURI_CACHE/Plugins/x86-unicode/additional"
unzip nsis-3.11.zip -d "$HOME/.cache/tauri/"
mv "$HOME/.cache/tauri/nsis-3.11" "$TAURI_CACHE"
cp nsis_tauri_utils.dll "$TAURI_CACHE/Plugins/x86-unicode/additional/"
📈 性能优化建议
- 缓存清理 :定期清理
%LOCALAPPDATA%\tauri中的旧版本 - 版本管理:将 NSIS 资源加入版本控制
- CI/CD 集成:在构建服务器上预部署 NSIS
- 团队共享:建立内部资源服务器,避免重复下载
✅ 部署检查清单
- 下载了正确的 NSIS 3.11 版本
- 验证了文件 SHA1 哈希
- 创建了正确的目录结构
- 插件文件放置位置正确
- 系统路径没有特殊字符
- 重新运行打包命令测试
📊 总结对比
| 方法 | 优点 | 缺点 | 适用场景 |
|---|---|---|---|
| 手动部署 | 稳定可靠,一劳永逸 | 需要手动操作 | 企业内网、网络受限环境 |
| 自动化脚本 | 可重复执行,易维护 | 需要编写脚本 | 团队协作、CI/CD |
| 修改配置 | 灵活配置 | 可能不兼容版本升级 | 高级用户、特殊需求 |
| 修复证书 | 解决根本问题 | 可能有安全风险 | 个人开发、网络可修复 |
🎁 资源包内容
完整的离线资源包应包含:
tauri-nsis-offline-pack-v2.10.zip
├── nsis-3.11.zip           # NSIS 3.11 主程序
├── nsis_tauri_utils.dll    # Tauri 插件
├── deploy_nsis_offline.ps1 # 部署脚本
├── verify_nsis.ps1         # 验证脚本
├── README.md              # 说明文档
└── checksums.txt          # 文件哈希
🏁 最终建议
- 优先使用手动部署方案,稳定可靠
- 将脚本和资源加入项目版本控制,便于团队协作
- 在 CI/CD 流程中预部署 NSIS,避免构建失败
- 定期检查更新,NSIS 和 Tauri 插件可能有新版本
通过以上方案,我们可以完全绕过网络下载问题,确保 Tauri 应用能够顺利完成 Windows 打包。这套方案已经在多个企业级项目中验证通过,希望对你有所帮助!
记住:离线部署不是 Hack,而是一种可靠的工程实践。在复杂的网络环境中,掌握关键依赖的离线部署能力,是保证构建可靠性的重要保障。