Android 短视频项目实战:基于 MVVM、DataBinding、LiveData、ARouter、EventBus、WebView 与 EncryptedSharedPreferences 打通个人中心与设置模块全链路,涵盖登录态回流、用户信息渲染、设置页动作分发、确认弹窗、缓存清理、协议页复用、账号绑定、验证码重置密码、版本信息展示与退出登录刷新
前言
个人中心和设置页看起来只是几组入口与若干静态文案,真正落地时却要同时处理登录态同步、用户信息渲染、统一跳转分发、确认弹窗、缓存管理、协议页复用、账号安全和退出登录回刷等一整条链路。只要其中一个环节处理得不够稳定,页面表现就会出现"登录后不刷新""按钮状态不正确"或"配置入口重复开发"的问题。
这篇文章按实际开发顺序展开,先把登录成功后的状态回流到个人中心,再搭建设置页的界面与统一动作分发,接着补齐确认弹窗、缓存清理、协议页、账号与绑定、设置密码、关于我们和退出登录,最后收束到个人中心交互入口和相关代码附录。读完以后,可以直接把整套个人中心与设置模块的实现链路串起来。

目录
- 短视频个人中心与设置模块实战:从登录态回流、设置页动作分发到缓存清理、协议页复用与密码重置的完整实现
- [1. 个人中心页的登录态回流与用户信息联动](#1. 个人中心页的登录态回流与用户信息联动)
- [2. 登录链路回顾:从 LoginActivity 到 UserManager 的状态落盘与 UI 回刷](#2. 登录链路回顾:从 LoginActivity 到 UserManager 的状态落盘与 UI 回刷)
- [3. 设置页界面搭建与通用返回能力下沉](#3. 设置页界面搭建与通用返回能力下沉)
- [4. 用枚举驱动设置页动作分发与路由跳转](#4. 用枚举驱动设置页动作分发与路由跳转)
- [5. 设置页确认弹窗:通用 YesOrNoDialog 的封装与调用](#5. 设置页确认弹窗:通用 YesOrNoDialog 的封装与调用)
- [6. 清除缓存能力:缓存统计、删除与 UI 同步刷新](#6. 清除缓存能力:缓存统计、删除与 UI 同步刷新)
- [7. 协议页与用户信息清单:通过路由参数复用 WebView 页面](#7. 协议页与用户信息清单:通过路由参数复用 WebView 页面)
- [8. 账号与绑定页:手机号脱敏展示与跳转闭环](#8. 账号与绑定页:手机号脱敏展示与跳转闭环)
- [9. 设置密码页:验证码、表单校验与重置密码请求](#9. 设置密码页:验证码、表单校验与重置密码请求)
- [9.1 View:页面结构与按钮联动](#9.1 View:页面结构与按钮联动)
- [9.2 Model:验证码发送与重置密码接口封装](#9.2 Model:验证码发送与重置密码接口封装)
- [9.3 ViewModel:输入校验、倒计时与提交动作](#9.3 ViewModel:输入校验、倒计时与提交动作)
- [10. 关于我们页:版本号读取、组装与展示](#10. 关于我们页:版本号读取、组装与展示)
- [11. 退出登录:服务端失效、本地清理与设置页刷新](#11. 退出登录:服务端失效、本地清理与设置页刷新)
- [11.1 ViewModel:按钮可见性与退出动作](#11.1 ViewModel:按钮可见性与退出动作)
- [11.2 View:弹窗触发与交互入口](#11.2 View:弹窗触发与交互入口)
- [11.3 Model:退出登录接口与本地状态清理](#11.3 Model:退出登录接口与本地状态清理)
- [12. 个人中心交互补齐:头像、收藏、记录与退出登录入口](#12. 个人中心交互补齐:头像、收藏、记录与退出登录入口)
- [13. 相关代码附录](#13. 相关代码附录)
- [13.1 登录态与个人中心](#13.1 登录态与个人中心)
- [13.2 设置页动作、弹窗与缓存](#13.2 设置页动作、弹窗与缓存)
- [13.3 协议页、账号绑定与密码重置](#13.3 协议页、账号绑定与密码重置)
- [13.4 关于我们与退出登录](#13.4 关于我们与退出登录)
1. 个人中心页的登录态回流与用户信息联动
个人中心页真正需要先解决的问题,不是头像、昵称这些控件怎么摆,而是登录成功之后,状态能不能稳定地从登录页回流到用户页,并驱动整块 UI 一次性刷新。这里先把登录成功事件、UserFragment 的订阅时机,以及 UserViewModel 的数据更新逻辑串起来。
登录态变化先统一收口到 MessageEvent.LoginStatusEvent。这样做的好处是,登录页只负责发布状态,用户页只负责订阅状态,中间不需要互相持有引用,也不会把登录成功后的刷新逻辑散落到多个页面里。
LoginStatusEvent 封装登录态变化:
isLogin表示当前是否处于已登录状态。post(boolean isLogin)使用postSticky(...)发送粘性事件,是为了让订阅者在重新进入活跃状态后,仍然能拿到最近一次登录结果。- 这一步把"登录成功"从页面跳转行为里剥离出来,后续的个人中心、设置页甚至其他依赖登录态的页面,都可以复用同一套消息。
java
public class MessageEvent {

    /**
     * 登录状态变更 登录成功、退出
     */
    public static class LoginStatusEvent {
        private boolean isLogin;//是否登录

        public LoginStatusEvent(boolean isLogin) {
            this.isLogin = isLogin;
        }

        public boolean isLogin() {
            return isLogin;
        }

        public static void post(boolean isLogin) {
            //使用粘性事件发送消息,确保订阅者在活跃的时候再处理消息
            EventBus.getDefault().postSticky(new LoginStatusEvent(isLogin));
        }

    }
}
项目内路径:LsxbugVideo/library_base/src/main/java/com/ls/libbase/eventbus/MessageEvent.java
登录流程里,真正发布这条状态消息的时机,不是手机号登录接口刚成功的时候,而是拿到用户详情之后。原因很直接:只有 token 和用户资料都准备好了,个人中心页才能一次性刷新出完整内容:
login()先校验是否同意协议,没勾选就直接提示并返回,避免无效请求继续向后推进。mModel.mobileLogin(...)成功后,只拿到了登录结果里的用户 id,这一步还不足以刷新个人中心。getUserInfo(id)再发一次用户详情请求,等资料落齐以后,才把mLoginSuccess改成true,并调用MessageEvent.LoginStatusEvent.post(true)广播登录成功。- 两层回调都分别补了失败分支,保证加载动画和提示信息不会因为某个接口失败而悬空。
java
/**
 * 登录
 */
public void login() {
    Boolean checkAgreement = mCheckAgreement.getValue();
    if (!checkAgreement) {
        showToast("请先同意用户协议与隐私政策");
        Log.i(TAG, "请先同意用户协议与隐私政策");
        return;
    }
    showLoading(true);

    String mobile = mUserMobile.getValue();
    String code = mCode.getValue();

    mModel.mobileLogin(mobile, code, new IRequestCallback<ResBase<ResLogin>>() {
        @Override
        public void onLoadFinish(ResBase<ResLogin> datas) {
            Log.i(TAG, "onLoadFinish token:" + datas.getData());
            showLoading(false);
            showToast(datas.getMsg());

            int id = datas.getData().getId();
            getUserInfo(id);
        }

        @Override
        public void onLoadFailure(int errorCode, String message) {
            showToast(message);
            showLoading(false);
        }
    });
}

private void getUserInfo(int id) {
    showLoading(true);
    mModel.getUserInfo(String.valueOf(id), new IRequestCallback<ResBase<ResUser>>() {
        @Override
        public void onLoadFinish(ResBase<ResUser> datas) {
            showLoading(false);
            mLoginSuccess.setValue(true);
            //发送一个已登录的状态
            MessageEvent.LoginStatusEvent.post(true);
        }

        @Override
        public void onLoadFailure(int errorCode, String message) {
            showLoading(false);
            showToast(message);
        }
    });

}
项目内路径:LsxbugVideo/feature_user/src/main/java/com/ls/feature_user/ui/login/LoginViewModel.java
个人中心页要接住这条消息,关键不在订阅代码本身,而在注册和反注册的生命周期时机。用户从个人中心跳到登录页时,UserFragment 可能已经走到 onStop(),如果只依赖普通事件,等 Fragment 恢复活跃时,登录成功消息就已经丢了。
注意:
@Subscribe(sticky = true, threadMode = ThreadMode.MAIN)明确要求接收粘性事件,并且在主线程里处理 UI 刷新。onStart()注册、onStop()反注册,保证只有页面处于活跃状态时才消费事件,避免后台页面继续响应消息。event.isLogin()拿到的不是"刚才发生过登录动作"这么一个抽象概念,而是一个明确的布尔状态,UserFragment会把这个状态继续传给UserViewModel.loadUserInfo(login),让 ViewModel 决定后续展示逻辑。
java
@Override
protected void initView() {
    Log.i(TAG, "initView");
    StatusBarUtils.addStatusBarHeight2Views(mDataBinding.getRoot(), mDataBinding.ivSettings, mDataBinding.ivQualifications);

    mDataBinding.ivEdit.setOnClickListener(new View.OnClickListener() {
        @Override
        public void onClick(View v) {
            ARouter.getInstance().build(ARouterPath.User.ACTIVITY_LOGIN).navigation();
        }
    });

}

/**
 * 通过eventBus订阅 登录状态变化的消息
 *
 * @param event
 */
@Subscribe(sticky = true, threadMode = ThreadMode.MAIN)//表示接收粘性事件
public void onMessageEvent(MessageEvent.LoginStatusEvent event) {
    boolean login = event.isLogin();
    Log.i(TAG, "onMessageEvent: isLogin = " + login);
    mViewModel.loadUserInfo(login);
}

@Override
public void onStart() {
    super.onStart();
    //确保页面活跃的时候再接收事件
    EventBus.getDefault().register(this);
}

@Override
public void onStop() {
    super.onStop();
    //页面不活跃的时候取消事件接收
    if (EventBus.getDefault().isRegistered(this)) {
        EventBus.getDefault().unregister(this);//注销
    }
}
项目内路径:LsxbugVideo/feature_user/src/main/java/com/ls/feature_user/ui/user/UserFragment.java
Fragment 的泛型也要同步切到 UserViewModel,否则数据绑定和后面的 LiveData 都挂不上去。
java
@Route(path = ARouterPath.User.FRAGMENT_USER)
public class UserFragment extends BaseFragment<LayoutFragmentUserBinding, UserViewModel> {
    private static final String TAG = "UserFragment";

    @Override
    protected UserViewModel getViewModel() {
        return new ViewModelProvider(this).get(UserViewModel.class);
    }

    @Override
    protected int getLayoutResId() {
        return R.layout.layout_fragment_user;
    }

    @Override
    protected int getBindingVariableId() {
        return BR.viewModel;
    }
}
项目内路径:LsxbugVideo/feature_user/src/main/java/com/ls/feature_user/ui/user/UserFragment.java
ViewModel 侧先把个人中心页所有需要联动的字段准备出来,后面 XML 直接绑定这些 LiveData,就不需要在 Fragment 里手动逐个赋值。
java
private MutableLiveData<String> mAvatar = new MutableLiveData<>();      // 头像
private MutableLiveData<String> mNickName = new MutableLiveData<>();    // 昵称
private MutableLiveData<String> mBio = new MutableLiveData<>();         // 签名
private MutableLiveData<String> mFans = new MutableLiveData<>();        // 粉丝
private MutableLiveData<String> mFollow = new MutableLiveData<>();      // 关注
private MutableLiveData<String> mMedal = new MutableLiveData<>();       // 奖章

// get
项目内路径:LsxbugVideo/feature_user/src/main/java/com/ls/feature_user/ui/user/UserViewModel.java
布局文件接下来要做的,是把这些字段一一挂到头像、昵称、签名和统计项上,让 UI 具备"等数据一到就自动刷新"的能力。
这段布局里最关键的,不是控件数量,而是绑定关系已经提前铺好:
- 头像、昵称、签名、粉丝、关注和奖章都直接从
UserViewModel取值。 tools:text只负责预览,方便开发阶段校对布局,不会影响运行时数据。- 头像默认图使用
@mipmap/icon_default_avatar,如果子模块和library_base里有同名资源,系统会优先取当前子模块的资源;真要复用基座里的同名资源,就必须先消掉本地冲突。
xml
<?xml version="1.0" encoding="utf-8"?>
<layout xmlns:android="http://schemas.android.com/apk/res/android"
    xmlns:app="http://schemas.android.com/apk/res-auto"
    xmlns:tools="http://schemas.android.com/tools">

    <data>

        <variable
            name="viewModel"
            type="com.ls.feature_user.ui.user.UserViewModel" />
    </data>

    <androidx.constraintlayout.widget.ConstraintLayout
        android:layout_width="match_parent"
        android:layout_height="match_parent">

        <ImageView
            android:id="@+id/imageView"
            android:layout_width="match_parent"
            android:layout_height="200dp"
            android:scaleType="centerCrop"
            android:src="@mipmap/bg_user_center"
            app:layout_constraintEnd_toEndOf="parent"
            app:layout_constraintStart_toStartOf="parent"
            app:layout_constraintTop_toTopOf="parent" />

        <ImageView
            android:id="@+id/iv_settings"
            android:layout_width="20dp"
            android:layout_height="20dp"
            android:layout_marginTop="2dp"
            android:layout_marginEnd="14dp"
            android:src="@mipmap/icon_settings"
            app:layout_constraintEnd_toEndOf="parent"
            app:layout_constraintTop_toTopOf="parent" />

        <ImageView
            android:id="@+id/iv_qualifications"
            android:layout_width="20dp"
            android:layout_height="20dp"
            android:layout_marginTop="2dp"
            android:layout_marginEnd="12dp"
            android:src="@mipmap/icon_qualifications"
            app:layout_constraintEnd_toStartOf="@id/iv_settings"
            app:layout_constraintTop_toTopOf="parent" />

        <ImageView
            android:id="@+id/iv_avatar"
            imageCircleUrl="@{viewModel.avatar}"
            android:layout_width="80dp"
            android:layout_height="80dp"
            android:layout_marginStart="20dp"
            android:layout_marginTop="171dp"
            android:src="@mipmap/icon_default_avatar"
            app:layout_constraintStart_toStartOf="parent"
            app:layout_constraintTop_toTopOf="parent" />

        <TextView
            android:id="@+id/tv_nick_name"
            android:layout_width="wrap_content"
            android:layout_height="wrap_content"
            android:layout_marginTop="12dp"
            android:text="@{viewModel.nickName}"
            android:textColor="@color/black"
            android:textSize="@dimen/font_size_14sp"
            app:layout_constraintStart_toStartOf="@+id/iv_avatar"
            app:layout_constraintTop_toBottomOf="@+id/iv_avatar"
            tools:text="请先登录" />

        <ImageView
            android:id="@+id/iv_edit"
            android:layout_width="12dp"
            android:layout_height="12dp"
            android:layout_marginStart="12.5dp"
            android:src="@mipmap/icon_user_edit"
            app:layout_constraintBottom_toBottomOf="@+id/tv_nick_name"
            app:layout_constraintStart_toEndOf="@+id/tv_nick_name"
            app:layout_constraintTop_toTopOf="@+id/tv_nick_name" />

        <TextView
            android:id="@+id/tv_sign"
            android:layout_width="wrap_content"
            android:layout_height="wrap_content"
            android:layout_marginTop="16dp"
            android:text="@{viewModel.bio}"
            android:textColor="#ff9c9c9c"
            android:textSize="@dimen/font_size_12sp"
            app:layout_constraintStart_toStartOf="@+id/tv_nick_name"
            app:layout_constraintTop_toBottomOf="@+id/tv_nick_name"
            tools:text="用户签名" />


        <TextView
            android:id="@+id/tv_fans"
            android:layout_width="wrap_content"
            android:layout_height="wrap_content"
            android:layout_marginTop="16dp"
            android:text="@{viewModel.fans}"
            android:textColor="@color/black"
            android:textSize="12sp"
            app:layout_constraintStart_toStartOf="@id/tv_sign"
            app:layout_constraintTop_toBottomOf="@id/tv_sign"
            tools:text="0 粉丝" />


        <TextView
            android:id="@+id/tv_follow"
            android:layout_width="wrap_content"
            android:layout_height="wrap_content"
            android:layout_marginStart="17dp"
            android:layout_marginTop="16dp"
            android:text="@{viewModel.follow}"
            android:textColor="@color/black"
            android:textSize="12sp"
            app:layout_constraintStart_toEndOf="@id/tv_fans"
            app:layout_constraintTop_toBottomOf="@id/tv_sign"
            tools:text="0 关注" />

        <TextView
            android:id="@+id/tv_medal"
            android:layout_width="wrap_content"
            android:layout_height="wrap_content"
            android:layout_marginStart="17dp"
            android:layout_marginTop="16dp"
            android:text="@{viewModel.medal}"
            android:textColor="@color/black"
            android:textSize="12sp"
            app:layout_constraintStart_toEndOf="@id/tv_follow"
            app:layout_constraintTop_toBottomOf="@id/tv_sign"
            tools:text="0 奖章" />

        <View
            android:id="@+id/view_div"
            android:layout_width="match_parent"
            android:layout_height="5dp"
            android:layout_marginTop="36dp"
            android:background="#fff8f8f8"
            app:layout_constraintEnd_toEndOf="parent"
            app:layout_constraintStart_toStartOf="parent"
            app:layout_constraintTop_toBottomOf="@id/tv_fans" />

        <!--因为每一行都是一个点击区域,所以给每个菜单添加一个父布局用来做点击事件-->
        <LinearLayout
            android:id="@+id/ll_collection"
            android:layout_width="match_parent"
            android:layout_height="46dp"
            android:layout_marginTop="16dp"
            android:gravity="center|start"
            android:orientation="horizontal"
            app:layout_constraintStart_toStartOf="parent"
            app:layout_constraintTop_toBottomOf="@+id/view_div">

            <ImageView
                android:id="@+id/iv_collection"
                android:layout_width="20dp"
                android:layout_height="20dp"
                android:layout_marginStart="20dp"
                android:src="@mipmap/icon_user_collection" />

            <TextView
                android:layout_width="0dp"
                android:layout_height="wrap_content"
                android:layout_marginStart="8dp"
                android:layout_weight="1"
                android:text="我的收藏"
                android:textColor="#ff444444"
                android:textSize="13sp" />


            <ImageView
                android:layout_width="16dp"
                android:layout_height="16dp"
                android:layout_marginEnd="20dp"
                android:src="@mipmap/icon_menu_right_arrow" />

        </LinearLayout>

        <View
            android:id="@+id/view_div1"
            android:layout_width="match_parent"
            android:layout_height="1dp"
            android:layout_marginStart="10dp"
            android:layout_marginEnd="10dp"
            android:background="#33000000"
            app:layout_constraintStart_toStartOf="parent"
            app:layout_constraintTop_toBottomOf="@+id/ll_collection" />

        <LinearLayout
            android:id="@+id/ll_record"
            android:layout_width="match_parent"
            android:layout_height="46dp"
            android:gravity="center|start"
            android:orientation="horizontal"
            app:layout_constraintStart_toStartOf="parent"
            app:layout_constraintTop_toBottomOf="@+id/view_div1">

            <ImageView
                android:layout_width="20dp"
                android:layout_height="20dp"
                android:layout_marginStart="20dp"
                android:src="@mipmap/icon_user_record" />

            <TextView
                android:layout_width="0dp"
                android:layout_height="wrap_content"
                android:layout_marginStart="8dp"
                android:layout_weight="1"
                android:text="观看记录"
                android:textColor="#ff444444"
                android:textSize="13sp" />

            <ImageView
                android:layout_width="16dp"
                android:layout_height="16dp"
                android:layout_marginEnd="20dp"
                android:src="@mipmap/icon_menu_right_arrow" />

        </LinearLayout>

        <View
            android:id="@+id/view_div2"
            android:layout_width="match_parent"
            android:layout_height="1dp"
            android:layout_marginStart="10dp"
            android:layout_marginEnd="10dp"
            android:background="#33000000"
            app:layout_constraintStart_toStartOf="parent"
            app:layout_constraintTop_toBottomOf="@+id/ll_record" />

        <LinearLayout
            android:id="@+id/ll_exit"
            android:layout_width="match_parent"
            android:layout_height="46dp"
            android:gravity="center|start"
            android:orientation="horizontal"
            app:layout_constraintStart_toStartOf="parent"
            app:layout_constraintTop_toBottomOf="@+id/ll_record">

            <ImageView
                android:layout_width="20dp"
                android:layout_height="20dp"
                android:layout_marginStart="20dp"
                android:src="@mipmap/icon_exit_login" />

            <TextView
                android:layout_width="0dp"
                android:layout_height="wrap_content"
                android:layout_marginStart="8dp"
                android:layout_weight="1"
                android:text="我的收藏"
                android:textColor="#ff444444"
                android:textSize="13sp" />

            <ImageView
                android:layout_width="16dp"
                android:layout_height="16dp"
                android:layout_marginEnd="20dp"
                android:src="@mipmap/icon_menu_right_arrow" />
        </LinearLayout>

    </androidx.constraintlayout.widget.ConstraintLayout>
</layout>
项目内路径:LsxbugVideo/feature_user/src/main/res/layout/layout_fragment_user.xml
头像绑定这里还额外加了一层 imageCircleUrl="@{viewModel.avatar}", 加载封装成一个可复用的圆形头像能力,而不是每个页面都手写一遍 Glide。
xml
<ImageView
    android:id="@+id/iv_avatar"
    imageCircleUrl="@{viewModel.avatar}"
    android:layout_width="80dp"
    android:layout_height="80dp"
    android:layout_marginStart="20dp"
    android:layout_marginTop="171dp"
    android:src="@mipmap/icon_default_avatar"
    app:layout_constraintStart_toStartOf="parent"
    app:layout_constraintTop_toTopOf="parent" />
项目内路径:LsxbugVideo/feature_user/src/main/res/layout/layout_fragment_user.xml
真正接住 imageCircleUrl 这个自定义属性的是 CommonBindingAdapter;这段适配器的职责非常明确:
@BindingAdapter("imageCircleUrl")会扫描所有写了imageCircleUrl的ImageView。- 第一个参数固定是目标控件类型,第二个参数就是绑定进来的 URL。
placeholder(...)和error(...)都使用默认头像,这样"加载中"和"加载失败"时页面不会出现空白。CircleCrop()统一把普通图片裁成圆形,后续个人中心、评论区头像等位置都能复用这一套能力。
java
public class CommonBindingAdapter {

    @BindingAdapter("imageUrl")
    public static void loadImage(ImageView imageView, String url) {
        if (url != null && !url.isEmpty()) {
            Glide.with(imageView.getContext())
                    .load(url)
                    .error(R.mipmap.bg_default)
                    .into(imageView);
        }
    }

    @BindingAdapter("imageCircleUrl")
    public static void loadCircleImage(ImageView imageView, String url) {
        if (url != null && !url.isEmpty()) {
            Glide.with(imageView.getContext())
                    .load(url)
                    .placeholder(R.mipmap.icon_default_avatar)//加载过程的占位图
                    .error(R.mipmap.icon_default_avatar)//加载失败时候的占位图
                    .apply(RequestOptions.bitmapTransform(new CircleCrop()))//加载圆形图片
                    .into(imageView);
        }
    }

}
项目内路径:LsxbugVideo/library_base/src/main/java/com/ls/libbase/adapter/CommonBindingAdapter.java
订阅到登录态之后,UserFragment 不直接操作控件,而是把登录状态继续传递到 UserViewModel,这样页面刷新逻辑依旧停留在 ViewModel 层。
java
/**
 * 通过eventBus订阅 登录状态变化的消息
 *
 * @param event
 */
@Subscribe(sticky = true, threadMode = ThreadMode.MAIN)//表示接收粘性事件
public void onMessageEvent(MessageEvent.LoginStatusEvent event) {
    boolean login = event.isLogin();
    Log.i(TAG, "onMessageEvent: isLogin = " + login);
    mViewModel.loadUserInfo(login);
}
项目内路径:LsxbugVideo/feature_user/src/main/java/com/ls/feature_user/ui/user/UserFragment.java
ViewModel 初始化时也会主动读取一次当前登录态,这样即使用户不是刚从登录页跳回来,而是直接打开个人中心,页面也能拿到正确状态。这里要注意两个分支:
在构造方法中,初始化 UserModel,同时调用 UserModel 的 isLogin() 方法,判断登录状态;login == true时,先展示加载状态,再通过 Model 读用户信息。- 成功分支走
updateUserInfo(user),调用 loadUserInfo() 方法,把真实资料刷到 UI。 - 失败分支和未登录分支都统一走
notLoginUpdateUserInfo(),这样"未登录"态的展示不会散落在多个地方。
java
private final UserModel mModel;

public UserViewModel() {
    mModel = new UserModel();
    //进入到user页面后 根据登录状态更新ui
    boolean login = mModel.isLogin();
    loadUserInfo(login);
}

/**
 * 加载用户信息
 *
 * @param login
 */
public void loadUserInfo(boolean login) {
    if (login) {
        showLoading(true);
        mModel.loadUserInfo(new ILoadUserInfoCallback() {
            @Override
            public void onLoadSuccess(ResUser user) {
                showLoading(false);
                updateUserInfo(user);
            }

            @Override
            public void onLoadFailure(int errorCode, String message) {
                showLoading(false);
                notLoginUpdateUserInfo();
            }
        });
    } else {
        notLoginUpdateUserInfo();
    }
}
项目内路径:LsxbugVideo/feature_user/src/main/java/com/ls/feature_user/ui/user/UserViewModel.java
Model 层先定义好成功、失败两个回调,ViewModel 才能根据不同结果决定显示什么。
java
public interface ILoadUserInfoCallback {

    /**
     * 用户信息加载成功
     *
     * @param user
     */
    void onLoadSuccess(ResUser user);

    /**
     * 加载失败
     *
     * @param errorCode
     * @param message
     */
    void onLoadFailure(int errorCode, String message);
}
项目内路径:LsxbugVideo/feature_user/src/main/java/com/ls/feature_user/ui/user/ILoadUserInfoCallback.java
Model 的职责是把"当前是否登录"和"当前能不能拿到用户信息"这两个判断收束起来,不让 ViewModel 直接依赖 UserManager 的细节:
- 这里不通过 EventBus 监听 LoginModel 发布的登录状态变更事件,来判断登录状态,而是通过 UserManager 单例对象的内置 isLogin() 方法,判断当前登录状态;
- 在获取登录状态后,调用 UserManager 单例对象内置的
getUserInfo()方法,获取用户信息; - 只有用户信息对象不为空,才触发成功回调;用户信息对象为空,或者 isLogin() 返回 false,都触发失败回调;
java
public class UserModel {

    public boolean isLogin() {
        return UserManager.getInstance().isLogin();//是否登录
    }

    /**
     * 获取用户信息
     *
     * @param callback
     */
    public void loadUserInfo(ILoadUserInfoCallback callback) {
        if (isLogin()) {
            //获取到用户信息
            ResUser userInfo = UserManager.getInstance().getUserInfo();
            if (userInfo != null) {
                callback.onLoadSuccess(userInfo);
            } else {
                callback.onLoadFailure(ErrorStatusConfig.ERROR_STATUS_NOT_LOGIN, "未登录");
            }
        } else {
            callback.onLoadFailure(ErrorStatusConfig.ERROR_STATUS_NOT_LOGIN, "未登录");
        }
    }
}
项目内路径:LsxbugVideo/feature_user/src/main/java/com/ls/feature_user/ui/user/UserModel.java
一旦拿到 ResUser,UserViewModel 就开始把对象里的每个字段拆开,分别映射到对应的控件展示文案上。这里不能只说"更新 UI",因为每个字段都有自己的兜底逻辑。
java
public void loadUserInfo(boolean login) {
if (login) {
showLoading(true);
mModel.loadUserInfo(new ILoadUserInfoCallback() {
@Override
public void onLoadSuccess(ResUser user) {
showLoading(false);
updateUserInfo(user);
}
@Override
public void onLoadFailure(int errorCode, String message) {
showLoading(false);
notLoginUpdateUserInfo();
}
});
} else {
notLoginUpdateUserInfo();
}
}
private void notLoginUpdateUserInfo() {
//如果没登录 或者获取不到登录的信息,那么传个空的user用来更新ui
ResUser user = new ResUser();
user.setUser(new UserInfo());
updateUserInfo(user);
}
/**
* 更新用户数据的显示
*
* @param user
*/
private void updateUserInfo(ResUser user) {
String avatar = user.getUser().getAvatar();
if (avatar != null && !avatar.isEmpty()) {
mAvatar.setValue(avatar);
} else {
mAvatar.setValue(null);
}
String nickname = user.getUser().getNickname();
if (nickname != null && !nickname.isEmpty()) {
mNickName.setValue(nickname);
} else {
mNickName.setValue("请先登录");
}
String bio = user.getUser().getBio();
if (bio != null && !bio.isEmpty()) {
mBio.setValue(bio);
} else {
mBio.setValue("请编辑资料完善个人信息吧!");
}
int fans = user.getFans();
mFans.setValue(fans + " 粉丝");
int follow = user.getFollow();
mFollow.setValue(follow + " 关注");
int medal = user.getMedal();
mMedal.setValue(medal + " 粉丝");
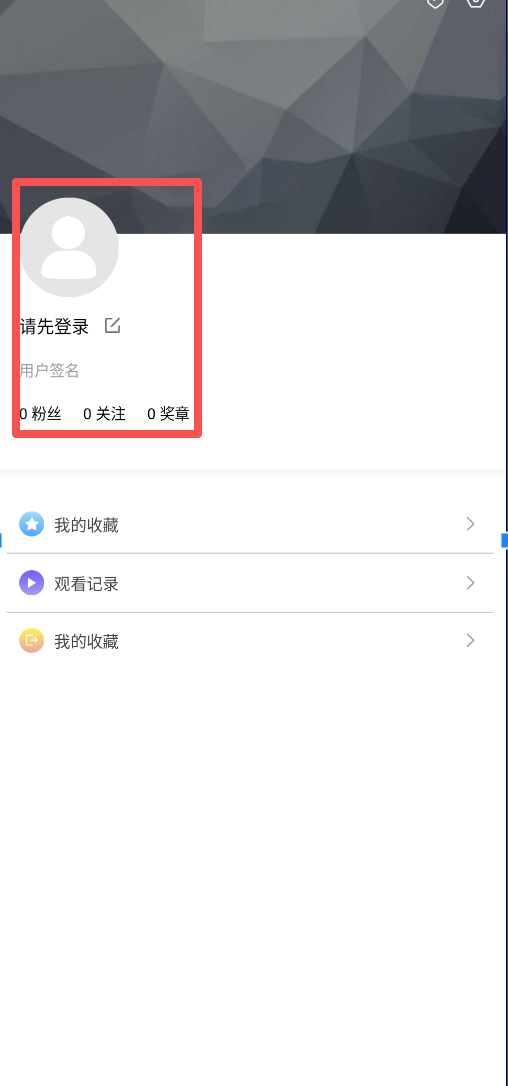
}项目内路径:LsxbugVideo/feature_user/src/main/java/com/ls/feature_user/ui/user/UserViewModel.java
这一步的状态变化要逐项对应起来:
- 头像 URL 非空时才交给
mAvatar,否则传null让绑定适配器回退到默认头像。 - 昵称没有值时,直接显示"请先登录",让页面在未登录态下也有明确提示。
- 个性签名为空时,回退成引导文案,提醒用户去完善资料。
- 粉丝、关注、奖章则统一走字符串拼接,把数值转换成最终要展示的标签。
登录页最后还要实现"登录成功后关闭当前页面",否则用户完成登录以后还会停留在 LoginActivity 上,看起来像是没有返回成功。
- 定义 mLoginSuccess,在获取用户信息接口的成功回调中,将 mLoginSuccess 设置为 true
java
private MutableLiveData<Boolean> mLoginSuccess = new MutableLiveData<>(false);//是否登录成功

// get

private void getUserInfo(int id) {
    showLoading(true);
    mModel.getUserInfo(String.valueOf(id), new IRequestCallback<ResBase<ResUser>>() {
        @Override
        public void onLoadFinish(ResBase<ResUser> datas) {
            showLoading(false);
            mLoginSuccess.setValue(true);
            //发送一个已登录的状态
            MessageEvent.LoginStatusEvent.post(true);
        }

        @Override
        public void onLoadFailure(int errorCode, String message) {
            showLoading(false);
            showToast(message);
        }
    });

}
项目内路径:LsxbugVideo/feature_user/src/main/java/com/ls/feature_user/ui/login/LoginViewModel.java
在 LoginActivity 中监听 mLoginSuccess,为 true 则关闭登录页面:
java
@Override
protected void initView() {
  	// ...
    mViewModel.getLoginSuccess().observe(this, isLoginSuceess -> {
        if (isLoginSuceess) {
            finish();//登录成功后 关闭当前页面
        }
    });
}
项目内路径:LsxbugVideo/feature_user/src/main/java/com/ls/feature_user/ui/login/LoginActivity.java
这样,登录完成后的完整回路就闭合了:登录页拿到 token 和用户详情后发送粘性事件,同时关闭自己;UserFragment 在重新活跃时接住这条消息,把登录状态交给 UserViewModel;ViewModel 再把用户对象拆成头像、昵称、签名和统计数据,最终刷新整个个人中心页。
2. 登录链路回顾:从 LoginActivity 到 UserManager 的状态落盘与 UI 回刷
把个人中心页的刷新逻辑打通以后,最好再回头梳理一次登录态到底怎么流转。这样后面继续补设置页、退出登录和协议页面时,才不会把状态入口做散。
第一张图先把登录页、用户页、事件总线和 UserManager 的配合关系完整展开:
libbase.eventbus
libbase.manager
feature_user.ui.user
feature_user.ui.login
UserApplication
DataBinding / 点击登录 / 观察登录结果
sendCode() / login()
创建并绑定
持有
初始化时先校验登录态
loadUserInfo(mModel.isLogin())
收到登录状态消息后
event.isLogin()
loadUserInfo(login)
Application 启动后提供全局 Context
创建 EncryptedSharedPreferences
isLogin()
token != null && !token.isEmpty()
getUserInfo()
mobileLogin() 成功后
saveToken(token)
getUserInfo() 成功后
saveUserInfo(ResUser)
getUserInfo() 成功后
mLoginSuccess = true
登录成功后发送粘性消息
MessageEvent.LoginStatusEvent.post(true)
onStart() register(this)
postSticky(LoginStatusEvent)
分发登录状态
onStop() unregister(this)
UserApplication
extends BaseApplication
LoginActivity
LoginViewModel
LoginModel
UserFragment
UserViewModel
UserModel
UserManager
BaseApplication.getContext()
MessageEvent.LoginStatusEvent
这一层链路里要盯住的关键点:
LoginActivity -> LoginViewModel -> LoginModel:登录页通过 MVVM 发起验证码发送、手机号登录和用户信息请求。LoginModel -> UserManager:登录成功后先保存token,拿到用户详情后再保存用户信息,这两部分都落在EncryptedSharedPreferences。UserManager.isLogin():通过token是否存在且非空来校验登录状态。LoginViewModel -> MessageEvent.LoginStatusEvent.post(true):登录完成后发送粘性登录状态消息。UserFragment -> UserViewModel -> UserModel -> UserManager:用户页既会在初始化时主动校验登录状态,也会在收到 EventBus 登录消息后再次刷新 UI。
第二张图把关键动作再压回到一个更容易回忆的顺序里,适合后面继续扩展设置页和退出登录逻辑时对照检查。
UserApplication
libbase.manager
feature_user.ui.login
libbase.eventbus
feature_user.ui.user
创建绑定
持有
初始化校验登录态
收到登录事件
loadUserInfo(login)
绑定/触发登录
sendCode / login
登录成功回传
postSticky(true)
saveToken(token)
saveUserInfo(user)
提供全局 Context
创建加密 SP
isLogin()
getUserInfo()
register
分发登录状态
unregister
UserFragment
UserViewModel
UserModel
MessageEvent.LoginStatusEvent
LoginActivity
LoginViewModel
LoginModel
UserManager
BaseApplication.getContext()
UserApplication
后面的设置页、账号页、密码页和退出登录逻辑,本质上都围绕这条主线继续扩展:状态写进 UserManager,页面通过 ViewModel 判断当前登录态,再根据动作枚举或事件消息决定具体 UI 行为。
3. 设置页界面搭建与通用返回能力下沉
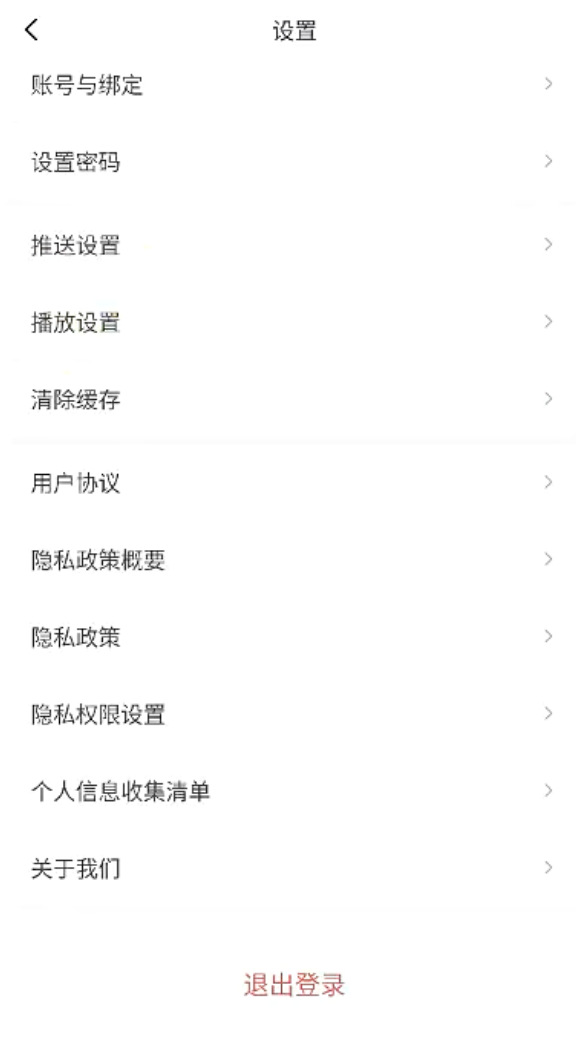
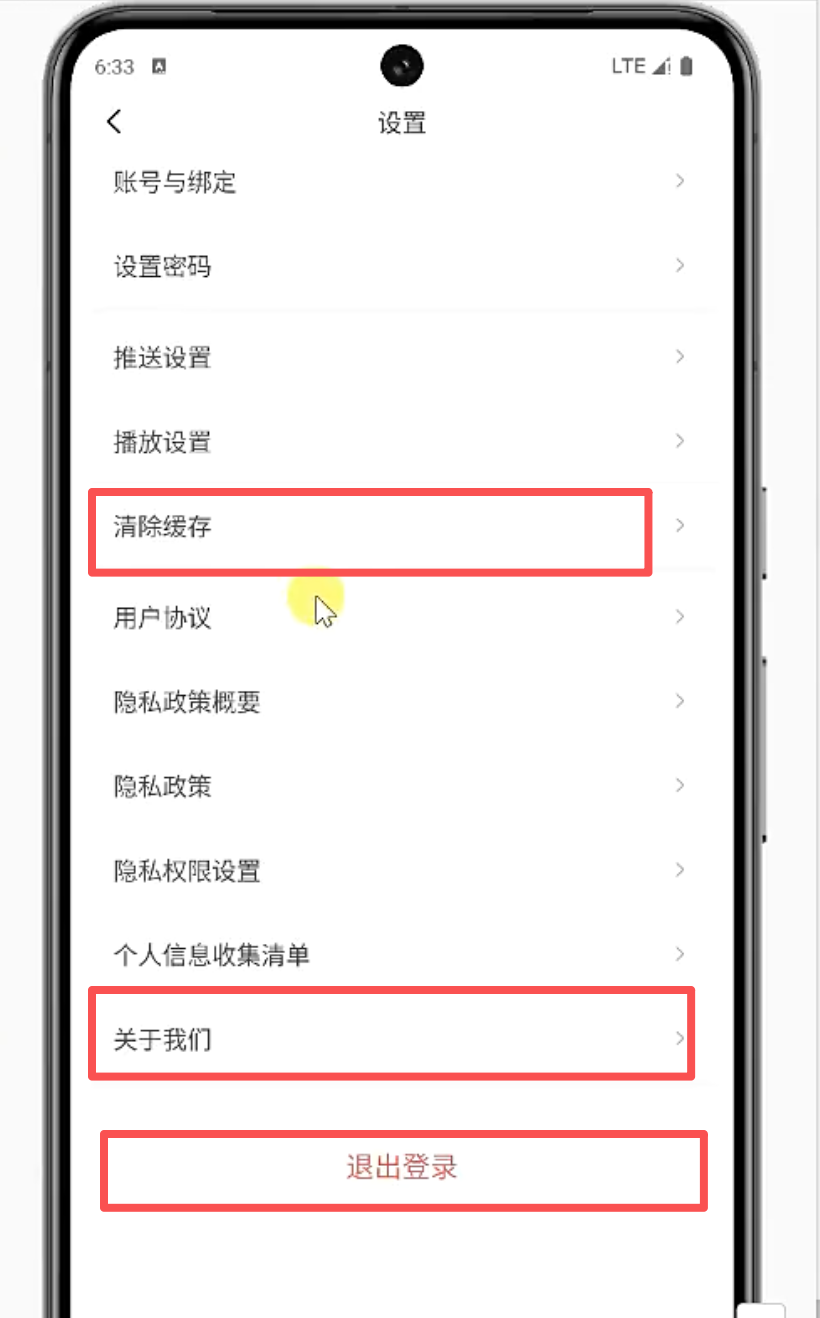
登录态链路打通以后,下一步开始搭设置页。这个页面表面上是若干条列表项,真正要处理的是三件事:
- 界面如何复用;
- 每一项如何和 ViewModel 绑定;
- 通用的返回关闭能力该不该继续写在页面自己的 ViewModel 里;
先看设置页主布局:
- 每个设置项都通过
include复用item_settings_normal.xml,避免"标题 + 右箭头 + 可选内容"这套结构重复写很多遍。 app:content="@{viewModel.mobile}"、app:content="@{viewModel.cacheSize}"这类绑定,把动态文案直接挂到 ViewModel 上,设置页不需要手动找控件更新文本。- 每个条目的点击都直接映射到 ViewModel 的某个方法,后面统一由动作枚举分发页面跳转或弹窗显示。
xml
<?xml version="1.0" encoding="utf-8"?>
<layout xmlns:android="http://schemas.android.com/apk/res/android"
    xmlns:app="http://schemas.android.com/apk/res-auto">

    <data>

        <variable
            name="viewModel"
            type="com.ls.feature_user.ui.settings.SettingsViewModel" />
    </data>

    <androidx.constraintlayout.widget.ConstraintLayout
        android:layout_width="match_parent"
        android:layout_height="match_parent"
        android:background="@color/white"
        android:orientation="vertical">


        <ImageView
            android:id="@+id/iv_back"
            android:layout_width="20dp"
            android:onClick="@{()->viewModel.onFinishPage()}"
            android:layout_height="20dp"
            android:layout_marginStart="@dimen/margin_start_14dp"
            android:src="@mipmap/icon_back_black"
            app:layout_constraintStart_toStartOf="parent"
            app:layout_constraintTop_toTopOf="parent" />

        <TextView
            android:id="@+id/tv_title"
            android:layout_width="wrap_content"
            android:layout_height="wrap_content"
            android:layout_centerInParent="true"
            android:text="设置"
            android:textColor="#333333"
            android:textSize="14sp"
            app:layout_constraintEnd_toEndOf="parent"
            app:layout_constraintStart_toStartOf="parent"
            app:layout_constraintTop_toTopOf="parent" />

        <ScrollView
            android:layout_width="match_parent"
            android:layout_height="0dp"
            app:layout_constraintBottom_toBottomOf="parent"
            app:layout_constraintEnd_toEndOf="parent"
            app:layout_constraintStart_toStartOf="parent"
            app:layout_constraintTop_toBottomOf="@id/tv_title">

            <LinearLayout
                android:layout_width="match_parent"
                android:layout_height="wrap_content"
                android:orientation="vertical">

                <!-- 账号与绑定 -->
                <include
                    layout="@layout/item_settings_normal"
                    android:layout_width="match_parent"
                    android:layout_height="46.5dp"
                    android:onClick="@{() -> viewModel.onAccountBindClick()}"
                    app:content="@{viewModel.mobile}"
                    app:title="@{`账号与绑定`}" />
                <!--                                    app:title="@{@string/app_name}" />-->

                <View
                    android:layout_width="match_parent"
                    android:layout_height="1dp"
                    android:layout_marginStart="10dp"
                    android:layout_marginEnd="9.5dp"
                    android:background="#F8F8F8" />
                <!-- 设置密码 -->
                <include
                    layout="@layout/item_settings_normal"
                    android:layout_width="match_parent"
                    android:layout_height="46.5dp"
                    android:onClick="@{() -> viewModel.onPasswordSettingClick()}"
                    app:title="@{`设置密码`}" />

                <View
                    android:layout_width="match_parent"
                    android:layout_height="5dp"
                    android:layout_marginStart="10dp"
                    android:layout_marginEnd="9.5dp"
                    android:background="#F8F8F8" />

                <!-- 推送设置 -->
                <include
                    layout="@layout/item_settings_normal"
                    android:layout_width="match_parent"
                    android:layout_height="46.5dp"
                    android:onClick="@{() -> viewModel.onPushSettingClick()}"
                    app:title="@{`推送设置`}" />

                <View
                    android:layout_width="match_parent"
                    android:layout_height="1dp"
                    android:layout_marginStart="10dp"
                    android:layout_marginEnd="9.5dp"
                    android:background="#F8F8F8" />
                <!-- 播放设置 -->
                <include
                    layout="@layout/item_settings_normal"
                    android:layout_width="match_parent"
                    android:layout_height="46.5dp"
                    android:onClick="@{() -> viewModel.onPlaySettingClick()}"
                    app:title="@{`播放设置`}" />

                <View
                    android:layout_width="match_parent"
                    android:layout_height="1dp"
                    android:layout_marginStart="10dp"
                    android:layout_marginEnd="9.5dp"
                    android:background="#F8F8F8" />
                <!-- 清除缓存 -->
                <include
                    layout="@layout/item_settings_normal"
                    android:layout_width="match_parent"
                    android:layout_height="46.5dp"
                    android:onClick="@{() -> viewModel.onClearCacheClick()}"
                    app:content="@{viewModel.cacheSize}"
                    app:title="@{`清除缓存`}" />

                <View
                    android:layout_width="match_parent"
                    android:layout_height="5dp"
                    android:layout_marginStart="10dp"
                    android:layout_marginEnd="9.5dp"
                    android:background="#F8F8F8" />
                <!-- 用户协议 -->
                <include
                    layout="@layout/item_settings_normal"
                    android:layout_width="match_parent"
                    android:layout_height="46.5dp"
                    android:onClick="@{() -> viewModel.onUserAgreementClick()}"
                    app:title="@{`用户协议`}" />

                <!-- 隐私政策 -->
                <include
                    layout="@layout/item_settings_normal"
                    android:layout_width="match_parent"
                    android:layout_height="46.5dp"
                    android:layout_marginTop="1dp"
                    android:onClick="@{() -> viewModel.onSimplePrivacyPolicyClick()}"
                    app:title="@{`隐私政策概要`}" />

                <include
                    layout="@layout/item_settings_normal"
                    android:layout_width="match_parent"
                    android:layout_height="46.5dp"
                    android:layout_marginTop="1dp"
                    android:onClick="@{() -> viewModel.onPrivacyPolicyClick()}"
                    app:title="@{`隐私政策`}" />

                <include
                    layout="@layout/item_settings_normal"
                    android:layout_width="match_parent"
                    android:layout_height="46.5dp"
                    android:layout_marginTop="1dp"
                    android:onClick="@{() -> viewModel.onPermissionSettingsClick()}"
                    app:title="@{`隐私权限设置`}" />

                <include
                    layout="@layout/item_settings_normal"
                    android:layout_width="match_parent"
                    android:layout_height="46.5dp"
                    android:layout_marginTop="1dp"
                    android:onClick="@{() -> viewModel.onUserInfoMenusClick()}"
                    app:title="@{`个人信息收集清单`}" />

                <!-- 关于我们 -->
                <include
                    layout="@layout/item_settings_normal"
                    android:layout_width="match_parent"
                    android:layout_height="46.5dp"
                    android:layout_marginTop="1dp"
                    android:onClick="@{() -> viewModel.onAboutUsClick()}"
                    app:title="@{`关于我们`}" />

                <View
                    android:layout_width="match_parent"
                    android:layout_height="5dp"
                    android:layout_marginStart="10dp"
                    android:layout_marginEnd="9.5dp"
                    android:background="#F8F8F8" />

                <!-- 退出登录按钮 -->
                <TextView
                    android:layout_width="match_parent"
                    android:layout_height="46.5dp"
                    android:layout_marginTop="20dp"
                    android:background="@android:color/white"
                    android:gravity="center"
                    android:onClick="@{() -> viewModel.onLogoutClick()}"
                    android:text="退出登录"
                    android:textColor="#FF4444"
                    android:textSize="16sp"
                    android:visibility="@{viewModel.showExitLoginBtn}" />

            </LinearLayout>
        </ScrollView>
    </androidx.constraintlayout.widget.ConstraintLayout>
</layout>
项目内路径:LsxbugVideo/feature_user/src/main/res/layout/activity_settings.xml
复用条目布局 item_settings_normal.xml
- 参考 databinding 制定 viewmodel 的写法,实现 variable ,分别为 String 类型的标题和内容
- 通过
@{content}、@{title}指定控件的 text - 在 activity_settings.xml 中,使用
app:title="@{账号与绑定}"、app:content="@{viewModel.xxx}"赋值;
xml
<?xml version="1.0" encoding="utf-8"?>
<layout xmlns:android="http://schemas.android.com/apk/res/android">

    <data>

        <variable
            name="title"
            type="String" />

        <variable
            name="content"
            type="String" />
    </data>

    <RelativeLayout
        android:layout_width="match_parent"
        android:layout_height="46.5dp"
        android:background="@android:color/white"
        android:paddingStart="24dp"
        android:paddingEnd="24dp">

        <TextView
            android:layout_width="wrap_content"
            android:layout_height="wrap_content"
            android:layout_centerVertical="true"
            android:text="@{title}"
            android:textColor="#444444"
            android:textSize="14sp" />

        <TextView
            android:layout_width="wrap_content"
            android:layout_height="wrap_content"
            android:layout_centerVertical="true"
            android:layout_toStartOf="@+id/iv_arrow"
            android:text="@{content}"
            android:textColor="#9C9C9C"
            android:textSize="14sp" />

        <ImageView
            android:id="@+id/iv_arrow"
            android:layout_width="12dp"
            android:layout_height="12dp"
            android:layout_alignParentEnd="true"
            android:layout_centerVertical="true"
            android:src="@mipmap/icon_menu_right_arrow" />
    </RelativeLayout>
</layout>
项目内路径:LsxbugVideo/feature_user/src/main/res/layout/item_settings_normal.xml
条目复用完成以后,页面结构就能快速铺开:
SettingsActivity 这一层先把 ViewModel 和布局绑起来,并处理状态栏高度。页面初始化阶段还没有业务动作,重点只是让设置页能正常起屏。
java
@Route(path = ARouterPath.User.ACTIVITY_SETTINGS)
public class SettingsActivity extends BaseActivity<ActivitySettingsBinding, SettingsViewModel> {
    private static final String TAG = "SettingsActivity";

    @Override
    protected SettingsViewModel getViewModel() {
        return new ViewModelProvider(this).get(SettingsViewModel.class);
    }

    @Override
    protected int getLayoutResId() {
        return R.layout.activity_settings;
    }

    @Override
    protected int getBindingVariableId() {
        return BR.viewModel;
    }

    @Override
    protected void initView() {
        StatusBarUtils.addStatusBarHeight2RootView(mDataBinding.getRoot());

    }

    @Override
    protected void initData() {

    }
}
项目内路径:LsxbugVideo/feature_user/src/main/java/com/ls/feature_user/ui/settings/SettingsActivity.java
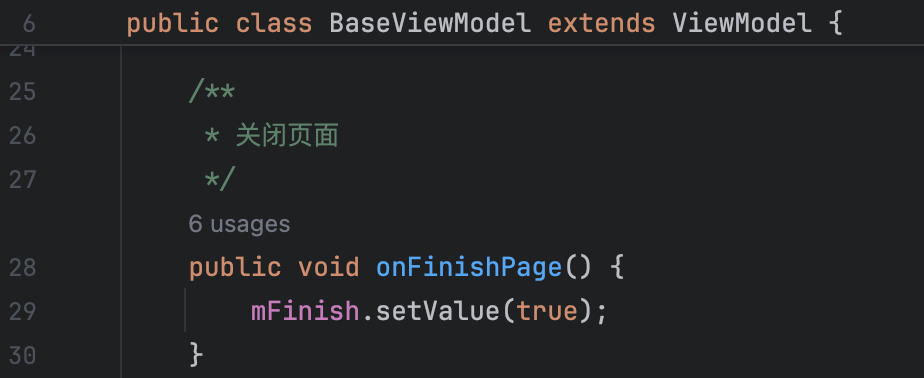
最早的返回逻辑可以先写在 SettingsViewModel 里,把"当前页面是否需要关闭"抽成一个 LiveData。
java
//是否需要关闭当前页面
private MutableLiveData<Boolean> mFinish = new MutableLiveData<>();
// get

public void onFinishPage() {
    mFinish.setValue(true);
}
项目内路径:LsxbugVideo/library_base/src/main/java/com/ls/libbase/base/BaseViewModel.java
然后在 Activity 里观察这个状态,一旦收到 true 就执行 finish()。
java
@Override
protected void initData() {

    mViewModel.getFinish().observe(this, new Observer<Boolean>() {
        @Override
        public void onChanged(Boolean finish) {
            if (finish) {
                finish();//关闭页面
            }
        }
    });
}
项目内路径:LsxbugVideo/feature_user/src/main/java/com/ls/feature_user/ui/settings/SettingsActivity.java
左上角返回按钮只需要和 onFinishPage() 做一次绑定,就能把交互串起来。
xml
<ImageView
    android:id="@+id/iv_back"
    android:layout_width="20dp"
    android:onClick="@{() ->viewModel.onFinishPage()}"
    android:layout_height="20dp"
    android:layout_marginStart="14dp"
    android:src="@mipmap/icon_back_black"
    app:layout_constraintStart_toStartOf="parent"
    app:layout_constraintTop_toTopOf="parent" />
项目内路径:LsxbugVideo/feature_user/src/main/res/layout/activity_settings.xml
不过这个关闭页面的模式非常通用,继续只留在 SettingsViewModel 里会造成重复。
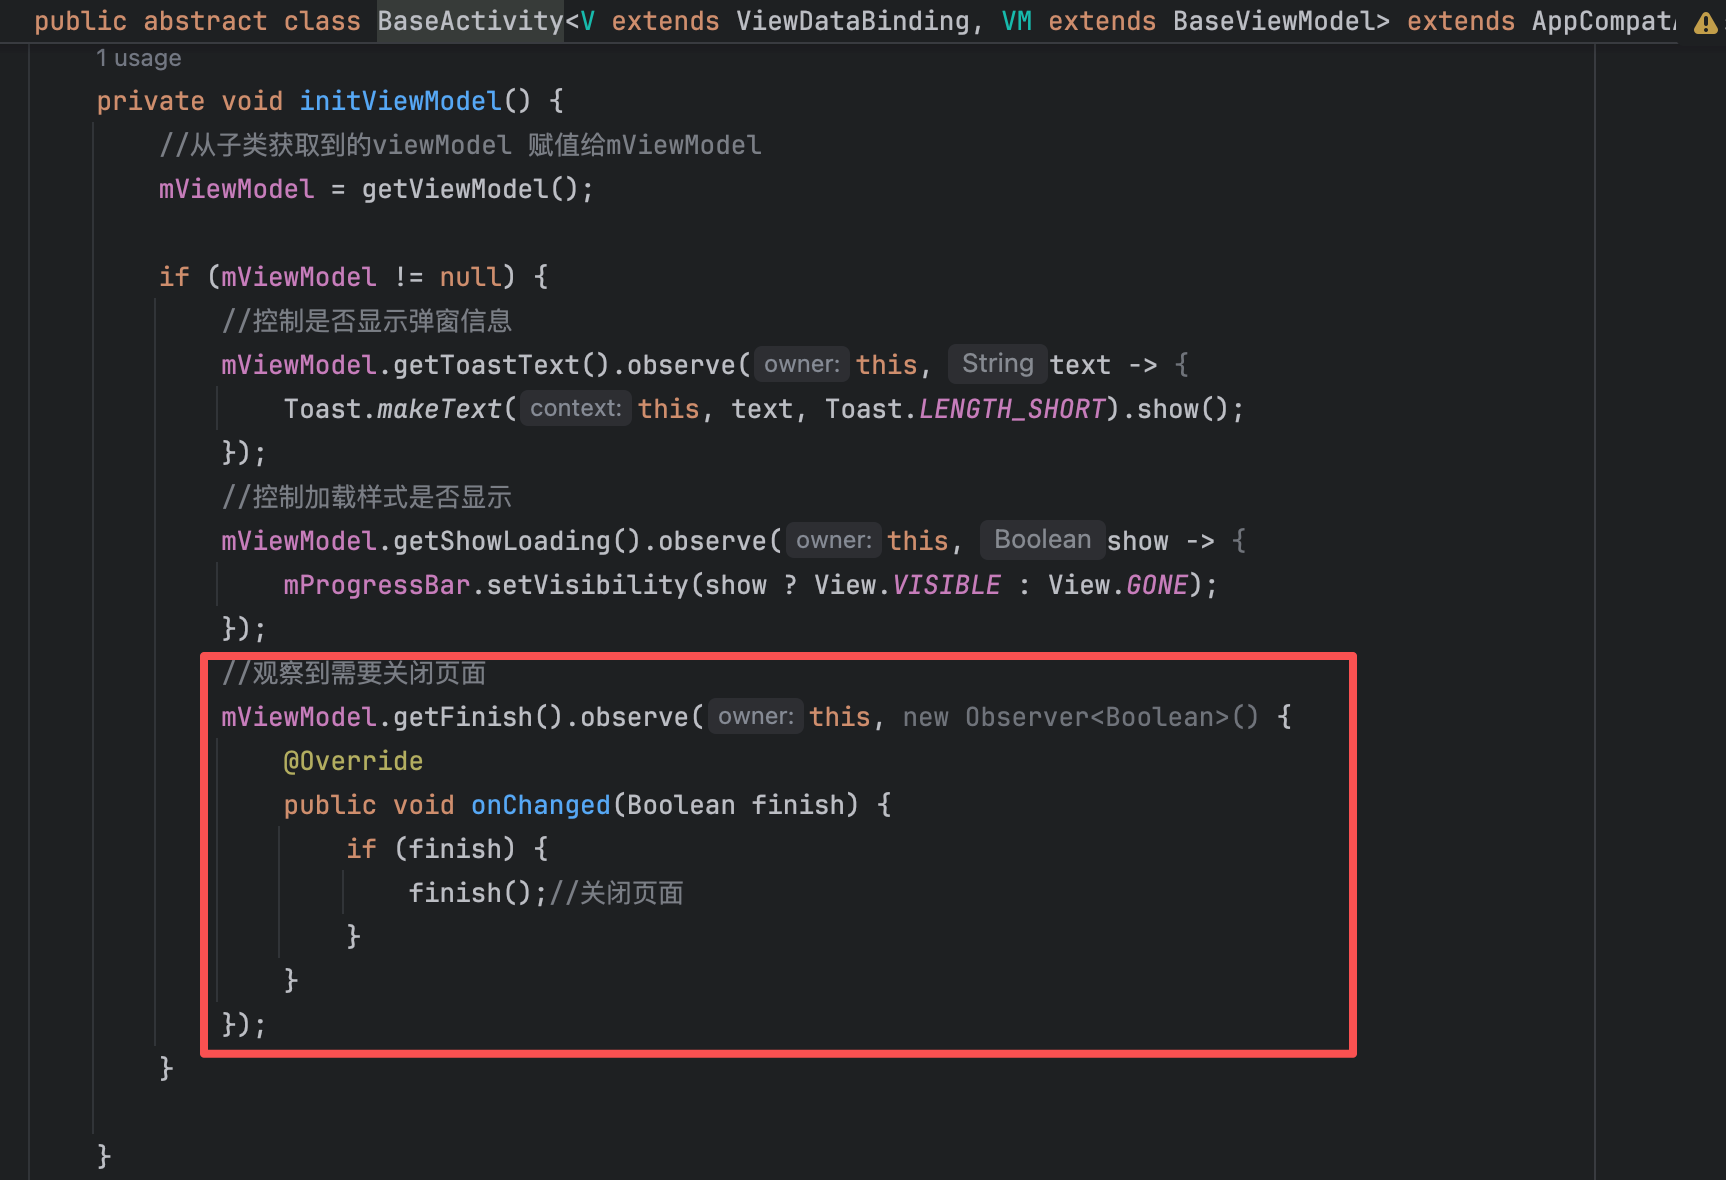
更合理的做法,是把 mFinish 和 onFinishPage() 下沉到 BaseViewModel,再把观察逻辑统一放进 BaseActivity。
java
private void initViewModel() {
    //从子类获取到的viewModel 赋值给mViewModel
    mViewModel = getViewModel();

    if (mViewModel != null) {
        //控制是否显示弹窗信息
        mViewModel.getToastText().observe(this, text -> {
            Toast.makeText(this, text, Toast.LENGTH_SHORT).show();
        });
        //控制加载样式是否显示
        mViewModel.getShowLoading().observe(this, show -> {
            mProgressBar.setVisibility(show ? View.VISIBLE : View.GONE);
        });
        //观察到需要关闭页面
        mViewModel.getFinish().observe(this, new Observer<Boolean>() {
            @Override
            public void onChanged(Boolean finish) {
                if (finish) {
                    finish();//关闭页面
                }
            }
        });
    }

}
项目内路径:LsxbugVideo/library_base/src/main/java/com/ls/libbase/base/BaseActivity.java
这一步下沉完成以后,后面的协议页、账号与绑定页、设置密码页、关于我们页都可以直接复用"ViewModel 发关闭信号,BaseActivity 统一 finish"的模式,页面只保留自己的业务逻辑。
4. 用枚举驱动设置页动作分发与路由跳转
设置页条目一多,如果每个点击都单独写一套 LiveData,View 和 ViewModel 之间的沟通会迅速失控。这里更稳的做法,是把所有页面动作统一抽象成一个枚举,再由 Activity 观察这个枚举,决定究竟是跳页面、弹对话框还是直接关闭当前页。
要让这些入口真正工作起来,先看最终想要覆盖的跳转范围:
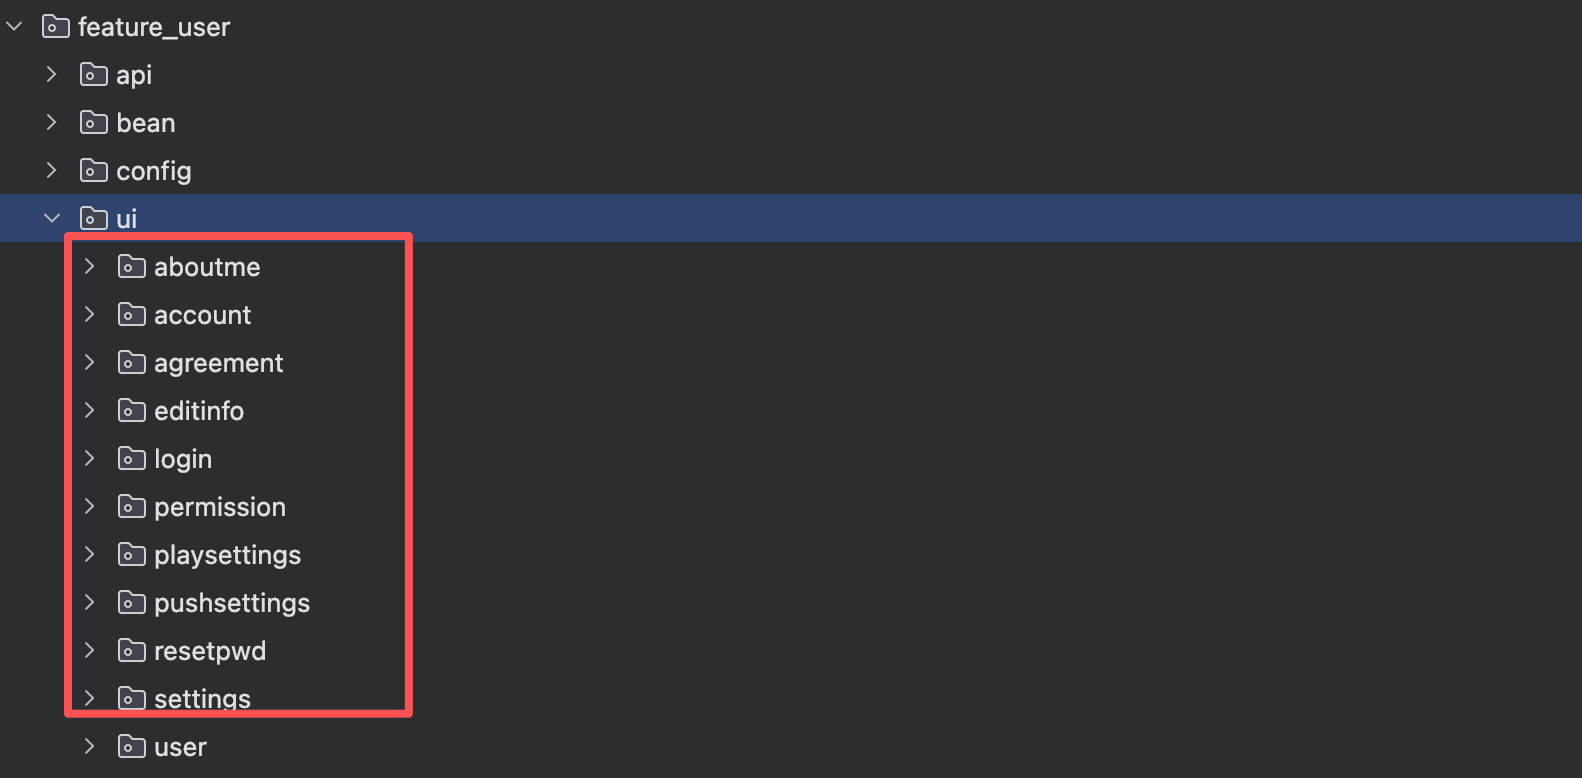
设置页涉及的页面比较多,先把用户模块的页面包结构拆干净,每个页面一套 Activity + ViewModel + Model,后面路由和动作枚举就有清晰落点。
路由常量先统一加到 ARouterPath 里,这样所有页面跳转都只依赖一份集中配置。
java
public class ARouterPath {

    //.....

    public static class User {

        private static final String USER = "/user";
        public static final String FRAGMENT_USER = USER + "/userFragment";

        public static final String ACTIVITY_LOGIN = USER + "/loginActivity";
        public static final String ACTIVITY_AGREEMENT = USER + "/AgreementActivity";

        //设置页
        public static final String ACTIVITY_SETTINGS = USER + "/SettingsActivity";
        //修改密码
        public static final String ACTIVITY_RESETPWD = USER + "/ResetPasswordActivity";
        //推送设置
        public static final String ACTIVITY_PUSHSETTINGS = USER + "/PushSettingsActivity";
        //播放设置
        public static final String ACTIVITY_PLAYTTINGS = USER + "/PlaySettingsActivity";
        //账户与绑定
        public static final String ACTIVITY_ACCOUNT = USER + "/AccountActivity";
        public static final String ACTIVITY_PERMISSION = USER + "/PermissionActivity";
        public static final String ACTIVITY_EDITUSERINFO = USER + "/EditUserInfoActivity";
        public static final String ACTIVITY_ABOUTME = USER + "/AboutMeActivity";
    }


}
项目内路径:LsxbugVideo/library_base/src/main/java/com/ls/libbase/config/ARouterPath.java
比如账号与绑定页,对应的 Activity 先落成一个标准页壳,这样设置页后面触发路由时就有明确目的地。
java
@Route(path = ARouterPath.User.ACTIVITY_ACCOUNT)
public class AccountActivity extends BaseActivity<ActivityAccountBinding,AccountViewModel> {


    @Override
    protected AccountViewModel getViewModel() {
        return new ViewModelProvider(this).get(AccountViewModel.class) ;
    }

    @Override
    protected int getLayoutResId() {
        return R.layout.activity_account;
    }

    @Override
    protected int getBindingVariableId() {
        return BR.viewModel;
    }

    @Override
    protected void initView() {
        StatusBarUtils.addStatusBarHeight2RootView(mDataBinding.getRoot());
    }

    @Override
    protected void initData() {

    }
}
项目内路径:LsxbugVideo/feature_user/src/main/java/com/ls/feature_user/ui/account/AccountActivity.java
当设置页需要区分"已登录跳账号页"和"未登录先跳登录页"时,单个布尔开关已经不够用了,这时就该把动作抽成枚举。
在 SettingsViewModel 中,负责根据当前状态生成动作,不负责真正跳转:
- 定义设置页面具体要跳转的页面变量 mAction,类型为
MutableLiveData<SettingsAction>,表示枚举 SettingsAction 对应的类型; - onAccountBindClick() 方法,与 activity_settings.xml 中,账号与绑定 item 的点击绑定;
- 当点击账号与绑定选项,先判断用户是否登录,根据登录状态,设置 mAction 对应的跳转页面,是 AccountActivity 还是 LoginActivity 对应的枚举常量;
java
private MutableLiveData<SettingsAction> mAction = new MutableLiveData<>();
// get

/**
 * 账号与绑定点击事件
 */
public void onAccountBindClick() {
    if (mModel.isLogin()) {
        mAction.setValue(SettingsAction.NAVIGATION_TO_ACCOUNT);
    } else {
        mAction.setValue(SettingsAction.NAVIGATE_TO_LOGIN);
    }
}

/**
 * 枚举
 */
public enum SettingsAction {
    FINISH,                      // 关闭页面
    SHOW_LOGOUT_DIALOG,         // 显示退出登录的弹窗
    NAVIGATION_TO_ACCOUNT,   // 跳转到账号与绑定
    NAVIGATION_TO_PASSWORD,// 跳转到设置密码页
    NAVIGATE_TO_PUSH_SETTING,   // 跳转到推送设置
    NAVIGATE_TO_PLAY_SETTING,   // 跳转到播放设置
    SHOW_CLEAR_CACHE_DIALOG,    // 显示清除缓存对话框
    NAVIGATE_TO_USER_AGREEMENT, // 跳转到用户协议
    NAVIGATE_TO_SIMPLE_PRIVACY_POLICY, // 跳转到概要隐私政策
    NAVIGATE_TO_PRIVACY_POLICY, // 跳转到隐私政策
    NAVIGATE_TO_PERMISSION_SETTING, // 跳转到权限设置
    NAVIGATE_TO_USER_INFO_MENU, // 跳转到用户信息清单
    NAVIGATE_TO_ABOUT_US,       // 跳转到关于我们
    NAVIGATE_TO_LOGIN   // 跳转到登录页
}
项目内路径:LsxbugVideo/feature_user/src/main/java/com/ls/feature_user/ui/settings/SettingsViewModel.java
这段枚举驱动的好处在于:
- ViewModel 只负责判定"应该做什么",例如跳账号页、跳登录页或弹对话框。
- Activity 只负责消费动作,不介入登录态判断。
- 所有设置页动作都收敛到
SettingsAction一处,后面新增入口时不会到处补零散状态。
在 SettingsActivity 中,观察 mAction,根据枚举值,再把每种动作映射成真正的页面跳转或弹窗显示。
java
@Override
protected void initView() {
    StatusBarUtils.addStatusBarHeight2RootView(mDataBinding.getRoot());

    mViewModel.getAction().observe(this, settingsAction -> {
        switch (settingsAction) {
            case NAVIGATION_TO_ACCOUNT://账号与绑定
                ARouter.getInstance().build(ARouterPath.User.ACTIVITY_ACCOUNT).navigation();
                break;
            case NAVIGATION_TO_PASSWORD://设置密码
                ARouter.getInstance().build(ARouterPath.User.ACTIVITY_RESETPWD).navigation();
                break;
            case NAVIGATE_TO_PUSH_SETTING://推送设置
                ARouter.getInstance().build(ARouterPath.User.ACTIVITY_PUSHSETTINGS).navigation();
                break;
            case NAVIGATE_TO_PLAY_SETTING://播放设置
                ARouter.getInstance().build(ARouterPath.User.ACTIVITY_PLAYTTINGS).navigation();
                break;
            case SHOW_CLEAR_CACHE_DIALOG://清除缓存
                //显示清除缓存的弹窗
                showClearCacheDialog();
                break;
            case NAVIGATE_TO_USER_AGREEMENT://用户协议
                ARouter.getInstance().build(ARouterPath.User.ACTIVITY_AGREEMENT)
                        .withInt(UserConfig.AgreementType.KEY_AGREEMENT_TYPE, UserConfig.AgreementType.VALUE_AGREEMENT)
                        .navigation();
                break;
            case NAVIGATE_TO_SIMPLE_PRIVACY_POLICY://隐私概要
                ARouter.getInstance().build(ARouterPath.User.ACTIVITY_AGREEMENT)
                        .withInt(UserConfig.AgreementType.KEY_AGREEMENT_TYPE, UserConfig.AgreementType.VALUE_SIMPLE_PRIVATE)
                        .navigation();
                break;
            case NAVIGATE_TO_PRIVACY_POLICY://隐私政策
                ARouter.getInstance().build(ARouterPath.User.ACTIVITY_AGREEMENT)
                        .withInt(UserConfig.AgreementType.KEY_AGREEMENT_TYPE, UserConfig.AgreementType.VALUE_PRIVATE)
                        .navigation();
                break;
            case NAVIGATE_TO_PERMISSION_SETTING://隐私权限设置页面
                break;
            case NAVIGATE_TO_USER_INFO_MENU://用户信息收集清单
                ARouter.getInstance().build(ARouterPath.User.ACTIVITY_AGREEMENT)
                        .withInt(UserConfig.AgreementType.KEY_AGREEMENT_TYPE, UserConfig.AgreementType.VALUE_USER_INFO)
                        .navigation();
                break;
            case FINISH://关闭当前页面
                finish();
                break;
            case NAVIGATE_TO_ABOUT_US://关于我们
                ARouter.getInstance().build(ARouterPath.User.ACTIVITY_ABOUTME).navigation();
                break;
            case SHOW_LOGOUT_DIALOG://退出登录
                showLogoutDialog();
                break;
            case NAVIGATE_TO_LOGIN://跳转到登录页
                ARouter.getInstance().build(ARouterPath.User.ACTIVITY_LOGIN).navigation();
                break;
        }
    });

}
项目内路径:LsxbugVideo/feature_user/src/main/java/com/ls/feature_user/ui/settings/SettingsActivity.java
这样一来,设置页每个 item 的职责就清晰了:XML 只发点击,ViewModel 只产出动作,Activity 只执行动作。状态判断和页面跳转不再纠缠在一起。
把各个条目 item 都切换到"枚举驱动"以后,接下来就可以继续处理那些不直接跳页、而是需要先二次确认的动作,比如清除缓存和退出登录弹窗。
5. 设置页确认弹窗:通用 YesOrNoDialog 的封装与调用
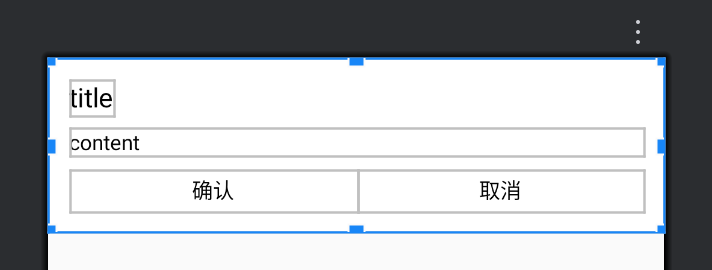
设置页里有两类动作不适合点完立刻执行:清除缓存和退出登录。它们都属于带破坏性后果的操作,必须先给用户一次确认机会。这里的重点不是只做一个弹窗,而是把确认弹窗抽成通用组件,后续所有"确认/取消"场景都能直接复用。
先看需要被确认的交互形态:
弹窗布局先落到 library_base,这样用户模块和其他业务模块都可以共用。
xml
<?xml version="1.0" encoding="utf-8"?>
<layout xmlns:android="http://schemas.android.com/apk/res/android"
    xmlns:app="http://schemas.android.com/apk/res-auto">

    <data>

    </data>

    <androidx.constraintlayout.widget.ConstraintLayout
        android:layout_width="match_parent"
        android:layout_height="wrap_content"
        android:background="@color/white"
        android:padding="@dimen/margin_start_14dp">

        <TextView
            android:id="@+id/tv_title"
            android:layout_width="wrap_content"
            android:layout_height="wrap_content"
            android:text="title"
            android:textColor="@color/black"
            android:textSize="18sp"
            app:layout_constraintStart_toStartOf="parent"
            app:layout_constraintTop_toTopOf="parent" />

        <TextView
            android:id="@+id/tv_content"
            android:layout_width="0dp"
            android:layout_height="wrap_content"
            android:layout_marginTop="8dp"
            android:gravity="start"
            android:maxLines="8"
            android:text="content"
            android:textColor="@color/black"
            android:textSize="@dimen/font_size_14sp"
            app:layout_constraintEnd_toEndOf="parent"
            app:layout_constraintStart_toStartOf="parent"
            app:layout_constraintTop_toBottomOf="@id/tv_title" />


        <TextView
            android:id="@+id/tv_confirm"
            android:layout_width="0dp"
            android:layout_height="28dp"
            android:layout_marginTop="8dp"
            android:gravity="center"
            android:text="确认"
            android:textColor="@color/black"
            app:layout_constraintEnd_toStartOf="@id/tv_cancel"
            app:layout_constraintStart_toStartOf="parent"
            app:layout_constraintTop_toBottomOf="@id/tv_content" />

        <TextView
            android:id="@+id/tv_cancel"
            android:layout_width="0dp"
            android:layout_height="28dp"
            android:layout_marginTop="8dp"
            android:gravity="center"
            android:text="取消"
            android:textColor="@color/black"
            app:layout_constraintEnd_toEndOf="parent"
            app:layout_constraintStart_toEndOf="@id/tv_confirm"
            app:layout_constraintTop_toBottomOf="@id/tv_content" />

    </androidx.constraintlayout.widget.ConstraintLayout>
</layout>
项目内路径:LsxbugVideo/library_base/src/main/res/layout/layout_dialog_yes_or_no.xml
这份布局只保留最核心的三个区域:标题、正文和底部的确认/取消按钮。弹窗组件越轻,复用起来越稳定,后面切换文案时也不需要改 Java 层逻辑。
布局准备好以后,再用 DialogFragment 封装真正的弹窗行为。这里不仅要把标题和内容塞进去,还要把按钮回调、显示位置和宽度都处理好。
在 libbase.ui.dialog 下,使用该弹窗布局:
- 继承 DialogFragment,重写 onCreateDialog;
- 调用 getArguments(),从 Bundle 中获取参数信息,去除相关的 title、content;
- 构建 AlertDialog.Builder 构造者;
- 从上下文中获取布局渲染 LayoutInflater;
- 通过数据绑定,对 LayoutDialogYesOrNoBinding 对象进行布局渲染,得到数据绑定对象 binding;
- 从 binding 中设置 Title、Content,如果用户点击确定,使用回调告知外界,同时关闭弹窗;点击取消,则直接关闭弹窗;
- 将 binding 设置为 AlertDialog.Builder 的视图,然后构建 AlertDialog;
- 设置 AlertDialog 弹出监听 setOnShowListener,在弹出监听中,设置弹窗内容居中,宽度为屏幕的 0.9
- 通过 alertDialog.getWindow().getAttributes() 获取弹窗参数,设置弹窗居中;
(int) (getResources().getDisplayMetrics().widthPixels * 0.9)设置宽度为屏幕的90%- 将设置好居中,宽度的布局参数,设置到
alertDialog.getWindow().setAttributes(layoutParams)
java
public class YesOrNoDialog extends DialogFragment {

    @NonNull
    @Override
    public Dialog onCreateDialog(@Nullable Bundle savedInstanceState) {

        Bundle bundle = getArguments();
        String title = bundle.getString("KEY_TITLE");
        String content = bundle.getString("KEY_CONTENT");

        AlertDialog.Builder builder = new AlertDialog.Builder(getActivity());
        //查找布局
        LayoutInflater inflater = LayoutInflater.from(getContext());
        LayoutDialogYesOrNoBinding binding = LayoutDialogYesOrNoBinding.inflate(inflater);
        binding.tvTitle.setText(title);
        binding.tvContent.setText(content);

        binding.tvConfirm.setOnClickListener(v -> {
            mCallback.onConfirm();
            dismiss();//关闭弹窗
        });
        binding.tvCancel.setOnClickListener(v -> {
            dismiss();//关闭弹窗
        });

        //布局关联dialog
        builder.setView(binding.getRoot());
        AlertDialog alertDialog = builder.create();
        //设置弹窗的宽度、位置
        alertDialog.setOnShowListener(dialog -> {
            //在dialog显示之后
            WindowManager.LayoutParams layoutParams = alertDialog.getWindow().getAttributes();
            layoutParams.gravity = Gravity.CENTER;
            layoutParams.width = (int) (getResources().getDisplayMetrics().widthPixels * 0.9);//设置宽度为屏幕的90%
            //更新设置
            alertDialog.getWindow().setAttributes(layoutParams);
        });

        return alertDialog;
    }
}
项目内路径:LsxbugVideo/library_base/src/main/java/com/ls/libbase/ui/dialog/YesOrNoDialog.java
这里的执行顺序需要明确:
- 先从
getArguments()里拿到KEY_TITLE和KEY_CONTENT,决定本次弹窗的展示内容。 - 再通过数据绑定把
layout_dialog_yes_or_no.xml渲染成binding,这样标题和正文可以直接赋值,不需要手写findViewById。 - 点击确认时调用
mCallback.onConfirm(),把"外界想做的事"回调出去,然后关闭弹窗。 - 点击取消时只关闭弹窗,不触发业务动作。
setOnShowListener(...)放到弹窗真正显示之后执行,用来统一设置居中和宽度为屏幕的0.9,避免不同场景下弹窗尺寸不一致。
确认按钮需要一个对外回调接口,否则弹窗组件自己根本不知道"确认之后要清缓存"还是"确认之后要退出登录"。
java
public interface Callback {
    void onConfirm();//点击确定
}
项目内路径:LsxbugVideo/library_base/src/main/java/com/ls/libbase/ui/dialog/YesOrNoDialog.java
接着再补一个 newInstance(...) 和统一的 showDialog(...),把参数构造、Bundle 注入和展示动作都包装起来。

- 往 Bundle 中设置的参数,可以通过在 newInstance 设置,如 title、content、callback;
- 在方法体中,将参数设置到 Bundle
- 调用 YesOrNoDialog 构造方法,以 callback 作为参数实例 YesOrNoDialog;
- 设置 YesOrNoDialog 的 Arguments 参数,参数为 Bundle
- 返回 YesOrNoDialog 对象;
- 封装 showDialog(),先构建好 YesOrNoDialog,然后将 YesOrNoDialog 展示出来,注意 show() 一个弹窗,需要依托于一个 FragmentActivity 对象,所以将 FragmentActivity 作为 showDialog() 参数,外界页面调用 showDialog(),如果是 FragmentActivity,需要把自身传进来
java
private final Callback mCallback;

public YesOrNoDialog(Callback callback) {
    mCallback = callback;
}

private static YesOrNoDialog newInstance(String title, String content, Callback callback) {

    Bundle args = new Bundle();
    args.putString("KEY_TITLE", title);
    args.putString("KEY_CONTENT", content);

    YesOrNoDialog fragment = new YesOrNoDialog(callback);
    fragment.setArguments(args);
    return fragment;
}

public static void showDialog(FragmentActivity activity, String title, String content, Callback callback) {
    YesOrNoDialog yesOrNoDialog = YesOrNoDialog.newInstance(title, content, callback);
    yesOrNoDialog.show(activity.getSupportFragmentManager(), "yesorno");
}
项目内路径:LsxbugVideo/library_base/src/main/java/com/ls/libbase/ui/dialog/YesOrNoDialog.java
这层封装的价值在于:
title、content和callback都通过同一个入口传进来,页面侧不需要再关心Bundle细节。show()依赖FragmentActivity,所以showDialog(...)直接把宿主 Activity 当参数传进来,外界只管调用。- 后续新增确认弹窗时,只要换一组文案和一段回调逻辑就够了。
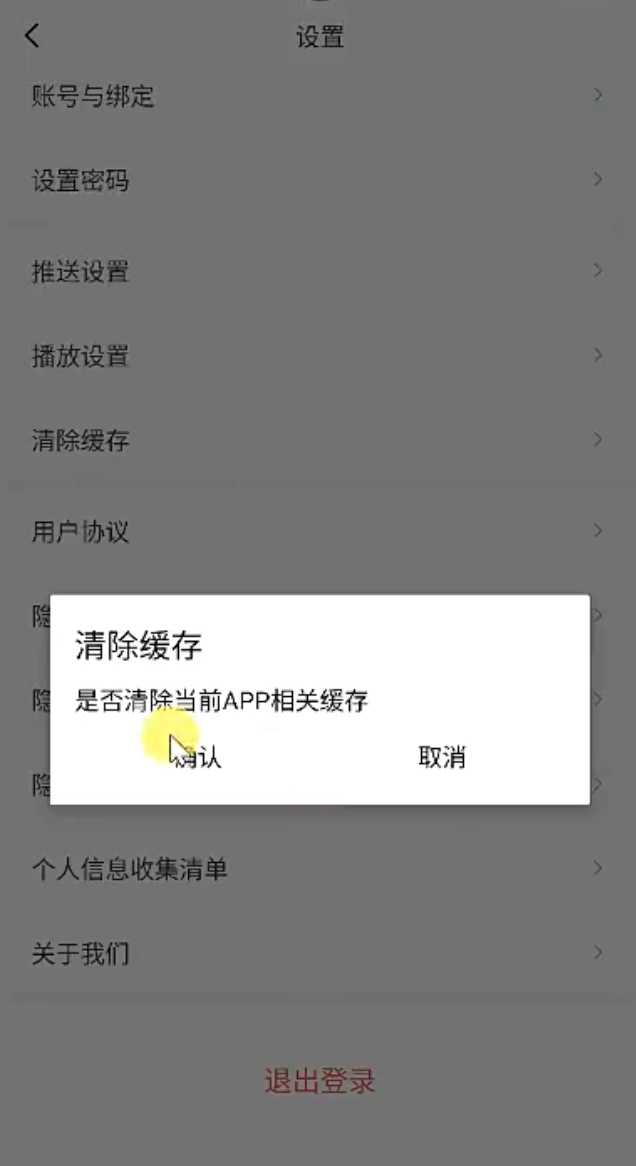
设置页里,退出登录和清除缓存,都调用 YesOrNoDialog 的 showDialog() 方法,展示构建好的弹窗接入:
java
/**
 * 显示是否退出登录的弹窗
 */
private void showLogoutDialog() {
    YesOrNoDialog.showDialog(this, "提示", "是否退出当前账号?",
            new YesOrNoDialog.Callback() {
                @Override
                public void onConfirm() {
                    mViewModel.logout();
                }
            });
}

/**
 * 显示清除缓存的弹窗
 */
private void showClearCacheDialog() {
    YesOrNoDialog.showDialog(this, "清除缓存", "是否清除当前APP相关缓存",
            new YesOrNoDialog.Callback() {
                @Override
                public void onConfirm() {

                }
            });

}
项目内路径:LsxbugVideo/feature_user/src/main/java/com/ls/feature_user/ui/settings/SettingsActivity.java
退出登录和清除缓存虽然业务不同,但这段调用代码的结构完全一致:展示弹窗、确认后触发 ViewModel 方法、取消则什么都不做。公共弹窗组件的价值就在这里体现出来了。
6. 清除缓存能力:缓存统计、删除与 UI 同步刷新
清除缓存这一项不是只有一个"点完就清"的按钮,它至少要解决三个问题:页面上要显示当前缓存大小,点击后要先弹确认框,清理完成后还得把显示值刷新掉。也就是说,缓存统计、缓存删除和 UI 更新是一条完整链路。
设计稿里,清除缓存条目本身就需要先展示一个缓存大小:
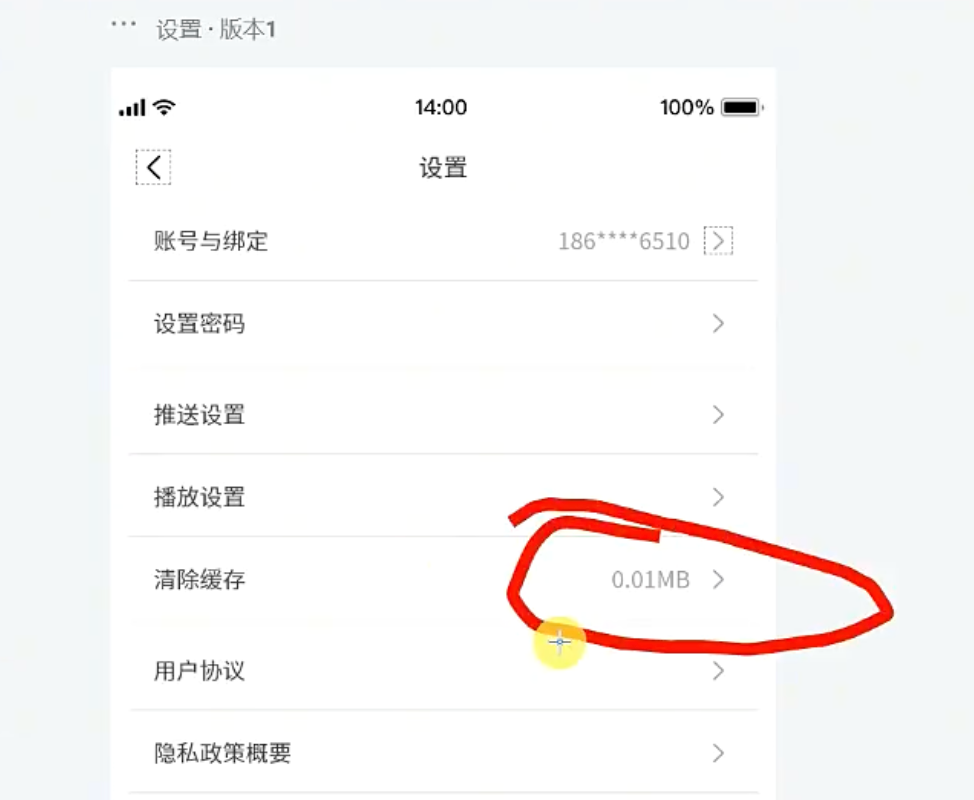
缓存的来源也不是单一目录,图片加载、网络请求等都可能在运行时不断积累数据:
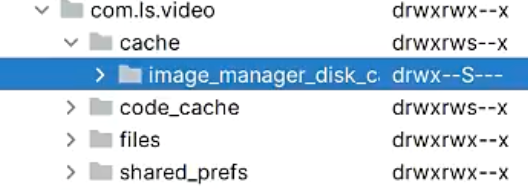
因此,先把缓存查询和缓存删除统一下沉到工具类里最稳妥。
CacheUtils 这段代码需要按职责拆开理解:
getTotalCacheSize()负责查缓存。Android 8.0 及以上优先走StorageStatsManager,因为它更接近系统设置页看到的缓存统计;更低版本则退回到递归遍历cache目录。getFolderSize(File file)是低版本统计的核心,通过递归方式把目录里所有文件大小累加起来。formatSize(long size)把字节值格式化成B / KB / MB / GB / TB,保证设置页展示给用户的是可读值。clearAppCache()删除内部缓存目录,clearExternalCache()删除外部缓存目录,两者都返回布尔值,供上层判断结果。deleteDir(File dir)负责真正执行递归删除,目录先删子节点,再删自己;文件则直接删除。- 工具类全部通过
BaseApplication.getContext()拿全局Context,避免在页面里到处传上下文。 - 查询和删除都做了
try-catch,失败时分别返回"0B"和false,不会把异常直接抛到界面层。
java
/**
 * 缓存管理的工具类
 */
public class CacheUtils {


    // 获取应用缓存大小(不包含外部缓存)
    public static String getTotalCacheSize() {
        Context context = BaseApplication.getContext();
        //安卓8.0以上的系统,可以用StorageStatsManager计算缓存大小,更贴近系统设置显示的缓存大小
        if (Build.VERSION.SDK_INT >= Build.VERSION_CODES.O) {
            try {
                StorageStatsManager storageStatsManager = (StorageStatsManager) context.getSystemService(Context.STORAGE_STATS_SERVICE);
                String packageName = context.getPackageName();
                StorageManager storageManager = (StorageManager) context.getSystemService(Context.STORAGE_SERVICE);
                UUID uuid = storageManager.getUuidForPath(context.getFilesDir());
                StorageStats storageStats = storageStatsManager.queryStatsForPackage(uuid, packageName, Process.myUserHandle());

                long cacheSize = storageStats.getCacheBytes(); // 缓存大小
                return formatSize(cacheSize);
            } catch (Exception e) {
                e.printStackTrace();
                return "0B";
            }
        } else {
            //这种形式的原理是手动计算缓存目录的大小,但是容易不贴近系统缓存
            // 因为在app内无法统计到一些缓存数据,比如系统设置、系统层面管理的缓存等等
            try {
                long cacheSize = getFolderSize(context.getCacheDir());
                //如果需要计算外部存储,可以把这段代码打开
//            if (context.getExternalCacheDir() != null) {
//                cacheSize += getFolderSize(context.getExternalCacheDir());
//            }
                return formatSize(cacheSize);
            } catch (Exception e) {
                e.printStackTrace();
                return "0B";
            }
        }
    }

    // 计算文件夹的大小
    private static long getFolderSize(File file) {
        long size = 0;
        try {
            File[] files = file.listFiles();
            if (files != null) {
                for (File f : files) {
                    if (f.isDirectory()) {
                        size += getFolderSize(f);
                    } else {
                        size += f.length();
                    }
                }
            }
        } catch (Exception e) {
            e.printStackTrace();
        }
        return size;
    }

    // 格式化文件大小(B -> KB -> MB -> GB)
    private static String formatSize(long size) {
        double kiloByte = size / 1024.0;
        if (kiloByte < 1) {
            return size + "B";
        }

        double megaByte = kiloByte / 1024.0;
        if (megaByte < 1) {
            return String.format("%.2fKB", kiloByte);
        }

        double gigaByte = megaByte / 1024.0;
        if (gigaByte < 1) {
            return String.format("%.2fMB", megaByte);
        }

        double teraBytes = gigaByte / 1024.0;
        if (teraBytes < 1) {
            return String.format("%.2fGB", gigaByte);
        }

        return String.format("%.2fTB", teraBytes);
    }


    /**
     * 清除缓存 原理就是删除app内的缓存目录
     */
    public static boolean clearAppCache() {
        boolean success = false;
        Context context = BaseApplication.getContext();
        try {
            File cacheDir = context.getCacheDir();
            success = deleteDir(cacheDir);
        } catch (Exception e) {
            e.printStackTrace();
        }

        return success;
    }

    /**
     * 清除指定目录的缓存
     * 如果需要删除缓存目录以外的目录,比如外部存储的一些数据,那就自行处理
     */
    public static boolean clearExternalCache() {
        boolean isSuccess = false;
        Context context = BaseApplication.getContext();
        try {
            File externalCacheDir = context.getExternalCacheDir();
            isSuccess = deleteDir(externalCacheDir);
        } catch (Exception e) {
            e.printStackTrace();
        }
        return isSuccess;
    }

    private static boolean deleteDir(File dir) {
        if (dir != null && dir.isDirectory()) {
            String[] children = dir.list();
            for (String child : children) {
                boolean success = deleteDir(new File(dir, child));
                if (!success) {
                    return false;
                }
            }
            return dir.delete();
        } else if (dir != null && dir.isFile()) {
            return dir.delete();
        }
        return false;
    }


}
项目内路径:LsxbugVideo/library_base/src/main/java/com/ls/libbase/utils/CacheUtils.java
这段 CacheUtils 的作用,就是统一管理 App 缓存的查询、格式化和清理。
实现要点可以这样理解:
- 整体职责
- 提供"查缓存大小"和"清缓存"两类能力。
- 通过静态方法调用,不需要
new CacheUtils(),哪里用哪里直接调。
getTotalCacheSize()的作用- 用来获取当前应用的缓存大小。
- 返回值是已经格式化好的字符串,比如
512B、12.35KB、3.20MB。
- 安卓 8.0 及以上的处理方式
- 优先使用
StorageStatsManager来查询缓存大小。 - 这种方式更接近系统设置页里显示的缓存值。
- 原因是它统计的是系统层面识别到的缓存数据,不只是你手动能遍历到的目录。
- 优先使用
- 安卓 8.0 以下的处理方式
- 通过
getFolderSize(context.getCacheDir())手动计算cache目录大小。 - 本质就是递归遍历缓存目录,把里面所有文件大小加起来。
- 这种方式简单直接,但统计结果可能和系统设置里的缓存大小不完全一致。
- 通过
getFolderSize(File file)的作用- 递归计算某个文件夹的总大小。
- 如果当前是目录,就继续遍历子文件。
- 如果当前是普通文件,就直接累加
f.length()。
formatSize(long size)的作用- 把字节数转换成更适合展示的单位。
- 转换顺序是:
BKBMBGBTB
- 这样用户在设置页里看到的缓存大小会更直观。
clearAppCache()的作用- 清除应用内部缓存目录,也就是
context.getCacheDir()。 - 本质上就是把缓存目录里的文件递归删除掉。
- 返回
boolean,表示清理是否成功。
- 清除应用内部缓存目录,也就是
clearExternalCache()的作用- 清除外部缓存目录,也就是
context.getExternalCacheDir()。 - 一般是一些放在外部存储区域的缓存文件。
- 同样返回是否删除成功。
- 清除外部缓存目录,也就是
deleteDir(File dir)的作用- 这是清缓存的核心方法。
- 如果传入的是目录,就先递归删除子文件和子目录。
- 如果传入的是文件,就直接删除。
- 最后再删除当前目录本身。
- 为什么用
BaseApplication.getContext()- 因为这些工具方法是静态的,没有页面实例。
- 所以通过全局 `Context`` 获取缓存目录、包名、系统服务。
- 异常处理
- 查询缓存和清理缓存的地方都做了
try-catch。 - 这样即使某一步失败,也不会让应用直接崩溃。
- 查询失败时返回
"0B",清理失败时返回false。
- 查询缓存和清理缓存的地方都做了
- 这段代码的优点
- 结构清晰,查询和清理职责分明。
- 兼容了不同 Android 版本。
- 适合直接放到"设置页 -> 清理缓存"场景里使用。
- 这段代码需要注意的地方
clearAppCache()只清内部缓存,不会清数据库、SP、文件目录。clearExternalCache()只清外部缓存目录,不会清其他自定义目录。deleteDir()里如果children为null,当前写法有空指针风险,最好先判空。- 删除目录本身后,缓存目录通常会在后续使用时被系统或应用重新创建。
一句话概括:
- 查缓存:高版本走系统统计,低版本走手动遍历。
- 清缓存:递归删除缓存目录下的文件和文件夹。
缓存大小拿到以后,先在 SettingsViewModel 里准备好一个可绑定的字段:
java
//缓存大小
private MutableLiveData<String> mCacheSize = new MutableLiveData<>();

// get

/**
 * 刷新缓存大小
 */
public void refreshCashSize() {
    String cacheSize = mModel.getCacheSize();
    mCacheSize.setValue(cacheSize);
}
项目内路径:LsxbugVideo/feature_user/src/main/java/com/ls/feature_user/ui/settings/SettingsViewModel.java
布局这一侧只负责把 cacheSize 展示出来,并把点击动作继续分发到 ViewModel。
xml
<!-- 清除缓存 -->
<include
    layout="@layout/item_settings_normal"
    android:layout_width="match_parent"
    android:layout_height="46.5dp"
    android:onClick="@{() -> viewModel.onClearCacheClick()}"
    app:content="@{viewModel.cacheSize}"
    app:title="@{`清除缓存`}" />
项目内路径:LsxbugVideo/feature_user/src/main/res/layout/activity_settings.xml
Model 再把"查缓存"和"清缓存"变成设置页能直接调用的接口。
java
/**
 * 获取缓存大小
 *
 * @return
 */
public String getCacheSize() {
    String totalCacheSize = CacheUtils.getTotalCacheSize();
    return totalCacheSize;
}

/**
 * 清除缓存
 */
public boolean clearCache() {
    boolean b = CacheUtils.clearAppCache();//清除缓存
    boolean b1 = CacheUtils.clearExternalCache();//如果需要对外部存储的数据做删除,可以自行处理外部的存储目录

    return b && b1;//如果返回true表示删除成功
}
项目内路径:LsxbugVideo/feature_user/src/main/java/com/ls/feature_user/ui/settings/SettingsModel.java
在 SettingsViewModel 中,调用 SettingsModel 清除缓存,并且获取返回结果,是否清除成功;
清除成功,则调用 refreshCashSize() 刷新当前 mCacheSize 的值;
java
/**
 * 清除缓存
 */
public void clearCache() {
    showLoading(true);
    boolean isSuccess = mModel.clearCache();
    if (isSuccess) {
        refreshCashSize();
        showLoading(false);
        showToast("缓存清除成功!");
    } else {
        showToast("缓存清除失败,请手动前往设置页处理!");
        showLoading(false);
    }

}
项目内路径:LsxbugVideo/feature_user/src/main/java/com/ls/feature_user/ui/settings/SettingsViewModel.java
这段逻辑里每一步都承担明确作用:
showLoading(true)先把界面切到处理中状态,避免用户误以为没有响应。mModel.clearCache()返回的是最终清理结果,不是简单地"是否执行过方法"。- 成功分支调用
refreshCashSize(),让列表项里的缓存文案立刻刷新,而不是等用户下次重进页面才看到变化。 - 失败分支直接提示用户去系统设置页处理,避免页面沉默失败。
确认弹窗这边,用户点"确定"之后,才真正调起 clearCache()。
java
/**
 * 显示清除缓存的弹窗
 */
private void showClearCacheDialog() {
    YesOrNoDialog.showDialog(this, "清除缓存", "是否清除当前APP相关缓存",
            new YesOrNoDialog.Callback() {
                @Override
                public void onConfirm() {
                    //清除缓存
                    mViewModel.clearCache();
                }
            });

}
项目内路径:LsxbugVideo/feature_user/src/main/java/com/ls/feature_user/ui/settings/SettingsActivity.java
到这里,清除缓存已经形成了完整闭环:进入页面先显示缓存大小,点击后弹确认框,确认后执行删除,再把结果和新的缓存值同步回设置页。
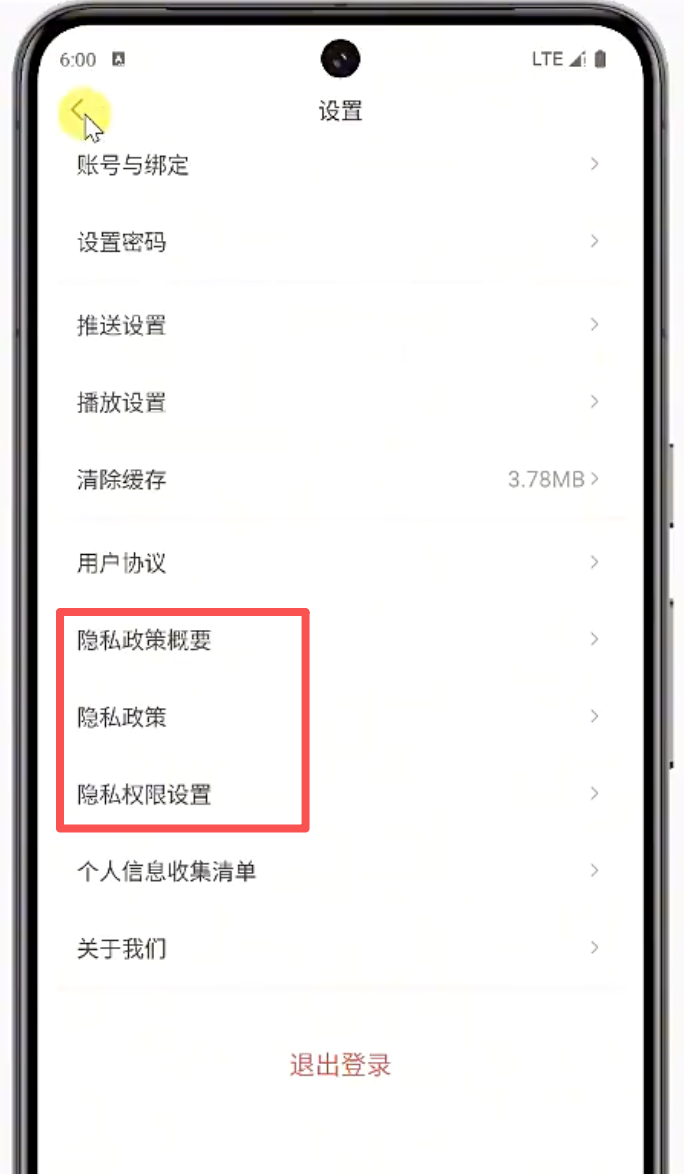
7. 协议页与用户信息清单:通过路由参数复用 WebView 页面
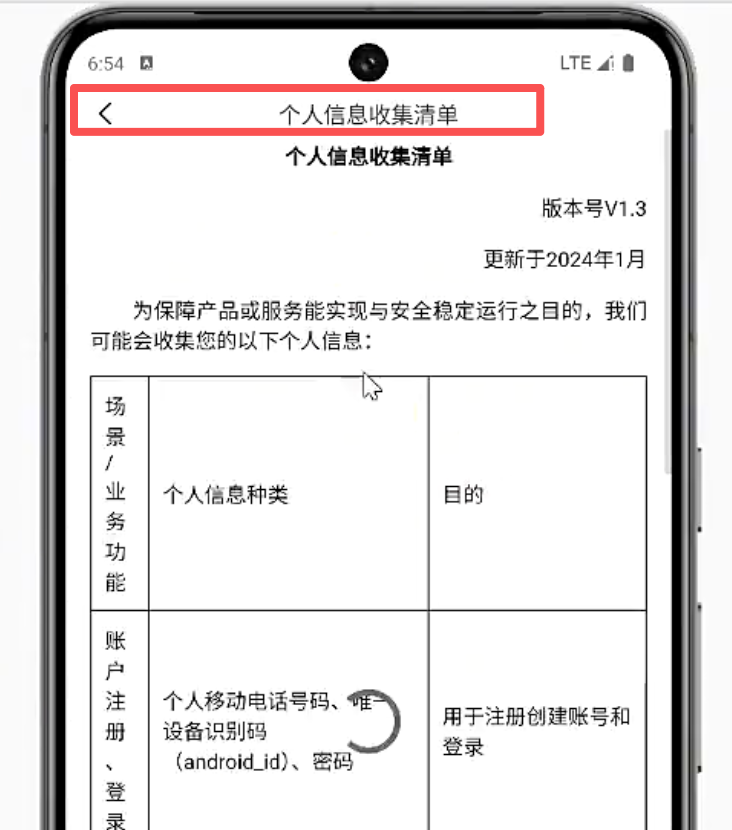
设置页里"用户协议""隐私政策""隐私政策概要""个人信息收集清单"这四个入口,展示形式其实完全一致,差别只在标题和最终加载的 URL。如果每个入口都做一个单独 Activity,不仅重复,而且后续改样式也要改四遍。更合理的做法,是只保留一个 AgreementActivity,再通过路由参数区分当前要展示什么内容。
先看页面最终要承载的协议内容:
Activity 里先把几种 URL 定下来:
java
private final String BASE_URL = "https://titok.fzqq.fun/";
private final String PRIVATE_URL = BASE_URL + "agreement.html";//隐私政策、隐私概要
private final String AGREEMENT_URL = BASE_URL + "UserAgreement.html";//用户协议
private final String USER_INFO_URL = BASE_URL + "userinfomenus.html";//隐私政策、隐私概要
项目内路径:LsxbugVideo/feature_user/src/main/java/com/ls/feature_user/ui/agreement/AgreementActivity.java
协议类型的 key 和 value 统一抽到 UserConfig,实现跳转的协议类型参数的 key、value:
java
public class UserConfig {

    public static class AgreementType {
        public static final String KEY_AGREEMENT_TYPE = "KEY_AGREEMENT_TYPE";//跳转到协议页面的key

        public static final int VALUE_AGREEMENT = 0;//用户协议
        public static final int VALUE_PRIVATE = 1;//隐私政策
        public static final int VALUE_SIMPLE_PRIVATE = 2;//隐私政策概要
        public static final int VALUE_USER_INFO = 3;//个人信息收集清单
    }
}
项目内路径:LsxbugVideo/feature_user/src/main/java/com/ls/feature_user/config/UserConfig.java
设置页里,四个入口虽然都跳到同一个 AgreementActivity,但会携带不同的协议类型参数。
java
@Override
protected void initView() {
    StatusBarUtils.addStatusBarHeight2RootView(mDataBinding.getRoot());

    mViewModel.getAction().observe(this, settingsAction -> {
        switch (settingsAction) {
            // ....
            case NAVIGATE_TO_USER_AGREEMENT://用户协议
                ARouter.getInstance().build(ARouterPath.User.ACTIVITY_AGREEMENT)
                        .withInt(UserConfig.AgreementType.KEY_AGREEMENT_TYPE, UserConfig.AgreementType.VALUE_AGREEMENT)
                        .navigation();
                break;
            case NAVIGATE_TO_SIMPLE_PRIVACY_POLICY://隐私概要
                ARouter.getInstance().build(ARouterPath.User.ACTIVITY_AGREEMENT)
                        .withInt(UserConfig.AgreementType.KEY_AGREEMENT_TYPE, UserConfig.AgreementType.VALUE_SIMPLE_PRIVATE)
                        .navigation();
                break;
            case NAVIGATE_TO_PRIVACY_POLICY://隐私政策
                ARouter.getInstance().build(ARouterPath.User.ACTIVITY_AGREEMENT)
                        .withInt(UserConfig.AgreementType.KEY_AGREEMENT_TYPE, UserConfig.AgreementType.VALUE_PRIVATE)
                        .navigation();
                break;
            case NAVIGATE_TO_PERMISSION_SETTING://隐私权限设置页面
                break;
            case NAVIGATE_TO_USER_INFO_MENU://用户信息收集清单
                ARouter.getInstance().build(ARouterPath.User.ACTIVITY_AGREEMENT)
                        .withInt(UserConfig.AgreementType.KEY_AGREEMENT_TYPE, UserConfig.AgreementType.VALUE_USER_INFO)
                        .navigation();
                break;
            // ......
        }
    });

}
项目内路径:LsxbugVideo/feature_user/src/main/java/com/ls/feature_user/ui/settings/SettingsActivity.java
SettingsActivity 中,上述的四种枚举,都会跳转到 AgreementActivity,AgreementActivity 显示的内容,又携带的跳转参数 UserConfig.AgreementType.KEY_AGREEMENT_TYPE 的 VALUE 决定;
在 AgreementActivity 中,接收 ARouter 参数,需要使用 @Autowire 注入被 public 修饰的成员变量:
java
@Autowired(name = UserConfig.AgreementType.KEY_AGREEMENT_TYPE)
public int mType;
项目内路径:LsxbugVideo/feature_user/src/main/java/com/ls/feature_user/ui/agreement/AgreementActivity.java
ARouter 的初始化动作已经在 BaseActivity 完成了,协议页 AgreementActivity 不需要重复写一遍:
接下来,在 AgreementActivity 中,对 ARouter 注入的参数进行判断,根据参数的值,决定 webview 加载网页的 URL
java
@Override
protected void initData() {
    mViewModel.showLoading(true);

    mDataBinding.webView.setWebViewClient(new WebViewClient() {

        @Override
        public void onPageFinished(WebView view, String url) {
            super.onPageFinished(view, url);
            //网页加载结束  会触发这个方法
            mViewModel.showLoading(false);
        }
    });

    String url = AGREEMENT_URL;
    switch (mType) {
        case UserConfig.AgreementType.VALUE_AGREEMENT:
            url = AGREEMENT_URL;
            mDataBinding.tvTitle.setText("用户协议");
            break;
        case UserConfig.AgreementType.VALUE_SIMPLE_PRIVATE:
        case UserConfig.AgreementType.VALUE_PRIVATE:
            url = PRIVATE_URL;
            mDataBinding.tvTitle.setText("隐私政策");
            break;
        case UserConfig.AgreementType.VALUE_USER_INFO:
            url = USER_INFO_URL;
            mDataBinding.tvTitle.setText("个人信息收集清单");
            break;
    }

    mDataBinding.webView.loadUrl(url);

}
项目内路径:LsxbugVideo/feature_user/src/main/java/com/ls/feature_user/ui/agreement/AgreementActivity.java
这一段要特别注意四件事:
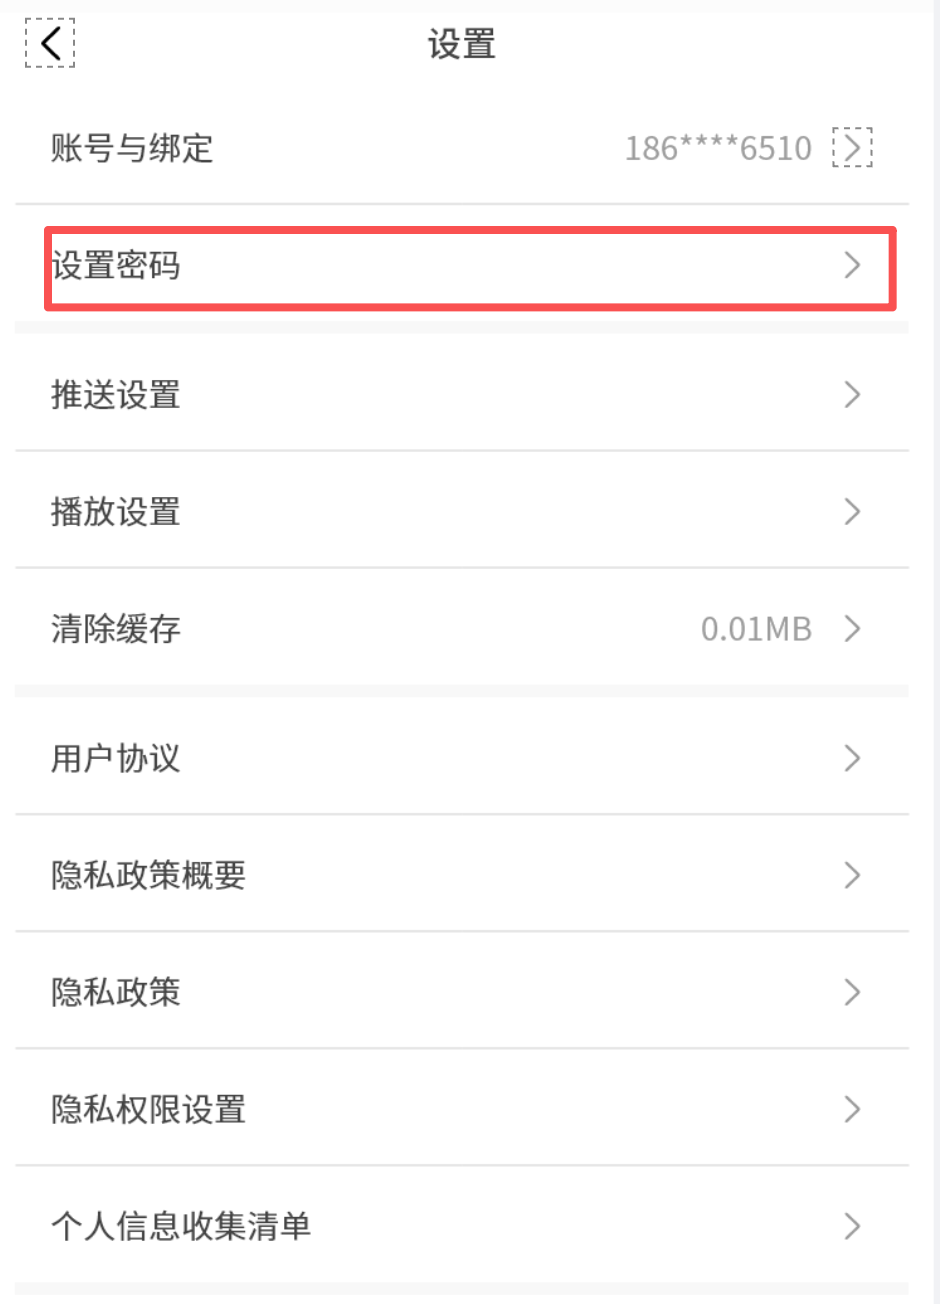
- 页面一开始先
showLoading(true),避免 WebView 首次加载期间毫无反馈。 onPageFinished(...)才关闭 loading,保证动画和真实加载状态一致。switch (mType)决定的不只是 URL,还同步决定标题文案。- "隐私政策"和"隐私政策概要"当前都走同一个
PRIVATE_URL,区别更多体现在上游入口的业务语义上。
协议页的布局也很直接:一个返回按钮、一个标题和一个撑满剩余区域的 WebView。
xml
<?xml version="1.0" encoding="utf-8"?>
<layout xmlns:android="http://schemas.android.com/apk/res/android"
    xmlns:app="http://schemas.android.com/apk/res-auto"
    xmlns:tools="http://schemas.android.com/tools">

    <data>

        <variable
            name="viewModel"
            type="com.ls.libbase.base.BaseViewModel" />
    </data>

    <androidx.constraintlayout.widget.ConstraintLayout
        android:id="@+id/main"
        android:layout_width="match_parent"
        android:layout_height="match_parent"
        android:background="@color/white"
        tools:context=".ui.agreement.AgreementActivity">

        <ImageView
            android:id="@+id/iv_back"
            android:layout_width="20dp"
            android:layout_height="20dp"
            android:layout_marginStart="@dimen/margin_start_14dp"
            android:onClick="@{()->viewModel.onFinishPage()}"
            android:src="@mipmap/icon_back_black"
            app:layout_constraintStart_toStartOf="parent"
            app:layout_constraintTop_toTopOf="parent" />

        <TextView
            android:id="@+id/tv_title"
            android:layout_width="wrap_content"
            android:layout_height="wrap_content"
            android:layout_centerInParent="true"
            android:text="设置"
            android:textColor="#333333"
            android:textSize="14sp"
            app:layout_constraintEnd_toEndOf="parent"
            app:layout_constraintStart_toStartOf="parent"
            app:layout_constraintTop_toTopOf="parent" />

        <WebView
            android:id="@+id/web_view"
            android:layout_width="match_parent"
            android:layout_height="0dp"
            app:layout_constraintBottom_toBottomOf="parent"
            app:layout_constraintEnd_toEndOf="parent"
            app:layout_constraintStart_toStartOf="parent"
            app:layout_constraintTop_toBottomOf="@id/tv_title" />
    </androidx.constraintlayout.widget.ConstraintLayout>
</layout>
项目内路径:LsxbugVideo/feature_user/src/main/res/layout/activity_agreement.xml
返回按钮调用 BaseViewModel 的 onFinishPage() ,关闭页面:
xml
<ImageView
    android:id="@+id/iv_back"
    android:layout_width="20dp"
    android:layout_height="20dp"
    android:layout_marginStart="@dimen/margin_start_14dp"
    android:onClick="@{()->viewModel.onFinishPage()}"
    android:src="@mipmap/icon_back_black"
    app:layout_constraintStart_toStartOf="parent"
    app:layout_constraintTop_toTopOf="parent" />
项目内路径:LsxbugVideo/feature_user/src/main/res/layout/activity_agreement.xml
页面效果跑通以后,顶部标题和正文网页就会同时出现:
当 BaseActivity 观察到 mFinish == true 时,会统一帮协议页关闭自己:
如果最终发现 Activity 标题和网页内标题重复,那就不是代码逻辑问题,而是展示策略问题,需要和团队确认是调整 AgreementActivity,还是调整网页:
8. 账号与绑定页:手机号脱敏展示与跳转闭环
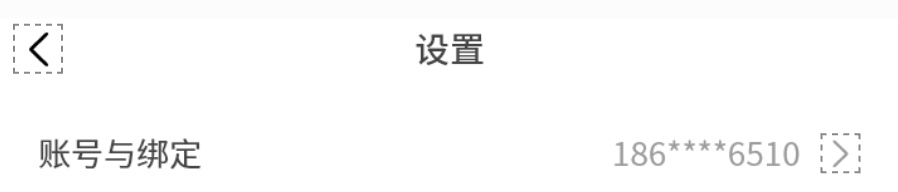
设置页里的"账号与绑定"不是孤立入口,它一方面要在设置页列表里直接显示当前绑定手机号,另一方面点击以后还要进入独立页面查看详细信息。这里要解决的核心问题,是手机号如何按登录态安全展示,以及如何在多个页面里复用同一套脱敏逻辑。
设置页里,登录后的账号与绑定条目会直接显示脱敏手机号:
ViewModel 先准备一个 mMobile,专门承接条目右侧内容。
java
//手机号
private MutableLiveData<String> mMobile = new MutableLiveData<>();
// get
项目内路径:LsxbugVideo/feature_user/src/main/java/com/ls/feature_user/ui/settings/SettingsViewModel.java
设置页条目本身不关心手机号怎么来,只需要把 content 和 viewModel.mobile 绑定起来。
xml
<!-- 账号与绑定 -->
<include
    layout="@layout/item_settings_normal"
    android:layout_width="match_parent"
    android:layout_height="46.5dp"
    android:onClick="@{() -> viewModel.onAccountBindClick()}"
    app:content="@{viewModel.mobile}"
    app:title="@{`账号与绑定`}" />
项目内路径:LsxbugVideo/feature_user/src/main/res/layout/activity_settings.xml
手机号的真实读取和脱敏处理放到 SettingsModel 里。这样 ViewModel 不需要知道 UserManager 的字段结构,也不用在多个页面里重复写字符串处理。在 SettingsModel 中,实现获取手机号接口:
- 调用 UserManager,获取用户登录状态;
- 校验登录状态,登录后,在获取手机号;
- 当前项目中,用户名实际上就是手机号;
- 获取用户名,将中间四位替换为 ****
java
public boolean isLogin() {
    return UserManager.getInstance().isLogin();//是否登录
}

/**
 * 如果未登录 返回null
 *
 * @return 返回手机号
 */
public String getMobile() {
    if (isLogin()) {
        String mobile = UserManager.getInstance().getUserInfo().getUser().getUsername();
        //把username中间的4位替换成****

        StringBuilder builder = new StringBuilder();
        builder.append(mobile.substring(0, 3));
        builder.append("****");
        builder.append(mobile.substring(7));
        String string = builder.toString();
        return string;//返回手机号,userName就是手机号
    }
    return null;
}
项目内路径:LsxbugVideo/feature_user/src/main/java/com/ls/feature_user/ui/settings/SettingsModel.java
这段逻辑里有两层约束:
- 只有在
isLogin()为true时,才允许继续读取用户资料,未登录直接返回null。 - 当前服务端把用户名当作手机号存储,所以脱敏时直接对
username做截断替换,中间四位统一改成****。
SettingsModel 初次进入时,ViewModel 构造方法里就把手机号和缓存大小一起初始化掉,避免列表项先闪空值再更新:
java
public SettingsViewModel() {
    this.mModel = new SettingsModel();

    mMobile.setValue(mModel.getMoile());
    refreshCashSize();//显示缓存
}
项目内路径:LsxbugVideo/feature_user/src/main/java/com/ls/feature_user/ui/settings/SettingsViewModel.java
点击账号与绑定,跳转到 AccountActivity:
java
@Route(path = ARouterPath.User.ACTIVITY_ACCOUNT)
public class AccountActivity extends BaseActivity<ActivityAccountBinding,AccountViewModel> {


    @Override
    protected AccountViewModel getViewModel() {
        return new ViewModelProvider(this).get(AccountViewModel.class) ;
    }

    @Override
    protected int getLayoutResId() {
        return R.layout.activity_account;
    }

    @Override
    protected int getBindingVariableId() {
        return BR.viewModel;
    }

    @Override
    protected void initView() {
        StatusBarUtils.addStatusBarHeight2RootView(mDataBinding.getRoot());
    }

    @Override
    protected void initData() {

    }
}
项目内路径:LsxbugVideo/feature_user/src/main/java/com/ls/feature_user/ui/account/AccountActivity.java
这个页面的布局和设置页保持一致风格:顶部返回、居中标题,再加一条"手机号"条目。
xml
<?xml version="1.0" encoding="utf-8"?>
<layout xmlns:android="http://schemas.android.com/apk/res/android"
    xmlns:app="http://schemas.android.com/apk/res-auto"
    xmlns:tools="http://schemas.android.com/tools">

    <data>

        <variable
            name="viewModel"
            type="com.ls.feature_user.ui.account.AccountViewModel" />
    </data>

    <androidx.constraintlayout.widget.ConstraintLayout
        android:id="@+id/main"
        android:layout_width="match_parent"
        android:layout_height="match_parent"
        android:background="#F8F8F8"
        tools:context=".ui.account.AccountActivity">

        <ImageView
            android:id="@+id/iv_back"
            android:layout_width="20dp"
            android:layout_height="20dp"
            android:layout_marginStart="@dimen/margin_start_14dp"
            android:onClick="@{() -> viewModel.onFinishPage()}"
            android:src="@mipmap/icon_back_black"
            app:layout_constraintStart_toStartOf="parent"
            app:layout_constraintTop_toTopOf="parent" />

        <TextView
            android:id="@+id/tv_title"
            android:layout_width="wrap_content"
            android:layout_height="wrap_content"
            android:layout_centerInParent="true"
            android:text="账号与绑定"
            android:textColor="#333333"
            android:textSize="14sp"
            app:layout_constraintEnd_toEndOf="parent"
            app:layout_constraintStart_toStartOf="parent"
            app:layout_constraintTop_toTopOf="parent" />


        <include
            layout="@layout/item_settings_normal"
            android:layout_width="match_parent"
            android:layout_height="46.5dp"
            android:layout_marginTop="28dp"
            android:onClick="@{() -> viewModel.onAccountBindClick()}"
            app:content="@{viewModel.mobile}"
            app:layout_constraintEnd_toEndOf="parent"
            app:layout_constraintStart_toStartOf="parent"
            app:layout_constraintTop_toBottomOf="@id/tv_title"
            app:title="@{`手机号`}" />

    </androidx.constraintlayout.widget.ConstraintLayout>
</layout>
项目内路径:LsxbugVideo/feature_user/src/main/res/layout/activity_account.xml
ViewModel 这边负责把脱敏手机号取出来,并决定点击后提示什么。
java
public class AccountViewModel extends BaseViewModel {

    private final AccountModel mModel;
    private MutableLiveData<String> mMobile = new MutableLiveData<>();

    public AccountViewModel() {
        mModel = new AccountModel();

        String mobile = mModel.getMobile();
        mMobile.setValue(mobile);
    }

    public void onAccountBindClick() {
        showToast("无法换绑!");
    }

    // get
}
项目内路径:LsxbugVideo/feature_user/src/main/java/com/ls/feature_user/ui/account/AccountViewModel.java
这里特意没有把点击动作继续往后跳,因为当前服务端还没有提供换绑手机号接口,所以界面只展示信息。
Model 继续复用和设置页相同的手机号读取/脱敏逻辑:
java
public class AccountModel {

    public boolean isLogin() {
        return UserManager.getInstance().isLogin();//是否登录
    }

    /**
     * 如果未登录 返回null
     *
     * @return 返回手机号
     */
    public String getMobile() {
        if (isLogin()) {
            String mobile = UserManager.getInstance().getUserInfo().getUser().getUsername();
            //把username中间的4位替换成****

            StringBuilder builder = new StringBuilder();
            builder.append(mobile.substring(0, 3));
            builder.append("****");
            builder.append(mobile.substring(7));
            String string = builder.toString();
            return string;//返回手机号,userName就是手机号
        }
        return null;
    }
}
项目内路径:LsxbugVideo/feature_user/src/main/java/com/ls/feature_user/ui/account/AccountModel.java
这样,设置页和账号与绑定页展示的是同一套手机号来源和脱敏结果,数据表现就不会出现一边是明文、一边是脱敏或者一边有值、一边没值的割裂感。
9. 设置密码页:验证码、表单校验与重置密码请求
设置密码这一页比账号与绑定复杂得多,因为它同时涉及页面表单、验证码发送、倒计时按钮、密码一致性校验和重置密码接口。要把这条链路讲清楚,最好按 View、Model、ViewModel 三层拆开来看。
9.1 View:页面结构与按钮联动
页面壳子还是标准的 BaseActivity + ViewModel 结构,但这里额外要监听验证码和两次密码输入,实时决定提交按钮是否可点。
java
@Route(path = ARouterPath.User.ACTIVITY_RESETPWD)
public class ResetPasswordActivity extends BaseActivity<ActivityResetPasswordBinding, ResetPasswordViewModel> {

    @Override
    protected ResetPasswordViewModel getViewModel() {
        return new ViewModelProvider(this).get(ResetPasswordViewModel.class);
    }

    @Override
    protected int getLayoutResId() {
        return R.layout.activity_reset_password;
    }

    @Override
    protected int getBindingVariableId() {
        return BR.viewModel;
    }

    @Override
    protected void initView() {
        StatusBarUtils.addStatusBarHeight2RootView(mDataBinding.getRoot());

        mViewModel.getCode().observe(this, s -> {
            mViewModel.updateEnableResetBtnStatus();
        });
        mViewModel.getPassword1().observe(this, s -> {
            mViewModel.updateEnableResetBtnStatus();
        });
        mViewModel.getPassword2().observe(this, s -> {
            mViewModel.updateEnableResetBtnStatus();
        });
    }

    @Override
    protected void initData() {

    }
}
项目内路径:LsxbugVideo/feature_user/src/main/java/com/ls/feature_user/ui/resetpwd/ResetPasswordActivity.java
这三处 observe(...) 不能省略,因为提交按钮能不能点击,并不是某一个字段单独决定的,而是"验证码长度 + 两次密码一致性"共同决定的。
页面布局把手机号、验证码、两次密码输入和提交按钮一次铺开,并全部绑定到 ViewModel。
xml
<?xml version="1.0" encoding="utf-8"?>
<layout xmlns:android="http://schemas.android.com/apk/res/android"
    xmlns:app="http://schemas.android.com/apk/res-auto"
    xmlns:tools="http://schemas.android.com/tools">

    <data>
1
        <variable
            name="viewModel"
            type="com.ls.feature_user.ui.resetpwd.ResetPasswordViewModel" />

    </data>

    <androidx.constraintlayout.widget.ConstraintLayout
        android:id="@+id/main"
        android:layout_width="match_parent"
        android:layout_height="match_parent"
        android:background="@color/white"
        tools:context=".ui.resetpwd.ResetPasswordActivity">

        <ImageView
            android:id="@+id/iv_back"
            android:layout_width="20dp"
            android:layout_height="20dp"
            android:layout_marginStart="@dimen/margin_start_14dp"
            android:onClick="@{() -> viewModel.onFinishPage()}"
            android:src="@mipmap/icon_back_black"
            app:layout_constraintStart_toStartOf="parent"
            app:layout_constraintTop_toTopOf="parent" />

        <TextView
            android:id="@+id/tv_title"
            android:layout_width="wrap_content"
            android:layout_height="wrap_content"
            android:layout_centerInParent="true"
            android:text="设置密码"
            android:textColor="#333333"
            android:textSize="14sp"
            app:layout_constraintEnd_toEndOf="parent"
            app:layout_constraintStart_toStartOf="parent"
            app:layout_constraintTop_toTopOf="parent" />

        <!-- 手机号输入框 -->
        <TextView
            android:id="@+id/tv_mobile_label"
            android:layout_width="60dp"
            android:layout_height="wrap_content"
            android:layout_marginStart="@dimen/margin_start_14dp"
            android:layout_marginTop="28dp"
            android:text="手机号"
            android:textColor="@color/black"
            android:textSize="@dimen/font_size_14sp"
            app:layout_constraintEnd_toStartOf="@id/phoneEditText"
            app:layout_constraintStart_toStartOf="parent"
            app:layout_constraintTop_toBottomOf="@id/tv_title" />

        <TextView
            android:id="@+id/phoneEditText"
            android:layout_width="0dp"
            android:layout_height="wrap_content"
            android:layout_marginStart="8dp"
            android:layout_marginEnd="@dimen/margin_start_14dp"
            android:background="@null"
            android:inputType="phone"
            android:maxLength="11"
            android:text="@{viewModel.mobile}"
            android:textSize="@dimen/font_size_14sp"
            app:layout_constraintBottom_toBottomOf="@id/tv_mobile_label"
            app:layout_constraintEnd_toEndOf="parent"
            app:layout_constraintStart_toEndOf="@id/tv_mobile_label" />

        <!-- 验证码输入框 -->
        <TextView
            android:id="@+id/tv_code_label"
            android:layout_width="60dp"
            android:layout_height="wrap_content"
            android:layout_marginStart="@dimen/margin_start_14dp"
            android:layout_marginTop="28dp"
            android:text="验证码"
            android:textColor="@color/black"
            android:textSize="@dimen/font_size_14sp"
            app:layout_constraintEnd_toStartOf="@id/codeEditText"
            app:layout_constraintStart_toStartOf="parent"
            app:layout_constraintTop_toBottomOf="@id/tv_mobile_label" />

        <EditText
            android:id="@+id/codeEditText"
            android:layout_width="0dp"
            android:layout_height="wrap_content"
            android:layout_marginStart="@dimen/margin_start_14dp"
            android:background="@null"
            android:hint="验证码"
            android:text="@={viewModel.code}"
            android:inputType="number"
            android:textSize="@dimen/font_size_14sp"
            app:layout_constraintBottom_toBottomOf="@id/tv_code_label"
            app:layout_constraintEnd_toStartOf="@id/tv_get_code"
            app:layout_constraintStart_toEndOf="@id/tv_code_label" />

        <!-- 获取验证码按钮 -->

        <TextView
            android:id="@+id/tv_get_code"
            android:layout_width="64dp"
            android:layout_height="16dp"
            android:layout_marginEnd="@dimen/margin_start_14dp"
            android:background="@drawable/bg_send_sms"
            android:enabled="@{viewModel.isEnableSendCode}"
            android:gravity="center"
            android:onClick="@{()->viewModel.sendCode()}"
            android:text="@{viewModel.getVerticalCodeText}"
            android:textSize="10sp"
            app:layout_constraintBottom_toBottomOf="@id/codeEditText"
            app:layout_constraintEnd_toEndOf="parent"
            app:layout_constraintStart_toEndOf="@id/codeEditText"
            app:layout_constraintTop_toTopOf="@id/codeEditText"
            tools:text="获取验证码" />

        <!-- 新密码输入框 -->
        <TextView
            android:id="@+id/tv_password_label"
            android:layout_width="60dp"
            android:layout_height="wrap_content"
            android:layout_marginStart="@dimen/margin_start_14dp"
            android:layout_marginTop="28dp"
            android:text="新密码"
            android:textColor="@color/black"
            android:textSize="@dimen/font_size_14sp"
            app:layout_constraintEnd_toStartOf="@id/newPasswordEditText"
            app:layout_constraintStart_toStartOf="parent"
            app:layout_constraintTop_toBottomOf="@id/tv_code_label" />

        <EditText
            android:id="@+id/newPasswordEditText"
            android:layout_width="0dp"
            android:layout_height="wrap_content"
            android:layout_marginStart="@dimen/margin_start_14dp"
            android:layout_marginTop="16dp"
            android:layout_marginEnd="@dimen/margin_start_14dp"
            android:background="@null"
            android:hint="输入新密码"
            android:text="@={viewModel.password1}"
            android:inputType="textPassword"
            android:textSize="@dimen/font_size_14sp"
            app:layout_constraintBottom_toBottomOf="@id/tv_password_label"
            app:layout_constraintEnd_toEndOf="parent"
            app:layout_constraintStart_toEndOf="@id/tv_password_label" />

        <!-- 确认密码输入框 -->
        <TextView
            android:id="@+id/tv_confirm_label"
            android:layout_width="60dp"
            android:layout_height="wrap_content"
            android:layout_marginStart="@dimen/margin_start_14dp"
            android:layout_marginTop="28dp"
            android:text="确认密码"
            android:textColor="@color/black"
            android:textSize="@dimen/font_size_14sp"
            app:layout_constraintEnd_toStartOf="@id/confirmPasswordEditText"
            app:layout_constraintStart_toStartOf="parent"
            app:layout_constraintTop_toBottomOf="@id/tv_password_label" />

        <EditText
            android:id="@+id/confirmPasswordEditText"
            android:layout_width="0dp"
            android:layout_height="wrap_content"
            android:layout_marginStart="@dimen/margin_start_14dp"
            android:layout_marginTop="16dp"
            android:layout_marginEnd="@dimen/margin_start_14dp"
            android:background="@null"
            android:text="@={viewModel.password2}"
            android:hint="确认密码"
            android:inputType="textPassword"
            android:textSize="@dimen/font_size_14sp"
            app:layout_constraintBottom_toBottomOf="@id/tv_confirm_label"
            app:layout_constraintEnd_toEndOf="parent"
            app:layout_constraintStart_toEndOf="@id/tv_confirm_label" />

        <!-- 提交按钮 -->
        <TextView
            android:id="@+id/submitButton"
            android:layout_width="0dp"
            android:layout_height="55dp"
            android:layout_marginStart="@dimen/margin_start_14dp"
            android:layout_marginTop="24dp"
            android:layout_marginEnd="@dimen/margin_start_14dp"
            android:layout_marginBottom="80dp"
            android:background="@drawable/bg_login_button"
            android:enabled="@{viewModel.isEnableLogin}"
            android:onClick="@{()->viewModel.resetPassword()}"
            android:gravity="center"
            android:text="提交"
            android:textColor="@color/white"
            android:textSize="16sp"
            app:layout_constraintBottom_toBottomOf="parent"
            app:layout_constraintEnd_toEndOf="parent"
            app:layout_constraintStart_toStartOf="parent" />


    </androidx.constraintlayout.widget.ConstraintLayout>
</layout>
项目内路径:LsxbugVideo/feature_user/src/main/res/layout/activity_reset_password.xml
这份布局里有两个必须盯住的绑定点:
- 手机号是只读展示,所以用
TextView直接绑定viewModel.mobile。 - 验证码、两次密码和提交按钮都走双向或状态绑定,让 ViewModel 能实时掌握表单变化。
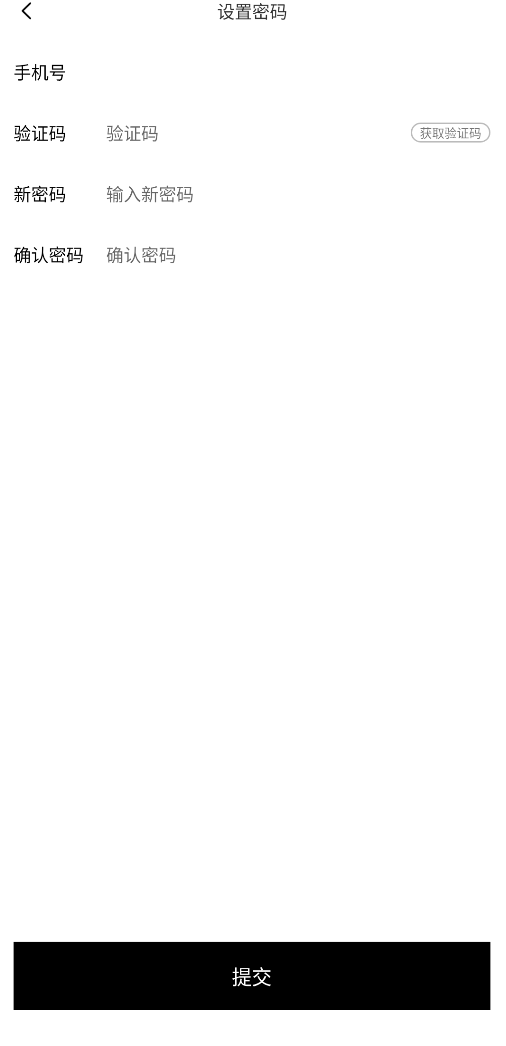
设置页跳到密码页时,同样要先判断当前是否登录。账号绑定、设置密码和退出登录这三个入口,其实都在复用同一种"先看登录态,再决定动作"的模式。
在 SettingsViewModel 中,点击设置密码,要判断当前是否登录,根据登录状态设置跳转页面;账号绑定点击也是同理,根据登录状态决定跳转的页面;
同时,只有用户登录,点击退出登录按钮,才弹出确认退出登录的弹窗:
java
/**
 * 设置密码点击事件
 */
public void onPasswordSettingClick() {
    if (mModel.isLogin()) {
        mAction.setValue(SettingsAction.NAVIGATION_TO_PASSWORD);
    } else {
        mAction.setValue(SettingsAction.NAVIGATE_TO_LOGIN);
    }
}

/**
 * 账号与绑定点击事件
 */
public void onAccountBindClick() {
    if (mModel.isLogin()) {
        mAction.setValue(SettingsAction.NAVIGATION_TO_ACCOUNT);
    } else {
        mAction.setValue(SettingsAction.NAVIGATE_TO_LOGIN);
    }
}

/**
 * 退出登录点击事件
 */
public void onLogoutClick() {
    if (mModel.isLogin()) {
        mAction.setValue(SettingsAction.SHOW_LOGOUT_DIALOG);
    } else {
        mAction.setValue(SettingsAction.NAVIGATE_TO_LOGIN);
    }
}
项目内路径:LsxbugVideo/feature_user/src/main/java/com/ls/feature_user/ui/settings/SettingsViewModel.java
9.2 Model:验证码发送与重置密码接口封装
密码重置接口不是简单地带一个新密码就能完成,它需要 token、手机号、验证码和密码本身共同参与,所以先把请求结构和接口声明补齐。
修改密码接口需要的请求体字段如下:
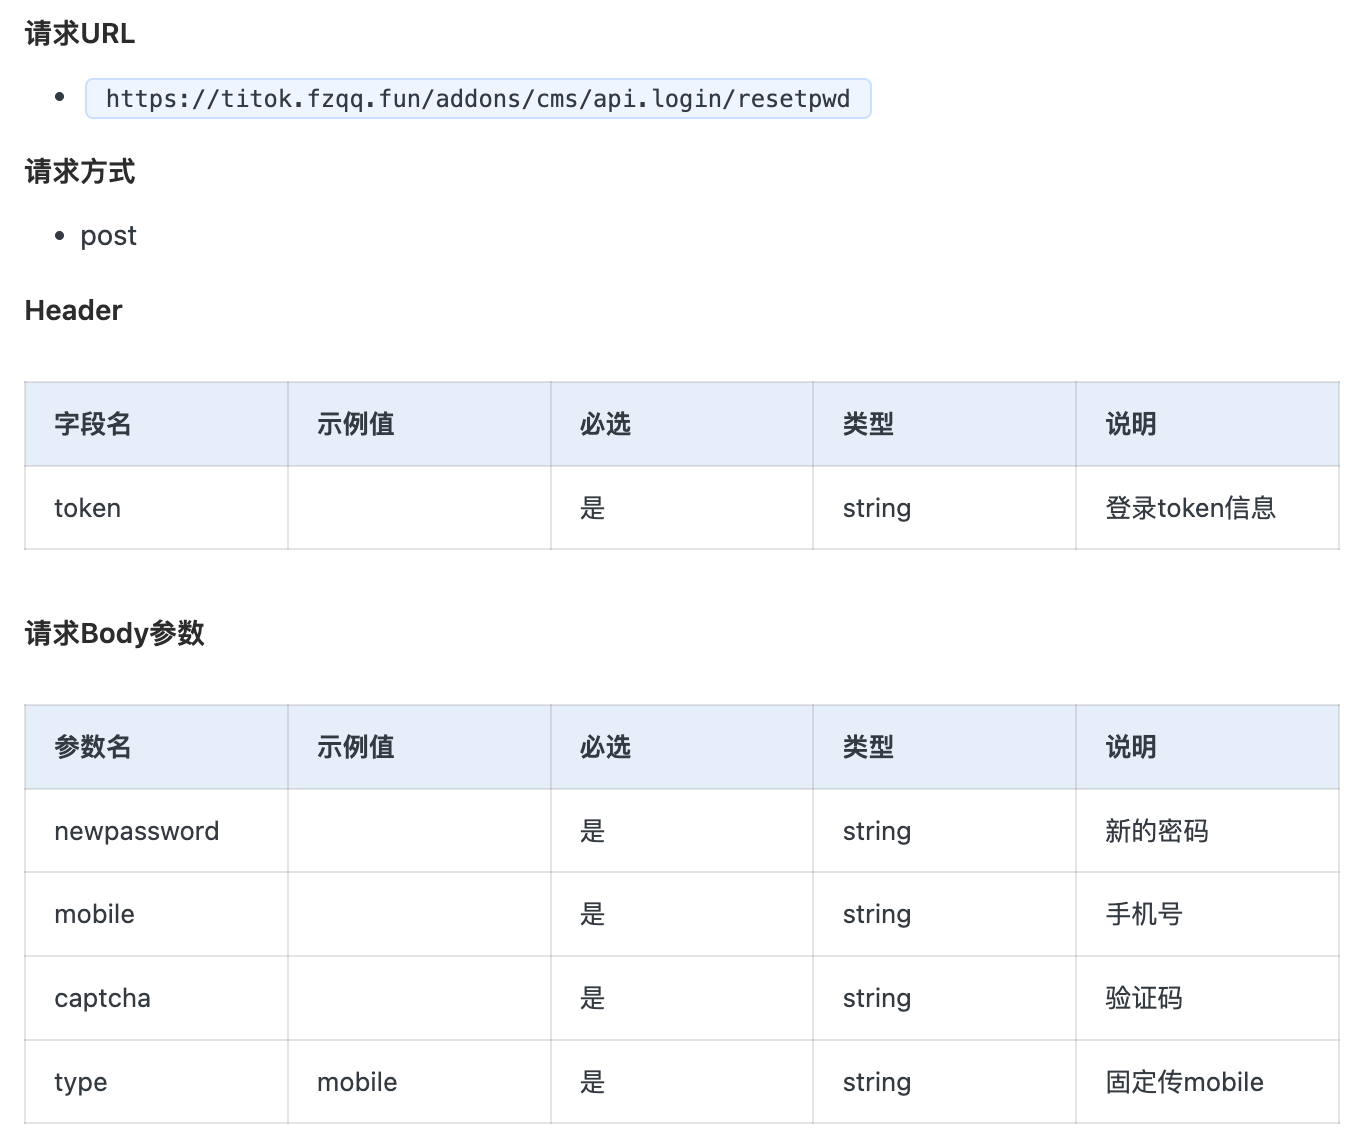
而验证码发送接口又是一条独立请求:

先看接口成功与失败时服务端返回的大致结构,后面 ViewModel 的提示文案就依赖这些响应消息。
修改密码成功返回示例:
text
{
    "code": 1,
    "msg": "修改密码成功",
    "time": "1737786183",
    "data": null
}
修改密码失败返回示例:
tex
{
  "code": 401,
  "msg": "请登录后操作",
  "time": "1724388400",
  "data": null
}
请求体先定义成一个独立对象,把服务端需要的字段一次封装好。
java
public class ReqResetPwd {
    private String newpassword;
    private String mobile;
    private String captcha;
    private String type;


    public ReqResetPwd(String newpassword, String mobile, String captcha) {
        this.newpassword = newpassword;
        this.mobile = mobile;
        this.captcha = captcha;
        this.type = "mobile";
    }
}
项目内路径:LsxbugVideo/feature_user/src/main/java/com/ls/feature_user/bean/ReqResetPwd.java
User 模块的接口声明里,重置密码需要同时带请求头 token 和请求体。
java
/**
 * 重置密码
 *
 * @param code 请求体
 * @return
 */
@POST("addons/cms/api.login/resetpwd")
Call<ResBase<ResBase>> resetPassword(@Header("token") String token, @Body ReqResetPwd code);
项目内路径:LsxbugVideo/feature_user/src/main/java/com/ls/feature_user/api/UserApiService.java
Model 的页壳先准备出来,后面逐步补登录态、手机号、验证码和重置密码请求。
java
public class ResetPasswordModel {


}
项目内路径:LsxbugVideo/feature_user/src/main/java/com/ls/feature_user/ui/resetpwd/ResetPasswordModel.java
首先还是先判断登录态:
java
public boolean isLogin() {
    return UserManager.getInstance().isLogin();//是否登录
}
然后复用和前面相同的手机号读取与脱敏逻辑,让密码页顶部直接显示当前绑定手机号:
java
/**
 * 如果未登录 返回null
 *
 * @return 返回手机号
 */
public String getMobile() {
    if (isLogin()) {
        String mobile = UserManager.getInstance().getUserInfo().getUser().getUsername();
        //把username中间的4位替换成****

        StringBuilder builder = new StringBuilder();
        builder.append(mobile.substring(0, 3));
        builder.append("****");
        builder.append(mobile.substring(7));
        String string = builder.toString();
        return string;//返回手机号,userName就是手机号
    }
    return null;
}
验证码发送接口封装时,有两个点要特别留意:手机号直接取当前已登录用户的手机号,业务类型要传 resetpwd。
java
/**
 * 发送验证码
 *
 * @param callback
 */
public void sendSmsCode(IRequestCallback<ResBase<ResBase>> callback) {
    //获取手机号
    String mobile = UserManager.getInstance().getUserInfo().getUser().getUsername();
    ReqSendSmsCode smsCode = new ReqSendSmsCode(mobile, "resetpwd");
    Call<ResBase<ResBase>> call = UserApiServiceProvider.getApiService().sendSmsCode(smsCode);
    ApiCall.enqueue(call, new ApiCall.ApiCallback<ResBase<ResBase>>() {
        @Override
        public void onSuccess(ResBase<ResBase> result) {
            callback.onLoadFinish(result);
        }

        @Override
        public void onError(int errorCode, String meesage) {
            callback.onLoadFailure(errorCode, meesage);
        }
    });
}
重置密码接口这边,token、手机号和验证码都不能少:
java
/**
 * 重置密码
 * @param password
 * @param code
 * @param callback
 */
public void resetPassword(String password, String code, IRequestCallback<ResBase<ResBase>> callback) {
    String token = UserManager.getInstance().getToken();
    String mobile = UserManager.getInstance().getUserInfo().getUser().getUsername();
    ReqResetPwd pwd = new ReqResetPwd(password, mobile, code);
    Call<ResBase<ResBase>> call = UserApiServiceProvider.getApiService().resetPassword(token, pwd);
    ApiCall.enqueue(call, new ApiCall.ApiCallback<ResBase<ResBase>>() {
        @Override
        public void onSuccess(ResBase<ResBase> result) {
            callback.onLoadFinish(result);

        }

        @Override
        public void onError(int errorCode, String meesage) {
            callback.onLoadFailure(errorCode, meesage);
        }
    });
}
这段 Model 封装的价值在于:
- ViewModel 不需要直接拼 token、手机号和请求体对象。
- 成功回调和失败回调被统一转交给
IRequestCallback,页面层只处理结果,不关心 Retrofit 细节。 - 验证码发送和重置密码虽然是两条不同请求,但都在同一个业务 Model 里,便于页面复用当前用户的上下文。
9.3 ViewModel:输入校验、倒计时与提交动作
ViewModel 这一层是密码页的核心,它同时要维护手机号展示、验证码文本、发送按钮状态、提交按钮状态、两次密码输入和验证码倒计时。
在 ResetPasswordViewModel 中,定义出下面的成员变量:
java
public class ResetPasswordViewModel extends BaseViewModel {

    private static final String TAG = "ResetPasswordViewModel";
    private final ResetPasswordModel mModel;
    private MutableLiveData<String> mMobile = new MutableLiveData<>();
    private MutableLiveData<String> mCode = new MutableLiveData<>();//用户输入的验证码
    private MutableLiveData<Boolean> mIsEnableLogin = new MutableLiveData<>(false);//登录按钮是否可用。默认不可用
    private MutableLiveData<String> mGetVerticalCodeText = new MutableLiveData<>("获取验证码");//获取验证码控件的显示文本
    private MutableLiveData<Boolean> mIsEnableSendCode = new MutableLiveData<>(true);//获取验证码控件是否可用
    private MutableLiveData<Boolean> mLoginSuccess = new MutableLiveData<>(false);//登录状态

    private MutableLiveData<String> mPassword1 = new MutableLiveData<>();
    private MutableLiveData<String> mPassword2 = new MutableLiveData<>();
    private CountDownTimer mDownTimer;//获取验证码的倒计时

  	// get、set
}
项目内路径:LsxbugVideo/feature_user/src/main/java/com/ls/feature_user/ui/resetpwd/ResetPasswordViewModel.java
手机号区域的绑定是只读显示,所以 XML 里直接拿 viewModel.mobile:
xml
<TextView
android:id="@+id/phoneEditText"
android:layout_width="0dp"
android:layout_height="wrap_content"
android:layout_marginStart="8dp"
android:layout_marginEnd="@dimen/margin_start_14dp"
android:background="@null"
android:inputType="phone"
android:maxLength="11"
android:text="@{viewModel.mobile}"
android:textSize="@dimen/font_size_14sp"
app:layout_constraintBottom_toBottomOf="@id/tv_mobile_label"
app:layout_constraintEnd_toEndOf="parent"
app:layout_constraintStart_toEndOf="@id/tv_mobile_label" />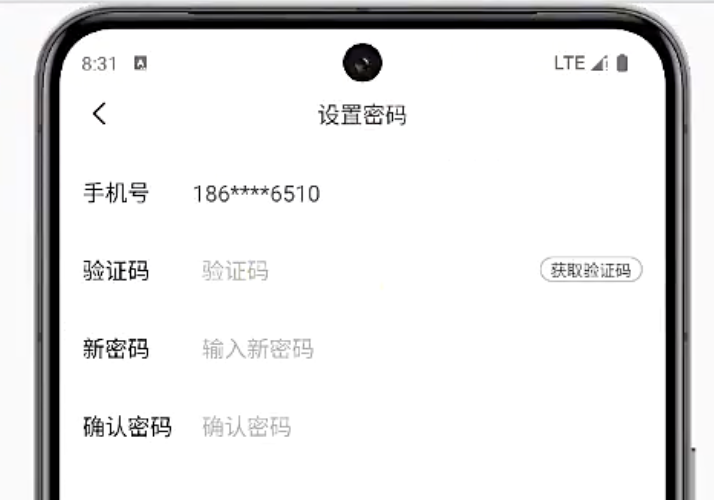 项目内路径:LsxbugVideo/feature_user/src/main/res/layout/activity_reset_password.xml
对应的默认值在构造方法里从 Model 读取:
java
public ResetPasswordViewModel() {
    mModel = new ResetPasswordModel();

    mMobile.setValue(mModel.getMobile());
}
项目内路径:LsxbugVideo/feature_user/src/main/java/com/ls/feature_user/ui/resetpwd/ResetPasswordViewModel.java
验证码按钮这边,需要同时绑定文本、可点击状态和点击事件。
xml
<!-- 获取验证码按钮 -->

<TextView
    android:id="@+id/tv_get_code"
    android:layout_width="64dp"
    android:layout_height="16dp"
    android:layout_marginEnd="@dimen/margin_start_14dp"
    android:background="@drawable/bg_send_sms"
    android:enabled="@{viewModel.isEnableSendCode}"
    android:gravity="center"
    android:onClick="@{()->viewModel.sendCode()}"
    android:text="@{viewModel.getVerticalCodeText}"
    android:textSize="10sp"
    app:layout_constraintBottom_toBottomOf="@id/codeEditText"
    app:layout_constraintEnd_toEndOf="parent"
    app:layout_constraintStart_toEndOf="@id/codeEditText"
    app:layout_constraintTop_toTopOf="@id/codeEditText"
    tools:text="获取验证码" />
项目内路径:LsxbugVideo/feature_user/src/main/res/layout/activity_reset_password.xml
真正的发送验证码逻辑要同时处理手机号校验、按钮禁用、倒计时文本更新和接口请求:
- 先校验手机号,不合法就直接终止,避免无意义倒计时和请求。
- 如果旧的
CountDownTimer还在运行,先cancel(),防止用户重复点击后出现多个计时器并行。 - 发送请求前先把
mIsEnableSendCode改成false,按钮立刻禁用。 onTick(...)每秒更新一次文本,把毫秒换成秒数回显到按钮上。onFinish()把文案恢复成"获取验证码",并重新开放点击。- 请求成功和失败都要关闭 loading,并把服务端返回的消息透给用户。
java
/**
 * 发送验证码
 */
public void sendCode() {

    String mobile = mMobile.getValue();
    if (mobile == null || mobile.length() != 11) {
        Log.i(TAG, "sendCode: 手机号不符合规则!");
        showToast("请输入正确的手机号码!");
        return;
    }

    if (mDownTimer != null) {
        mDownTimer.cancel();//防止重复点击时 未停止之前的计时
    }
    //禁用发送按钮
    mIsEnableSendCode.setValue(false);

    mDownTimer = new CountDownTimer(60000, 1000) {

        @Override
        public void onTick(long millisUntilFinished) {
            //每1秒会被触发 把毫秒转为秒
            int seconds = (int) (millisUntilFinished / 1000);
            mGetVerticalCodeText.setValue(seconds + "s");//更新倒计时的显示
        }

        @Override
        public void onFinish() {
            //倒计时完成后
            mGetVerticalCodeText.setValue("获取验证码");
            //60s后允许发送验证码
            mIsEnableSendCode.setValue(true);
        }
    }.start();

    //发起请求,让服务端发送验证码
    Log.i(TAG, "sendCode: ");
    showLoading(true);
    //在这发起获取验证码请求
    mModel.sendSmsCode(new IRequestCallback<ResBase<ResBase>>() {
        @Override
        public void onLoadFinish(ResBase<ResBase> datas) {
            showToast(datas.getMsg());
            showLoading(false);
        }

        @Override
        public void onLoadFailure(int errorCode, String message) {
            showToast(message);
            showLoading(false);
        }
    });
}
项目内路径:LsxbugVideo/feature_user/src/main/java/com/ls/feature_user/ui/resetpwd/ResetPasswordViewModel.java
提交按钮这边,样式和可点击状态都要跟 mIsEnableLogin 联动。
xml
<!-- 提交按钮 -->
<TextView
    android:id="@+id/submitButton"
    android:layout_width="0dp"
    android:layout_height="55dp"
    android:layout_marginStart="@dimen/margin_start_14dp"
    android:layout_marginTop="24dp"
    android:layout_marginEnd="@dimen/margin_start_14dp"
    android:layout_marginBottom="80dp"
    android:background="@drawable/bg_login_button"
    android:enabled="@{viewModel.isEnableLogin}"
    android:onClick="@{()->viewModel.resetPassword()}"
    android:gravity="center"
    android:text="提交"
    android:textColor="@color/white"
    android:textSize="16sp"
    app:layout_constraintBottom_toBottomOf="parent"
    app:layout_constraintEnd_toEndOf="parent"
    app:layout_constraintStart_toStartOf="parent" />
项目内路径:LsxbugVideo/feature_user/src/main/res/layout/activity_reset_password.xml
背景选择器负责根据 enabled 状态切换按钮颜色:
xml
<?xml version="1.0" encoding="utf-8"?>
<selector xmlns:android="http://schemas.android.com/apk/res/android">
    <!-- 状态:不可点击 -->
    <item android:state_enabled="false" android:drawable="@android:color/darker_gray" />
    <!-- 状态:可点击 -->
    <item android:state_enabled="true" android:drawable="@android:color/black" />
</selector>
项目内路径:LsxbugVideo/feature_user/src/main/res/drawable/bg_login_button.xml
可点击状态的真实数据源就是这个字段:
java
private MutableLiveData<Boolean> mIsEnableLogin = new MutableLiveData<>(false);
//登录按钮是否可用。默认不可用
项目内路径:LsxbugVideo/feature_user/src/main/java/com/ls/feature_user/ui/resetpwd/ResetPasswordViewModel.java
真正提交密码时,要依次校验验证码、第一次密码、第二次密码和两次密码是否一致,只有全部通过才发请求。
注意,在重置密码成功,触发回调,调用父类 ViewModel 的 onFinishPage(),关闭当前页面:
java
private MutableLiveData<String> mPassword1 = new MutableLiveData<>();

private MutableLiveData<String> mPassword2 = new MutableLiveData<>();

/**
 * 重置密码
 */
public void resetPassword() {
    String password1 = mPassword1.getValue();
    String password2 = mPassword2.getValue();
    String code = mCode.getValue();

    if (code == null || code.isEmpty()) {
        showToast("验证码不能为空");
        return;
    }

    if (password1 == null || password1.isEmpty()) {
        showToast("密码不能为空");
        return;
    }

    if (password2 == null || password2.isEmpty()) {
        showToast("请确认密码");
        return;
    }

    if (!password1.equals(password2)) {
        showToast("两次输入的密码不一致!");
        return;
    }

    showLoading(true);
    mModel.resetPassword(password1, code, new IRequestCallback<ResBase<ResBase>>() {
        @Override
        public void onLoadFinish(ResBase<ResBase> datas) {
            showToast(datas.getMsg());
            showLoading(false);
            onFinishPage();//关闭页面
        }

        @Override
        public void onLoadFailure(int errorCode, String message) {
            showToast(message);
            showLoading(false);
        }
    });
}
项目内路径:LsxbugVideo/feature_user/src/main/java/com/ls/feature_user/ui/resetpwd/ResetPasswordViewModel.java
成功回调里直接 onFinishPage() 很重要,因为密码修改成功以后,当前页的职责就完成了,继续停留在这个页面只会增加一次多余返回。
提交按钮的可点击状态,则由 updateEnableResetBtnStatus() 统一计算:
java
private MutableLiveData<Boolean> mIsEnableLogin = new MutableLiveData<>(false);
//登录按钮是否可用。默认不可用

/**
 * 是否允许点击重置密码的按钮
 */
public void updateEnableResetBtnStatus() {
    String password1 = mPassword1.getValue();
    String password2 = mPassword2.getValue();
    String code = mCode.getValue();

    if (code == null || password1 == null || password2 == null) {
        return;
    }
    //如果验证码不是4位数,并且两次输入的密码不一致,就不让点击重置按钮
    boolean isEnable = code.length() == 4 && password1.equals(password2);
    mIsEnableLogin.setValue(isEnable);
}
项目内路径:LsxbugVideo/feature_user/src/main/java/com/ls/feature_user/ui/resetpwd/ResetPasswordViewModel.java
这样一来,按钮是否可点和真正提交前的空值校验就分成了两层:
updateEnableResetBtnStatus()负责控制视觉和交互可达性,让明显不满足条件的状态下按钮直接灰掉。resetPassword()再做一次最终兜底校验,确保即使绕过前面的 UI 状态判断,也不会把非法请求发出去。
最后,还要把网络层的错误信息透传做好,否则接口明明返回了"请登录后操作"或其他业务错误,页面却只会看到模糊的"服务器异常"。
完善 network.ApiCall ,当返回的 code != 1,不要直接返回"服务器异常",而是从请求体中获取错误信息:
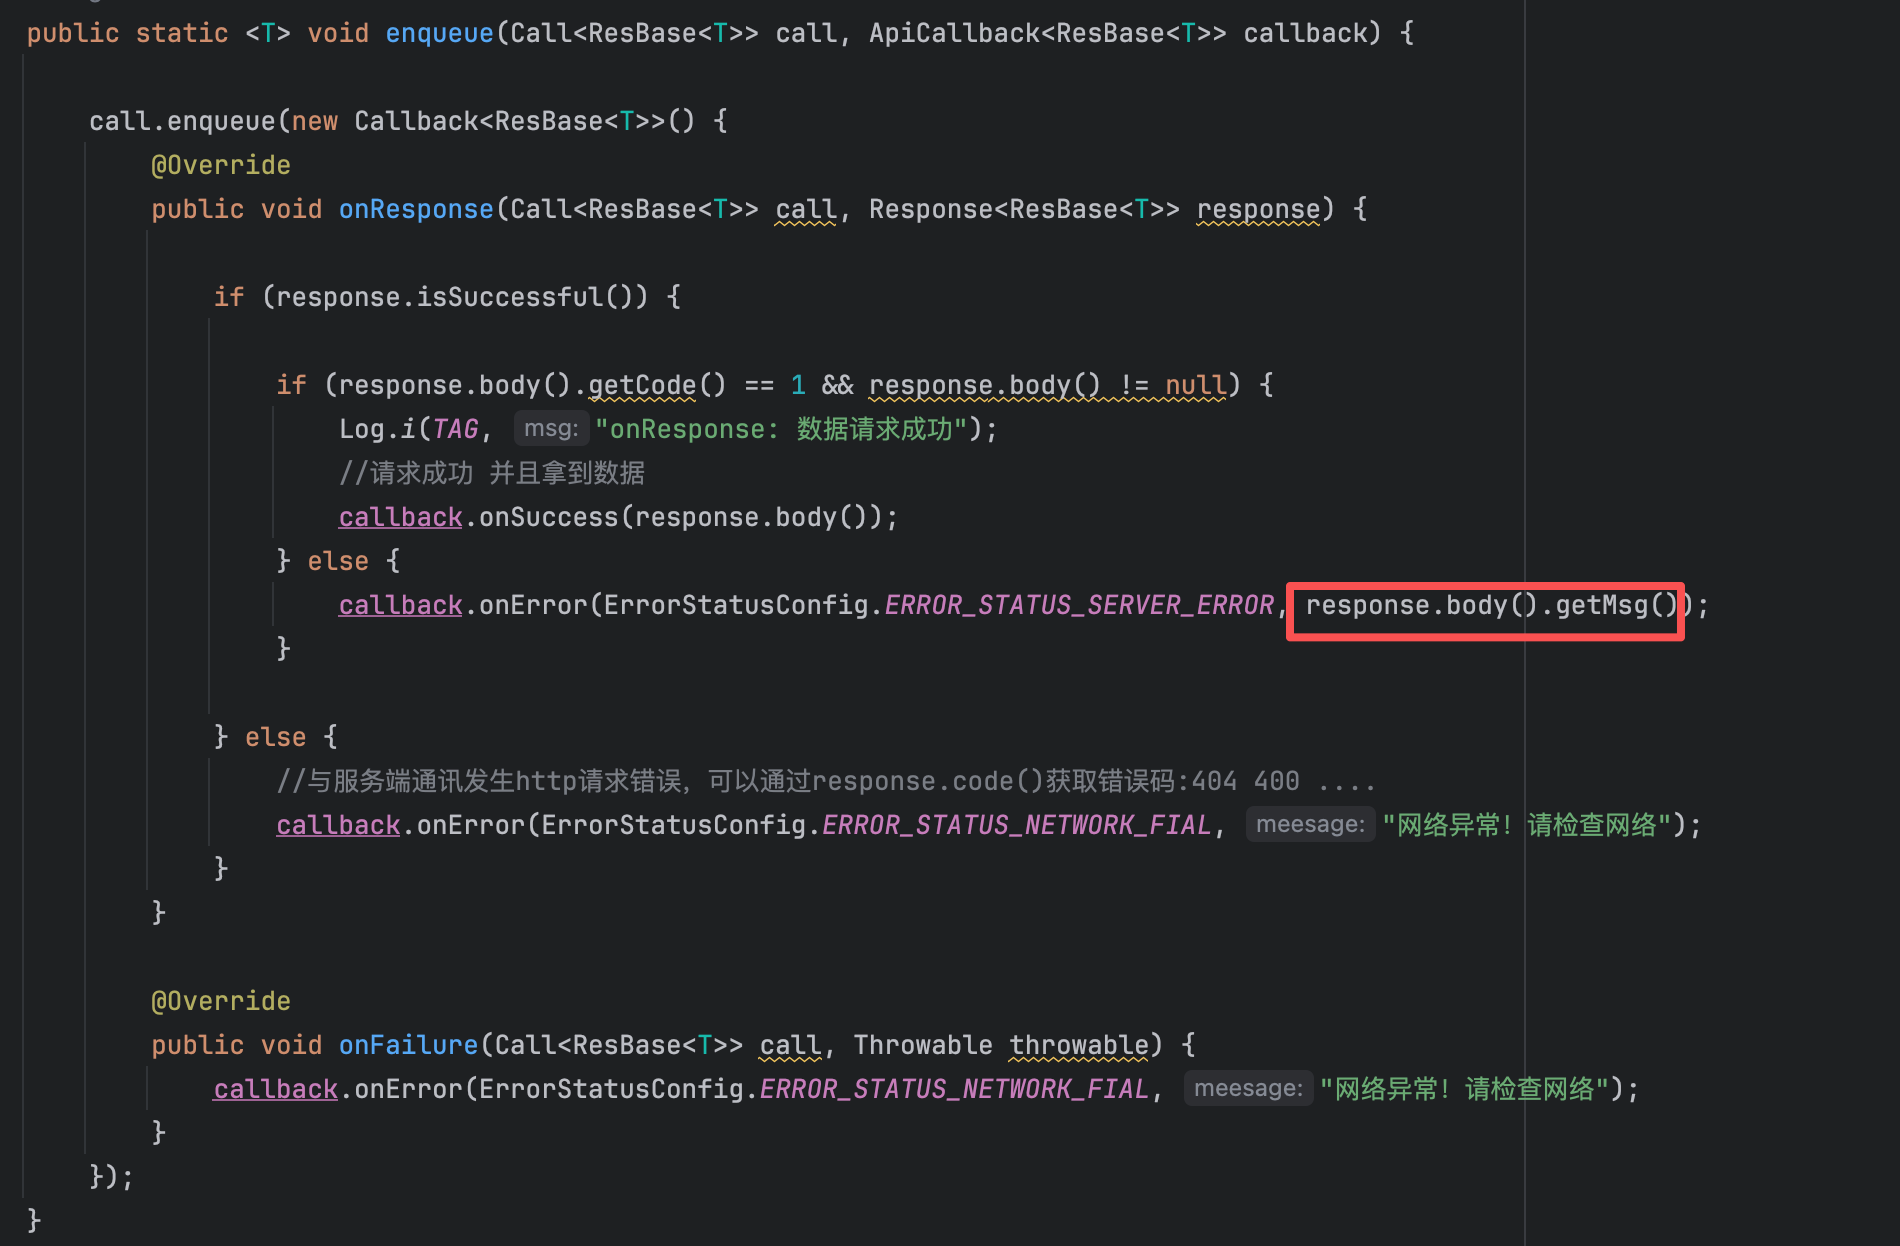
这里的处理原则很明确:当 ApiCall 发现响应体里的 code != 1 时,不应该直接吞掉服务端 msg,而是要把具体错误文案继续回传给上层页面。只有这样,设置密码失败时,用户才能收到真实原因,ViewModel 里的 showToast(message) 才有意义。
10. 关于我们页:版本号读取、组装与展示
关于我们页的实现很轻,但它完整串起了"工程配置 -> 工具类读取 -> Model 转发 -> ViewModel 组装 -> XML 展示"这一条链路。真正重要的不是页面长什么样,而是版本信息不能写死在布局里,必须从当前安装包里实时读取。
先把页面壳子建出来:
java
@Route(path = ARouterPath.User.ACTIVITY_ABOUTME)
public class AboutMeActivity extends BaseActivity<ActivityAboutMeBinding, AboutMeViewModel> {


    @Override
    protected AboutMeViewModel getViewModel() {
        return new ViewModelProvider(this).get(AboutMeViewModel.class);
    }

    @Override
    protected int getLayoutResId() {
        return R.layout.activity_about_me;
    }

    @Override
    protected int getBindingVariableId() {
        return BR.viewModel;
    }

    @Override
    protected void initView() {
        StatusBarUtils.addStatusBarHeight2RootView(mDataBinding.getRoot());
    }

    @Override
    protected void initData() {

    }
}
项目内路径:LsxbugVideo/feature_user/src/main/java/com/ls/feature_user/ui/aboutme/AboutMeActivity.java
布局文件只负责展示返回按钮、Logo 和版本文案:
xml
<?xml version="1.0" encoding="utf-8"?>
<layout xmlns:android="http://schemas.android.com/apk/res/android"
    xmlns:app="http://schemas.android.com/apk/res-auto"
    xmlns:tools="http://schemas.android.com/tools">

    <data>

        <variable
            name="viewModel"
            type="com.ls.feature_user.ui.aboutme.AboutMeViewModel" />
    </data>

    <androidx.constraintlayout.widget.ConstraintLayout
        android:id="@+id/main"
        android:layout_width="match_parent"
        android:layout_height="match_parent"
        android:background="@color/white"
        tools:context=".ui.aboutme.AboutMeActivity">

        <ImageView
            android:id="@+id/iv_back"
            android:layout_width="20dp"
            android:layout_height="20dp"
            android:layout_marginStart="@dimen/margin_start_14dp"
            android:onClick="@{() -> viewModel.onFinishPage()}"
            android:src="@mipmap/icon_back_black"
            app:layout_constraintStart_toStartOf="parent"
            app:layout_constraintTop_toTopOf="parent" />

        <TextView
            android:id="@+id/tv_title"
            android:layout_width="wrap_content"
            android:layout_height="wrap_content"
            android:layout_centerInParent="true"
            android:text="关于我们"
            android:textColor="#333333"
            android:textSize="14sp"
            app:layout_constraintEnd_toEndOf="parent"
            app:layout_constraintStart_toStartOf="parent"
            app:layout_constraintTop_toTopOf="parent" />

        <ImageView
            android:id="@+id/iv_logo"
            android:layout_width="120dp"
            android:layout_height="120dp"
            android:src="@mipmap/icon_logo"
            app:layout_constraintBottom_toBottomOf="parent"
            app:layout_constraintEnd_toEndOf="parent"
            app:layout_constraintStart_toStartOf="parent"
            app:layout_constraintTop_toTopOf="@+id/tv_title"
            app:layout_constraintVertical_bias="0.3" />

        <TextView
            android:id="@+id/tv_version"
            android:layout_width="wrap_content"
            android:layout_height="wrap_content"
            android:layout_marginTop="@dimen/margin_start_12dp"
            android:text="@{viewModel.versionLabel}"
            tools:text="版本信息:v1.0-202501011"
            app:layout_constraintEnd_toEndOf="@+id/iv_logo"
            app:layout_constraintStart_toStartOf="@+id/iv_logo"
            app:layout_constraintTop_toBottomOf="@+id/iv_logo" />

    </androidx.constraintlayout.widget.ConstraintLayout>
</layout>
项目内路径:LsxbugVideo/feature_user/src/main/res/layout/activity_about_me.xml
页面效果如下:

ViewModel 负责把版本号组装成最终展示文案:
- mVersionLabel 会关联 XML 的版本信息,拼接号完整的版本信息,设置到 mVersionLabel
java
public class AboutMeViewModel extends BaseViewModel {

    AboutMeModel mModel;
    private MutableLiveData<String> mVersionLabel = new MutableLiveData<>();

    public AboutMeViewModel() {
        this.mModel = new AboutMeModel();

        int versionCode = mModel.getVersionCode();
        String versionName = mModel.getVersionName();

        String label = "版本信息:v" + versionName + "-" + versionCode;
        mVersionLabel.setValue(label);
    }

    public MutableLiveData<String> getVersionLabel() {
        return mVersionLabel;
    }
}
项目内路径:LsxbugVideo/feature_user/src/main/java/com/ls/feature_user/ui/aboutme/AboutMeViewModel.java
版本号的数据来源,来自 app 的 build.gradle 的版本信息中:
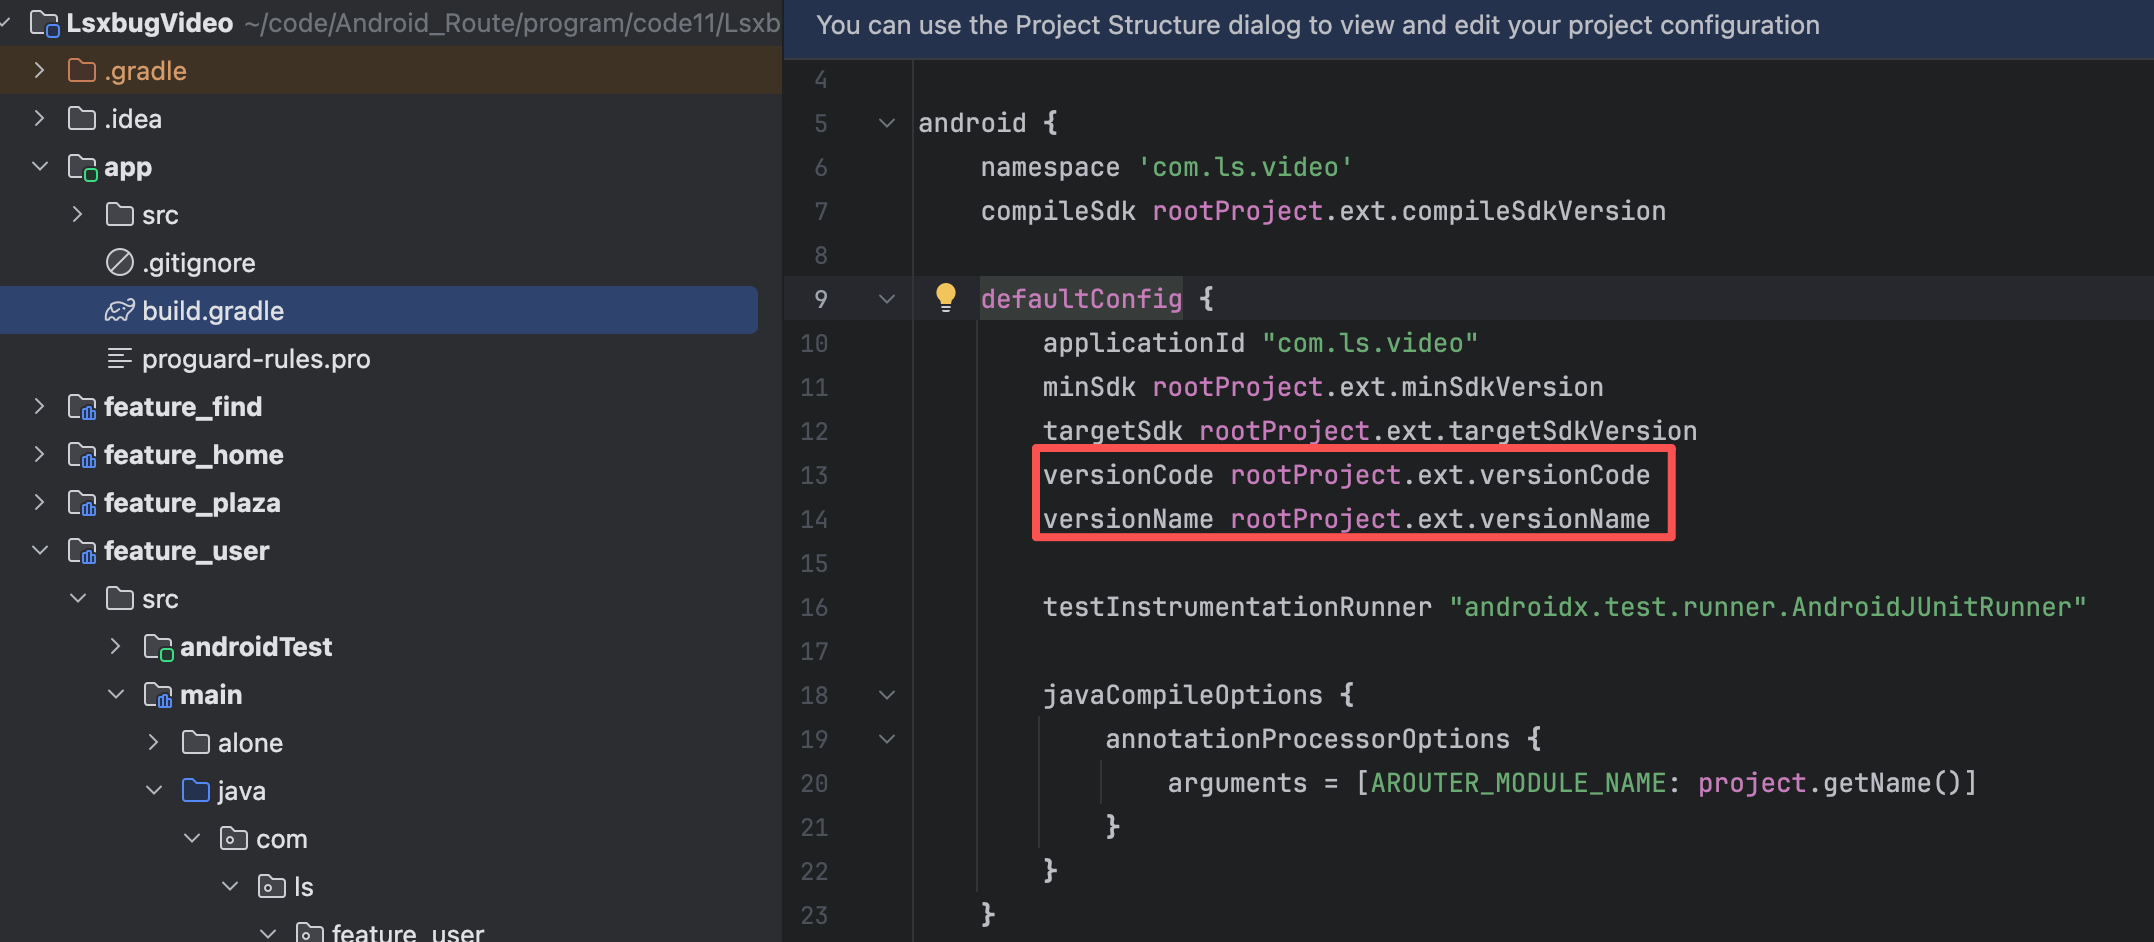
对应项目根目录下的 build.gradle 统一管理的版本号,当用户本地安装的 app 的 versionCode ,低于应用商店的 versionCode,会提醒用户更新:
groovy
plugins {
    alias(libs.plugins.androidApplication) apply false
    alias(libs.plugins.androidLibrary) apply false
}

ext {

    isModule = false //module是否能够独立运行

    compileSdkVersion = 34
    minSdkVersion = 26
    targetSdkVersion = 34
    versionCode = 202502151
    versionName = "2.0"

}
项目内路径:LsxbugVideo/build.gradle
在 libbase.utils 中,定义版本号工具:
getVersionName()读取versionName,给用户展示。getVersionCode()读取versionCode,给升级判断和版本比对使用。- 两个方法都先通过
BaseApplication.getContext()拿到Context,再用PackageManager读取当前包信息。 - Android 9 及以上优先走
getLongVersionCode(),更低版本退回versionCode,保证兼容。 - 读取失败时返回空字符串或
-1,避免页面层异常。
java
public class VersionUtils {

    /**
     * 获取应用的版本名称
     *
     * @return 版本名称,如果获取失败则返回空字符串
     */
    public static String getVersionName() {
        try {
            Context context = BaseApplication.getContext();
            // 获取 PackageManager 实例
            PackageManager packageManager = context.getPackageManager();
            // 获取当前应用的包信息
            PackageInfo packageInfo = packageManager.getPackageInfo(context.getPackageName(), 0);
            // 返回版本名称
            return packageInfo.versionName;
        } catch (PackageManager.NameNotFoundException e) {
            e.printStackTrace();
            return "";
        }
    }

    /**
     * 获取应用的版本代码
     *
     * @return 版本代码,如果获取失败则返回 -1
     */
    public static int getVersionCode() {
        Context context = BaseApplication.getContext();
        try {
            PackageManager packageManager = context.getPackageManager();
            PackageInfo packageInfo = packageManager.getPackageInfo(context.getPackageName(), 0);
            // 在 Android 10 及以上版本使用 getLongVersionCode(),以下版本使用 versionCode
            if (android.os.Build.VERSION.SDK_INT >= android.os.Build.VERSION_CODES.P) {
                return (int) packageInfo.getLongVersionCode();
            } else {
                return packageInfo.versionCode;
            }
        } catch (PackageManager.NameNotFoundException e) {
            e.printStackTrace();
            return -1;
        }
    }
}
项目内路径:LsxbugVideo/library_base/src/main/java/com/ls/libbase/utils/VersionUtils.java
这段 VersionUtils 的作用很简单:专门用来获取当前 App 的版本信息,包括:
versionName:给用户看的版本名,比如1.0.3versionCode:给系统和升级逻辑用的版本号,比如103
可以按下面理解。
getVersionName()
这个方法是拿应用的版本名称。
核心流程是:
- 先通过
BaseApplication.getContext()拿到全局Context - 再通过
context.getPackageManager()拿到PackageManager - 然后通过
packageManager.getPackageInfo(context.getPackageName(), 0)拿到当前应用的包信息 - 最后返回
packageInfo.versionName
也就是说,这个方法本质上是在问系统:
"把我这个应用自己的安装包信息给我,我要读里面的版本名。"
比如在 build.gradle 里配置了:
gradle
versionName "1.0.0"那这里拿到的通常就是 "1.0.0"。
如果获取失败,就捕获 NameNotFoundException,最后返回空字符串 ""。
getVersionCode()
这个方法是拿应用的版本号。
前面的流程和上面差不多,也是先拿:
ContextPackageManagerPackageInfo
不同点在最后返回的是版本号。
这里又分了 Android 版本判断:
- Android 9(
P)及以上:用packageInfo.getLongVersionCode() - 更低版本:用
packageInfo.versionCode
这是因为高版本系统里版本号接口做了升级,支持更大的数字范围,所以官方更推荐用 getLongVersionCode()。
如果失败,就返回 -1。
Model 只负责把工具类结果,获取到版本号转给 ViewModel:
java
public class AboutMeModel {

    /**
     * 获取应用的版本名称
     *
     * @param context 上下文对象
     * @return 版本名称,如果获取失败则返回空字符串
     */
    public String getVersionName() {
        String versionName = VersionUtils.getVersionName();
        return versionName;
    }

    /**
     * 获取应用的版本代码
     *
     * @return 版本代码,如果获取失败则返回 -1
     */
    public int getVersionCode() {
        int versionCode = VersionUtils.getVersionCode();
        return versionCode;
    }
}
项目内路径:LsxbugVideo/feature_user/src/main/java/com/ls/feature_user/ui/aboutme/AboutMeModel.java
最终布局里只观察 versionLabel:
xml
<TextView
      android:id="@+id/tv_version"
      android:layout_width="wrap_content"
      android:layout_height="wrap_content"
      android:layout_marginTop="@dimen/margin_start_12dp"
      android:text="@{viewModel.versionLabel}"
      tools:text="版本信息:v1.0-202501011"
      app:layout_constraintEnd_toEndOf="@+id/iv_logo"
      app:layout_constraintStart_toStartOf="@+id/iv_logo"
      app:layout_constraintTop_toBottomOf="@+id/iv_logo" />
项目内路径:LsxbugVideo/feature_user/src/main/res/layout/activity_about_me.xml
修改根目录 build.gradle ,AboutMeModel 会调用 VersionUtils ,获取版本名和版本号,返回给 AboutMeViewModel,AboutMeViewModel 设置到 mVersionLabel,XML 会观察到 mVersionLabel 的变化,更新 UI
这样一来,工程版本一更新,关于我们页就会自动显示最新结果:
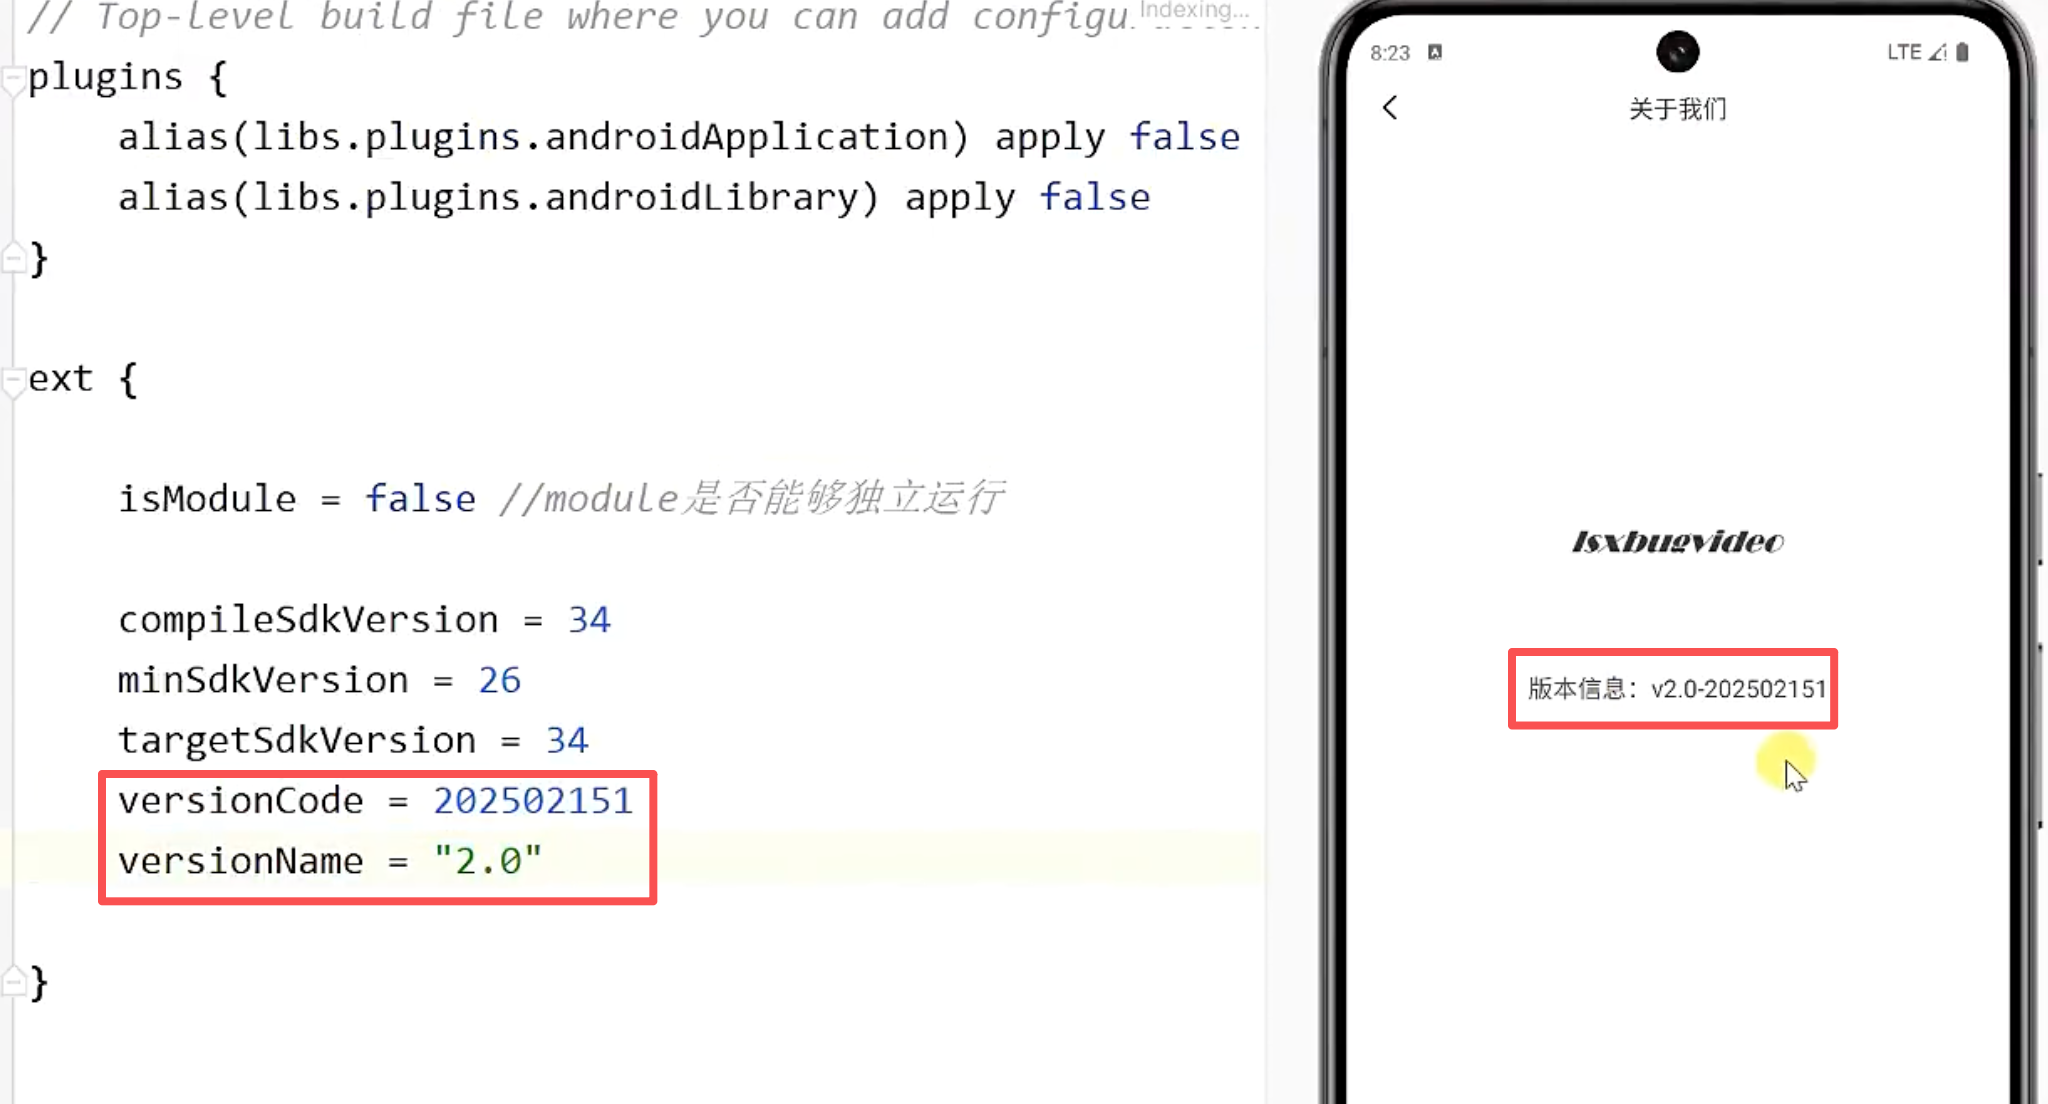
11. 退出登录:服务端失效、本地清理与设置页刷新
退出登录这条链路不能只做到"按钮点了有反应"。真正可用的实现必须同时处理入口显隐、确认弹窗、服务端 token 失效、本地用户信息清理,以及设置页和个人中心的联动回刷。
先看设置页中的目标效果:
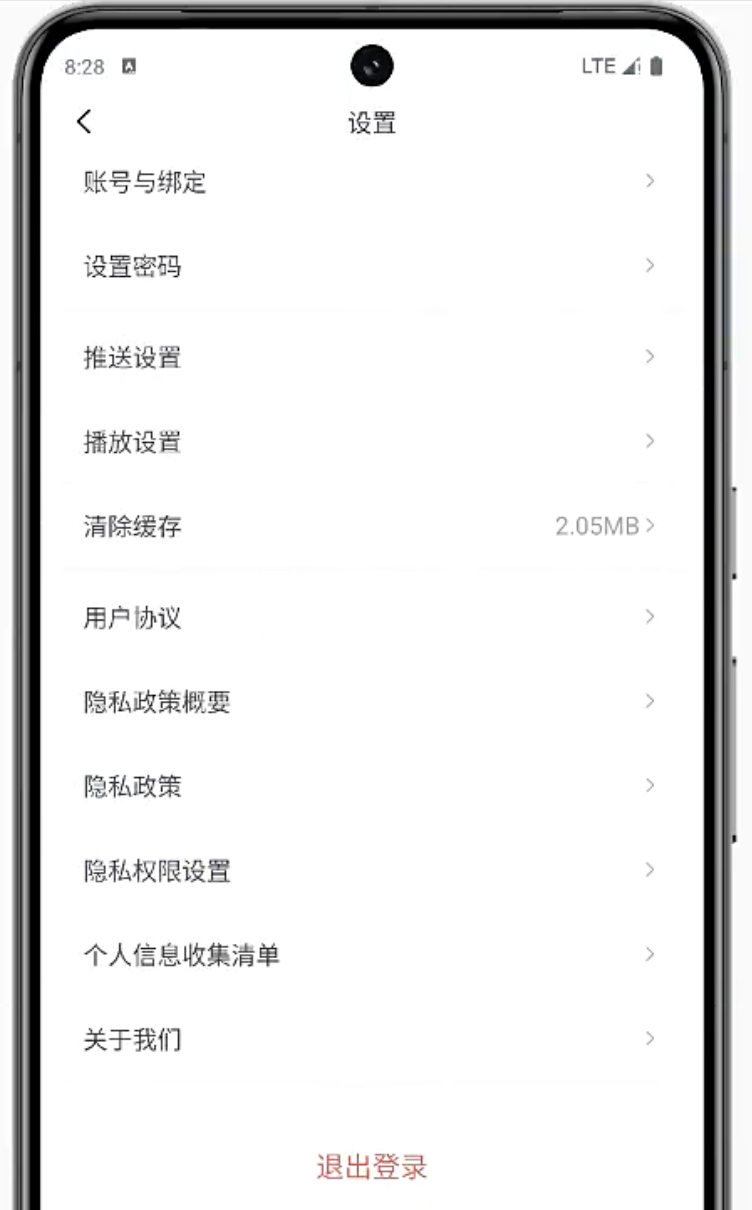
11.1 ViewModel:按钮可见性与退出动作
退出登录按钮只应该在已登录状态下出现,所以进入设置页时就要先刷新一次当前登录态。
在 SettingsViewModel 中:
- 因为已进入设置页面,就要判断是否展示退出登录按钮,进而判断用户登录状态;
- 所以应该把这部分逻辑放到 SettingsViewModel 构造方法中执行;
- 同时,退出登录按钮的点击,可以不校验登录态,因为未登录时不显示登录按钮;
java
//是否显示退出登录的按钮
private MutableLiveData<Integer> mExitLoginBtnVisibility = new MutableLiveData<>();

public SettingsViewModel() {
    this.mModel = new SettingsModel();

    refreshLoginStatus();
    refreshCashSize();//显示缓存
}

/**
 * 第一次进入页面、以及退出登录,需要调用这个方法,刷新当前的页面显示
 */
private void refreshLoginStatus() {
    boolean login = mModel.isLogin();
    mExitLoginBtnVisibility.setValue(login ? View.VISIBLE : View.INVISIBLE);
    mMobile.setValue(mModel.getMobile());
}

/**
 * 退出登录点击事件
 */
public void onLogoutClick() {
    mAction.setValue(SettingsAction.SHOW_LOGOUT_DIALOG);
}
项目内路径:LsxbugVideo/feature_user/src/main/java/com/ls/feature_user/ui/settings/SettingsViewModel.java
这里的职责划分很清楚:
refreshLoginStatus()同时刷新退出按钮和手机号显示,让设置页始终保持一致状态。onLogoutClick()只发出"需要弹确认框"的动作,不直接执行退出。
11.2 View:弹窗触发与交互入口
布局里,退出登录按钮的显隐直接绑定到 ViewModel:
xml
<!-- 退出登录按钮 -->
<TextView
    android:layout_width="match_parent"
    android:layout_height="46.5dp"
    android:layout_marginTop="20dp"
    android:background="@android:color/white"
    android:gravity="center"
    android:onClick="@{() -> viewModel.onLogoutClick()}"
    android:text="退出登录"
    android:textColor="#FF4444"
    android:textSize="16sp"
    android:visibility="@{viewModel.showExitLoginBtn}" />
项目内路径:LsxbugVideo/feature_user/src/main/res/layout/activity_settings.xml
在 SettingsActivity 中,监听到 mAction 的变化,比如点击退出登录时,设置 mAction 为 SettingsAction.SHOW_LOGOUT_DIALOG 枚举常量,表示需要弹出退出登录弹窗:
java
@Override
protected void initView() {
    StatusBarUtils.addStatusBarHeight2RootView(mDataBinding.getRoot());

    mViewModel.getAction().observe(this, settingsAction -> {
        switch (settingsAction) {
           	// ....
            case SHOW_LOGOUT_DIALOG://退出登录
                showLogoutDialog();
                break;
            case NAVIGATE_TO_LOGIN://跳转到登录页
                ARouter.getInstance().build(ARouterPath.User.ACTIVITY_LOGIN).navigation();
                break;
        }
    });

}
项目内路径:LsxbugVideo/feature_user/src/main/java/com/ls/feature_user/ui/settings/SettingsActivity.java
展示退出登录弹窗,如果用户点击确定,触发回调,在回调中调用 SettingsViewModel 的 logout():
java
/**
 * 显示是否退出登录的弹窗
 */
private void showLogoutDialog() {
    YesOrNoDialog.showDialog(this, "提示", "是否退出当前账号?",
            new YesOrNoDialog.Callback() {
                @Override
                public void onConfirm() {
                    mViewModel.logout();
                }
            });
}
项目内路径:LsxbugVideo/feature_user/src/main/java/com/ls/feature_user/ui/settings/SettingsActivity.java
ViewModel 侧先把退出流程骨架搭出来:
java
/**
 * 退出登录
 * 1、清除已登录的用户信息
 * 2、告诉服务端退出登录
 */
public void logout() {
    showLoading(true);
    mModel.logout(new IRequestCallback<ResBase<ResBase>>() {
        @Override
        public void onLoadFinish(ResBase<ResBase> datas) {

        }

        @Override
        public void onLoadFailure(int errorCode, String message) {

        }
    });

}
项目内路径:LsxbugVideo/feature_user/src/main/java/com/ls/feature_user/ui/settings/SettingsViewModel.java
11.3 Model:退出登录接口与本地状态清理
退出登录真正的业务动作落在 Model:把 token 发给服务端,让服务端设置失效;只有服务端返回成功,才清本地用户信息。
服务端接口如下:
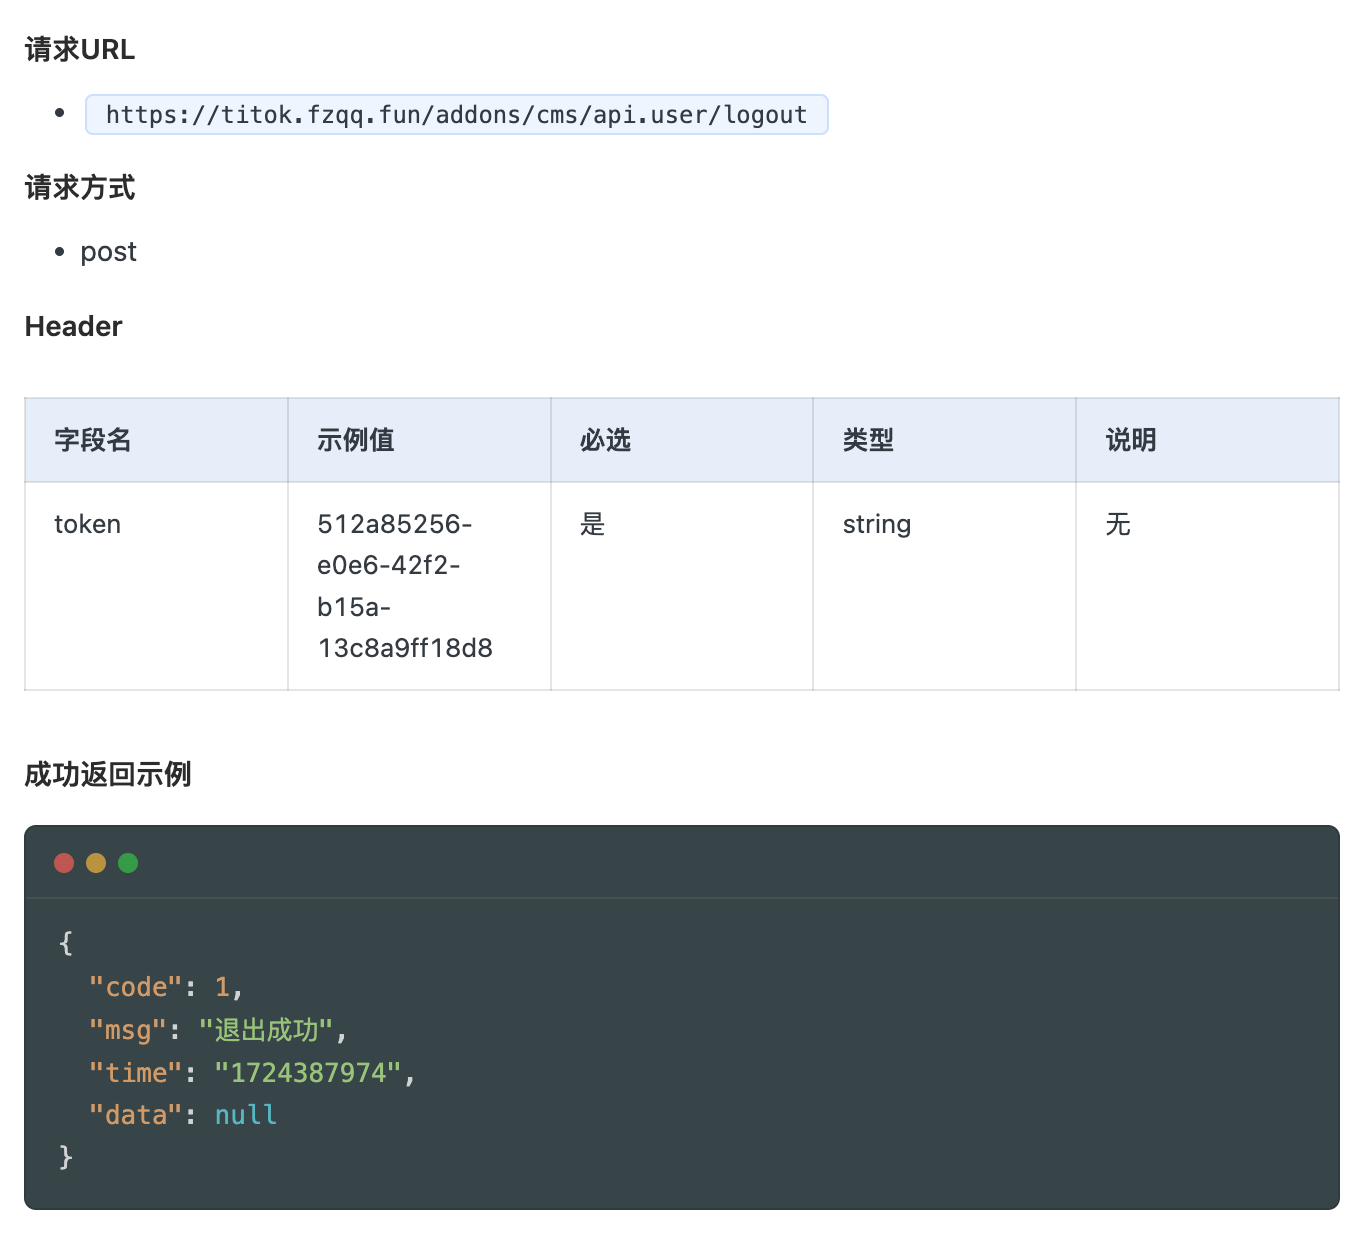
接口声明先加到 UserApiService:
java
/**
 * 退出登录
 *
 * @return
 */
@POST("addons/cms/api.user/logout")
Call<ResBase<ResBase>> logout(@Header("token") String token);
项目内路径:LsxbugVideo/feature_user/src/main/java/com/ls/feature_user/api/UserApiService.java
SettingsModel 负责真正发请求并在成功时清理本地状态:
- 将
IRequestCallback<ResBase<ResBase>>回调接口作为参数; - 从 UserManager 单例对象中,获取 token;
- 将 token 作为退出登录参数,调用 UserApiService 的 logout() 接口,获取 Call 对象;
- 用封装好的 ApiCall ,异步发送 Call
- 在发送成功的回调中,当返回的请求体 code 字段为 1,表示服务端退出登录成功,此时删除客户端的用户登录信息;
- 调用 UserManager 单例对象的静态方法 logout(),将 SharedPreferences 中存储的,用户相关的信息键值对删除;
- 将响应结果通过回调,返回给 ViewModel;
java
/**
 * 退出登录
 */
public void logout(IRequestCallback<ResBase<ResBase>> callback) {

    String token = UserManager.getInstance().getToken();
    Call<ResBase<ResBase>> call = UserApiServiceProvider.getApiService().logout(token);
    ApiCall.enqueue(call, new ApiCall.ApiCallback<ResBase<ResBase>>() {
        @Override
        public void onSuccess(ResBase<ResBase> result) {
            if (result.getCode() == 1) {
                //清除本地已登录用户数据
                UserManager.getInstance().logout();
                callback.onLoadFinish(result);
            }
        }

        @Override
        public void onError(int errorCode, String meesage) {
            callback.onLoadFailure(errorCode, meesage);
        }
    });
}
项目内路径:LsxbugVideo/feature_user/src/main/java/com/ls/feature_user/ui/settings/SettingsModel.java
本地数据删除最终由 UserManager.logout() 完成:
java
/**
 * 退出登录 清除用户信息
 */
public void logout() {
    mPreferences.edit()
            .remove(KEY_TOKEN)
            .remove(KEY_USER_ID)
            .remove(KEY_NICK_NAME)
            .remove(KEY_USER_NAME)
            .remove(KEY_AVATAR)
            .remove(KEY_BIO)
            .remove(KEY_STATUS)
            .remove(KEY_FANS)
            .remove(KEY_FOLLOW)
            .remove(KEY_MEDAL).apply();
}
项目内路径:LsxbugVideo/library_base/src/main/java/com/ls/libbase/manager/UserManager.java
Model 补齐后,ViewModel 再把成功和失败分支真正写完整:
- 调用 model 的 logout 时,在成功回调中,使用 EventBus ,发布用户登录状态粘性事件,设置登录态为 false;
- 调用 refreshLoginStatus(),此时会调用 model 接口,判断登录状态,然后更新退出登录按钮的可见性;
- 手机号 mMobile,也调用 model 接口获取最新的,在未登录时返回 null;
java
/**
 * 退出登录
 * 1、清除已登录的用户信息
 * 2、告诉服务端退出登录
 */
public void logout() {
    showLoading(true);
    mModel.logout(new IRequestCallback<ResBase<ResBase>>() {
        @Override
        public void onLoadFinish(ResBase<ResBase> datas) {
            //发送一个退出登录的状态
            MessageEvent.LoginStatusEvent.post(false);
            refreshLoginStatus();
            showToast(datas.getMsg());
            showLoading(false);
        }

        @Override
        public void onLoadFailure(int errorCode, String message) {
            showToast(message);
            showLoading(false);
        }
    });

}

/**
 * 第一次进入页面、以及退出登录,需要调用这个方法,刷新当前的页面显示
 */
private void refreshLoginStatus() {
    boolean login = mModel.isLogin();
    mExitLoginBtnVisibility.setValue(login ? View.VISIBLE : View.INVISIBLE);
    mMobile.setValue(mModel.getMobile());
}
项目内路径:LsxbugVideo/feature_user/src/main/java/com/ls/feature_user/ui/settings/SettingsViewModel.java
重新登录后回到设置页,退出按钮和手机号都还在:
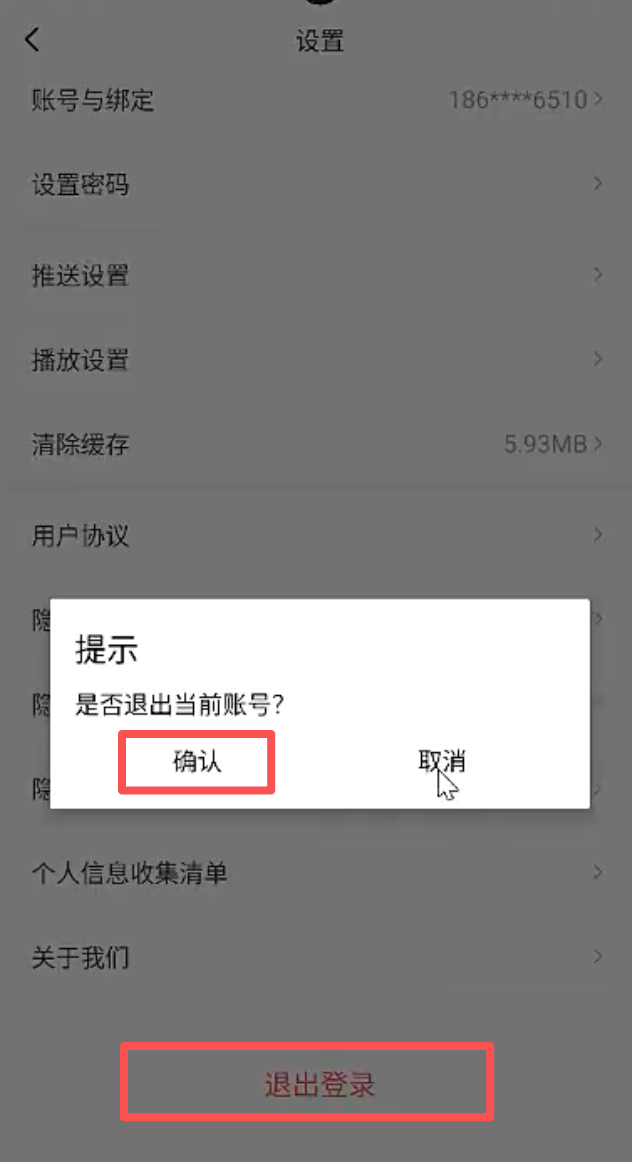
确认退出以后,手机号被清空,退出登录按钮也同步隐藏:

此时回到个人中心 UserFragment,也会看到页面已经切回未登录态:
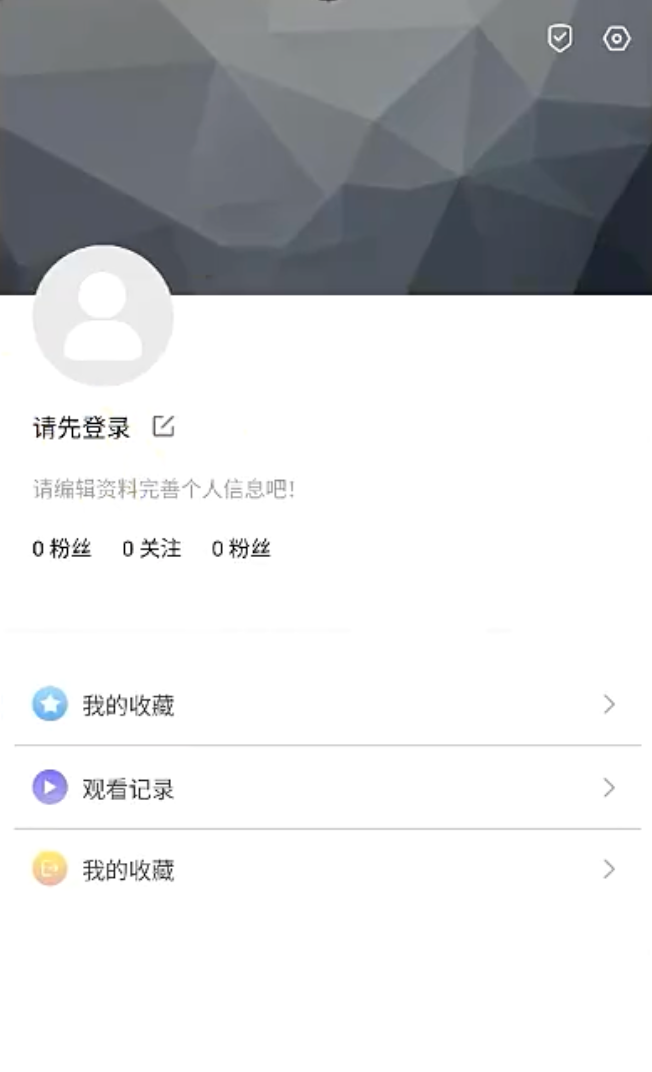
12. 个人中心交互补齐:头像、收藏、记录与退出登录入口
最后再把个人中心页上的点击行为补完整。头像区、收藏、观看记录和退出登录入口都不应该只是静态布局,而要统一接入登录态判断和动作分发。
先把布局里的点击事件全部挂到对应控件上:
xml
<?xml version="1.0" encoding="utf-8"?>
<layout xmlns:android="http://schemas.android.com/apk/res/android"
    xmlns:app="http://schemas.android.com/apk/res-auto"
    xmlns:tools="http://schemas.android.com/tools">

    <data>

        <variable
            name="viewModel"
            type="com.ls.feature_user.ui.user.UserViewModel" />
    </data>

    <androidx.constraintlayout.widget.ConstraintLayout
        android:layout_width="match_parent"
        android:layout_height="match_parent">

        <ImageView
            android:id="@+id/imageView"
            android:layout_width="match_parent"
            android:layout_height="200dp"
            android:scaleType="centerCrop"
            android:src="@mipmap/bg_user_center"
            app:layout_constraintEnd_toEndOf="parent"
            app:layout_constraintStart_toStartOf="parent"
            app:layout_constraintTop_toTopOf="parent" />

        <ImageView
            android:id="@+id/iv_settings"
            android:layout_width="20dp"
            android:layout_height="20dp"
            android:layout_marginTop="2dp"
            android:layout_marginEnd="14dp"
            android:onClick="@{()->viewModel.onSettingsClick()}"
            android:src="@mipmap/icon_settings"
            app:layout_constraintEnd_toEndOf="parent"
            app:layout_constraintTop_toTopOf="parent" />

        <ImageView
            android:id="@+id/iv_qualifications"
            android:layout_width="20dp"
            android:layout_height="20dp"
            android:layout_marginTop="2dp"
            android:layout_marginEnd="12dp"
            android:onClick="@{()->viewModel.onUserInfoMenuClick()}"
            android:src="@mipmap/icon_qualifications"
            app:layout_constraintEnd_toStartOf="@id/iv_settings"
            app:layout_constraintTop_toTopOf="parent" />

        <ImageView
            android:id="@+id/iv_avatar"
            imageCircleUrl="@{viewModel.avatar}"
            android:layout_width="80dp"
            android:layout_height="80dp"
            android:layout_marginStart="20dp"
            android:layout_marginTop="171dp"
            android:onClick="@{()->viewModel.onEditUserInfoClick()}"
            android:src="@mipmap/icon_default_avatar"
            app:layout_constraintStart_toStartOf="parent"
            app:layout_constraintTop_toTopOf="parent" />

        <TextView
            android:id="@+id/tv_nick_name"
            android:layout_width="wrap_content"
            android:layout_height="wrap_content"
            android:layout_marginTop="12dp"
            android:onClick="@{()->viewModel.onEditUserInfoClick()}"
            android:text="@{viewModel.nickName}"
            android:textColor="@color/black"
            android:textSize="@dimen/font_size_14sp"
            app:layout_constraintStart_toStartOf="@+id/iv_avatar"
            app:layout_constraintTop_toBottomOf="@+id/iv_avatar"
            tools:text="请先登录" />

        <ImageView
            android:id="@+id/iv_edit"
            android:layout_width="12dp"
            android:layout_height="12dp"
            android:layout_marginStart="12.5dp"
            android:onClick="@{()->viewModel.onEditUserInfoClick()}"
            android:src="@mipmap/icon_user_edit"
            app:layout_constraintBottom_toBottomOf="@+id/tv_nick_name"
            app:layout_constraintStart_toEndOf="@+id/tv_nick_name"
            app:layout_constraintTop_toTopOf="@+id/tv_nick_name" />

        <TextView
            android:id="@+id/tv_sign"
            android:layout_width="wrap_content"
            android:layout_height="wrap_content"
            android:layout_marginTop="16dp"
            android:onClick="@{()->viewModel.onEditUserInfoClick()}"
            android:text="@{viewModel.bio}"
            android:textColor="#ff9c9c9c"
            android:textSize="@dimen/font_size_12sp"
            app:layout_constraintStart_toStartOf="@+id/tv_nick_name"
            app:layout_constraintTop_toBottomOf="@+id/tv_nick_name"
            tools:text="用户签名" />


        <TextView
            android:id="@+id/tv_fans"
            android:layout_width="wrap_content"
            android:layout_height="wrap_content"
            android:layout_marginTop="16dp"
            android:text="@{viewModel.fans}"
            android:textColor="@color/black"
            android:textSize="12sp"
            app:layout_constraintStart_toStartOf="@id/tv_sign"
            app:layout_constraintTop_toBottomOf="@id/tv_sign"
            tools:text="0 粉丝" />


        <TextView
            android:id="@+id/tv_follow"
            android:layout_width="wrap_content"
            android:layout_height="wrap_content"
            android:layout_marginStart="17dp"
            android:layout_marginTop="16dp"
            android:text="@{viewModel.follow}"
            android:textColor="@color/black"
            android:textSize="12sp"
            app:layout_constraintStart_toEndOf="@id/tv_fans"
            app:layout_constraintTop_toBottomOf="@id/tv_sign"
            tools:text="0 关注" />

        <TextView
            android:id="@+id/tv_medal"
            android:layout_width="wrap_content"
            android:layout_height="wrap_content"
            android:layout_marginStart="17dp"
            android:layout_marginTop="16dp"
            android:text="@{viewModel.medal}"
            android:textColor="@color/black"
            android:textSize="12sp"
            app:layout_constraintStart_toEndOf="@id/tv_follow"
            app:layout_constraintTop_toBottomOf="@id/tv_sign"
            tools:text="0 奖章" />

        <View
            android:id="@+id/view_div"
            android:layout_width="match_parent"
            android:layout_height="5dp"
            android:layout_marginTop="36dp"
            android:background="#fff8f8f8"
            app:layout_constraintEnd_toEndOf="parent"
            app:layout_constraintStart_toStartOf="parent"
            app:layout_constraintTop_toBottomOf="@id/tv_fans" />

        <!--因为每一行都是一个点击区域,所以给每个菜单添加一个父布局用来做点击事件-->
        <LinearLayout
            android:id="@+id/ll_collection"
            android:layout_width="match_parent"
            android:layout_height="46dp"
            android:layout_marginTop="16dp"
            android:gravity="center|start"
            android:onClick="@{()->viewModel.onCollectionClick()}"
            android:orientation="horizontal"
            app:layout_constraintStart_toStartOf="parent"
            app:layout_constraintTop_toBottomOf="@+id/view_div">

            <ImageView
                android:id="@+id/iv_collection"
                android:layout_width="20dp"
                android:layout_height="20dp"
                android:layout_marginStart="20dp"
                android:src="@mipmap/icon_user_collection" />

            <TextView
                android:layout_width="0dp"
                android:layout_height="wrap_content"
                android:layout_marginStart="8dp"
                android:layout_weight="1"
                android:text="我的收藏"
                android:textColor="#ff444444"
                android:textSize="13sp" />


            <ImageView
                android:layout_width="16dp"
                android:layout_height="16dp"
                android:layout_marginEnd="20dp"
                android:src="@mipmap/icon_menu_right_arrow" />

        </LinearLayout>

        <View
            android:id="@+id/view_div1"
            android:layout_width="match_parent"
            android:layout_height="1dp"
            android:layout_marginStart="10dp"
            android:layout_marginEnd="10dp"
            android:background="#33000000"
            app:layout_constraintStart_toStartOf="parent"
            app:layout_constraintTop_toBottomOf="@+id/ll_collection" />

        <LinearLayout
            android:id="@+id/ll_record"
            android:layout_width="match_parent"
            android:layout_height="46dp"
            android:gravity="center|start"
            android:onClick="@{()->viewModel.onRecordClick()}"
            android:orientation="horizontal"
            app:layout_constraintStart_toStartOf="parent"
            app:layout_constraintTop_toBottomOf="@+id/view_div1">

            <ImageView
                android:layout_width="20dp"
                android:layout_height="20dp"
                android:layout_marginStart="20dp"
                android:src="@mipmap/icon_user_record" />

            <TextView
                android:layout_width="0dp"
                android:layout_height="wrap_content"
                android:layout_marginStart="8dp"
                android:layout_weight="1"
                android:text="观看记录"
                android:textColor="#ff444444"
                android:textSize="13sp" />

            <ImageView
                android:layout_width="16dp"
                android:layout_height="16dp"
                android:layout_marginEnd="20dp"
                android:src="@mipmap/icon_menu_right_arrow" />

        </LinearLayout>

        <View
            android:id="@+id/view_div2"
            android:layout_width="match_parent"
            android:layout_height="1dp"
            android:layout_marginStart="10dp"
            android:layout_marginEnd="10dp"
            android:background="#33000000"
            app:layout_constraintStart_toStartOf="parent"
            app:layout_constraintTop_toBottomOf="@+id/ll_record" />

        <LinearLayout
            android:id="@+id/ll_exit"
            android:layout_width="match_parent"
            android:layout_height="46dp"
            android:gravity="center|start"
            android:onClick="@{()->viewModel.onLogoutClick()}"
            android:orientation="horizontal"
            android:visibility="@{viewModel.showLogoutBtn}"
            app:layout_constraintStart_toStartOf="parent"
            app:layout_constraintTop_toBottomOf="@+id/ll_record">

            <ImageView
                android:layout_width="20dp"
                android:layout_height="20dp"
                android:layout_marginStart="20dp"
                android:src="@mipmap/icon_exit_login" />

            <TextView
                android:layout_width="0dp"
                android:layout_height="wrap_content"
                android:layout_marginStart="8dp"
                android:layout_weight="1"
                android:text="退出登录"
                android:textColor="#ff444444"
                android:textSize="13sp" />

            <ImageView
                android:layout_width="16dp"
                android:layout_height="16dp"
                android:layout_marginEnd="20dp"
                android:src="@mipmap/icon_menu_right_arrow" />
        </LinearLayout>

    </androidx.constraintlayout.widget.ConstraintLayout>
</layout>
项目内路径:LsxbugVideo/feature_user/src/main/res/layout/layout_fragment_user.xml
现在,头像区、入口区和退出登录入口都能被点击了:
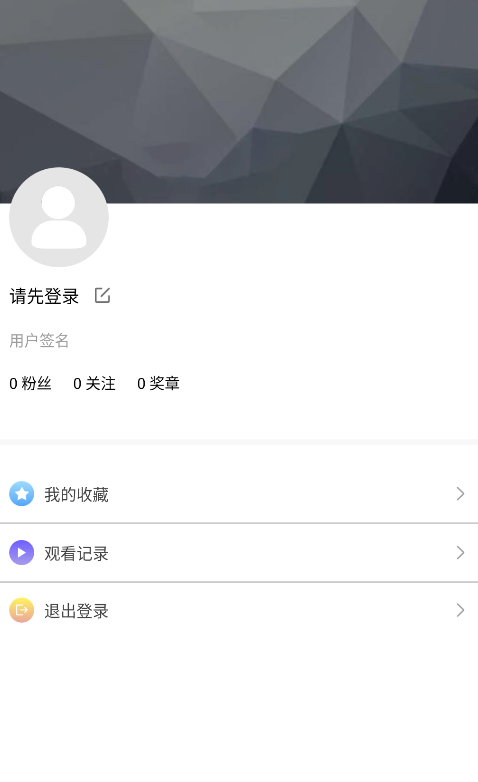
个人中心里的退出登录入口和设置页是同一套退出链路:先确认、再请求服务端、成功后清本地并刷新页面。
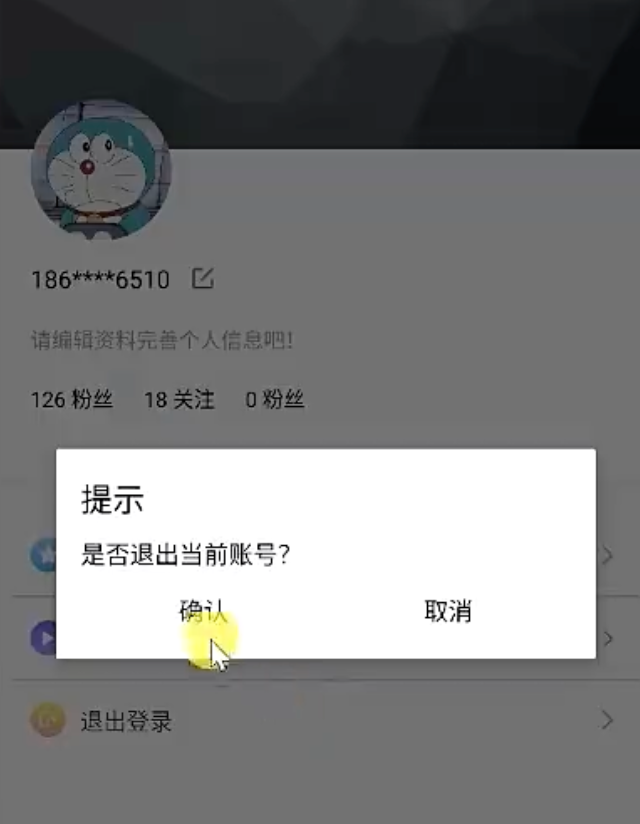
- 点击确认退出后,会先调用服务端退出登录接口,让 token 失效。
- 服务端返回成功以后,客户端解析响应并发送
EventBus粘性事件,广播未登录状态。 UserManager会删除 SharedPreferences 里和当前用户相关的键值对。- 个人中心页收到状态变化后,会重新构造一个空用户对象回刷 UI,并隐藏退出登录按钮。
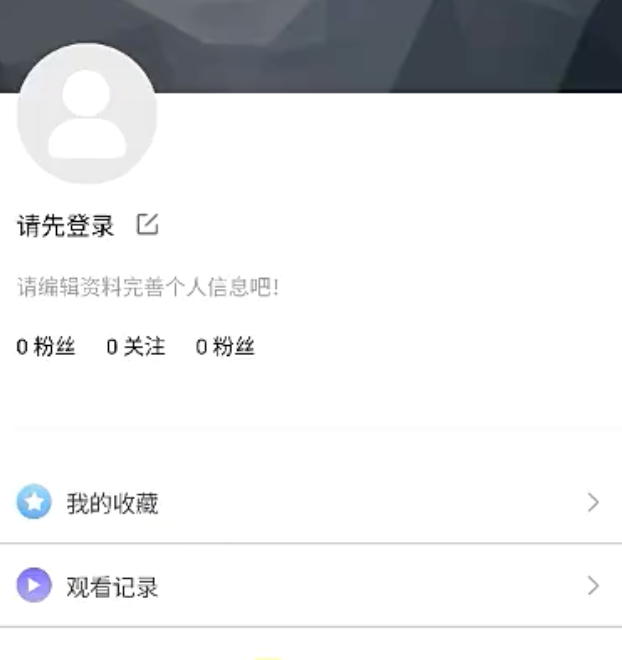
这些入口的动作统一由 UserViewModel 生成,先判断登录态,再决定跳目标页还是先去登录页。
在 UserViewModel ,用户点击了 头像、昵称、签名、收藏、登录状态,都先校验登录状态:
- 当用户未登录,跳转到登录页面;
- 当用户已登录,点击则跳转到对应的页面;
java
private MutableLiveData<UserCenterAction> mAction = new MutableLiveData<>();

/**
 * 编辑资料
 */
public void onEditUserInfoClick() {
    boolean login = mModel.isLogin();
    //如果未登录 就去登录页
    mAction.setValue(login ? UserCenterAction.NAVIGATION_TO_EDIT_INFO : UserCenterAction.NAVIGATE_TO_LOGIN);
}

/**
 * 收藏页
 */
public void onCollectionClick() {
    boolean login = mModel.isLogin();
    //如果未登录 就去登录页
    mAction.setValue(login ? UserCenterAction.NAVIGATION_TO_COLLECTION : UserCenterAction.NAVIGATE_TO_LOGIN);
}

/**
 * 播放记录页
 */
public void onRecordClick() {
    boolean login = mModel.isLogin();
    //如果未登录 就去登录页
    mAction.setValue(login ? UserCenterAction.NAVIGATION_TO_RECORD : UserCenterAction.NAVIGATE_TO_LOGIN);
}
项目内路径:LsxbugVideo/feature_user/src/main/java/com/ls/feature_user/ui/user/UserViewModel.java
UserFragment 负责消费这些动作并执行跳转:
java
@Override
protected void initView() {
    Log.i(TAG, "initView");
    StatusBarUtils.addStatusBarHeight2Views(mDataBinding.getRoot(), mDataBinding.ivSettings, mDataBinding.ivQualifications);

    mViewModel.getAction().observe(this, userCenterAction -> {
        switch (userCenterAction) {
            case NAVIGATE_TO_LOGIN:
                //跳转到登录页
                ARouter.getInstance().build(ARouterPath.User.ACTIVITY_LOGIN).navigation();
                break;
            case NAVIGATION_TO_EDIT_INFO:
                //跳转到用户信息编辑
                ARouter.getInstance().build(ARouterPath.User.ACTIVITY_EDITUSERINFO).navigation();
                break;
            case NAVIGATION_TO_RECORD:
                //跳转到播放记录
                ARouter.getInstance().build(ARouterPath.User.ACTIVITY_PLAYRECORD).navigation();
                break;
            // ...
}
项目内路径:LsxbugVideo/feature_user/src/main/java/com/ls/feature_user/ui/user/UserFragment.java
对应路由常量也要补到统一配置里:
java
package com.ls.libbase.config;

public class ARouterPath {

    public static class User {

        private static final String USER = "/user";
        public static final String FRAGMENT_USER = USER + "/userFragment";

        public static final String ACTIVITY_LOGIN = USER + "/loginActivity";
        public static final String ACTIVITY_AGREEMENT = USER + "/AgreementActivity";

        //设置页
        public static final String ACTIVITY_SETTINGS = USER + "/SettingsActivity";
        //修改密码
        public static final String ACTIVITY_RESETPWD = USER + "/ResetPasswordActivity";
        //推送设置
        public static final String ACTIVITY_PUSHSETTINGS = USER + "/PushSettingsActivity";
        //播放设置
        public static final String ACTIVITY_PLAYTTINGS = USER + "/PlaySettingsActivity";
        //账户与绑定
        public static final String ACTIVITY_ACCOUNT = USER + "/AccountActivity";
        public static final String ACTIVITY_PERMISSION = USER + "/PermissionActivity";
        public static final String ACTIVITY_EDITUSERINFO = USER + "/EditUserInfoActivity";
        public static final String ACTIVITY_PLAYRECORD = USER + "/EditUserInfoActivity";
        public static final String ACTIVITY_ABOUTME = USER + "/AboutMeActivity";
    }

}
项目内路径:LsxbugVideo/library_base/src/main/java/com/ls/libbase/config/ARouterPath.java
补充 UserViewModel 逻辑,当登录成功,设置退出登录按钮的标记 mShowLogoutBtn 为可见,当未登录,或者退出登录时,设置 mShowLogoutBtn 为不可见:
java
//是否显示退出登录按钮,默认不显示
private MutableLiveData<Integer> mShowLogoutBtn = new MutableLiveData<>(View.INVISIBLE);

/**
 * 加载用户信息
 *
 * @param login
 */
public void loadUserInfo(boolean login) {
    if (login) {
        showLoading(true);
        mModel.loadUserInfo(new ILoadUserInfoCallback() {
            @Override
            public void onLoadSuccess(ResUser user) {
                showLoading(false);
                updateUserInfo(user);
            }

            @Override
            public void onLoadFailure(int errorCode, String message) {
                showLoading(false);
                notLoginUpdateUserInfo();
            }
        });
        //已登录时 刷新退出登录按钮的状态为可见
        mShowLogoutBtn.setValue(View.VISIBLE);
    } else {
        notLoginUpdateUserInfo();
    }
}

private void notLoginUpdateUserInfo() {
    //如果没登录 或者获取不到登录的信息,那么传个空的user用来更新ui
    ResUser user = new ResUser();
    user.setUser(new UserInfo());
    updateUserInfo(user);

    //没登录的时候 刷新退出登录按钮的状态
    mShowLogoutBtn.setValue(View.INVISIBLE);
}
项目内路径:LsxbugVideo/feature_user/src/main/java/com/ls/feature_user/ui/user/UserViewModel.java
这样,个人中心页就和设置页真正连成了一个整体:登录后能显示完整资料和退出入口,未登录时所有敏感入口都会先转去登录,退出登录后两边页面又会同时回到未登录状态。
13. 相关代码附录
下面按主题把关键源码再集中整理一遍,方便从实现角度快速回看整套个人中心与设置模块。
13.1 登录态与个人中心
登录态事件定义:
java
public class MessageEvent {

    /**
     * 登录状态变更 登录成功、退出
     */
    public static class LoginStatusEvent {
        private boolean isLogin;//是否登录

        public LoginStatusEvent(boolean isLogin) {
            this.isLogin = isLogin;
        }

        public boolean isLogin() {
            return isLogin;
        }

        public static void post(boolean isLogin) {
            //使用粘性事件发送消息,确保订阅者在活跃的时候再处理消息
            EventBus.getDefault().postSticky(new LoginStatusEvent(isLogin));
        }

    }
}
项目内路径:LsxbugVideo/library_base/src/main/java/com/ls/libbase/eventbus/MessageEvent.java
个人中心页订阅登录态并刷新数据:
java
@Subscribe(sticky = true, threadMode = ThreadMode.MAIN)//表示接收粘性事件
public void onMessageEvent(MessageEvent.LoginStatusEvent event) {
    boolean login = event.isLogin();
    Log.i(TAG, "onMessageEvent: isLogin = " + login);
    mViewModel.loadUserInfo(login);
}

@Override
public void onStart() {
    super.onStart();
    EventBus.getDefault().register(this);
}

@Override
public void onStop() {
    super.onStop();
    if (EventBus.getDefault().isRegistered(this)) {
        EventBus.getDefault().unregister(this);
    }
}
项目内路径:LsxbugVideo/feature_user/src/main/java/com/ls/feature_user/ui/user/UserFragment.java
个人中心页数据刷新核心:
java
public void loadUserInfo(boolean login) {
    if (login) {
        showLoading(true);
        mModel.loadUserInfo(new ILoadUserInfoCallback() {
            @Override
            public void onLoadSuccess(ResUser user) {
                showLoading(false);
                updateUserInfo(user);
            }

            @Override
            public void onLoadFailure(int errorCode, String message) {
                showLoading(false);
                notLoginUpdateUserInfo();
            }
        });
        mShowLogoutBtn.setValue(View.VISIBLE);
    } else {
        notLoginUpdateUserInfo();
    }
}

private void notLoginUpdateUserInfo() {
    ResUser user = new ResUser();
    user.setUser(new UserInfo());
    updateUserInfo(user);
    mShowLogoutBtn.setValue(View.INVISIBLE);
}
项目内路径:LsxbugVideo/feature_user/src/main/java/com/ls/feature_user/ui/user/UserViewModel.java
13.2 设置页动作、弹窗与缓存
设置页动作枚举:
java
public enum SettingsAction {
    FINISH,
    SHOW_LOGOUT_DIALOG,
    NAVIGATION_TO_ACCOUNT,
    NAVIGATION_TO_PASSWORD,
    NAVIGATE_TO_PUSH_SETTING,
    NAVIGATE_TO_PLAY_SETTING,
    SHOW_CLEAR_CACHE_DIALOG,
    NAVIGATE_TO_USER_AGREEMENT,
    NAVIGATE_TO_SIMPLE_PRIVACY_POLICY,
    NAVIGATE_TO_PRIVACY_POLICY,
    NAVIGATE_TO_PERMISSION_SETTING,
    NAVIGATE_TO_USER_INFO_MENU,
    NAVIGATE_TO_ABOUT_US,
    NAVIGATE_TO_LOGIN
}
项目内路径:LsxbugVideo/feature_user/src/main/java/com/ls/feature_user/ui/settings/SettingsViewModel.java
确认弹窗统一展示入口:
java
public static void showDialog(FragmentActivity activity, String title, String content, Callback callback) {
    YesOrNoDialog yesOrNoDialog = YesOrNoDialog.newInstance(title, content, callback);
    yesOrNoDialog.show(activity.getSupportFragmentManager(), "yesorno");
}
项目内路径:LsxbugVideo/library_base/src/main/java/com/ls/libbase/ui/dialog/YesOrNoDialog.java
缓存清理的 Model 实现:
java
public boolean clearCache() {
    boolean b = CacheUtils.clearAppCache();
    boolean b1 = CacheUtils.clearExternalCache();
    return b && b1;
}
项目内路径:LsxbugVideo/feature_user/src/main/java/com/ls/feature_user/ui/settings/SettingsModel.java
缓存清理的 ViewModel 刷新逻辑:
java
public void clearCache() {
    showLoading(true);
    boolean isSuccess = mModel.clearCache();
    if (isSuccess) {
        refreshCashSize();
        showLoading(false);
        showToast("缓存清除成功!");
    } else {
        showToast("缓存清除失败,请手动前往设置页处理!");
        showLoading(false);
    }
}
项目内路径:LsxbugVideo/feature_user/src/main/java/com/ls/feature_user/ui/settings/SettingsViewModel.java
13.3 协议页、账号绑定与密码重置
协议页按参数切换 URL:
java
String url = AGREEMENT_URL;
switch (mType) {
    case UserConfig.AgreementType.VALUE_AGREEMENT:
        url = AGREEMENT_URL;
        mDataBinding.tvTitle.setText("用户协议");
        break;
    case UserConfig.AgreementType.VALUE_SIMPLE_PRIVATE:
    case UserConfig.AgreementType.VALUE_PRIVATE:
        url = PRIVATE_URL;
        mDataBinding.tvTitle.setText("隐私政策");
        break;
    case UserConfig.AgreementType.VALUE_USER_INFO:
        url = USER_INFO_URL;
        mDataBinding.tvTitle.setText("个人信息收集清单");
        break;
}

mDataBinding.webView.loadUrl(url);
项目内路径:LsxbugVideo/feature_user/src/main/java/com/ls/feature_user/ui/agreement/AgreementActivity.java
手机号脱敏逻辑:
java
public String getMobile() {
    if (isLogin()) {
        String mobile = UserManager.getInstance().getUserInfo().getUser().getUsername();
        StringBuilder builder = new StringBuilder();
        builder.append(mobile.substring(0, 3));
        builder.append("****");
        builder.append(mobile.substring(7));
        return builder.toString();
    }
    return null;
}
项目内路径:LsxbugVideo/feature_user/src/main/java/com/ls/feature_user/ui/account/AccountModel.java
设置密码页验证码发送逻辑:
java
public void sendCode() {
    String mobile = mMobile.getValue();
    if (mobile == null || mobile.length() != 11) {
        showToast("请输入正确的手机号码!");
        return;
    }
    if (mDownTimer != null) {
        mDownTimer.cancel();
    }
    mIsEnableSendCode.setValue(false);
    mDownTimer = new CountDownTimer(60000, 1000) {
        @Override
        public void onTick(long millisUntilFinished) {
            int seconds = (int) (millisUntilFinished / 1000);
            mGetVerticalCodeText.setValue(seconds + "s");
        }

        @Override
        public void onFinish() {
            mGetVerticalCodeText.setValue("获取验证码");
            mIsEnableSendCode.setValue(true);
        }
    }.start();
    showLoading(true);
    mModel.sendSmsCode(new IRequestCallback<ResBase<ResBase>>() {
        @Override
        public void onLoadFinish(ResBase<ResBase> datas) {
            showToast(datas.getMsg());
            showLoading(false);
        }

        @Override
        public void onLoadFailure(int errorCode, String message) {
            showToast(message);
            showLoading(false);
        }
    });
}
项目内路径:LsxbugVideo/feature_user/src/main/java/com/ls/feature_user/ui/resetpwd/ResetPasswordViewModel.java
13.4 关于我们与退出登录
关于我们页版本文案组装:
java
public AboutMeViewModel() {
    this.mModel = new AboutMeModel();

    int versionCode = mModel.getVersionCode();
    String versionName = mModel.getVersionName();

    String label = "版本信息:v" + versionName + "-" + versionCode;
    mVersionLabel.setValue(label);
}
项目内路径:LsxbugVideo/feature_user/src/main/java/com/ls/feature_user/ui/aboutme/AboutMeViewModel.java
退出登录接口调用:
java
public void logout(IRequestCallback<ResBase<ResBase>> callback) {
    String token = UserManager.getInstance().getToken();
    Call<ResBase<ResBase>> call = UserApiServiceProvider.getApiService().logout(token);
    ApiCall.enqueue(call, new ApiCall.ApiCallback<ResBase<ResBase>>() {
        @Override
        public void onSuccess(ResBase<ResBase> result) {
            if (result.getCode() == 1) {
                UserManager.getInstance().logout();
                callback.onLoadFinish(result);
            }
        }

        @Override
        public void onError(int errorCode, String meesage) {
            callback.onLoadFailure(errorCode, meesage);
        }
    });
}
项目内路径:LsxbugVideo/feature_user/src/main/java/com/ls/feature_user/ui/settings/SettingsModel.java
退出登录后的页面刷新:
java
public void logout() {
    showLoading(true);
    mModel.logout(new IRequestCallback<ResBase<ResBase>>() {
        @Override
        public void onLoadFinish(ResBase<ResBase> datas) {
            MessageEvent.LoginStatusEvent.post(false);
            refreshLoginStatus();
            showToast(datas.getMsg());
            showLoading(false);
        }

        @Override
        public void onLoadFailure(int errorCode, String message) {
            showToast(message);
            showLoading(false);
        }
    });
}
项目内路径:LsxbugVideo/feature_user/src/main/java/com/ls/feature_user/ui/settings/SettingsViewModel.java