【SpringMVC笔记】 - 4 - 三个域对象
一、Servlet 中的三个域对象回顾
在 Servlet 体系中,核心的三个域对象分别是请求域(request) 、会话域(session) 、应用域(application) ,它们都具备 setAttribute(String name, Object value)、getAttribute(String name)、removeAttribute(String name) 三个核心方法,用于完成域内数据的传递与共享,核心区别在于作用范围 和生命周期:
| 域对象 | 接口名 | 生命周期 | 作用范围 | 核心业务场景 |
|---|---|---|---|---|
| 请求域(request) | HttpServletRequest | 一次请求开始到响应结束 | 单次请求(转发有效) | 转发场景下 A 资源与 B 资源共享数据 |
| 会话域(session) | HttpSession | 浏览器打开到关闭(JSESSIONID 失效) | 一次会话(多次请求) | 重定向场景数据共享、登录状态保存、购物车数据存储 |
| 应用域(application) | ServletContext | 服务器启动到关闭 | 整个 Web 应用(所有用户) | 记录网站在线人数、全局配置信息(如数据库连接参数) |
二、SpringMVC 中操作请求域(request)
SpringMVC 提供了多种操作请求域的方式,既兼容原生 Servlet API,也提供了更符合 MVC 设计的优雅方式,以下结合代码示例逐一说明:
2.1 方式 1:使用原生 Servlet API(不推荐)
核心原理
直接在 Controller 方法参数中声明 HttpServletRequest 对象,SpringMVC 会自动注入 Tomcat 创建的 request 实例,通过原生 API 操作请求域。
代码示例
java
@Controller
public class RequestScopeTestController {
    @RequestMapping("/testServletApi")
    public String testServletApi(HttpServletRequest request) {
        // 存入请求域
        request.setAttribute("testRequestScope", "hello,servletApi");
        // 转发到 ok.html
        return "ok";
    }
}
视图层(ok.html)取值
html
<!DOCTYPE html>
<html lang="en" xmlns:th="http://www.thymeleaf.org">
<head>
    <meta charset="UTF-8">
    <title>OK</title>
</head>
<body>
<h1>OK</h1>
<h1 th:text="${testRequestScope}"></h1>

<h1 th:text="${session.testSessionScope}"></h1>

<h1 th:text="${session.x}"></h1>

<h1 th:text="${session.y}"></h1>

<h1 th:text="${application.testApplicationScope}"></h1>

</body>
</html>
优缺点
- 优点:兼容 Servlet 原生逻辑,上手成本低;
- 缺点:耦合 Servlet API,不符合 SpringMVC "脱离原生 API" 的设计思想,不利于后续扩展和测试。
2.2 方式 2:使用 Model 接口(推荐)
核心原理
SpringMVC 提供 org.springframework.ui.Model 接口,方法参数声明 Model 后,框架自动注入实现类(底层为BindingAwareModelMap),通过addAttribute方法向请求域存储数据。
代码示例
java
@RequestMapping("/testModel")
public String testModel(Model model) {
    model.addAttribute("testRequestScope", "hello,model");
    return "ok";
}
2.3 方式 3:使用 Map 接口(推荐)
核心原理
方法参数声明Map<String, Object>,SpringMVC 自动注入BindingAwareModelMap(实现了 Map 接口),向 Map 中 put 的数据会自动同步到请求域。
代码示例
java
@RequestMapping("/testMap")
public String testMap(Map<String, Object> map) {
    map.put("testRequestScope", "hello,map");
    return "ok";
}
2.4 方式 4:使用 ModelMap 类(推荐)
核心原理
org.springframework.ui.ModelMap 是 SpringMVC 提供的 Map 实现类,同时实现了 Model 接口,使用方式与 Model/Map 完全一致,底层仍是BindingAwareModelMap。
代码示例
java
@RequestMapping("/testModelMap")
public String testModelMap(ModelMap modelMap) {
    modelMap.addAttribute("testRequestScope", "hello,modelMap");
    return "ok";
}
2.5 方式 5:使用 ModelAndView 类(推荐,适用于 "数据 + 视图" 一体化场景)
核心原理
ModelAndView 是 SpringMVC 提供的 "模型 + 视图" 封装类,既可以存储请求域数据,也可以指定跳转视图,方法返回值需改为ModelAndView类型(而非 String)。
代码示例
java
@RequestMapping("/testRequestByModelAndView")
public ModelAndView testRequestByModelAndView() {
    // 1. 创建ModelAndView对象
    ModelAndView mv = new ModelAndView();

    // 2. 向请求域存储数据(等价于request.setAttribute)
    mv.addObject("testRequestScope", "hello,modelAndView");

    // 3. 指定跳转视图(等价于return "ok")
    mv.setViewName("ok");

    // 4. 返回ModelAndView对象
    return mv;
}
2.6 Model/Map/ModelMap/ModelAndView 的底层关联
通过打印运行时类名可知,Model、Map、ModelMap 的底层实现均为 BindingAwareModelMap,其继承结构如下:
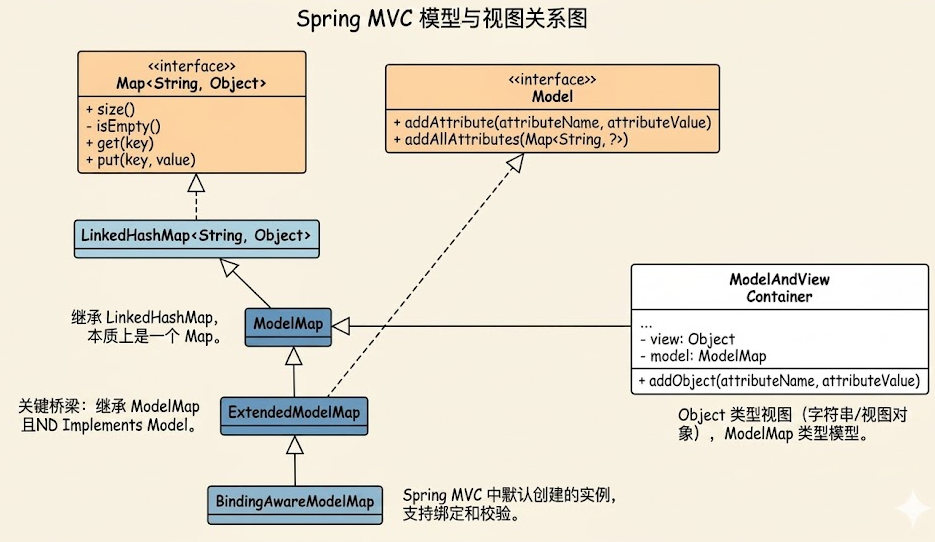
-
ModelMap实现了Model接口,同时继承LinkedHashMap,因此兼具 Model 和 Map 的特性; -
BindingAwareModelMap是 SpringMVC 为 Web 场景定制的实现类,增强了 "请求域数据绑定" 能力; -
无论使用 Model/Map/ModelMap,最终都会被 DispatcherServlet 封装为ModelAndView对象,源码层面 DispatcherServlet 的核心处理逻辑如下:
java// DispatcherServlet核心代码片段(简化) protected ModelAndView doDispatch(HttpServletRequest request, HttpServletResponse response) throws Exception { ModelAndView mv = null; // 调用Controller方法,获取返回值(String/ModelAndView等) Object handlerResult = ha.handle(processedRequest, response, mappedHandler.getHandler()); // 将返回值转换为统一的ModelAndView mv = processHandlerResult(processedRequest, response, mappedHandler, handlerResult, ex); // 渲染视图(将ModelAndView中的数据存入request域) render(mv, request, response); return mv; }
三、SpringMVC 中操作会话域(session)
会话域作用于一次完整会话(浏览器打开到关闭),SpringMVC 中操作 session 的核心方式有两种:
3.1 方式 1:使用原生 Servlet API(简单直接)
代码示例
java
@Controller
public class SessionScopeTestController {
    @RequestMapping("/testSessionServletApi")
    public String testSessionServletApi(HttpSession session) {
        session.setAttribute("testSessionScope", "hello,sessionServletApi");
        return "ok";
    }
}
3.2 方式 2:使用 @SessionAttributes 注解(声明式,适用于批量绑定)
核心原理
@SessionAttributes 是类级别注解,标注在 Controller 上,指定 "哪些请求域的 key 需要自动同步到 session 域",适用于 "请求域数据升级为会话域" 的场景。
代码示例
java
@Controller
// 指定存入session的key,以及String类型数据也存入session
@SessionAttributes(
    value = {"testSessionScope","x","y"},
    types = {String.class}
)
public class SessionScopeTestController {

    @RequestMapping("/testSessionAttributes")
    public String testSessionAttributes(ModelMap modelMap) {
        // 这些数据会自动存入 session 域
        modelMap.addAttribute("testSessionScope", "hello,sessionAttributes");
        modelMap.addAttribute("x", "我是艾克斯");
        modelMap.addAttribute("y", "我是歪");
        return "ok";
    }
}
注意事项
@SessionAttributes作用于类级别,仅对当前 Controller 有效;- 若需清除 @SessionAttributes 绑定的 session 数据,需在方法参数中声明
SessionStatus并调用setComplete(); - 避免滥用:仅对 "需要长期保存在会话域" 的数据使用,否则易导致 session 数据冗余。
四、SpringMVC 中操作应用域(application)
应用域(ServletContext)是全局域,整个 Web 应用唯一,SpringMVC 中推荐直接使用原生 Servlet API 操作(无专属封装):
4.1 代码示例
java
@Controller
public class ApplicationScopeTestController {
    @RequestMapping("/testApplicationScope")
    public String testApplicationScope(HttpServletRequest request) {
        // 获取应用域对象
        ServletContext application = request.getServletContext();
        // 存入全局数据
        application.setAttribute("testApplicationScope", "hello,applicationScope");
        return "ok";
    }
}
4.2 应用场景扩展
- 存储全局配置:如网站名称、版权信息、数据库连接池(非分布式场景);
- 统计全局数据:如总访问量、在线人数(需结合 session 监听);
- 注意:应用域数据无过期时间,服务器重启后丢失,且多线程环境下需注意线程安全。
五、域对象选择原则(核心总结)
- 优先使用最小作用域:能使用 request 域解决的,不使用 session;能使用 session 的,不使用 application(减少资源占用);
- 请求域(request) :
- 推荐使用 Model/Map/ModelMap/ModelAndView(解耦 Servlet API);
- 仅在特殊场景(如获取请求头、Cookie)使用原生 HttpServletRequest;
- 会话域(session) :
- 简单场景用原生 HttpSession;
- 批量绑定场景用 @SessionAttributes(注意及时清除);
- 应用域(application):仅使用原生 ServletContext,适用于全局共享数据;
- 转发 vs 重定向 :
- 转发(return "视图名"):request 域有效,可传递数据;
- 重定向(return "redirect: 视图名"):request 域失效,需使用 session/application 域传递数据。
六、实战细节扩展说明
6.1 字符编码与域对象的关联
在web.xml中配置的CharacterEncodingFilter不仅解决请求 / 响应乱码,也保证域对象中存储的中文数据在视图层正常显示:
xml
<!-- SpringMVC内置字符编码过滤器(保证域数据编码正确) -->
<filter>
    <filter-name>characterEncodingFilter</filter-name>
    <filter-class>org.springframework.web.filter.CharacterEncodingFilter</filter-class>
    <init-param>
        <param-name>encoding</param-name>
        <param-value>UTF-8</param-value>
    </init-param>
    <init-param>
        <param-name>forceRequestEncoding</param-name>
        <param-value>true</param-value>
    </init-param>
    <init-param>
        <param-name>forceResponseEncoding</param-name>
        <param-value>true</param-value>
    </init-param>
</filter>
<filter-mapping>
    <filter-name>characterEncodingFilter</filter-name>
    <url-pattern>/*</url-pattern>
</filter-mapping>
6.2 POJO 对象存入域对象示例
将User对象存入 request 域,供视图层展示:
java
@RequestMapping("/testUserInRequest")
public String testUserInRequest(Model model) {
    // 构建User对象(模拟表单提交的数据)
    User user = new User("zhangsan", "123456", "male", new String[]{"football", "swimming"}, "SpringMVC域对象测试");
    // 将User对象存入请求域
    model.addAttribute("user", user);
    return "register_ok";
}
视图层展示 User 数据(register_ok.html)
html
<div>
    <h3>用户信息(请求域)</h3>
    <p>用户名:<span th:text="${user.username}"></span></p>
    <p>密码:<span th:text="${user.password}"></span></p>
    <p>性别:<span th:text="${user.sex}"></span></p>
    <p>爱好:<span th:text="${#strings.arrayJoin(user.hobbies, ', ')}"></span></p>
    <p>简介:<span th:text="${user.introduction}"></span></p>
</div>
6.3 Cookie 与 Session 的联动(结合现有 register.html)
register.html中通过 JS 设置 JSESSIONID 的 Cookie,保证 Session 的唯一性:
javascript
function sendCookie() {
    // 设置JSESSIONID的Cookie,有效期到2025-12-18
    document.cookie = "JSESSIONID=123456789; expires=Thu, 18 Dec 2025 12:00:00 UTC; path=/";
    document.location = "/SpringMVC_004/register";
}服务器端可通过@CookieValue获取 JSESSIONID,验证 Session 关联:
java
@RequestMapping("/register")
public String register(User user,
                       @CookieValue(value = "JSESSIONID", required = false, defaultValue = "defaultId") String jsessionId,
                       HttpSession session) {
    System.out.println("当前Session的JSESSIONID:" + jsessionId);
    System.out.println("Session对象:" + session.getId()); // 与Cookie中的JSESSIONID一致
    session.setAttribute("loginUser", user); // 将用户信息存入Session,模拟登录状态
    return "register_ok";
}
七、常见问题与解决方案
7.1 域对象数据取值为 null?
- 检查 key 是否一致(如 Model.addAttribute ("user") vs 视图 ${User},大小写敏感);
- 重定向场景下,request 域数据失效,需改用 session;
- @SessionAttributes 注解标注的 key,需确保 Model 中先存入对应数据。
7.2 中文乱码?
-
确认
CharacterEncodingFilter配置正确(forceRequestEncoding/forceResponseEncoding=true); -
Tomcat9 + 默认 URIEncoding=UTF-8(get 请求),Tomcat8 及以下需在 server.xml 中配置:
xml<Connector port="8080" protocol="HTTP/1.1" connectionTimeout="20000" redirectPort="8443" URIEncoding="UTF-8"/>
7.3 Session 数据丢失?
-
检查浏览器是否禁用 Cookie(JSESSIONID 无法存储);
-
配置 Session 超时时间(web.xml):
xml<session-config> <session-timeout>30</session-timeout> <!-- 30分钟超时 --> </session-config>