问题
在学习了 Spring IoC 之后,可以使用 IoC 的知识将代码中层与层之间的耦合性进行解耦,便于后期维护,但是在实际生产环境中,发现随着公司业务的增长,会对现有的功能方法进行功能升级,就是保留原有功能的基础上增加新的逻辑,最容易想到的方案就是找到要升级的功能方法直接修改,但是如果调用的是第三方的功能代码,就没有源码,那么就没有办法直接修改了,怎么办?而且就算有源码,源码也可能是其他人写的,这时候去修改源码,就需要花费大量的时间去阅读源码的逻辑,非常麻烦,效率又低, 又该怎么办?
解决思路
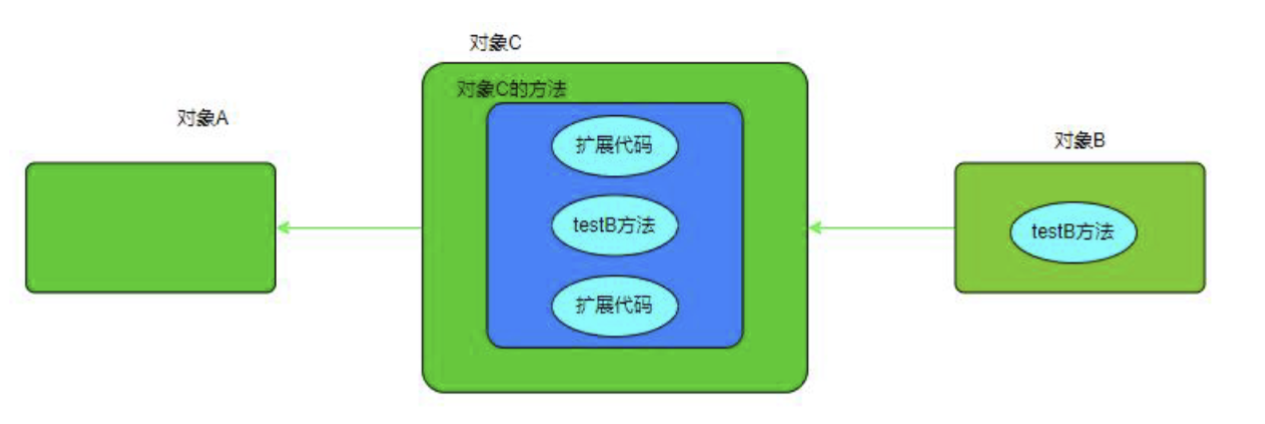
根据问题,最舒服的方案就是在不修改源码的基础上就能添加新的业务逻辑,怎么实现呢?其实很简单,比如现在 A 对象中在调用 B 对象中的 testB 方法,我们现在需要对 testB 方法进行升级

可以在 A 和 B 之间插入一个对象 C,让 A 不再直接调用 B,而是调用对象 C,在 C 中调用对象 B 的 testB 方法,在 C 对象中调用对象 B 的方法之前可以添加我们的扩展代码即可,这就舒服了!
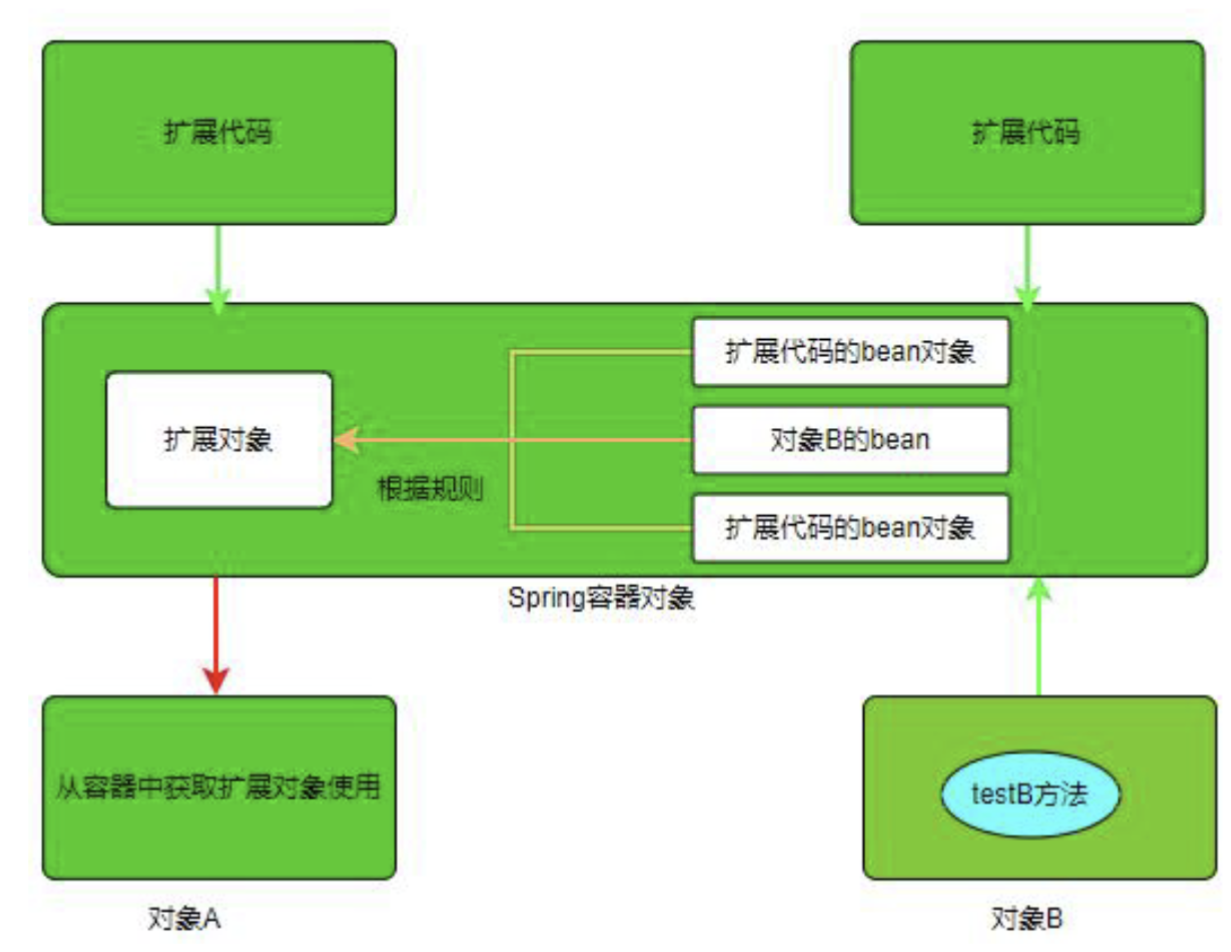
但是扩展对象 C 需要自己去创建完成编写,并且还是需要修改对象 A 中直接调用对象 B 的代码为调用对象 C,如果修改的位置比较多的话会非常的麻烦,又该怎么办呢?我们是学习过 SpringIOC 的,那么能不能将对象 B 配置为 Bean 对象,这样对象 B 的替换就可以 Spring 容器来完成了,我们就不用修改对象 A 中的调用代码了。但是如果让 Spring 容器来完成,Spring 容器中就要有 B 对象的 bean 以及扩展对象 C 的 bean,那干脆扩展对象我们也不自己写了,而是让 Spring 底层帮我们动态实现,实现后直接替换原有的 B 对象的 bean,这就是想要的!
Spring AOP 介绍
- 面向切面编程 (AOP) 通过提供另一种思考程序结构的方式来补充面向对象编程 (OOP)。 OOP 中模块化的关键单位是类,而 AOP 中模块化的单位是切面。切面能够实现跨越多种类型和对象的关注点(例如事务管理)的模块化(这种关注点在 AOP 文献中通常被称为"横 切"关注点)
- Spring 的关键组件之一是 AOP 框架。虽然 Spring IoC 容器不依赖于 AOP(意味着如果不想使用 AOP,则不需要使用 AOP),但 AOP 补充了 Spring IoC 以提供一个非常强大的中间件解决方案。 对上面官方解释的总结:官方在强调 AOP 时强调了下面几点
- AOP 叫做面向切面编程
- AOP 是对 OOP 的补充
- AOP 的核心是切面
- Spring 中 AOP 是对 IoC 的补充
- 想要把 AOP 解释清楚,就必须把 AOP 中的专业术语搞清楚(了解)
- Join Point: 连接点,程序执行过程中的任意位置,就是我们平时说的目标方法、抛出异常、设置变量等,或说对哪个方法做扩展,做增强
- Pointcut:切入点,就是表达式,通过表达式说明哪些方法是 join point
- Advice:通知,增强内容,在切入点处要执行的操作,也就是共性功能
- Aspect:切面,即 join point + Advice
- AOP Proxy:代理,Spring 支持 JDK 动态代理和 cglib 动态代理两种方式,可以通过 proxy-target-class=true 把默认的 JDK 动态代理修改为 Cglib 动态代理
- Weaving:织入,织入就是把 Advice 添加到 join point 的过程
- AOP 的作用是:在不改动原始设计的基础上为其进行功能增强,Spring 对 AOP 的设计理 念是:无入侵式
AOP 入门案例
搭建基础环境
pom.xml文件(引入lombok依赖)
java
<dependency>
      <groupId>org.projectlombok</groupId>
      <artifactId>lombok</artifactId>
      <version>1.18.40</version>
      <scope>compile</scope>
    </dependency>
学生类型
java
package com.tianshi.domain;

import lombok.AllArgsConstructor;
import lombok.Data;
import lombok.EqualsAndHashCode;
import lombok.NoArgsConstructor;

import java.io.Serializable;

@Data
@NoArgsConstructor
@AllArgsConstructor
@EqualsAndHashCode
public class Student implements Serializable {

    private Integer id;     //身份唯一标识
    private String name;    //姓名

//    //数组
//    private String[] hobbies;
//    //List集合
//    private List<Book> books;
//    //Set集合
//    private Set<String> set;
//    //Map集合
//    private Map<Integer,String> map;
//    //引用类型
//    private Book book;
//
//    public Student() {
//    }
//
//    public Student(Integer id, String name) {
//        this.id = id;
//        this.name = name;
//    }
//
//    public Integer id() {
//        return id;
//    }
//
//    public void setId(Integer id) {
//        this.id = id;
//    }
//
//    public String name() {
//        return name;
//    }
//
//    public void setName(String name) {
//        this.name = name;
//    }
//
//    public List<Book> books() {
//        return books;
//    }
//
//    public void setBooks(List<Book> books) {
//        this.books = books;
//    }
//
//    public String[] hobbies() {
//        return hobbies;
//    }
//
//    public void setHobbies(String[] hobbies) {
//        this.hobbies = hobbies;
//    }
//
//    public Set<String> set() {
//        return set;
//    }
//
//    public void setSet(Set<String> set) {
//        this.set = set;
//    }
//
//    public Map<Integer, String> map() {
//        return map;
//    }
//
//    public void setMap(Map<Integer, String> map) {
//        this.map = map;
//    }
//
//    public Book book() {
//        return book;
//    }
//
//    public void setBook(Book book) {
//        this.book = book;
//    }
//
//    @Override
//    public String toString() {
//        return "Student{" +
//                "id=" + id +
//                ", name='" + name + '\'' +
//                ", hobbies=" + Arrays.toString(hobbies) +
//                ", books=" + books +
//                ", set=" + set +
//                ", map=" + map +
//                ", book=" + book +
//                '}';
//    }
//
//    @Override
//    public boolean equals(Object o) {
//        if (o == null || getClass() != o.getClass()) return false;
//        Student student = (Student) o;
//        return Objects.equals(id, student.id) && Objects.equals(name, student.name) && Objects.deepEquals(hobbies, student.hobbies) && Objects.equals(books, student.books) && Objects.equals(set, student.set) && Objects.equals(map, student.map) && Objects.equals(book, student.book);
//    }
//
//    @Override
//    public int hashCode() {
//        return Objects.hash(id, name, Arrays.hashCode(hobbies), books, set, map, book);
//    }
}
创建 DAO 接口
java
package com.tianshi.dao;

import com.tianshi.domain.Student;

import java.util.List;

public interface StudentDao {
    /**
     * 新增学生
     * @param student
     */
    void insertStudent(Student student);

    /**
     * 查询所有学生
     * @return List<Student>
     */
    List<Student> selectAllStudents();
}
创建DAO接口实现类
java
package com.tianshi.dao.impl;

import com.tianshi.dao.StudentDao;
import com.tianshi.domain.Student;

import java.util.Arrays;
import java.util.List;

public class StudentDaoImpl implements StudentDao {
    // 伪代码模拟数据库访问。打印文字即可。
    @Override
    public void insertStudent(Student student) {
        System.out.println("StudentDao新增学生:" + student);
    }

    @Override
    public List<Student> selectAllStudents() {
        List<Student> students =
                Arrays.asList(
                        new Student(1, "张三"),
                        new Student(2, "李四"),
                        new Student(3, "王五")
                );
        System.out.println("StudentDao查询所有学生:" + students);
        return students;
    }
}
创建 Service 接口
java
package com.tianshi.service;

import com.tianshi.domain.Student;

import java.util.List;

public interface StudentService {
    void addStudent(Student student);
    List<Student> getAllStudents();
}
创建 Service 接口实现类
java
package com.tianshi.service.impl;

import com.tianshi.dao.StudentDao;
import com.tianshi.domain.Student;
import com.tianshi.service.StudentService;
import lombok.Getter;
import lombok.Setter;

import java.util.List;

/**
 * Getter - 给类型中所有的属性提供getter方法
 * Setter - 给所有属性提供setter方法
 * 配置用的是 set 注入,Spring 必须调用 setXxx () 方法才能把 Dao 注入进去;
 * Dao 没有被别人注入依赖,所以不需要 setter
 */
@Getter
@Setter
public class StudentServiceImpl implements StudentService {
    // 通过此对象,访问数据库
    private StudentDao studentDao;

    @Override
    public void addStudent(Student student) {
        System.out.println("StudentService新增学生:" + student + " , 开始调用DAO访问数据库");
        studentDao.insertStudent(student);
        System.out.println("StudentService新增学生执行结束。");
    }

    @Override
    public List<Student> getAllStudents() {
        System.out.println("StudentService查询所有学生,开始调用DAO访问数据库");
        List<Student> students = studentDao.selectAllStudents();
        System.out.println("DAO查询结束,查询结果是:" + students + " , StudentService执行结束。");
        return students;
    }
}
Spring 配置
java
<?xml version="1.0" encoding="UTF-8"?>
<beans xmlns="http://www.springframework.org/schema/beans"
xmlns:xsi="http://www.w3.org/2001/XMLSchema-instance"
xmlns:c="http://www.springframework.org/schema/c"
xmlns:p="http://www.springframework.org/schema/p"
xsi:schemaLocation="
http://www.springframework.org/schema/beans
http://www.springframework.org/schema/beans/spring-beans.xsd"
default-autowire="default">
<!--配置StudentDao和StudentService,通过设置注入实现依赖注入。-->
<bean id="studentDao" class="com.tianshi.dao.impl.StudentDaoImpl"/>
<bean id="studentService" class="com.tianshi.service.impl.StudentServiceImpl">
<property name="studentDao" ref="studentDao"/>
</bean>
<!-- <bean id="book" class="com.tianshi.domain.Book">-->
<!--<!– init-method="init" destroy-method="destroy"–>-->
<!-- <property name="id" value="100"/>-->
<!-- <property name="name" value="spring in action"/>-->
<!-- </bean>-->
<!-- <bean id="student1" name="stu1 stu2" class="com.tianshi.domain.Student" >-->
<!-- <property name="id" value="1"/>-->
<!-- <property name="name" value="单例学生"/>-->
<!-- </bean>-->
<!-- <bean id="student" name="student_" class="com.tianshi.domain.Student" scope="prototype">-->
<!-- <property name="id" value="1"/>-->
<!-- <property name="name" value="多例学生"/>-->
<!-- </bean>-->
<!--
标签常用属性:
name: 别名,给bean增加别名。功能和id相同。一个标签id唯一。name可以定义若干个。
别名的值要求全局唯一。定义多个别名,可以使用符合分割。常用 ',' ' '。
现在使用的不多。曾经struts框架流行的时候常用。
scope : 作用域。可以赋予的值只有 singleton 和 prototype
singleton, 单例的。Spring IoC容器启动的时候自动创建bean对象,且仅创建唯一一次。默认
prototype, 多例的。IoC容器启动时不创建对象,每次调用geBean方法时,创建一个对象。
init-method : 初始化方法。在对象创建完成,设置注入完成后,getBean获取对象前,运行。
初始化逻辑,会在容器创建完成时,就已完成。
destroy-method : 销毁方法。在容器关闭|销毁前执行。
-->
<!-- <!–Spring框架的核心配置文件–>-->
<!-- <!–一个bean标签就是一个domain对象,让Spring框架帮忙创建管理这个对象-->
<!-- id 唯一标识-->
<!-- class 类型的具体名称,必须写包名.类名-->
<!-- –>-->
<!--<!– <bean id="student" class="com.tianshi.domain.Student"/>–>-->
<!-- <!–配置静态工厂–>-->
<!--<!– //唯一一个静态工厂(构造注入)–>-->
<!-- <bean id="studentWithStaticFactory" class="com.tianshi.factory.StudentStaticFactory"-->
<!-- factory-method="getStudent">-->
<!-- <!–DI构造注入-->
<!-- 用来确定给哪个属性赋值(可同时使用):-->
<!-- index:参数在构造参数表中的下标,从0开始计数-->
<!-- name:构造方法参数名称-->
<!-- type:构造方法参数类型-->
<!-- 设置属性的值(只用一个):-->
<!-- value:要传入的构造方法参数值(简单类型)-->
<!-- ref:要传入的构造方法参数(引用类型)-->
<!-- 建议用index+name+value/ref完成配置-->
<!-- –>-->
<!-- <constructor-arg index="0" name="id" value="100"/>-->
<!-- <constructor-arg index="1" name="name" value="小明"/>-->
<!-- </bean>-->
<!-- <!–配置实例工厂两个–>-->
<!-- <!–C名称空间注入-->
<!-- 基于参数索引的配置:-->
<!-- c:_索引数="值" 注入简单类型数据值-->
<!-- c:_索引数-ref="bean的id" 注入Spring容器中的其他的bean对象-->
<!-- 基于参数名的配置:-->
<!-- c:参数名="值" 注入简单类型的数据值-->
<!-- c:参数名="bean的id" 注入Spring容器中其他的bean对象-->
<!--–>-->
<!--<!– //第一个实例工厂(C名称空间注入)–>-->
<!-- <bean id="studentFactory1" class="com.tianshi.factory.StudentInstanceFactory"/>-->
<!-- <bean id="studentWithInstanceFactory1" class="com.tianshi.domain.Student"-->
<!-- factory-bean="studentFactory1" factory-method="getStudent" c:_0="101" c:name="李四"/>-->
<!--<!– //Book的实例工厂–>-->
<!-- <bean id="bookFactory" class="com.tianshi.factory.BookInstanceFactory"/>-->
<!-- <bean id="bookWithInstanceFactory" class="com.tianshi.domain.Book" p:id="1" p:name="空"/>-->
<!--<!– //第二个实例工厂(各种类型的属性注入的配置)–>-->
<!-- <bean id="studentFactory2" class="com.tianshi.factory.StudentInstanceFactory"/>-->
<!-- <!–自动装配–>-->
<!-- <!–局部的依赖注入自动装配-->
<!-- 在bean标签中,有属性 autowire,代表是否采用自动装配逻辑。-->
<!-- 可以设置的值:-->
<!-- default : 默认的,此是默认值。默认策略就是全局策略-->
<!-- no : 不使用自动装配逻辑。-->
<!-- byName : 根据名字完成自动装配。当前bean中的property的名字和当前配置文件中bean的id如果一样,则自动注入-->
<!-- 有可能,类型不匹配-->
<!-- byType : 根据类型完成自动装配。当前bean中的property的类型和当前配置文件中bean的类型如有一样,则自动注入-->
<!-- 有可能,当前配置文件中有多个bean的类型和同一个property的类型相同,抛出异常。-->
<!-- 最常用。一般情况下,一个配置文件,不会配置多个同类型bean-->
<!-- constructor : 构造器注入。扫描当前bean类型中的有参数构造方法,扫描构造方法的参数表,-->
<!-- 基于先byType,再byName的顺序逻辑,在当前配置文件中匹配bean对象,调用构造方法注入。-->
<!-- –>-->
<!-- <bean id="studentWithInstanceFactory2" class="com.tianshi.domain.Student"-->
<!-- factory-bean="studentFactory2" factory-method="getStudent" autowire="byType">-->
<!-- <property name="id" value="105"/>-->
<!-- <property name="name" value="王"/>-->
<!-- <!–数组array标签,一个标签代表一个数组–>-->
<!-- <property name="hobbies">-->
<!-- <array>-->
<!-- <!–数组中的简单数据,按照属性依次从0开始赋值–>-->
<!-- <value>0下标</value>-->
<!-- <value>1下标</value>-->
<!-- <value>2下标</value>-->
<!-- <!–ref,数组中的一个引用类型数据,按照配置属性依次从0下标开始赋值–>-->
<!-- <!–<ref bean="beanId"></ref>–>-->
<!-- </array>-->
<!-- </property>-->
<!-- <!–List集合,list标签,一个标签代表一个集合对象–>-->
<!-- <property name="books">-->
<!-- <list>-->
<!-- <!–0下标位置对象–>-->
<!-- <ref bean="bookWithInstanceFactory"></ref>-->
<!-- <!–配置一个局部的bean对象,不需要命名(不写id),局部有效–>-->
<!-- <bean class="com.tianshi.domain.Book">-->
<!-- <property name="id" value="2"></property>-->
<!-- <property name="name" value="算法导论"/>-->
<!-- </bean>-->
<!-- <ref bean="bookWithInstanceFactory"></ref>-->
<!-- </list>-->
<!-- </property>-->
<!-- <!–Set集合,set标签–>-->
<!-- <property name="set">-->
<!-- <set>-->
<!-- <value>set值1</value>-->
<!-- <value>set值2</value>-->
<!-- <value>set值3</value>-->
<!-- </set>-->
<!-- </property>-->
<!-- <!–Map集合,map标签和entry子标签,一个map标签代表一个Map集合一个entry标签代表map中的一个键值对–>-->
<!-- <property name="map">-->
<!-- <map>-->
<!-- <!–entry有属性 key:简单类型键值,key-ref:引用类型键值-->
<!-- value:简单类型value值,value-ref:引用类型value值–>-->
<!-- <entry key="1" value="value1"></entry>-->
<!-- <entry key="2" value="value2"></entry>-->
<!-- <entry key="3" value="value3"></entry>-->
<!-- </map>-->
<!-- </property>-->
<!-- <!–引用类型属性,使用ref注入–>-->
<!--<!– <property name="book" ref="bookWithInstanceFactory"/>–>-->
<!-- </bean>-->
<!-- <!–配置FactoryBean工厂两个–>-->
<!-- <!–设值注入-->
<!-- 标签属性:-->
<!-- name:要注入数据的property属性名-->
<!-- value:为属性赋值(简单数据类型)-->
<!-- ref:为属性赋值(引用数据类型)-->
<!-- –>-->
<!--<!– //第一个FactoryBean工厂(设值注入)–>-->
<!-- <bean id="studentWithFactoryBean1" class="com.tianshi.factory.StudentFactoryBean">-->
<!-- <property name="id" value="102"/>-->
<!-- <property name="name" value="王五"/>-->
<!-- </bean>-->
<!-- <!–P名称空间注入-->
<!-- 仅基于参数名,无基于索引:-->
<!-- p:属性名 = "简单数据"-->
<!-- p:属性名-ref = "引用数据,其他bean标签的id"-->
<!-- –>-->
<!--<!– //第二个FactoryBean工厂(P名称空间注入)–>-->
<!-- <bean id="studentWithFactoryBean2" class="com.tianshi.factory.StudentFactoryBean" p:id="103" p:name="赵六"/>-->
</beans>测试
java
package com.tianshi.test;
import com.tianshi.domain.Student;
import com.tianshi.service.StudentService;
import org.springframework.context.ApplicationContext;
import org.springframework.context.support.ClassPathXmlApplicationContext;
import java.util.List;
public class StudentServiceTest {
public static void main(String[] args) {
ApplicationContext context =
new ClassPathXmlApplicationContext("applicationContext.xml");
// 获取StudentService对象
StudentService service = context.getBean("studentService", StudentService.class);
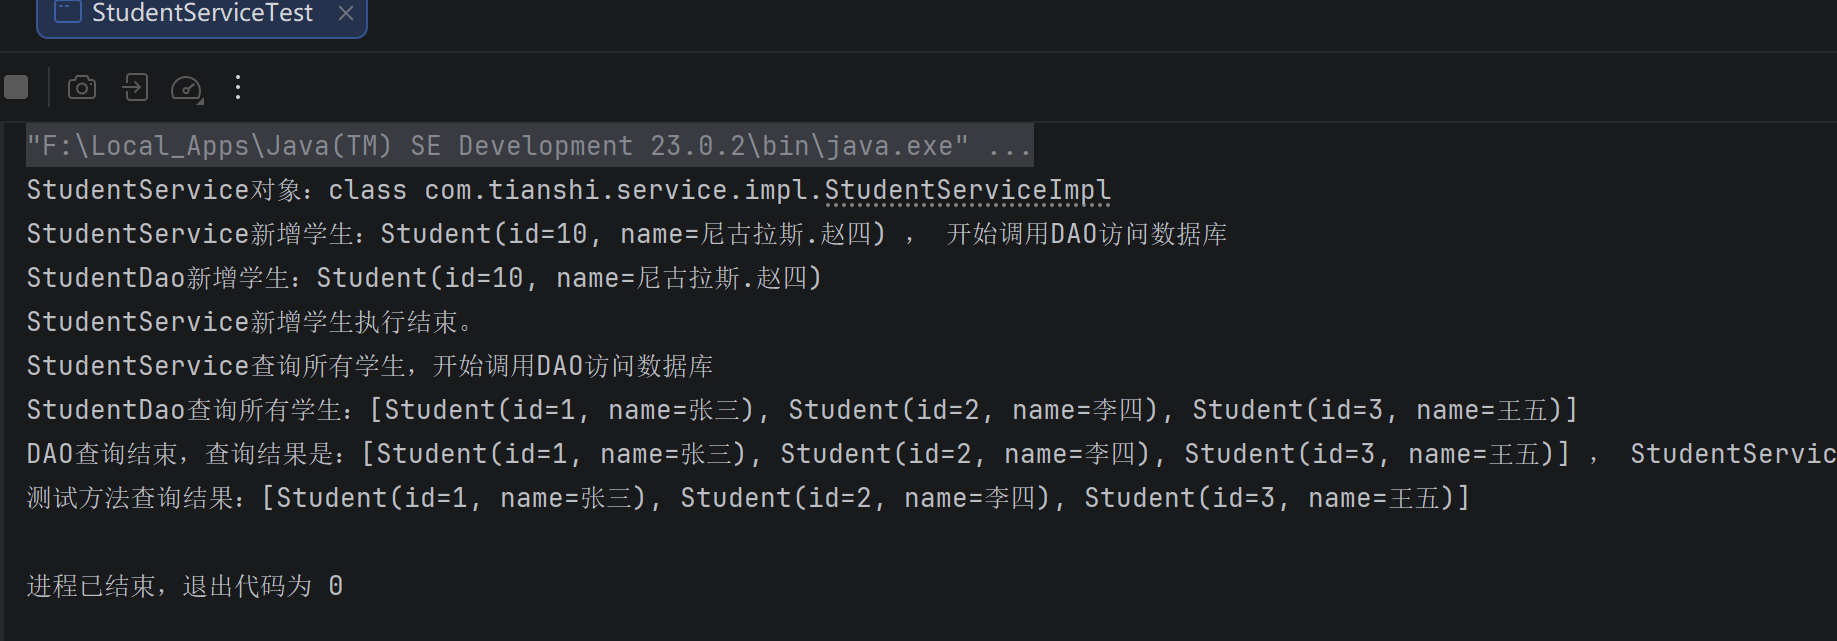
System.out.println("StudentService对象:" + service.getClass());
// 调用方法测试
service.addStudent(new Student(10, "尼古拉斯.赵四"));
List<Student> students =
service.getAllStudents();
System.out.println("测试方法查询结果:" + students);
}
}
增加额外需求
- 针对于程序设计来说,直接修改源码是侵入式的,因为改变了原有代码,是不符合开发设计原则的,接下来使用 Spring AOP 技术来完成功能的增加
增加 POM 依赖
xml
<!--使用SpringAOP技术开发代码,aspectjweaver依赖必要-->
    <dependency>
      <groupId>org.aspectj</groupId>
      <artifactId>aspectjweaver</artifactId>
      <version>1.8.14</version>
    </dependency>
创建自定义通知类型
java
package com.tianshi.advice;

/**
 * 自定义通知类型。类型没有特定的定义要求。
 * 通常建议定义在包  advice 中。 类型建议 XxxAdvice 。
 */
public class LoggerAdvice {
    /**
     * 定义方法。通知方法。此访问用于记录日志信息。
     * 日志内容是当前运行时刻
     * log2Time  ->  logToTime
     * log4Time  ->  logForTime
     */
    public void log4Timestamp(){
        System.out.println("日志通知类型中的记录时间戳日志方法运行,当前时间是:" +
                System.nanoTime());
    }
}
Spring 配置
java
<?xml version="1.0" encoding="UTF-8"?>
<beans xmlns="http://www.springframework.org/schema/beans"
xmlns:xsi="http://www.w3.org/2001/XMLSchema-instance"
xmlns:c="http://www.springframework.org/schema/c"
xmlns:p="http://www.springframework.org/schema/p"
xmlns:aop="http://www.springframework.org/schema/aop"
xsi:schemaLocation="
http://www.springframework.org/schema/beans
http://www.springframework.org/schema/beans/spring-beans.xsd
http://www.springframework.org/schema/aop
http://www.springframework.org/schema/aop/spring-aop.xsd"
default-autowire="default">
<!--配置StudentDao和StudentService,通过设置注入实现依赖注入。-->
<bean id="studentDao" class="com.tianshi.dao.impl.StudentDaoImpl"/>
<bean id="studentService" class="com.tianshi.service.impl.StudentServiceImpl">
<property name="studentDao" ref="studentDao"/>
</bean>
<!--配置通知对象-->
<bean id="loggerAdvice" class="com.tianshi.advice.LoggerAdvice"></bean>
<!--定义AOP配置信息-->
<aop:config>
<!--定义切入点,也就是连接点表达式
id 唯一名字
expression 表达式字符串
-->
<aop:pointcut id="loggerPC"
expression="execution( * com.tianshi..service.*Service.*(..) )"/>
<!--<aop:pointcut id="loggerPC2"
expression="execution( * com.tianshi.service.*Service.*() )"/>-->
<!--定义切面 id唯一名字,可以省略
ref 属性代表,标签aop:aspect 切面内定义的所有内容,使用的通知类型对象是什么。
-->
<aop:aspect ref="loggerAdvice">
<!--定义具体的切入位置。
把通知类型对象LoggerAdvice中的方法log4Timestamp,在StudentService.addStudent方法前运行。
标签 aop:before 代表的就是 "之前"。 method属性代表通知类型中的方法名.
pointcut-ref属性代表执行通知逻辑的具体位置,使用表达式描述的位置。
-->
<aop:before method="log4Timestamp" pointcut-ref="loggerPC"/>
<!--<aop:before method="log4Timestamp" pointcut-ref="loggerPC2"/>-->
</aop:aspect>
</aop:config>
<!-- <bean id="book" class="com.tianshi.domain.Book">-->
<!--<!– init-method="init" destroy-method="destroy"–>-->
<!-- <property name="id" value="100"/>-->
<!-- <property name="name" value="spring in action"/>-->
<!-- </bean>-->
<!-- <bean id="student1" name="stu1 stu2" class="com.tianshi.domain.Student" >-->
<!-- <property name="id" value="1"/>-->
<!-- <property name="name" value="单例学生"/>-->
<!-- </bean>-->
<!-- <bean id="student" name="student_" class="com.tianshi.domain.Student" scope="prototype">-->
<!-- <property name="id" value="1"/>-->
<!-- <property name="name" value="多例学生"/>-->
<!-- </bean>-->
<!--
标签常用属性:
name: 别名,给bean增加别名。功能和id相同。一个标签id唯一。name可以定义若干个。
别名的值要求全局唯一。定义多个别名,可以使用符合分割。常用 ',' ' '。
现在使用的不多。曾经struts框架流行的时候常用。
scope : 作用域。可以赋予的值只有 singleton 和 prototype
singleton, 单例的。Spring IoC容器启动的时候自动创建bean对象,且仅创建唯一一次。默认
prototype, 多例的。IoC容器启动时不创建对象,每次调用geBean方法时,创建一个对象。
init-method : 初始化方法。在对象创建完成,设置注入完成后,getBean获取对象前,运行。
初始化逻辑,会在容器创建完成时,就已完成。
destroy-method : 销毁方法。在容器关闭|销毁前执行。
-->
<!-- <!–Spring框架的核心配置文件–>-->
<!-- <!–一个bean标签就是一个domain对象,让Spring框架帮忙创建管理这个对象-->
<!-- id 唯一标识-->
<!-- class 类型的具体名称,必须写包名.类名-->
<!-- –>-->
<!--<!– <bean id="student" class="com.tianshi.domain.Student"/>–>-->
<!-- <!–配置静态工厂–>-->
<!--<!– //唯一一个静态工厂(构造注入)–>-->
<!-- <bean id="studentWithStaticFactory" class="com.tianshi.factory.StudentStaticFactory"-->
<!-- factory-method="getStudent">-->
<!-- <!–DI构造注入-->
<!-- 用来确定给哪个属性赋值(可同时使用):-->
<!-- index:参数在构造参数表中的下标,从0开始计数-->
<!-- name:构造方法参数名称-->
<!-- type:构造方法参数类型-->
<!-- 设置属性的值(只用一个):-->
<!-- value:要传入的构造方法参数值(简单类型)-->
<!-- ref:要传入的构造方法参数(引用类型)-->
<!-- 建议用index+name+value/ref完成配置-->
<!-- –>-->
<!-- <constructor-arg index="0" name="id" value="100"/>-->
<!-- <constructor-arg index="1" name="name" value="小明"/>-->
<!-- </bean>-->
<!-- <!–配置实例工厂两个–>-->
<!-- <!–C名称空间注入-->
<!-- 基于参数索引的配置:-->
<!-- c:_索引数="值" 注入简单类型数据值-->
<!-- c:_索引数-ref="bean的id" 注入Spring容器中的其他的bean对象-->
<!-- 基于参数名的配置:-->
<!-- c:参数名="值" 注入简单类型的数据值-->
<!-- c:参数名="bean的id" 注入Spring容器中其他的bean对象-->
<!--–>-->
<!--<!– //第一个实例工厂(C名称空间注入)–>-->
<!-- <bean id="studentFactory1" class="com.tianshi.factory.StudentInstanceFactory"/>-->
<!-- <bean id="studentWithInstanceFactory1" class="com.tianshi.domain.Student"-->
<!-- factory-bean="studentFactory1" factory-method="getStudent" c:_0="101" c:name="李四"/>-->
<!--<!– //Book的实例工厂–>-->
<!-- <bean id="bookFactory" class="com.tianshi.factory.BookInstanceFactory"/>-->
<!-- <bean id="bookWithInstanceFactory" class="com.tianshi.domain.Book" p:id="1" p:name="空"/>-->
<!--<!– //第二个实例工厂(各种类型的属性注入的配置)–>-->
<!-- <bean id="studentFactory2" class="com.tianshi.factory.StudentInstanceFactory"/>-->
<!-- <!–自动装配–>-->
<!-- <!–局部的依赖注入自动装配-->
<!-- 在bean标签中,有属性 autowire,代表是否采用自动装配逻辑。-->
<!-- 可以设置的值:-->
<!-- default : 默认的,此是默认值。默认策略就是全局策略-->
<!-- no : 不使用自动装配逻辑。-->
<!-- byName : 根据名字完成自动装配。当前bean中的property的名字和当前配置文件中bean的id如果一样,则自动注入-->
<!-- 有可能,类型不匹配-->
<!-- byType : 根据类型完成自动装配。当前bean中的property的类型和当前配置文件中bean的类型如有一样,则自动注入-->
<!-- 有可能,当前配置文件中有多个bean的类型和同一个property的类型相同,抛出异常。-->
<!-- 最常用。一般情况下,一个配置文件,不会配置多个同类型bean-->
<!-- constructor : 构造器注入。扫描当前bean类型中的有参数构造方法,扫描构造方法的参数表,-->
<!-- 基于先byType,再byName的顺序逻辑,在当前配置文件中匹配bean对象,调用构造方法注入。-->
<!-- –>-->
<!-- <bean id="studentWithInstanceFactory2" class="com.tianshi.domain.Student"-->
<!-- factory-bean="studentFactory2" factory-method="getStudent" autowire="byType">-->
<!-- <property name="id" value="105"/>-->
<!-- <property name="name" value="王"/>-->
<!-- <!–数组array标签,一个标签代表一个数组–>-->
<!-- <property name="hobbies">-->
<!-- <array>-->
<!-- <!–数组中的简单数据,按照属性依次从0开始赋值–>-->
<!-- <value>0下标</value>-->
<!-- <value>1下标</value>-->
<!-- <value>2下标</value>-->
<!-- <!–ref,数组中的一个引用类型数据,按照配置属性依次从0下标开始赋值–>-->
<!-- <!–<ref bean="beanId"></ref>–>-->
<!-- </array>-->
<!-- </property>-->
<!-- <!–List集合,list标签,一个标签代表一个集合对象–>-->
<!-- <property name="books">-->
<!-- <list>-->
<!-- <!–0下标位置对象–>-->
<!-- <ref bean="bookWithInstanceFactory"></ref>-->
<!-- <!–配置一个局部的bean对象,不需要命名(不写id),局部有效–>-->
<!-- <bean class="com.tianshi.domain.Book">-->
<!-- <property name="id" value="2"></property>-->
<!-- <property name="name" value="算法导论"/>-->
<!-- </bean>-->
<!-- <ref bean="bookWithInstanceFactory"></ref>-->
<!-- </list>-->
<!-- </property>-->
<!-- <!–Set集合,set标签–>-->
<!-- <property name="set">-->
<!-- <set>-->
<!-- <value>set值1</value>-->
<!-- <value>set值2</value>-->
<!-- <value>set值3</value>-->
<!-- </set>-->
<!-- </property>-->
<!-- <!–Map集合,map标签和entry子标签,一个map标签代表一个Map集合一个entry标签代表map中的一个键值对–>-->
<!-- <property name="map">-->
<!-- <map>-->
<!-- <!–entry有属性 key:简单类型键值,key-ref:引用类型键值-->
<!-- value:简单类型value值,value-ref:引用类型value值–>-->
<!-- <entry key="1" value="value1"></entry>-->
<!-- <entry key="2" value="value2"></entry>-->
<!-- <entry key="3" value="value3"></entry>-->
<!-- </map>-->
<!-- </property>-->
<!-- <!–引用类型属性,使用ref注入–>-->
<!--<!– <property name="book" ref="bookWithInstanceFactory"/>–>-->
<!-- </bean>-->
<!-- <!–配置FactoryBean工厂两个–>-->
<!-- <!–设值注入-->
<!-- 标签属性:-->
<!-- name:要注入数据的property属性名-->
<!-- value:为属性赋值(简单数据类型)-->
<!-- ref:为属性赋值(引用数据类型)-->
<!-- –>-->
<!--<!– //第一个FactoryBean工厂(设值注入)–>-->
<!-- <bean id="studentWithFactoryBean1" class="com.tianshi.factory.StudentFactoryBean">-->
<!-- <property name="id" value="102"/>-->
<!-- <property name="name" value="王五"/>-->
<!-- </bean>-->
<!-- <!–P名称空间注入-->
<!-- 仅基于参数名,无基于索引:-->
<!-- p:属性名 = "简单数据"-->
<!-- p:属性名-ref = "引用数据,其他bean标签的id"-->
<!-- –>-->
<!--<!– //第二个FactoryBean工厂(P名称空间注入)–>-->
<!-- <bean id="studentWithFactoryBean2" class="com.tianshi.factory.StudentFactoryBean" p:id="103" p:name="赵六"/>-->
</beans>再次测试
