js
项目地址:https://github.com/imaxiaoqi777/Seven-Visual-model#Seven 视觉模型项目介绍
1. 项目概述
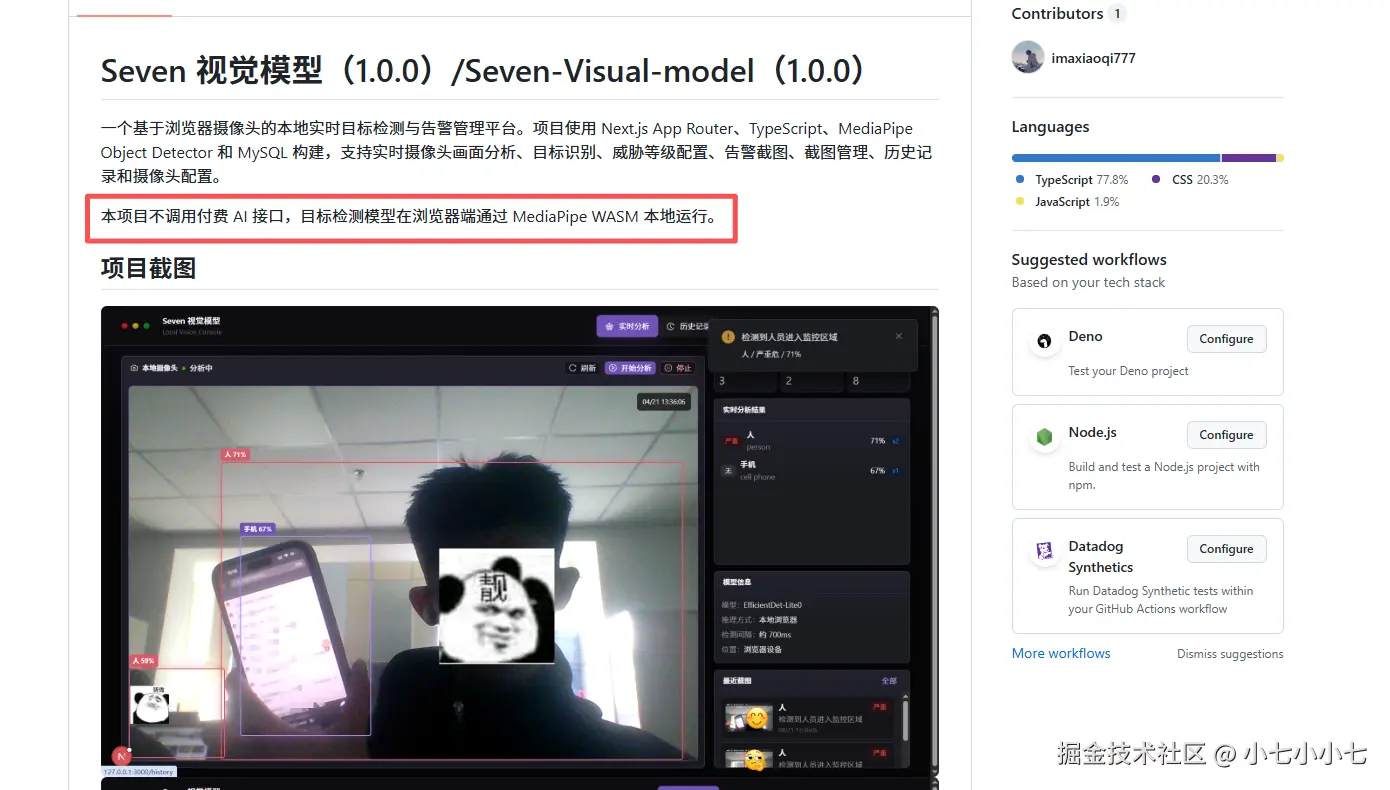
Seven 视觉模型是一个基于浏览器摄像头的本地实时目标检测与告警管理系统。项目使用 Next.js、React、TypeScript、MediaPipe Object Detector、EfficientDet-Lite0 和 MySQL 构建,主要实现摄像头实时画面采集、目标检测、威胁等级配置、告警截图、截图管理、历史记录和摄像头配置等功能。
本项目的核心特点是:目标检测不依赖云端 AI 接口,而是在浏览器端通过 MediaPipe WASM 加载本地模型完成推理。这样可以减少服务端压力,同时避免摄像头画面上传到第三方平台。
项目使用的目标检测模型是:
text
MediaPipe Object Detector + EfficientDet-Lite0模型文件路径为:
text
public/models/efficientdet_lite0_uint8.tflite2. 项目技术栈
项目整体采用前后端一体化架构。页面和接口都由 Next.js 提供,前端 UI 使用 Ant Design,目标检测逻辑运行在浏览器端,数据持久化使用 MySQL。
ts
// package.json 中的核心依赖
{
  "dependencies": {
    "@mediapipe/tasks-vision": "0.10.34",
    "antd": "^6.3.6",
    "mysql2": "^3.22.2",
    "next": "16.2.4",
    "react": "19.2.5",
    "react-dom": "19.2.5"
  }
}
项目主要技术包括:
- Next.js App Router:负责页面路由和 API Routes。
- React Hooks:负责摄像头状态、检测状态和页面交互。
- TypeScript:提供类型约束。
- Ant Design:构建后台管理界面。
- MediaPipe Object Detector:实现浏览器端目标检测。
- EfficientDet-Lite0:轻量级目标检测模型。
- MySQL:保存威胁配置、截图、历史记录和摄像头配置。
3. 系统功能模块
系统主要分为五个页面:
text
/           实时视觉分析首页
/history    历史记录
/threats    威胁管理
/snapshots  截图管理
/cameras    摄像头管理
在 components/AppShell.tsx 中,项目通过导航菜单将这些页面统一组织起来:
tsx
const menuItems = [
  {
    key: "/",
    icon: <RadarChartOutlined />,
    label: <Link href="/">实时分析</Link>
  },
  {
    key: "/history",
    icon: <HistoryOutlined />,
    label: <Link href="/history">历史记录</Link>
  },
  {
    key: "/threats",
    icon: <AlertOutlined />,
    label: <Link href="/threats">威胁管理</Link>
  },
  {
    key: "/snapshots",
    icon: <PictureOutlined />,
    label: <Link href="/snapshots">截图管理</Link>
  },
  {
    key: "/cameras",
    icon: <CameraOutlined />,
    label: <Link href="/cameras">摄像头管理</Link>
  }
];
首页主要负责实时检测,其他页面用于管理和查看数据,使整个系统不仅能检测目标,还能完成告警闭环。
4. 浏览器摄像头采集
项目通过浏览器原生的 MediaDevices.getUserMedia API 获取摄像头画面。摄像头采集逻辑封装在 hooks/useObjectDetector.ts 中。
ts
const stream = await navigator.mediaDevices.getUserMedia({
  audio: false,
  video: {
    facingMode: "environment",
    width: { ideal: 1280 },
    height: { ideal: 720 }
  }
});

streamRef.current = stream;
video.srcObject = stream;
video.muted = true;
video.playsInline = true;
这里设置了:
audio: false:只读取视频,不读取音频。facingMode: "environment":移动端优先使用后置摄像头。width和height:期望摄像头输出 1280x720。playsInline:提升移动端 Safari 兼容性,避免视频全屏播放。
如果用户拒绝摄像头权限,项目会根据浏览器返回的异常类型展示对应错误提示:
ts
function getCameraErrorMessage(error: unknown) {
  if (error instanceof DOMException && error.name === "NotAllowedError") {
    return "浏览器拒绝了摄像头权限,请在地址栏或浏览器设置中允许摄像头访问。";
  }

  if (error instanceof DOMException && error.name === "NotFoundError") {
    return "没有找到可用摄像头,请确认设备已连接并且没有被其他应用占用。";
  }

  if (error instanceof DOMException && error.name === "NotReadableError") {
    return "摄像头暂时无法读取,可能正在被其他应用占用。";
  }

  return "启动摄像头失败,请检查浏览器权限和设备状态。";
}
5. MediaPipe 模型加载
目标检测模型通过 MediaPipe Tasks Vision 在浏览器端加载。项目使用动态导入,避免服务端渲染阶段访问浏览器 API。
ts
const { FilesetResolver, ObjectDetector } = await import("@mediapipe/tasks-vision");

const vision = await FilesetResolver.forVisionTasks("/mediapipe/wasm");
const detector = await ObjectDetector.createFromOptions(vision, {
  baseOptions: {
    modelAssetPath: "/models/efficientdet_lite0_uint8.tflite"
  },
  maxResults: 20,
  runningMode: "VIDEO",
  scoreThreshold: 0.45
});
这段代码说明:
- WASM 文件从
/mediapipe/wasm加载。 - 检测模型从
/models/efficientdet_lite0_uint8.tflite加载。 runningMode: "VIDEO"表示使用视频流检测模式。maxResults: 20表示最多返回 20 个检测结果。scoreThreshold: 0.45表示置信度低于 0.45 的目标会被过滤。
为了让模型文件和 WASM 文件自动准备好,项目提供了脚本:
js
// scripts/prepare-mediapipe-assets.mjs
const modelUrl =
  "https://storage.googleapis.com/mediapipe-tasks/object_detector/efficientdet_lite0_uint8.tflite";
安装依赖后会自动执行:
bash
npm run prepare:mediapipe6. 实时检测与节流处理
目标检测不应该每一帧都执行,否则浏览器主线程压力会比较大。因此项目设置了检测间隔:
ts
const DETECTION_INTERVAL_MS = 700;检测启动后,通过 setInterval 周期性执行推理:
ts
detectOnce();
intervalRef.current = window.setInterval(detectOnce, DETECTION_INTERVAL_MS);
单次检测逻辑如下:
ts
const result = detector.detectForVideo(video, performance.now());
setObjects(readDetectedObjects(result, video.videoWidth, video.videoHeight));
这表示系统大约每 700ms 对当前视频帧执行一次目标检测。这样既能保持实时感,又能避免浏览器资源占用过高。
7. 检测结果处理
MediaPipe 返回的检测结果会被转换成项目内部统一的数据结构:
ts
export type DetectedObject = {
  id: string;
  label: string;
  displayName: string;
  score: number;
  box?: {
    x: number;
    y: number;
    width: number;
    height: number;
  };
};
其中:
label是模型原始标签,例如person、car、knife。displayName是中文显示名称,例如人、汽车、刀。score是置信度。box是目标框坐标,使用百分比表示,便于在响应式视频区域上绘制。
项目内置了一份英文标签到中文名称的映射:
ts
const LABEL_ZH_CN: Record<string, string> = {
  person: "人",
  bicycle: "自行车",
  car: "汽车",
  motorcycle: "摩托车",
  bus: "公交车",
  truck: "卡车",
  knife: "刀",
  scissors: "剪刀",
  laptop: "笔记本电脑",
  "cell phone": "手机"
};
目标框坐标会被转换成百分比:
ts
box: {
  x: (box.originX / videoWidth) * 100,
  y: (box.originY / videoHeight) * 100,
  width: (box.width / videoWidth) * 100,
  height: (box.height / videoHeight) * 100
}
这样在页面上绘制检测框时,只需要设置 CSS 百分比定位:
tsx
<span className={getBoxClass(level)} key={object.id} style={getBoxStyle(object)}>
  <em>
    {config?.displayName || object.displayName} {Math.round(object.score * 100)}%
  </em>
</span>
8. 威胁等级配置
项目支持为不同目标设置威胁等级。威胁等级类型定义如下:
ts
type ThreatLevel = "none" | "low" | "medium" | "high" | "critical";对应含义为:
text
none      无威胁
low       低危
medium    中危
high      高危
critical  严重
默认威胁配置写在 lib/db.ts 中:
ts
const defaultConfigs = [
  ["person", "行人", "medium", "检测到人员进入监控区域", 1],
  ["car", "车辆", "low", "检测到车辆经过", 1],
  ["truck", "卡车", "medium", "检测到货运车辆进入区域", 1],
  ["knife", "刀具", "critical", "检测到刀具,高危告警", 1],
  ["scissors", "剪刀", "high", "检测到尖锐物品", 1],
  ["cell phone", "手机", "none", "检测到手机", 1],
  ["laptop", "笔记本电脑", "none", "检测到笔记本电脑", 1]
];
首页检测到目标后,会根据数据库中的威胁配置判断是否需要告警:
ts
const threatObjects = objects
  .map((object) => ({ object, config: configMap.get(object.label) }))
  .filter(
    (item): item is { object: DetectedObject; config: ThreatConfig } =>
      Boolean(item.config?.enabled && item.config.threatLevel !== "none")
  );
如果目标被启用,并且威胁等级不是 none,系统就会将它视为告警目标。
9. 告警提醒
当检测到威胁目标时,系统会弹出告警通知:
ts
notification.warning({
  message: primaryThreat.config.alertMessage,
  description: `${primaryThreat.config.displayName} / ${
    THREAT_META[primaryThreat.config.threatLevel].label
  }危 / ${Math.round(primaryThreat.object.score * 100)}%`,
  placement: "topRight"
});
为了避免同一个目标连续重复提醒,项目使用 lastNoticeRef 保存上次提醒时间:
ts
const lastNoticeAt = lastNoticeRef.current[key] ?? 0;

if (now - lastNoticeAt < 6000) {
  return;
}

lastNoticeRef.current[key] = now;
这表示同一类威胁目标在 6 秒内不会重复弹出提醒。
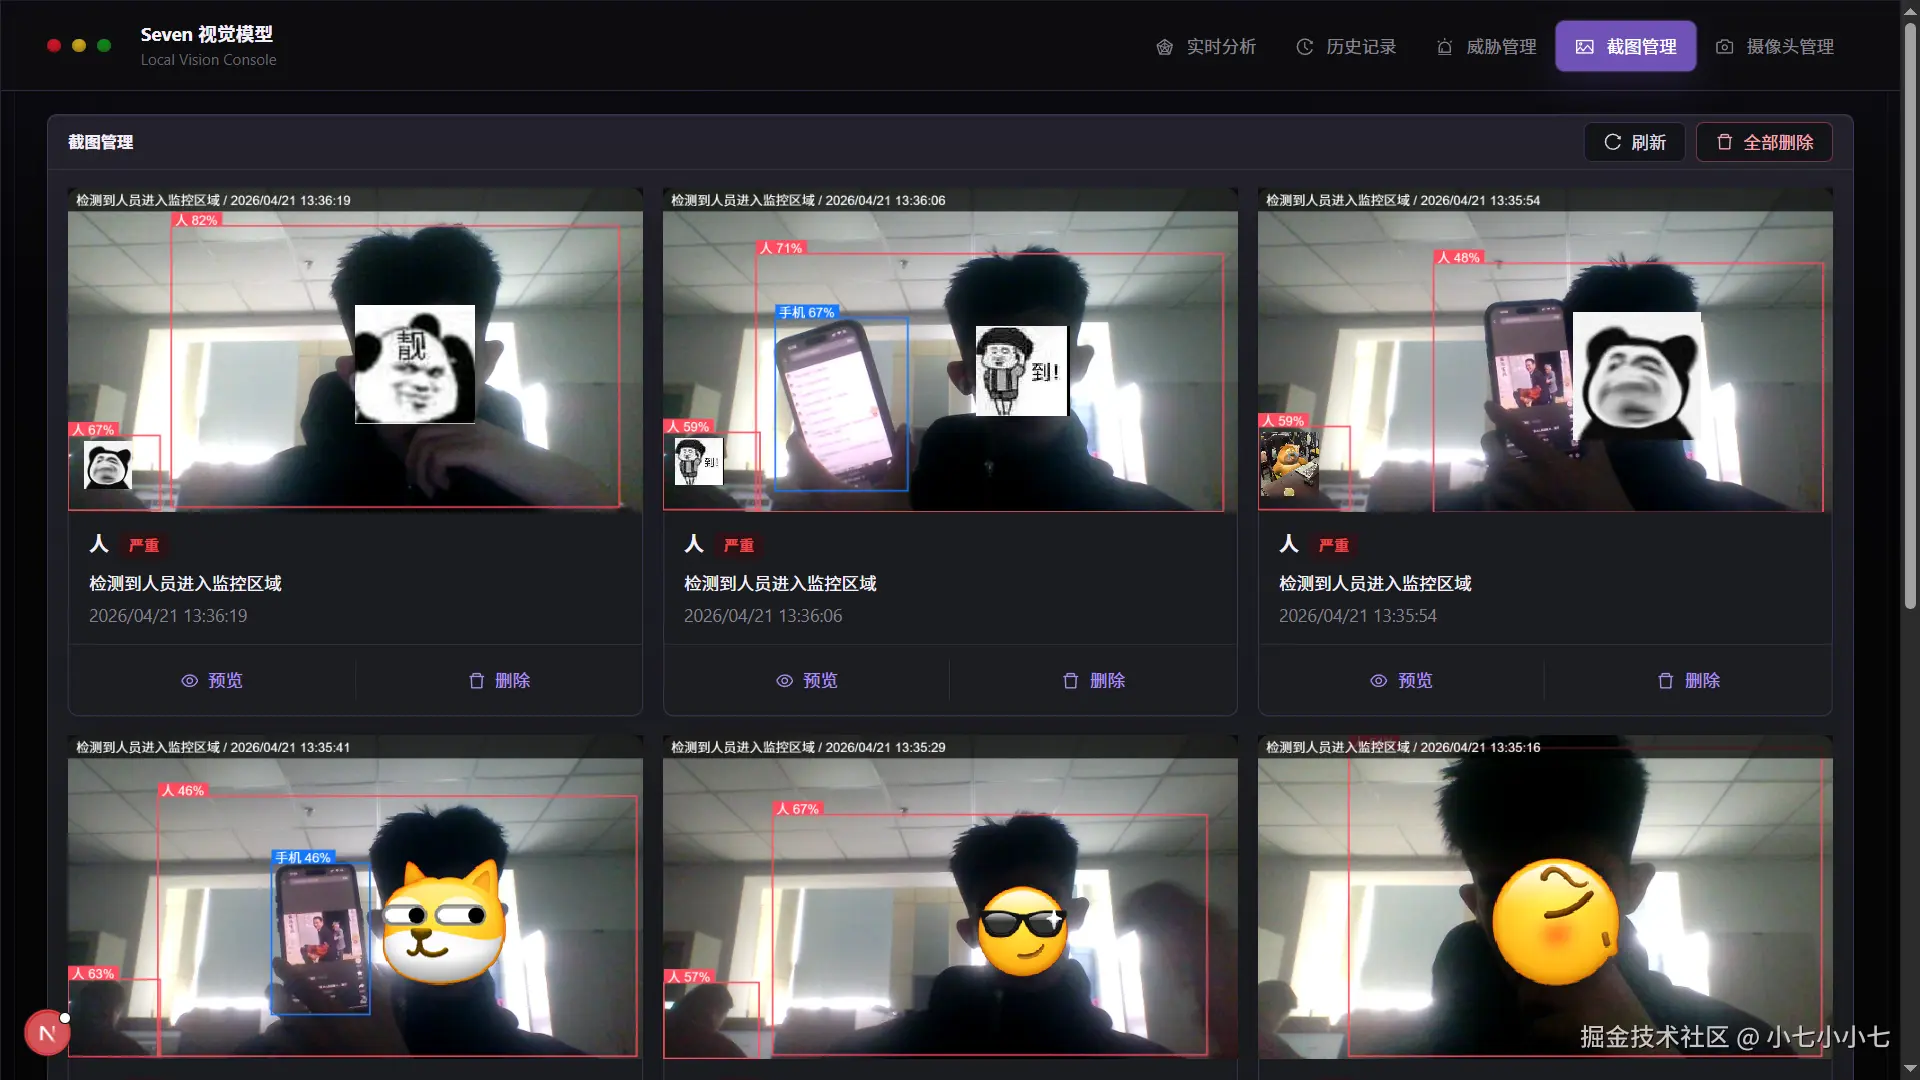
10. 告警截图生成
当系统检测到威胁目标时,会使用 Canvas 截取当前视频帧:
ts
const canvas = document.createElement("canvas");
canvas.width = video.videoWidth;
canvas.height = video.videoHeight;

const context = canvas.getContext("2d");
context.drawImage(video, 0, 0, canvas.width, canvas.height);
然后在截图上绘制目标框和文字:
ts
context.strokeStyle = color;
context.fillStyle = color;
context.strokeRect(x, y, width, height);
context.fillRect(x, Math.max(0, y - 30), context.measureText(label).width + 18, 28);

context.fillStyle = "#fff";
context.fillText(label, x + 8, Math.max(0, y - 25));
截图顶部还会添加告警信息和时间:
ts
context.fillStyle = "rgba(0, 0, 0, 0.7)";
context.fillRect(0, 0, canvas.width, 52);

context.fillStyle = "#ffffff";
context.fillText(`${config.alertMessage} / ${timeLabel}`, 18, 15);
最后,截图会被转换为 Base64 并提交到后端:
ts
imageData: canvas.toDataURL("image/jpeg", 0.86)项目也设置了截图冷却时间,避免连续保存过多截图:
ts
const SNAPSHOT_COOLDOWN_MS = 12000;11. 历史记录管理
项目不仅记录某一帧的检测结果,还会记录目标进入和离开时间。每当画面中出现新的目标,就创建一条历史记录:
ts
const response = await fetch("/api/history", {
  method: "POST",
  headers: { "Content-Type": "application/json" },
  body: JSON.stringify({
    cameraId: currentCamera?.id ?? null,
    cameraName: currentCamera?.name ?? "本地摄像头",
    objectLabel: label,
    displayName: config?.displayName || object.displayName,
    threatLevel: config?.enabled ? config.threatLevel : "none",
    confidence: object.score
  })
});
当目标从画面中消失时,系统会更新该记录的离开时间和最高置信度:
ts
fetch(`/api/history/${record.id}`, {
  method: "PATCH",
  headers: { "Content-Type": "application/json" },
  body: JSON.stringify({ confidence: record.confidence })
});
后端会根据进入时间和离开时间计算停留时长。
12. 数据库连接与建表
数据库连接逻辑位于 lib/db.ts:
ts
function createPool() {
  return mysql.createPool({
    host: process.env.MYSQL_HOST ?? "127.0.0.1",
    port: Number(process.env.MYSQL_PORT ?? 3306),
    user: process.env.MYSQL_USER ?? "root",
    password: process.env.MYSQL_PASSWORD ?? "123456",
    database: DATABASE_NAME,
    waitForConnections: true,
    connectionLimit: 10,
    namedPlaceholders: true,
    timezone: "+08:00"
  });
}
数据库名为:
ts
const DATABASE_NAME = "vision_analysis_system";项目启动接口时会自动创建数据库:
ts
await bootstrapConnection.query(
  `CREATE DATABASE IF NOT EXISTS \`${DATABASE_NAME}\`
   DEFAULT CHARACTER SET utf8mb4
   COLLATE utf8mb4_unicode_ci`
);
数据库表包括:
sql
CREATE TABLE IF NOT EXISTS threat_configs (...);
CREATE TABLE IF NOT EXISTS threat_snapshots (...);
CREATE TABLE IF NOT EXISTS system_events (...);
CREATE TABLE IF NOT EXISTS cameras (...);
CREATE TABLE IF NOT EXISTS detection_records (...);
同时项目也提供了独立 SQL 文件:
text
database/vision_analysis_system.sql可以通过下面命令手动导入:
bash
mysql -u root -p < database/vision_analysis_system.sql13. 后端 API 设计
项目使用 Next.js API Routes 实现后端接口。
例如截图接口位于:
text
app/api/snapshots/route.ts保存截图时,前端会向 /api/snapshots 发送 POST 请求:
ts
const response = await fetch("/api/snapshots", {
  method: "POST",
  headers: { "Content-Type": "application/json" },
  body: JSON.stringify({
    objectLabel: config.objectLabel,
    displayName: config.displayName,
    threatLevel: config.threatLevel,
    alertMessage: config.alertMessage,
    confidence: object.score,
    imageData: canvas.toDataURL("image/jpeg", 0.86),
    detectedObjects: objects
  })
});
后端接收后写入 MySQL:
ts
await db.query(
  `
    INSERT INTO threat_snapshots
      (object_label, display_name, threat_level, alert_message, confidence, image_data, detected_objects)
    VALUES
      (:objectLabel, :displayName, :threatLevel, :alertMessage, :confidence, :imageData, CAST(:detectedObjects AS JSON))
  `,
  {
    objectLabel,
    displayName,
    threatLevel,
    alertMessage,
    confidence,
    imageData,
    detectedObjects: JSON.stringify(payload.detectedObjects ?? [])
  }
);
这种设计让前端页面和后端接口都在同一个 Next.js 项目中,部署和维护更加简单。
14. 页面与响应式设计
项目界面使用 Ant Design 组件搭建,并通过全局 CSS 实现深色科技风格。页面整体分为顶部导航、实时视频区域和右侧信息区域。
首页核心结构如下:
tsx
<div className="monitor-layout">
  <Card className="video-card monitor-video-card">
    <div className="video-shell">
      <video ref={videoRef} autoPlay muted playsInline />
      <div className="detection-layer">
        {/* 目标框 */}
      </div>
    </div>
  </Card>

  <aside className="monitor-sidebar">
    {/* 统计信息、检测结果、模型信息、最近截图 */}
  </aside>
</div>
桌面端使用左右布局:
css
.monitor-layout {
  display: grid;
  grid-template-columns: minmax(0, 1fr) minmax(300px, 360px);
  gap: 16px;
}
手机端使用单列布局:
css
@media (max-width: 1023px) {
  .monitor-layout {
    grid-template-columns: 1fr;
  }
}
这样可以保证电脑端视频画面占主要区域,手机端则按内容自然向下排列。
15. 项目总结
Seven 视觉模型是一个前后端一体化的浏览器端实时目标检测系统。它通过 MediaPipe Object Detector 和 EfficientDet-Lite0 模型在浏览器中完成本地推理,避免依赖云端 AI 接口。系统不仅实现了摄像头画面检测,还扩展了威胁等级配置、告警截图、历史记录、截图管理和摄像头管理等功能。
从技术实现上看,项目结合了浏览器摄像头 API、WebAssembly 本地推理、React Hooks 状态管理、Canvas 截图绘制、Next.js API Routes 和 MySQL 数据持久化。整体结构清晰,适合作为计算机视觉、前端 AI、智能监控和本地化目标检测方向的学习项目或毕业设计项目。
项目的核心价值在于:使用普通浏览器即可完成实时视觉分析,不需要专门客户端,也不需要付费云端 AI 服务,具有部署简单、成本较低、隐私性较好和扩展性较强等特点。