Flutter for OpenHarmony 实战:跨平台天气应用开发指南
作者:maaath
欢迎加入开源鸿蒙跨平台社区:https://openharmonycrossplatform.csdn.net
前言
在移动应用开发领域,跨平台技术一直是开发者关注的焦点。Flutter 作为 Google 推出的跨平台 UI 框架,凭借其高性能和丰富的生态体系,被广泛应用于 iOS、Android 以及嵌入式设备开发。而 OpenHarmony 作为国产操作系统的代表,正在积极拥抱跨平台开发能力。本文将通过一个实际的天气应用案例,详细介绍如何在 OpenHarmony 设备上运行 Flutter 应用,并实现原生能力与跨平台代码的协同工作。
本文将手把手教你如何将一个完整的 Flutter 天气应用集成到 OpenHarmony 项目中,包括网络请求、城市搜索、本地存储、下拉刷新以及动画效果等核心功能的实现。通过这个实战项目,你将掌握 Flutter 与 OpenHarmony 混合开发的核心技巧。
一、项目概述
1.1 项目背景
本项目是一个集成了 Flutter 模块的 OpenHarmony 应用示例,主要展示了以下技术能力:
- Flutter 模块集成:在 OpenHarmony 原生应用中嵌入 Flutter 页面
- 跨平台 UI 开发:使用 Flutter 实现天气展示界面
- 状态管理:使用 Provider 进行状态管理
- 网络请求:通过 HTTP 请求获取天气数据
- 本地存储:使用 shared_preferences 持久化用户数据
- 动画效果:实现天气图标动画和页面过渡动画
1.2 技术架构
项目采用分层架构设计,将业务逻辑、数据层和 UI 层分离:
┌─────────────────────────────────────┐
│          OpenHarmony 原生层          │
│  (EntryAbility、Index页面、路由)     │
├─────────────────────────────────────┤
│          Flutter 嵌入层              │
│      (FlutterPage 组件)             │
├─────────────────────────────────────┤
│          Flutter 业务层              │
│  (Provider、Service、Models)        │
├─────────────────────────────────────┤
│          Flutter UI 层              │
│   (页面、组件、动画)                 │
└─────────────────────────────────────┘
1.3 项目结构
ohos/
├── entry/
│   └── src/main/ets/
│       ├── entryability/            # 原生 Ability
│       └── pages/                   # 原生页面
│           └── Index.ets            # 集成 Flutter 的主页
├── flutter_weather/                 # Flutter 模块
│   └── lib/
│       ├── main.dart               # Flutter 入口
│       ├── models/                  # 数据模型
│       ├── pages/                   # 页面
│       ├── providers/               # 状态管理
│       ├── services/                # 服务层
│       └── widgets/                 # 组件
└── lib/                            # Flutter 业务代码(编译输出)
二、核心功能实现
2.1 天气数据模型
首先定义天气数据的数据模型,包括城市信息、天气状况、温度等核心字段:
dart
class WeatherData {
  final String cityName;           // 城市名称
  final double temperature;         // 温度(摄氏度)
  final double feelsLike;          // 体感温度
  final int humidity;              // 湿度
  final double windSpeed;          // 风速
  final String description;        // 天气描述
  final String icon;               // 天气图标代码
  final DateTime timestamp;         // 数据时间戳

  WeatherData({
    required this.cityName,
    required this.temperature,
    required this.feelsLike,
    required this.humidity,
    required this.windSpeed,
    required this.description,
    required this.icon,
    required this.timestamp,
  });

  factory WeatherData.fromJson(Map<String, dynamic> json) {
    return WeatherData(
      cityName: json['name'] ?? '',
      temperature: (json['main']['temp'] as num).toDouble(),
      feelsLike: (json['main']['feels_like'] as num).toDouble(),
      humidity: json['main']['humidity'] as int,
      windSpeed: (json['wind']['speed'] as num).toDouble(),
      description: json['weather'][0]['description'] ?? '',
      icon: json['weather'][0]['icon'] ?? '01d',
      timestamp: DateTime.now(),
    );
  }
}

class CityInfo {
  final String name;               // 城市名称
  final String country;            // 国家
  final double lat;                // 纬度
  final double lon;                // 经度

  CityInfo({
    required this.name,
    required this.country,
    required this.lat,
    required this.lon,
  });

  factory CityInfo.fromJson(Map<String, dynamic> json) {
    return CityInfo(
      name: json['name'] ?? '',
      country: json['country'] ?? '',
      lat: (json['lat'] as num).toDouble(),
      lon: (json['lon'] as num).toDouble(),
    );
  }
}
2.2 网络请求服务
天气数据通过 OpenWeatherMap API 获取,以下是网络请求服务的实现:
dart
class WeatherService {
  // API 配置
  static const String _apiKey = 'YOUR_API_KEY_HERE';
  static const String _baseUrl = 'https://api.openweathermap.org/data/2.5';

  final http.Client _client;

  WeatherService({http.Client? client}) : _client = client ?? http.Client();

  // 获取城市天气
  Future<WeatherData> getWeatherByCity(String city) async {
    final url = '$_baseUrl/weather?q=$city&appid=$_apiKey&units=metric';
    final response = await _client.get(Uri.parse(url));

    if (response.statusCode == 200) {
      final json = jsonDecode(response.body) as Map<String, dynamic>;
      return WeatherData.fromJson(json);
    } else {
      throw WeatherException('Failed to load weather: ${response.statusCode}');
    }
  }

  // 搜索城市
  Future<List<CityInfo>> searchCities(String query) async {
    final url = '$_baseUrl/find?q=$query&appid=$_apiKey';
    final response = await _client.get(Uri.parse(url));

    if (response.statusCode == 200) {
      final json = jsonDecode(response.body) as Map<String, dynamic>;
      final list = json['list'] as List<dynamic>;
      return list.map((item) => CityInfo.fromJson(item)).toList();
    } else {
      return [];
    }
  }

  void dispose() {
    _client.close();
  }
}

class WeatherException implements Exception {
  final String message;
  WeatherException(this.message);

  @override
  String toString() => message;
}
2.3 本地存储服务
使用 shared_preferences 实现用户偏好设置的持久化存储:
dart
class StorageService {
  static late SharedPreferences _prefs;

  static Future<StorageService> init() async {
    _prefs = await SharedPreferences.getInstance();
    return StorageService();
  }

  // 城市管理
  Future<void> saveCurrentCity(CityInfo city) async {
    await _prefs.setString('current_city', city.name);
    await _prefs.setString('current_country', city.country);
  }

  CityInfo? getCurrentCity() {
    final name = _prefs.getString('current_city');
    if (name == null) return null;
    return CityInfo(
      name: name,
      country: _prefs.getString('current_country') ?? '',
      lat: 0,
      lon: 0,
    );
  }

  // 收藏城市
  Future<void> addFavoriteCity(CityInfo city) async {
    final favorites = getFavoriteCities();
    if (!favorites.any((c) => c.name == city.name)) {
      favorites.add(city);
      await _saveFavorites(favorites);
    }
  }

  Future<void> removeFavoriteCity(CityInfo city) async {
    final favorites = getFavoriteCities();
    favorites.removeWhere((c) => c.name == city.name);
    await _saveFavorites(favorites);
  }

  List<CityInfo> getFavoriteCities() {
    final data = _prefs.getStringList('favorite_cities') ?? [];
    return data.map((s) {
      final parts = s.split(',');
      return CityInfo(name: parts[0], country: parts[1], lat: 0, lon: 0);
    }).toList();
  }

  Future<void> _saveFavorites(List<CityInfo> favorites) async {
    final data = favorites.map((c) => '${c.name},${c.country}').toList();
    await _prefs.setStringList('favorite_cities', data);
  }

  // 设置管理
  bool getTemperatureUnit() => _prefs.getBool('use_celsius') ?? true;
  Future<void> setTemperatureUnit(bool value) async {
    await _prefs.setBool('use_celsius', value);
  }

  bool getThemeMode() => _prefs.getBool('dark_mode') ?? false;
  Future<void> setThemeMode(bool value) async {
    await _prefs.setBool('dark_mode', value);
  }
}
2.4 状态管理
使用 Provider 进行全局状态管理,实现天气数据、收藏城市和应用设置的统一管理:
dart
class WeatherProvider extends ChangeNotifier {
  final WeatherService _weatherService;
  late StorageService _storage;

  WeatherData? _currentWeather;
  List<CityInfo> _favoriteCities = [];
  bool _isLoading = false;
  String? _error;
  bool _useCelsius = true;
  bool _isDarkMode = false;

  WeatherProvider({WeatherService? weatherService})
      : _weatherService = weatherService ?? WeatherService();

  // Getter 方法
  WeatherData? get currentWeather => _currentWeather;
  List<CityInfo> get favoriteCities => _favoriteCities;
  bool get isLoading => _isLoading;
  String? get error => _error;
  bool get useCelsius => _useCelsius;
  bool get isDarkMode => _isDarkMode;

  // 初始化
  Future<void> initialize(StorageService storage) async {
    _storage = storage;
    _favoriteCities = storage.getFavoriteCities();
    _useCelsius = storage.getTemperatureUnit();
    _isDarkMode = storage.getThemeMode();

    final currentCity = storage.getCurrentCity();
    await loadWeatherByCity(currentCity?.name ?? 'Beijing');
    notifyListeners();
  }

  // 加载天气数据
  Future<void> loadWeatherByCity(String city) async {
    _isLoading = true;
    _error = null;
    notifyListeners();

    try {
      _currentWeather = await _weatherService.getWeatherByCity(city);
      _error = null;
    } catch (e) {
      _error = e.toString();
    } finally {
      _isLoading = false;
      notifyListeners();
    }
  }

  // 刷新天气
  Future<void> refreshWeather() async {
    if (_currentWeather != null) {
      await loadWeatherByCity(_currentWeather!.cityName);
    }
  }

  // 温度格式化
  String formatTemperature(double celsius) {
    if (_useCelsius) {
      return '${celsius.round()}°C';
    } else {
      final fahrenheit = celsius * 9 / 5 + 32;
      return '${fahrenheit.round()}°F';
    }
  }

  // 收藏管理
  Future<void> addFavorite(CityInfo city) async {
    await _storage.addFavoriteCity(city);
    _favoriteCities = _storage.getFavoriteCities();
    notifyListeners();
  }

  Future<void> removeFavorite(CityInfo city) async {
    await _storage.removeFavoriteCity(city);
    _favoriteCities = _storage.getFavoriteCities();
    notifyListeners();
  }
}
2.5 天气图标动画
使用 CustomPainter 实现丰富的天气动画效果,包括晴天旋转、降雨、雷电等:
dart
class AnimatedWeatherIcon extends StatefulWidget {
  final String condition;
  final double size;

  const AnimatedWeatherIcon({
    super.key,
    required this.condition,
    this.size = 100,
  });

  @override
  State<AnimatedWeatherIcon> createState() => _AnimatedWeatherIconState();
}

class _AnimatedWeatherIconState extends State<AnimatedWeatherIcon>
    with TickerProviderStateMixin {
  late AnimationController _primaryController;
  late AnimationController _secondaryController;

  @override
  void initState() {
    super.initState();
    _primaryController = AnimationController(
      vsync: this,
      duration: const Duration(seconds: 2),
    )..repeat();
    _secondaryController = AnimationController(
      vsync: this,
      duration: const Duration(milliseconds: 500),
    );
  }

  @override
  void dispose() {
    _primaryController.dispose();
    _secondaryController.dispose();
    super.dispose();
  }

  @override
  Widget build(BuildContext context) {
    return AnimatedBuilder(
      animation: _primaryController,
      builder: (context, child) {
        return CustomPaint(
          size: Size(widget.size, widget.size),
          painter: _getPainter(),
        );
      },
    );
  }

  WeatherPainter _getPainter() {
    if (widget.condition.contains('rain')) {
      return RainPainter(_primaryController.value);
    } else if (widget.condition.contains('thunder')) {
      return ThunderPainter(_primaryController.value);
    } else if (widget.condition.contains('snow')) {
      return SnowPainter(_primaryController.value);
    } else if (widget.condition.contains('cloud')) {
      return CloudPainter(_primaryController.value);
    } else if (widget.condition.contains('fog') ||
               widget.condition.contains('mist')) {
      return FogPainter(_primaryController.value);
    }
    return SunPainter(_primaryController.value);
  }
}

class SunPainter extends CustomPainter {
  final double animation;

  SunPainter(this.animation);

  @override
  void paint(Canvas canvas, Size size) {
    final center = Offset(size.width / 2, size.height / 2);
    final radius = size.width * 0.25;

    // 太阳主体
    final sunPaint = Paint()
      ..color = const Color(0xFFFFC107)
      ..style = PaintingStyle.fill;
    canvas.drawCircle(center, radius, sunPaint);

    // 旋转光芒
    final rayPaint = Paint()
      ..color = const Color(0xFFFFC107)
      ..strokeWidth = 3
      ..strokeCap = StrokeCap.round;

    for (int i = 0; i < 8; i++) {
      final angle = (i * 45 + animation * 360) * pi / 180;
      final start = center + Offset(cos(angle), sin(angle)) * radius * 1.3;
      final end = center + Offset(cos(angle), sin(angle)) * radius * 1.8;
      canvas.drawLine(start, end, rayPaint);
    }
  }

  @override
  bool shouldRepaint(covariant SunPainter oldDelegate) {
    return oldDelegate.animation != animation;
  }
}

class RainPainter extends CustomPainter {
  final double animation;

  RainPainter(this.animation);

  @override
  void paint(Canvas canvas, Size size) {
    final cloudCenter = Offset(size.width / 2, size.height * 0.3);
    final cloudPaint = Paint()
      ..color = Colors.grey.shade400
      ..style = PaintingStyle.fill;
    canvas.drawCircle(cloudCenter, size.width * 0.2, cloudPaint);

    final dropPaint = Paint()
      ..color = const Color(0xFF2196F3)
      ..strokeWidth = 2
      ..strokeCap = StrokeCap.round;

    for (int i = 0; i < 6; i++) {
      final x = size.width * 0.25 + i * size.width * 0.1;
      final dropAnimation = (animation + i * 0.15) % 1.0;
      final y = size.height * 0.4 + dropAnimation * size.height * 0.5;
      canvas.drawLine(
        Offset(x, y),
        Offset(x - 5, y + 15),
        dropPaint,
      );
    }
  }

  @override
  bool shouldRepaint(covariant RainPainter oldDelegate) {
    return oldDelegate.animation != animation;
  }
}
2.6 天气主页面
整合所有组件,实现下拉刷新、天气展示和底部导航:
dart
class WeatherPage extends StatelessWidget {
  const WeatherPage({super.key});

  @override
  Widget build(BuildContext context) {
    return Consumer<WeatherProvider>(
      builder: (context, provider, child) {
        return RefreshIndicator(
          onRefresh: provider.refreshWeather,
          child: CustomScrollView(
            physics: const AlwaysScrollableScrollPhysics(),
            slivers: [
              // 天气主显示区
              SliverToBoxAdapter(
                child: _buildMainWeather(provider),
              ),
              // 天气详情卡片
              SliverToBoxAdapter(
                child: _buildWeatherDetails(provider),
              ),
              // 底部占位
              const SliverToBoxAdapter(
                child: SizedBox(height: 100),
              ),
            ],
          ),
        );
      },
    );
  }

  Widget _buildMainWeather(WeatherProvider provider) {
    if (provider.isLoading) {
      return const Center(
        child: Padding(
          padding: EdgeInsets.all(50),
          child: CircularProgressIndicator(),
        ),
      );
    }

    final weather = provider.currentWeather;
    if (weather == null) {
      return const Center(
        child: Text('No weather data'),
      );
    }

    return Container(
      padding: const EdgeInsets.all(24),
      child: Column(
        children: [
          Text(
            weather.cityName,
            style: const TextStyle(
              fontSize: 32,
              fontWeight: FontWeight.bold,
            ),
          ),
          const SizedBox(height: 8),
          AnimatedWeatherIcon(
            condition: weather.description,
            size: 120,
          ),
          const SizedBox(height: 16),
          Text(
            provider.formatTemperature(weather.temperature),
            style: const TextStyle(
              fontSize: 64,
              fontWeight: FontWeight.w300,
            ),
          ),
          Text(
            weather.description,
            style: const TextStyle(fontSize: 20),
          ),
        ],
      ),
    );
  }

  Widget _buildWeatherDetails(WeatherProvider provider) {
    final weather = provider.currentWeather;
    if (weather == null) return const SizedBox();

    return Padding(
      padding: const EdgeInsets.symmetric(horizontal: 16),
      child: Row(
        mainAxisAlignment: MainAxisAlignment.spaceEvenly,
        children: [
          _buildDetailItem('湿度', '${weather.humidity}%'),
          _buildDetailItem('风速', '${weather.windSpeed} m/s'),
          _buildDetailItem('体感', provider.formatTemperature(weather.feelsLike)),
        ],
      ),
    );
  }

  Widget _buildDetailItem(String label, String value) {
    return Column(
      children: [
        Text(label, style: const TextStyle(color: Colors.white70)),
        const SizedBox(height: 4),
        Text(
          value,
          style: const TextStyle(
            fontSize: 18,
            fontWeight: FontWeight.bold,
          ),
        ),
      ],
    );
  }
}
三、项目集成配置
3.1 Flutter 模块配置
在 Flutter 模块的 pubspec.yaml 中添加必要的依赖:
yaml
name: flutter_weather
description: Flutter weather app for OpenHarmony
publish_to: 'none'
version: 1.0.0+1

environment:
  sdk: '>=3.0.0 <4.0.0'

dependencies:
  flutter:
    sdk: flutter
  provider: ^6.1.0
  http: ^1.1.0
  shared_preferences: ^2.2.0

dev_dependencies:
  flutter_test:
    sdk: flutter
  flutter_lints: ^3.0.0
3.2 OpenHarmony 原生集成
在 OpenHarmony 原生页面中使用 FlutterPage 组件嵌入 Flutter 内容:
typescript
import { FlutterPage } from '@ohos/flutter_ohos';

@Entry
@Component
struct Index {
  @LocalStorageLink('viewId') viewId: string = "";

  build() {
    Stack() {
      // Flutter 内容作为背景
      FlutterPage({ viewId: this.viewId })
        .opacity(1)

      // 原生导航浮层
      Column() {
        // 导航内容...
      }
      .width('100%')
      .alignItems(HorizontalAlign.Center)
    }
    .width('100%')
    .height('100%')
  }
}
四、运行效果
4.1 编译配置
使用 hvigor 进行项目构建:
bash
# 清理并重新构建
hvigor clean
hvigor assembleDebug --no-daemon
4.2 运行截图
项目成功运行后的界面截图如下:
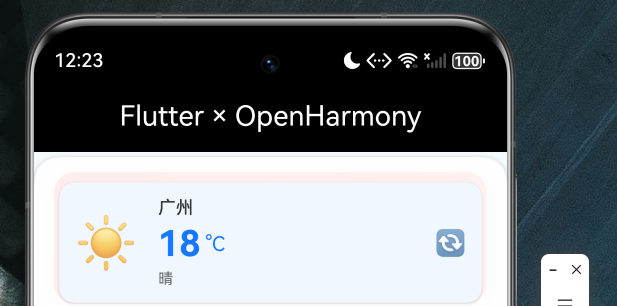
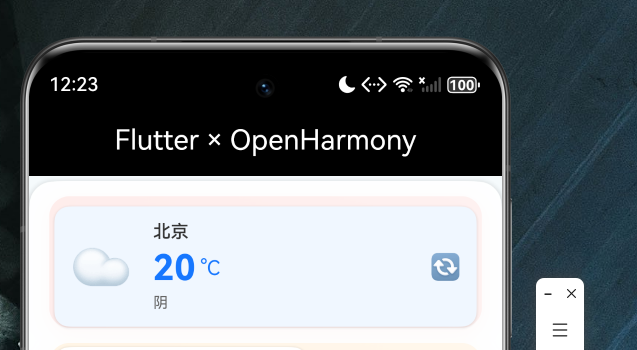
界面展示了以下功能模块:
- 顶部天气卡片:显示城市名称、温度和天气状况
- 天气图标动画:太阳/云朵/雨滴等动态效果
- 天气详情:湿度、风速、体感温度等数据展示
- 底部导航:天气、城市、设置三个 Tab 页面
五、关键技术与最佳实践
5.1 混合开发架构
在进行 Flutter 与 OpenHarmony 混合开发时,需要注意以下要点:
- 明确职责边界:原生层负责系统级功能和页面导航,Flutter 层负责业务 UI 和交互
- 数据共享:通过 LocalStorage 或平台通道实现原生与 Flutter 的数据通信
- 性能优化:避免在 Flutter 中执行重量级计算,合理使用 Isolate
5.2 状态管理建议
对于中等复杂度的应用,推荐使用 Provider 作为状态管理方案:
- 简单易用:学习曲线平缓,API 设计直观
- 功能完整:支持依赖注入、响应式更新和作用域控制
- 性能良好:基于 ChangeNotifier 的发布-订阅模式,开销可控
5.3 网络请求处理
在鸿蒙设备上进行网络请求时,需要注意:
- 添加网络权限声明
- 处理网络异常和超时情况
- 实现请求缓存策略减少流量消耗
5.4 本地存储策略
使用 shared_preferences 存储轻量级数据,如用户偏好设置。对于大量数据,考虑使用 SQLite 或文件存储。
六、总结与展望
本文通过一个完整的天气应用案例,详细介绍了 Flutter 模块集成到 OpenHarmony 项目的全过程,包括数据模型设计、网络请求封装、本地存储实现、状态管理以及动画效果等核心功能。
通过本项目的学习,开发者可以掌握以下技能:
- Flutter 模块的创建和配置
- OpenHarmony 原生页面的 Flutter 嵌入
- 跨平台状态管理方案
- 网络请求和本地存储的实现
- 丰富动画效果的制作
未来,随着 Flutter 对 OpenHarmony 支持的不断完善,我们将能够实现更加复杂的跨平台应用,为 OpenHarmony 生态注入更多活力。
代码仓库
本文完整项目代码托管于 AtomGit:
仓库地址:https://atomgit.com/maaath/flutter-ohos-weather-demo
仓库包含完整的项目源码、配置文件以及本文涉及的示例代码,开发者可以直接克隆进行学习和实践。
欢迎加入开源鸿蒙跨平台社区:https://openharmonycrossplatform.csdn.net
感谢各位阅读!