全志T113 Tina-SDK 配套工具链开发应用(从Makefile到CMake再到Autotools)
本章内容:掌握Tina-SDK中交叉编译工具链的用法,学会编写Makefile、CMakeLists.txt以及Autotools构建脚本,将你的C程序交叉编译为ARM可执行文件,并通过ADB部署到开发板上运行。这是嵌入式Linux应用开发的起点,学完本章你就能独立完成"编译-部署-运行"的完整闭环。
文章目录
-
- [全志T113 Tina-SDK 配套工具链开发应用(从Makefile到CMake再到Autotools)](#全志T113 Tina-SDK 配套工具链开发应用(从Makefile到CMake再到Autotools))
- 第一部分:交叉编译工具链位置与配置
- 第二部分:系统库和头文件位置
- [第三部分:使用 Makefile 交叉编译 Hello 程序](#第三部分:使用 Makefile 交叉编译 Hello 程序)
-
- [3.1 编写源代码 hello.c](#3.1 编写源代码 hello.c)
- [3.2 编写 Makefile](#3.2 编写 Makefile)
- [3.3 执行编译](#3.3 执行编译)
- [第四部分:使用 CMake 交叉编译](#第四部分:使用 CMake 交叉编译)
-
- [4.1 安装 CMake](#4.1 安装 CMake)
- [4.2 编写 CMakeLists.txt](#4.2 编写 CMakeLists.txt)
- [4.3 使用外部构建(out-of-source)](#4.3 使用外部构建(out-of-source))
- [4.4 编译](#4.4 编译)
- [4.5 验证](#4.5 验证)
- [第六部分:使用 Autotools 交叉编译](#第六部分:使用 Autotools 交叉编译)
-
-
- [5.1 准备工作:确认开发板架构和交叉工具链](#5.1 准备工作:确认开发板架构和交叉工具链)
- [5.2 清理之前编译的残留文件](#5.2 清理之前编译的残留文件)
- [5.3 配置交叉编译(静态链接)](#5.3 配置交叉编译(静态链接))
- [5.4 编译](#5.4 编译)
- [5.5 验证生成的可执行文件](#5.5 验证生成的可执行文件)
- [5.6 通过 ADB 传输到开发板并运行](#5.6 通过 ADB 传输到开发板并运行)
- [5.7 常见错误汇总与解决方案](#5.7 常见错误汇总与解决方案)
- [5.8 完整一键脚本(供参考)](#5.8 完整一键脚本(供参考))
-
- [第六部分:ADB 连接开发板并部署程序](#第六部分:ADB 连接开发板并部署程序)
-
- [6.1 连接开发板 USB 到虚拟机](#6.1 连接开发板 USB 到虚拟机)
- [6.2 推送可执行文件到开发板](#6.2 推送可执行文件到开发板)
- [6.3 通过串口或 adb shell 运行](#6.3 通过串口或 adb shell 运行)
- 第七部分:常见错误与注意事项
-
- [7.1 Makefile 中缺少 TAB 键](#7.1 Makefile 中缺少 TAB 键)
- [7.2 STAGING_DIR 未定义警告](#7.2 STAGING_DIR 未定义警告)
- [7.3 CMake 未使用交叉编译器](#7.3 CMake 未使用交叉编译器)
- [7.4 Autotools 缺少宏或工具](#7.4 Autotools 缺少宏或工具)
- 面试官提问环节
-
- [第1问:Tina-SDK 交叉编译工具链的前缀是什么?如何将其加入 PATH?](#第1问:Tina-SDK 交叉编译工具链的前缀是什么?如何将其加入 PATH?)
- [第2问:使用 Makefile 交叉编译时,常见的缩进错误是什么?如何解决?](#第2问:使用 Makefile 交叉编译时,常见的缩进错误是什么?如何解决?)
- [第3问:CMake 交叉编译时,如何指定交叉编译器?需要注意什么顺序?](#第3问:CMake 交叉编译时,如何指定交叉编译器?需要注意什么顺序?)
- [第4问:Autotools 项目的 `./configure` 中 `--host` 和 `--prefix` 分别有什么作用?](#第4问:Autotools 项目的
./configure中--host和--prefix分别有什么作用?) - [第5问:`adb push` 和 `adb shell` 的作用是什么?](#第5问:
adb push和adb shell的作用是什么?)
第一部分:交叉编译工具链位置与配置
bash
book@ubuntu1804:~/tina-d1-h/prebuilt/gcc/linux-x86/arm/toolchain-sunxi-musl/toolchain/bin$ ls
arm-openwrt-linux-addr2line    arm-openwrt-linux-muslgnueabi-addr2line
arm-openwrt-linux-ar           arm-openwrt-linux-muslgnueabi-ar
arm-openwrt-linux-as           arm-openwrt-linux-muslgnueabi-as
arm-openwrt-linux-c++          arm-openwrt-linux-muslgnueabi-c++
...
arm-openwrt-linux-gcc          arm-openwrt-linux-muslgnueabi-gcc
arm-openwrt-linux-gcc-6.4.1    arm-openwrt-linux-muslgnueabi-gcc-6.4.1
...讲解:
Tina-SDK 自带的交叉编译工具链位于 SDK 目录下的 prebuilt/gcc/linux-x86/arm/toolchain-sunxi-musl/toolchain/bin。
工具链命名规则 :前缀为 arm-openwrt-linux-muslgnueabi-,后面跟具体工具名,例如:
arm-openwrt-linux-muslgnueabi-gcc:C 编译器arm-openwrt-linux-muslgnueabi-g++:C++ 编译器arm-openwrt-linux-muslgnueabi-ld:链接器arm-openwrt-linux-muslgnueabi-strip:去除调试符号
C 库类型 :musl ------ 轻量级 C 库,适合嵌入式系统。工具链基于 GCC 6.4.1。
配置 PATH 环境变量(临时,仅当前终端有效):
bash
export PATH=$PATH:/home/ubuntu/tina-d1-h/prebuilt/gcc/linux-x86/arm/toolchain-sunxi-musl/toolchain/bin验证工具链:
bash
arm-openwrt-linux-muslgnueabi-gcc -v
你应该能看到 gcc version 6.4.1 (OpenWrt/Linaro GCC 6.4.2017.11) 等信息。
提示 :每次新开终端都需要重新执行
export,或者将命令写入~/.bashrc永久生效。
第二部分:系统库和头文件位置
bash
# 系统lib库所在路径
~/tina-d1-h/out/t113-100ask/staging_dir/target/usr/lib

# 系统头文件所在路径
~/tina-d1-h/out/t113-100ask/staging_dir/target/usr/include

# 全志专用头文件
~/tina-d1-h/out/t113-100ask/staging_dir/target/usr/include/allwinner讲解:
当你用 Tina-SDK 编译完系统(执行过 make)后,out/t113-100ask/staging_dir/target/ 目录下会生成一个临时的根文件系统镜像,里面包含了:
usr/lib:所有编译好的动态库(.so)和静态库(.a)usr/include:所有头文件usr/include/allwinner:全志芯片专用驱动/硬件接口头文件
为什么需要这些路径? 当你编写应用程序并依赖某些库(如 libcurl、libxml2、libaw_aacdec 等)时,编译器和链接器需要知道:
- 头文件位置(用
-I参数) - 库文件位置(用
-L参数)
后面我们的 Makefile 和 CMake 都会引用这些路径。
第三部分:使用 Makefile 交叉编译 Hello 程序
3.1 编写源代码 hello.c
c
#include <stdio.h>
int main(void)
{
    printf ("Hello 100ASK T113-Pro !!! \r\n");
    return 0;
}
3.2 编写 Makefile
makefile
CC := arm-openwrt-linux-muslgnueabi-gcc
hello: hello.c
    ${CC} -o hello hello.c   # 注意:这行前面必须是【TAB】键,不能是空格
clean:
    rm hello
重要错误 :Makefile 中命令行的缩进必须使用 TAB 键,不能用空格。如果使用空格,会报错:
text
Makefile:3: *** missing separator (did you mean TAB instead of 8 spaces?). Stop.解决方法:用 vi 或 vim 打开 Makefile,将 hello: 下一行的空格全部删除,然后按 Tab 键重新缩进。
3.3 执行编译
bash
ubuntu@ubuntu1804:~$ make
arm-openwrt-linux-muslgnueabi-gcc -o hello hello.c
arm-openwrt-linux-muslgnueabi-gcc.bin: warning: environment variable 'STAGING_DIR' not defined
arm-openwrt-linux-muslgnueabi-gcc.bin: warning; environment variable 'STAGING_DIR' not defined
警告解释 :STAGING_DIR 是 Tina 构建系统使用的环境变量,指向 out/.../staging_dir 目录。如果不定义,工具链可能找不到一些库和头文件。但对于一个简单的 printf 程序,这个警告可以忽略(因为 libc 是工具链自带的)。
验证生成的文件:
bash
file hello输出:
text
hello: ELF 32-bit LSB executable, ARM, EABI5 version 1 (SYSV), dynamically linked, interpreter /lib/ld-musl-armhf.so.1, not strippedARM:说明是 ARM 架构dynamically linked:动态链接,需要依赖板子上的 musl C 库interpreter /lib/ld-musl-armhf.so.1:动态链接器的路径
ADB 传输要点:OTG/Debug都要接上串口线,并且虚拟机也要连接上ADB
adb push:推送通过串口到开发板

正常应该看到这样的效果
第四部分:使用 CMake 交叉编译
4.1 安装 CMake
bash
ubuntu@ubuntu1804:~$ sudo apt install cmake4.2 编写 CMakeLists.txt
cmake
cmake_minimum_required(VERSION 3.10)
project(helloword)
SET(CROSS_COMPILE 1)
set(CMAKE_SYSTEM_NAME Linux)

# 交叉编译器路径
set(CMAKE_C_COMPILER "/home/ubuntu/tina-d1-h/prebuilt/gcc/linux-x86/arm/toolchain-sunxi-musl/toolchain/bin/arm-openwrt-linux-muslgnueabi-gcc")

# 链接库路径
link_directories(
    /home/ubuntu/tina-d1-h/out/t113-100ask/staging_dir/target/usr/lib
)

# 头文件路径
include_directories(/home/ubuntu/tina-d1-h/out/t113-100ask/staging_dir/target/usr/include/)
include_directories(/home/ubuntu/tina-d1-h/out/t113-100ask/staging_dir/target/usr/include/allwinner/)
include_directories(/home/ubuntu/tina-d1-h/out/t113-100ask/staging_dir/target/usr/include/allwinner/include/)

add_executable(hello_word hello.c)
4.3 使用外部构建(out-of-source)
bash
mkdir build
cd build
cmake ..
执行 cmake .. 后,会生成 Makefile 文件。
输出 (注意此处 cmake 检测到的是主机 GCC,而不是交叉编译器------这是错误的):
text
-- The C compiler identification is GNU 7.5.0
-- Check for working C compiler: /usr/bin/cc
...
问题 :上面的 CMakeLists.txt 中明明设置了 CMAKE_C_COMPILER,为什么还是用了主机的 /usr/bin/cc?
原因 :set(CMAKE_C_COMPILER ...) 必须在 project() 之前定义,否则 CMake 会先使用默认编译器探测。修正后的 CMakeLists.txt 开头应该是:
cmake
cmake_minimum_required(VERSION 3.10)
set(CMAKE_C_COMPILER "/path/to/arm-openwrt-linux-muslgnueabi-gcc")
project(helloword)
...
同学们可以按照修正后的顺序编写。
4.4 编译
bash
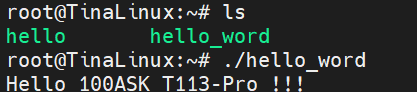
make输出显示交叉编译器被调用,同样会有 STAGING_DIR 警告。最终生成 hello_word 可执行文件。
4.5 验证
bash
file hello_word应该看到 ELF 32-bit LSB executable, ARM。
依旧串口传输

正常结果
第六部分:使用 Autotools 交叉编译
5.1 准备工作:确认开发板架构和交叉工具链
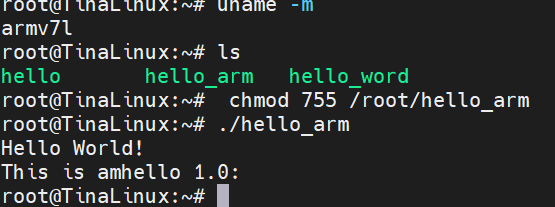
首先登录开发板(通过串口或 ADB),查看架构:
bash
# 在开发板上执行
uname -m典型输出:armv7l(32位 ARM)或 aarch64(64位 ARM)。
本文以 armv7l + TinaLinux(使用 musl libc)为例。
在 Ubuntu 宿主机上,你需要目标平台的交叉编译器 。Tina SDK 通常自带工具链,其前缀类似 arm-openwrt-linux-muslgnueabi。如果你还没有配置好环境变量,可以先定位工具链位置:
bash
# 假设 $T 指向 Tina SDK 根目录
ls $T/prebuilt/gcc/linux-x86/arm/arm-openwrt-linux-muslgnueabi/bin/
确认存在 arm-openwrt-linux-muslgnueabi-gcc 后,将其加入 PATH:
bash
export PATH=$T/prebuilt/gcc/linux-x86/arm/arm-openwrt-linux-muslgnueabi/bin:$PATH注意 :如果你的 SDK 路径不同,请相应修改。也可以使用系统自带的
gcc-arm-linux-gnueabihf,但 TinaLinux 使用 musl,静态链接时一般能兼容,不过推荐使用 SDK 配套的工具链。
5.2 清理之前编译的残留文件
在 ~/hello_auto 目录下执行:
bash
cd ~/hello_auto
make distclean
这会删除所有由 configure 和 make 生成的文件,让项目回到刚跑完 automake --add-missing 的状态。
5.3 配置交叉编译(静态链接)
运行 configure 脚本,并指定:
--host:目标三元组(告诉 build 系统我们要交叉编译)CC:明确指定交叉编译器(防止 configure 找到宿主机 gcc)LDFLAGS="-static":静态链接,避免开发板上缺少动态库
bash
./configure --host=arm-openwrt-linux-muslgnueabi \
            --prefix=/usr \
            CC=arm-openwrt-linux-muslgnueabi-gcc \
            LDFLAGS="-static"
成功标志 :输出中应出现 checking whether we are cross compiling... yes。
如果报错 C compiler cannot create executables,请检查:
- 交叉编译器路径是否正确(
which arm-openwrt-linux-muslgnueabi-gcc) - 是否缺少必要的库(如静态 libc),可尝试去掉
LDFLAGS="-static"先测试动态链接。
5.4 编译
bash
make输出中应看到交叉编译器被调用,例如:
text
arm-openwrt-linux-muslgnueabi-gcc -DHAVE_CONFIG_H ... -c -o main.o main.c
arm-openwrt-linux-muslgnueabi-gcc -static -o hello main.o
如果出现 warning: environment variable 'STAGING_DIR' not defined,可忽略(不影响结果)。
5.5 验证生成的可执行文件
bash
file src/hello期望输出:
text
src/hello: ELF 32-bit LSB executable, ARM, statically linked, ...5.6 通过 ADB 传输到开发板并运行
常见错误1:adb push 时目标路径写错
bash
# 错误:目标是一个目录,未指定文件名
adb push src/hello /data/local/tmp/          # 报错:remote Is a directory

# 正确:指定完整路径+文件名
adb push src/hello /data/local/tmp/hello
常见错误2:推送到 /root 后无法 chmod
如果你 push 到 /root/hello_arm,在 Ubuntu 宿主机上执行 chmod 755 /root/hello_arm 会报 Permission denied,因为 /root 是开发板上的目录,你需要在开发板上执行 chmod。
正确做法:
bash
# 1. 推送到开发板可写的目录(例如 /data/local/tmp/ 或 /root)
adb push src/hello /data/local/tmp/hello_arm

# 2. 通过 adb shell 登录开发板,修改权限并运行
adb shell
chmod 755 /data/local/tmp/hello_arm
/data/local/tmp/hello_arm
或者一条命令完成:
bash
adb push src/hello /data/local/tmp/hello_arm && \
adb shell chmod 755 /data/local/tmp/hello_arm && \
adb shell /data/local/tmp/hello_arm预期输出:
text
Hello World!
This is amhello 1.0:
5.7 常见错误汇总与解决方案
| 错误现象 | 原因 | 解决方法 |
|---|---|---|
config.status: error: cannot find input file: 'Makefile.in' |
忘记运行 automake --add-missing 或 autoheader |
执行 aclocal; autoheader; autoconf; automake --add-missing |
make: *** No targets specified and no makefile found. |
没有先运行 ./configure |
先运行 ./configure 生成 Makefile |
./hello: line 1: syntax error: unexpected word |
在开发板上运行了 x86 版本的可执行文件 | 确认交叉编译并 file 查看架构 |
adb push: remote Is a directory |
目标路径末尾带了 / 且未指定文件名 |
指定完整文件名,如 /data/local/tmp/hello |
chmod: cannot access '/root/hello_arm': Permission denied |
在宿主机上对开发板路径执行 chmod | 应通过 adb shell chmod ... 在开发板上执行 |
arm-openwrt-linux-muslgnueabi-gcc.bin: warning: environment variable 'STAGING_DIR' not defined |
Tina SDK 环境变量缺失 | 可忽略,不影响编译;若要消除,export STAGING_DIR=$T/staging_dir/target-... |
cannot execute binary file: Exec format error |
开发板架构与编译目标不匹配(如 64 位板子运行 32 位程序) | 检查开发板 uname -m,重新配置正确的 --host(如 aarch64-openwrt-linux-musl) |
5.8 完整一键脚本(供参考)
将以下内容保存为 cross_build.sh,根据你的实际工具链路径修改:
bash
#!/bin/bash
# 交叉编译并自动部署到开发板

# 设置工具链路径(根据实际修改)
export PATH=/path/to/tina-sdk/prebuilt/gcc/linux-x86/arm/arm-openwrt-linux-muslgnueabi/bin:$PATH
export STAGING_DIR=/path/to/tina-sdk/staging_dir/target-arm_cortex-a7_musl-1.1.16_eabi  # 可选

# 清理
make distclean

# 配置
./configure --host=arm-openwrt-linux-muslgnueabi \
            --prefix=/usr \
            CC=arm-openwrt-linux-muslgnueabi-gcc \
            LDFLAGS="-static"

# 编译
make

# 检查
file src/hello

# 部署
adb push src/hello /data/local/tmp/hello_arm
adb shell chmod 755 /data/local/tmp/hello_arm
adb shell /data/local/tmp/hello_arm
执行 bash cross_build.sh 即可完成全流程。
第六部分:ADB 连接开发板并部署程序

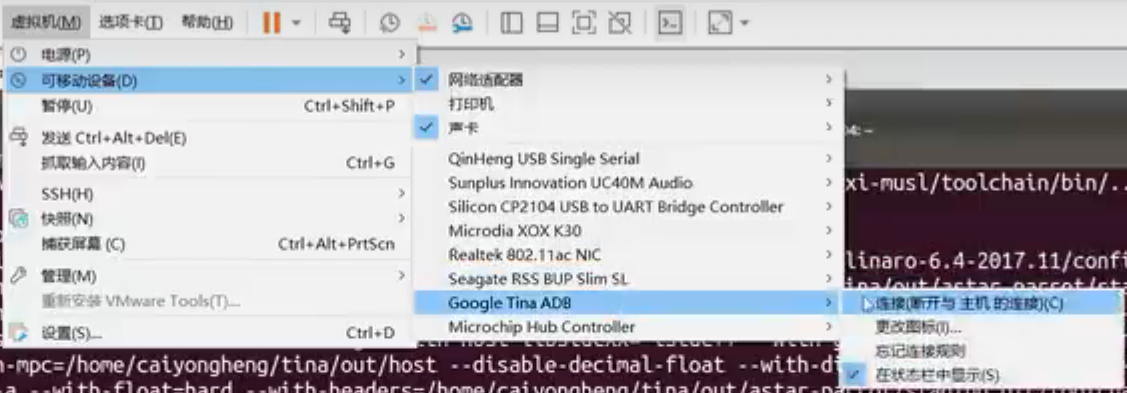
6.1 连接开发板 USB 到虚拟机
VMware 菜单 → 可移动设备 → 选择 Google Tina ADB → 连接。
确保开发板已启动并且 USB 线(OTG 口)连接到电脑。在虚拟机中执行:
bash
adb devices输出:
text
List of devices attached
20080411    device
说明设备已识别。
6.2 推送可执行文件到开发板
bash
adb push hello /root/输出:
text
hello: 1 file pushed. 1.3 MB/s (7132 bytes in 0.005s)6.3 通过串口或 adb shell 运行
bash
adb shell
# 进入板子 shell
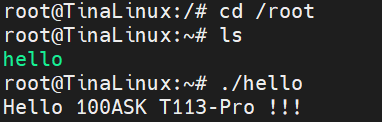
cd /root
./hello图片输出:
text
Hello 100ASK T113-Pro !!!第七部分:常见错误与注意事项
7.1 Makefile 中缺少 TAB 键
错误信息 :missing separator
解决 :用 vi 确保命令行前是 Tab 而不是空格。
7.2 STAGING_DIR 未定义警告
警告 :environment variable 'STAGING_DIR' not defined
影响 :简单程序无影响;若依赖外部库可能找不到。
解决(可选):
bash
export STAGING_DIR=/home/ubuntu/tina-d1-h/out/t113-100ask/staging_dir7.3 CMake 未使用交叉编译器
现象 :cmake 输出显示 /usr/bin/cc
解决 :将 set(CMAKE_C_COMPILER ...) 放在 project() 之前。
7.4 Autotools 缺少宏或工具
bash
sudo apt install autoconf automake libtool面试官提问环节
第1问:Tina-SDK 交叉编译工具链的前缀是什么?如何将其加入 PATH?
参考答案 :
前缀为 arm-openwrt-linux-muslgnueabi-。加入 PATH:
bash
export PATH=$PATH:/home/ubuntu/tina-d1-h/prebuilt/gcc/linux-x86/arm/toolchain-sunxi-musl/toolchain/bin第2问:使用 Makefile 交叉编译时,常见的缩进错误是什么?如何解决?
参考答案 :
Makefile 中命令必须以 Tab 字符 开头,不能用空格。错误提示 missing separator。用 vi 打开,将空格删除后按 Tab 键即可。
第3问:CMake 交叉编译时,如何指定交叉编译器?需要注意什么顺序?
参考答案 :
在 CMakeLists.txt 中:
cmake
set(CMAKE_C_COMPILER "/path/to/arm-openwrt-linux-muslgnueabi-gcc")
project(helloword)
必须先设置编译器再调用 project(),否则 CMake 会先使用默认编译器探测。
第4问:Autotools 项目的 ./configure 中 --host 和 --prefix 分别有什么作用?
参考答案:
--host:指定目标系统三元组,使 configure 查找对应的交叉编译器。--prefix:指定安装目录(例如/usr),最终可执行文件会安装在/usr/bin(相对于 DESTDIR 而言)。
第5问:adb push 和 adb shell 的作用是什么?
参考答案:
adb push <本地文件> <远程路径>:将主机文件传输到开发板。adb shell:打开开发板的远程终端,可直接执行板子上的命令。
结束语:本章通过 Makefile、CMake、Autotools 三种方式演示了如何交叉编译应用程序,并通过 ADB 部署到 T113 开发板运行。这三种构建系统覆盖了绝大多数嵌入式项目的需求。作为初学者,建议先熟练掌握 Makefile 方法(最直接),再了解 CMake 和 Autotools(阅读开源项目时会遇到)。反复练习,直到能独立完成从编写代码到板子上运行的完整流程。加油!