Flutter for OpenHarmony 实战:构建跨平台房产租售应用
作者:maaath
欢迎加入开源鸿蒙跨平台社区: https://openharmonycrossplatform.csdn.net
一、引言
在移动应用开发领域,跨平台技术一直是开发者关注的焦点。Flutter 作为 Google 推出的跨平台 UI 框架,凭借其高性能和一致性表现,逐渐成为主流选择。而当 Flutter 遇上 OpenHarmony,又会擦出怎样的火花?本文将通过一个完整的房产租售应用实战案例,带大家深入了解 Flutter for OpenHarmony 的开发流程与核心实现。
Flutter for OpenHarmony 是 Flutter 团队针对 OpenHarmony 操作系统推出的官方适配版本,它允许开发者使用 Dart 语言编写一次代码,即可部署到包括手机、平板、智能穿戴等多种设备上。这种开发模式不仅大幅提升了开发效率,还确保了应用在不同设备上的体验一致性。
二、项目概述
本文要实现的是一个功能完善的房产租售应用,具备以下核心功能:
- 底部选项卡导航:首页、租房、二手房、我的
- 房源列表展示:支持图片、价格、位置等信息展示
- 下拉刷新与上拉加载:提升用户体验
- 房源详情页:展示完整的房屋信息
- 地图找房功能:可视化定位目标房源
通过这个项目,读者将学习到如何利用 Flutter 的声明式 UI 特性,快速构建跨平台应用界面,以及如何处理列表数据、页面跳转等常见业务场景。
三、项目结构
在开始编码之前,我们先来了解项目的整体结构。良好的项目结构不仅有助于代码维护,也能让团队协作更加高效。
lib/
├── main.dart                 # 应用入口
├── pages/
│   ├── home_page.dart       # 首页
│   ├── rent_page.dart       # 租房页面
│   ├── second_hand_page.dart # 二手房页面
│   ├── mine_page.dart       # 我的页面
│   └── house_detail_page.dart # 房源详情页
├── models/
│   └── house_model.dart     # 房源数据模型
├── widgets/
│   └── house_card.dart      # 房源卡片组件
└── utils/
    └── constants.dart       # 常量定义
四、核心实现
4.1 数据模型定义
良好的数据类型定义是构建健壮应用的基础。在 Flutter 中,我们使用 Dart 语言进行类型声明,这使得代码具有更好的可读性和可维护性。
dart
// 房源数据模型
class HouseModel {
  final String id;
  final String title;
  final String district;
  final String community;
  final double price;
  final String priceUnit;
  final int area;
  final String rooms;
  final String imageUrl;
  final List<String> tags;

  HouseModel({
    required this.id,
    required this.title,
    required this.district,
    required this.community,
    required this.price,
    required this.priceUnit,
    required this.area,
    required this.rooms,
    required this.imageUrl,
    required this.tags,
  });

  factory HouseModel.fromJson(Map<String, dynamic> json) {
    return HouseModel(
      id: json['id'] as String,
      title: json['title'] as String,
      district: json['district'] as String,
      community: json['community'] as String,
      price: (json['price'] as num).toDouble(),
      priceUnit: json['priceUnit'] as String,
      area: json['area'] as int,
      rooms: json['rooms'] as String,
      imageUrl: json['image'] as String,
      tags: List<String>.from(json['tags']),
    );
  }

  Map<String, dynamic> toJson() {
    return {
      'id': id,
      'title': title,
      'district': district,
      'community': community,
      'price': price,
      'priceUnit': priceUnit,
      'area': area,
      'rooms': rooms,
      'image': imageUrl,
      'tags': tags,
    };
  }
}
上述代码展示了如何在 Dart 中定义数据模型。通过 required 关键字确保必填字段,使用 factory 构造函数实现 JSON 序列化与反序列化,这种模式在实际开发中非常实用。
4.2 底部导航栏实现
底部导航栏是大多数移动应用的核心交互元素。在 Flutter 中,我们可以利用 BottomNavigationBar 组件快速实现这一功能。
dart
class MainPage extends StatefulWidget {
  @override
  State<MainPage> createState() => _MainPageState();
}

class _MainPageState extends State<MainPage> {
  int _currentIndex = 0;

  final List<Widget> _pages = [
    HomePage(),
    RentPage(),
    SecondHandPage(),
    MinePage(),
  ];

  final List<BottomNavItem> _navItems = [
    BottomNavItem('首页', Icons.home, Icons.home_outlined),
    BottomNavItem('租房', Icons.apartment, Icons.apartment_outlined),
    BottomNavItem('二手房', Icons.store, Icons.store_outlined),
    BottomNavItem('我的', Icons.person, Icons.person_outlined),
  ];

  @override
  Widget build(BuildContext context) {
    return Scaffold(
      body: IndexedStack(
        index: _currentIndex,
        children: _pages,
      ),
      bottomNavigationBar: BottomNavigationBar(
        currentIndex: _currentIndex,
        type: BottomNavigationBarType.fixed,
        selectedItemColor: const Color(0xFF0077FF),
        unselectedItemColor: const Color(0xFF999999),
        onTap: (index) {
          setState(() {
            _currentIndex = index;
          });
        },
        items: _navItems.map((item) {
          return BottomNavigationBarItem(
            icon: Icon(item.normalIcon),
            activeIcon: Icon(item.selectedIcon),
            label: item.title,
          );
        }).toList(),
      ),
    );
  }
}
这段代码展示了 Flutter 中状态管理的典型模式。通过 setState 方法触发 UI 更新,IndexedStack 确保页面切换时状态得以保留,避免重复加载。
4.3 房源列表实现
房源列表是应用的核心页面之一,我们需要实现下拉刷新和上拉加载功能。Flutter 提供了原生的下拉刷新组件 RefreshIndicator,配合 ListView.builder 可以高效地渲染长列表。
dart
class RentPage extends StatefulWidget {
  @override
  State<RentPage> createState() => _RentPageState();
}

class _RentPageState extends State<RentPage> {
  final List<HouseModel> _houses = [];
  final ScrollController _scrollController = ScrollController();
  bool _isLoading = false;
  bool _hasMore = true;
  int _currentPage = 1;

  @override
  void initState() {
    super.initState();
    _loadData(refresh: true);
    _scrollController.addListener(_onScroll);
  }

  Future<void> _loadData({bool refresh = false}) async {
    if (_isLoading) return;

    setState(() {
      _isLoading = true;
      if (refresh) {
        _currentPage = 1;
        _houses.clear();
      }
    });

    // 模拟网络请求
    await Future.delayed(const Duration(milliseconds: 800));

    final newHouses = _generateMockData(_currentPage);

    setState(() {
      _houses.addAll(newHouses);
      _currentPage++;
      _hasMore = _currentPage <= 3;
      _isLoading = false;
    });
  }

  void _onScroll() {
    if (_scrollController.position.pixels >=
        _scrollController.position.maxScrollExtent - 200) {
      if (!_isLoading && _hasMore) {
        _loadData();
      }
    }
  }

  @override
  Widget build(BuildContext context) {
    return Scaffold(
      appBar: AppBar(
        title: const Text('租房'),
        backgroundColor: Colors.white,
        elevation: 0,
      ),
      body: RefreshIndicator(
        onRefresh: () => _loadData(refresh: true),
        child: ListView.builder(
          controller: _scrollController,
          itemCount: _houses.length + (_hasMore ? 1 : 0),
          itemBuilder: (context, index) {
            if (index == _houses.length) {
              return _buildLoadingIndicator();
            }
            return HouseCard(house: _houses[index]);
          },
        ),
      ),
    );
  }

  Widget _buildLoadingIndicator() {
    return Container(
      padding: const EdgeInsets.all(16),
      alignment: Alignment.center,
      child: _isLoading
          ? const CircularProgressIndicator()
          : const Text('没有更多数据了'),
    );
  }
}
这段代码展示了 Flutter 中列表分页加载的标准实现。通过 ScrollController 监听滚动位置,在接近底部时自动加载更多数据,有效提升了长列表的加载性能。
4.4 房源卡片组件
为了保持代码的整洁和复用性,我们将房源展示单元抽取为独立组件。
dart
class HouseCard extends StatelessWidget {
  final HouseModel house;

  const HouseCard({Key? key, required this.house}) : super(key: key);

  @override
  Widget build(BuildContext context) {
    return GestureDetector(
      onTap: () {
        Navigator.push(
          context,
          MaterialPageRoute(
            builder: (context) => HouseDetailPage(houseId: house.id),
          ),
        );
      },
      child: Container(
        margin: const EdgeInsets.symmetric(horizontal: 16, vertical: 8),
        decoration: BoxDecoration(
          color: Colors.white,
          borderRadius: BorderRadius.circular(8),
          boxShadow: [
            BoxShadow(
              color: Colors.black.withOpacity(0.1),
              blurRadius: 8,
              offset: const Offset(0, 2),
            ),
          ],
        ),
        child: Row(
          children: [
            ClipRRect(
              borderRadius: const BorderRadius.only(
                topLeft: Radius.circular(8),
                bottomLeft: Radius.circular(8),
              ),
              child: Image.network(
                house.imageUrl,
                width: 120,
                height: 100,
                fit: BoxFit.cover,
                errorBuilder: (context, error, stackTrace) {
                  return Container(
                    width: 120,
                    height: 100,
                    color: Colors.grey[200],
                    child: const Icon(Icons.image_not_supported),
                  );
                },
              ),
            ),
            Expanded(
              child: Padding(
                padding: const EdgeInsets.all(12),
                child: Column(
                  crossAxisAlignment: CrossAxisAlignment.start,
                  children: [
                    Text(
                      house.title,
                      style: const TextStyle(
                        fontSize: 15,
                        fontWeight: FontWeight.w500,
                      ),
                      maxLines: 1,
                      overflow: TextOverflow.ellipsis,
                    ),
                    const SizedBox(height: 4),
                    Text(
                      '${house.district} · ${house.community}',
                      style: TextStyle(fontSize: 12, color: Colors.grey[600]),
                    ),
                    const SizedBox(height: 4),
                    Text(
                      '${house.rooms} · ${house.area}m²',
                      style: TextStyle(fontSize: 12, color: Colors.grey[600]),
                    ),
                    const SizedBox(height: 8),
                    Row(
                      children: [
                        Text(
                          '${house.price.toInt()}',
                          style: const TextStyle(
                            fontSize: 18,
                            fontWeight: FontWeight.bold,
                            color: Color(0xFFFF5722),
                          ),
                        ),
                        Text(
                          house.priceUnit,
                          style: TextStyle(fontSize: 12, color: Colors.grey[600]),
                        ),
                      ],
                    ),
                  ],
                ),
              ),
            ),
          ],
        ),
      ),
    );
  }
}
通过将房源卡片抽取为独立组件,我们实现了 UI 复用。同时,Flutter 的 errorBuilder 机制让我们能够优雅地处理图片加载失败的情况。
五、运行效果展示
经过上述代码的实现,应用已经具备了完整的房源展示功能。以下是应用在鸿蒙设备上的运行截图:
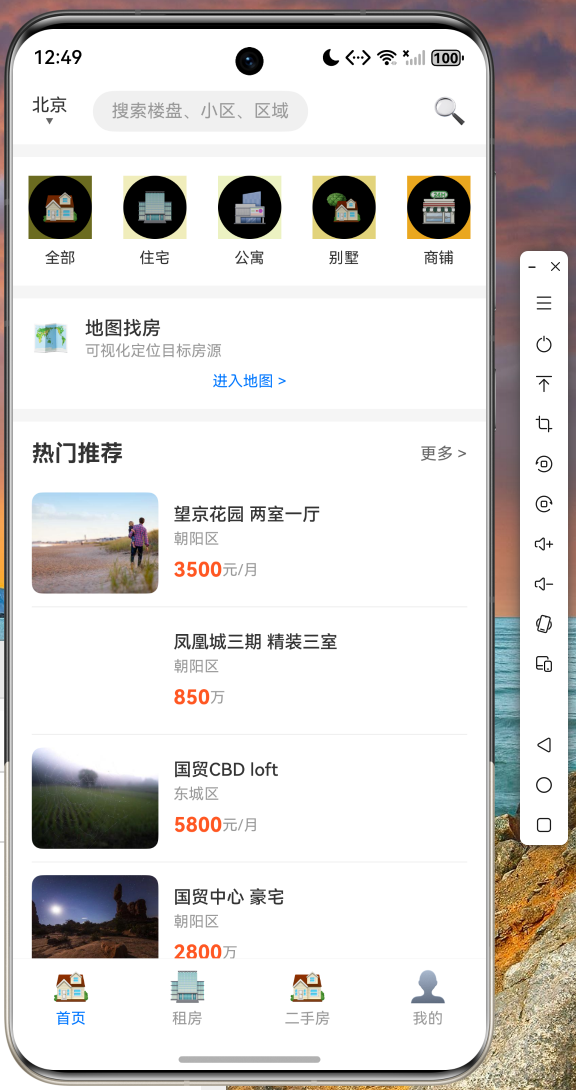
5.1 首页展示
首页包含搜索区域、分类快捷入口、地图找房入口以及热门推荐房源。用户可以快速浏览各类房源信息,并通过底部导航栏切换到不同的功能模块。
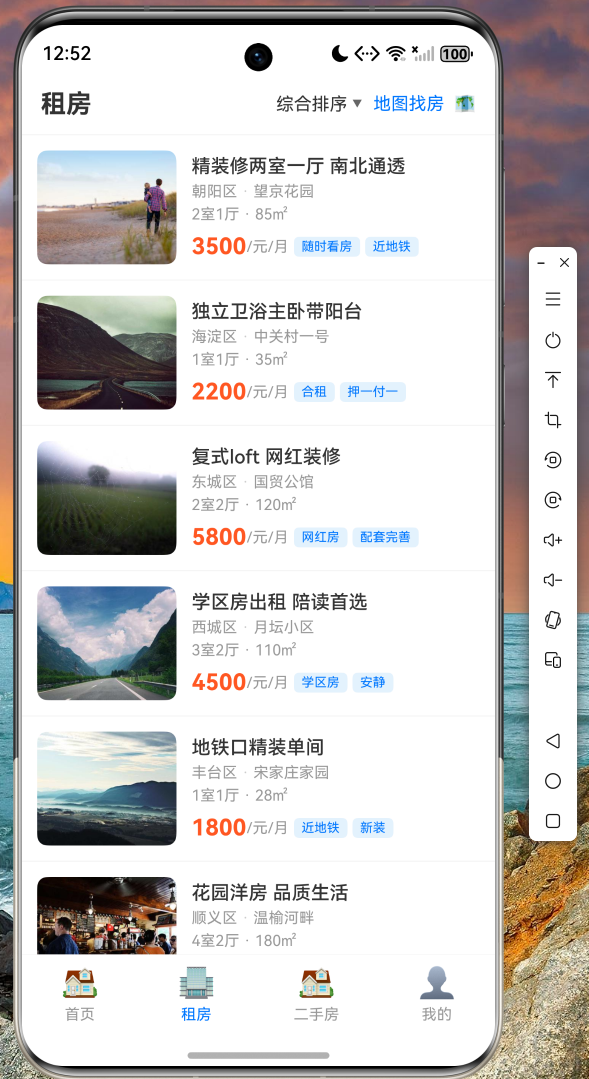
5.2 租房列表
租房页面展示了完整的房源列表,支持下拉刷新获取最新数据,上拉加载更多房源。每个房源卡片都清晰地展示了价格、位置、户型等关键信息。
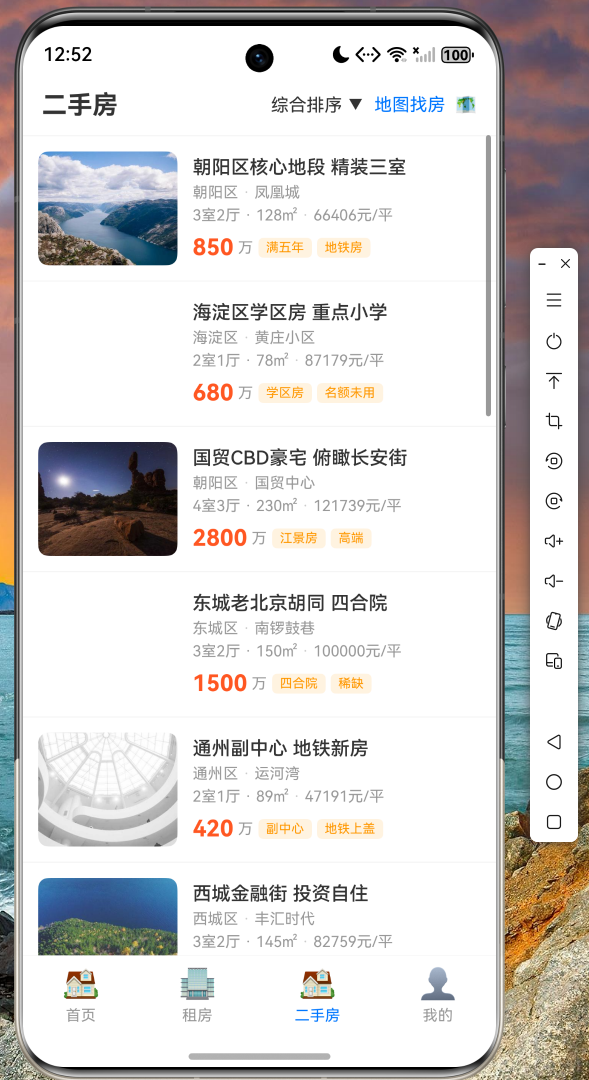
5.3 二手房页面
二手房页面采用相同的设计语言,但在配色上进行了区分,使用橙色主题突出二手房的特点。
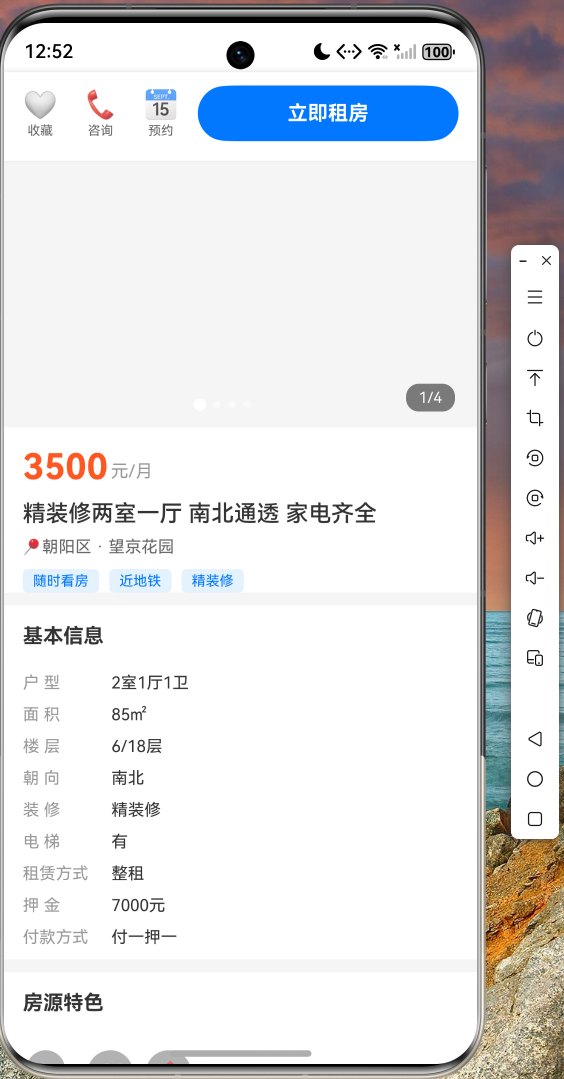
5.4 房源详情页
点击任意房源卡片,可以进入详情页查看完整信息,包括图片轮播、基本信息、特色标签等。
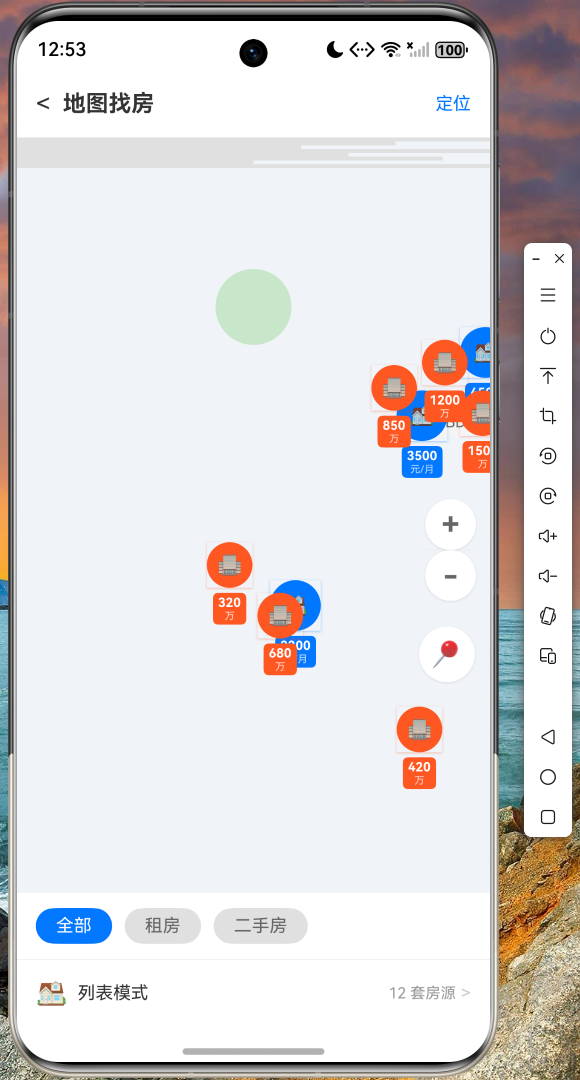
5.5 地图找房
地图找房功能以可视化的方式展示房源分布,用户可以通过地图直观地了解目标区域的房源情况。
六、关键技术点总结
通过本项目的实战开发,我们深入学习了以下 Flutter for OpenHarmony 开发的关键技术:
-
声明式 UI 编程:Flutter 采用声明式 UI 范式,开发者只需描述 UI 应该呈现的状态,框架会自动处理 UI 更新。
-
状态管理 :本项目使用了
StatefulWidget和setState进行简单状态管理。在更复杂的应用中,可以考虑使用 Provider、GetX 或 Riverpod 等状态管理方案。 -
跨平台适配:Flutter 的自适应组件能够根据不同平台自动调整样式,确保应用在 OpenHarmony 设备上的原生体验。
-
列表性能优化 :使用
ListView.builder实现按需加载,配合itemExtent或缓存策略可以进一步提升长列表性能。
七、代码仓库
本项目的完整源代码已托管至 AtomGit 平台,便于开发者学习参考:
仓库地址:https://atomgit.com/maaath/house_rental_app
开发者可以通过以下命令克隆项目:
bash
git clone https://atomgit.com/maaath/house_rental_app.git八、结语
本文通过一个完整的房产租售应用案例,展示了 Flutter for OpenHarmony 的开发流程与核心技巧。可以看到,使用 Flutter 进行跨平台开发,不仅能够大幅提升开发效率,还能保证应用在不同平台上的一致性体验。
随着 OpenHarmony 生态的持续发展,Flutter for OpenHarmony 将成为越来越多开发者的选择。希望本文能够为读者提供有价值的参考,激发大家探索跨平台开发的热情。
如果您在开发过程中遇到任何问题,欢迎在社区中提问交流。让我们一起推动开源鸿蒙跨平台技术的发展!