一、前言
随着移动互联网的深入发展,地图导航功能已成为现代应用不可或缺的基础能力。无论是出行服务、本地生活还是企业级应用,集成地图导航都能大幅提升用户体验和应用价值。鸿蒙6.0推出的Map Kit提供了完整的地图服务解决方案,支持嵌入式地图渲染、调起Petal Maps导航、POI搜索等核心功能,更关键的是其设计充分考虑了模块化和可复用性,便于开发者将地图导航能力封装为独立组件,灵活集成到各类应用中。
本文将从开发环境配置、核心功能实现讲到最核心的模块化设计 ,手把手教你打造一个可插拔的地图导航组件,实现"一行代码集成"的极致开发体验。
二、开发环境准备
2.1 必要工具安装
- DevEco Studio 5.0+:支持HarmonyOS NEXT 6.0开发的官方IDE
- HarmonyOS SDK:确保包含Map Kit、Location Kit等必要组件
- Node.js 18+:部分构建依赖需要
2.2 AGC应用创建与地图服务开通
- 登录华为AppGallery Connect
- 创建应用,选择"手机"设备类型,勾选"HarmonyOS"
- 在"增长服务 > 地图服务"中开通Map Kit
- 创建API Key并记录(后续配置使用)
2.3 项目结构创建
推荐采用多模块架构设计:
MyMapNavigationKit/
├── entry/                    # 主应用(集成示例)
├── mapnavigation/           # 地图导航模块(HAR包)
│   └── src/main/
│       ├── ets/
│       │   ├── components/  # 可复用组件
│       │   ├── services/    # 服务封装
│       │   └── pages/       # 导航页面
│       └── module.json5
└── mapnavigationconsumer/   # 消费示例APP
三、权限声明与配置
3.1 权限清单
地图导航功能需要以下权限,在module.json5中声明:
json
{
  "module": {
    "requestPermissions": [
      {
        "name": "ohos.permission.LOCATION",
        "reason": "$string:location_reason",
        "usedScene": {
          "abilities": ["EntryAbility"],
          "when": "always"
        }
      },
      {
        "name": "ohos.permission.APPROXIMATELY_LOCATION",
        "reason": "$string:location_reason",
        "usedScene": {
          "abilities": ["EntryAbility"],
          "when": "always"
        }
      },
      {
        "name": "ohos.permission.INTERNET",
        "reason": "$string:network_reason",
        "usedScene": {
          "abilities": ["EntryAbility"],
          "when": "always"
        }
      }
    ]
  }
}
3.2 权限申请文案(en_US.json)
json
{
  "string": {
    "location_reason": "地图导航功能需要获取您的位置信息以提供精准定位和导航服务",
    "network_reason": "地图数据加载需要网络连接"
  }
}
四、嵌入式地图核心开发
4.1 地图初始化与渲染
MapComponent是鸿蒙6.0提供的原生地图渲染组件,支持在应用内直接展示地图:
typescript
// mapnavigation/src/main/ets/pages/MapView.ets
import { MapComponent, mapCommon, map } from '@kit.MapKit'
import { AsyncCallback } from '@kit.BasicServicesKit'

@Component
export struct MapView {
  // 地图控制器
  private mapController?: map.MapComponentController
  // 地图配置
  private mapOptions: mapCommon.MapOptions = {
    position: {
      target: { latitude: 39.9042, longitude: 116.4074 }, // 北京天安门
      zoom: 12
    },
    mapType: mapCommon.MapType.STANDARD
  }
  // 回调函数
  private mapCallback: AsyncCallback<map.MapComponentController> =
    (err: Error, controller: map.MapComponentController) => {
    if (!err && controller) {
      this.mapController = controller
      // 启用我的位置
      this.mapController.setMyLocationEnabled(true)
      // 设置地图监听
      this.setupMapListeners()
    }
  }

  // 地图事件监听
  private setupMapListeners(): void {
    if (this.mapController) {
      // 点击事件
      this.mapController.on('click', (event: mapCommon.MapClickEvent) => {
        console.info(`地图点击: 经度${event.longitude}, 纬度${event.latitude}`)
      })

      // 拖拽事件
      this.mapController.on('cameraIdle', (event: mapCommon.CameraIdleEvent) => {
        console.info(`相机位置变更: 缩放级别${event.zoom}`)
      })
    }
  }

  aboutToDisappear(): void {
    // 清理监听
    if (this.mapController) {
      this.mapController.off('click')
      this.mapController.off('cameraIdle')
    }
  }

  build() {
    Stack() {
      MapComponent({
        mapOptions: this.mapOptions,
        mapCallback: this.mapCallback
      })
      .width('100%')
      .height('100%')

      // 自定义覆盖层
      this.buildOverlayControls()
    }
  }

  @Builder
  buildOverlayControls() {
    Column() {
      // 缩放控制按钮
      Row() {
        Button('+')
          .onClick(() => this.mapController?.setZoom(1))
        Button('-')
          .onClick(() => this.mapController?.setZoom(-1))
      }
    }
    .alignItems(HorizontalAlign.End)
    .padding(16)
  }
}
4.2 地图类型切换(鸿蒙6.0.0+新特性)
鸿蒙6.0.0(20)版本新增了卫星图、混合地图、地形图等丰富地图类型:
typescript
// 地图类型枚举
enum MapDisplayType {
  STANDARD = 0,     // 标准地图
  SATELLITE = 1,    // 卫星地图
  HYBRID = 2,       // 混合地图
  TERRAIN = 3       // 地形图
}

// 切换地图类型方法
setMapDisplayType(type: MapDisplayType): void {
  if (this.mapController) {
    // 根据类型设置不同的mapType
    switch (type) {
      case MapDisplayType.SATELLITE:
        this.mapController.setMapType(mapCommon.MapType.SATELLITE)
        break
      case MapDisplayType.HYBRID:
        this.mapController.setMapType(mapCommon.MapType.HYBRID)
        break
      case MapDisplayType.TERRAIN:
        this.mapController.setMapType(mapCommon.MapType.TERRAIN)
        break
      default:
        this.mapController.setMapType(mapCommon.MapType.STANDARD)
    }
  }
}
4.3 标记点与路线绘制
typescript
// 添加标记点
addMarker(lat: number, lng: number, title: string): string {
  if (!this.mapController) return ''

  const markerOptions: mapCommon.MarkerOptions = {
    position: { latitude: lat, longitude: lng },
    title: title,
    clickable: true,
    anchorU: 0.5,
    anchorV: 1.0
  }

  return this.mapController.addMarker(markerOptions)
}

// 绘制导航路线
drawRoute(startLat: number, startLng: number, endLat: number, endLng: number): void {
  if (!this.mapController) return

  // 定义路线节点
  const routeNodes: mapCommon.LatLng[] = [
    { latitude: startLat, longitude: startLng },
    { latitude: endLat, longitude: endLng }
  ]

  // 绘制折线
  const polylineOptions: mapCommon.PolylineOptions = {
    points: routeNodes,
    strokeColor: Color.Blue,
    strokeWidth: 8,
    arrowColor: Color.White,
    arrowEnabled: true
  }

  this.mapController.addPolyline(polylineOptions)
}
五、导航功能实现
5.1 调起Petal Maps进行导航
使用petalMaps命名空间调起系统地图应用:
typescript
// mapnavigation/src/main/ets/services/NavigationService.ets
import { petalMaps } from '@kit.MapKit'
import { common } from '@kit.AbilityKit'
import { hilog } from '@kit.PerformanceAnalysisKit'

const TAG = 'NavigationService'
const DOMAIN = 0x0001

export class NavigationService {
  private context: common.UIAbilityContext

  constructor(context: common.UIAbilityContext) {
    this.context = context
  }

  /**
   * 发起导航
   * @param destLat 目的地纬度
   * @param destLng 目的地经度
   * @param destName 目的地名称
   */
  async startNavigation(destLat: number, destLng: number, destName: string): Promise<void> {
    try {
      const naviParams: petalMaps.NaviParams = {
        destinationPosition: {
          latitude: destLat,
          longitude: destLng,
          name: destName
        },
        navigationMode: petalMaps.NavigationMode.COLLECT
      }

      await petalMaps.openMapNavi(this.context, naviParams)
      hilog.info(DOMAIN, TAG, '导航发起成功')
    } catch (error) {
      hilog.error(DOMAIN, TAG, `导航发起失败: ${JSON.stringify(error)}`)
      throw error
    }
  }

  /**
   * 路线规划
   * @param destLat 目的地纬度
   * @param destLng 目的地经度
   */
  async planRoute(destLat: number, destLng: number): Promise<void> {
    try {
      const routeParams: petalMaps.RoutePlanParams = {
        destinationPosition: {
          latitude: destLat,
          longitude: destLng
        },
        // 途经点(可选)
        waypoints: [],
        // 偏好路线:0-推荐, 1-高速优先, 2-少收费, 3-避堵
        preference: 0
      }

      await petalMaps.openMapRoutePlan(this.context, routeParams)
      hilog.info(DOMAIN, TAG, '路线规划成功')
    } catch (error) {
      hilog.error(DOMAIN, TAG, `路线规划失败: ${JSON.stringify(error)}`)
      throw error
    }
  }

  /**
   * POI搜索
   * @param keyword 搜索关键词
   */
  async searchPOI(keyword: string): Promise<void> {
    try {
      const searchParams: petalMaps.TextSearchParams = {
        searchWord: keyword
      }

      await petalMaps.openMapTextSearch(this.context, searchParams)
      hilog.info(DOMAIN, TAG, 'POI搜索成功')
    } catch (error) {
      hilog.error(DOMAIN, TAG, `POI搜索失败: ${JSON.stringify(error)}`)
      throw error
    }
  }

  /**
   * 查看POI详情
   * @param poiId POI ID
   */
  async showPOIDetail(poiId: string): Promise<void> {
    try {
      await petalMaps.openMapPoiDetail(this.context, { poiId: poiId })
      hilog.info(DOMAIN, TAG, 'POI详情打开成功')
    } catch (error) {
      hilog.error(DOMAIN, TAG, `POI详情打开失败: ${JSON.stringify(error)}`)
      throw error
    }
  }
}
5.2 坐标系统注意事项
typescript
// 坐标转换工具
export class CoordinateConverter {
/**
* GCJ02转WGS84(中国大陆以外)
* 中国大陆使用GCJ02坐标系
*/
static gcj02ToWgs84(lat: number, lng: number): { latitude: number, longitude: number } {
// 简化转换,实际生产建议使用专业坐标转换库
const PI = 3.1415926535897932384626
const a = 6378245.0
const ee = 0.00669342162296594323
let dLat = this.transformLat(lng - 105.0, lat - 35.0)
let dLng = this.transformLng(lng - 105.0, lat - 35.0)
const radLat = lat / 180.0 * PI
let magic = Math.sin(radLat)
magic = 1 - ee * magic * magic
const sqrtMagic = Math.sqrt(magic)
dLat = (dLat * 180.0) / ((a * (1 - ee)) / (magic * sqrtMagic) * PI)
dLng = (dLng * 180.0) / (a / sqrtMagic * Math.cos(radLat) * PI)
return {
latitude: lat - dLat,
longitude: lng - dLng
}
}
private static transformLat(x: number, y: number): number {
const PI = 3.1415926535897932384626
let ret = -100.0 + 2.0 * x + 3.0 * y + 0.2 * y * y + 0.1 * x * y
ret += 0.2 * Math.sqrt(Math.abs(x))
ret += (20.0 * Math.sin(6.0 * x * PI) + 20.0 * Math.sin(2.0 * x * PI)) * 2.0 / 3.0
ret += (20.0 * Math.sin(y * PI) + 40.0 * Math.sin(y / 3.0 * PI)) * 2.0 / 3.0
ret += (160.0 * Math.sin(y / 12.0 * PI) + 320 * Math.sin(y * PI / 30.0)) * 2.0 / 3.0
return ret
}
private static transformLng(x: number, y: number): number {
const PI = 3.1415926535897932384626
let ret = 300.0 + x + 2.0 * y + 0.1 * x * x + 0.1 * x * y + 0.1 * Math.sqrt(Math.abs(x))
ret += (20.0 * Math.sin(6.0 * x * PI) + 20.0 * Math.sin(2.0 * x * PI)) * 2.0 / 3.0
ret += (20.0 * Math.sin(x * PI) + 40.0 * Math.sin(x / 3.0 * PI)) * 2.0 / 3.0
ret += (150.0 * Math.sin(x / 12.0 * PI) + 300.0 * Math.sin(x / 30.0 * PI)) * 2.0 / 3.0
return ret
}
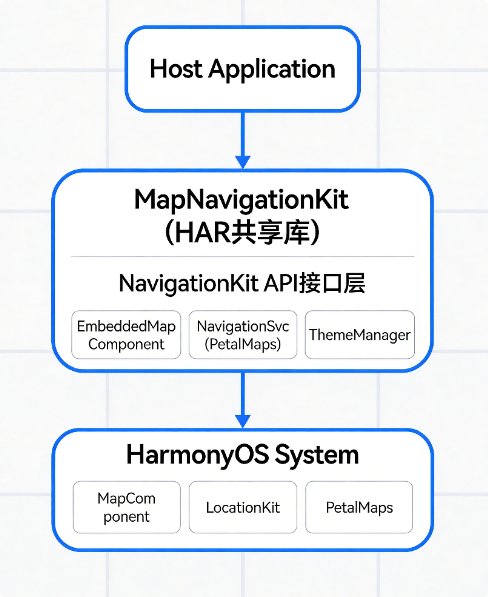
}六、模块化设计:打造可集成导航组件
这是本文的核心章节,我们将地图导航能力封装为独立的共享库(SharedLibrary/HAR),实现应用间的复用。
6.1 整体架构设计
6.2 NavigationKit接口设计
typescript
// mapnavigation/src/main/ets/NavigationKit.ets

/**
 * 导航套件 - 统一入口
 * 封装地图导航相关能力,提供简洁的API给宿主应用
 */

// ==================== 类型定义 ====================

/** 目的地信息 */
export interface Destination {
  latitude: number
  longitude: number
  name?: string
  address?: string
}

/** 导航配置 */
export interface NavigationConfig {
  /** 初始中心点 */
  center?: Destination
  /** 默认缩放级别 */
  zoom?: number
  /** 地图类型: standard | satellite | hybrid | terrain */
  mapType?: 'standard' | 'satellite' | 'hybrid' | 'terrain'
  /** 是否显示我的位置 */
  showMyLocation?: boolean
  /** 是否启用路线规划 */
  enableRoutePlan?: boolean
  /** 导航回调 */
  onNavigationStart?: (dest: Destination) => void
  onNavigationEnd?: (dest: Destination) => void
  onError?: (error: Error) => void
  onMapClick?: (lat: number, lng: number) => void
}

/** 主题配置 */
export interface NavigationTheme {
  primaryColor?: string
  secondaryColor?: string
  backgroundColor?: string
  textColor?: string
  markerColor?: string
}

/** 导航事件 */
export interface NavigationEvent {
  type: 'click' | 'longPress' | 'routeSelected' | 'navigationStart' | 'navigationEnd'
  data?: any
}

// ==================== 核心类 ====================

import { common } from '@kit.AbilityKit'
import { MapView } from './components/MapView'
import { NavigationService } from './services/NavigationService'

/**
 * 导航套件主类
 * 提供嵌入式地图和调起导航两种模式
 */
export class NavigationKit {
  private context: common.UIAbilityContext
  private config: NavigationConfig
  private navigationService: NavigationService
  private currentTheme: NavigationTheme

  constructor(context: common.UIAbilityContext, config?: NavigationConfig) {
    this.context = context
    this.config = {
      zoom: 12,
      mapType: 'standard',
      showMyLocation: true,
      enableRoutePlan: true,
      ...config
    }
    this.navigationService = new NavigationService(context)
    this.currentTheme = {}
  }

  /**
   * 发起导航(调起Petal Maps)
   * @param destination 目的地
   */
  async startNavigation(destination: Destination): Promise<void> {
    try {
      this.config.onNavigationStart?.(destination)
      await this.navigationService.startNavigation(
        destination.latitude,
        destination.longitude,
        destination.name || '目的地'
      )
    } catch (error) {
      this.config.onError?.(error as Error)
      throw error
    }
  }

  /**
   * 路线规划
   * @param destination 目的地
   */
  async planRoute(destination: Destination): Promise<void> {
    await this.navigationService.planRoute(
      destination.latitude,
      destination.longitude
    )
  }

  /**
   * 创建嵌入式地图组件(供UI调用)
   */
  createMapComponent(): MapView {
    return new MapView(this.config, this.navigationService)
  }

  /**
   * 设置主题
   * @param theme 主题配置
   */
  setTheme(theme: NavigationTheme): void {
    this.currentTheme = theme
    // 主题应用到全局样式
    // 实际实现可使用AppStorage或事件总线
  }

  /**
   * 注册事件监听
   * @param callback 事件回调
   */
  onEvent(callback: (event: NavigationEvent) => void): void {
    // 事件总线实现
    EventBus.getInstance().subscribe(callback)
  }

  /**
   * 销毁资源
   */
  destroy(): void {
    EventBus.getInstance().unsubscribe()
  }
}

// ==================== 事件总线(简化实现) ====================

class EventBusClass {
  private subscribers: Array<(event: NavigationEvent) => void> = []

  subscribe(callback: (event: NavigationEvent) => void): void {
    this.subscribers.push(callback)
  }

  unsubscribe(callback?: (event: NavigationEvent) => void): void {
    if (callback) {
      this.subscribers = this.subscribers.filter(cb => cb !== callback)
    } else {
      this.subscribers = []
    }
  }

  publish(event: NavigationEvent): void {
    this.subscribers.forEach(cb => cb(event))
  }

  static getInstance(): EventBusClass {
    if (!EventBusClass.instance) {
      EventBusClass.instance = new EventBusClass()
    }
    return EventBusClass.instance
  }

  private static instance: EventBusClass
}

// 导出单例
const EventBus = EventBusClass

// ==================== 工厂函数 ====================

/**
 * 创建导航套件实例
 * 宿主应用使用此函数快速初始化
 */
export function createNavigationKit(
  context: common.UIAbilityContext,
  config?: NavigationConfig
): NavigationKit {
  return new NavigationKit(context, config)
}
6.3 宿主APP集成示例
方式一:调起Petal Maps导航(推荐,最简集成)
typescript
// hostapp/src/main/ets/pages/Index.ets
import { createNavigationKit, Destination } from '../library/mapnavigation'

@Entry
@Component
struct Index {
  private navKit = createNavigationKit(getContext(this) as common.UIAbilityContext, {
    onNavigationStart: (dest) => {
      console.info(`开始导航到: ${dest.name}`)
    },
    onNavigationEnd: (dest) => {
      console.info(`导航结束: ${dest.name}`)
    },
    onError: (error) => {
      console.error(`导航错误: ${error.message}`)
    }
  })

  async aboutToAppear(): void {
    // 模拟:从服务器获取目的地
    const destination: Destination = {
      latitude: 31.230416,
      longitude: 121.473701,
      name: '上海外滩',
      address: '上海市黄浦区中山东一路'
    }

    // 一行代码发起导航!
    await this.navKit.startNavigation(destination)
  }

  build() {
    Column() {
      Text('地图导航示例')
        .fontSize(24)
        .fontWeight(FontWeight.Bold)

      Button('导航到上海外滩')
        .onClick(async () => {
          await this.navKit.startNavigation({
            latitude: 31.230416,
            longitude: 121.473701,
            name: '上海外滩'
          })
        })
    }
    .width('100%')
    .height('100%')
    .justifyContent(FlexAlign.Center)
  }
}
方式二:嵌入式地图集成
typescript
// hostapp/src/main/ets/pages/MapIntegration.ets
import { createNavigationKit, NavigationConfig } from '../library/mapnavigation'
import { MapView } from '../library/mapnavigation/components/MapView'

@Entry
@Component
struct MapIntegration {
  private navKit: any
  private mapView: MapView | null = null

  aboutToAppear(): void {
    const config: NavigationConfig = {
      center: { latitude: 39.9042, longitude: 116.4074 },
      zoom: 12,
      mapType: 'standard',
      showMyLocation: true,
      onMapClick: (lat, lng) => {
        console.info(`点击地图位置: ${lat}, ${lng}`)
        // 在点击位置添加标记
        this.mapView?.addMarker(lat, lng, '新标记')
      }
    }

    this.navKit = createNavigationKit(getContext(this) as common.UIAbilityContext, config)
    this.mapView = this.navKit.createMapComponent()
  }

  build() {
    Stack() {
      // 嵌入式地图
      if (this.mapView) {
        this.mapView
      }

      // 顶部工具栏
      Column() {
        Row() {
          Button('标准地图')
            .onClick(() => this.mapView?.setMapDisplayType(0))

          Button('卫星图')
            .onClick(() => this.mapView?.setMapDisplayType(1))

          Button('混合地图')
            .onClick(() => this.mapView?.setMapDisplayType(2))
        }
        .padding(10)
        .backgroundColor('#80000000')
        .borderRadius(8)
      }
      .width('100%')
      .padding(16)
      .alignItems(HorizontalAlign.Start)

      // 底部导航栏
      Column() {
        Row() {
          Button('发起导航')
            .onClick(async () => {
              await this.navKit.startNavigation({
                latitude: 31.230416,
                longitude: 121.473701,
                name: '上海外滩'
              })
            })

          Button('路线规划')
            .onClick(async () => {
              await this.navKit.planRoute({
                latitude: 31.230416,
                longitude: 121.473701
              })
            })
        }
        .width('100%')
        .justifyContent(FlexAlign.SpaceEvenly)
      }
      .width('100%')
      .padding(16)
      .backgroundColor(Color.White)
    }
  }

  aboutToDisappear(): void {
    this.navKit?.destroy()
  }
}
6.4 高级配置:自定义主题与回调
typescript
// 完整配置示例
const advancedConfig: NavigationConfig = {
  // 地图初始配置
  center: {
    latitude: 39.9042,
    longitude: 116.4074,
    name: '北京市'
  },
  zoom: 14,
  mapType: 'standard',
  showMyLocation: true,
  enableRoutePlan: true,

  // 事件回调
  onNavigationStart: (dest) => {
    // 统计上报
    console.info(`[埋点] 开始导航 to ${dest.name}`)
    // 跳转页面
    // 显示loading
  },

  onNavigationEnd: (dest) => {
    console.info(`[埋点] 导航完成 from ${dest.name}`)
    // 评价弹窗
    // 结束计时
  },

  onError: (error) => {
    console.error(`[异常] ${error.code}: ${error.message}`)
    // 错误上报
    // 用户提示
    promptAction.showToast({ message: '导航启动失败,请重试' })
  },

  onMapClick: (lat, lng) => {
    // 反向地理编码获取地址
    // 更新UI显示地址
  }
}

// 主题配置
const darkTheme: NavigationTheme = {
  primaryColor: '#1F89FF',
  secondaryColor: '#409CFF',
  backgroundColor: '#1A1A1A',
  textColor: '#FFFFFF',
  markerColor: '#FF6B6B'
}

// 应用主题
navKit.setTheme(darkTheme)
七、完整项目结构与配置
7.1 mapnavigation模块的oh-package.json5
json
{
  "name": "mapnavigation",
  "version": "1.0.0",
  "description": "鸿蒙地图导航可集成组件",
  "main": "",
  "type": "module",
  "dependencies": {
    "@kit.MapKit": "5.0.0+",
    "@kit.BasicServicesKit": "5.0.0+",
    "@kit.AbilityKit": "5.0.0+",
    "@kit.PerformanceAnalysisKit": "5.0.0+"
  },
  "buildOption": {
    " Harcourt ": "shared"
  }
}
7.2 宿主APP的oh-package.json5依赖配置
json
{
  "dependencies": {
    "mapnavigation": "file:../mapnavigation"
  }
}
7.3 模块导出配置(index.ets)
typescript
// mapnavigation/src/main/ets/index.ets

// 导出所有公共API
export { NavigationKit, createNavigationKit } from './NavigationKit'
export type {
  Destination,
  NavigationConfig,
  NavigationTheme,
  NavigationEvent
} from './NavigationKit'

// 导出组件(高级用户可直接使用)
export { MapView } from './components/MapView'

// 导出服务(高级用户可直接使用)
export { NavigationService } from './services/NavigationService'
八、常见问题与解决方案
8.1 真机调试地图不显示
问题表现:模拟器或真机运行时地图区域为空白
排查步骤:
- 确认AGC已开通Map Kit服务并获取API Key
- 检查
module.json5中metadata配置是否正确 - 确保已正确签名(地图服务需要华为主题签名)
- 检查设备是否为HarmonyOS 6.0+真机
解决方案:
json
// module.json5中添加API Key配置
{
  "app": {
    "bundleName": "com.example.mapdemo",
    "metadata": [
      {
        "name": "client_id",
        "value": "your_api_key_here"
      }
    ]
  }
}
8.2 模拟器无法测试地图
原因:Map Kit需要真实的地图数据服务,模拟器不提供此服务
解决方案:
- 使用真机进行地图功能测试
- 在
build()中添加模拟器检测逻辑
typescript
if (!canUseMapOnSimulator()) {
  Column() {
    Text('地图功能需要在真机上测试')
    Text('请连接HarmonyOS 6.0+设备')
  }
} else {
  MapComponent({ ... })
}
8.3 坐标偏移问题
问题:标记点位置与实际位置有偏移
原因:不同地图服务商使用不同坐标系
解决方案:统一使用GCJ02坐标系(鸿蒙Map Kit国内默认)
typescript
// GPS坐标转GCJ02
function wgs84ToGcj02(lat: number, lng: number): { latitude: number, longitude: number } {
  // 已在CoordinateConverter中实现
}
8.4 权限申请被拒绝
问题:用户拒绝定位权限后地图无法使用
解决方案:
typescript
import { bundleManager, permissionFlags } from '@kit.AbilityKit'

async function checkAndRequestLocation(): Promise<boolean> {
  // 检查权限
  let state = await permissionManager.checkGrantPermissionForResult(
    getContext(this),
    'ohos.permission.LOCATION',
    permissionFlags.PERMISSION_USER_STRICTLY_REQUIRED
  )

  if (state === permissionManager.GrantStatus.PERMISSION_GRANT) {
    return true
  }

  // 申请权限
  return await permissionManager.requestPermissionOnUser(
    getContext(this),
    ['ohos.permission.LOCATION']
  )
}
九、总结
本文详细介绍了鸿蒙6.0地图导航应用开发方案,重点阐述了如何将地图导航能力封装为可复用的模块组件。核心要点包括:
- 完整的技术实现:从环境配置、权限申请到地图渲染、导航调起,覆盖开发全流程
- 模块化架构设计:通过NavigationKit统一入口,实现地图能力的即插即用
- 一行代码集成:宿主应用只需几行配置即可拥有完整导航功能
- 丰富的配置选项:支持地图类型切换、主题定制、事件回调等高级功能
- 完善的错误处理:提供常见问题的解决方案
通过本文的设计,地图导航模块可以作为独立的HAR包发布,其他应用只需添加依赖即可复用。这种设计模式符合鸿蒙生态的模块化理念,能够大幅提升开发效率,避免重复造轮子。