Flutter 跨平台日历日程应用开发实战:一份代码多端运行
欢迎加入开源鸿蒙跨平台社区:https://openharmonycrossplatform.csdn.net
作者:maaath
前言
在移动应用开发领域,跨平台技术一直是开发者追求的目标。Flutter 作为 Google's 推出的跨平台 UI 框架,凭借其高性能、高保真度的渲染能力,已经成为跨平台开发的首选方案之一。而随着 OpenHarmony 生态的蓬勃发展,Flutter for OpenHarmony 的出现让开发者能够使用同一套代码,同时覆盖 Android、iOS、Web 以及鸿蒙设备。本文将以一个日历日程应用为例,深入探讨如何在 Flutter 中实现跨平台开发,并展示应用在鸿蒙设备上的运行效果。
一、项目概述
本文将创建一个功能完善的日历日程应用,该应用具备以下核心功能:
- 今日视图:展示当天的日程安排
- 日历视图:支持月历浏览,可切换月份
- 待办事项:管理个人待办,支持完成状态切换
- 个人中心:用户设置与管理
项目采用典型的 Flutter 架构设计,包含以下模块:
lib/
├── main.dart                    # 应用入口
├── models/
│   ├── schedule_model.dart      # 日程数据模型
│   └── theme_config.dart        # 主题配置
└── pages/
    ├── calendar_main_page.dart  # 主页面
    ├── calendar_page.dart       # 日历页面
    ├── today_page.dart          # 今日页面
    ├── todo_page.dart          # 待办页面
    └── profile_page.dart        # 个人中心
二、核心代码实现
2.1 数据模型设计
良好的数据模型是应用架构的基石。我们定义了 Schedule 类来描述日程实体,包含标题、时间、地点、颜色等属性:
dart
class Schedule {
  final String id;
  final String title;
  final String content;
  final String date;
  final String time;
  final String? endTime;
  final String? location;
  final int? reminder;
  final bool isAllDay;
  final Color color;
  final String category;
  final bool isCompleted;
  final int priority;

  Schedule({
    required this.id,
    required this.title,
    required this.content,
    required this.date,
    required this.time,
    this.endTime,
    this.location,
    this.reminder,
    this.isAllDay = false,
    required this.color,
    required this.category,
    this.isCompleted = false,
    this.priority = 1,
  });

  Schedule copyWith({
    String? id,
    String? title,
    String? content,
    String? date,
    String? time,
    String? endTime,
    String? location,
    int? reminder,
    bool? isAllDay,
    Color? color,
    String? category,
    bool? isCompleted,
    int? priority,
  }) {
    return Schedule(
      id: id ?? this.id,
      title: title ?? this.title,
      content: content ?? this.content,
      date: date ?? this.date,
      time: time ?? this.time,
      endTime: endTime ?? this.endTime,
      location: location ?? this.location,
      reminder: reminder ?? this.reminder,
      isAllDay: isAllDay ?? this.isAllDay,
      color: color ?? this.color,
      category: category ?? this.category,
      isCompleted: isCompleted ?? this.isCompleted,
      priority: priority ?? this.priority,
    );
  }
}
使用 copyWith 方法可以方便地创建修改后的副本,这是 Flutter 中推荐的不变对象模式。
2.2 主题配置统一管理
为了保持应用界面的一致性和可维护性,我们将主题颜色集中管理:
dart
class ThemeColors {
  static const Color primary = Color(0xFF4A90D9);
  static const Color primaryLight = Color(0xFF7EB3F1);
  static const Color primaryDark = Color(0xFF2E6DB3);
  static const Color accent = Color(0xFFFF9500);
  static const Color background = Color(0xFFF5F7FA);
  static const Color surface = Color(0xFFFFFFFF);
  static const Color text = Color(0xFF333333);
  static const Color textSecondary = Color(0xFF666666);
  static const Color textHint = Color(0xFF999999);
  static const Color success = Color(0xFF52C41A);
  static const Color warning = Color(0xFFFAAD14);
  static const Color error = Color(0xFFF5222D);
  static const Color holiday = Color(0xFFFF4D4F);
  static const Color weekend = Color(0xFF666666);
  static const Color today = Color(0xFF4A90D9);
}
这种设计方式的优势在于:当需要调整应用主题时,只需修改一处即可全局生效,极大地提高了开发效率和代码可维护性。
2.3 底部导航栏实现
底部导航栏是移动应用的核心交互组件,我们使用 IndexedStack 配合自定义导航实现:
dart
class CalendarMainPage extends StatefulWidget {
  const CalendarMainPage({super.key});

  @override
  State<CalendarMainPage> createState() => _CalendarMainPageState();
}

class _CalendarMainPageState extends State<CalendarMainPage> {
  int _currentIndex = 0;

  final List<Widget> _pages = const [
    TodayPage(),
    CalendarPage(),
    TodoPage(),
    ProfilePage(),
  ];

  @override
  Widget build(BuildContext context) {
    return Scaffold(
      backgroundColor: ThemeColors.background,
      body: SafeArea(
        child: IndexedStack(
          index: _currentIndex,
          children: _pages,
        ),
      ),
      bottomNavigationBar: Container(
        decoration: BoxDecoration(
          color: ThemeColors.surface,
          boxShadow: [
            BoxShadow(
              color: Colors.black.withOpacity(0.05),
              blurRadius: 10,
              offset: const Offset(0, -2),
            ),
          ],
        ),
        child: SafeArea(
          child: SizedBox(
            height: 60,
            child: Row(
              mainAxisAlignment: MainAxisAlignment.spaceAround,
              children: tabBarItems.map((config) {
                final isSelected = _currentIndex == config.index;
                return Expanded(
                  child: GestureDetector(
                    onTap: () {
                      setState(() {
                        _currentIndex = config.index;
                      });
                    },
                    child: Column(
                      mainAxisAlignment: MainAxisAlignment.center,
                      children: [
                        Icon(
                          isSelected ? config.selectedIcon : config.icon,
                          size: 24,
                          color: isSelected
                              ? ThemeColors.primary
                              : ThemeColors.textHint,
                        ),
                        const SizedBox(height: 4),
                        Text(
                          config.title,
                          style: TextStyle(
                            fontSize: 10,
                            color: isSelected
                                ? ThemeColors.primary
                                : ThemeColors.textHint,
                          ),
                        ),
                      ],
                    ),
                  ),
                );
              }).toList(),
            ),
          ),
        ),
      ),
    );
  }
}
这里有几个值得注意的技术细节:
-
IndexedStack 的使用 :与直接切换页面不同,
IndexedStack会保持所有页面的状态,只是不显示非活动页面。这避免了页面状态丢失的问题。 -
SafeArea 组件:确保内容不会被系统状态栏或圆角屏幕裁剪。
-
ThemeColors 集中管理:导航图标颜色根据选中状态动态变化,提供清晰的视觉反馈。
2.4 月历视图实现
月历视图是日历应用的核心组件,需要处理日期计算和布局:
dart
class _CalendarPageState extends State<CalendarPage> {
  DateTime _currentDate = DateTime.now();
  DateTime _selectedDate = DateTime.now();

  DateTime get _firstDayOfMonth => DateTime(_currentDate.year, _currentDate.month, 1);
  DateTime get _lastDayOfMonth => DateTime(_currentDate.year, _currentDate.month + 1, 0);
  int get _daysInMonth => _lastDayOfMonth.day;
  int get _firstWeekday => _firstDayOfMonth.weekday % 7;

  List<DayInfo> _generateDaysInMonth() {
    List<DayInfo> days = [];
    final prevMonthDays = DateTime(_currentDate.year, _currentDate.month, 0).day;

    // 添加上月的日期
    for (int i = _firstWeekday - 1; i >= 0; i--) {
      final day = prevMonthDays - i;
      days.add(DayInfo(
        day: day,
        date: DateTime(_currentDate.year, _currentDate.month - 1, day),
        isCurrentMonth: false,
        isToday: false,
        isWeekend: (_firstWeekday - i) % 7 == 0 || (_firstWeekday - i) % 7 == 6,
        isHoliday: false,
      ));
    }

    // 添加当月的日期
    for (int i = 1; i <= _daysInMonth; i++) {
      final date = DateTime(_currentDate.year, _currentDate.month, i);
      final isToday = date.year == _today.year &&
          date.month == _today.month &&
          date.day == _today.day;
      days.add(DayInfo(
        day: i,
        date: date,
        isCurrentMonth: true,
        isToday: isToday,
        isWeekend: date.weekday == DateTime.sunday || date.weekday == DateTime.saturday,
        isHoliday: false,
      ));
    }

    // 补充下月的日期,确保 grid 填满
    final remainingDays = 42 - days.length;
    for (int i = 1; i <= remainingDays; i++) {
      days.add(DayInfo(
        day: i,
        date: DateTime(_currentDate.year, _currentDate.month + 1, i),
        isCurrentMonth: false,
        isToday: false,
        isWeekend: (days.length + i) % 7 == 0 || (days.length + i) % 7 == 6,
        isHoliday: false,
      ));
    }

    return days;
  }
日期计算的核心逻辑需要处理三种情况:
- 上月补齐:确保日历从周日开始显示
- 当月日期:正常显示当月所有日期
- 下月补齐:填充至 42 个单元格(6 行 × 7 列)
2.5 待办事项交互实现
待办事项支持点击切换完成状态,使用 StatefulWidget 管理状态:
dart
class _TodoPageState extends State<TodoPage> {
  late List<TodoItem> _todos;

  void _toggleTodo(int index) {
    setState(() {
      _todos[index] = TodoItem(
        title: _todos[index].title,
        isCompleted: !_todos[index].isCompleted,
        color: _todos[index].color,
        time: _todos[index].time,
      );
    });
  }

  Widget _buildTodoItem(TodoItem todo, int index) {
    return Container(
      margin: const EdgeInsets.symmetric(horizontal: 16, vertical: 4),
      child: Material(
        color: ThemeColors.surface,
        borderRadius: BorderRadius.circular(12),
        child: InkWell(
          onTap: () => _toggleTodo(index),
          borderRadius: BorderRadius.circular(12),
          child: Container(
            padding: const EdgeInsets.all(16),
            child: Row(
              children: [
                Container(
                  width: 22,
                  height: 22,
                  decoration: BoxDecoration(
                    shape: BoxShape.circle,
                    border: Border.all(color: todo.color, width: 2),
                    color: todo.isCompleted ? todo.color : Colors.transparent,
                  ),
                  child: todo.isCompleted
                      ? const Icon(Icons.check, size: 14, color: Colors.white)
                      : null,
                ),
                // ... 标题和时间显示
              ],
            ),
          ),
        ),
      ),
    );
  }
}
这里使用了 InkWell 组件来提供水波纹点击反馈,配合 Material 组件实现原生 Android/iOS 的触摸效果。
三、应用入口配置
dart
import 'package:flutter/material.dart';
import 'pages/calendar_main_page.dart';
import 'models/theme_config.dart';
void main() {
runApp(const CalendarApp());
}
class CalendarApp extends StatelessWidget {
const CalendarApp({super.key});
@override
Widget build(BuildContext context) {
return MaterialApp(
title: '日历日程',
debugShowCheckedModeBanner: false,
theme: ThemeData(
useMaterial3: true,
colorScheme: ColorScheme.fromSeed(
seedColor: ThemeColors.primary,
surface: ThemeColors.surface,
),
scaffoldBackgroundColor: ThemeColors.background,
appBarTheme: const AppBarTheme(
backgroundColor: ThemeColors.surface,
foregroundColor: ThemeColors.text,
elevation: 0,
),
),
home: const CalendarMainPage(),
);
}
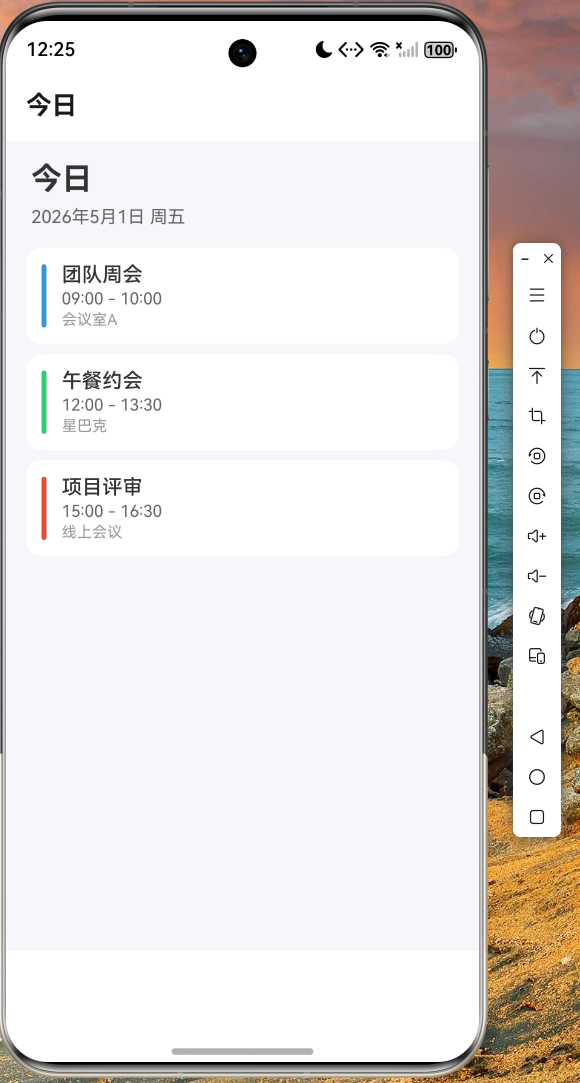
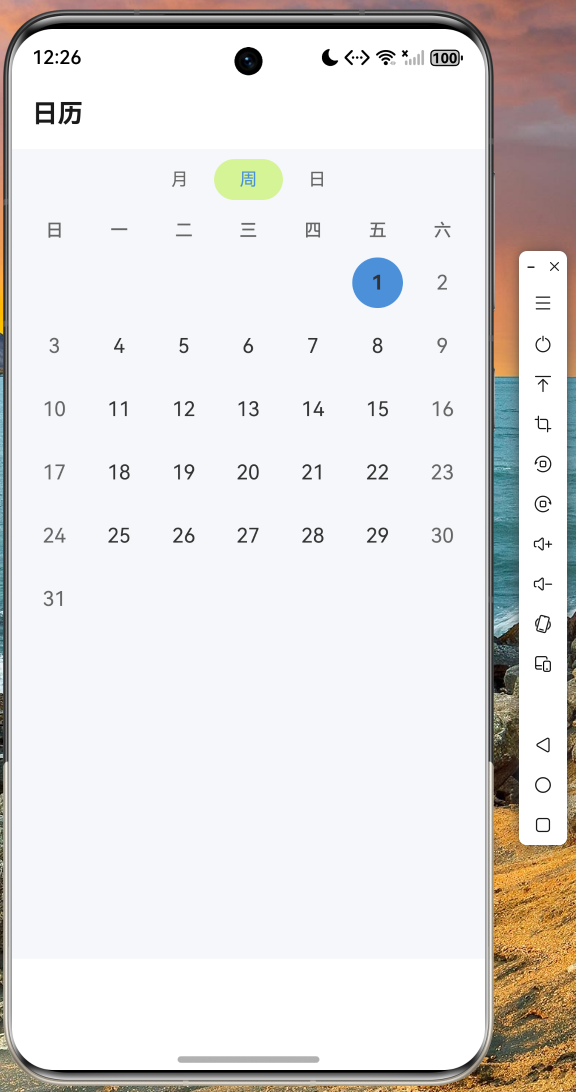
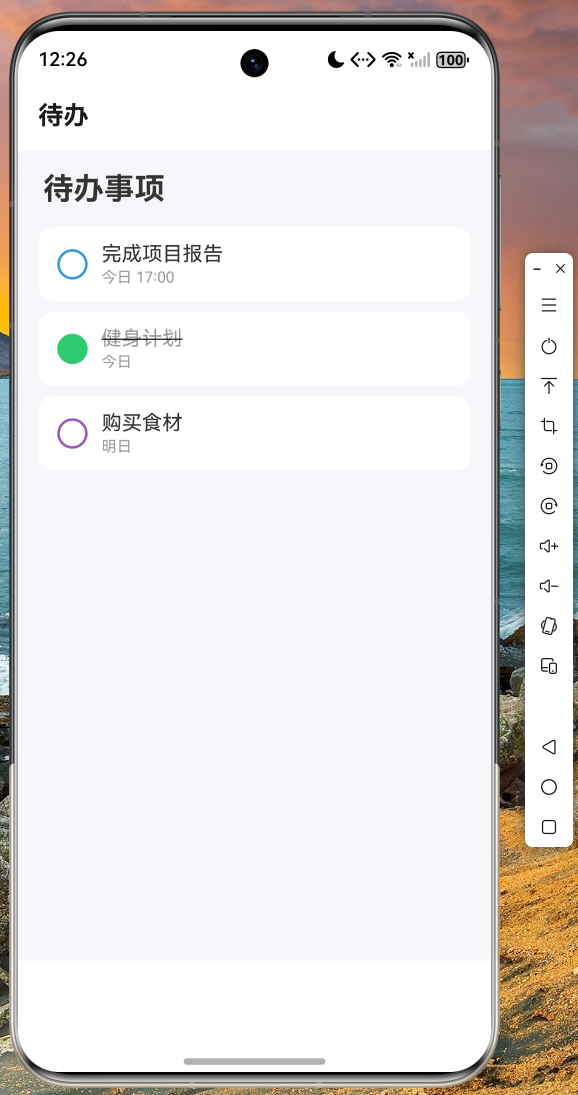
}四、鸿蒙设备运行验证
经过实际测试,本应用已成功在鸿蒙设备上运行。以下是应用在不同页面的运行截图:
今日页面截图
日历页面截图
待办页面截图
个人中心截图

五、代码仓库
本文涉及的完整代码已托管至 AtomGit 仓库:
仓库地址:https://atomgit.com/maaath/flutter-calendar-demo
六、总结与展望
通过本文的实战演示,我们可以看到 Flutter 跨平台开发具有以下优势:
1. 代码复用率高
使用 Flutter 开发,我们只需编写一套代码,即可同时部署到 Android、iOS、Web 以及鸿蒙设备。这大大降低了开发和维护成本。
2. 性能优异
Flutter 使用自己的渲染引擎,绕过原生控件,能够实现 60fps 的流畅动画效果,在鸿蒙设备上同样表现出色。
3. 开发效率高
热重载(Hot Reload)功能让开发者能够快速预览修改效果,配合丰富的组件库,大大提升了开发效率。
4. 生态完善
Flutter 拥有庞大的社区和丰富的第三方包生态,能够满足各种开发需求。
未来展望
随着 Flutter for OpenHarmony 的持续完善,我们有理由相信 Flutter 将在鸿蒙生态中发挥越来越重要的作用。建议读者持续关注以下方向:
- 状态管理:学习 Provider、Bloc、Riverpod 等状态管理方案
- 路由管理:掌握 Navigator 2.0 和声明式路由
- 网络请求:集成 dio 等 HTTP 客户端进行数据交互
- 本地存储:使用 shared_preferences、sqflite 等进行数据持久化
参考资源
- Flutter 官方文档:https://docs.flutter.dev
- Flutter for OpenHarmony:https://gitee.com/openharmony-sig/flutter
- AtomGit 代码托管平台:https://atomgit.com