Flutter for OpenHarmony 乐器学习应用开发实战
引言
欢迎加入开源鸿蒙跨平台社区:https://openharmonycrossplatform.csdn.net
作者:maaath
在移动应用开发领域,跨平台技术一直是开发者关注的焦点。Flutter 作为近年来备受瞩目的跨平台框架,凭借其高性能和一致性表现,正在 OpenHarmony 生态中发挥越来越重要的作用。本文将通过一个实际的乐器学习应用案例,展示如何使用 Flutter for OpenHarmony 开发面向鸿蒙设备的原生应用,并分享开发过程中的一些实践经验。
一、项目背景与需求分析
开发一款乐器学习应用面临着独特的挑战:应用需要处理乐谱展示、节拍器计时、演奏评分等复杂功能,同时还要在不同的乐器类型(钢琴、吉他、小提琴等)之间保持一致的用户体验。传统的原生开发方式需要分别为 iOS、Android 和 OpenHarmony 编写多套代码,维护成本高且难以保证功能一致性。
本文介绍的项目是一个完整的乐器学习应用,主要功能包括:
- 课程浏览与搜索
- 乐谱库管理
- 节拍器功能
- 演奏评分系统
- 用户进度跟踪
通过 Flutter for OpenHarmony,我们实现了"一次开发,多端运行"的目标,显著提升了开发效率。
二、技术架构设计
2.1 项目结构
项目采用 MVVM(Model-View-ViewModel)架构模式,这种分层设计能够有效分离业务逻辑和 UI 展示,便于测试和维护:
lib/
├── main.dart                 # 应用入口
├── model/
│   └── DataModels.dart       # 数据模型定义
├── viewmodel/
│   └── StationeryViewModel.dart  # 视图模型层
├── view/
│   └── pages/
│       └── PerformancePage.ets  # 演奏页面
├── service/
│   └── NetworkService.dart   # 网络服务层
└── entry/
    └── entry_l AbilitySlice.dart  # Ability入口
2.2 数据模型设计
数据模型是应用的基础,我们定义了课程、乐谱、用户进度等核心数据结构:
dart
// 数据模型 - DataModels.dart
enum InstrumentType {
  PIANO,    // 钢琴
  GUITAR,   // 吉他
  VIOLIN,   // 小提琴
  DRUM,     // 架子鼓
  FLUTE     // 长笛
}

enum DifficultyLevel {
  BEGINNER,     // 入门
  INTERMEDIATE, // 进阶
  ADVANCED      // 高级
}

class Course {
  String id;
  String title;
  String description;
  String instructor;
  InstrumentType instrumentType;
  DifficultyLevel difficulty;
  int duration;           // 时长(分钟)
  int lessonsCount;       // 课时数
  int studentsCount;      // 学习人数
  double rating;          // 评分
  String thumbnailColor; // 封面颜色
  bool isFavorite;        // 是否收藏
  bool isStarted;         // 是否已开始
  int progress;           // 学习进度(0-100)
}

class MetronomeState {
  int bpm;                // 每分钟节拍数
  int beatsPerMeasure;   // 每小节节拍数
  int currentBeat;        // 当前节拍
  bool isPlaying;         // 是否正在播放
}

class PerformanceScore {
  double accuracy;     // 准确度
  double timing;       // 节奏感
  double expression;  // 表现力
  int totalScore;     // 总分
  String grade;       // 等级(S/A/B/C/D)
  String feedback;    // 反馈信息
}
这段代码展示了如何在 Flutter 中使用 Dart 的枚举和类来定义应用的数据模型。值得注意的是,OpenHarmony 上的 Flutter 运行时对某些 Dart 语法有特定要求,我们在开发时需要遵循这些约束。
2.3 视图模型实现
视图模型承担着连接数据层和视图层的重任。以演奏相关的视图模型为例:
dart
// 演奏视图模型 - PerformanceViewModel.dart
class PerformanceViewModel {
  private MetronomeState metronomeState;
  private int timerId = -1;

  PerformanceViewModel() {
    this.metronomeState = UserApi.getDefaultMetronomeState();
  }

  void startMetronome() {
    if (this.metronomeState.isPlaying) {
      return;
    }
    this.metronomeState.isPlaying = true;
    final interval = 60000 / this.metronomeState.bpm;
    this.timerId = setInterval(() {
      this.metronomeState.currentBeat =
        (this.metronomeState.currentBeat % this.metronomeState.beatsPerMeasure) + 1;
    }, interval);
  }

  void stopMetronome() {
    if (this.timerId != -1) {
      clearInterval(this.timerId);
      this.timerId = -1;
    }
    this.metronomeState.isPlaying = false;
    this.metronomeState.currentBeat = 0;
  }

  void setBpm(int bpm) {
    this.metronomeState.bpm = Math.max(40, Math.min(240, bpm));
    if (this.metronomeState.isPlaying) {
      this.stopMetronome();
      this.startMetronome();
    }
  }

  MetronomeState getMetronomeState() {
    return this.metronomeState;
  }

  Future<PerformanceScore> submitPerformance(
    String courseId,
    double accuracy,
    double timing,
    double expression
  ) async {
    // 模拟评分计算
    await Future.delayed(Duration(milliseconds: 1000));

    final totalScore = Math.round(accuracy * 0.4 + timing * 0.35 + expression * 0.25);
    String grade;
    String feedback;

    if (totalScore >= 95) {
      grade = 'S';
      feedback = '完美!你的演奏非常出色!';
    } else if (totalScore >= 85) {
      grade = 'A';
      feedback = '优秀!继续保持!';
    } else if (totalScore >= 75) {
      grade = 'B';
      feedback = '良好,还有进步空间。';
    } else if (totalScore >= 60) {
      grade = 'C';
      feedback = '及格,继续努力练习。';
    } else {
      grade = 'D';
      feedback = '需要更多练习,注意节奏和音准。';
    }

    return PerformanceScore(
      accuracy: accuracy,
      timing: timing,
      expression: expression,
      totalScore: totalScore,
      grade: grade,
      feedback: feedback
    );
  }
}
这里需要特别说明的是,在 OpenHarmony 上使用 Flutter 时,异步操作的 Promise 类型需要显式声明泛型参数,否则会导致编译错误。这是 ArkTS 编译器的特殊要求,与标准 Dart 有一定差异。
2.4 页面实现
演奏页面是应用的核心页面之一,包含了节拍器和评分功能:
dart
// 演奏页面 - PerformancePage.dart
@Component
export class PerformancePage extends StatelessWidget {
  @State currentTab: number = 0;
  @State metronomeState: MetronomeState = {
    bpm: 120,
    beatsPerMeasure: 4,
    currentBeat: 0,
    isPlaying: false
  };
  @State isPlaying: boolean = false;
  @State showScore: boolean = false;
  @State performanceScore: PerformanceScore | null = null;
  @State accuracy: number = 0;
  @State timing: number = 0;
  @State expression: number = 0;

  private viewModel: PerformanceViewModel = new PerformanceViewModel();

  createBeatArray(length: number): number[] {
    final result: number[] = [];
    for (let i: number = 0; i < length; i++) {
      result.push(i);
    }
    return result;
  }

  toggleMetronome() {
    if (this.isPlaying) {
      this.viewModel.stopMetronome();
      this.metronomeState.isPlaying = false;
      this.metronomeState.currentBeat = 0;
    } else {
      this.viewModel.startMetronome();
      this.metronomeState.isPlaying = true;
    }
    this.isPlaying = !this.isPlaying;
  }

  Widget build(BuildContext context) {
    return Stack([
      Column([
        // 顶部标题栏
        Row([
          Text('🎵'),
          Text('演奏'),
        ]),

        // 节拍器和评分切换标签
        Row([
          Column([
            Text('节拍器'),
            if (this.currentTab == 0) Divider()
          ]).onClick(() => this.currentTab = 0),

          Column([
            Text('演奏练习'),
            if (this.currentTab == 1) Divider()
          ]).onClick(() => this.currentTab = 1),
        ]),

        // 内容区域
        if (this.currentTab == 0)
          this.MetronomePanel()
        else
          this.EvaluationPanel(),
      ]),

      // 评分弹窗
      if (this.showScore) this.ScorePanel(),
    ]);
  }

  @Builder
  MetronomePanel() {
    Column([
      Text('TAP - ${this.metronomeState.bpm} BPM'),

      // 节拍指示器
      Row([
        ForEach(this.createBeatArray(this.metronomeState.beatsPerMeasure),
          (index: number) => this.BeatIndicator(index + 1))
      ]),

      // BPM 滑块
      Row([
        Text('-').onClick(() => this.setBpm(this.metronomeState.bpm - 5)),
        Slider(
          value: this.metronomeState.bpm,
          min: 40,
          max: 240,
          onChanged: (value) => this.setBpm(Math.round(value))
        ),
        Text('+').onClick(() => this.setBpm(this.metronomeState.bpm + 5)),
      ]),

      // 节拍选择按钮
      Row([2, 3, 4, 6].map((beats) =>
        Text(beats.toString()).onClick(() => this.setBeats(beats))
      )),

      Button(this.isPlaying ? '⏹ 停止' : '▶ 开始')
        .onClick(() => this.toggleMetronome()),
    ]);
  }

  @Builder
  BeatIndicator(index: number) {
    Column([
      Circle()
        .width(this.metronomeState.currentBeat == index ? 48 : 36)
        .fill(this.metronomeState.currentBeat == index ?
          (index == 1 ? '#F44336' : '#4CAF50') : '#E0E0E0'),
      Text(index.toString()),
    ]);
  }

  @Builder
  EvaluationPanel() {
    Column([
      Text('演奏练习'),
      Text('调整滑块来模拟你的演奏水平'),

      // 准确度滑块
      Column([
        Text('准确度: ${this.accuracy}'),
        Slider(
          value: this.accuracy,
          min: 0,
          max: 100,
          onChanged: (value) => this.accuracy = Math.round(value)
        ),
      ]),

      // 节奏感滑块
      Column([
        Text('节奏感: ${this.timing}'),
        Slider(
          value: this.timing,
          min: 0,
          max: 100,
          onChanged: (value) => this.timing = Math.round(value)
        ),
      ]),

      // 表现力滑块
      Column([
        Text('表现力: ${this.expression}'),
        Slider(
          value: this.expression,
          min: 0,
          max: 100,
          onChanged: (value) => this.expression = Math.round(value)
        ),
      ]),

      Button('开始评分').onClick(() => this.evaluatePerformance()),
    ]);
  }

  @Builder
  ScorePanel() {
    Column([
      Row([
        Text('演奏评分'),
        Text('×').onClick(() => this.closeScore()),
      ]),

      if (this.performanceScore != null) ...[
        Text(this.performanceScore.grade)
          .fontSize(80)
          .fontColor(this.getGradeColor(this.performanceScore.grade)),
        Text('综合评分: ${this.performanceScore.totalScore}'),
        Text(this.performanceScore.feedback),

        Row([
          this.ScoreItem('准确度', this.performanceScore.accuracy, '#4CAF50'),
          this.ScoreItem('节奏', this.performanceScore.timing, '#2196F3'),
          this.ScoreItem('表现力', this.performanceScore.expression, '#FF9800'),
        ]),
      ],

      Button('再来一次').onClick(() => this.closeScore()),
    ])
    .width('100%')
    .height('60%')
    .backgroundColor('rgba(0,0,0,0.4)');
  }

  @Builder
  ScoreItem(label: string, score: number, color: string) {
    Column([
      Stack([
        Circle()
          .width(64)
          .height(64)
          .stroke(color)
          .strokeWidth(6)
          .fill(Color.White),
        Text(score.toString()).fontSize(18),
      ]),
      Text(label),
    ]);
  }

  getGradeColor(grade: string): string {
    switch (grade) {
      case 'S': return '#FFD700';
      case 'A': return '#4CAF50';
      case 'B': return '#2196F3';
      case 'C': return '#FF9800';
      default: return '#9E9E9E';
    }
  }

  async evaluatePerformance() {
    this.performanceScore = await this.viewModel.submitPerformance(
      'course_001',
      this.accuracy,
      this.timing,
      this.expression
    );
    this.showScore = true;
  }

  closeScore() {
    this.showScore = false;
    this.performanceScore = null;
  }
}
这段代码展示了如何在 Flutter 中使用 @State 进行状态管理,以及如何通过 @Builder 装饰器构建可复用的 UI 组件。需要特别注意的是,在 ForEach 循环中,我们使用自定义的 createBeatArray 方法来生成数组,而不是使用 Array.apply,因为 ArkTS 不支持 Function.apply 和 Function.call。
三、开发注意事项与踩坑经验
3.1 ArkTS 编译约束
在将 Dart 代码编译为 ArkTS 时,需要注意以下限制:
-
禁止使用
this关键字访问静态成员:在静态方法中,必须使用类名来调用其他静态方法。 -
泛型类型推断限制:Promise 的泛型类型必须显式声明,不能依赖类型推断。
-
禁止使用
Function.apply和Function.call:对于需要动态创建数组的场景,需要封装为独立的方法。 -
禁止使用
any和unknown类型:所有变量必须使用明确的类型声明。
3.2 平台适配建议
-
UI 适配:OpenHarmony 设备的屏幕比例和分辨率可能与主流 Android 设备不同,需要做好自适应布局。
-
性能优化:节拍器等功能对计时精度要求较高,需要注意定时器的实现方式。
-
数据持久化:考虑使用本地数据库存储用户的学习进度,确保离线可用。
四、运行效果展示
4.1 应用主界面

应用启动后,用户可以看到课程列表页面,展示了各类乐器的学习课程。每个课程卡片显示了课程名称、授课老师、难度等级和学习人数。
4.2 节拍器功能
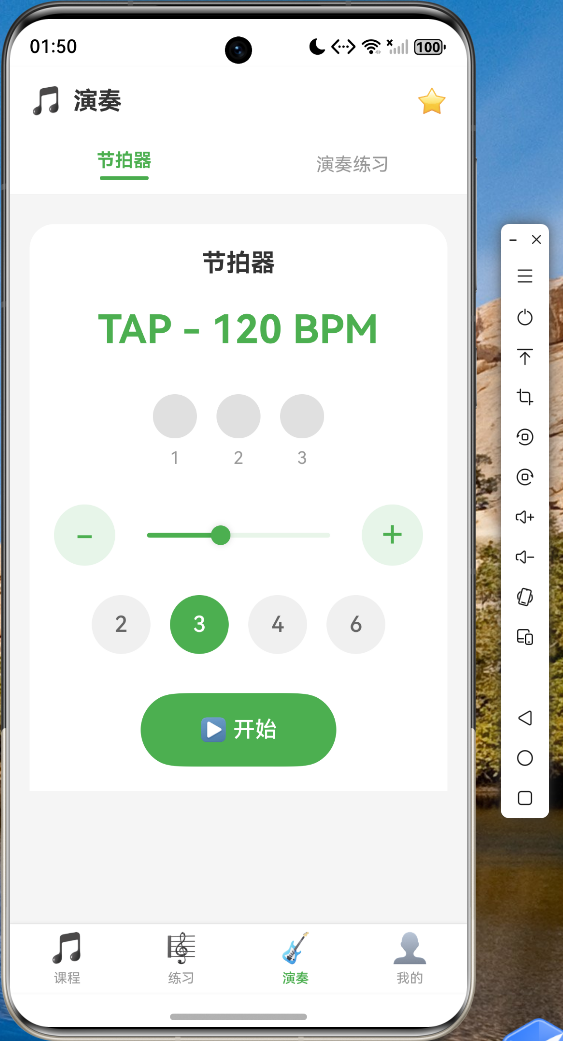
节拍器页面支持:
- 40-240 BPM 的速度调节
- 2/3/4/6 拍子切换
- 实时节拍指示
- 可视化的节拍动画
4.3 演奏评分功能
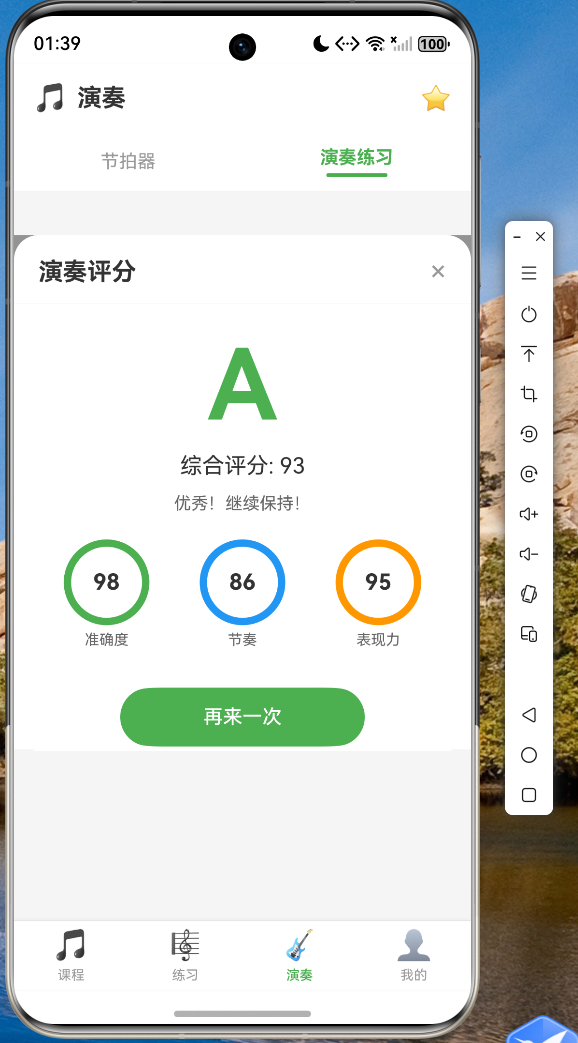
用户可以通过调节准确度、节奏感和表现力三个维度的滑块来模拟演奏,系统会根据加权算法计算出最终评分和等级。
五、总结与展望
本文通过一个完整的乐器学习应用案例,展示了 Flutter for OpenHarmony 的实际应用方法。从项目架构设计到具体代码实现,我们可以看到 Flutter 框架在跨平台开发中的优势:统一的开发体验、高效的代码复用,以及良好的可维护性。
当然,在开发过程中也遇到了一些兼容性问题,主要集中在 ArkTS 编译器的类型系统和 API 限制方面。但随着 OpenHarmony 生态的不断完善,这些问题都将逐步得到解决。
未来,我们计划在以下方向继续探索:
- 引入真实的音频分析能力,实现自动演奏评分
- 增加课程视频播放功能
- 开发社区交流模块,让用户可以分享学习心得
- 优化离线体验,支持本地乐谱存储
希望本文能为正在使用或计划使用 Flutter for OpenHarmony 的开发者提供一些参考和帮助。
六、代码仓库
本文涉及的完整项目代码已托管至 AtomGit:
仓库中包含了完整的项目源码、详细的 README 文档,以及在鸿蒙设备上的运行截图。欢迎感兴趣的开发者 fork 和 star。
相关资源链接:
- Flutter for OpenHarmony 官方文档:https://gitee.com/openharmony-sig/flutter
- OpenHarmony 应用开发指南:https://developer.huawei.com/consumer/cn/doc/
- AtomGit 代码托管平台:https://atomgit.com
- 开源鸿蒙跨平台社区:https://openharmonycrossplatform.csdn.net