上篇主要介绍了 three.js 的基础使用及配置,例如场景、相机、渲染器、轨道控制器、灯光等等;本篇主要介绍 GUI 控制器,方便调试模型属性,例如按钮事件、位置、颜色、线框模式等等
初始化模型
js
let scene; // 场景
let camera; // 相机
let renderer; // 渲染器
let controls; // 轨道控制器
const width = 300;
const height = 300;
let glbScene; // 3d加载模型
let cube; // 立方体

// 1. 初始化场景
const initScene = () => {
  scene = new THREE.Scene();
  // 设置背景色
  scene.background = new THREE.Color(0xffffff);
};

// 2. 初始化相机
const initCamera = () => {
  camera = new THREE.PerspectiveCamera(
    75, // 视角
    width / height, // 宽高比
    0.1, // 近平面
    2000 // 远平面
  );
  camera.position.z = 2; // 设置相机在 z 轴上的位置
  camera.position.y = 0.2;
  camera.lookAt(0, 0, 0); // 看向原点
};

// 3. 创建渲染器
const initRenderer = (id) => {
  renderer = new THREE.WebGLRenderer({ antialias: true });
  renderer.setSize(width, height); // 设置渲染器尺寸
  // renderer.setClearColor(0xffffff, 0); // 设置背景颜色 默认黑色

  // 获取渲染元素
  const container = document.getElementById(id) as HTMLElement;
  container.appendChild(renderer.domElement);
};

// 4. 添加轨道控制器(调整相机位置,即视角位置)
const initControls = () => {
  controls = new OrbitControls(camera, renderer.domElement);
  controls.enableDamping = true; // 允许阻尼效果,使动画更平滑
  controls.dampingFactor = 0.05; // 阻尼系数
  controls.rotateSpeed = 0.1; // 旋转速度
  // controls.autoRotate = true; // 自动旋转
  // controls.autoRotateSpeed = 1; // 自动旋转速度
};

// 5. 动画刷新
const animate = () => {
  requestAnimationFrame(animate);
  controls.update(); // 更新控制器状态
  renderer.render(scene, camera); // 重新渲染
};

// (1)添加3d元素(立方体)
const initBox = () => {
  // import buyImg from "../../../assets/img/buy-gift.png";
  // 环境贴图
  new THREE.TextureLoader().load(buyImg, (texture) => {
    // 创建立方体(width,height,depth)
    const box = new THREE.BoxGeometry(1, 1, 1);
    // 创建材质
    const material = new THREE.MeshBasicMaterial({
      color: 0x00ff00,
      map: texture,
      side: THREE.BackSide,
    });
    // 创建网格(将物体和材质链接起来)
    cube = new THREE.Mesh(box, material);
    cube.position.set(1, 1, 0);
    // 添加到场景
    scene.add(cube);
  });
};

// (2)加载3D模型
const initGlb = (url) => {
  // 创建GLTF实例
  const loader = new GLTFLoader();
  // 加载模型
  loader.load(url, (glb) => {
    // console.log("glb.scene", glb.scene);
    glbScene = glb.scene;
    glb.scene.position.y = -0.7;
    scene.add(glb.scene);
  });
};

// (3)添加灯光
const initLight = () => {
  // 添加环境光
  const ambientLight = new THREE.AmbientLight(0xffffff, 4); // 柔和的白光
  scene.add(ambientLight);
};

// (4)添加其他
const initOther = () => {
  // 添加网格地面
  const gridHelper = new THREE.GridHelper(10, 10);
  scene.add(gridHelper);

  // 添加坐标轴
  const axesHelper = new THREE.AxesHelper(5);
  scene.add(axesHelper);
};

initScene();
initCamera();
initRenderer(item.id);
initControls();
animate();

initBox();
initGlb(item.nftFileUrl);
initLight();
initOther();
添加灯光(initLight)和其他(initOther)前的效果:
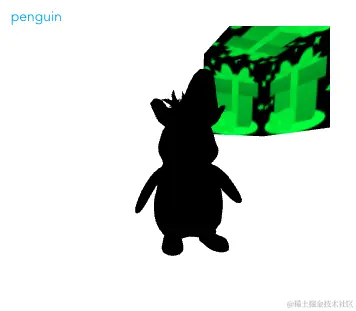
添加灯光(initLight)和其他(initOther)后的效果:

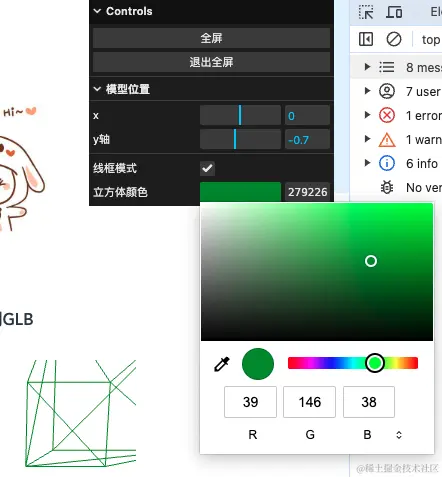
添加 GUI 控制
js
// 创建立方体
const initBox = () => {
  // 创建立方体(width,height,depth)
  const box = new THREE.BoxGeometry(1, 1, 1);
  // 创建材质
  const material = new THREE.MeshBasicMaterial({
    color: 0x00ff00,
    side: THREE.BackSide,
  });
  material.wireframe = true; // 设置为线框模式
  // 创建网格(将物体和材质链接起来)
  cube = new THREE.Mesh(box, material);
  cube.position.set(1, 1, 0);
  // 添加到场景
  scene.add(cube);
};

// 加载glb实例
const initGlb = (url) => {
  // 创建GLTF实例
  const loader = new GLTFLoader();
  // 加载模型
  loader.load(url, (glb) => {
    console.log("glb.scene", glb.scene);
    glbScene = glb.scene;
    glb.scene.position.y = -0.7;
    scene.add(glb.scene);

    // 添加GUI配置
    initGui();
  });
};

// 添加GUI配置
// import { GUI } from "three/examples/jsm/libs/lil-gui.module.min.js";
const initGui = () => {
  // 创建GUI
  const gui = new GUI();

  // 添加按钮(.name重命名为中文)
  const eventObj = {
    fullScreen: () => {
      // 全屏
      document.body.requestFullscreen();
    },
    exitScreen: () => {
      // 退出全屏
      document.exitFullscreen();
    },
  };
  gui.add(eventObj, "fullScreen").name("全屏");
  gui.add(eventObj, "exitScreen").name("退出全屏");

  // 控制模型位置
  console.log(glbScene);
  let folder = gui.addFolder("模型位置"); // 添加分组
  folder
    .add(glbScene.position, "x", -5, 5) // 参数和下面同等效果
    .onChange((val) => console.log("x", val)); // 变动时触发
  folder
    .add(glbScene.position, "y")
    .min(-5) // 最小值
    .max(5) // 最大值
    .step(1) // 部进
    .name("y轴") // 重命名
    .onFinishChange((val) => console.log("y", val)); // 变动结束时触发

  // 线框模式控制
  console.log("cube", cube);
  // 要有配置:material.wireframe = true,boolean值处理
  gui.add(cube.material, "wireframe").name("线框模式");

  // 颜色调整
  const colorParams = { cubeColor: "#ff0000" };
  gui
    .addColor(colorParams, "cubeColor")
    .name("立方体颜色")
    .onChange((val) => cube.material.color.set(val));
};