3 招让你的 Shadcn 出海应用性能提升 40 倍
你好,我是冴羽。
Shadcn UI + Next.js 15 + Tailwind CSS 4 是最常见的构建出海网站的技术栈。
本篇和你分享 3 个技巧,让你从一开始就构建出高性能应用。
1. 第一招:Tree Shaking
Tree Shaking 会删除那些你导入了但从来没用过的代码。
而且 Shadcn UI 因为把组件源码直接复制到你的项目里,打包工具可以直接分析和优化它们。
如何操作:
步骤 1:配置 package.json
告诉打包工具哪些文件是无副作用的:
json
// package.json
{
  "sideEffects": false  // 所有文件都是 pure
}

// 指定
{
  "sideEffects": ["*.css", "./src/polyfills.js"]
}
因为打包工具做 Tree Shaking 通常十分保守。
如果它不确定一个模块是否有副作用,就会保守地保留整个模块,即使你只导入了其中一个函数。
步骤 2:只导入需要的内容
javascript
// You only import what you need
import { Button } from "@/components/ui/button";

// Unused variants? Automatically removed by minifier
// 在传统的组件库中,打包工具无法优化它看不到的内容。而使用 Shadcn UI,一切都是透明的。
最佳实践:
javascript
// ❌ Bad - Imports everything
import * as utils from "./utils";

// ✅ Good - Imports only needed
import { formatDate } from "./utils";

// ❌ Bad - Default export object
export default { fn1, fn2, fn3 };

// ✅ Good - Named exports
export { fn1, fn2, fn3 };
步骤 3:验证效果
bash
npm install @next/bundle-analyzer

# next.config.js
const withBundleAnalyzer = require('@next/bundle-analyzer')({
  enabled: process.env.ANALYZE === 'true',
})

module.exports = withBundleAnalyzer({ /* config */ })

# 运行分析
ANALYZE=true npm run build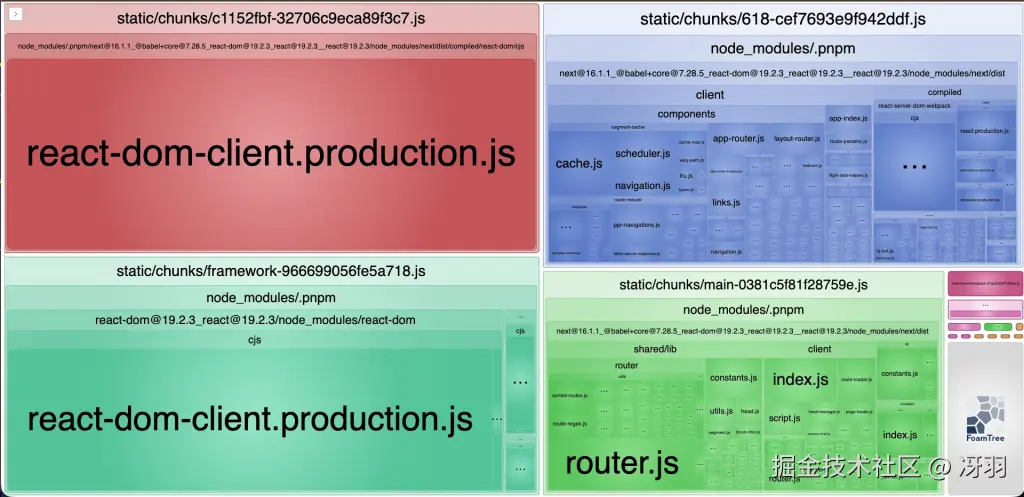
2. 第二招:Code Splitting
Code splitting 会把代码分成更小的块,在需要时才加载。
Next.js 会自动在页面级别分割代码,你只需要用 next/dynamic 处理重型组件。
如何操作:
typescript
// ❌ Without splitting - loads immediately
import HeavyModal from '@/components/heavy-modal'

// ✅ With splitting - loads on demand
import dynamic from 'next/dynamic'

const HeavyModal = dynamic(() => import('@/components/heavy-modal'), {
  loading: () => <p>Loading...</p>,
  ssr: false  // Skip server-side rendering (see warning below)
})
分享一个实战案例:
typescript
// components/user-profile-modal.tsx
'use client'

import { Dialog, DialogContent } from "@/components/ui/dialog"
import { Button } from "@/components/ui/button"
import Cropper from 'react-easy-crop'  // Heavy library

export function UserProfileModal({ open, onOpenChange, user }) {
  return (
    <Dialog open={open} onOpenChange={onOpenChange}>
      <DialogContent>
        <Cropper image={user.avatar} /* ... */ />
        <Button>Save</Button>
      </DialogContent>
    </Dialog>
  )
}
typescript
// app/users/page.tsx - Lazy load modal
import dynamic from 'next/dynamic'

const UserProfileModal = dynamic(
  () => import('@/components/user-profile-modal')
    .then(mod => ({ default: mod.UserProfileModal })),
  { ssr: false }
)

export default function UsersPage() {
  const [open, setOpen] = useState(false)

  return (
    <>
      <Button onClick={() => setOpen(true)}>View Profile</Button>
      {open && <UserProfileModal open={open} onOpenChange={setOpen} />}
    </>
  )
}
此时只有点击按钮时才会加载 150KB 的模态框!
3. 第三招:用 Tailwind CSS 4 优化 CSS
Tailwind CSS 4 使用 JIT 编译器,它会按需生成 CSS,只生成你实际使用的样式类。
比如你的代码是:
html
<button class="rounded bg-blue-500 px-4 py-2 hover:bg-blue-600">Click me</button>它会仅生成以下类:
css
.bg-blue-500 {
  background-color: #3b82f6;
}
.hover\\:bg-blue-600:hover {
  background-color: #2563eb;
}
.px-4 {
  padding-left: 1rem;
  padding-right: 1rem;
}
.py-2 {
  padding-top: 0.5rem;
  padding-bottom: 0.5rem;
}
.rounded {
  border-radius: 0.25rem;
}
配合 Shadcn UI 的 CSS 变量,可以实现运行时主题切换,无需重新构建。
Shadcn完美地运用了 CSS 变量:
css
:root {
  --primary: 222.2 47.4% 11.2%;
  --foreground: 210 40% 98%;
}

.dark {
  --primary: 210 40% 98%;
  --foreground: 222.2 84% 4.9%;
}
当组件使用这些变量:
typescript
<Button className="bg-primary text-primary-foreground">
  Click me
</Button>
Tailwind 会生成:
css
.bg-primary {
  background-color: hsl(var(--primary));
}
.text-primary-foreground {
  color: hsl(var(--primary-foreground));
}
这样做的好处在于 无需重建即可更改主题!
一个切换主题的示例如下:
typescript
'use client'

export function ThemeCustomizer() {
  const applyTheme = (primaryColor: string) => {
    document.documentElement.style.setProperty('--primary', primaryColor)
  }

  return (
    <div className="space-y-2">
      <Button onClick={() => applyTheme('222.2 47.4% 11.2%')}>
        Dark Theme
      </Button>
      <Button onClick={() => applyTheme('142.1 76.2% 36.3%')}>
        Green Theme
      </Button>
      <Button onClick={() => applyTheme('346.8 77.2% 49.8%')}>
        Red Theme
      </Button>
    </div>
  )
}
总结
记住: 性能是一个功能。 从第一天就把它构建进去。
用户可能不会注意到你的网站有多快,但他们绝对会注意到它有多慢。
从今天就开始:
-
运行
ANALYZE=true npm run build看看你的 bundle -
选最大的 chunk 优化它
-
测量改进
-
重复优化下一个最大的 chunk
小改进有复利效果。如果你每个迭代有 10% 的改进,7 个迭代后性能就能翻倍!
我是冴羽,10 年笔耕不辍,专注前端领域,更新了 10+ 系列、300+ 篇原创技术文章,翻译过 Svelte、Solid.js、TypeScript 文档,著有小册《Next.js 开发指南》、《Svelte 开发指南》、《Astro 实战指南》。
欢迎围观我的"网页版朋友圈",关注我的公众号:冴羽(或搜索 yayujs),每天分享前端知识、AI 干货。