什么是堆叠?为什么你需要它?
企业网络中,你是否遇到过这样的困扰:
- 交换机故障导致整层楼断网
- 几十台接入交换机要一台台单独配置
- 带宽不够用,又不想换设备
今天教你一招------华为交换机堆叠(iStack),把多台交换机变成一台。
一个案例:某公司网络故障,一台接入交换机宕机,结果整个部门 30 多人断网。网管排查后发现只是电源模块老化,但已经影响了两个小时的生产。事后复盘,如果用了堆叠技术,即使一台故障,另一台也能在 30 秒内自动接管业务------断网?那只是过去的事了。
堆叠的本质是横向虚拟化:将多台物理交换机,通过专用堆叠线缆连接,在逻辑上虚拟成一台设备。
实验环境
- 设备:华为 S 系列交换机
- 软件:eNSP Pro V100R003C10
可以直接在 Hi168 云平台部署 eNSP Pro 环境完成实验,注意:需要自备有权限的华为账号。
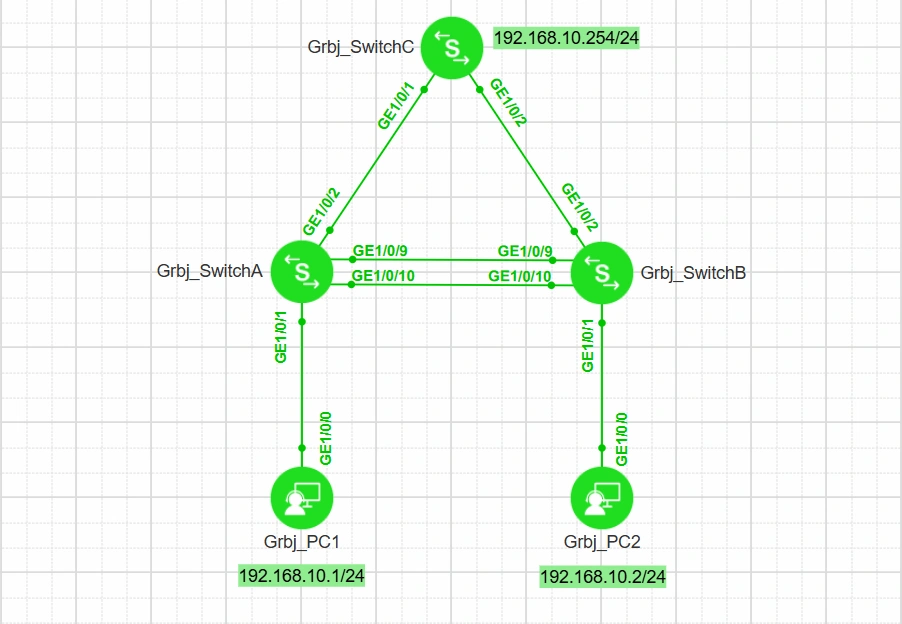
实验拓扑
原理速览:堆叠是怎么工作的?
在开始配置之前,先了解三个核心概念:
1. 角色选举
堆叠建立时,交换机会自动选举角色:
| 角色 | 职责 | 选举规则 |
|---|---|---|
| Master(主) | 统一管理所有配置 | 优先级高者优先,相同则 MAC 小者优先 |
| Standby(备) | 主设备故障时接管 | 选举规则同上 |
| Member(成员) | 转发流量 | 自动分配 |
2. 堆叠 ID
每台交换机在堆叠中有唯一 ID(0-8),用于标识成员。
3. 堆叠优先级
范围 1-255,数值越大越优先成为主设备。默认值为 100。
配置步骤
步骤一:设备基础配置
首先分别登录两台交换机,配置以下命令并保存配置,先不要连接两台交换机之间的堆叠线缆。
Grbj_SwtichA 配置:
bash
<HUAWEI> system-view
Enter system view, return user view with return command.
[HUAWEI] sysname Grbj_SwitchA
[Grbj_SwitchA] interface Stack-Port 1/1
[Grbj_SwitchA-Stack-Port1/1] port member-group interface GE 1/0/9
Warning: After the configuration is complete,
1.The interface(s) (GE1/0/9) will be converted to member of Stack-Port.
2.The current operation will clear all configurations on the interface and save all configurations on the device. Manually back up the configuration file before the operation.
3.The interface(s) may go Error-Down because there is no shutdown configuration on the interfaces. Continue? [Y/N]:Y
Warning: All running configurations of the interface will be cleared immediately. Continue? [Y/N]:Y
Info: Operating, please wait for a moment.....done.
[Grbj_SwitchA-Stack-Port1/1] port member-group interface GE 1/0/10
Warning: After the configuration is complete,
1.The interface(s) (GE1/0/10) will be converted to member of Stack-Port.
2.The current operation will clear all configurations on the interface and save all configurations on the device. Manually back up the configuration file before the operation.
3.The interface(s) may go Error-Down because there is no shutdown configuration on the interfaces. Continue? [Y/N]:Y
Warning: All running configurations of the interface will be cleared immediately. Continue? [Y/N]:Y
Info: Operating, please wait for a moment.....done.
[Grbj_SwitchA-Stack-Port1/1] quit
[Grbj_SwitchA] quit
<Grbj_SwitchA> save
Warning: The current configuration will be written to the device. Continue? [Y/N]:Y
Now saving the current configuration to the slot 1
Info: Save the configuration successfully.
<Grbj_SwitchA>
Grbj_SwtichB 配置:
bash
<HUAWEI> system-view
Enter system view, return user view with return command.
[HUAWEI] sysname Grbj_SwitchB
[Grbj_SwitchB] interface Stack-Port 1/2
[Grbj_SwitchB-Stack-Port1/2] port member-group interface GE 1/0/9
Warning: After the configuration is complete,
1.The interface(s) (GE1/0/9) will be converted to member of Stack-Port.
2.The current operation will clear all configurations on the interface and save all configurations on the device. Manually back up the configuration file before the operation.
3.The interface(s) may go Error-Down because there is no shutdown configuration on the interfaces. Continue? [Y/N]:Y
Warning: All running configurations of the interface will be cleared immediately. Continue? [Y/N]:Y
Info: Operating, please wait for a moment.....done.
[Grbj_SwitchB-Stack-Port1/2] port member-group interface GE 1/0/10
Warning: After the configuration is complete,
1.The interface(s) (GE1/0/10) will be converted to member of Stack-Port.
2.The current operation will clear all configurations on the interface and save all configurations on the device. Manually back up the configuration file before the operation.
3.The interface(s) may go Error-Down because there is no shutdown configuration on the interfaces. Continue? [Y/N]:Y
Warning: All running configurations of the interface will be cleared immediately. Continue? [Y/N]:Y
Info: Operating, please wait for a moment.....done.
[Grbj_SwitchB-Stack-Port1/2] quit
[Grbj_SwitchB] quit
<Grbj_SwitchB> save
Warning: The current configuration will be written to the device. Continue? [Y/N]:Y
Now saving the current configuration to the slot 1
Info: Save the configuration successfully.
<Grbj_SwitchB>
步骤二:保存配置并重启
等待10秒钟后,使用reboot命令重启两台S交换机。
两台设备都执行:
<Grbj_SwitchA> save
Warning: The current configuration will be written to the device. Continue? [Y/N]:Y
Now saving the current configuration to the slot 1
Info: Save the configuration successfully.

<Grbj_SwitchA> reboot
slot 1:
Next startup system software: flash:/ensp-lsw.cc
Next startup saved-configuration file: flash:/1.cfg
Next startup paf file: default
Next startup patch package: NULL
Warning: The system will reboot. Continue? [Y/N]:Y
Now saving startup checkpoint.done.
System preprocessing has started, 0% completed.
System preprocessing has started, 3% completed.
System preprocessing has started, 18% completed.
System preprocessing has started, 41% completed.
System preprocessing has started, 100% completed.

System preprocessing succeeded.
重要提醒:
- 重启前务必保存配置
- 两台设备不需要同时重启,可以依次进行
- 重启后将两台交换机之间的堆叠线缆连接起来,比如:Grbj_SwtichA-G1/0/9 和 Grbj_SwtichB-G1/0/9 相连。
步骤三:验证堆叠状态
重启后将自动发起堆叠主备协商,待其重启完成后,使用display stack命令查看堆叠系统的成员信息,确认堆叠已经成功建立。
<Grbj_SwtichB> display stack正常情况下应该显示:

步骤四:配置业务 VLAN
堆叠建立后,就可以像管理一台设备一样配置业务了。
<Grbj_SwtichB> system-view
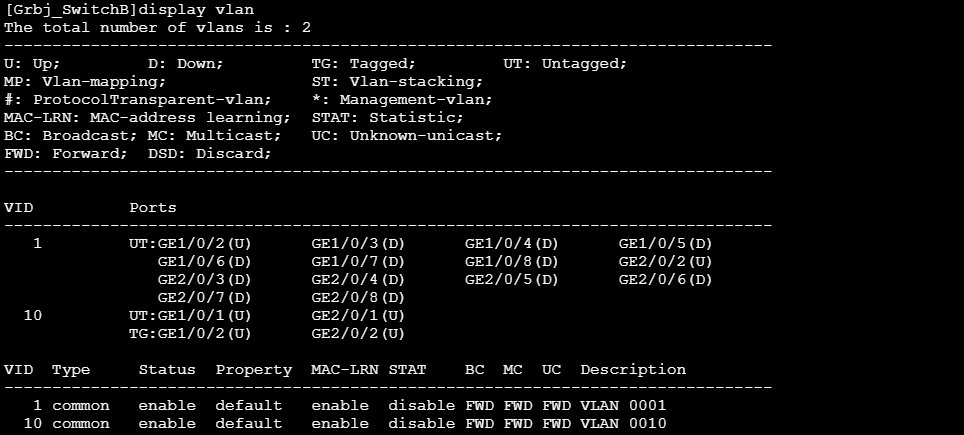
[Grbj_SwtichB] vlan 10
[Grbj_SwtichB-vlan10] quit

[Grbj_SwtichB] interface GigabitEthernet 1/0/1  // Grbj_SwtichA 的 G1/0/1 端口
[Grbj_SwtichB-GigabitEthernet1/0/1] port link-type access
[Grbj_SwtichB-GigabitEthernet1/0/1] port default vlan 10
[Grbj_SwtichB-GigabitEthernet1/0/1] quit
[Grbj_SwtichB] interface GigabitEthernet 2/0/1  // Grbj_SwtichB 的 G1/0/1 端口
[Grbj_SwtichB-GigabitEthernet2/0/1] port link-type access
[Grbj_SwtichB-GigabitEthernet2/0/1] port default vlan 10
[Grbj_SwtichB-GigabitEthernet2/0/1] quit
查看 vlan 配置。
步骤五:配置上行链路冗余
企业网络中,上行链路冗余是必须的。使用 Eth-Trunk 实现链路备份:
[Grbj_SwtichB] interface eth-trunk 1
[Grbj_SwtichB-Eth-Trunk1] trunkport gigabitethernet 1/0/2
[Grbj_SwtichB-Eth-Trunk1] trunkport gigabitethernet 2/0/2   // Grbj_SwtichB 的 G1/0/2 端口
[Grbj_SwtichB-Eth-Trunk1] port link-type trunk
[Grbj_SwtichB-Eth-Trunk1] port trunk allow-pass vlan 10
[Grbj_SwtichB-Eth-Trunk1] quit
SwitchC配置
bash
[Grbj_SwitchC] vlan 10
[Grbj_SwitchC-vlan10] quit
[Grbj_SwitchC] interface vlan 10
[Grbj_SwitchC-Vlanif10] ip address 192.168.10.254 24
[Grbj_SwitchC-Vlanif10] quit
[Grbj_SwitchC] interface Eth-Trunk 1
[Grbj_SwitchC-Eth-Trunk1] trunkport GE 1/0/1
Info: Operating, please wait for a moment......done.
[Grbj_SwitchC-Eth-Trunk1] trunkport GE 1/0/2
[Grbj_SwitchC-Eth-Trunk1] port link-type trunk
[Grbj_SwitchC-Eth-Trunk1] port trunk allow-pass vlan 10
[Grbj_SwitchC-Eth-Trunk1] quit
[Grbj_SwitchC]
查看配置是否生效
Grbj_SwitchA 或 Grbj_SwitchB 上查看 Eth-Trunk 配置信息。

Grbj_SwitchC 上查看 vlan 配置信息。
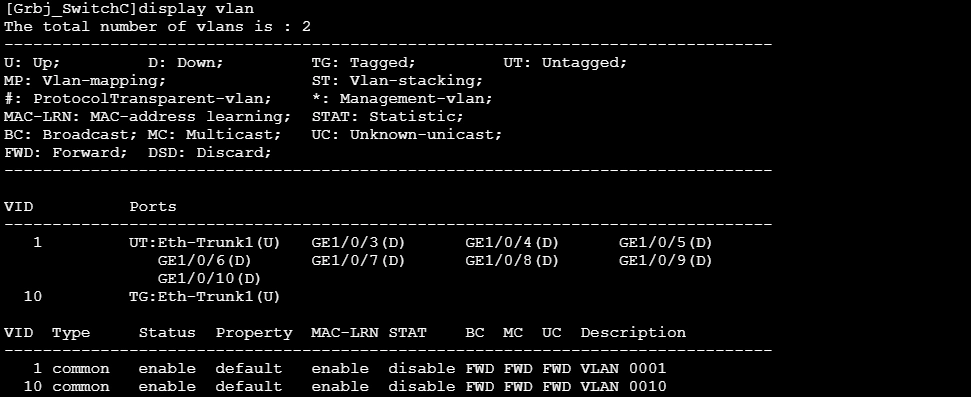
Grbj_SwitchC 上查看 Eth-Trunk 配置信息。

验证实验结果
测试 1:设备管理
从任意一台设备可以管理整个堆叠:
<Grbj_SwtichA> display stack // 查看堆叠状态
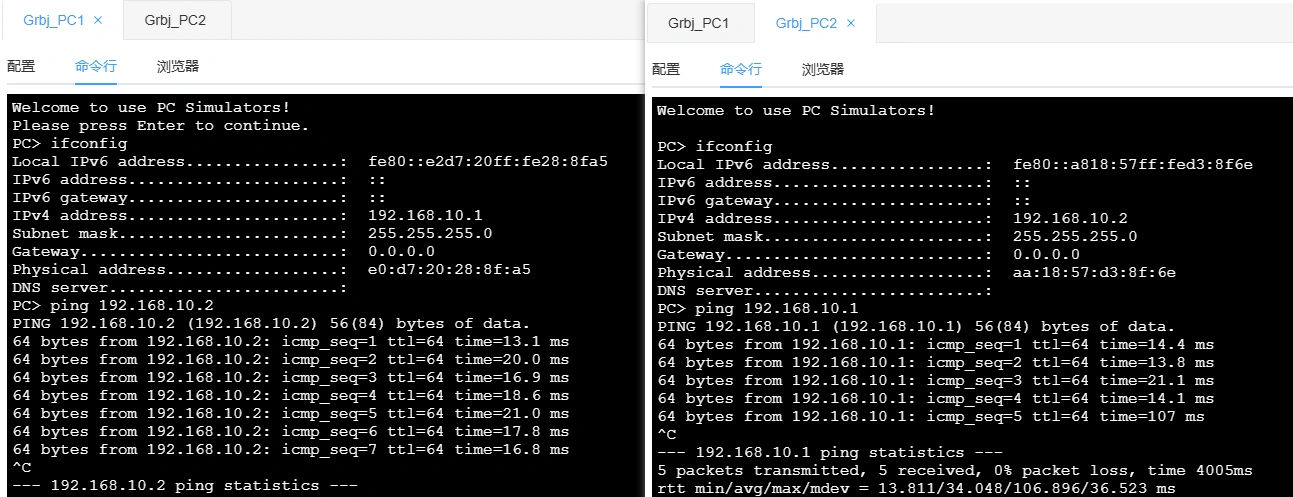
测试 2:PC 连通性测试
两台 PC 配置同网段 IP(192.168.10.1 和 192.168.10.2),默认网关 192.168.10.254,互相能 ping 通。
总结
通过今天这个实验,你应该掌握:
- 堆叠原理:多台变一台,统一管理
- 验证方法:display stack 系列命令
堆叠技术让网络运维从"逐台管理"变成"统一运维",在中小型网络中是性价比极高的可靠性方案。