欢迎阅读《Operational AI with Docker》。这是一本面向工程师和 ML 团队的实践型图书,适合那些希望自己的 AI 系统不只停留在单台笔记本电脑上,而是能够通过可重复的实验、可靠的持续集成(CI),以及不会因为某台机器依赖栈略有不同就出问题的生产部署,在更广泛环境中稳定运行的读者。
在第一章中,我们会通过将 Docker containers 和 images 视为一种 shared runtime contract 来打下基础:也就是说,它们是一种标准化、可移植的单元,能够将你的 code 及其 dependencies 一起打包,使其在不同 environments 中保持一致运行,从而让协作和交接变得不那么脆弱。
现代 AI/ML projects 经常遭遇脆弱的 environments:一个 model training script 在一台机器上可以运行,但在另一台机器上可能会因为 dependencies 差异或 library conflicts 而失败。这很少是一个 "model problem";几乎总是一个 environment problem。Docker 通过提供 runtime contract 来解决这个问题,也就是一个标准化的 container image,它可以在任何地方运行,从 researcher 的 laptop,到 CI pipelines,再到 production servers。
实际上,Docker 创建了一个 reproducible environment bundle,确保你的 code 和 dependencies 在每台机器上都以相同方式运行。对于 ML teams 来说,这种一致性尤其关键,因为 experiments 需要 repeatable,deployments 也需要 reliable。它还能降低 ML lifecycle 中不同角色之间 handoff 的摩擦,因为这些角色都依赖同一套 system 以可预测方式运行。
在本章中,你将学习 Docker 如何为 AI 和 machine learning workloads 提供一致、可复现、可扩展的 environments。你还会学习如何舒适地使用 images、containers 和 registries,并理解它们如何相互配合。你将安装并验证 Docker Desktop,并在日常 workflows 中同时使用 command-line interface(CLI)和 Docker Desktop UI。
你还将运行和管理 containers,包括 lifecycle basics 和 cleanup,并使用 essential Docker commands 来创建、管理和 troubleshoot containers。接下来,你会从 isolation models、performance 和 operational overhead 等角度比较 Docker 与 virtual machines,然后把 Docker 集成到 AI workflow 中,用于 training 和 deployment,并学习可以扩展到 teams 和 CI 的 patterns。最后,你会熟悉 Docker Model Runner,我们将在第 2 章用它在本地运行 LLM models。
本章将覆盖以下主要主题:
- 什么是 Docker,以及它为什么对 AI/ML 很重要?
- Docker architecture 如何工作:Images、containers 和 registries?
- 如何为 local development 设置 Docker Desktop?
- 如何运行你的第一个 container?
- 基础 Docker commands 如何工作:
run、build、ps、images和logs? - Docker 在现代 AI workflows 中扮演什么角色?
学习这些基础将直接改善你的日常工作:你会花更少时间调试 setup issues,减少 teammates 和 Continuous Integration(CI)之间由 environment 引发的 failures,更快完成 onboarding,并更有信心地交付 AI workloads,因为同一套 containerized workflow 可以从 experimentation 移动到 deployment,过程中出现意外的概率会低得多。更重要的是,它会为你提供一个稳定的基础,让我们在后续章节中构建更高级的 AI workflows。
Technical requirements
为了跟随本章内容,请确保满足以下 prerequisites:
Software:
- Docker Desktop 4.40+(macOS、Windows 10/11、Linux)
- Docker Compose(随 Docker Desktop bundled)
本章代码示例可在以下位置获取。
What is Docker and why does it matter for AI/ML?
在本节中,你会把 containerization 视为一种用于 reproducibility 的 engineering control,而不只是 packaging mechanism。你将考察 Docker 如何解决常见的 ML failure modes,例如 dependency drift、toolchain mismatches,以及 hidden system assumptions。最后,你会学习如何判断 containers 什么时候是合适的 abstraction,以及什么时候 virtual machine boundary 仍然更合适。
一个有用的思考方式是:大多数 ML systems 在真正进入 "ML" 部分之前就已经失败了。多数 teams 一开始损失的时间并不是花在 "ML" problems 上,而是花在 runtime problems 上:CUDA build 与 framework 不匹配,Python environment 悄悄升级了 transitive dependency,CI runner 缺少 system library,或者 inference service 因为 base OS 与测试环境不同而在不同 environments 中表现不同。
Docker 是一种 packaging and execution model,它会将你的 runtime environment 转化为一个 explicit artifact。你不再只是写下 setup 文档并希望它保持真实,而是将 environment 定义为 image。这个 image 可以 build once、versioned、shipped,并在任何运行 Docker 的 system 上作为 container 运行。
对于 AI/ML workflows,这种 shift 会被进一步放大,因为 stack 很深:OS packages、Python wheels、native libraries、BLAS implementations、GPU drivers、model runtimes,有时还有 custom ops。任何一层发生 drift,results 都可能发生 drift,而 debugging 也会变成 archaeology。
Docker 可以帮助解决三个反复出现的 AI problems:
Reproducible experiments:同一套 code 和 image 应该以相同方式运行(某些 GPU kernels 中的 nondeterminism 除外)。
Predictable deployment:你在本地测试的 artifact,就是你部署的 artifact,而不是由另一个 pipeline 重新构建出来的 "similar" environment。
Collaboration across roles:Data science、backend 和 platform teams 可以围绕一个 shared runtime contract,也就是 image,达成一致,即使他们使用的 tools 不同。
如果你做过严肃的 ML 工作,那么你其实已经非正式地构建过 "containers":conda environments、requirements files、setup scripts、golden AMIs,以及 team wiki pages。Docker 是这个想法更具 operational stability 的版本,并且可以与 CI/CD、registries 和 orchestrators 干净地集成。
本书将以 Docker Desktop 作为 local development 的标准。Docker Desktop 打包了 engine、CLI,以及一个 GUI,便于检查 containers、images、resource usage 和 logs。这一点比听上去更重要:在 ML workflows 中,能够在一个地方看到 lifecycle state、mounts 和 resource usage,通常可以让 debugging 更快。
Scope note
我们使用 Docker Desktop,而不是 Docker CE / raw Engine installs。目标是减少 developer machines 之间的 variance,因为 variance 会破坏 reproducibility。
既然我们已经把 Docker 定义为 AI/ML reproducibility 的 runtime contract,下一个实际问题就是:你到底需要什么样的 isolation boundary?Containers 和 virtual machines 解决的是 reliability problem 的不同部分,因此理解 containers 适合在哪里、什么时候仍然需要 VM boundary,有助于你为 training、CI 和 deployment 选择正确的 operational baseline。
Containers vs VMs
Virtual machine(VM)会打包一个完整的 guest operating system,包括自己的 kernel。Container 则打包 user space 和 metadata,然后作为 host OS kernel 上的一个 isolated process 运行。正是这种 shared-kernel model,使 containers 启动速度快,并且比完整 VMs 拥有更低 overhead。
Containers 并不是真正意义上的 "mini VMs"。它们采用的是另一种 approach:共享 host kernel,这让它们轻量且快速,但也意味着它们无法提供与 VMs 相同级别的 isolation。在 production 中,常见做法是在 VMs 上运行 containers,从而叠加 boundaries(VM isolation + container packaging)。在本地 macOS 和 Windows 上,Docker Desktop 实际上会在后台运行一个小型 Linux VM。在 macOS 上,它使用 HyperKit;在 Windows 上,它使用 WSL2。这个 VM 是 Docker Engine 运行的位置,而你仍然可以获得平滑的 "Local" container experience。
为了更容易可视化 isolation 和 runtime structure 的差异,下面的图将 virtual machines 和 containers 并排进行了比较。
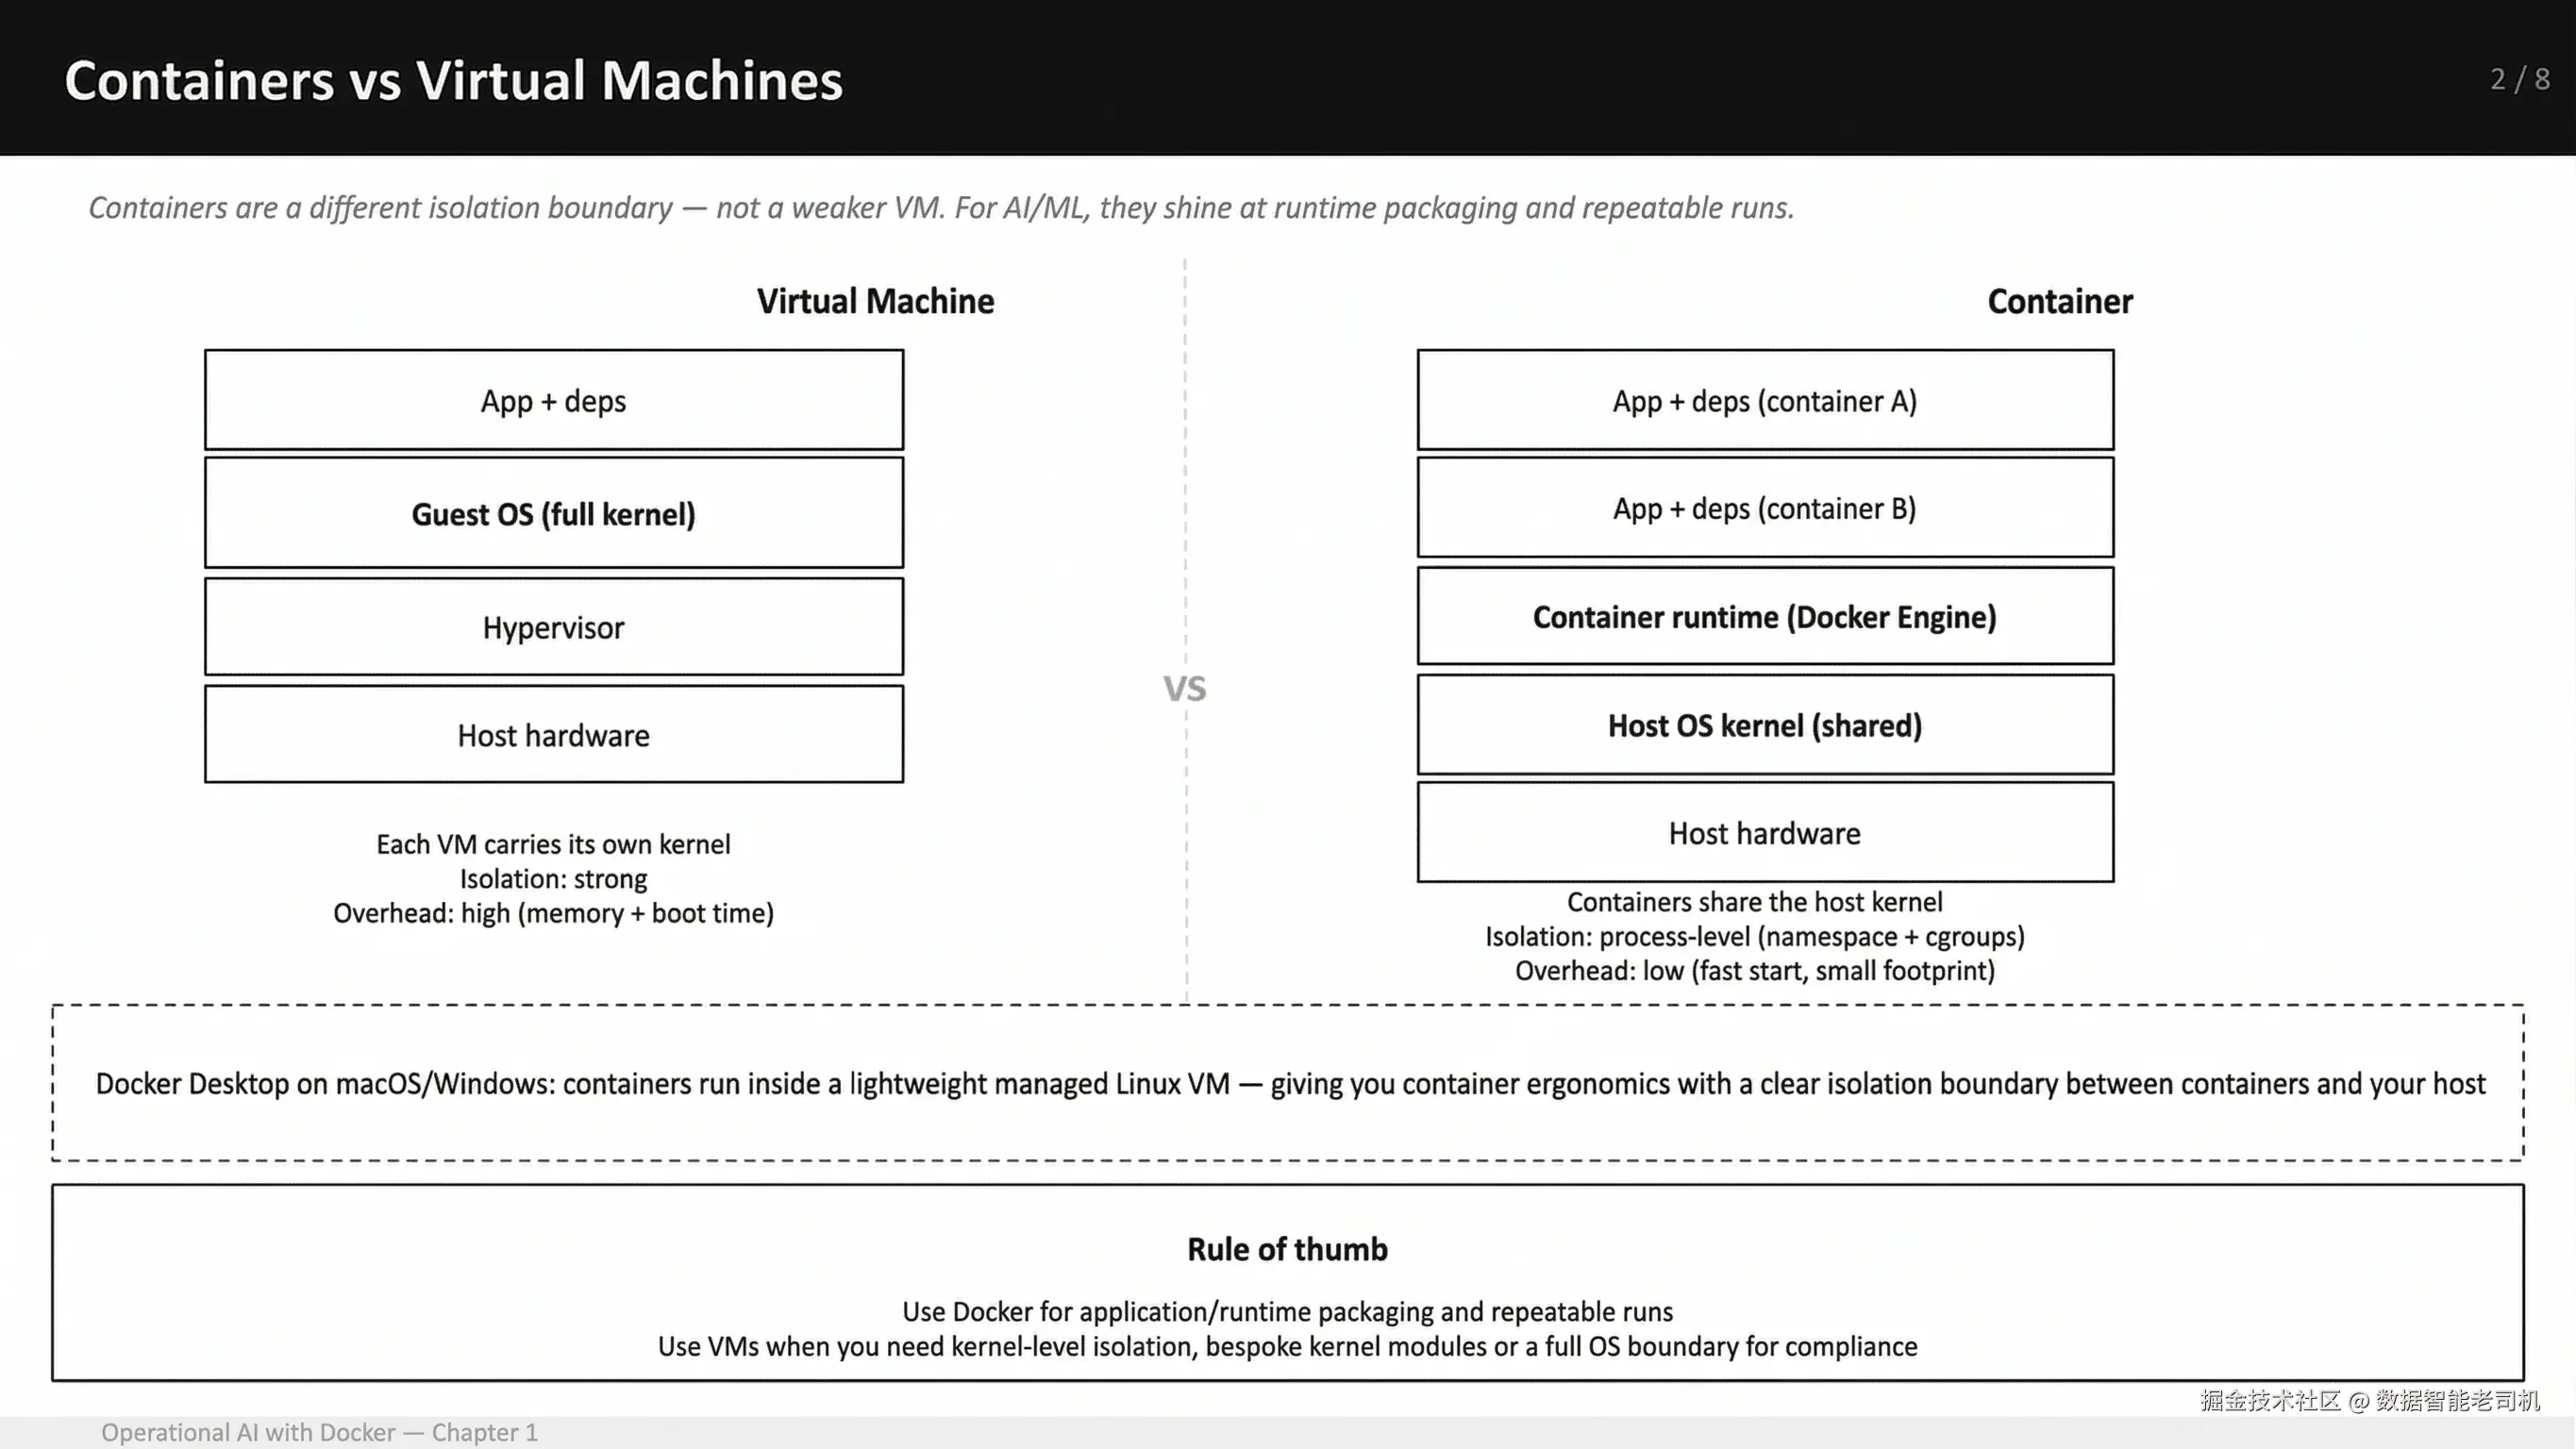
图 1.1:一个实用的 mental model------virtual machines 与 containers 的区别
作为经验法则,当你的目标是获得一致的 application 和 runtime packaging,以便在 laptops、CI 和 production 中实现 repeatable runs 时,使用 Docker。当你需要更强 boundary 时,例如 kernel-level isolation、custom kernel modules,或者你的 threat model / compliance posture 要求完整 operating system layer 时,则应选择 virtual machine。
对于 AI/ML 来说,当你想把一个 training job 或 inference service 与 pinned toolchain 一起交付,并让它以相同方式运行在 laptops、CI runners 和 deployment hosts 上时,containers 尤其出色。
在这里,我们也有必要明确 Docker 不能解决什么,以免把它过度扩展成一个万能工具。
Where Docker does not help(以及应改用什么):
Data versioning:Docker 不会为你的 datasets 做 versioning。你应该使用 data versioning strategy,并在 runtime mount 或 fetch data。
Experiment tracking:Docker 不会告诉你是哪组 hyperparameters 产生了某个 checkpoint。你应该使用 experiment tracker,例如 MLflow、Weights & Biases 等,并把 image tags 或 digests 与 runs 一起记录。
Orchestration:Docker Desktop 很适合 local;production scheduling 是另一个 layer,例如 Kubernetes、ECS、Nomad、batch systems。我们后面会连接这些层,但不要把 "container runtime" 与 "cluster" 混为一谈。
理解这些 boundaries 后,下一步就是理解 Docker 在日常使用中究竟由什么构成。如果你能区分 image 是什么、container 是什么,以及 registries 应该放在哪里,那么 Docker 会变得更容易推理,而不再是一个 opaque tool。
How does Docker architecture work: Images, containers, and registries?
在本节中,你将建立一个清晰的 Docker Desktop mental model,包括什么运行在哪里,以及如何理解 UI 正在展示什么。你将理解 Docker images 是 immutable、layered artifacts,并理解为什么 layer ordering 很重要;也会理解 containers 是具有 defined lifecycle 和 accessible logs 的 runtime instances。你还会探索 registries 作为 distribution points,如何支持 CI workflows 和 team collaboration。
一个有用的起点是:停止把 "Docker" 当成单一工具来想。Docker 相关讨论之所以变得低效,往往是因为人们把 "Docker" 当作一件事。实际上,你每天使用的是一小组 primitives:
Image:构建出来的 artifact(immutable、versionable)。
Container:image 的一个正在运行或已停止的 instance。
Registry:images 存放的地方,其他 machines 和 pipelines 可以从这里 pull。
只要你正确理解这些 primitives,大多数日常问题都可以解决。你知道自己正在处理三者中的哪一个,debugging 就会直接得多。
Docker Desktop 将这些 primitives 连接起来。在你的 laptop 上,Docker Desktop 运行 Docker Engine,并通过 Docker CLI 和 Desktop UI 暴露它。UI 是对同一个 engine state 的一个带有取舍的视图,而这个 state 你也可以通过 docker ps 和 docker images 看到。换句话说,CLI 和 UI 只是与同一个 underlying system 交互的两种方式。
为了让 workflow 更具体,下面的 diagram 展示了你的 code 和 dependencies 如何通过 docker build(BuildKit)变成 image,这个 image 如何通过 registry 被存储和共享,以及 docker run 如何在 Docker Desktop 上将它变成 container。
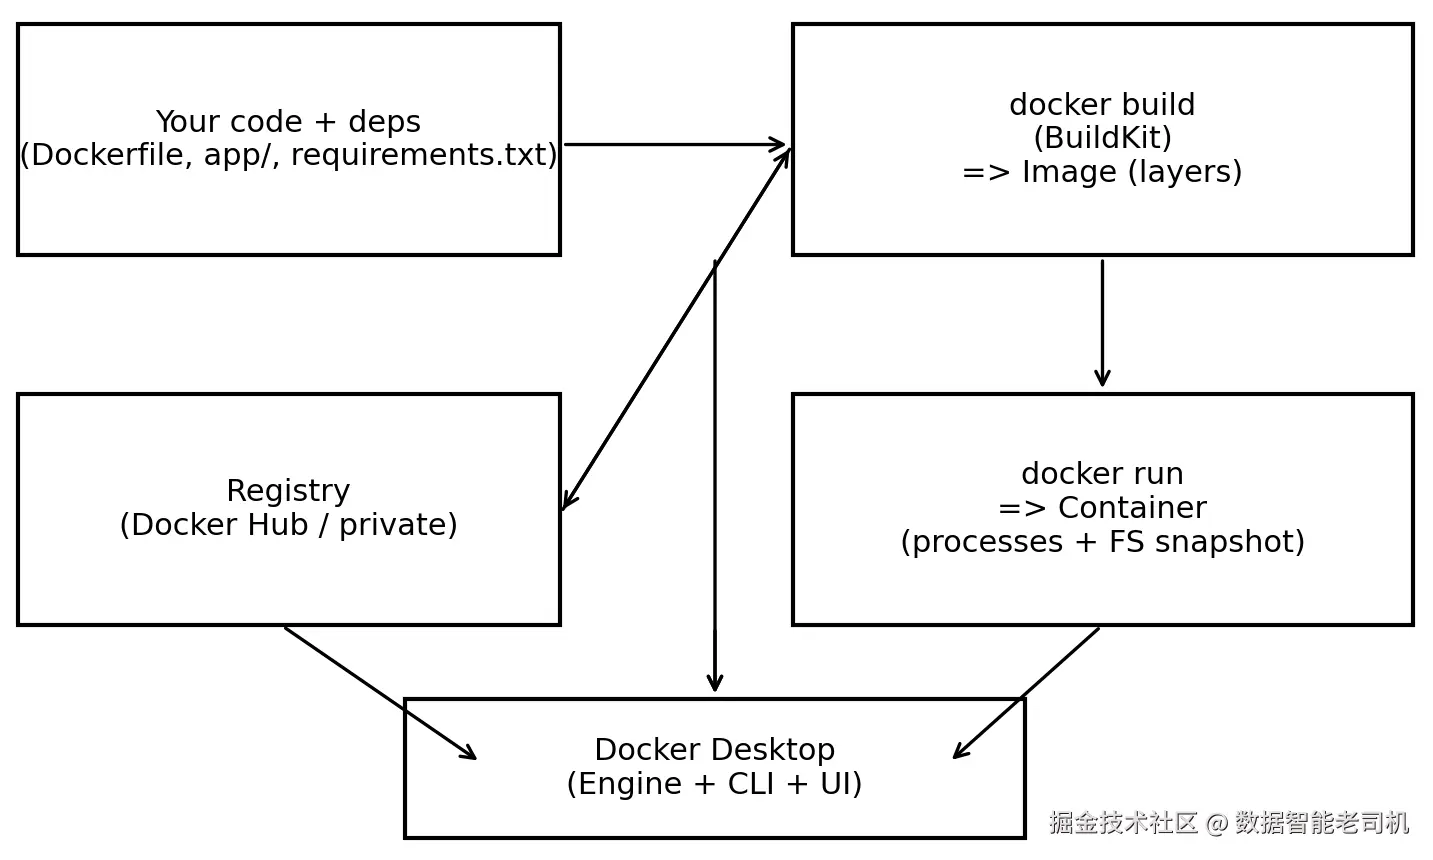
图 1.2:一个实用的 mental model------code build 成 image,images 作为 containers 运行,registries 分发 images;Docker Desktop 包装了 engine + CLI + UI
现在你已经拥有 images、containers 和 registries 如何关联的工作模型,我们可以放大来看每个部分,从这条链中最重要的 artifact 开始:image。Images 是 reproducibility 真正所在的地方,因为它们通过 BuildKit 被构建为 cached layers。学习这些 layers 如何工作、如何排序,以及如何用 tags 与 immutable digests 引用它们,会让你的 builds 更快,并且当某些东西看起来不对时,你也更容易 pin down 到底运行了什么。
Images: Immutable, layered build artifacts
Image 是你要 ship 的东西。它是 filesystem 的一个 snapshot,加上一些 metadata,例如 entrypoint、environment variables 和 default command。Images 由 layers 构建而成,这些 layers 会被 cached。在 ML repositories 中,caching 可以决定一次 rebuild 是 30 秒,还是 30 分钟。
BuildKit 是 Docker Desktop 和当前 Docker Engine versions 使用的现代 build backend。实践中,它支持 efficient layer caching 和 faster rebuilds,尤其是当只有 application 的部分内容发生变化时。
Layer ordering 是一个 performance tool。因为 images 是以 layers 方式构建并被 cached 的,所以你定义 layers 的顺序会直接影响 rebuild time。你希望稳定的 layers 放在前面,例如 base image、system packages、Python dependencies;易变的 layers 放在后面,例如你的 application code、频繁变化的 config。这样,小的 code changes 不会强制重建上层所有内容。
如果你来自 Python tooling,可以把 image 看作 virtual environment 的一个更 explicit、更 portable 的版本,只不过它还能包含 OS packages 和 native dependencies。
Tags vs digests
一旦你理解 images 如何构建,下一步问题就是:如何准确识别你正在运行的是哪个 image。当 incident 发生,或者某个 result 看起来可疑时,你希望能回答:"Exactly what ran?" Tags 是方便阅读的 labels。Digests 是 immutable identifiers。健康的 workflow 会同时使用二者:humans read tags,systems can lock to digests。
在深入 tags 和 digests 之前,下面的图展示了 Docker Desktop 中的 Images view,你可以在其中检查机器上的 images(如果登录,也可以查看 Hub images),以及 tags、creation time 和 size 等 key metadata。
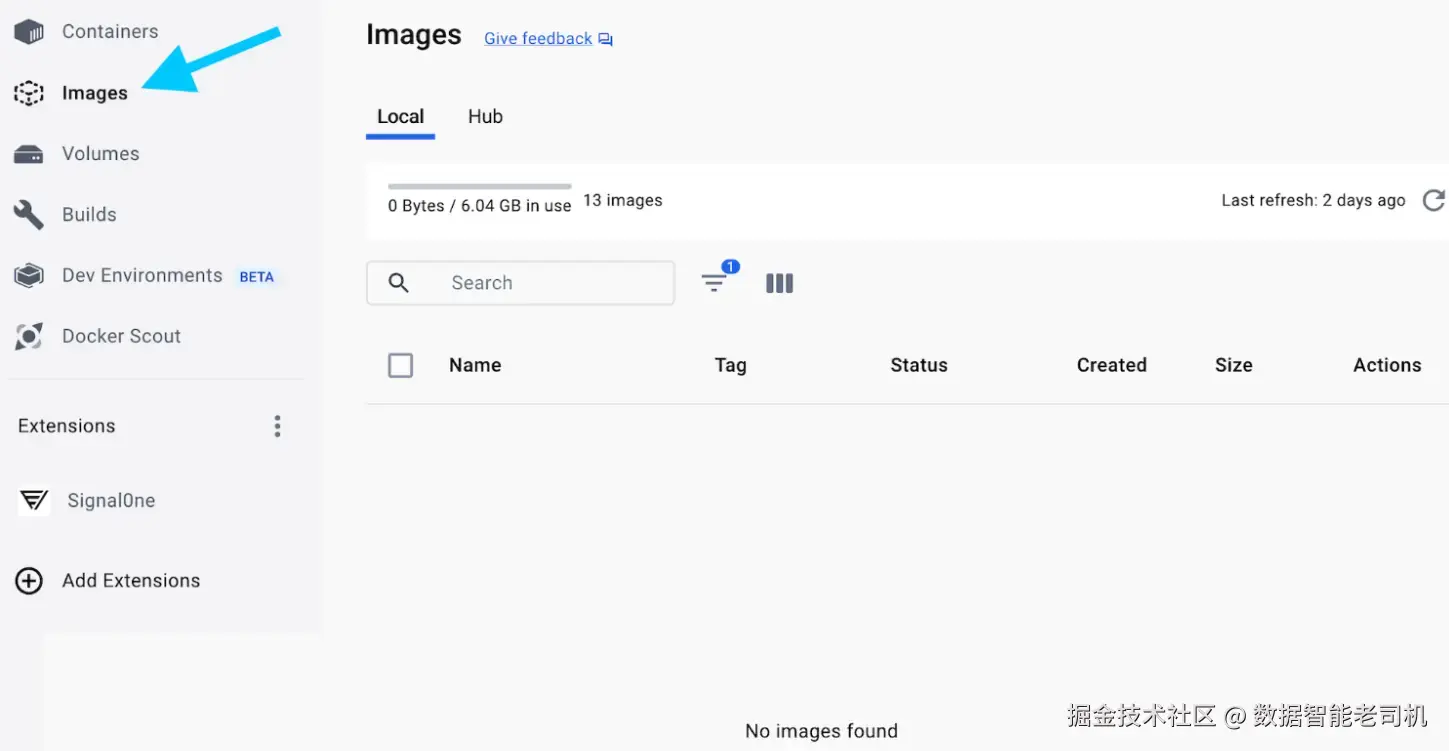
图 1.3:Docker Desktop Images view
一旦你知道如何结合 human-friendly tags 和 immutable digests 来 pin exactly what ran,下一步就是理解当你运行这个 image 时会发生什么。换句话说,Docker 如何把一个 built artifact 转换成一个 living process,具备 start / stop model、logs 和 cleanup。这就是 containers 及其 lifecycle 成为你日常管理的 operational unit 的地方。
Containers: Runtime instances and lifecycle
Container 是 image 的一个 runnable instance。它有自己的 process tree,在 image 顶部有一个 writable layer,并拥有自己的 networking namespace。当 container 的 primary process 退出时,container 就会停止。
这个 lifecycle model 在 ML 中很重要。Training job container 是一个 job;它应该在 training 完成时退出。Inference container 是一个 service;它应该保持运行、expose ports,并且可 restart。
如果你发现自己在 "SSH-ing into containers",并像对待 pets 一样对待它们,那么你其实是在对抗这个 model。Containers 应该是 disposable 和 reproducible 的,而不是需要你手动 tweak 的 long-lived machines。正确做法几乎总是:
- 修改 Dockerfile
- 重新 build image
- 重新 run container
当你已经能够在本地 build 和 run containers 后,下一个问题就是如何让同样的 artifacts 在 machines 和 teams 之间共享。这正是 registries 的作用。
Registries: Distribution and collaboration
Registry 是用于存储和服务 images 的 system。Docker Hub 是默认 public registry,但 teams 通常使用 private registries 来存放 internal artifacts。Docker 的 getting-started docs 将 registries 描述为用于存储和共享 images 的 centralized locations,可以是 public,也可以是 private。
Registries 是 local developer success 与 team success 之间缺失的连接。如果 image 不在 registry 中,它就不是 shared artifact,CI 也不能可靠地 pull 它,而 deployments 就会退化成 "rebuild what you think it was"。
到这里,各个 pieces 应该已经清晰连接起来:你已经学习了 Docker 的核心 building blocks,以及它们如何连接。你将 code 和 dependencies build 成 image,将该 image 作为拥有清晰 lifecycle 的 container 运行,并通过 registry 共享完全相同的 artifact,使 teammates、Continuous Integration 和 production 都能 pull 你真正测试过的东西。
这一点很重要,因为 operational AI 的核心大多是 reducing variance:一旦 images 被当作 versioned artifacts(tags 用于 readability,digests 用于 immutability),你就可以 reproduce results,更快 debug incidents,并避免 environments 之间的 "it worked locally" failures。
有了这个基础,接下来的 sections 会从 concepts 进入 practice。你将开始使用 essential Docker commands 来 build、run、inspect 和 troubleshoot 这些 primitives,从而在真实 AI workflows 中一致应用这个 model。
How do you set up Docker Desktop for local development?
在本节中,你将安装 Docker Desktop 到 macOS,并理解 installer 给你带来了什么:一个 packaged Docker environment,可用于在本地 build 和 run containers,并符合 Docker 的 macOS installation flow 和 requirements。
接下来,你会用 terminal 和 app 来确认一切工作正常。在 CLI 侧,你会通过运行一个简单 container,例如 docker run hello-world,来 sanity-check installation,并确认 Docker 能够 pull 和 execute images;在 UI 侧,你会验证 Docker Desktop 正在运行,并且 engine state 与 docker ps 和 docker images 等 commands 中看到的一致。
最后,你会调整对 AI 和 ML workflows 最重要的 settings,尤其是 resource allocation(CPU、memory、disk)和 file sharing,使 containers 能够无摩擦地访问你的 local project folders 和 data。
Installing Docker Desktop
首先,我们将在 macOS 上安装 Docker Desktop。其他 platforms 上的步骤类似:
- 安装 Docker Desktop。
- 启动 engine(在 macOS 上它会自动启动)。
- 验证 CLI。
- 使用 UI 检查 state。
从 Docker Desktop 官方页面下载 Docker Desktop,并为你的机器选择正确 build。
Verifying the installation
当 Docker Desktop 启动后,下一步是确认所有组件真的正确连接在一起。当 Docker Desktop 显示 engine 正在运行后,在 terminal 中验证:
docker version
docker info
你要检查两件事:Docker CLI 是否存在,以及它是否正在与已经启动的 Docker Desktop engine 通信。
docker version command 应该同时显示 Client 和 Server sections。如果你只看到 "Client",说明 CLI 已安装,但它无法连接到 engine。
现在打开 Docker Desktop。你应该能在 sidebar 中看到 Containers、Images、Volumes 和 Builds 等条目。稍后你会使用 UI 来 inspect logs、exec into a container,并 sanity-check 正在运行什么。
下图展示了 Docker Desktop 中的 running containers screen:
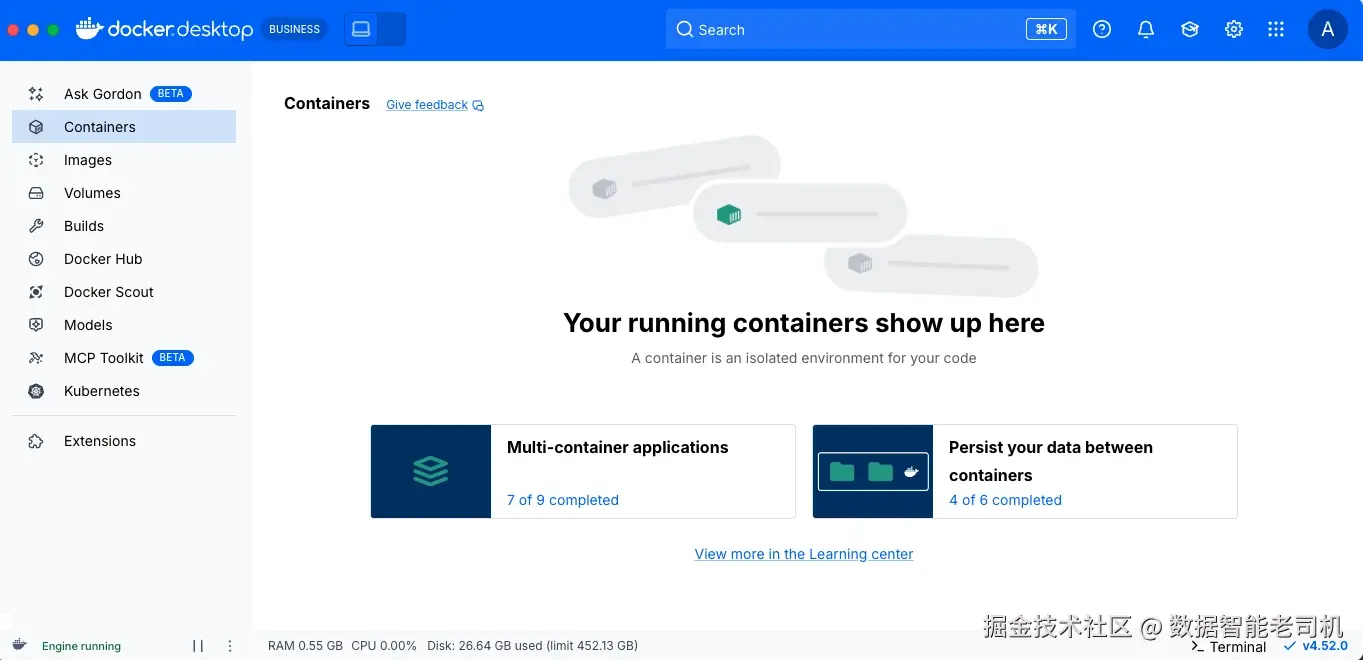
图 1.4:Docker Desktop dashboard
到这里,Docker 已经安装并正在运行,但这并不自动意味着它已经为 AI/ML workloads 配置得很好。
Why settings matter for AI/ML workflows
现在 Docker Desktop 已经安装完成,并且你已经验证 command-line interface(CLI)可以连接到正在运行的 Docker engine,而 user interface(UI)也反映了同一个 state,下一步就是确保 Docker 在 macOS 上真的适用于 artificial intelligence(AI)和 machine learning(ML)工作。
因为 Docker Desktop 会在一个 managed Linux VM 中运行 Linux containers,所以你在 Docker Desktop 中设置的 CPU、memory、disk 和 file-sharing options 会成为 containers 的真实 constraints。这会直接影响 training speed、preprocessing throughput,甚至影响 large images 是否能可靠 build 和 run。
Practical settings for AI workloads
Docker Desktop 在 macOS 上通过一个 lightweight VM 运行 containers;因此,Docker Desktop settings 中的 resource limits 是真实 limits。如果你计划运行 local training 或 intensive preprocessing,请为 Docker Desktop 分配足够 CPU 和 RAM,以确保它可用。
Docker Desktop 有意让 containers 运行在一个小型 managed Linux VM 中,而不是直接使用 host system。这种设计让 Docker 可以控制 containers 依赖的 exact kernel 和 system components,这意味着新的 container features、filesystem improvements 和 security fixes 可以一致地交付给所有人,而无需等待 host OS 跟上。它也在 containers 和 host 之间创建了清晰 isolation boundary,降低 misconfigured 或 vulnerable container 影响 developer machine 的风险。
从用户角度看,重要 takeaway 很简单:你在 Docker Desktop 中分配的 resources,就是 containers 实际得到的 resources。
Resource planning: CPU, memory, and local constraints
在这个阶段,你不需要 perfect sizing,但有一个 realistic baseline 可以帮助避免后续令人沮丧的 failures,尤其是在处理 AI workloads 时。
作为粗略起点:
- 在本地训练一个 medium-sized transformer model,预计至少需要 8 GB RAM 和 4 个或更多 CPU cores。这是假设进行 experimentation、fine-tuning 或较小 custom models,而不是 full-scale pretraining。内存不足通常表现为突然的 kernel crashes 或 silent process termination。
- 运行带有多个 kernels 的 Jupyter notebooks,baseline 可能需要 4 GB RAM;但当加载 datasets 或同时打开多个 notebooks 时,使用量会快速增长。每个 active kernel 都是一个 separate process,应该按这种方式对待。
- Inference 和 model serving 的需求会因 model size、quantization 和 concurrency 而显著不同。Lightweight models 可以在几 GB memory 内舒适运行,而 larger models 则需要更谨慎 planning。我们将在第 5 章详细覆盖 sizing strategies 和 trade-offs。
这些数字不是 hard limits,而是 practical reference points。核心思想是:先为 stability sizing,再在 workflow 经过验证后进行 optimization。
Key settings to configure early
以下是你早期应该关注的 settings:
Disk usage:Image layers、build cache 和 volumes 会快速消耗空间,尤其是当你 pull large framework images 时。
File sharing / mounts:Local datasets 和 notebooks 通常会 mount 到 containers 中;在使用真实 data 前,请确保 path 能干净工作。
在开始 build 真实 workloads 之前,确认整个 system end to end 工作正常很有帮助。
Run a simple smoke test container
在 containerize 任何严肃内容之前,运行一个小型 "smoke test" container 很有帮助,用来证明基础能力正常:Docker 可以连接 engine、从 registry pull image、启动 containerized process,并把 output stream 回给你。
官方 hello-world container 正是为此设计的。在 containerize 任何严肃内容之前,先运行一个快速 container,测试基础:pull an image、run a process、confirm logs。hello-world container 会完成这些事情。接下来我们运行它。
How to run your first container?
在本节中,你将从现有 image 运行第一个 container,并理解使用 docker run 时 Docker 在底层做了什么,包括当 image 不在本机时 pull image,并把它作为 new container 启动。
然后你将使用 Docker Desktop 检查什么正在运行、查看 container logs,并在 running container 内 execute commands,从 graphical user interface 和 command-line interface 两侧理解 configuration 和 state。最后,你会练习 safe cleanup,删除 stopped containers 和 unused images,让你的 system 在迭代时保持整洁。
建立直觉最快的方法,是运行一个不是你 build 的东西。Docker Hub 上的 official images 很适合这个目的。我们会从一个非常简单的 container 开始,然后转向一个 expose web interface 的 container。
Step 1: Run your first container(hello-world)
从最简单的 container 开始:
arduino
docker run hello-world运行这个 command 时,Docker 会检查 image 是否已存在于本地。如果没有,它会从 Docker Hub pull image,创建一个 container,运行它,并将 output 打印到 terminal。
hello-world 退出后,它仍然作为 stopped container 存在。你可以用以下命令看到它:
css
docker ps -a这是你第一次看到 container lifecycle:即使 process 已完成,Docker 仍然会跟踪这个 container,直到你将它 remove。
Step 2: Run a web container with port mapping
接下来,运行一个保持 alive 并 expose web interface 的 container。
运行 Docker 的 welcome container,并将 port 80 映射到你的 localhost:8080:
arduino
docker run -d -p 8080:80 docker/welcome-to-docker打开:
arduino
http://localhost:8080如果你能看到页面,说明 network 正常,并且 container 正在运行。
此时,你已经完成了一件重要事情:你运行了一个 background container,并通过 port mapping(-p 8080:80)将其 expose 到本地机器。
当 welcome page 在 browser 中加载后,你就确认了 essentials:
- Docker 可以 pull image。
- Docker 可以在 background 启动 container。
- 来自本地机器的 traffic 可以被 routing 到 container 内。
换句话说,你现在已经有了一个在本地运行的 containerized service。
下一步是看看这个 container 在 Docker Desktop 中 "lives" 在哪里,并学习如何 inspect 它。
Step 3: Inspect and interact via Docker Desktop
打开 Docker Desktop 并选择正在运行的 container。你需要尽早熟悉三个 tabs:
Logs :等价于 docker logs(stdout 和 stderr)。
Exec:在 container 中打开 shell。
Inspect:显示 configuration,例如 env、port mappings、mounts。
下图展示了 Exec tab screen,它显示 Docker Desktop 中一个正在运行的 container:
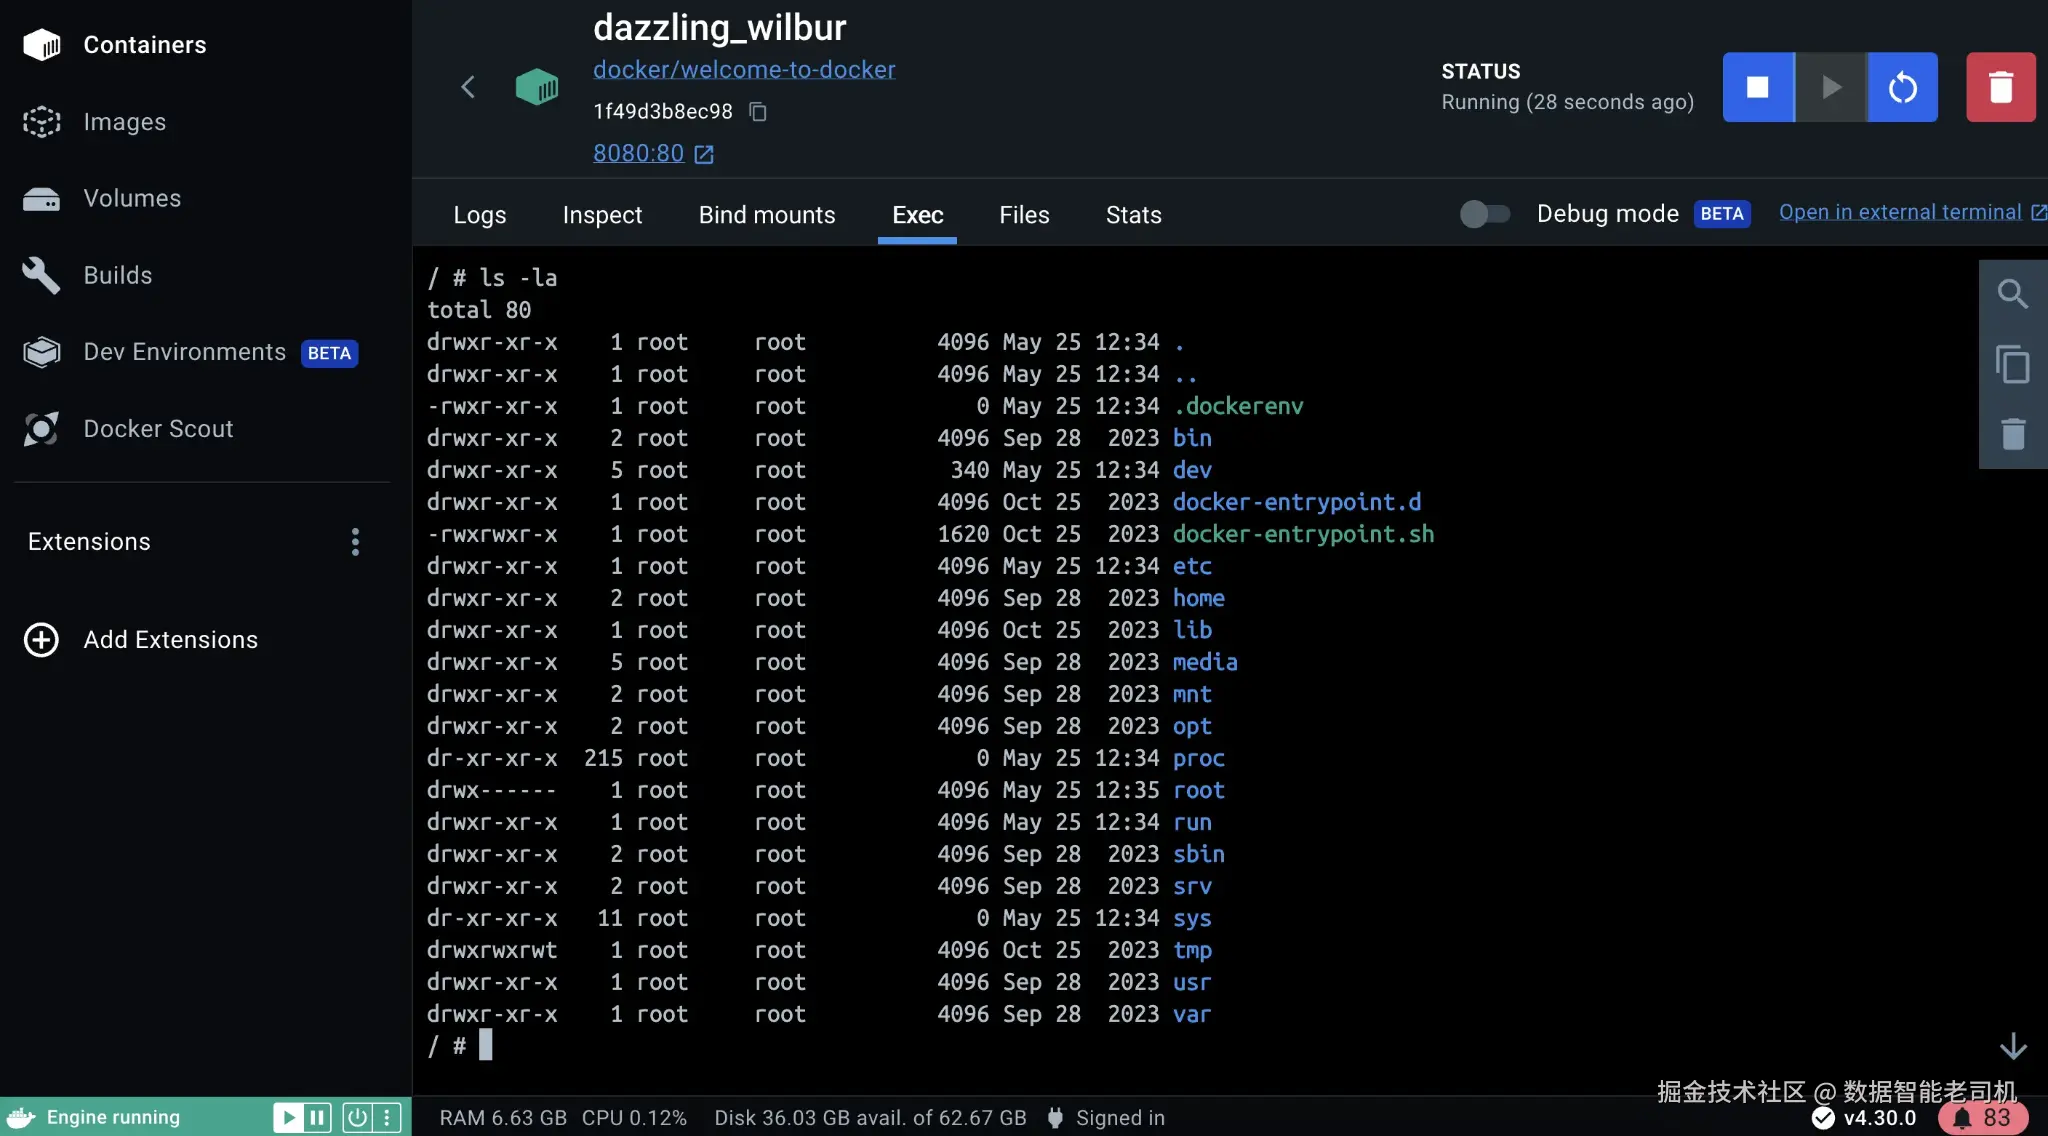
图 1.5:在 Docker Desktop 中 exec into a running container
类似地,如下一张图所示,你可以点击 Inspect tab 来检查某个 running container:
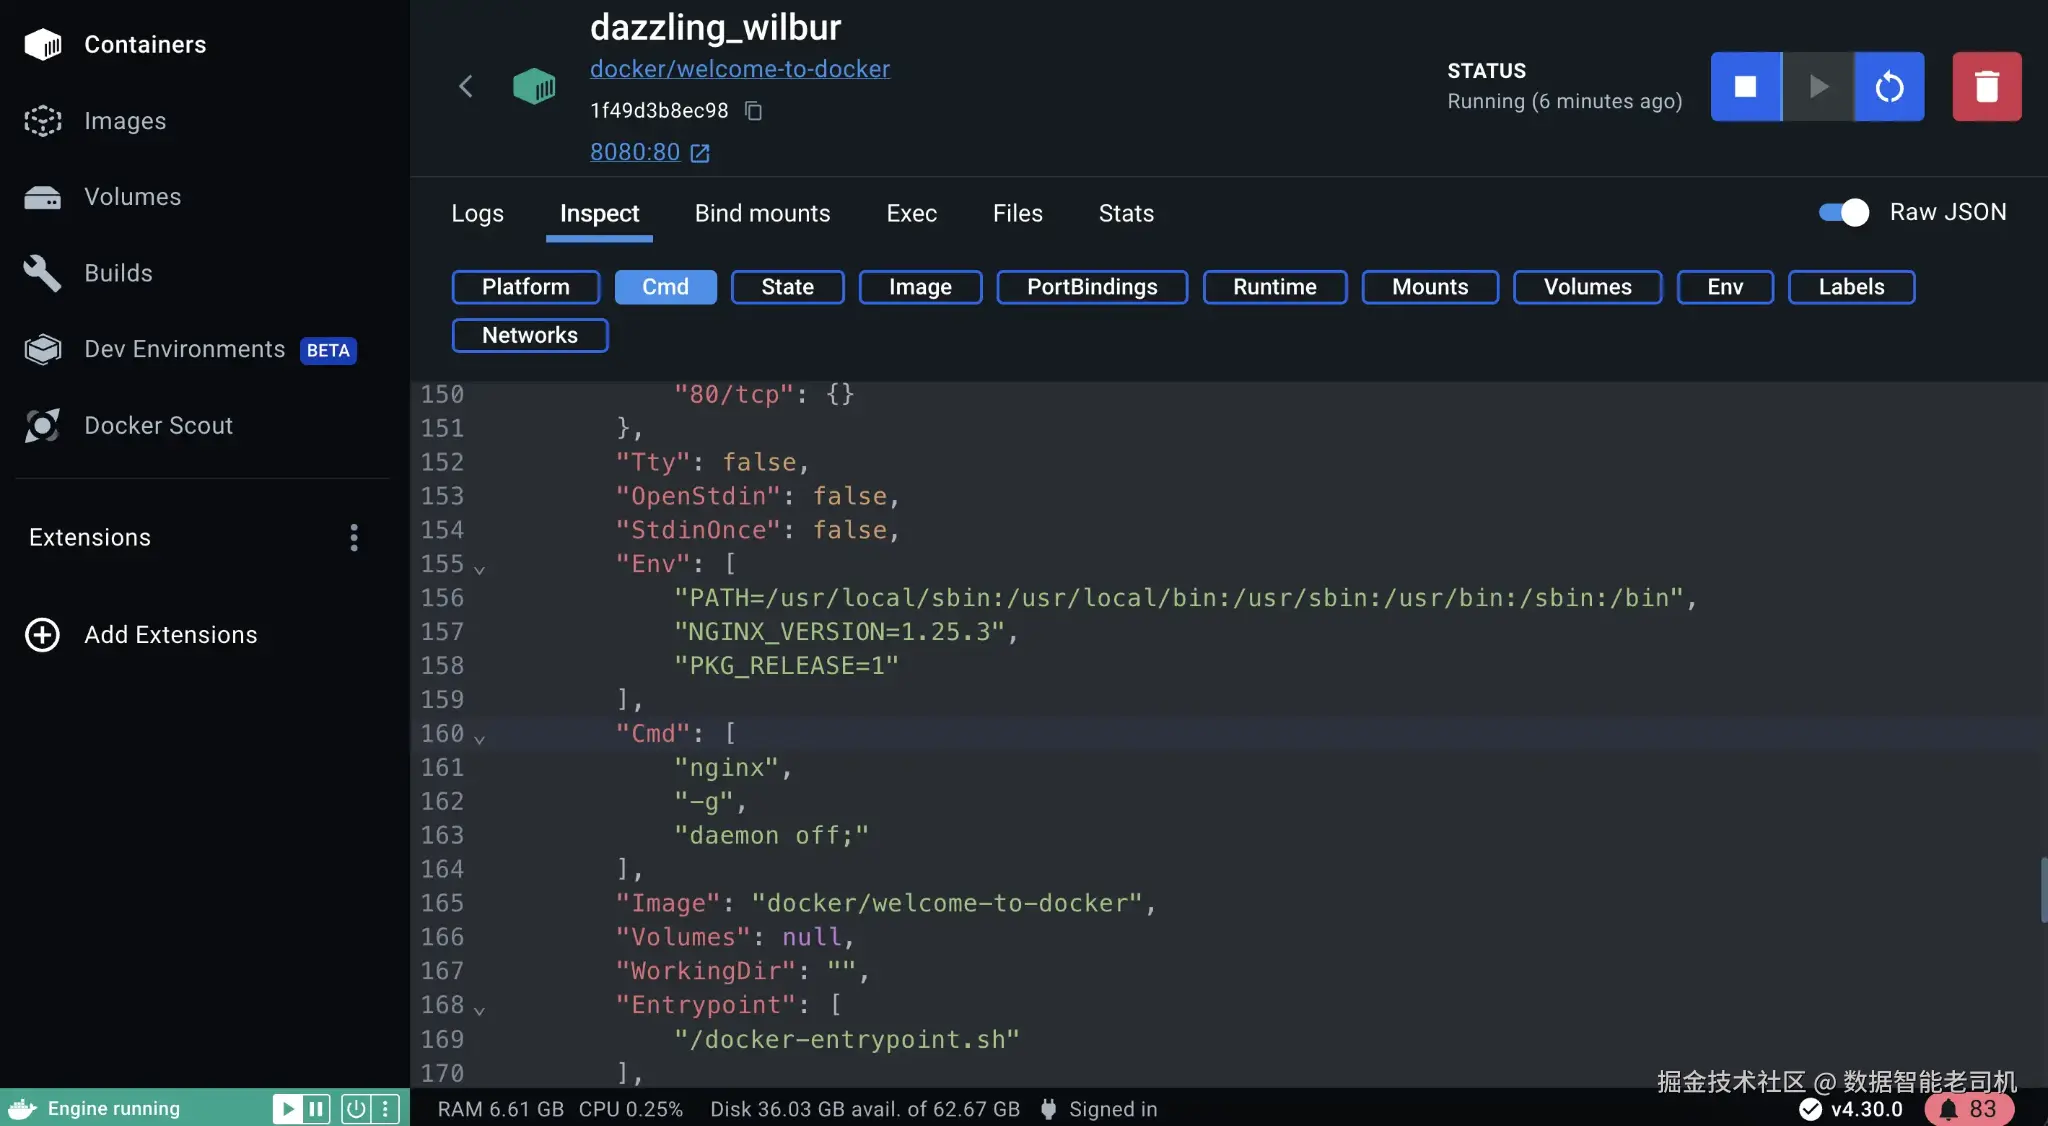
图 1.6:Inspecting a container in Docker Desktop
这是你会不断使用的 workflow:
- 当某件事失败时,检查 logs。
- Exec into a container 以 explore 或 debug。
- Inspect configuration,理解它是如何启动的。
探索完 container 后,下一步是 cleanly shut things down,并 reclaim resources。
Step 4: Clean up containers and images
Cleanup 是日常工作中 container lifecycle 的一部分,尤其是在 AI 和 ML machines 上,images 可能很大,disk space 很快就会消失。
首先列出 running containers:
docker ps停止 container:
arduino
docker stop <id>删除 container:
bash
docker rm <id>如果你还想删除 image:
bash
docker rmi docker/welcome-to-docker请有意识地操作:反复 pull large images 是纯粹的浪费,尤其是在 ML workflows 中,images 可能达到数 GB 大小。
现在你已经通过 starting container、inspecting it 和 cleaning it up safely,练习了完整 container lifecycle,也就具备了不留下 clutter、不丢失正在运行内容的 operational baseline。
接下来,我们会在这个基础上学习每天都会用到的 core Docker commands,包括用于 jobs 与 services 的 docker run、用于解释 system state 的 docker ps 和 docker images、用于 debug failures 的 docker logs,以及结合 Dockerfile 的 docker build,从而为 ML repositories 高效创建 images。
How do the basic Docker commands work: run, build, ps, images, and logs?
在本节中,你将学习如何有效使用 docker run,既用于 short-lived jobs,也用于 long-running services,包括 port publishing 和 mounting data into containers 的实用 flags。随后你会练习通过 docker ps 和 docker images 等 commands 来读取 system state,并通过解释 lifecycle state 和从 docker logs 获取正确 output 来 debug common failures。
最后,你将使用 Dockerfile build 自己的 images,并关注 layer ordering 和 cache behavior(via BuildKit),让 rebuilds 在 dependencies 很重且 code 经常变化的 machine learning repositories 中仍然保持快速。
你不需要记住完整 CLI,也可以用 Docker 做很多事情。关键是理解每个 command 操作的对象,以及它们如何融入一个简单 workflow:run something、inspect it、debug it,然后 build your own version。
Step 1: Start containers with docker run
docker run 是你最常用的 command。它会从 image 创建并启动一个 container。
你会经常使用的 flags:
--rm:one-shot containers 退出后自动 cleanup。-it:interactive shell / REPL。-d:detached mode,用于 services。-p host:container:publish ports。--name:给 scripts 和 debugging 一个 stable identifier。-e KEY=VALUE:通过 env vars parameterize behavior。-v host:container:将 code 或 data mount 到 container 中。
理解这一点最简单的方法,是看看同一个 command 如何因 use case 不同而表现不同。
bash
# One-shot job(container 退出后会被删除)
docker run --rm python:3.11-slim python -c "print('hello from a container')"

# Interactive shell
docker run --rm -it python:3.11-slim bash

# Detached service with port mapping
docker run -d --name web -p 8080:80 nginx:alpine
在 ML work 中,-v(bind mounts)是把 containers 从 sandbox 变成 usable workflow 的关键。你通常会将 working directory(code)和 data directory mount 到 container 中:
bash
# 将当前目录 mount 到 container 内的 /work
docker run --rm -it -v "$PWD":/work -w /work python:3.11-slim bash
Step 2: Check what is running with docker ps
启动 containers 后,下一步是理解实际正在运行什么。
docker ps 显示 running containers;加上 -a 则包含 stopped containers。
css
docker ps
docker ps -a
如果 container 立即退出,docker ps 不会显示它。docker ps -a 会显示。这通常是 debugging 的第一步。
Step 3: See available images with docker images
docker images 会显示本地存在的 images。
docker images在 ML 中,image lists 会很快变得 noisy。你会 pull 多个 framework versions、CPU vs GPU variants,然后在其上 build 自己的 images。保持 tags meaningful 很重要,这样你才能知道自己实际在运行什么。
Step 4: Debug with docker logs
当某件事不工作时,logs 通常是第一个要看的地方。
当一个 container "starts then stops" 时,原因几乎总在 logs 中。
xml
docker logs <container>
docker logs -f --tail 200 <container>
使用 -f 可以实时 follow logs。
在 ML workflows 中,logs 是你访问 training 和 inference jobs 的 primary interface。请用 structured way 打印 configuration、dataset versions 和 metrics,这样后续 debugging 会更容易。
Step 5: Build your own image with docker build
到目前为止,你一直在运行已有 images。下一步是 build 你自己的 image。
Dockerfile 是 image 的 build recipe。对于 ML repos,有两个目标:
- Deterministic builds
- Fast rebuilds
最小 pattern 如下:
sql
# Dockerfile
FROM python:3.11-slim

WORKDIR /app
COPY requirements.txt .

RUN pip install --no-cache-dir -r requirements.txt

COPY . .

CMD ["python", "main.py"]
这个 "copy manifest → install deps → copy code" 的 pattern 是有意设计的。它允许 Docker 在只有 application code 变化时复用 dependency layer。Docker 的 build docs 解释了 build cache 如何工作。
Step 6: Keep builds fast with .dockerignore
Docker 会把 build context 发送给 engine。如果你的 context 包含数 GB 的 datasets、checkpoints 或 raw logs,那么 builds 会变慢,并且你可能会不小心把 data copy 到 images 中。在 ML projects 中,这是一个常见问题来源。
.dockerignore 在 ML repos 中不可或缺,因为它让 builds 保持 lean。请把 build context 当作一个 packaging boundary。
bash
# .dockerignore(示例)
__pycache__/
*.pyc
.venv/
.env
data/
datasets/
artifacts/
models/
wandb/
mlruns/
最后那组 ignores(wandb/、mlruns/)是 teams 经常踩坑的地方。只要一次意外 build 把 logs 或 run artifacts 放进 context,你的 image 就可能膨胀数 GB。
Step 7: Use layer caching effectively
在 ML projects 中,dependency installation 通常是最慢的 build step。你希望 dependency layer 尽可能稳定,以便跨 builds 复用。
一些实用 tactics:
- 在
requirements.txt中 pin versions,或使用 lock files,让 rebuilds deterministic。 - 将 "core runtime" dependencies(numpy、torch/tf、onnxruntime)与 "dev tooling" dependencies(pytest、black)分开,使 production image 更小。
- 如果有 native builds(tokenizers、custom ops),考虑 multi-stage builds,这样 compilers 就不会进入 runtime images。
核心想法很简单:保持 slow、stable steps cached,并隔离频繁变化的 code 部分。BuildKit 还支持更高级 caching approaches,例如缓存 package manager downloads,这在 CI 中尤其重要,因为 CI machines 通常是 ephemeral 的。
Step 8: Debug build failures
当 builds 失败时,遵循一个简单 loop:
- 读取 failing layer;Docker 会打印 exact command that failed。
- 当 output 太 compact 时,用
--progress=plain重新运行。 - 验证 architecture(arm64 vs amd64)是否与正在 pull 的 wheels 匹配。
- 通过在 intermediate image 的 container 中打开 shell 进行 interactive debugging。
为了获得完整、逐行的 build log,而不是 compact BuildKit output,从而看清 failure 发生在哪里,可以用 plain progress output 重新运行 build:
ini
docker build --progress=plain -t my-image:debug .Step 9: Understand build output
你的 Docker build output 会显示哪些 layers 被 rebuilt,哪些 layers 被 reused。Cache hits(CACHED)表示 build 完整复用了 previous layer;layer rebuild 则表示 upstream 有东西变化了。
一个典型 build log(简化版):
ini
[+] Building 18.2s (8/8) FINISHED
 => [internal] load build definition from Dockerfile
 => [internal] load .dockerignore
 => [1/4] FROM python:3.11-slim
 => [2/4] WORKDIR /app
 => [3/4] COPY requirements.txt .
 => [4/4] RUN pip install -r requirements.txt
如果 step [4/4] 每次 build 都很慢,说明你的 cache 被 invalidated 了。常见原因是 requirements.txt 变化太频繁,或者 copy too much too early。
Step 10: Apply best practices for ML Dockerfiles
ML images 往往变得 unmaintainable,因为它们不断累积 "just one more dependency"。解决方法是严格区分什么应该属于 image,并明确 boundaries。
一些很快就会带来回报的 best practices:
- 使用 slim base image,除非你有理由不这样做;只添加真正需要的 system packages。
- 在 long-running services 中避免以 root 运行;为 inference containers 创建一个 user。
- 如果 training 和 inference images 的 dependency footprints 差异明显,请将它们分开。
- 让 rebuild 变得容易:Dockerfile 应保持 readable 和 deterministic。
- 永远不要把 credentials 或 API keys bake 到 images 中。
你刚刚覆盖了让 ML images fast、secure 和 maintainable 的 Dockerfile practices,例如选择 minimal base images、分离 training 与 inference footprints,以及避免在 images 中存放 secrets。这些实践会直接减少 rebuild time 和 operational risk。它们重要的原因很简单:在 operational AI 中,Dockerfile 是 reproducibility 和 reliability 被 enforce 的地方;如果不这样做,它们就会随着 "one more dependency" 的累积而逐渐腐蚀。
有了这些 commands,你现在拥有一个完整 loop:run containers、inspect them、debug failures,并 build your own images。下一节会从 "如何 build 一个好 image" 拉远到 "如何在真实 AI workflow 中使用这个 image",包括如何清晰分离 code、data 和 secrets,如何不在 host 上安装完整 ML stack 就在本地运行 workloads,以及如何将 local development 连接到 registries 和 CI pipelines,使同一个 artifact 可以从 experiment 移动到 deployment。
What is Docker's role in modern AI workflows?
在本节中,你将围绕一个 versioned Docker image 来组织 AI workflow,而不是围绕 one-off environment;你会在本地 CPU 上运行 AI workload,而无需在 host 上安装 ML stack;并通过 runtime attached data,例如 bind mounts,清晰分离 code、data 和 secrets。你还会把 local work 连接到 registries 和 CI,使你测试过的同一个 image 可以被 pipelines 和 deployments pull 和 run。
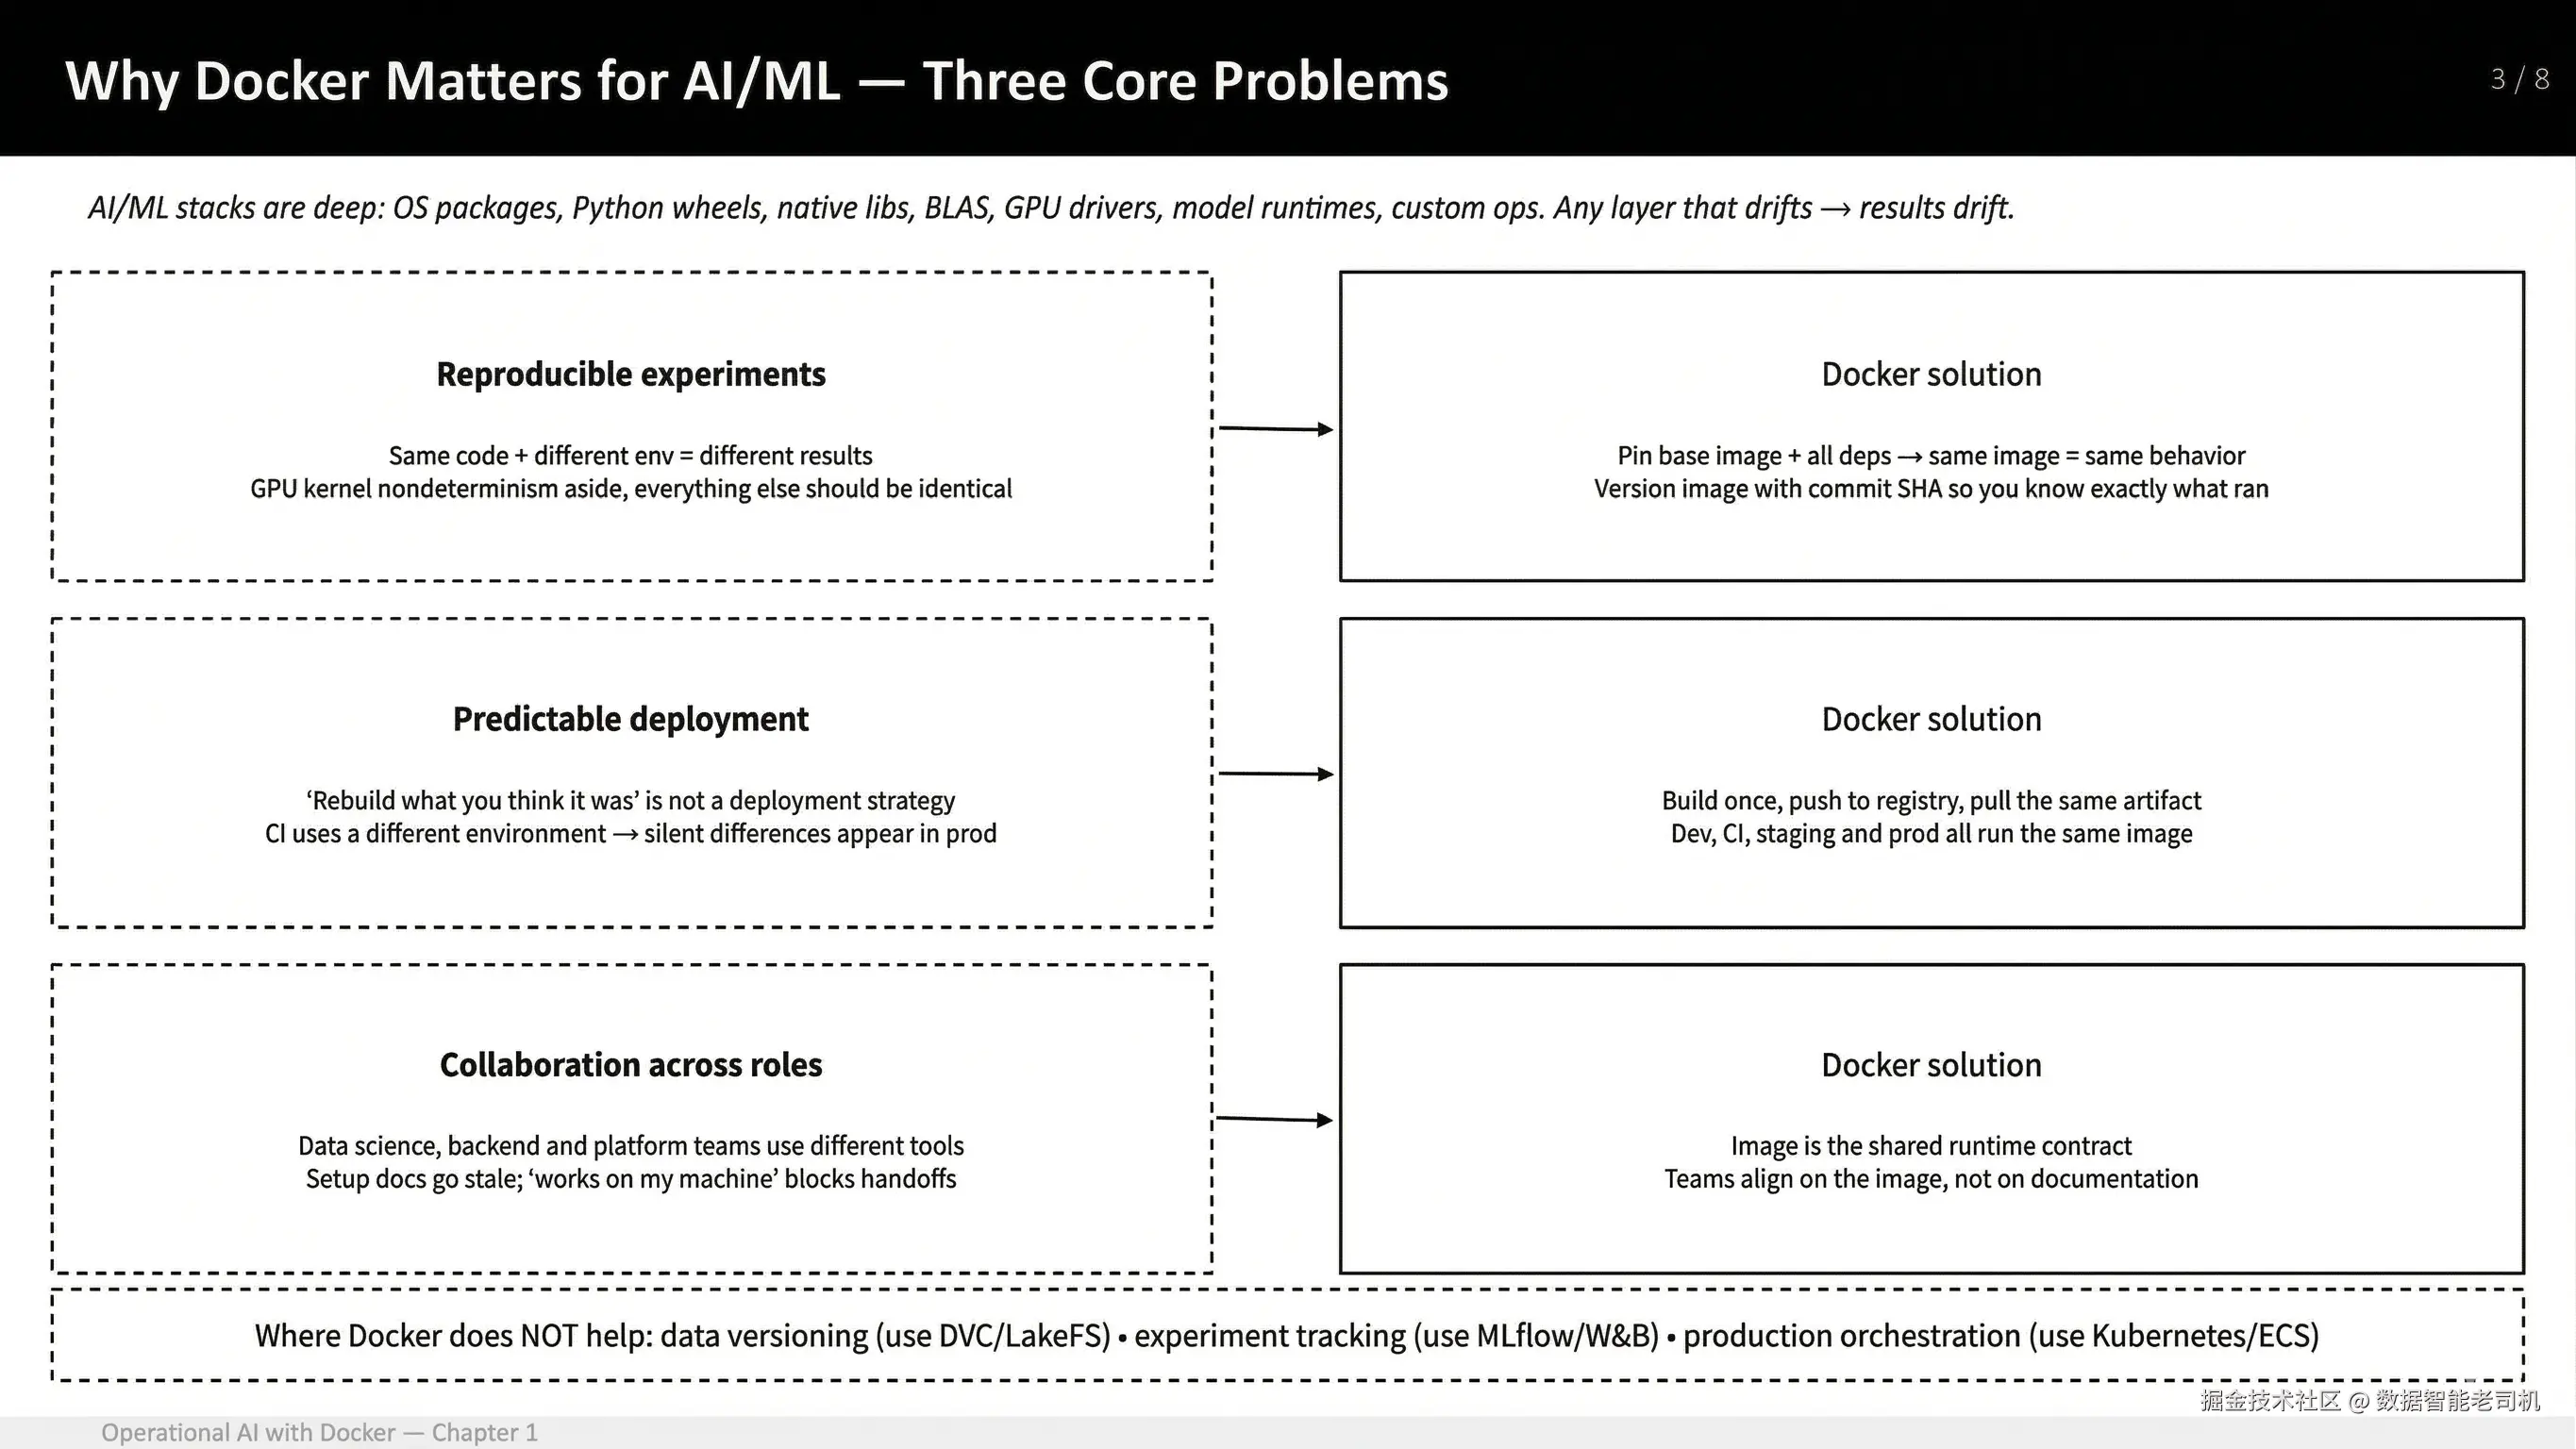
图 1.7:为什么 Docker 对 AI/ML 很重要------reproducible experiments、predictable deployment,以及 collaboration across roles
本节结束时,你会获得一个使用 Docker 进行日常 AI 工作的 practical roadmap。你将从核心概念开始:image 是 reproducible runtime contract;随后走过一个小型 hands-on training example;再将该 pattern 扩展到 common development workflows,例如 framework testing、GPU usage 和 notebooks;最后看到同一个 image 如何成为 registries、CI 和 deployment targets 之间共享的 artifact。
到这里,你已经可以运行 containers,并且理解 primitives。剩下的问题是:如何在 AI workflow 中使用它,同时不把 Docker 变成不必要的 ceremony?
最简单答案是:把 image 当作你的 runtime contract。
换句话说,不要把 Docker 想成一个你 "occasionally use" 的工具,而是把 image 视为你的 code 如何跨 environments 运行的 single source of truth。
Two recurring threads in this book
为了让这一点具体化,我们会反复回到两个 scenarios:
Model development workflow:本地 iterate,在 CI 或 batch 上运行同一个 training job,并将一个 pinned runtime ship 到 production。
Edge deployment workflow:为 constrained hardware(通常是 Arm)打包一个 slim inference runtime,尽量少做 assumptions,并支持 reliable updates。
这两个 workflows 看起来可能不同,但共享相同核心思想:image 定义 runtime,其他一切(CI、deployment、edge devices)只是执行这个 image。
为了展示一个 versioned image 如何从 developer machine 移动到 repeatable team workflow,下图映射了标准路径:你用 Docker Desktop 在本地 build,CI runner 重新 build 并测试同一个 image,tested artifact 被 push 到 registry,而你的 deployment target(batch job、service 或 edge device)会 pull 并运行这个 exact image。

图 1.8:基于 image 的 workflow:local build → CI build/test → registry → deployment target
这个 diagram 值得记住:同一个 image 会从 laptop 移动到 CI,再到 production,而不会在每一步被不同方式 rebuild。
What actually makes a workflow reproducible?
一个 reproducible workflow 不只是从 running container 开始。它从定义这个 container 的 traceable assets 开始,也从清楚划分什么应该放进 image、什么应该留在 image 外部开始。
The reproducible unit: repo + Dockerfile + pinned dependencies
有了 image-based path 后,下一步是定义为了让 run 可复现,必须 versioned 的内容:不是简单一句 "a container",而是 repository、Dockerfile,以及生成 specific image 的 pinned dependency inputs;同时让 data 和 secrets 留在 image 外部,并在 runtime 注入。
如果你想要 reproducibility,你需要的不只是 "a container"。你需要 recipe 和 inputs:repository、Dockerfile、lock files,以及一个能映射回 source control 的 image tag。
所有非 data、非 secrets 的东西都应该定义在 image 内部。Data 和 secrets 是 external 的:datasets 在 runtime mount 或 fetch;secrets 通过 environment variables 或 secret stores 注入。
理解这个 boundary 的简单方法是:
arduino
Code + dependencies → inside the image(versioned)
Data + secrets → outside the image(runtime 注入)
这种 separation 会防止 "it worked on my machine" problems 渗入 ML workflows。
Hands-on: Containerize a tiny training run
理解 boundary 后,我们用一个小型 end-to-end example 实践这个 model。这个 example 故意很小;重点是 workflow quality,而不是 model quality。
我们会 build 一个 image,训练一个 trivial classifier,并打印 metrics。
Step 1: Set up the project structure
Project layout:
arduino
tiny-training-run/
  Dockerfile
  requirements.txt
train.pyrequirements.txt:
ini
scikit-learn==1.4.2
numpy==1.26.4train.py:
ini
from sklearn.datasets import load_iris
from sklearn.model_selection import train_test_split
from sklearn.linear_model import LogisticRegression
from sklearn.metrics import accuracy_score

X, y = load_iris(return_X_y=True)
X_train, X_test, y_train, y_test = train_test_split(
    X, y, test_size=0.25, random_state=42, stratify=y
)

model = LogisticRegression(max_iter=200)
model.fit(X_train, y_train)

pred = model.predict(X_test)
print(f"accuracy={accuracy_score(y_test, pred):.3f}")Dockerfile:
sql
FROM python:3.11-slim

WORKDIR /app
COPY requirements.txt .
RUN pip install --no-cache-dir -r requirements.txt

COPY train.py .
CMD ["python", "train.py"]
Step 2: Build and run the container
arduino
docker build -t ch1-iris:0.1 .
docker run --rm ch1-iris:0.1
输出如下:
ini
accuracy=0.947这段代码展示了从 examples 中学习,然后检查学得如何。它查看一些 sample data 来学习 patterns,然后尝试猜测下一个 number 的 type。最后打印出的数字表示有多少 guesses 是正确的,这可以帮助我们理解 learning 是否有效。
你刚刚在 container 中执行了一个 ML training run。你的 host Python 没有被触碰。这就是核心价值主张。这里重要的不是 model 本身,而是 entire runtime(Python、dependencies 和 code)都由 image 定义,并以一致方式执行。
现在你已经确认 training run 可以在 container 中干净运行,下一步是让它的 outputs 在 container 外部可用:将 metrics、model files 和 plots 写入 mounted directory(bind mount)或 Docker volume,而不是留在 container 的 writable layer 中。
Making outputs usable: Mounting artifacts
Training jobs 通常会产生 artifacts:metrics、models、plots。你通常不希望这些 bake 到 image 中,而是希望它们写入 mounted directory 或 volume。
与其把这当成一个独立 step-by-step exercise,不如将它视为同一个 training run 的小扩展。唯一不同的是,你现在给 container 一个 host directory,让它可以写 outputs。
为了将 training outputs 持久化到 host machine,创建一个 local artifacts directory,然后用 bind mount(-v)运行 container,使 container 写入 /artifacts 的任何内容都直接写入你机器上的 ./artifacts。
bash
mkdir -p artifacts
docker run --rm \
  -v "$PWD/artifacts":/artifacts \
  ch1-iris:0.1
这会将 host directory mount 到 /artifacts。你的 code 可以写入 /artifacts,而结果会在 container 退出后保留在 metrics.txt 文件中。
bash
cat metrics.txt
ini
accuracy=0.947Extending the same idea to a real workflow
当你理解了基本 pattern(image defines runtime、data is mounted、outputs persist),同样方法就可以扩展到其他 common ML workflows。接下来的 examples 不是新概念,而是同一个概念的 practical variations。
Running ML stacks without installing them locally
有时你只是想快速验证一个 framework stack。Docker Hub 上的 official TensorFlow images 是直接方法。
bash
docker run --rm tensorflow/tensorflow:2.16.1 python -c "import tensorflow as tf; print(tf.reduce_sum(tf.random.normal([1000,1000])))"第一次运行会下载 image layers;之后再次运行会很快。如果 command 打印出 tensor value,就说明你已经在 isolated environment 中执行了 TensorFlow,而无需在 host OS 上安装 TensorFlow。
这在切换 frameworks 或测试 versions,而不修改 local setup 时尤其有用。
GPU containers 采用同样思想,但需要 host 上安装 NVIDIA driver,以及 NVIDIA Container Toolkit。TensorFlow 的 Docker installation documentation 将 Docker 识别为使用 GPU 的 easy path,因为 host 主要需要 NVIDIA driver。
如果 CPU example 展示了 Docker 如何帮助你干净测试 framework,那么 GPU version 展示了即使引入 hardware acceleration,同样 pattern 仍然成立。Runtime 仍然由 image 定义,只不过现在 container 还需要显式访问 host 上的 GPU resources。
GPU-enabled version(using host GPU)
要使用 host GPU,你必须:
- 在 host 上安装 NVIDIA drivers。
- 安装 NVIDIA Container Toolkit。
- 使用带有 CUDA support 的 TensorFlow image。
示例 command:
css
docker run --rm --gpus all tensorflow/tensorflow:2.16.1-gpu python -c "import tensorflow as tf; print(tf.reduce_sum(tf.random.normal([1000,1000])))"What each GPU-related part means
--gpus all:告诉 Docker 将 host 上所有可用 NVIDIA GPUs expose 到 container 中。Docker 会自动处理 device mapping。
tensorflow/tensorflow:2.16.1-gpu :包含 GPU acceleration 所需的 CUDA 和 cuDNN libraries。即使指定了 --gpus,CPU-only image 也无法使用 GPU。
tf.random.normal([1000,1000]) :在 default device 上创建 tensor。如果 TensorFlow 检测到 GPU,它会自动把 operation 放到 GPU 上。
tf.reduce_sum(...) :执行 compute-heavy operation,使你更容易验证 GPU usage。
Command structure 与 CPU version 保持一致;不同之处在于 GPU resources 被显式 expose 给 container。
当你能解释 GPU flags,并验证 TensorFlow 确实在 graphics processing unit(GPU)上执行工作后,下一个 practical step 是将同样的 "pinned runtime in an image" 思想应用到 notebooks,因为 Jupyter 很方便,但它经常在不同 machines 上重现相同 dependency drift problems。
Notebook workflow: Run Jupyter inside a container
在 container 中运行 Jupyter,可以保留 familiar notebook workflow,同时将 environment 固定在一个 versioned image 中,使其可以跨 laptops 和 continuous integration runners 复现。
Notebooks 在 ML development 中很常见,同时也是 reproducibility trap。在 container 中运行 Jupyter 是一种 pragmatic compromise:保留 notebook UX,并将 runtime 锚定在 image 中。
ruby
docker run --rm -it \
  -p 8888:8888 \
  -v "$PWD":/home/jovyan/work \
  jupyter/scipy-notebook:latest
这是一个 dev-time convenience image,不是 production artifact。Production story 仍然是 build 你自己的 image,并 pin dependencies。
到目前为止,本节 examples 聚焦的是一个 developer 如何在本地使用 Docker。下一步是放大视角,看看同一个 image 变成 team shared、tested 和 deployed 的东西时,会发生什么变化。
From local workflow to team workflow
一旦 training 或 inference image 存在,teams 就会停止争论 setup,并开始讨论真正的 engineering questions:image 里放了什么,container 需要什么 config,data 如何 mount,以及部署的是哪个 version。
常见 pattern:
- Developer 在本地 build 并 run image。
- CI 重新 build image、run tests、用 commit SHA 打 tag,并 push 到 registry。
- Deployment 按 tag 或 digest pull image,并以 environment-specific configuration 运行。
这就是 image 从 local artifact 转变为 team-wide contract 的地方。只有当 image 能存储在其他人可靠访问的位置时,这个 team-wide contract 才能成立。实践中,这意味着要使用 registries、理解 authentication 如何工作,并遵循基本 push / pull workflow。
Working with registries
在你可以 push image 到 registry 之前,Docker 需要知道你是谁,以及你被允许向哪里 publish images。这就是 docker login 的作用。
当你在安装了 Docker Desktop 的机器上运行 docker login 时,后台会发生几件事。Docker 会与 container registry 的 authentication endpoint 通信(默认是 Docker Hub,或者你指定的其他 registry),然后将 authentication token 存储在本地。这个 token 会被未来的 docker push 和 docker pull 等 commands 自动复用。
在 Docker Desktop 上,这个过程通常比 headless server 上更顺滑。如果你已经通过 GUI 登录 Docker Desktop,那么 CLI 通常会透明复用这些 credentials。在很多情况下,运行 docker login 只是确认你已经 authenticated。
默认情况下:
- Credentials 会使用 operating system 的 keychain 或 credential manager 安全存储。
- Password 不会被 embedded 到 images 或 commands 中。
- Authentication scoped to 你登录的 registry。
例如,登录 Docker Hub 使用:
docker login登录其他 registry,例如 private 或 cloud-hosted registry,则类似:
docker login myorg.example.com认证完成后,Docker 就知道你可以 push 到哪个 namespace。如果你的 image 被 tag 为 myorg/image-name:tag,Docker 会使用该 namespace 在 docker push 时判断 ownership 和 permissions。
Authentication 处理好之后,实际 registry workflow 很简单。你为 namespace tag image,push 它,然后在别的地方 pull 并 run 同一个 artifact。
A minimal registry workflow(push/pull)
Registries 是 images 成为 team artifacts 的地方。Mechanics 很简单:tag、push、pull。Nuance 在于 access control 和 immutability policies,但 developer workflow 很直接。
将本地 image tag 到 registry namespace:
bash
docker tag ch1-iris:0.1 myorg/ch1-iris:0.1Push 到 Docker Hub,或根据 organization 使用其他 registry:
bash
docker push myorg/ch1-iris:0.1在另一台机器上:
bash
docker pull myorg/ch1-iris:0.1
docker run --rm myorg/ch1-iris:0.1
关键点是:第二台机器不 rebuild 任何东西。它只是 pull 同一个 pre-built image 并运行。
既然你现在已经可以在另一台机器上 pull 和 run exact same image,而无需 rebuild,下一项 operational concern 就是这个 artifact 移动起来有多重。在 machine learning(ML)workflows 中,images 可能增长到多个 GB,这会直接影响 pull time、build time 和 disk usage,因此下一节聚焦于养成使用 Docker built-in commands 在本地检查 image sizes 的习惯。
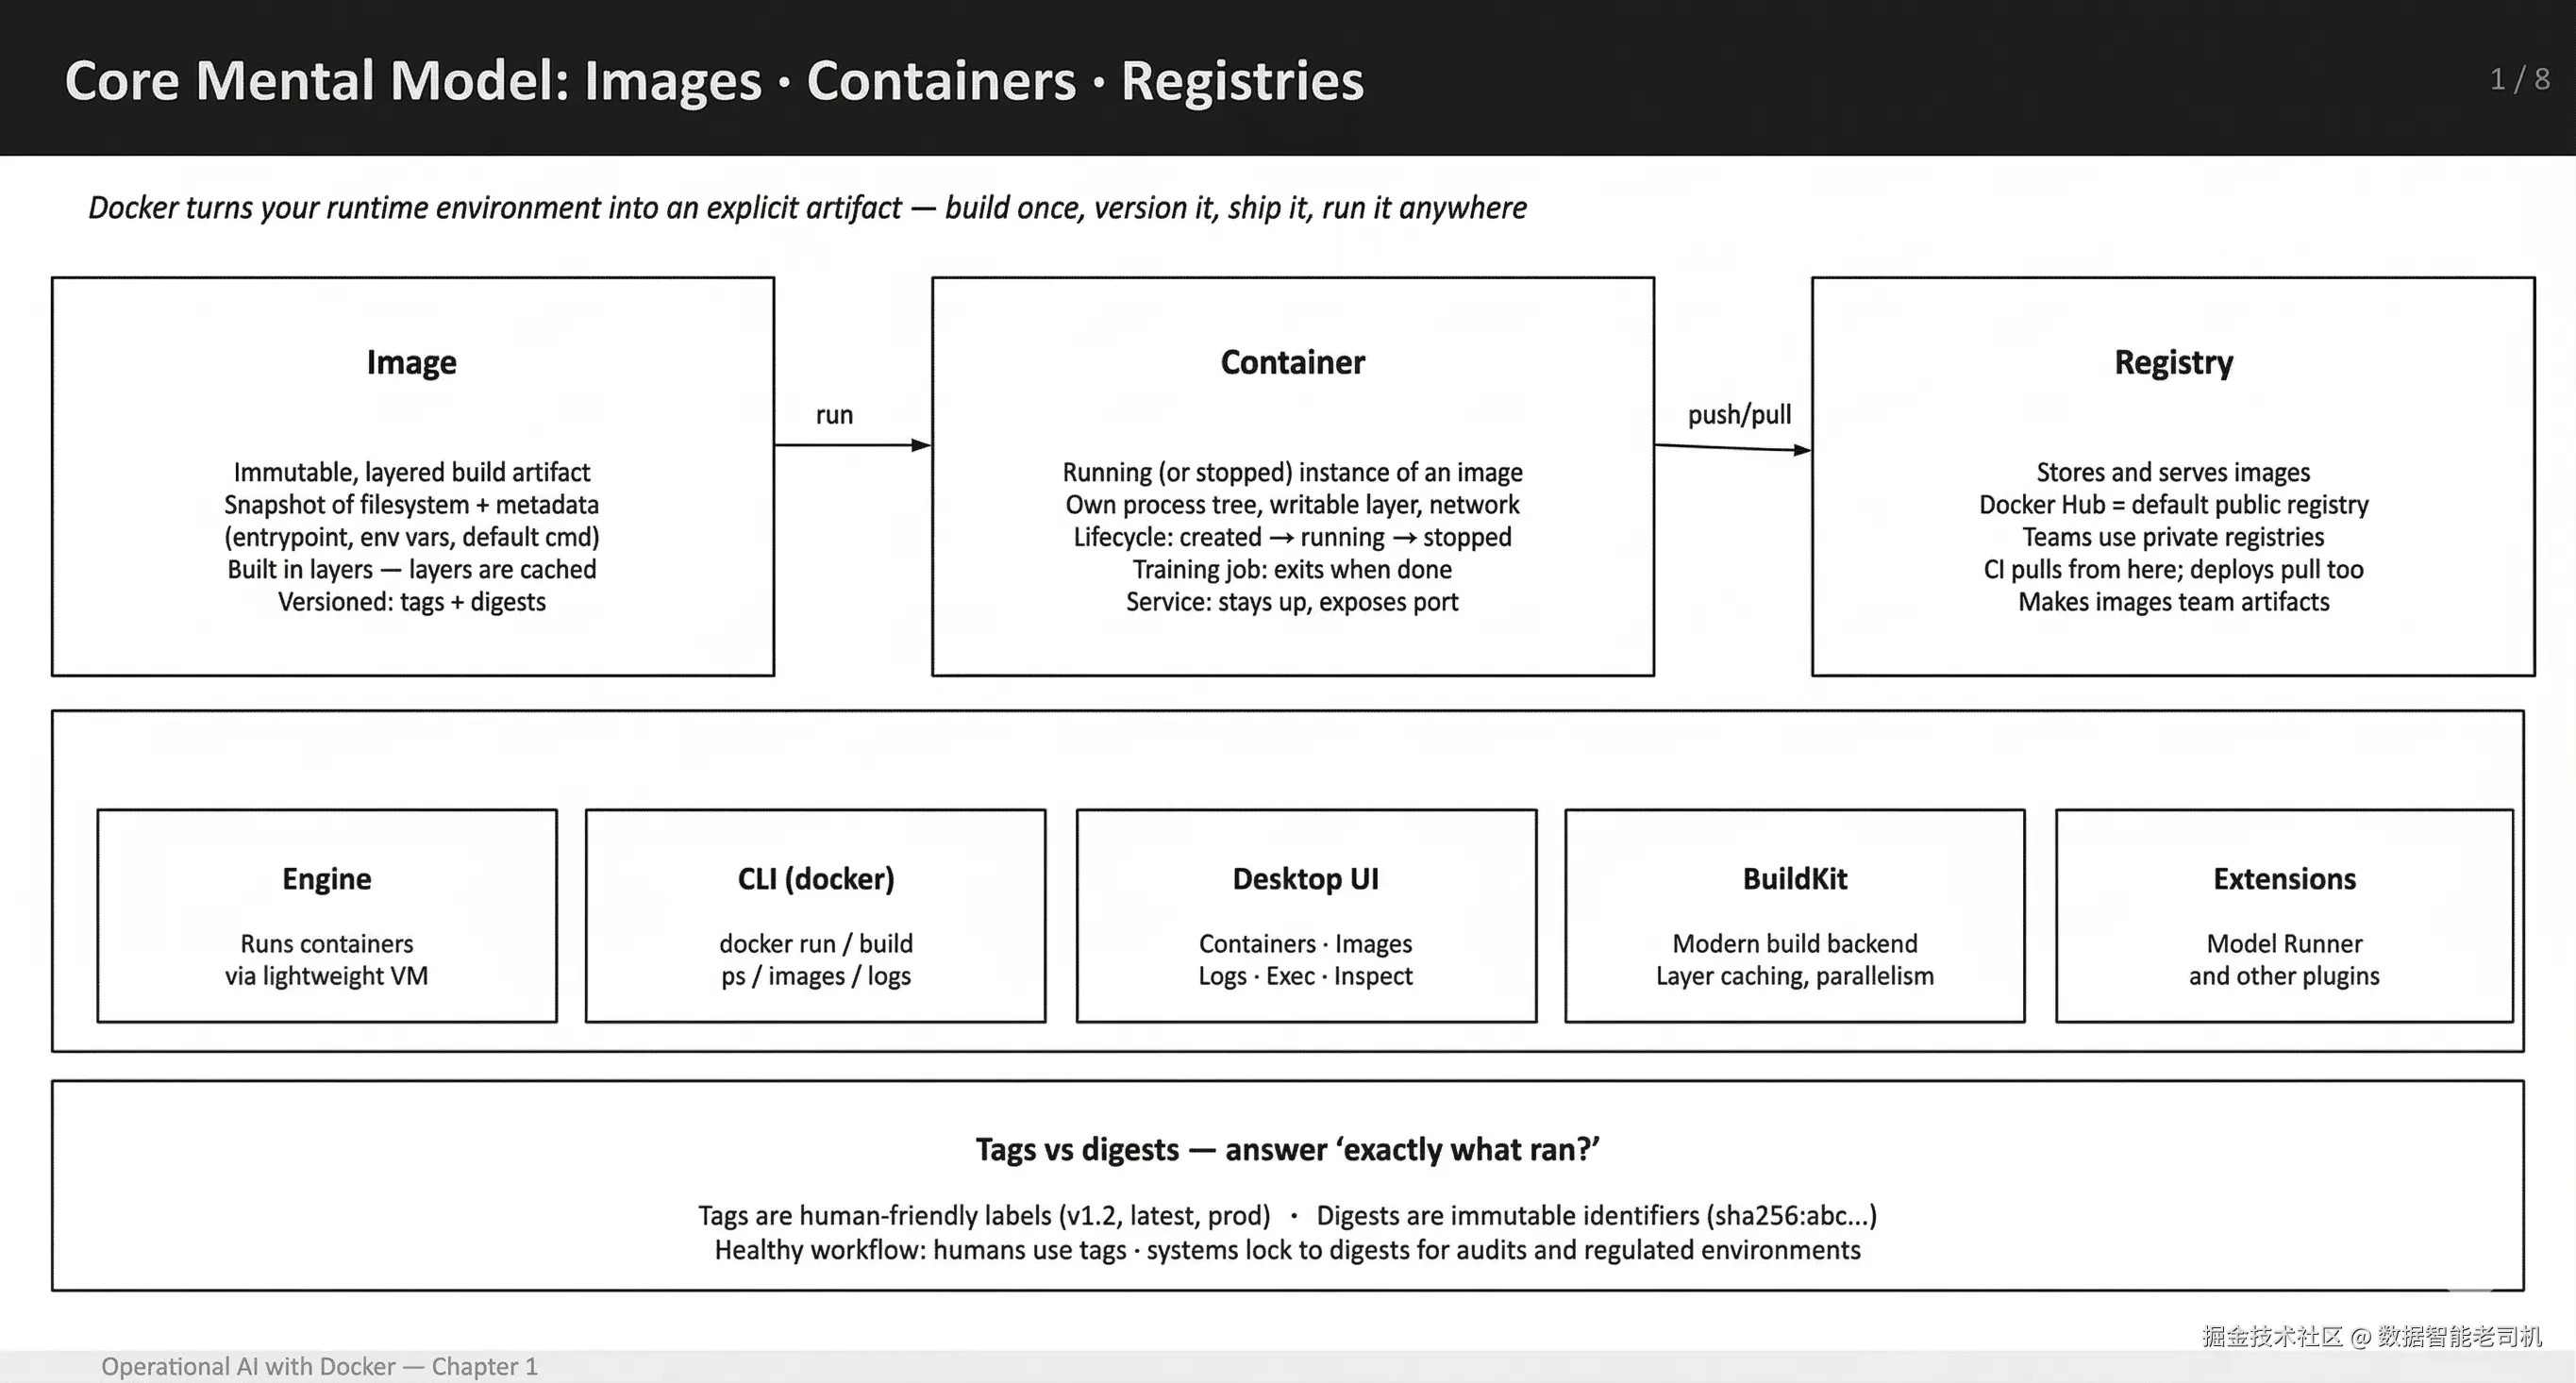
图 1.9:核心 mental model:Docker images、containers 和 registries
Operational considerations: image size and structure
一旦 images 开始在 machines、CI runners 和 deployment targets 之间移动,size 就不再是抽象问题,而是 operational problem。因此,养成检查 image size,并理解这些 size 来自哪里,很有帮助。
Image size awareness
Machine learning container images 增长很快,而且往往比预期更快。包含 CUDA、deep learning frameworks 和 system dependencies 的 base images,在你加入自己的 code 之前就很容易达到数 GB。如果放任不管,这会导致 pulls 更慢、build times 更长,以及不必要的 disk pressure。
一个简单习惯是定期检查本地机器上的 image sizes。Docker 提供了快速方法:
swift
docker images --format "table {{.Repository}}\t{{.Tag}}\t{{.Size}}"这个 view 可以让 oversized images 一眼可见,并帮助你识别哪些 images 值得 revisit。Large sizes 并不总是问题,但它们应该是 conscious trade-off,而不是 accident。
如果 size 告诉你某个 image 比预期大,下一步问题就是为什么。这正是 layer inspection 有用的地方,因为它让你看到哪些 build steps 对最终 artifact 的 size 贡献最大。
Inspecting image layers
当 image 变大时,下一步问题是为什么。Container images 是由 layers 构建的,一个位置不佳的 instruction 可能会增加数百 MB,而从最终 size alone 看不出来。
像 dive 这样的工具可以让这一点可见。它们允许你逐 layer 检查 image,显示每个 build step 添加了哪些 files、改变了哪些 files,或留下了哪些 files。这对 ML images 尤其有用,因为 package managers、temporary files 和 cached artifacts 会悄悄膨胀 image size。
Layer inspection 可以帮助你尽早发现常见问题,例如不必要的 build dependencies、未清理的 caches,或者把 large datasets copy 到 image 中,而不是在 runtime mount 它们。
你不需要 aggressively optimize 每个 image,但具备查看 layers 内部内容的能力,会把 image size 从 mystery 转变成 manageable design choice。
dive 是一个 lightweight CLI tool,用于逐 layer inspect Docker images。安装很直接,不同 platform 略有不同。在 macOS 和 Linux 上,通常通过 system package manager 安装;其他 environments 也有 prebuilt binaries。
安装完成后,分析 image 只需运行:
arduino
dive <your-image-tag>例如:
docker pull alpine:latest && dive alpine:latest输出效果如下:
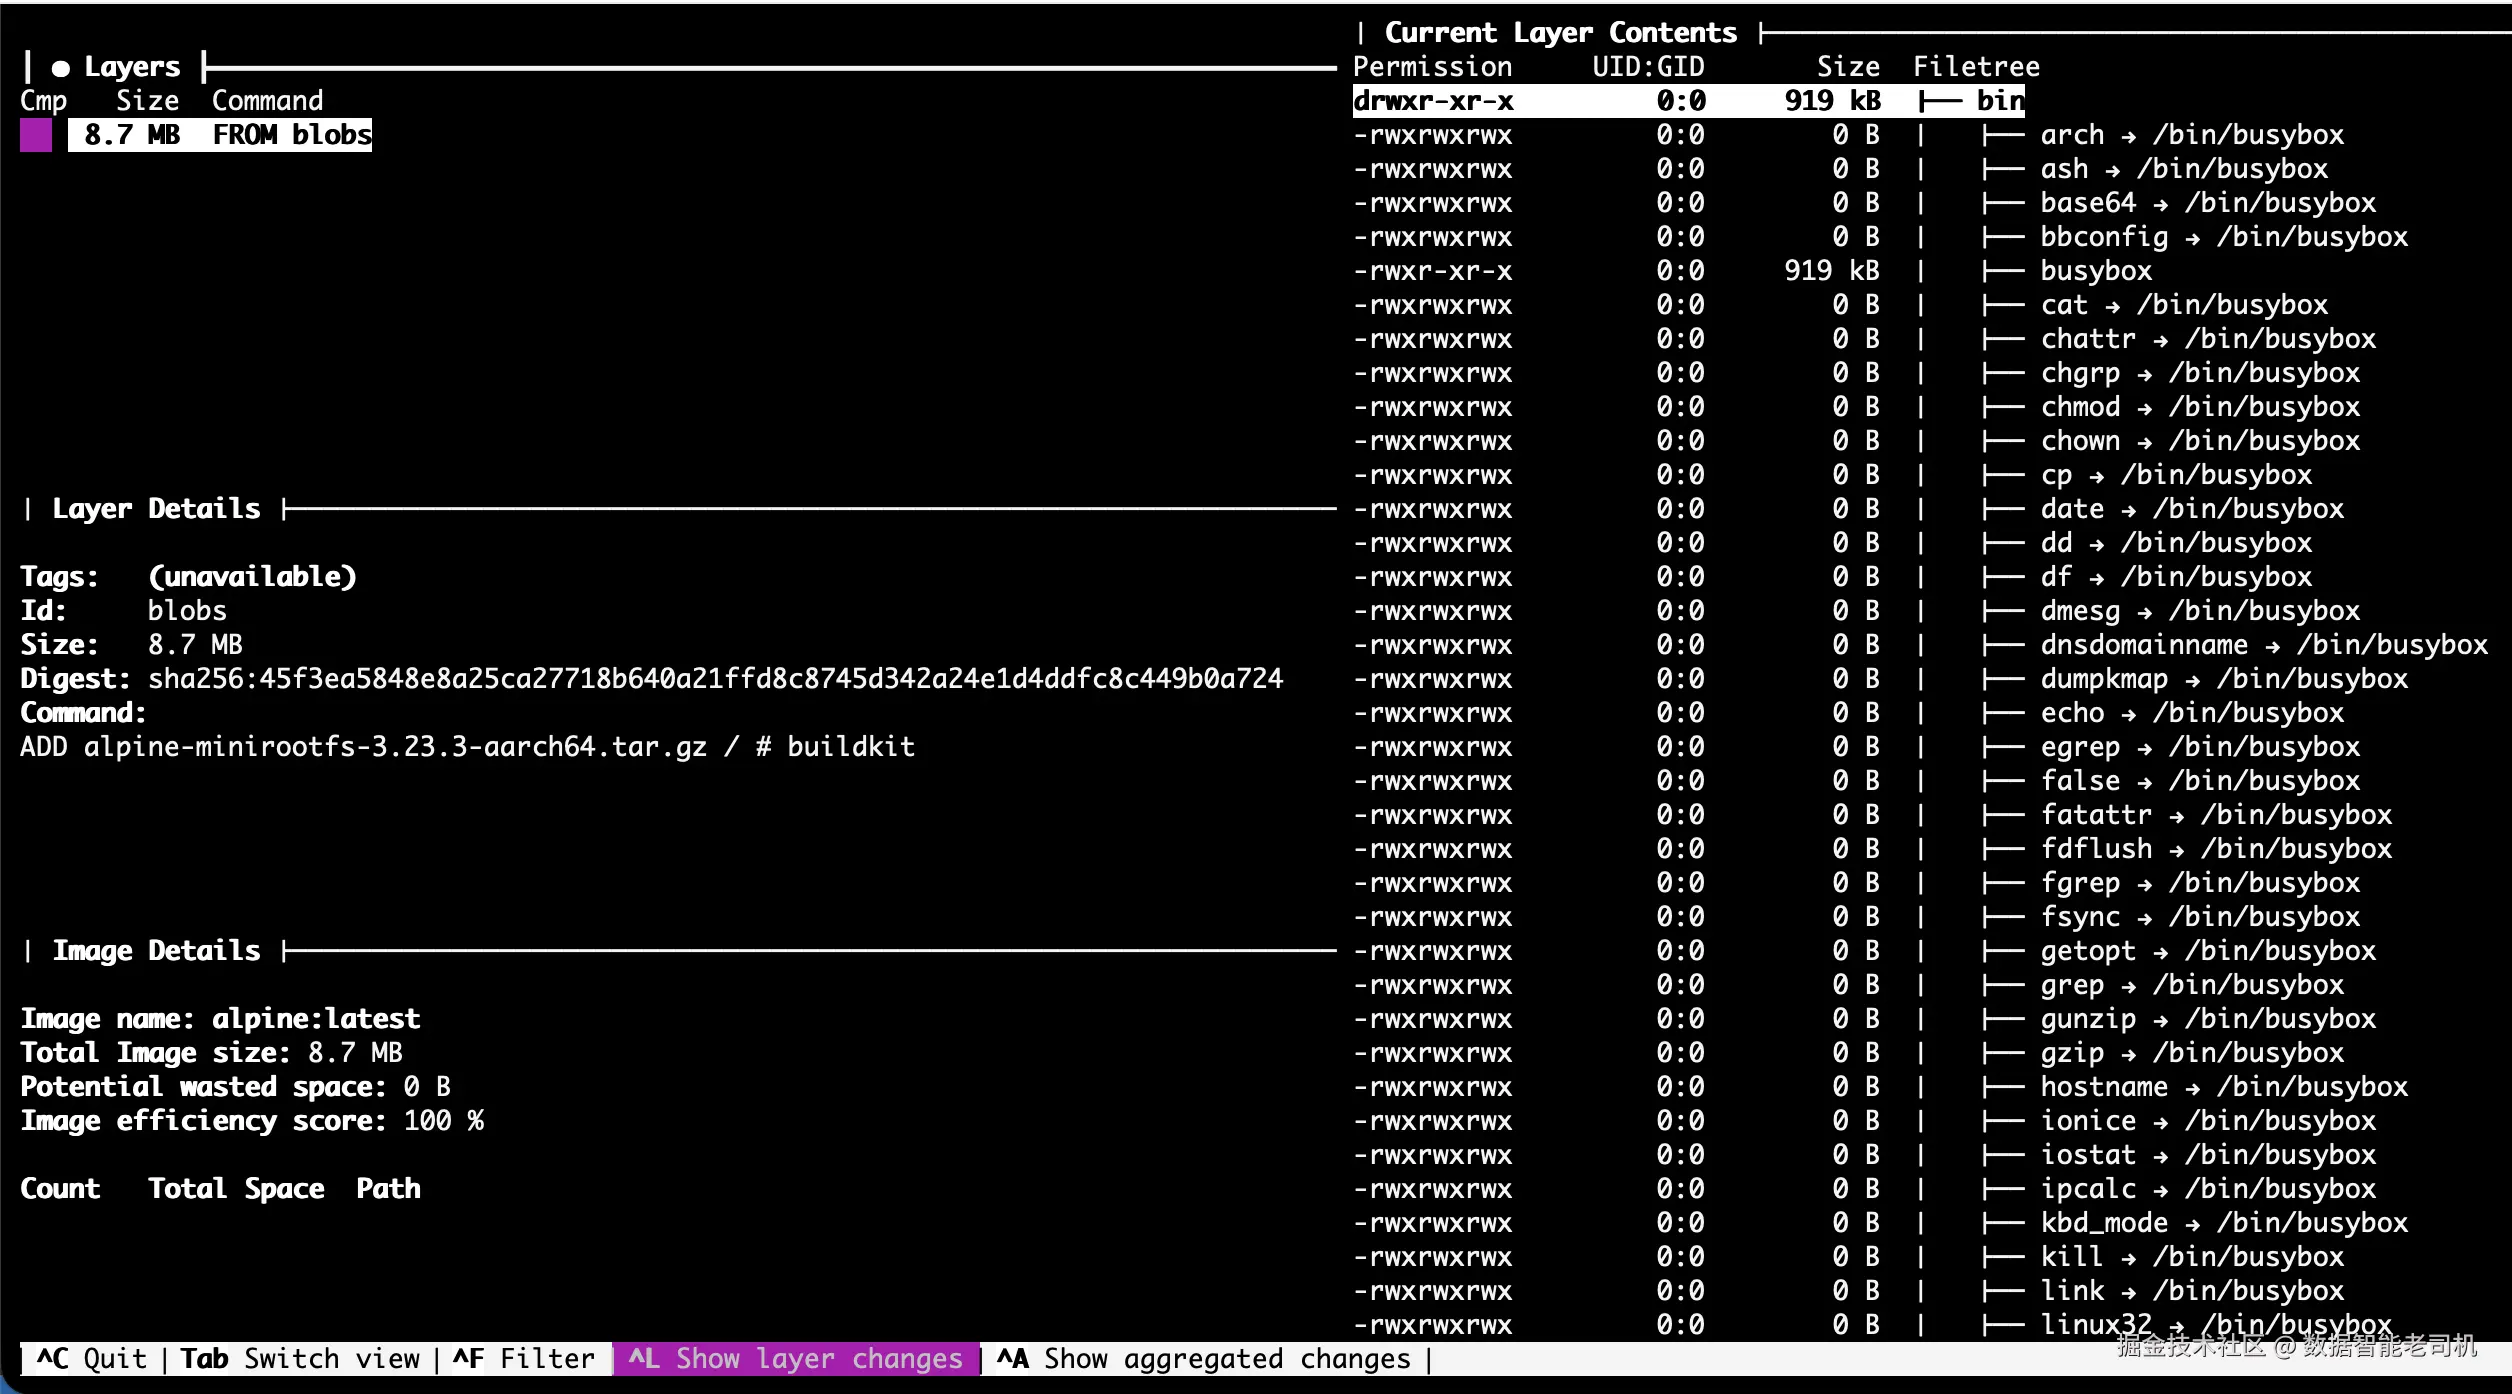
图 1.10:使用 dive tool 检查 Docker container image
这会打开一个 interactive view,展示 image 的每个 layer、添加或删除的 files,以及它们消耗的 space。它可以快速揭示 unnecessary files、leftover caches 或 build artifacts,这些内容可以在后续 iterations 中安全删除。
尽早使用 dive,会让 image optimization 成为 informed process,而不是 guesswork。
Edge deployment thread: smaller images, fewer assumptions
Edge environments 会放大 sloppy images 的成本。通过弱网络 pull multi-GB images 很痛苦。把 compilers 放进 runtime images 是浪费。Architecture mismatches 也很常见。
Edge-oriented images 的两个规则:
- 保持 runtime images small(slim base images,只保留 runtime dependencies)。
- 分离 build 和 runtime concerns,例如在 compiling native code 时使用 multi-stage builds。
在这里,disciplined image design 变成 essential,而不是 optional。
到目前为止,多数 examples 都被描述成 jobs:start、run、exit。AI systems 中另一种 common pattern 是 long-running service,container 会持续运行并响应 requests。
From jobs to services: A quick mental model
为了让 "training job" 到 "service" 的转变更具体,这里给出一个 minimal FastAPI inference skeleton。我们后面会继续扩展它;现在它只是一个 mental model。
Project layout:
tiny-service-container/
  Dockerfile
app.pyapp.py:
python
from fastapi import FastAPI
app = FastAPI()

@app.get("/health")
def health():
return {"ok": True}Dockerfile(service):
sql
FROM python:3.11-slim
WORKDIR /app
RUN pip install --no-cache-dir fastapi uvicorn
COPY app.py .
CMD ["uvicorn", "app:app", "--host", "0.0.0.0", "--port", "8000"]
与 training 的区别在于 lifecycle:这个 container 预期会保持运行、respond to requests,并且如果 crash,会由 supervisor restart。
现在你已经看到 service-style container 与 training job 的区别,下一步是指出最常破坏 real-world workflows 的 mistakes,尤其是在 developer machines 和 CI runners 之间移动时。
Common pitfalls(and how to avoid them)
两个问题反复出现:arm64 和 amd64 之间的 silent architecture mismatches,以及因为没有用 .dockerignore 排除 datasets 和 artifacts,而意外 shipping massive build contexts。
Silent architecture mismatch:在 Apple Silicon 上可以通过 emulation pull amd64 images,但会更慢,并且可能破坏 native dependencies。尽可能优先使用 native arm64 images。
Huge build contexts :Datasets 和 artifacts 被意外 copy 到 images 中。要 aggressive 使用 .dockerignore。
Non-deterministic builds :使用 latest tags 和 unpinned dependencies。对重要内容 pin versions。
Treating containers like pets:手动编辑 containers,而不是 rebuild images。Containers 是 disposable 的;images 才是你 version 的对象。
Reproducibility checklist
作为最终参考,这份 checklist 捕捉了随着时间保持 workflows stable 和 reproducible 的 practices:
- 在可行时 pin base images 和 dependency versions;把
latest当成 convenience,而不是 release strategy。 - 将 data 留在 images 外部;mount 或 runtime fetch,并单独 version。
- 将 secrets 留在 images 外部;通过 env vars 或 secret manager 在 runtime 注入。
- 让 Dockerfile layers 保持 stable:先 copy dependency manifests、install,再 copy application code。
- 使用 traceable 的东西 tag images,例如 commit SHA、semver,并记录 training run 或 deployment 使用的 image reference。
- 将 configuration 和 metrics 记录到 stdout / stderr,使
docker logs默认有用。
到这里,Docker 应该不再像一个工具,而更像是一种结构:它定义、共享,并一致执行你的 AI workflows across environments。
Summary
到这里,你已经完成了 Docker 对 AI/ML teams 真正重要的部分:你已经把 "my environment" 转化成了可以 name、version、run 和 share 的东西。
当你停止把 Docker 当成 packaging trick,而开始把它看作 runtime contract 时,它最有用。Image 是 contract。Container 只是 contract in execution。这种 shift 让 experiments 可复现,也让 handoffs 变得 boring(以最好的方式)。
你还建立了一种在 ML 工作中立即受益的 workflow muscle:observe first, then debug。当某件事失败时,你先检查 state(docker ps -a),然后读取 logs(docker logs),最后才改变东西。Docker 自己的 CLI documentation 明确说明,docker run 会基于 image reference 创建 new container(必要时会 pull),而 docker logs --follow 会 stream stdout / stderr;这就是 practical container debugging 的 backbone。
另一个 outcome 是 team-level:你现在可以清晰区分什么应该放进 image(runtime、pinned dependencies、entrypoint),什么应该留在外面(datasets、secrets、large artifacts)。这种 separation 正是 AI projects 可扩展的原因。它防止 "training containers" 变成巨大的、stateful snowflakes,也让同一个 workload 在 teammate machine、CI 或 production box 上运行成为现实。
最后,Docker Desktop 在这里不是 afterthought;它是 accelerant。Containers view 给你一个地方查看 running 和 stopped containers,inspect 它们,并与 logs 和 terminal / exec workflows 交互,而无需 context switching。当你运行多个 services(model server + worker + cache),或者迭代 container builds 时,这个 UI 会变得越来越有价值。
阅读完本章后,你现在应该能够做到:
- 解释 images vs containers vs registries,以及 registries 为什么存在。
- 有意识地使用 image references 运行 containers,使用 tagged references,而不是随便用当前碰巧叫
latest的东西。 - 快速 inspect state(
docker ps -a、docker images),并使用 logs debug。 - 从 Dockerfile build 一个小型、versioned image,并跨 machines 一致 rerun 它。
下一章会延续同样的 artifact-first mindset,但把它应用到 AI systems 围绕的核心对象上:model。
你不会再把 models 当作 "some file someone downloads",而会把 models 作为 OCI artifacts 放在 registries 中,以与分发 container images 相同的方式进行 distributed 和 versioned。Docker 已经明确说明,为什么 OCI artifacts 非常适合 AI model packaging:registry 已经提供了一个标准机制,可以一致分发 non-image content。
随后,我们会讨论 model selection 和 constraints。你将考察 GGUF,这是一种为快速 local inference 设计的 single-file format,并理解 quantization 如何影响 memory footprint、speed 和 quality 之间的 trade-offs。