这次学习主要是从整体架构上理解:
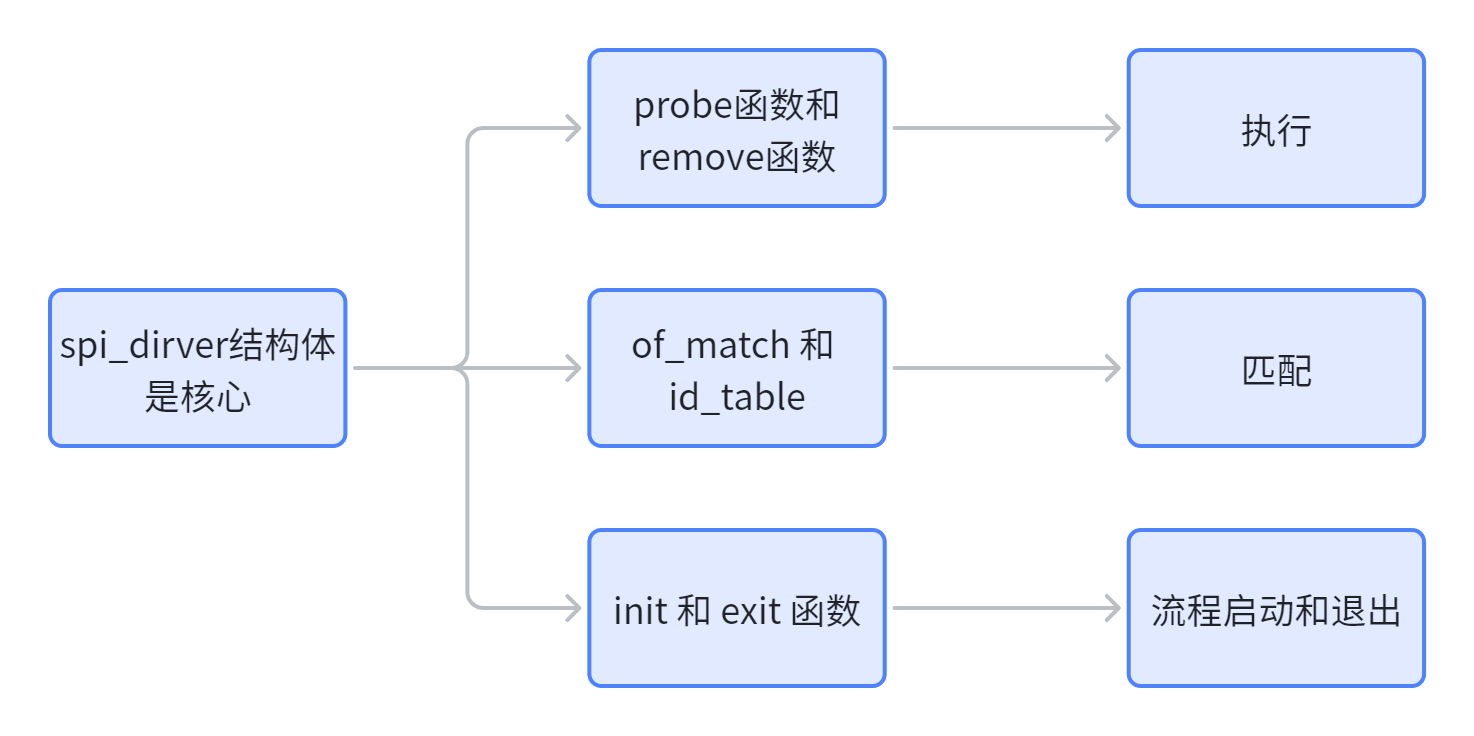
linux内核本来就有spi_driver 结构体,这个结构体定义在 include/linux/spi/spi.h 文件中,结构体内容如下:当 SPI 设备和驱动匹配成功以后 probe 函数就会执行。这就是需要#include <linux/spi/spi.h>这个文件的原因。
spi_driver结构体如下:
cpp
struct spi_driver {
    const struct spi_device_id *id_table;
    int (*probe)(struct spi_device *spi);
    int (*remove)(struct spi_device *spi);
    void (*shutdown)(struct spi_device *spi);
    struct device_driver driver;
};
整体的结构如下
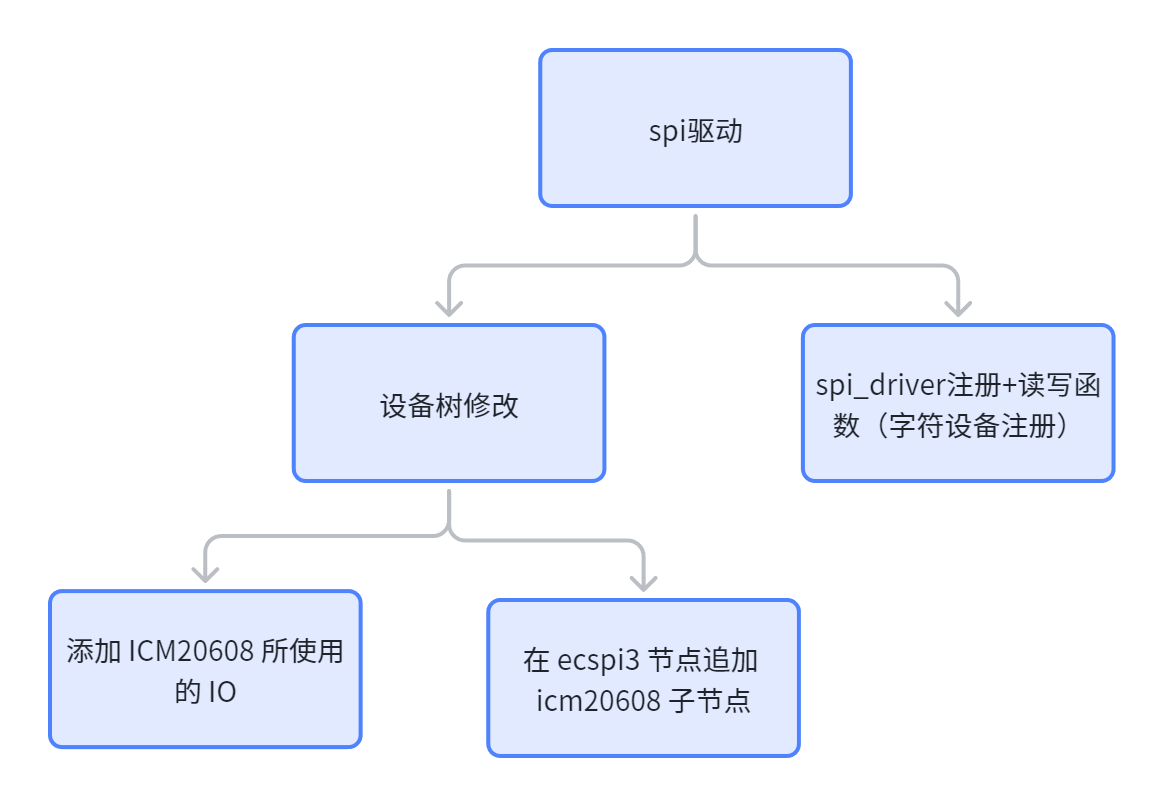
添加io
cpp
1 pinctrl_ecspi3: icm20608 {
2     fsl,pins = <
3     MX6UL_PAD_UART2_TX_DATA__GPIO1_IO20 0x10b0 /* CS */
4     MX6UL_PAD_UART2_RX_DATA__ECSPI3_SCLK 0x10b1 /* SCLK */
5     MX6UL_PAD_UART2_RTS_B__ECSPI3_MISO 0x10b1 /* MISO */
6     MX6UL_PAD_UART2_CTS_B__ECSPI3_MOSI 0x10b1 /* MOSI */
7     >;
8 };
添加子节点
cpp
1 &ecspi3 {
2 fsl,spi-num-chipselects = <1>;
3 cs-gpios = <&gpio1 20 GPIO_ACTIVE_LOW>;
4 pinctrl-names = "default";
5 pinctrl-0 = <&pinctrl_ecspi3>;
6 status = "okay";
7
8 spidev: icm20608@0 {
9 compatible = "alientek,icm20608";
10 spi-max-frequency = <8000000>;
11 reg = <0>;
12 };
13 };
写驱动--注册部分
架构
代码
cpp
1 /* probe 函数 */
2 static int xxx_probe(struct spi_device *spi)
3 {
4 /* 具体函数内容 */
5 return 0;
6 }
7
8 /* remove 函数 */
9 static int xxx_remove(struct spi_device *spi)
10 {
11 /* 具体函数内容 */
12 return 0;
13 }
14 /* 传统匹配方式 ID 列表 */
15 static const struct spi_device_id xxx_id[] = {
16 {"xxx", 0},
17 {}
18 };
19
20 /* 设备树匹配列表 */
21 static const struct of_device_id xxx_of_match[] = {
22 { .compatible = "xxx" },
23 { /* Sentinel */ }
24 };
25
26 /* SPI 驱动结构体 */
27 static struct spi_driver xxx_driver = {
28 .probe = xxx_probe,
29 .remove = xxx_remove,
30 .driver = {
31 .owner = THIS_MODULE,
32 .name = "xxx",
33 .of_match_table = xxx_of_match,
34 },
35 .id_table = xxx_id,
36 };
37
38 /* 驱动入口函数 */
39 static int __init xxx_init(void)
40 {
字符设备驱动部分:
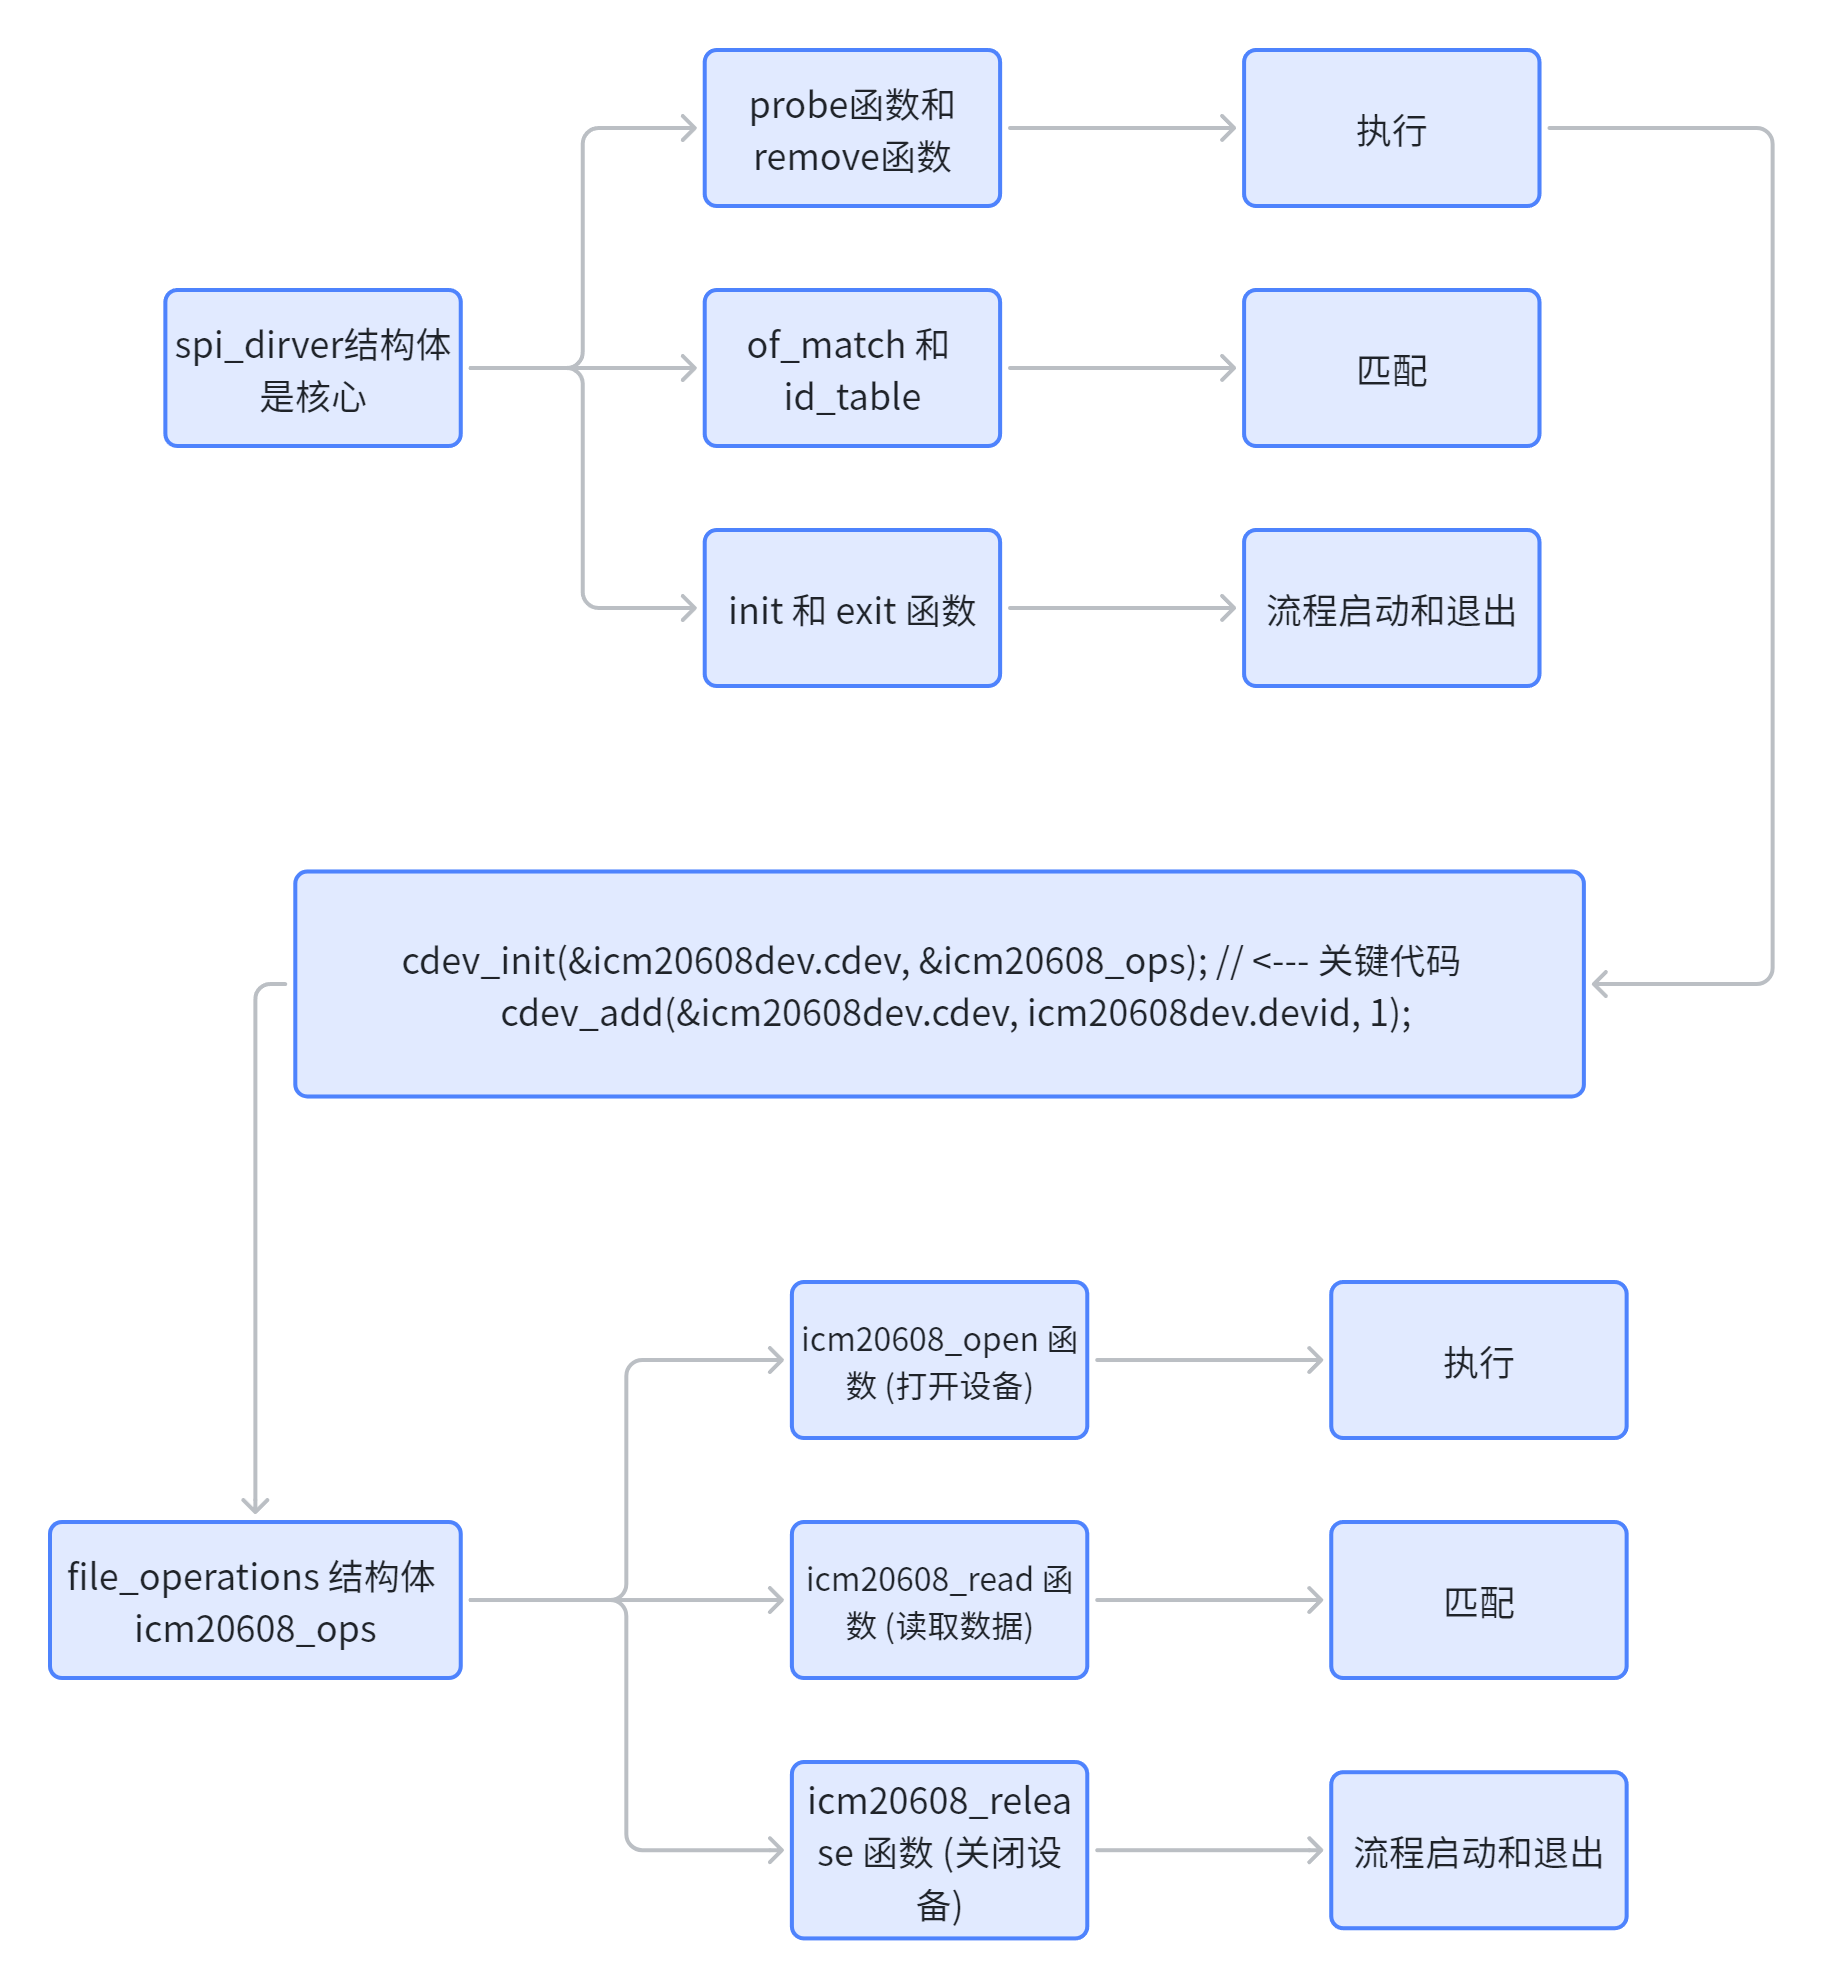
这里面比较重要的就是probe函数中,cdev_init 函数将设备结构体 icm20608dev.cdev 和操作函数集 icm20608_ops 绑定在一起。cdev_add 则将此设备注册到内核。至此,内核才知道,对设备 /dev/icm20608 的任何文件操作,都应去 icm20608_ops 这张菜单里查找对应的回调函数
匹配过程:
SPI 设备和驱动的匹配过程是由 SPI 总线来完成的,这点和 platform、I2C 等驱动一样,SP
I 总线为 spi_bus_type,定义在 drivers/spi/spi.c 文件中,内容如下:
cpp
struct bus_type spi_bus_type = {
    .name = "spi",
    .dev_groups = spi_dev_groups,
    .match = spi_match_device,
    .uevent = spi_uevent,
};
在spi_dev_groups函数中中,调用了of_driver_match_device 函数,这个函数用于完成设备树设备和驱动匹配。比较 SPI 设备点的 compatible 属性和 of_device_id 中的 compatible 属性是否相等,如果相当的话就表示 SPI设备和驱动匹配。
数据传输过程:
SPI 设备驱动的核心是 spi_driver , 当我们向 Linux 内 核注册成功 spi_driver 以后就可以使用 SPI 核心层提供的 API 函数来对设备进行读写操作了。
首先是 spi_transfer 结构体,此结构体用于描述 SPI 传输信息。
spi_transfer 需要组织成 spi_message,spi_message 也是一个结构体
在使用 spi_message 之前需要对其进行初始化,spi_message 初始化函数为 spi_message_ini
t
spi_message 初始化完成以后需要将 spi_transfer 添加到 spi_message 队列中,这里我们要用
到 spi_message_add_tail 函数
spi_message 准备好以后就可以进行数据传输了,数据传输分为同步传输和异步传输,同步
传输会阻塞的等待 SPI 数据传输完成,同步传输函数为 spi_sync。
异步传输不会阻塞的等到 SPI 数据传输完成,异步传输需要设置 spi_message 中的 complet
e 成员变量,complete 是一个回调函数,当 SPI 异步传输完成以后此函数就会被调用。SPI 异步
传输函数为 spi_async。