一、权限准备
如果你想实现这个功能,那么你的云效必须要有权限!!这非常重要!!如何确定自己是否有相关权限呢?
- 流水线权限
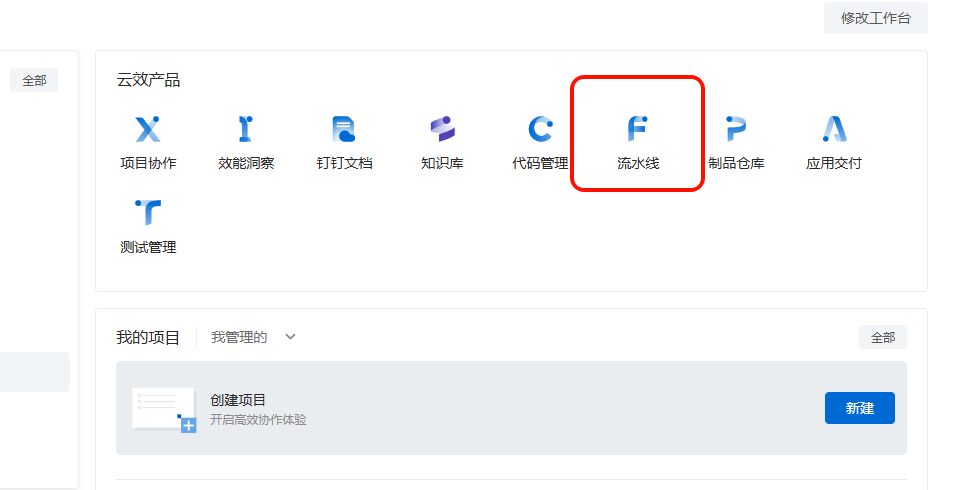

-
制品仓库权限
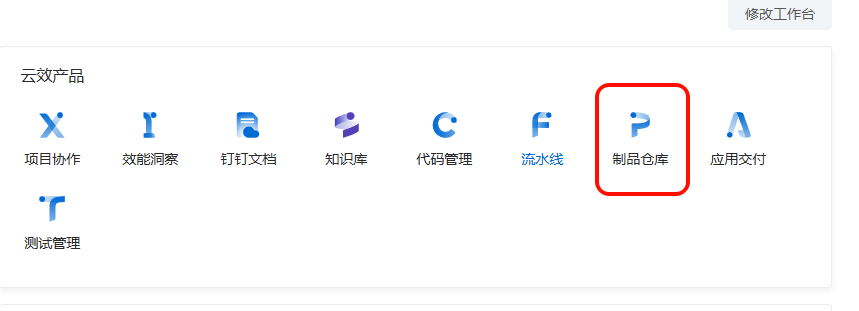

-
就是云服务器的权限,这个权限是要你可以读写文件的权限。
二、云服务器准备 -- 基本的环境部署,如果是已经搞好了可以跳过
需要云服务器,具备,nginx,pm2, nodejs的环境。
下载工具:
filezilla 下载地址
putty或者xshell:putty
以下演示的是centos环境的,如果是Ubuntu环境,请自行ai安装以下环境命令
- nginx
yum install nginx -y
systemctl start nginx
systemctl enable nginx
如果安装失败,
yum install -y epel-release // 先下官方源
yum install -y nginx
systemctl start nginx
systemctl enable nginx
- 安装 Node.js 18(前端必须)
curl -fsSL https://deb.nodesource.com/setup_18.x | bash -
yum install -y nodejs
验证:
node -v
npm -v
- 安装 pm2(守护进程,关闭终端不挂)
npm install pm2 -g
- 配置nginx
查看nginx配置的位置
nginx -t
找到nginxconf文件,正确配置nginx就行,以下是参考。可以先自己手动打个包,放上去看能不能访问到
bash
# For more information on configuration, see:
#   * Official English Documentation: http://nginx.org/en/docs/
#   * Official Russian Documentation: http://nginx.org/ru/docs/

user nginx;
worker_processes auto;
error_log /var/log/nginx/error.log;
pid /run/nginx.pid;

# Load dynamic modules. See /usr/share/doc/nginx/README.dynamic.
include /usr/share/nginx/modules/*.conf;

events {
    worker_connections 1024;
}

http {
    log_format  main  '$remote_addr - $remote_user [$time_local] "$request" '
                      '$status $body_bytes_sent "$http_referer" '
                      '"$http_user_agent" "$http_x_forwarded_for"';

    access_log  /var/log/nginx/access.log  main;

    sendfile            on;
    tcp_nopush          on;
    tcp_nodelay         on;
    keepalive_timeout   65;
    types_hash_max_size 4096;

    include             /etc/nginx/mime.types;
    default_type        application/octet-stream;

    # Load modular configuration files from the /etc/nginx/conf.d directory.
    # See http://nginx.org/en/docs/ngx_core_module.html#include
    # for more information.
    include /etc/nginx/conf.d/*.conf;

server {
    listen 80;
    server_name 服务器ip或者是域名;

    location / {
        proxy_pass http://127.0.0.1:3000;
        proxy_http_version 1.1;
        proxy_set_header Upgrade $http_upgrade;
        proxy_set_header Connection 'upgrade';
        proxy_set_header Host $host;
        proxy_cache_bypass $http_upgrade;
        proxy_set_header X-Real-IP $remote_addr;
    }
}

# Settings for a TLS enabled server.
#
#    server {
#        listen       443 ssl http2;
#        listen       [::]:443 ssl http2;
#        server_name  _;
#        root         /usr/share/nginx/html;
#
#        ssl_certificate "/etc/pki/nginx/server.crt";
#        ssl_certificate_key "/etc/pki/nginx/private/server.key";
#        ssl_session_cache shared:SSL:1m;
#        ssl_session_timeout  10m;
#        ssl_ciphers PROFILE=SYSTEM;
#        ssl_prefer_server_ciphers on;
#
#        # Load configuration files for the default server block.
#        include /etc/nginx/default.d/*.conf;
#
#        error_page 404 /404.html;
#            location = /40x.html {
#        }
#
#        error_page 500 502 503 504 /50x.html;
#            location = /50x.html {
#        }
#    }

}
- 手动打包测验
可以先手动打一个包,扔进服务器,然后进入项目目录执行, 这里我用的是nuxt3,大家仅供参考。反正就是把进程启动起来就行。
pm2 start .output/server/index.mjs --name "nuxt3"
然后在浏览器里输入你的ip,能看见你打包的项目网页即算成功环境部署完毕。
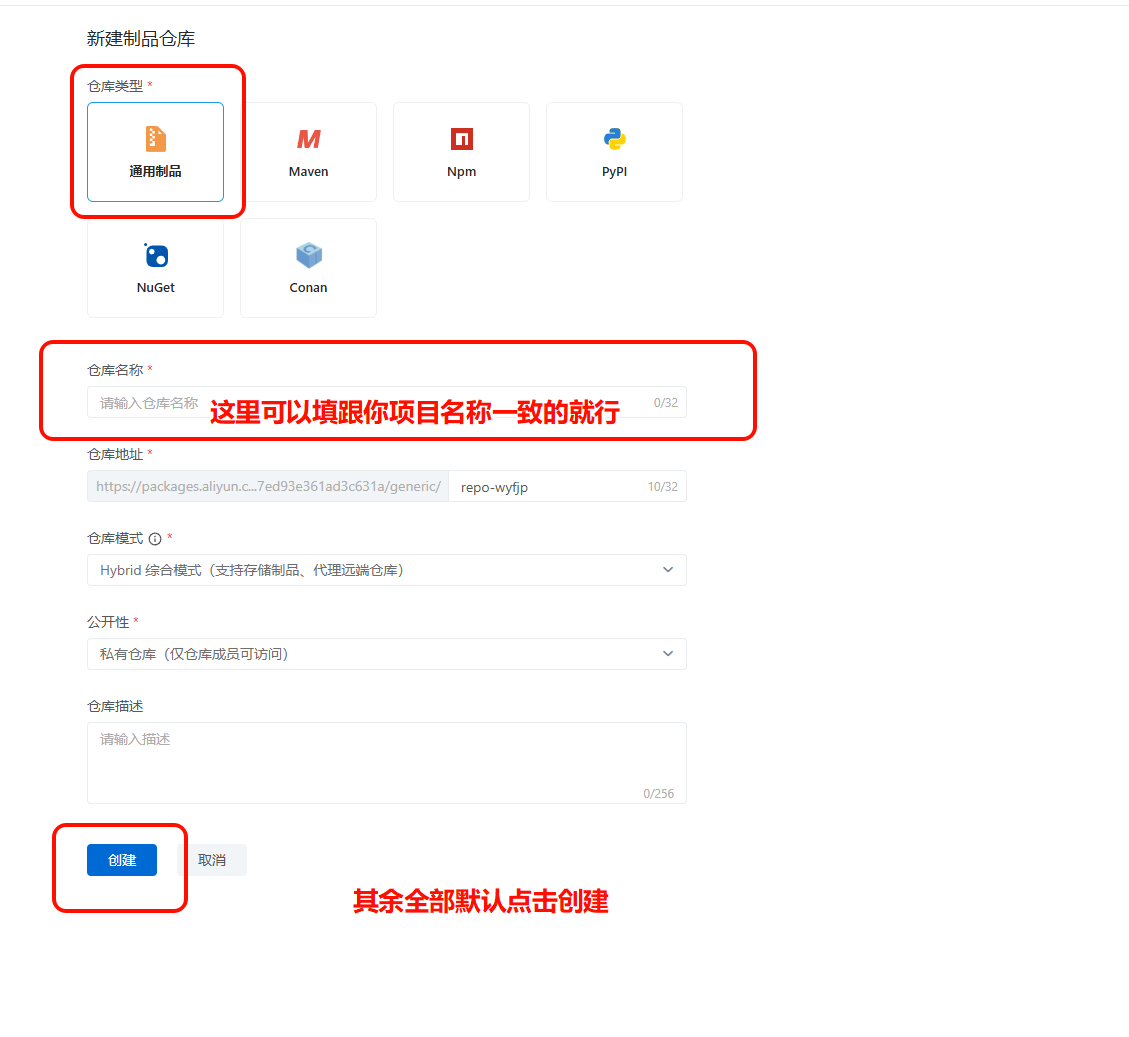
三、云效制品库配置

四、创建流水线

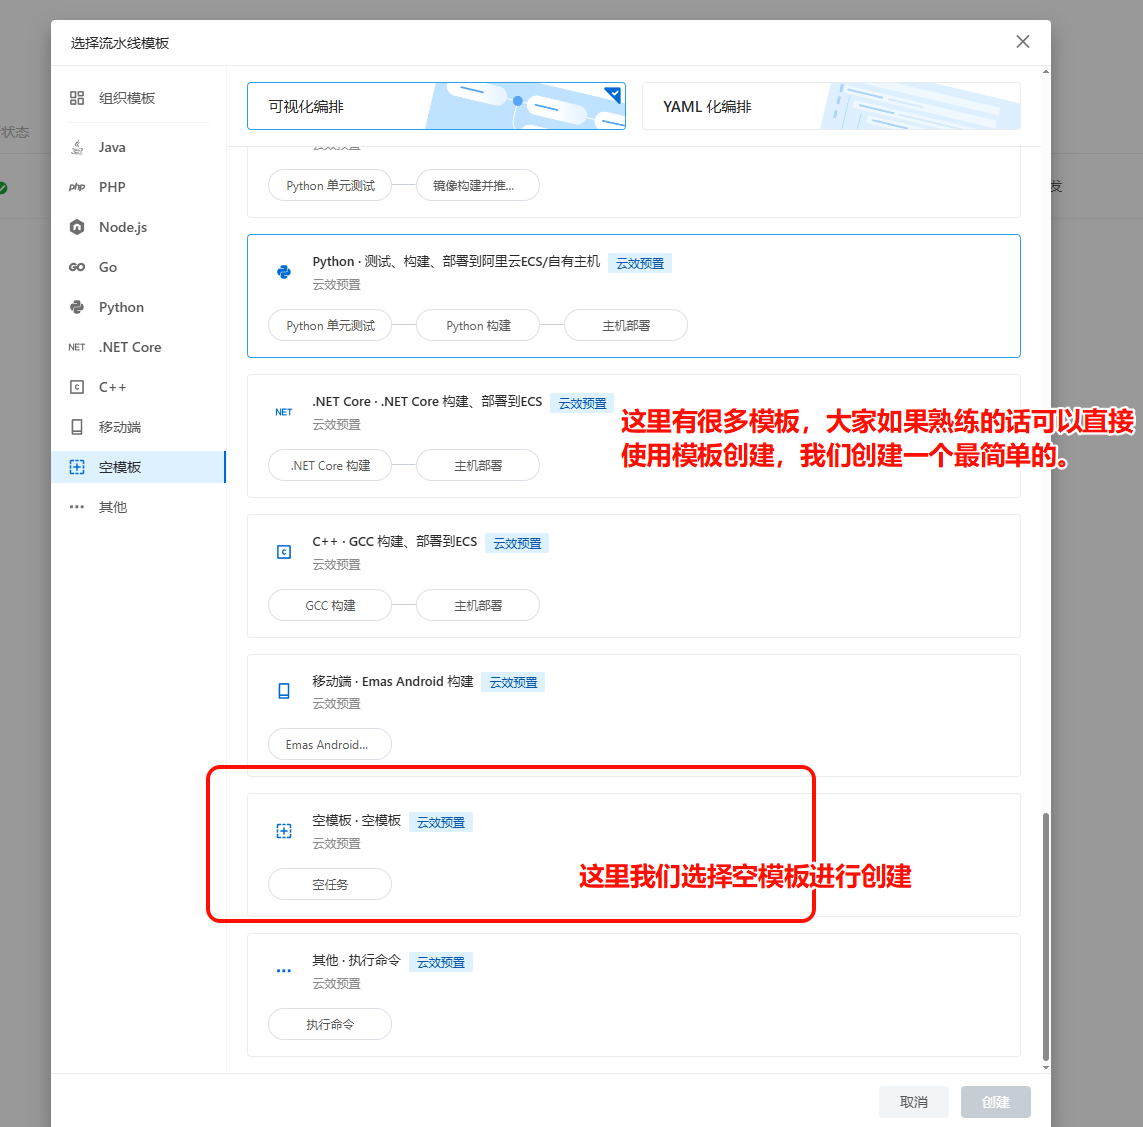
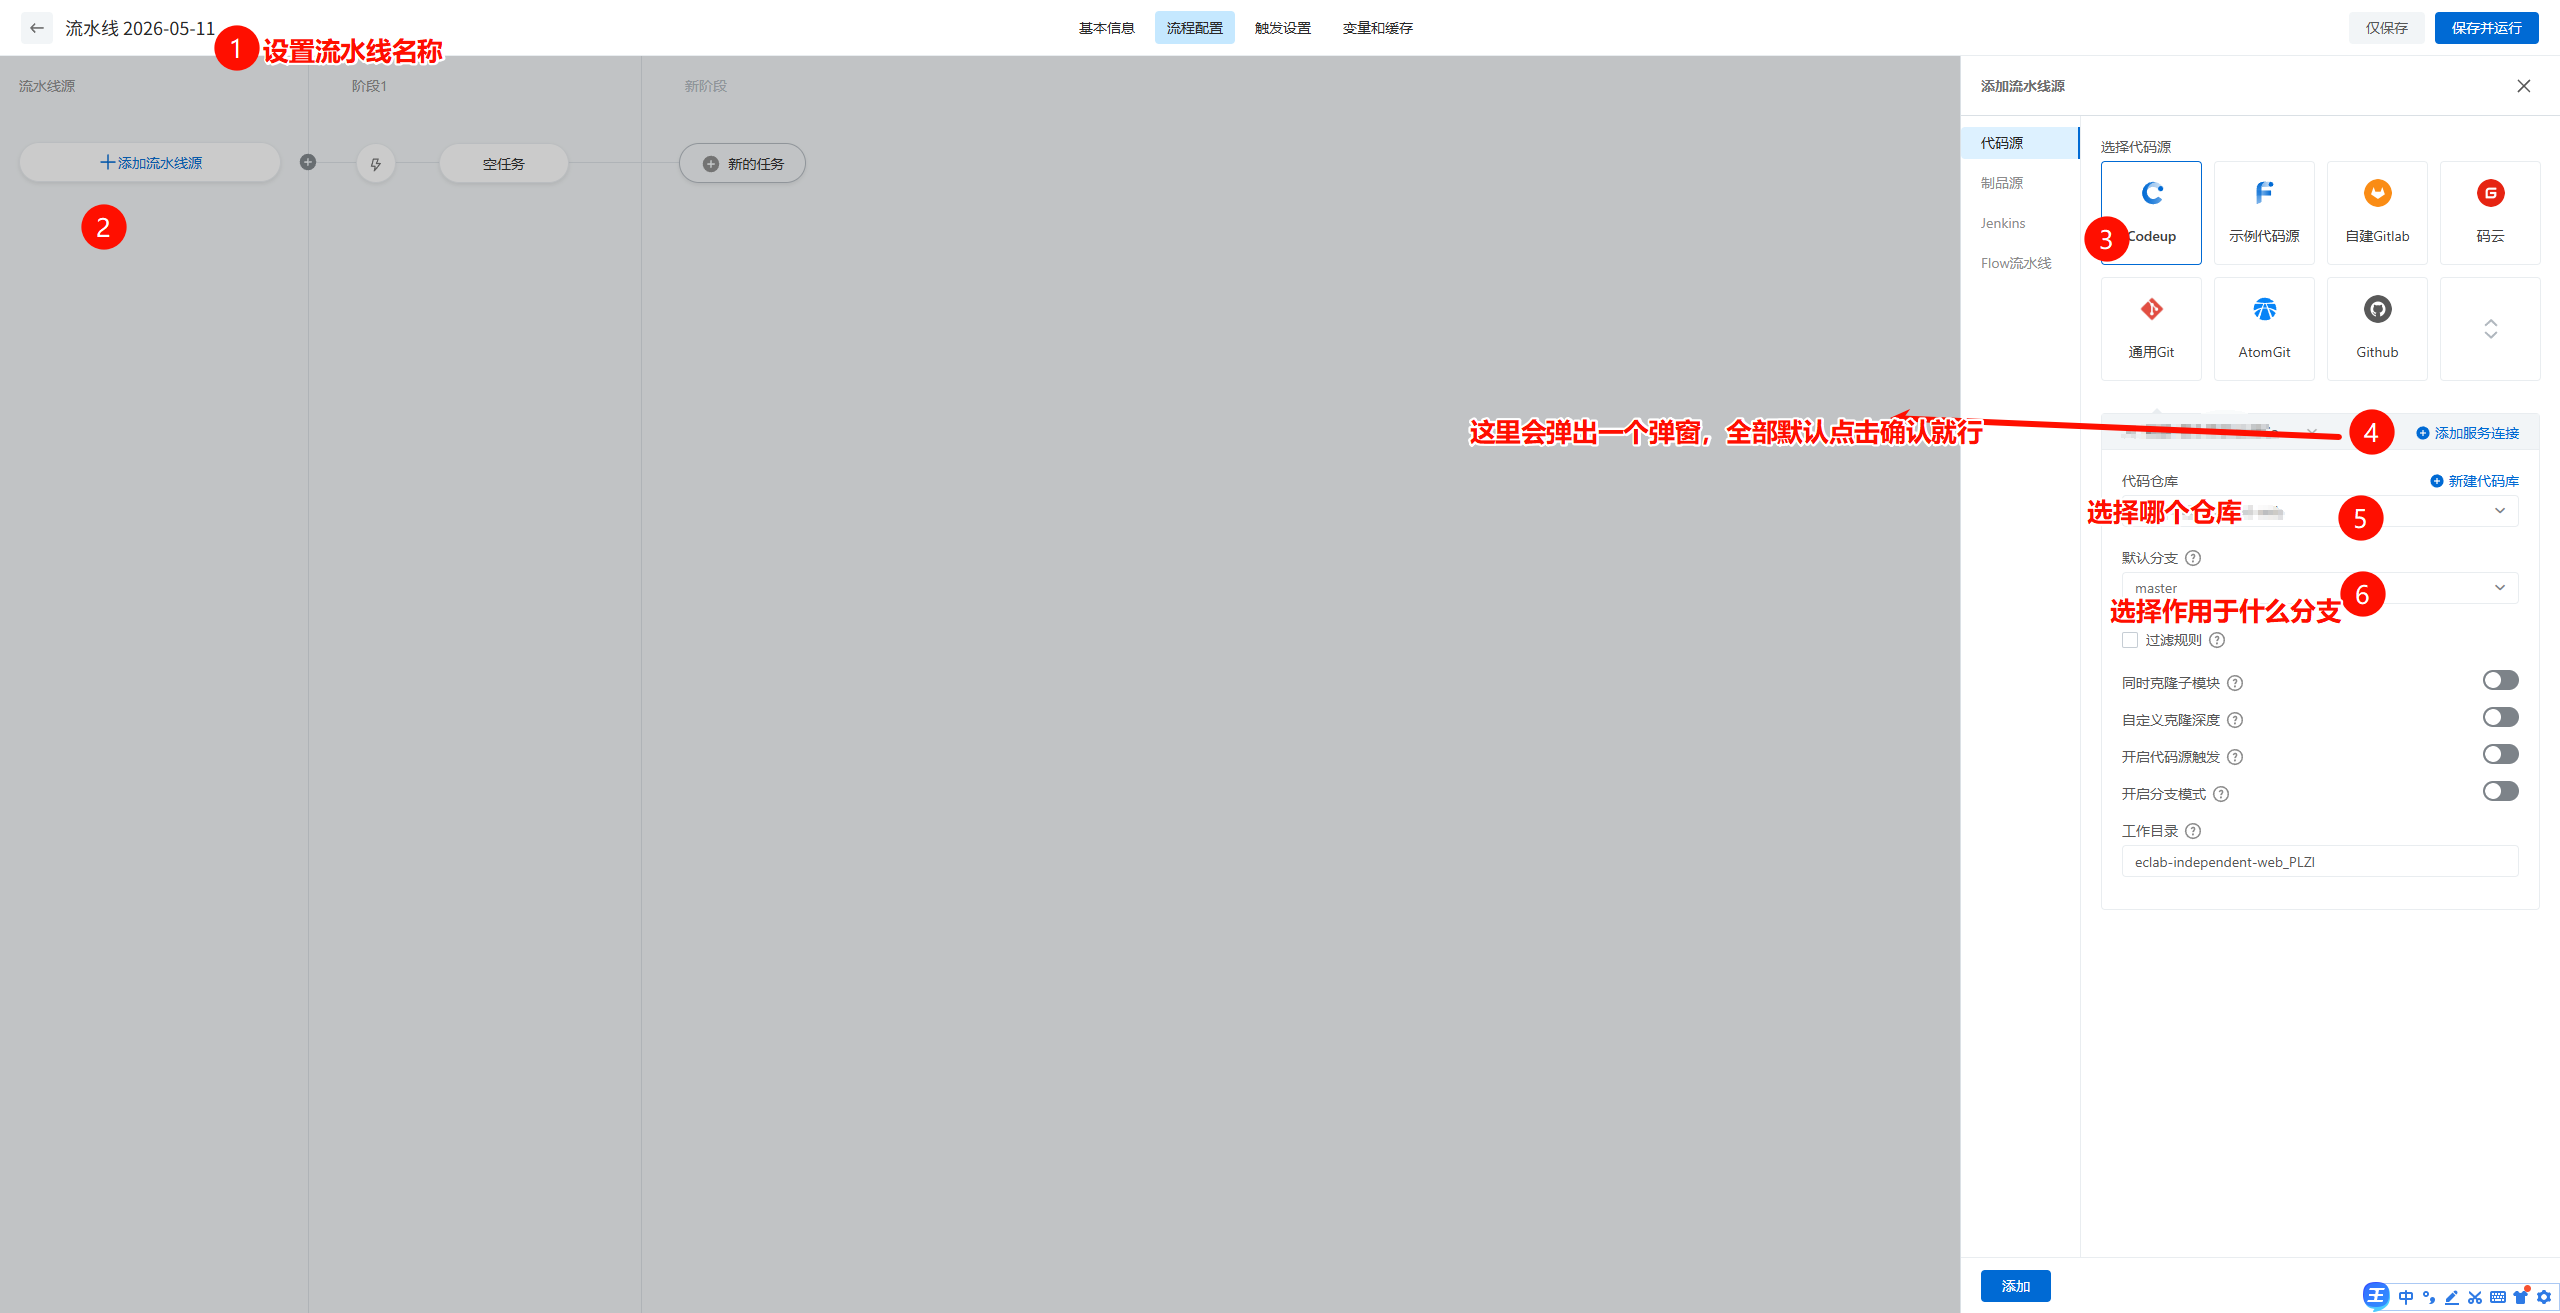
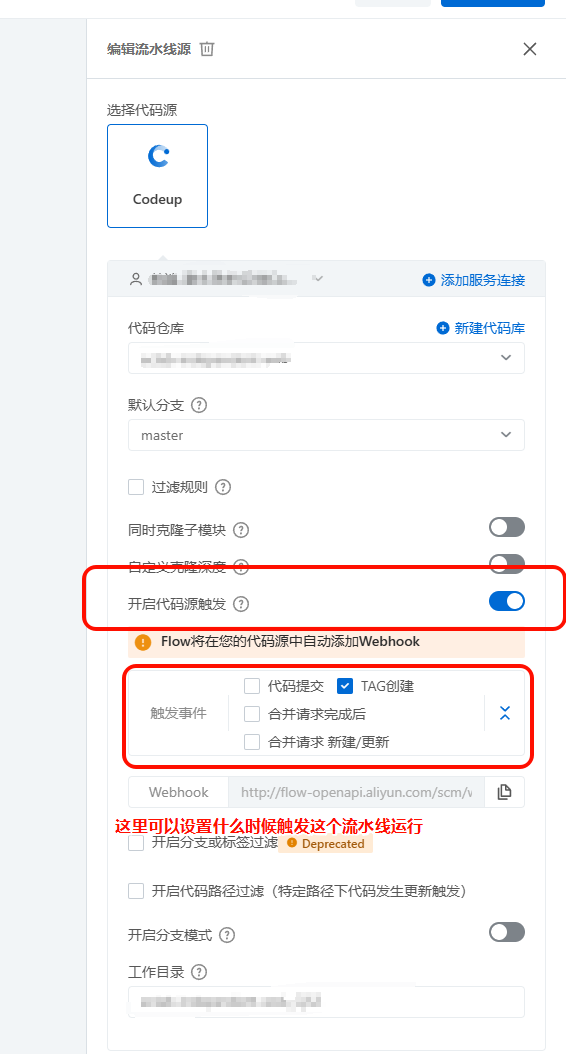
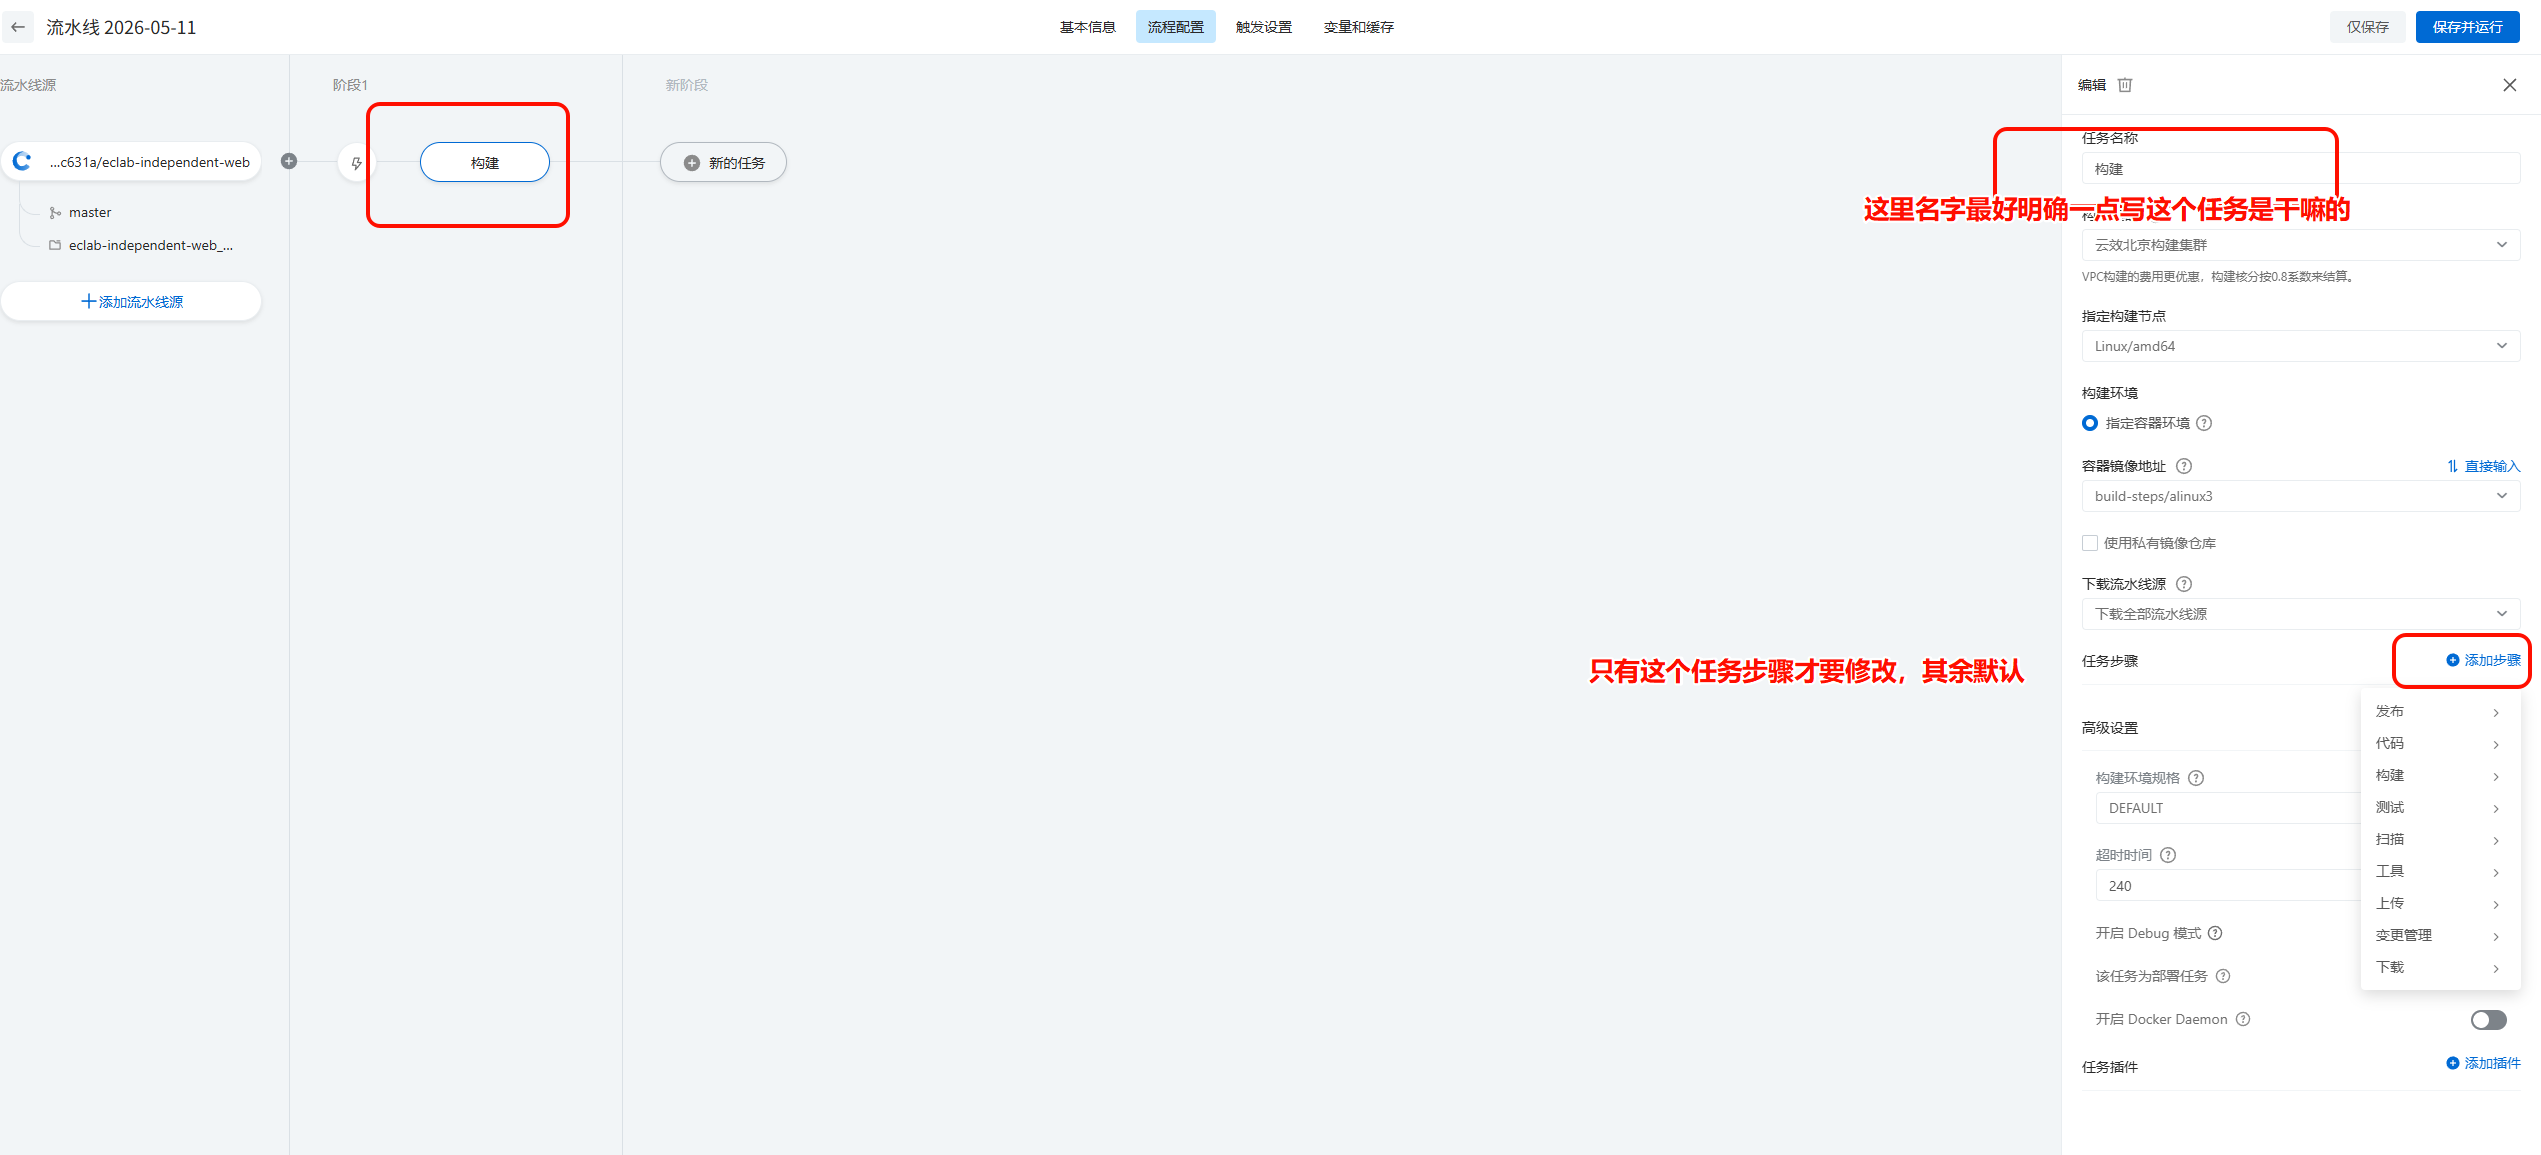
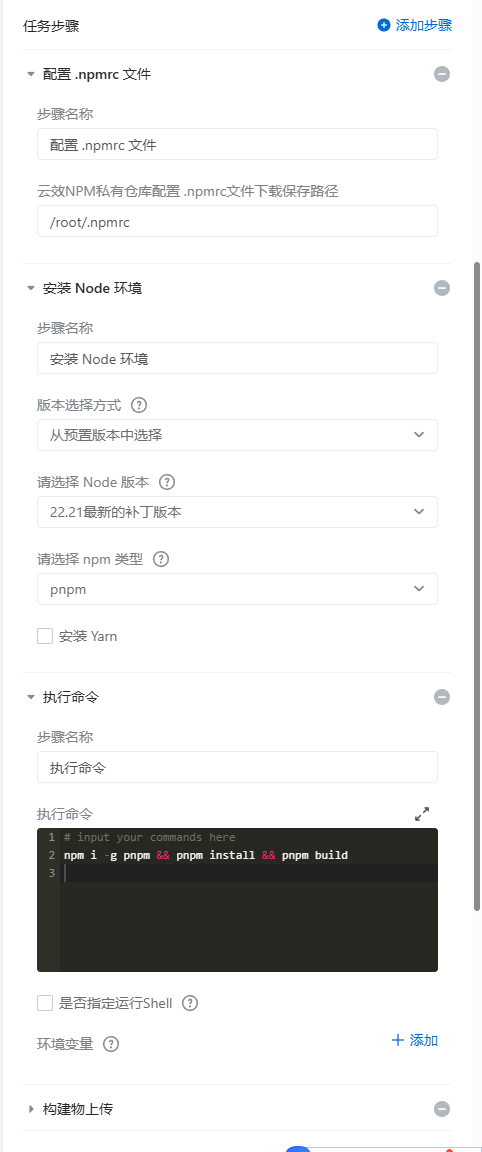
按顺序添加任务步骤
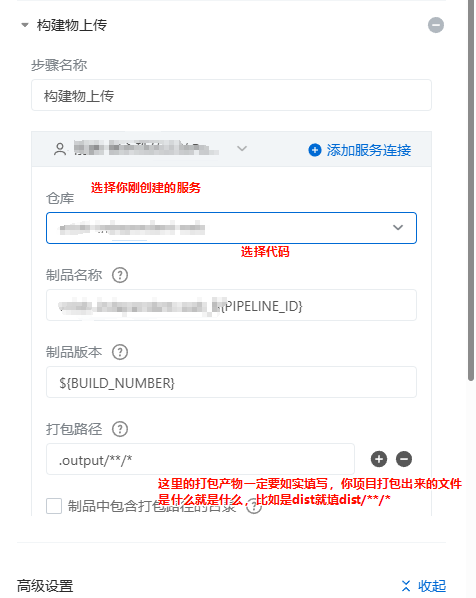
比较麻烦的是主机部署最后一个任务
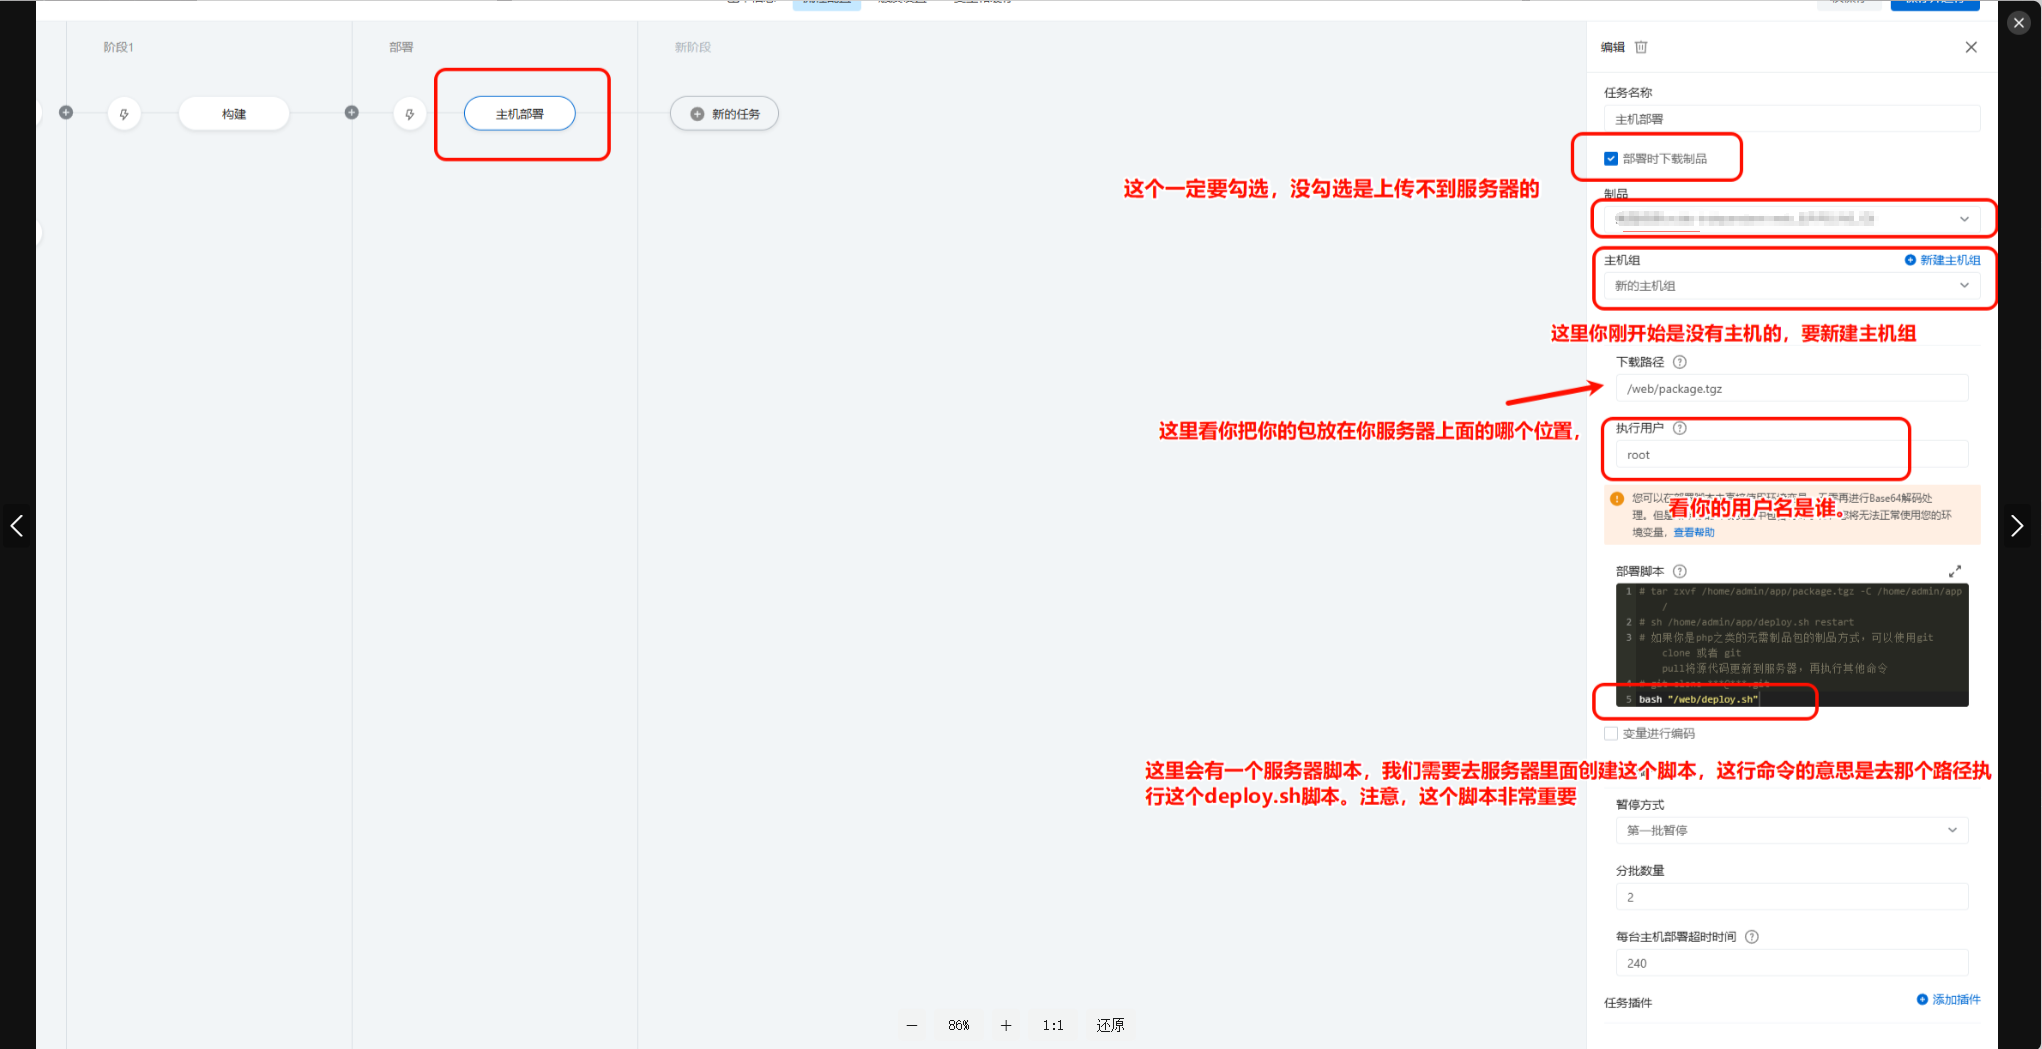
新建主机组,新建主机
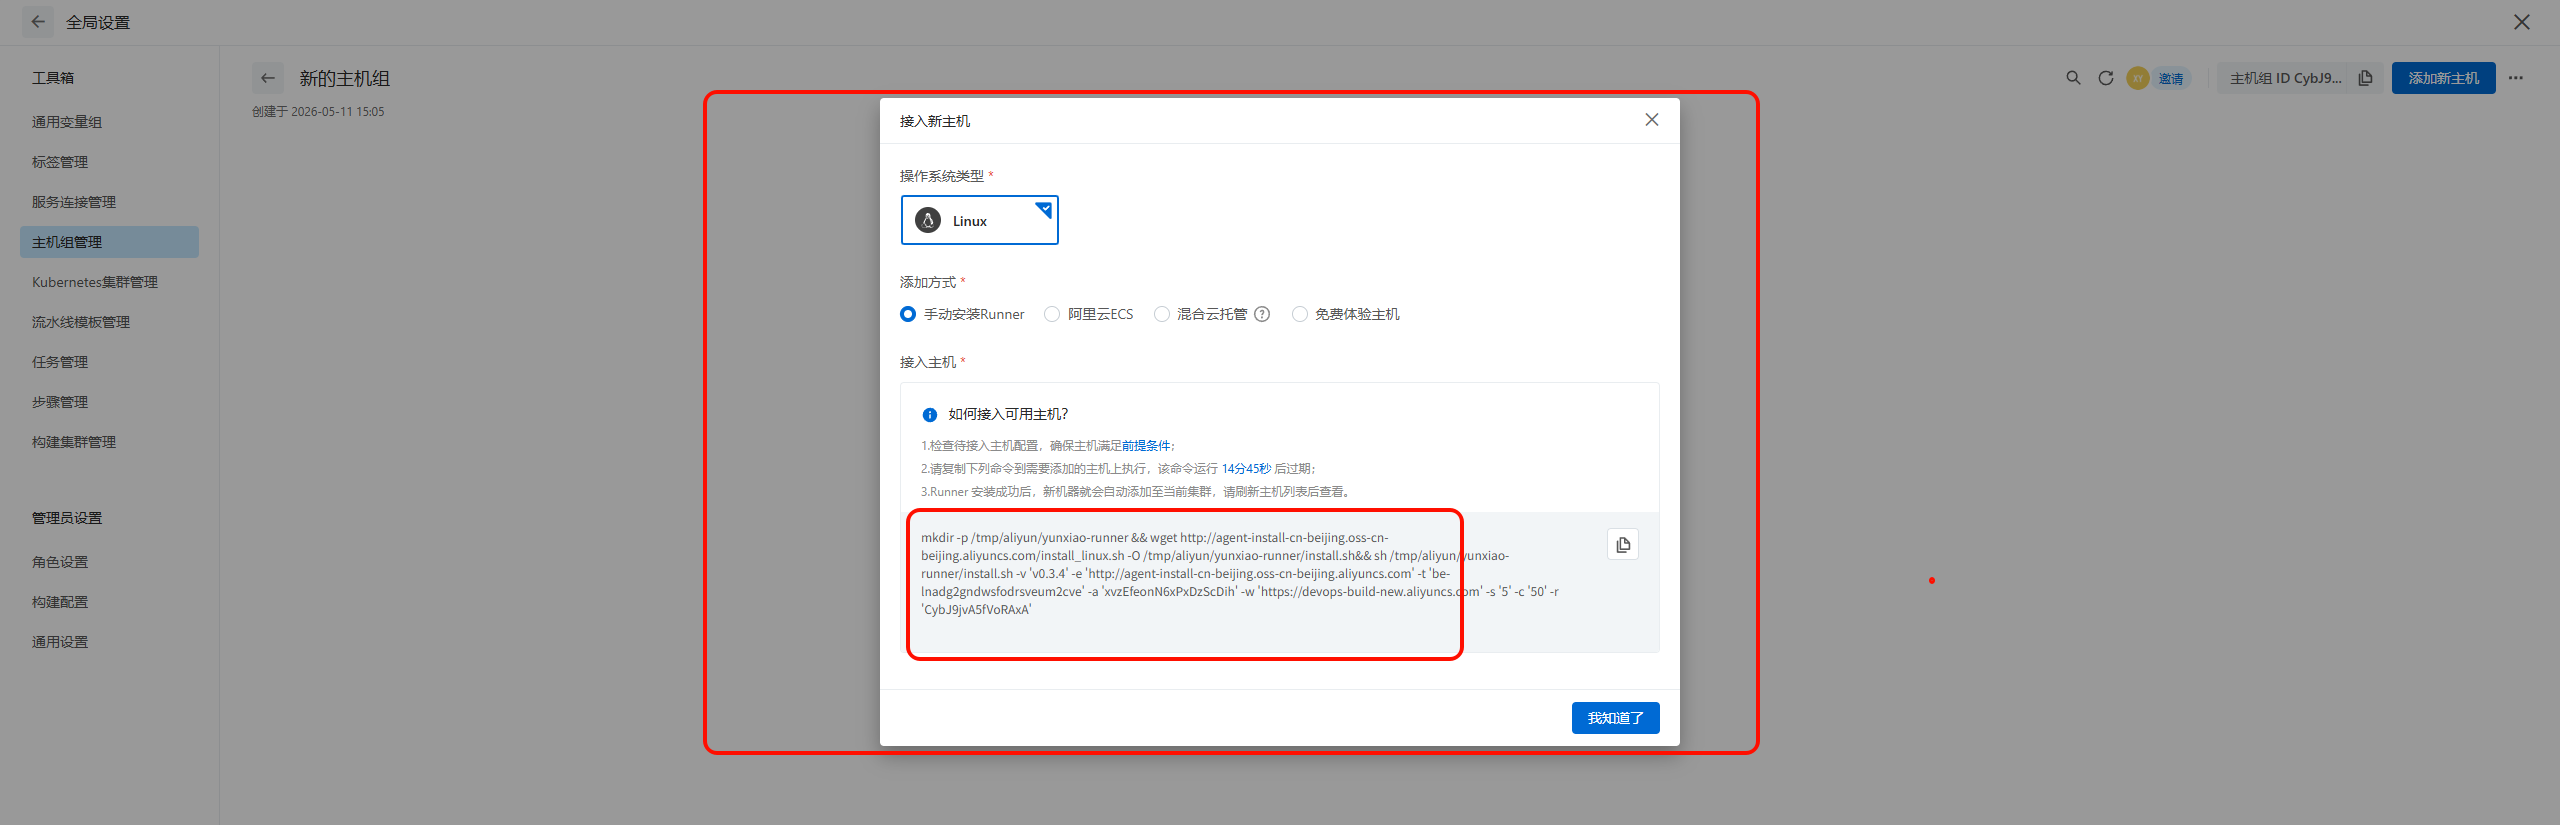
把红框一段直接复制到服务器运行就行。完事刷新以下,就会看到你的主机,勾选上你的主机,放到这个主机组上面
ok!现在就完成这个流水线的创建啦!
五、服务器脚本
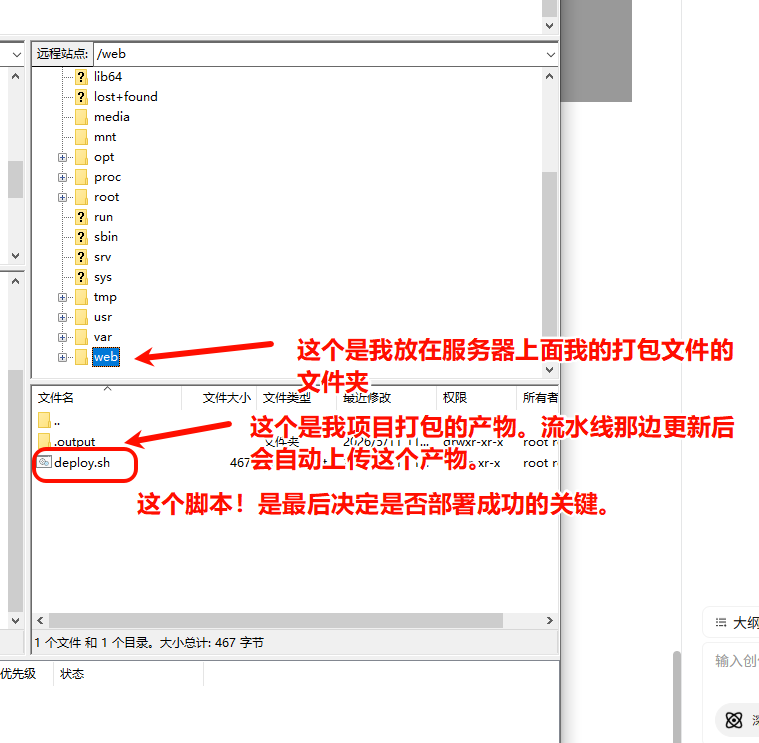
执行 命令后,复制以下内容
cat > /web/deploy.sh <<'EOF'
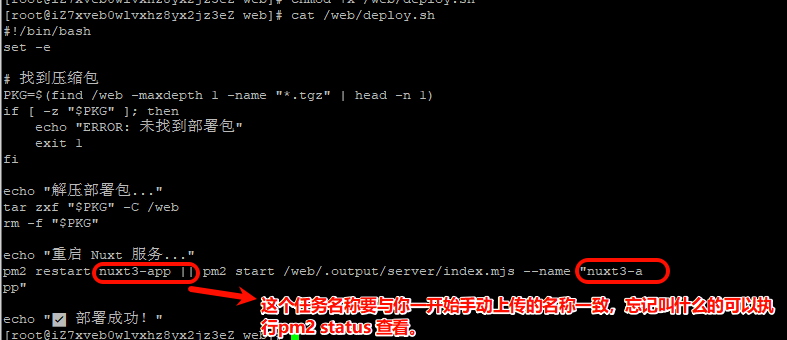
bash
#!/bin/bash
set -e

# 找到压缩包
PKG=$(find /web -maxdepth 1 -name "*.tgz" | head -n 1)
if [ -z "$PKG" ]; then
    echo "ERROR: 未找到部署包"
    exit 1
fi

echo "解压部署包..."
tar zxf "$PKG" -C /web
rm -f "$PKG"

echo "重启 Nuxt 服务..."
pm2 restart nuxt3-app || pm2 start /web/.output/server/index.mjs --name "nuxt3-app"

echo "✅ 部署成功!"
六、验证流水线
回到我们的云效,把云效的流水线点击运行,看能否运行成功,成功即可。
七 tag触发
我的示例是在勾选tag时触发的流水线,tag就是更新标签,标签可以通过git自行手动打,当然也有插件可以实现自动打的。
现在我们演示使用插件自动打tag,触发流水线的运行
bash
pnpm add -D standard-version在package.json的script里面加入命令
bash
    "releases": "standard-version && git push --follow-tags origin master",
    "releases:custom": "standard-version -r "
把代码合并上传到master分支后,执行
bash
pnpm releases 这样就可以自动打上版本号以及tag了,触发流水线运行。
执行 releases:custom 可以自己手动填写版本号哦