小伙伴们大家好,我是小溪,见字如面。OpenSpec升级到了1.x版本,玩了2天发现相对于老版本来说还是有不小变动的,不仅提供了更灵活的协同工作流程,还支持了自定义工作流模式。习惯使用老版本和对老版本OpenSpec还不了解的小伙伴也可以往期内容:
当前使用版本
openspec 1.2.0
优势
-
轻量化、灵活性和可扩展性进一步提高
-
向下兼容,旧版变更可以使用 OPSX 命令继续,制品结构是兼容的
-
新增Skills技能调用方式更节省tokens
-
提供更细粒度的扩展命令
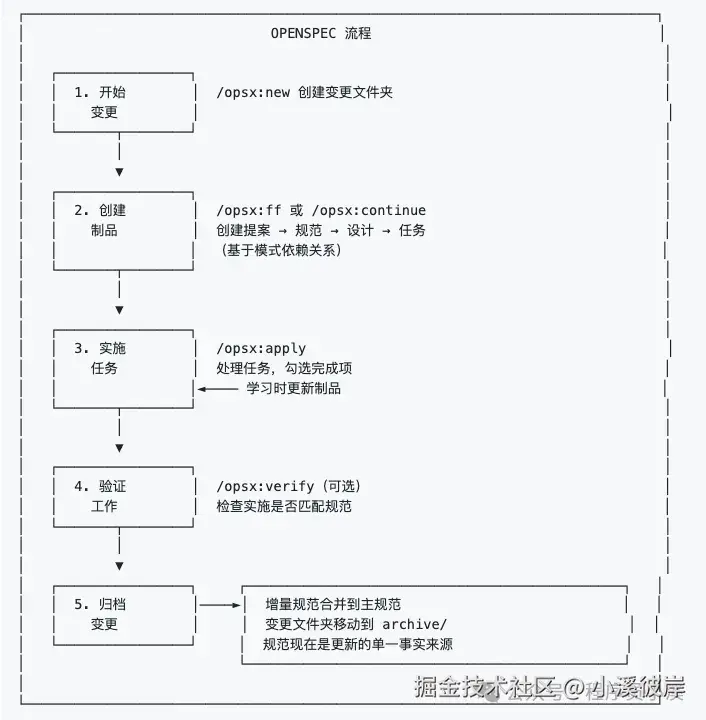
协同工作流程
OpenSepc新版本协同工作流程如下:
如何使用?
需要 Node.js 20.19.0 或更高版本
首先更新OpenSpec至最新版本,在命令行终端输入如下命令:
shell
$ npm install -g @fission-ai/openspec@latest更新完成后,新项目直接进入项目根目录进行初始化
shell
$ cd your-project
$ openspec init
旧项目也是可以用的,作者建议使用新版本命令,可以直接进入项目根目录进行更新
shell
$ cd your-project
$ openspec update想了解更多OpenSpec内容,但又看不太习惯英文的小伙伴,可以看OpenSpec社区中文版本,Github仓库地址:github.com/studyzy/Ope...
基本使用
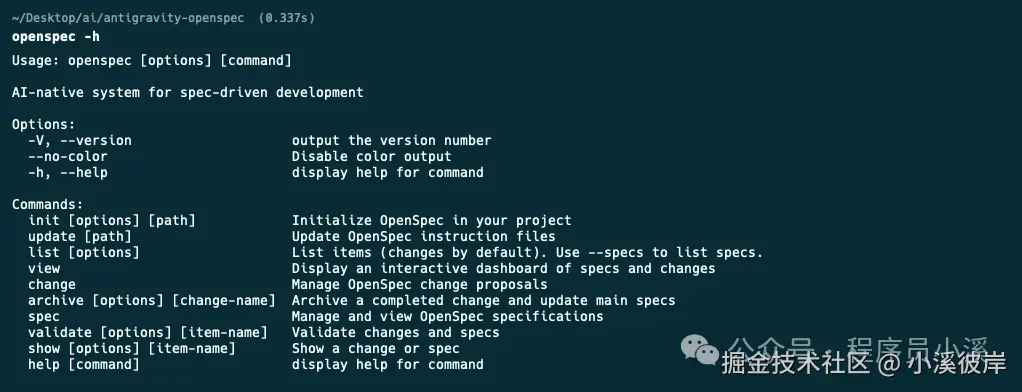
命令行指令
OpenSpec扩展了新的命令行指令,在命令行终端输入 openspec -h 可以查看完整的命令行帮助文档,这里只列举新增的功能,对已存在的指令还不了解的小伙伴可以看往期内容:初识OpenSpec
-
config:查看并修改全局OpenSpec配置
-
schema:管理工作流程模式
-
feedback:提交OpenSpec反馈
-
completion:管理OpenSpec CLI的Shell补全
-
generate:生成Shell补全脚本
-
install:安装Shell补全脚本
-
uninstall:卸载Shell补全脚本
-
status:显示变更的制品完成状态
-
instructions:输出用于创建制品或执行任务的增强指引
-
templates:显示 Schema 中所有制品的解析后模板路径
-
schemas:列出可用的工作流 Schema 及其描述
-
new:创建一个新的变更
OpenSpec新增了CLI Shell自动补管理,我们只需要在命令行终端执行下面命令就会自动安装
shell
$ openspec completion install安装完成后重启命令行终端,输入 openspec comp 按下【Tab】快捷键就可以看到命令的自动补全效果了

自定义命令和Skills
OpenSpec新版本提供了一套以 /opsx:前缀的自定义命令 和 以 openspec-为前缀的Skills

OpenSpec默认提供了4个自定义命令:
-
/opsx:explore:深入思考想法、调查问题、明确需求,用于需求前的头脑风暴
-
/opsx:propose:开始一个新变更,会一次性生成所有规划阶段的制品如 proposal、specs、design、tasks
-
/opsx:apply:实施变更中的任务,AI 会根据 tasks.md 中的任务清单逐一实现功能
-
/opsx:archive:归档已完成的变更,会把整个变更文件夹移入存档并将增量规范合并到主规范库
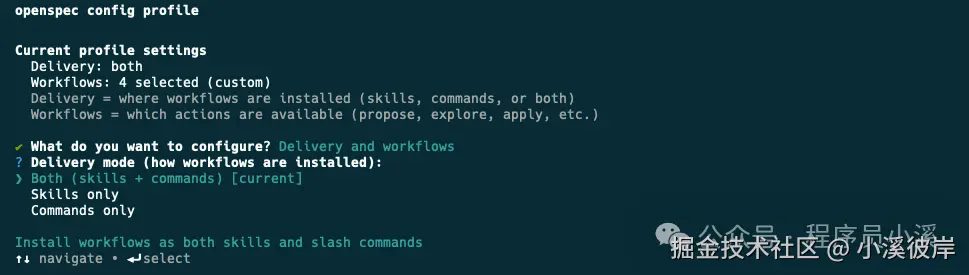
除了这套核心命令,OpenSpec还提供了一套更细粒度的扩展命令,需要通过 openspec config命令配置进行开启。开启需要在命令行终端输入 以下命令:
shell
$ openspec config profile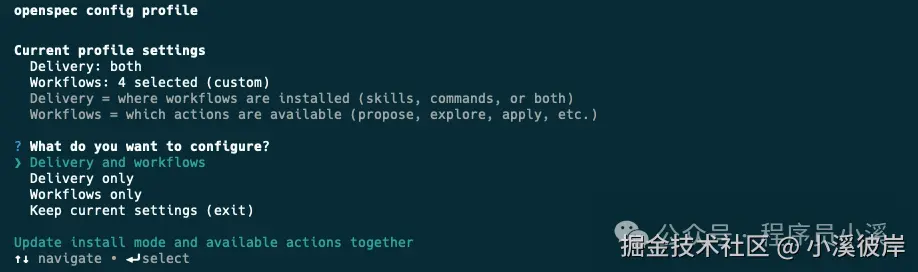
-
Delivery:在哪里安装工作流,比如在 Skills、Commands
-
Workflows:工作流中哪些设计指令是可用的,比如 /opsx:explore、/opsx:new
可以灵活选择配置方式,这里我选择【Delivery and workflows】两者都配置,接下来会先配置Delivery,选择Both同时生成Skills和Commands
然后配置Workflows使用【Space】快捷键选中需要的命令
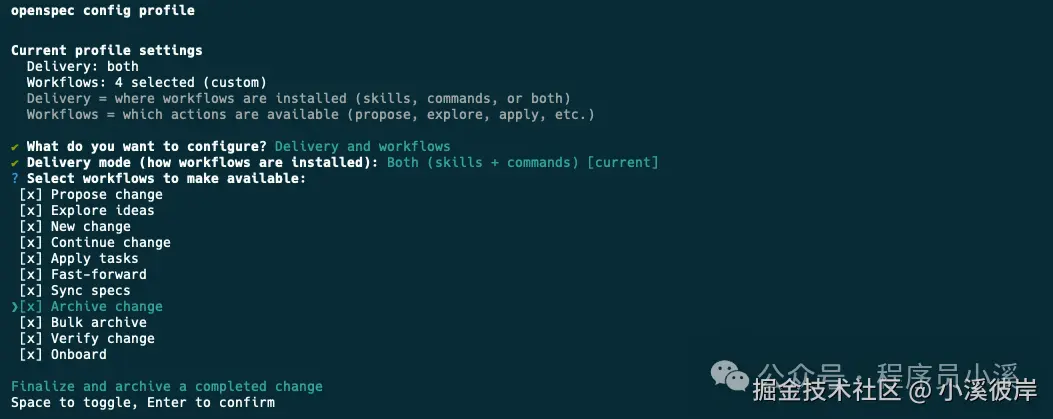
最后输入【Y】确认
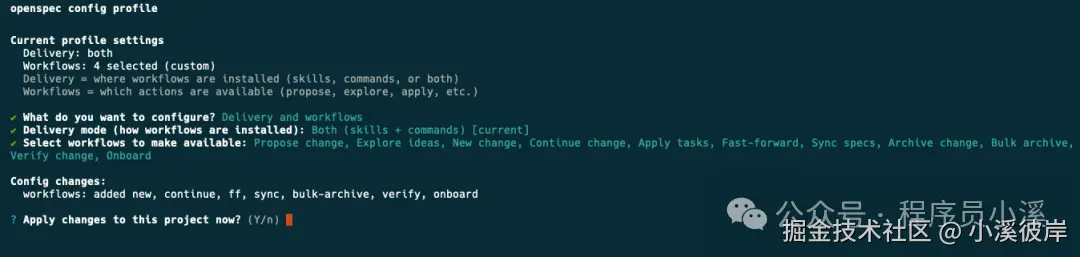
更新完成后就可以看到更新后的全部配置了
OpenSpec其他自定义命令:
-
/opsx:new:开始一个新变更,只创建一个空的变更目录
-
/opsx:continue:基于依赖关系创建下一个制品,就是一步步创建 proposal、specs、design、tasks
-
/opsx:ff:Fast-Forward 快速一次性创建所有规划制品 proposal、specs、design、tasks
-
/opsx:verify:校验实现是否与制品匹配
-
/opsx:sync:将增量规范合并到主规范中,通常不需要手动执行
-
/opsx:bulk-archive:批量归档多个变更
-
/opsx:onboard:完整的 OpenSpec 工作流引导教程
OpenSpec目录结构
OpenSpec新版本目录结构也发生了变化,移除了 project.md 和 AGENTS.md
bash
openspec/
├── config.yaml            # 新增,项目上下文和规则配置
├── project.md             # 已移除,项目规范约定
├── AGENTS.md              # 已移除,为Agent提供的OpenSpec使用说明,
├── specs/                 # 源规范目录,每次变更归档后会合并到这里
│       ├── spec.md        # 源需求和场景规范
│       └── design.md      # 源技术模式
├── changes/                # 提案变更目录
│   ├── [change-name]/     # 单个提案变更
│   │   ├── proposal.md     # 为什么,什么,影响
│   │   ├── tasks.md        # 实施检查清单
│   │   ├── design.md       # 技术决策(可选;见标准)
│   │   └── specs/          # 增量变更规范
│   │       └── [capability]/
│   │           └── spec.md # ADDED/MODIFIED/REMOVED
│   └── archive/            # 已完成的提案变更
项目初始化
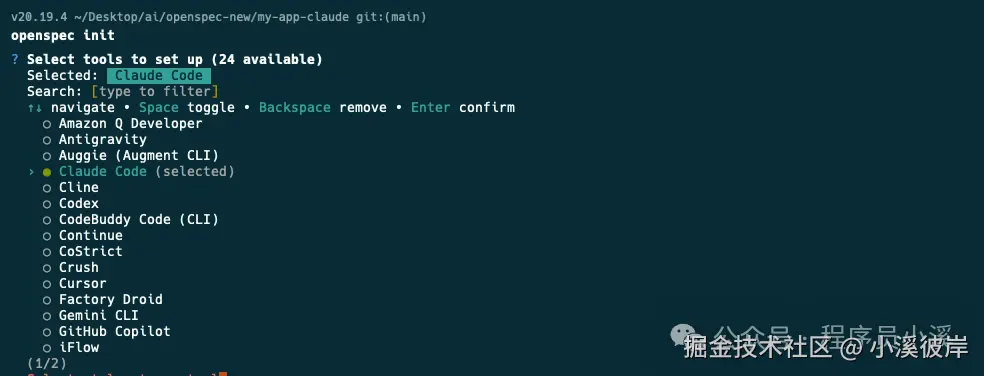
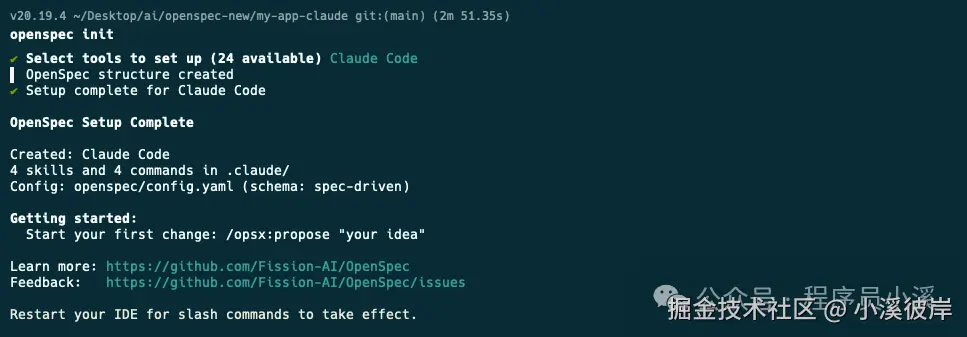
使用OpenSpec新版本初始化项目,首先在命令行终端进入到项目根目录,执行 openspec init,使用【space】快捷键选择自己使用的AI工具
确认配置后回车
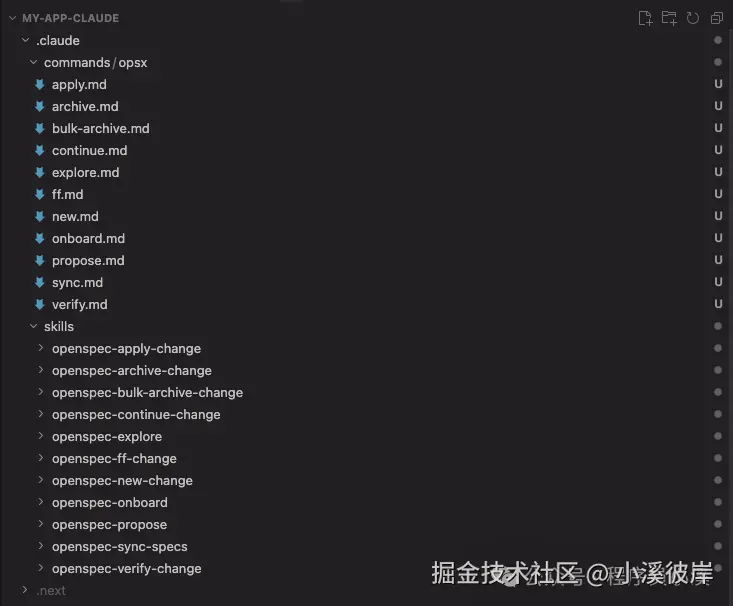
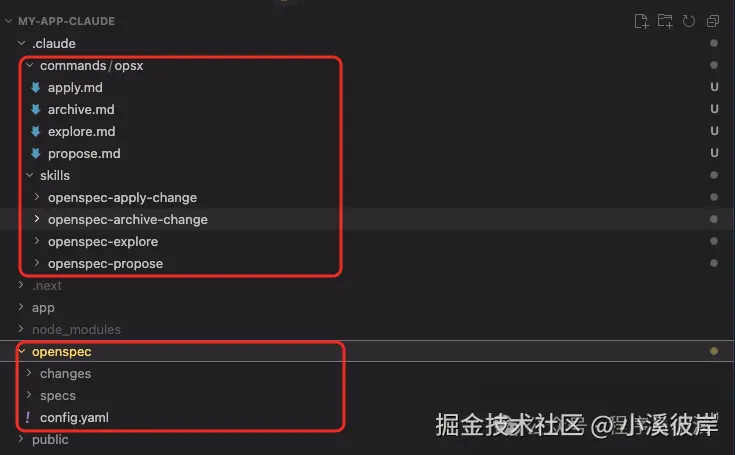
使用IDE打开可以看到如下目录结构,在 commands/ 目录下创建了 opsx/ 命令集,在 skills/ 目录下创建了对应的技能,同时创建了openspec 配置目录
创建变更提案
OpenSpec新版本创建变更提案的命令和老版本没有太大差异,只是做了命令的变更,新版本可以使用 /opsx:propose需求描述创建 创建变更,也可以使用 /opsx:new需求描述创建创建变更,甚至可以通过自然语言使用Skills能力创建变更提案
js
创建一个登录授权功能提案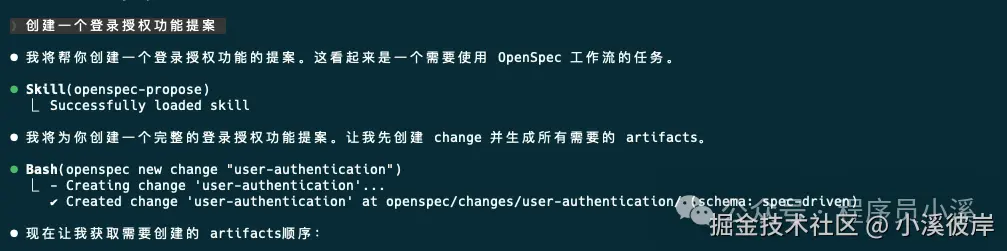
这里以新版本提供的 /opsx:new命令为例,记录一下创建变更提案的流程。首先使用下面命令创建一个变更提案:
javascript
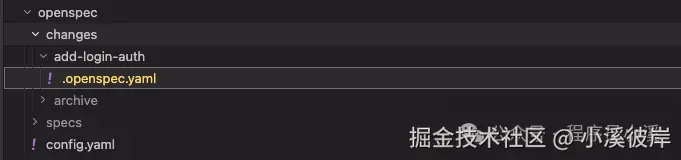
/opsx:new 创建一个登录授权功能可以OpenSpec只创建了变更目录 add-login-auth 和 .openspec.yaml文件并没有创建我们之前所熟悉的 proposal.md、specs/capability/spec.md、design.md 和 tasks.md
要创建上面所需的配置文件,我们需要再次执行 /opsx:continue 命令,到这一步OpenSpec才真正开始创建变更提案内容,与AI确定好问题边界后提交
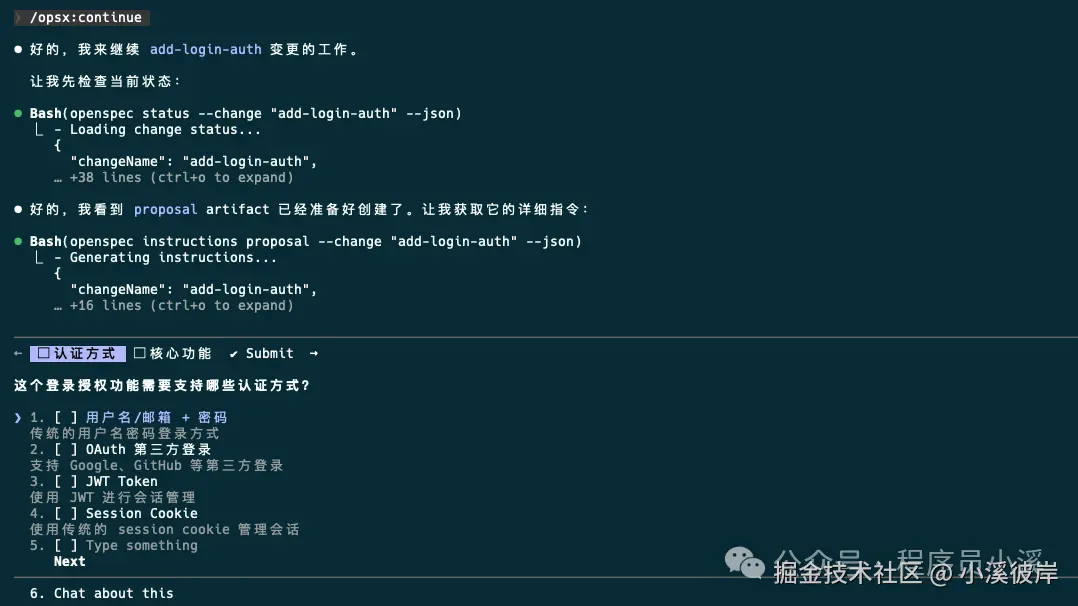
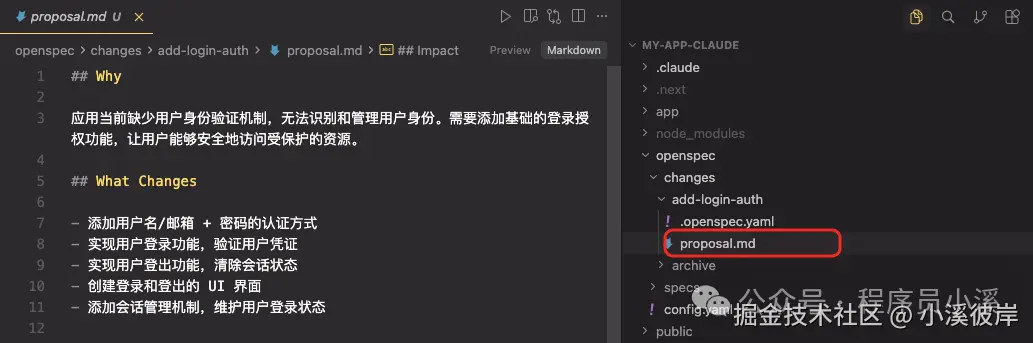
执行完成后,可以看到此时才创建了 add-login-auth/proposal.md相当于单步执行
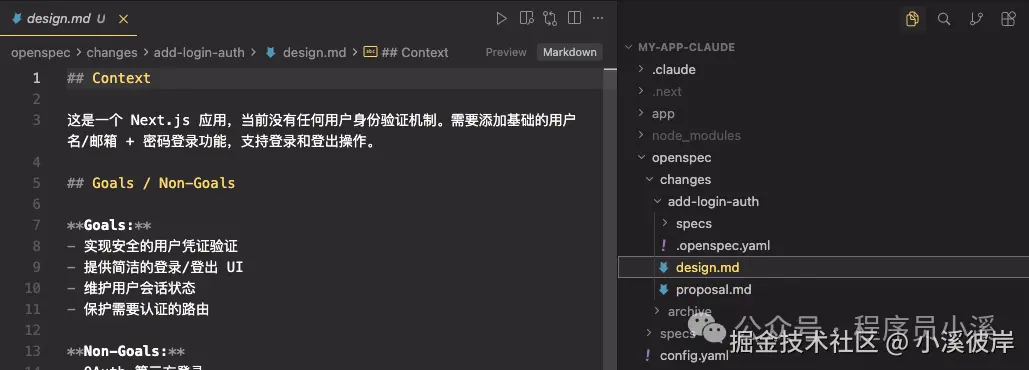
检查提案没有问题后再次执行 /opsx:continue 会继续生成 add-login-auth/design.md
待 proposal.md、design.md、tasks.md 都生成后,再次 /opsx:continueOpenSpec会检查artifacts状态,告诉我们下一步该执行的操作
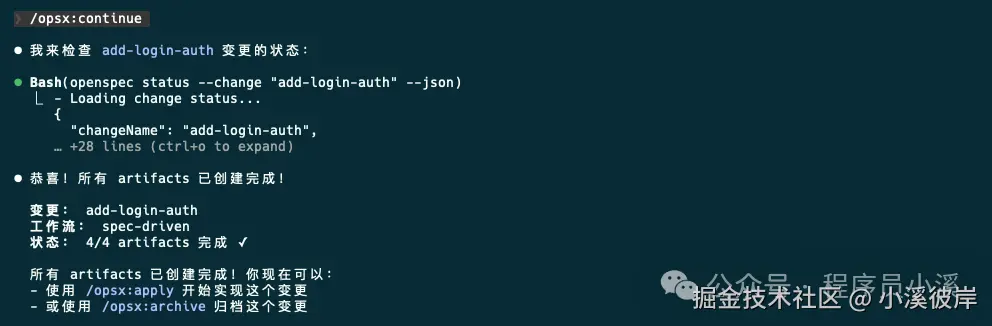
当然也可以创建提案后直接执行 /opsx:ff,一步完成所有artifacts工作,到这里变更提案阶段就算完成了,下一步就可以实施任务了。
实施任务与归档
实施任务、归档操作和旧版本也没有太大变化,只是将命令调整为了 /opsx:apply和/opsx:archive,归档后的文件目录和旧版本也基本是保持一致的

自定义项目配置
OpenSpec提供了 项目配置、自定义模式、全局覆盖 3个 级别的自定义:
-
项目配置:针对项目生效,位于 openspec/schemas/,支持设置默认值,注入上下文/规则,适合大多数团队
-
自定义模式:定义自己的工作流制品,适合有独特流程的团队
-
全局模式:针对所有项目生效,位于 ~/.local/share/openspec/schemas/,在所有项目间共享模式,适用于高级用户
1)项目配置
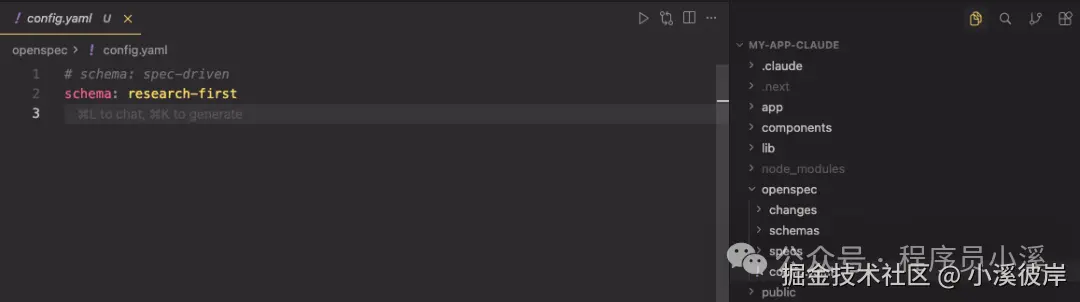
在移除 project.md 和 agent.md 后,OpenSpec新版本中新增了 openspec/config.yaml 文件承担了部分原本由这些文件负责的"项目常识"管理功能。
openspec/config.yaml 文件是为团队自定义OpenSpec的最简单方法,它允许我们:
-
设置默认模式:在每个命令上跳过 --schema
-
注入项目上下文:AI 看到你的技术栈、约定等
-
添加每个制品的规则:特定制品的自定义规则
默认工作模式的配置方式大致如下:
makefile
# openspec/config.yaml
schema: spec-driven
context: |
  技术栈:TypeScript、React、Node.js
  API 约定:RESTful、JSON 响应
  测试:Vitest 用于单元测试、Playwright 用于端到端测试
  代码风格:ESLint 搭配 Prettier、严格 TypeScript
rules:
  proposal:
    - 包含回滚计划
    - 识别受影响的团队
  specs:
    - 使用 Given/When/Then 格式描述场景
  design:
    - 为复杂流程包含序列图
2)自定义模式
当项目配置不够时,创建具有完全自定义工作流的模式。自定义模式位于项目的 openspec/schemas/ 目录中,并与代码一起进行版本控制。
perl
your-project/
├── openspec/
│   ├── config.yaml        # 项目配置
│   ├── schemas/           # 自定义模式在此
│   │   └── my-workflow/
│   │       ├── schema.yaml
│   │       └── templates/
│   └── changes/           # 你的变更
└── src/
创建自定义模式最快的方法是 派生内置模式,即通过克隆复制一份默认的内置模式
perl
$ openspec schema fork spec-driven my-workflow这个命令会将整个 spec-driven 模式复制到 openspec/schemas/my-workflow/目录下
文件大致描述如下:
bash
openspec/schemas/my-workflow/
├── schema.yaml # 工作流定义
└── templates/
├── proposal.md # 提案制品的模板
├── spec.md # 规范的模板
├── design.md # 设计的模板
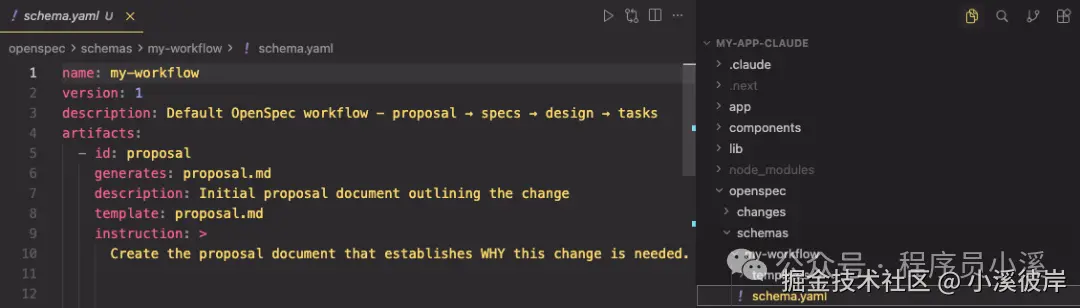
└── tasks.md # 任务的模板系统内置的提示词模版如下:
kotlin
# schema.yaml
name: my-workflow
version: 1
description: Default OpenSpec workflow - proposal → specs → design → tasks
artifacts:
- id: proposal
  generates: proposal.md
  description: Initial proposal document outlining the change
  template: proposal.md
  instruction: >
    Create the proposal document that establishes WHY this change is needed.
    Sections:
    - **Why**: 1-2 sentences on the problem or opportunity. What problem does this solve? Why now?
    - **What Changes**: Bullet list of changes. Be specific about new capabilities, modifications, or removals. Mark breaking changes with **BREAKING**.
    - **Capabilities**: Identify which specs will be created or modified:
      - **New Capabilities**: List capabilities being introduced. Each becomes a new `specs/<name>/spec.md`. Use kebab-case names (e.g., `user-auth`, `data-export`).
      - **Modified Capabilities**: List existing capabilities whose REQUIREMENTS are changing. Only include if spec-level behavior changes (not just implementation details). Each needs a delta spec file. Check `openspec/specs/` for existing spec names. Leave empty if no requirement changes.
    - **Impact**: Affected code, APIs, dependencies, or systems.
    IMPORTANT: The Capabilities section is critical. It creates the contract between
    proposal and specs phases. Research existing specs before filling this in.
    Each capability listed here will need a corresponding spec file.
    Keep it concise (1-2 pages). Focus on the "why" not the "how" -
    implementation details belong in design.md.
    This is the foundation - specs, design, and tasks all build on this.
  requires: []
- id: specs
  generates: specs/**/*.md
  description: Detailed specifications for the change
  template: spec.md
  instruction: >
    Create specification files that define WHAT the system should do.
    Create one spec file per capability listed in the proposal's Capabilities section.
    - New capabilities: use the exact kebab-case name from the proposal (specs/<capability>/spec.md).
    - Modified capabilities: use the existing spec folder name from openspec/specs/<capability>/ when creating the delta spec at specs/<capability>/spec.md.
    Delta operations (use ## headers):
    - **ADDED Requirements**: New capabilities
    - **MODIFIED Requirements**: Changed behavior - MUST include full updated content
    - **REMOVED Requirements**: Deprecated features - MUST include **Reason** and **Migration**
    - **RENAMED Requirements**: Name changes only - use FROM:/TO: format
    Format requirements:
    - Each requirement: `### Requirement: <name>` followed by description
    - Use SHALL/MUST for normative requirements (avoid should/may)
    - Each scenario: `#### Scenario: <name>` with WHEN/THEN format
    - **CRITICAL**: Scenarios MUST use exactly 4 hashtags (`####`). Using 3 hashtags or bullets will fail silently.
    - Every requirement MUST have at least one scenario.
    MODIFIED requirements workflow:
    1. Locate the existing requirement in openspec/specs/<capability>/spec.md
    2. Copy the ENTIRE requirement block (from `### Requirement:` through all scenarios)
    3. Paste under `## MODIFIED Requirements` and edit to reflect new behavior
    4. Ensure header text matches exactly (whitespace-insensitive)
    Common pitfall: Using MODIFIED with partial content loses detail at archive time.
    If adding new concerns without changing existing behavior, use ADDED instead.
    Example:
    ```
    ## ADDED Requirements
    ### Requirement: User can export data
    The system SHALL allow users to export their data in CSV format.
    #### Scenario: Successful export
    - **WHEN** user clicks "Export" button
    - **THEN** system downloads a CSV file with all user data
    ## REMOVED Requirements
    ### Requirement: Legacy export
    **Reason**: Replaced by new export system
    **Migration**: Use new export endpoint at /api/v2/export
    ```
    Specs should be testable - each scenario is a potential test case.
  requires:
  - proposal
- id: design
  generates: design.md
  description: Technical design document with implementation details
  template: design.md
  instruction: >
    Create the design document that explains HOW to implement the change.
    When to include design.md (create only if any apply):
    - Cross-cutting change (multiple services/modules) or new architectural pattern
    - New external dependency or significant data model changes
    - Security, performance, or migration complexity
    - Ambiguity that benefits from technical decisions before coding
    Sections:
    - **Context**: Background, current state, constraints, stakeholders
    - **Goals / Non-Goals**: What this design achieves and explicitly excludes
    - **Decisions**: Key technical choices with rationale (why X over Y?). Include alternatives considered for each decision.
    - **Risks / Trade-offs**: Known limitations, things that could go wrong. Format: [Risk] → Mitigation
    - **Migration Plan**: Steps to deploy, rollback strategy (if applicable)
    - **Open Questions**: Outstanding decisions or unknowns to resolve
    Focus on architecture and approach, not line-by-line implementation.
    Reference the proposal for motivation and specs for requirements.
    Good design docs explain the "why" behind technical decisions.
  requires:
  - proposal
- id: tasks
  generates: tasks.md
  description: Implementation checklist with trackable tasks
  template: tasks.md
  instruction: >
    Create the task list that breaks down the implementation work.
    **IMPORTANT: Follow the template below exactly.** The apply phase parses
    checkbox format to track progress. Tasks not using `- [ ]` won't be tracked.
    Guidelines:
    - Group related tasks under ## numbered headings
    - Each task MUST be a checkbox: `- [ ] X.Y Task description`
    - Tasks should be small enough to complete in one session
    - Order tasks by dependency (what must be done first?)
    Example:
    ```
    ## 1. Setup
    - [ ] 1.1 Create new module structure
    - [ ] 1.2 Add dependencies to package.json
    ## 2. Core Implementation
    - [ ] 2.1 Implement data export function
    - [ ] 2.2 Add CSV formatting utilities
    ```
    Reference specs for what needs to be built, design for how to build it.
    Each task should be verifiable - you know when it's done.
  requires:
  - specs
  - design
apply:
  requires:
  - tasks
  tracks: tasks.md
  instruction: |
    Read context files, work through pending tasks, mark complete as you go.
    Pause if you hit blockers or need clarification.
xml
# proposal.md
## Why
<!-- Explain the motivation for this change. What problem does this solve? Why now? -->
## What Changes
<!-- Describe what will change. Be specific about new capabilities, modifications, or removals. -->
## Capabilities
### New Capabilities
<!-- Capabilities being introduced. Replace <name> with kebab-case identifier (e.g., user-auth, data-export, api-rate-limiting). Each creates specs/<name>/spec.md -->
- `<name>`: <brief description of what this capability covers>
### Modified Capabilities
<!-- Existing capabilities whose REQUIREMENTS are changing (not just implementation).
     Only list here if spec-level behavior changes. Each needs a delta spec file.
     Use existing spec names from openspec/specs/. Leave empty if no requirement changes. -->
- `<existing-name>`: <what requirement is changing>
## Impact
<!-- Affected code, APIs, dependencies, systems -->
xml
# spec.md
## ADDED Requirements
### Requirement: <!-- requirement name -->
<!-- requirement text -->
#### Scenario: <!-- scenario name -->
- **WHEN** <!-- condition -->
- **THEN** <!-- expected outcome -->
xml
# design.md
## Context
<!-- Background and current state -->
## Goals / Non-Goals
**Goals:**
<!-- What this design aims to achieve -->
**Non-Goals:**
<!-- What is explicitly out of scope -->
## Decisions
<!-- Key design decisions and rationale -->
## Risks / Trade-offs
<!-- Known risks and trade-offs -->
xml
# tasks.md
## 1. <!-- Task Group Name -->
- [ ] 1.1 <!-- Task description -->
- [ ] 1.2 <!-- Task description -->
## 2. <!-- Task Group Name -->
- [ ] 2.1 <!-- Task description -->
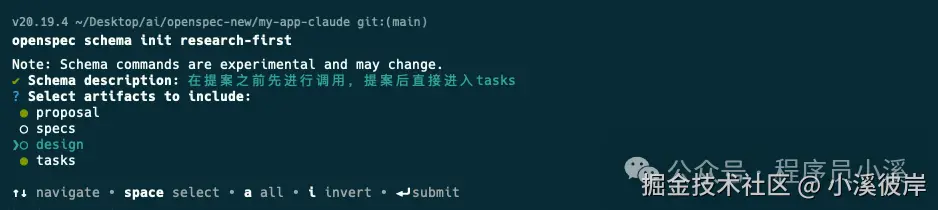
- [ ] 2.2 <!-- Task description -->当然我们也可以从0开始创建全新的工作流,我们可以自定义一个模式,在每次提案之前需要先进行调研,提案后直接产生tasks为例,在命令行终端输入如下指令:
powershell
$ openspec schema init research-first
或者
$ openspec schema init research-first --description "快速迭代工作流" --artifacts "proposal,specs,tasks"
输入Schema描述,选择artifacts制品
确认配置输入【y】回车选择将 research-first设置为默认Schema

创建完成后,我们将得到一个Schema项目
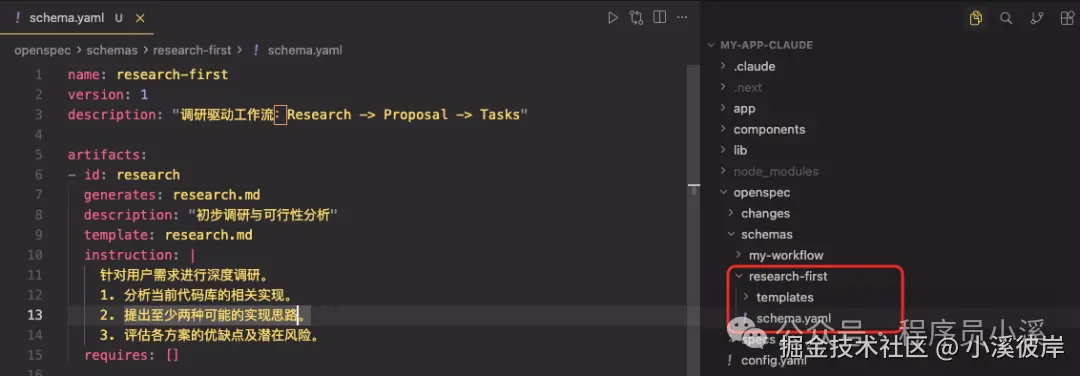
cpp
# schema.yaml
name: research-first
version: 1
description: "调研驱动工作流:Research -> Proposal -> Tasks"
artifacts:
- id: research
  generates: research.md
  description: "初步调研与可行性分析"
  template: research.md
  instruction: |
    针对用户需求进行深度调研。
    1. 分析当前代码库的相关实现。
    2. 提出至少两种可能的实现思路。
    3. 评估各方案的优缺点及潜在风险。
  requires: []
- id: proposal
  generates: proposal.md
  description: "最终选定的实施提案"
  template: proposal.md
  instruction: |
    基于 research.md 的调研结果,确定最终实施方案。
    1. 明确变更的具体范围。
    2. 描述对现有系统架构的影响。
    3. 定义成功交付的标准。
  requires: [ research ]
- id: tasks
  generates: tasks.md
  description: "可执行的任务清单"
  template: tasks.md
  instruction: |
    根据 proposal.md 的内容,分解为可直接执行的代码任务。
    1. 任务需具备原子性(每个任务对应 1-2 个文件修改)。
    2. 包含必要的测试任务。
  requires: [ proposal ]
apply:
  requires: [ tasks ]
  tracks: tasks.md
配置项字段:
-
id:唯一标识符,用于命令和规则
-
generates:输出文件名(支持通配符如 specs/**/*.md)
-
template:templates/ 目录中的模板文件
-
instruction:AI 创建此制品的指令
-
requires:依赖项 - 哪些制品必须先存在
shell
# research.md
# Research: {{change_name}}
## 1. 现状分析
## 2. 方案探索
### 方案 A: [简述]
- **实现路径**:
- **优点**:
- **风险**:
### 方案 B: [简述]
- **实现路径**:
- **优点**:
- **风险**:
## 3. 调研结论
shell
# proposal.md
# Proposal: {{change_name}}
## 1. 变更目标
## 2. 详细变更内容
- [ ] 修改点 A
- [ ] 新增组件 B
## 3. 技术约束
- 涉及文件:
- 性能/安全考虑:
markdown
# tasks.md
# 任务清单
## 前置任务
- [ ] 完成 research.md 的撰写和审核
- [ ] 完成 proposal.md 的撰写和审核
## 实施任务
- [ ] [任务1描述]
- [ ] [任务2描述]
- [ ] [任务3描述]
- [ ] ...
## 测试任务
- [ ] [测试任务1描述]
- [ ] [测试任务2描述]
- [ ] [测试任务3描述]
- [ ] ...
## 文档任务
- [ ] 更新相关技术文档
- [ ] 编写用户手册或操作指南
- [ ] 记录变更日志
## 审核任务
- [ ] 代码审核
- [ ] 测试报告审核
- [ ] 文档审核
接下来修改 openspec/config.yaml 文件,配置 research-first为默认schema
或者使用命令行指定
sql
$ openspec new change feature --schema research-first 在使用自定义schema之前,我们需要先对它进行验证,在命令行终端输入命令
powershell
$ openspec schema validate research-first
验证没有问题后就可以重新创建变更提案了
bash
/opsx:propose 添加暗黑模式最终效果如下,OpenSpec按照我们提供的工作流模版输出了对应的变更提案制品,检查无误后就可以实施任务了。

3)全局模式
OpenSpec也支持用户级schema,位于 ~/.local/share/openspec/schemas/,用于跨项目共享,但是更推荐使用项目级schema,因为它们与你的代码一起进行版本控制,使用方式和自定义一致。
友情提示
见原文:OpenSepc新版本新提升
本文同步自微信公众号 "程序员小溪" ,这里只是同步,想看及时消息请移步我的公众号,不定时更新我的学习经验。友情提示友情提示