如何编译并手动安装vscode插件
Trae给出的步骤
-
安装依赖: cd yan/vscode-extension && npm install
-
编译插件: npm run compile
-
测试插件:按 F5 启动调试
-
打包插件: npm run package
-
发布到 VS Code 市场:参考 CHANGELOG.md
正确安装方法:
方法1:在 VS Code 中安装(推荐)
- 打开 VS Code (不是 Visual Studio)
- 按 Ctrl+Shift+X 打开扩展面板
- 点击右上角的 ... 菜单
- 选择 Install from VSIX...
- 选择生成的 yan-language-0.1.0.vsix 文件
方法2:使用命令行安装
code --install-extension
G:\dumategithub\newlisp\yan\vscode-extension\yan
-language-0.1.0.vsix
方法3:开发模式安装
- 打开 VS Code
- 打开 yan/vscode-extension 目录
- 按 F5 启动调试
- 新窗口会打开,插件已自动加载
发布到 VS Code 市场流程
1. 注册发布者账户
- 访问 Visual Studio Marketplace 发布者页面
- 使用 Microsoft 账户登录
- 创建发布者账户(需要提供发布者名称等信息)
2. 获取个人访问令牌(PAT)
- 访问 Azure DevOps 个人访问令牌页面
- 创建新令牌:
- 名称 : 任意名称(如 vsce-publish )
- 作用域 : 选择 Marketplace (Publish)
- 过期时间 : 设置合适的有效期
- 复制生成的令牌( 只显示一次,务必保存 )
3. 登录 vsce
cd yan/vscode-extension
vsce login <your-publisher-name>
然后粘贴之前复制的 PAT。
4. 打包插件
vsce package这会生成 yan-language-0.1.0.vsix 文件。
5. 发布插件
vsce publish或者直接发布本地包:
vsce publish --packagePath yan-language-0.1.0.
vsix
6. 验证发布
访问 VS Code Marketplace ,搜索你的插件名称确认发布成功。
注意事项
- 图标 : 添加 icon.png (512x512 像素)到插件根目录
- README : 确保 README.md 内容完整
- 许可证 : 添加 LICENSE 文件
- 发布者名称 : 在 package.json 中设置正确的 publisher 字段
更新插件
更新版本时:
-
修改 package.json 中的 version 字段
-
更新 CHANGELOG.md
-
重新打包发布:
vsce publish
或
vsce publish minor # 自动升级小版本
vsce publish major # 自动升级大版本
vsce publish patch # 自动升级补丁版本
参考文档 : VS Code 插件发布指南
实践
首先让Trae帮我们写插件,插件代码放在G:\dumategithub\newlisp\yan\vscode-extension 目录。
打包插件
进入目录G:\dumategithub\newlisp\yan\vscode-extension 执行npm run package打包插件:
npm run package
> yan-language@0.1.0 package
> vsce package
Executing prepublish script 'npm run vscode:prepublish'...
> yan-language@0.1.0 vscode:prepublish
> npm run compile
> yan-language@0.1.0 compile
> tsc -p ./
WARNING LICENSE, LICENSE.md, or LICENSE.txt not found
Do you want to continue? y/N y
INFO Files included in the VSIX:
yan-language-0.1.0.vsix
├─ Content_Types.xml
├─ extension.vsixmanifest
└─ extension/
├─ CHANGELOG.md 0.47 KB
├─ README.md 1.41 KB
├─ debugger.js 2.1 KB
├─ extension.js 3.61 KB
├─ language-configuration.json 0.41 KB
├─ package.json 1.85 KB
├─ out/
│ ├─ completionProvider.js 7.28 KB
│ ├─ diagnosticProvider.js 4.15 KB
│ ├─ extension.js 4 KB
│ ├─ hoverProvider.js 4.92 KB
│ ├─ src/
│ │ ├─ completionProvider.js 7.28 KB
│ │ ├─ diagnosticProvider.js 4.15 KB
│ │ ├─ extension.js 4 KB
│ │ └─ hoverProvider.js 4.92 KB
│ └─ test/
│ ├─ extension.test.js 2.28 KB
│ └─ runTest.js 1.96 KB
├─ server/
│ └─ main.js 1.62 KB
├─ snippets/
│ └─ yan.json 2.84 KB
├─ syntaxes/
│ ├─ yan.tmLanguage.json 3.01 KB
│ └─ yanmd.tmLanguage.json 1.02 KB
└─ test/
├─ extension.test.js 2.28 KB
└─ runTest.js 1.96 KB
DONE Packaged: G:\dumategithub\newlisp\yan\vscode-extension\yan-language-0.1.0.vsix (24 files, 28.08 KB)
INFO The latest version of @vscode/vsce is 3.9.1 and you have 2.32.0.
Update it now: npm install -g @vscode/vsce
VScode导入插件
编译好的插件在:G:\dumategithub\newlisp\yan\vscode-extension\yan-language-0.1.0.vsix
直接命令行导入
code --install-extension G:\dumategithub\newlisp\yan\vscode-extension\yan-language-0.1.0.vsix导入成功
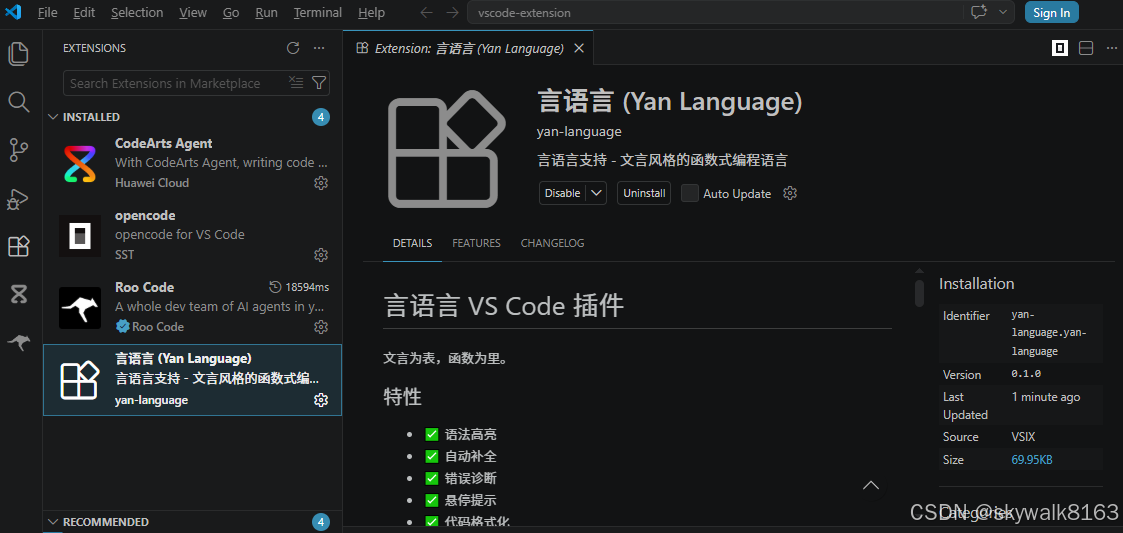
查看yan语言的高亮
发布到 VS Code 市场流程稍后再做。
调试
npm run compile编译报错
npm run compile
> yan-language@0.1.0 compile
> tsc -p ./
error TS6059: File 'G:/dumategithub/newlisp/yan/vscode-extension/test/extension.test.ts' is not under 'rootDir' 'G:/dumategithub/newlisp/yan/vscode-extension/src'. 'rootDir' is expected to contain all source files.
The file is in the program because:
Matched by default include pattern '**/*'
error TS6059: File 'G:/dumategithub/newlisp/yan/vscode-extension/test/runTest.ts' is not under 'rootDir' 'G:/dumategithub/newlisp/yan/vscode-extension/src'. 'rootDir' is expected to contain all source files.
The file is in the program because:
Matched by default include pattern '**/*'
Found 2 errors.
问题原因:
- tsconfig.json 中的 rootDir: "src" 与测试文件位置 test/ 冲突
- 缺少 @types/mocha 测试框架类型定义
修复内容:
修改 tsconfig.json :
-
移除 rootDir 设置
-
添加 include 明确指定编译目录: src//* 和 test/ /*
修改 package.json :
-
添加 @types/mocha: ^10.0.0
-
添加 mocha: ^10.0.0