Color Pick 2D(多 Canvas 像素拾取)
背景
在 2D 画布应用中,需要判断用户点击/悬停的是哪一个可交互元素。常见解决方案包括:
| 方案 | 优点 | 缺点 |
|---|---|---|
isPointInPath |
实现成本低, 系统提供默认方法, 性能优越 | 一般需要配合其他方法处理 (BVH 做初筛), 对于大批量渲染场景处理性能不够友好 , 对于不规则图片难以处理 |
colorPick |
选取快速, 对于渲染大量不规则图形,需要频繁拾取的场景性能优异 | 需要额外的渲染成本 |
核心思路
- 显示层:正常绘制原图 + 矢量元素,用户看到的就是最终效果
- Pick 缓冲:同一场景再画一遍,但每个元素只用一种标识色(一色一 id),背景用固定深色
- 交互时 :指针坐标映射到 Pick 缓冲 →
getImageData取色 → 与ELEMENTS中的颜色表匹配 → 得到元素 id
scss
指针 (clientX, clientY)
    ↓ getCanvasPixelCoords(含 DPR)
主画布缓冲坐标 (bufX, bufY)
    ↓ mapToPickBufferCoords(÷2)
Pick 缓冲坐标 (pickBufX, pickBufY)
    ↓ samplePixel
RGBA → detectPickElement → 元素 id
多 Canvas 实现
页面使用 三个 Canvas,职责分离:
| Canvas | 作用 | 是否参与 pick |
|---|---|---|
imageCanvas |
底层:原图 + 矢量路径(显示用) | 否 |
overlayCanvas |
上层透明叠加:取色圆环、接收指针事件 | 否(仅 UI) |
pickDrawCanvas |
右侧调试可见:Pick 缓冲(原图 1/2 尺寸) | 是 |
布局上,imageCanvas 与 overlayCanvas 叠放(position: absolute),overlayCanvas 负责 pointermove / pointerdown / pointerleave。Pick 缓冲单独展示,便于调试「一色一元素」是否正确。
为何 Pick 缓冲用半尺寸? 降低 getImageData 的像素量,对频繁移动的 hover 检测更友好;主画布坐标通过 floor(bufX / 2) 映射即可。
DPR 处理 :canvas.width = displayWidth * dpr,绘制时用 ctx.setTransform(dpr, 0, 0, dpr, 0, 0),读像素时用 buffer 坐标,显示 overlay 时再除以 dpr 回到 CSS 像素。
元素定义
可 pick 元素统一配置在 ELEMENTS 数组中:
ts
type PickElement = {
  id: string           // 业务标识,如「南瓜」「矩形1」
  color: string        // Pick 缓冲中的唯一标识色(hex)
  image?: string       // 位图元素:图片 URL
  path?: string        // 矢量元素:SVG path(坐标系与主画布显示尺寸一致)
}
当前示例包含三类:
| id | 类型 | 标识色 | 说明 |
|---|---|---|---|
| 南瓜 | 位图 | #f09000 |
使用 sample 图片,按透明区域生成剪影 |
| 矩形1 | 矢量 | #3080ff |
Path2D 矩形 |
| 椭圆1 | 矢量 | #40c060 |
Path2D 椭圆弧 |
约定 :每种 color 全局唯一;未命中任何元素时,采样到背景色 #111111。
Pick 缓冲绘制(renderPickLayer)
绘制顺序:
- 清空画布,铺背景
PICK_BACKGROUND = '#111111' - 遍历
ELEMENTS,按类型分别绘制
位图:剪影 + destination-in
图片不能简单 drawImage 后直接取色------非透明区域可能包含多种颜色。做法是 先铺标识色,再用图片 Alpha 裁剪:
ts
ctx.fillStyle = fillColor              // 元素标识色
ctx.fillRect(0, 0, width, height)
ctx.globalCompositeOperation = 'destination-in'
ctx.drawImage(img, 0, 0, width, height) // 保留与图片不透明区域交集
ctx.globalCompositeOperation = 'source-over'
这样 Pick 缓冲里图片轮廓内全是该元素的纯色,轮廓外仍是背景色。
矢量:Path2D 填充
矢量 path 的坐标定义在主画布显示尺寸下;Pick 缓冲为半尺寸,绘制时按 pickScale = pickWidth / displayWidth 缩放:
ts
ctx.save()
ctx.scale(pickScale, pickScale)
ctx.fillStyle = fillColor
ctx.fill(new Path2D(pathD))
ctx.restore()显示层(renderDisplayPaths)
主画布上的矢量仅做 fill,与 Pick 缓冲分离------显示可以半透明、描边、渐变,Pick 缓冲始终保持纯色,互不影响。
坐标映射
屏幕 → 主画布 buffer
ts
const scaleX = canvas.width / rect.width
const scaleY = canvas.height / rect.height
const x = Math.floor((clientX - rect.left) * scaleX)
const y = Math.floor((clientY - rect.top) * scaleY)
// clamp 到 [0, width-1] / [0, height-1]
主 buffer → Pick buffer(1/2)
ts
{ x: Math.floor(bufX / 2), y: Math.floor(bufY / 2) }Pick 缓冲尺寸:pickW = displayWidth / 2,pickH = displayHeight / 2,buffer 同样乘以 dpr。
颜色匹配(detectPickElement)
getImageData 读到的 RGB 可能因抗锯齿、缩放产生轻微偏差,因此用 容差匹配 而非精确相等:
ts
const COLOR_MATCH_TOLERANCE = 10  // 元素匹配
// 背景判断容差更严:6
逻辑:
- 若采样色接近背景
#111111→ 返回null(未命中) - 遍历
ELEMENTS,colorsMatch(sampled, hexToRgb(el.color))→ 返回对应id - 都不匹配 →
null
交互流程
- 初始化 (
useEffect):并行加载ELEMENTS中的图片 →setupCanvases设置三个 Canvas 尺寸、绘制显示层与 Pick 层 pointermove/pointerdown:调用handlePointer- 映射坐标 → 在 Pick ctx 上
samplePixel detectPickElement更新pickedElement状态- 在
overlayCanvas绘制取色圆环(drawPickColorRing)
- 映射坐标 → 在 Pick ctx 上
pointerleave:清空 overlay,重置pickedElement
Overlay 圆环会根据亮度自动选描边色(r + g + b > 380 用深色描边,否则白色),保证在浅色/深色像素上都可见。
性能与细节
- Pick 与主画布的 2D context 均使用
{ willReadFrequently: true },提示浏览器优化频繁读像素 - Pick ctx 保存在
pickCtxRef,避免重复getContext - 组件卸载时
cancelled标志 + 清空 ref,防止异步加载完成后写已卸载组件 touchAction: 'none'避免移动端指针移动触发页面滚动
适用场景与局限
适合:
- Canvas / WebGL 2D 场景中的元素拾取
- 元素数量中等、每种元素有独立 pick id 的场景
- 需要同时支持位图剪影与矢量 path 的混合场景
局限:
- 可 pick 元素数量受「可区分颜色」限制(实践上几十~上百个足够;更多可改用 R 通道编码 id)
- 半尺寸 Pick 缓冲在元素边缘可能有 1px 级误差,可通过提高 Pick 分辨率或容差调节
- 动态增删元素需重绘 Pick 缓冲
示例图例
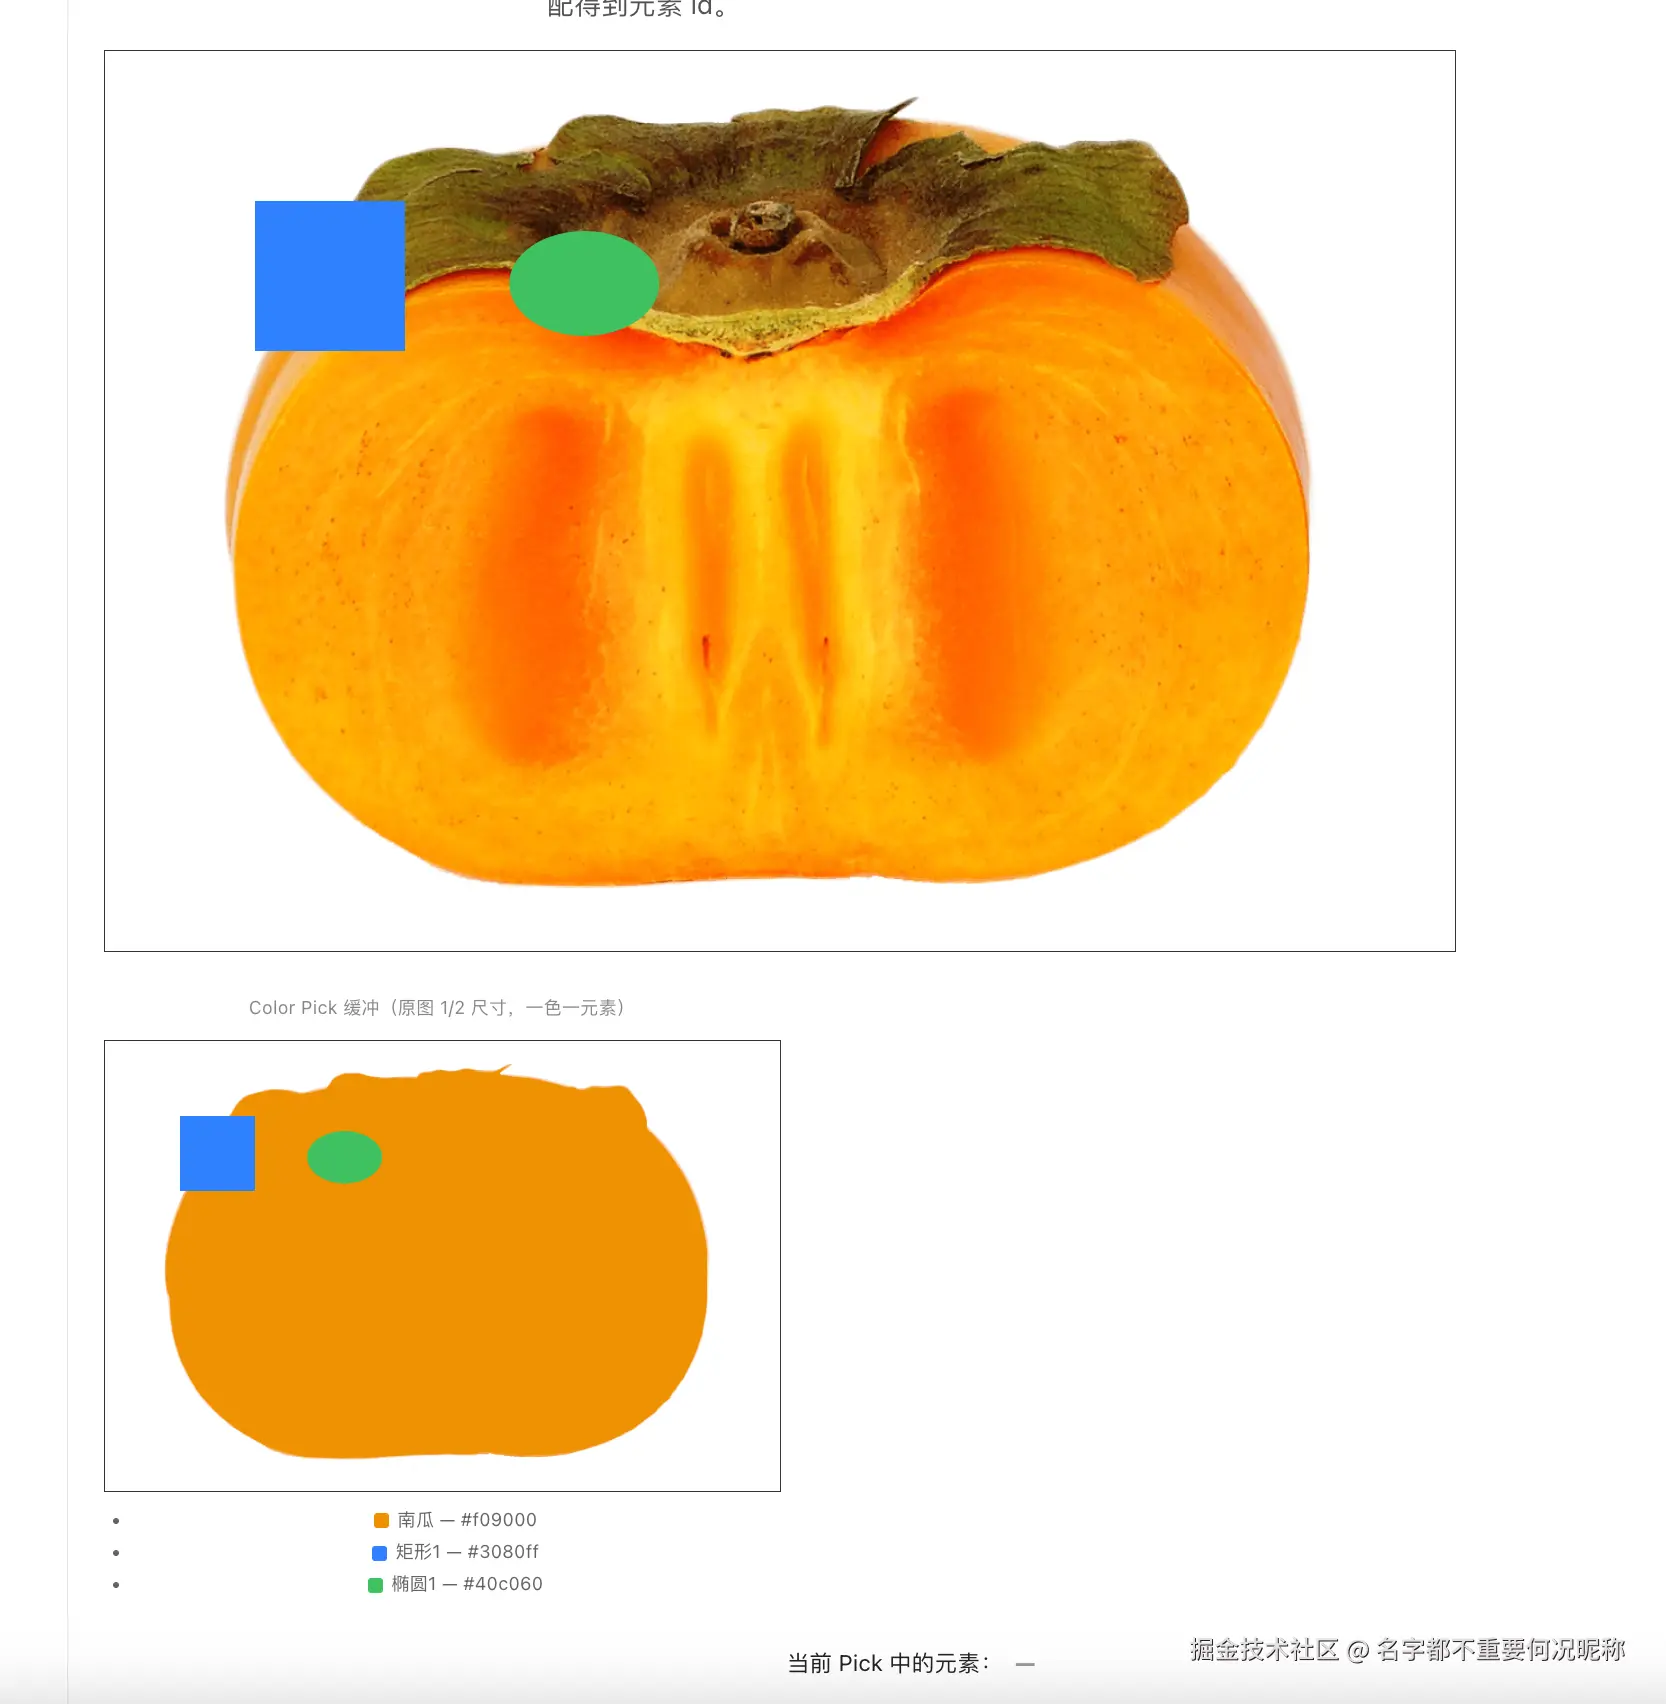
示例代码
以下是一个完整的 React 组件示例,演示多 Canvas 架构下的 Color Pick 2D 实现(TypeScript + Canvas 2D API):
tsx
import { useCallback, useEffect, useRef, useState } from 'react'
import sampleImage from '../assets/580b57fcd9996e24bc43c183.png'

const MAX_DISPLAY_WIDTH = 900
const PICK_BACKGROUND = '#111111'
const COLOR_MATCH_TOLERANCE = 10

type Rgba = { r: number; g: number; b: number; a: number }

type PickElement = {
  id: string
  /** 剪影 / pick 缓冲中的唯一标识色 */
  color: string
  image?: string
  /** SVG path,坐标系与主画布显示尺寸一致 */
  path?: string
}

/** 可 pick 元素:每种颜色对应一个 id */
const ELEMENTS: PickElement[] = [
  {
    id: '南瓜',
    color: '#f09000',
    image: sampleImage,
  },
  {
    id: '矩形1',
    color: '#3080ff',
    path: 'M 100 100 L 200 100 L 200 200 L 100 200 Z',
  },
  {
    id: '椭圆1',
    color: '#40c060',
    path: 'M 320 120 A 50 35 0 1 1 319 120 Z',
  },
]

function hexToRgb(hex: string): { r: number; g: number; b: number } {
  const h = hex.replace('#', '')
  return {
    r: parseInt(h.slice(0, 2), 16),
    g: parseInt(h.slice(2, 4), 16),
    b: parseInt(h.slice(4, 6), 16),
  }
}

function colorsMatch(
  sampled: Rgba,
  target: { r: number; g: number; b: number },
  tolerance = COLOR_MATCH_TOLERANCE,
): boolean {
  return (
    Math.abs(sampled.r - target.r) <= tolerance &&
    Math.abs(sampled.g - target.g) <= tolerance &&
    Math.abs(sampled.b - target.b) <= tolerance
  )
}

/** 根据 pick 缓冲采样色在 ELEMENTS 中查找对应 id */
function detectPickElement(color: Rgba): string | null {
  const bg = hexToRgb(PICK_BACKGROUND)
  if (colorsMatch(color, bg, 6)) return null

  for (const el of ELEMENTS) {
    if (colorsMatch(color, hexToRgb(el.color))) return el.id
  }
  return null
}

function samplePixel(ctx: CanvasRenderingContext2D, x: number, y: number): Rgba {
  const [r, g, b, a] = ctx.getImageData(x, y, 1, 1).data
  return { r, g, b, a }
}

function getCanvasPixelCoords(
  canvas: HTMLCanvasElement,
  clientX: number,
  clientY: number,
) {
  const rect = canvas.getBoundingClientRect()
  const scaleX = canvas.width / rect.width
  const scaleY = canvas.height / rect.height
  const x = Math.floor((clientX - rect.left) * scaleX)
  const y = Math.floor((clientY - rect.top) * scaleY)
  return {
    x: Math.max(0, Math.min(canvas.width - 1, x)),
    y: Math.max(0, Math.min(canvas.height - 1, y)),
  }
}

/** 将主画布缓冲坐标映射到 pick 剪影画布(1/2 尺寸) */
function mapToPickBufferCoords(bufX: number, bufY: number) {
  return {
    x: Math.max(0, Math.floor(bufX / 2)),
    y: Math.max(0, Math.floor(bufY / 2)),
  }
}

function resetOverlayCtx(
  ctx: CanvasRenderingContext2D,
  canvas: HTMLCanvasElement,
  dpr: number,
) {
  ctx.setTransform(1, 0, 0, 1, 0, 0)
  ctx.clearRect(0, 0, canvas.width, canvas.height)
  ctx.setTransform(dpr, 0, 0, dpr, 0, 0)
}

function strokeCircle(
  ctx: CanvasRenderingContext2D,
  cx: number,
  cy: number,
  radius: number,
  strokeStyle: string,
  lineWidth: number,
) {
  ctx.beginPath()
  ctx.arc(cx, cy, radius, 0, Math.PI * 2)
  ctx.strokeStyle = strokeStyle
  ctx.lineWidth = lineWidth
  ctx.stroke()
}

function drawPickColorRing(
  ctx: CanvasRenderingContext2D,
  x: number,
  y: number,
  color: Rgba,
  radius = 14,
) {
  const { r, g, b, a } = color
  ctx.beginPath()
  ctx.arc(x, y, radius, 0, Math.PI * 2)
  ctx.fillStyle = `rgba(${r},${g},${b},${a / 255})`
  ctx.fill()
  strokeCircle(ctx, x, y, radius, r + g + b > 380 ? '#222' : '#fff', 2)
}

function loadImage(src: string): Promise<HTMLImageElement> {
  return new Promise((resolve, reject) => {
    const img = new Image()
    img.onload = () => resolve(img)
    img.onerror = reject
    img.src = src
  })
}

function fillPathElement(
  ctx: CanvasRenderingContext2D,
  pathD: string,
  fillColor: string,
  scale = 1,
) {
  ctx.save()
  if (scale !== 1) ctx.scale(scale, scale)
  const path = new Path2D(pathD)
  ctx.fillStyle = fillColor
  ctx.fill(path)
  ctx.restore()
}

/** 在主画布上绘制矢量元素(半透明填充 + 描边) */
function renderDisplayPaths(ctx: CanvasRenderingContext2D) {
  for (const el of ELEMENTS) {
    if (!el.path) continue
    const path = new Path2D(el.path)
    ctx.fillStyle = el.color
    ctx.fill(path)
  }
}

/** destination-in:先铺元素色,再按图片透明区域裁剪为纯色剪影 */
function renderImageSilhouette(
  ctx: CanvasRenderingContext2D,
  img: HTMLImageElement,
  fillColor: string,
  width: number,
  height: number,
) {
  ctx.fillStyle = fillColor
  ctx.fillRect(0, 0, width, height)
  ctx.globalCompositeOperation = 'destination-in'
  ctx.drawImage(img, 0, 0, width, height)
  ctx.globalCompositeOperation = 'source-over'
}

/** 在 pick 缓冲上绘制全部可 pick 元素(各用唯一颜色) */
function renderPickLayer(
  ctx: CanvasRenderingContext2D,
  pickWidth: number,
  pickHeight: number,
  displayWidth: number,
  dpr: number,
  images: Map<string, HTMLImageElement>,
) {
  const bw = ctx.canvas.width
  const bh = ctx.canvas.height
  const pickScale = pickWidth / displayWidth

  ctx.setTransform(1, 0, 0, 1, 0, 0)
  ctx.clearRect(0, 0, bw, bh)
  ctx.setTransform(dpr, 0, 0, dpr, 0, 0)

  ctx.fillStyle = PICK_BACKGROUND
  ctx.fillRect(0, 0, pickWidth, pickHeight)

  for (const el of ELEMENTS) {
    if (el.image) {
      const img = images.get(el.image)
      if (!img) continue
      renderImageSilhouette(ctx, img, el.color, pickWidth, pickHeight)
    } else if (el.path) {
      fillPathElement(ctx, el.path, el.color, pickScale)
    }
  }
}

function ColorPick2DPage() {
  const imageCanvasRef = useRef<HTMLCanvasElement | null>(null)
  const overlayCanvasRef = useRef<HTMLCanvasElement | null>(null)
  const pickDrawCanvasRef = useRef<HTMLCanvasElement | null>(null)
  const pickCtxRef = useRef<CanvasRenderingContext2D | null>(null)
  const pickBufferSizeRef = useRef({ width: 0, height: 0 })
  const [pickedElement, setPickedElement] = useState<string | null>(null)
  const [ready, setReady] = useState(false)

  const setupCanvases = useCallback(
    (img: HTMLImageElement, elementImages: Map<string, HTMLImageElement>) => {
      const imageCanvas = imageCanvasRef.current
      const overlayCanvas = overlayCanvasRef.current
      const pickDrawCanvas = pickDrawCanvasRef.current
      if (!imageCanvas || !overlayCanvas || !pickDrawCanvas) return

      const ratio = img.naturalWidth / img.naturalHeight
      const displayWidth = Math.min(MAX_DISPLAY_WIDTH, img.naturalWidth)
      const displayHeight = Math.round(displayWidth / ratio)
      const dpr = window.devicePixelRatio || 1
      const bufferWidth = Math.round(displayWidth * dpr)
      const bufferHeight = Math.round(displayHeight * dpr)
      const pickW = displayWidth / 2
      const pickH = displayHeight / 2
      const pickBufferWidth = Math.round(pickW * dpr)
      const pickBufferHeight = Math.round(pickH * dpr)

      for (const canvas of [imageCanvas, overlayCanvas]) {
        canvas.width = bufferWidth
        canvas.height = bufferHeight
        canvas.style.width = `${displayWidth}px`
        canvas.style.height = `${displayHeight}px`
      }

      pickDrawCanvas.width = pickBufferWidth
      pickDrawCanvas.height = pickBufferHeight
      pickDrawCanvas.style.width = `${pickW}px`
      pickDrawCanvas.style.height = `${pickH}px`
      pickBufferSizeRef.current = {
        width: pickBufferWidth,
        height: pickBufferHeight,
      }

      const imageCtx = imageCanvas.getContext('2d', { willReadFrequently: true })
      const pickDrawCtx = pickDrawCanvas.getContext('2d', {
        willReadFrequently: true,
      })
      if (!imageCtx || !pickDrawCtx) return

      imageCtx.setTransform(dpr, 0, 0, dpr, 0, 0)
      imageCtx.drawImage(img, 0, 0, displayWidth, displayHeight)
      renderDisplayPaths(imageCtx)

      renderPickLayer(
        pickDrawCtx,
        pickW,
        pickH,
        displayWidth,
        dpr,
        elementImages,
      )
      pickCtxRef.current = pickDrawCtx
      setReady(true)
    },
    [],
  )

  useEffect(() => {
    let cancelled = false

    const init = async () => {
      const imageSrcs = ELEMENTS.map((e) => e.image).filter(
        (src): src is string => !!src,
      )
      const loaded = await Promise.all(
        imageSrcs.map(async (src) => [src, await loadImage(src)] as const),
      )
      if (cancelled) return

      const elementImages = new Map(loaded)
      const mainImg = elementImages.get(sampleImage)
      if (!mainImg) return

      setupCanvases(mainImg, elementImages)
    }

    init()
    return () => {
      cancelled = true
      pickCtxRef.current = null
      setReady(false)
    }
  }, [setupCanvases])

  const drawOverlay = useCallback((x: number, y: number, color: Rgba) => {
    const overlayCanvas = overlayCanvasRef.current
    if (!overlayCanvas) return

    const ctx = overlayCanvas.getContext('2d')
    if (!ctx) return

    const dpr = window.devicePixelRatio || 1
    resetOverlayCtx(ctx, overlayCanvas, dpr)
    drawPickColorRing(ctx, x, y, color)
  }, [])

  const handlePointer = useCallback(
    (clientX: number, clientY: number) => {
      const overlayCanvas = overlayCanvasRef.current
      const pickCtx = pickCtxRef.current
      const { width: pickBufW, height: pickBufH } = pickBufferSizeRef.current
      if (!overlayCanvas || !pickCtx || !ready || pickBufW === 0) return

      const dpr = window.devicePixelRatio || 1
      const { x: bufX, y: bufY } = getCanvasPixelCoords(
        overlayCanvas,
        clientX,
        clientY,
      )
      const { x: pickBufX, y: pickBufY } = mapToPickBufferCoords(bufX, bufY)
      const clampedPickX = Math.min(pickBufX, pickBufW - 1)
      const clampedPickY = Math.min(pickBufY, pickBufH - 1)

      const color = samplePixel(pickCtx, clampedPickX, clampedPickY)
      const x = Math.floor(bufX / dpr)
      const y = Math.floor(bufY / dpr)
      setPickedElement(detectPickElement(color))
      drawOverlay(x, y, color)
    },
    [drawOverlay, ready],
  )

  const onPointerMove = (e: React.PointerEvent<HTMLCanvasElement>) => {
    handlePointer(e.clientX, e.clientY)
  }

  const onPointerDown = (e: React.PointerEvent<HTMLCanvasElement>) => {
    handlePointer(e.clientX, e.clientY)
  }

  const onPointerLeave = () => {
    const overlayCanvas = overlayCanvasRef.current
    const overlayCtx = overlayCanvas?.getContext('2d')
    if (overlayCanvas && overlayCtx) {
      overlayCtx.clearRect(0, 0, overlayCanvas.width, overlayCanvas.height)
    }
    setPickedElement(null)
  }


  return (
    <section style={{ padding: '24px' }}>
      <h1>Color Pick 2D(多 Canvas)</h1>
      <p style={{ maxWidth: 720, lineHeight: 1.6, color: '#555' }}>
        底层 Canvas 绘制原图;上层透明 Canvas 显示当前 pick 色标记;
        右侧半尺寸 Canvas 为 pick 缓冲:每个可交互元素用唯一纯色绘制(图片用{' '}
        <code>destination-in</code>,矢量用 <code>Path2D</code>)。
        点击/移动主画布时,坐标按 1/2 映射到 pick 缓冲取色,再与{' '}
        <code>ELEMENTS</code> 中的颜色匹配得到元素 id。
      </p>

      <div
        style={{
          display: 'flex',
          flexWrap: 'wrap',
          gap: 24,
          alignItems: 'flex-start',
          marginTop: 16,
        }}
      >
        <div
          style={{
            position: 'relative',
            border: '1px solid #333',
            lineHeight: 0,
          }}
        >
          <canvas ref={imageCanvasRef} aria-hidden />
          <canvas
            ref={overlayCanvasRef}
            onPointerMove={onPointerMove}
            onPointerDown={onPointerDown}
            onPointerLeave={onPointerLeave}
            style={{
              position: 'absolute',
              left: 0,
              top: 0,
              cursor: 'pointer',
              touchAction: 'none',
            }}
          />
        </div>

        <div>
          <div style={{ fontSize: 12, color: '#888', marginBottom: 8 }}>
            Color Pick 缓冲(原图 1/2 尺寸,一色一元素)
          </div>
          <canvas
            ref={pickDrawCanvasRef}
            style={{ display: 'block', border: '1px solid #333' }}
          />
          <ul
            style={{
              marginTop: 8,
              paddingLeft: 18,
              fontSize: 12,
              color: '#666',
              lineHeight: 1.8,
            }}
          >
            {ELEMENTS.map((el) => (
              <li key={el.id}>
                <span
                  style={{
                    display: 'inline-block',
                    width: 10,
                    height: 10,
                    borderRadius: 2,
                    background: el.color,
                    marginRight: 6,
                    verticalAlign: 'middle',
                  }}
                />
                {el.id} --- {el.color}
              </li>
            ))}
          </ul>
        </div>
      </div>
      <p
        style={{
          marginTop: 16,
          fontSize: 15,
          color: '#222',
        }}
      >
        当前 Pick 中的元素:
        <strong style={{ marginLeft: 8, color: pickedElement ? '#c45c00' : '#999' }}>
          {pickedElement ?? '---'}
        </strong>
      </p>
    </section>
  )
}

export default ColorPick2DPage
总结
Color Pick 2D 的核心是 显示与拾取分离 :显示层自由渲染视觉效果,Pick 缓冲为每个元素分配唯一纯色,通过 getImageData 读像素反查 id。位图用 destination-in 生成剪影,矢量用 Path2D 填充,坐标经 DPR 校正后映射到半尺寸 Pick 缓冲,配合容差匹配即可稳定命中。
同一思路也广泛见于 3D 引擎的 GPU Pick(渲染 id 到离屏缓冲再读回),本文展示的是 原生 Canvas 2D 下的轻量实现,适合 2D 编辑器、贴纸画布等场景。