课程链接:www.bilibili.com/cheese/play...
代码链接:github.com/buglas/robo...
课程目标
- 创建joint的拖拽旋转路径
- 创建joint的拖拽推拉路径
1-概述
joint拖拽变换辅助路径的作用是让用户知道关节拖拽的方向和范围,从而更快捷的变换关节。
joint拖拽变换辅助路径有两种:
- joint拖拽旋转路径
- joint拖拽推拉路径
joint拖拽旋转路径效果如下:
- 无限旋转路径
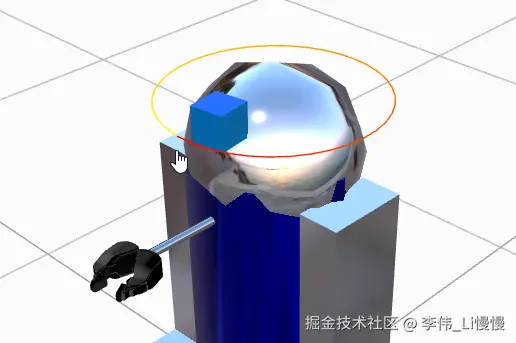
- 有限旋转路径
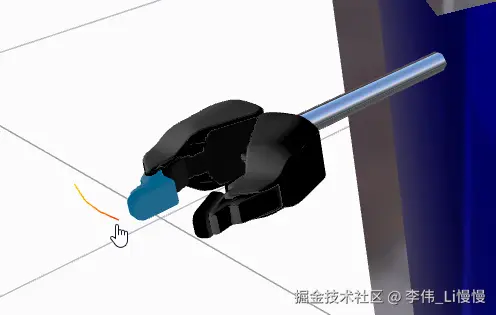
joint拖拽推拉的路径效果如下:
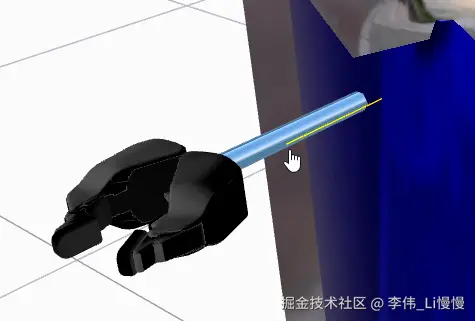
2-拖拽旋转路径的绘制算法
joint 拖拽旋转路径是一个圆弧,这个圆弧可以告诉用户拖拽旋转的范围。
2-1-关节的拖拽旋转范围
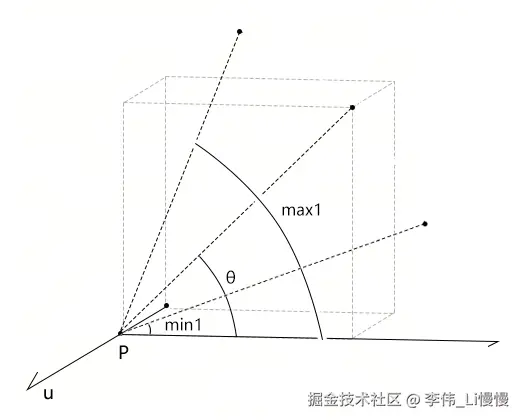
在世界坐标系中,已知:
- 模型的旋转轴是单位向量u
- 关节当前的旋转值的θ
- 关节的旋转限值是min1,max1
求:关节基于当前弧度可以旋转的范围 min2, max2
解:
将关节的旋转限值减去关节当前的弧度即可
ini
min2=min1-θ
max2=max1-θ
拖拽旋转路径便是自鼠标点击的位置,绕u轴向其两侧旋转到min2 和max2 的圆弧。
2-2-关节的拖拽旋转的半径
下图是之前说拖拽旋转算法时用到的图,我们用此图说旋转半径。
- 鼠标点击在模型上的点为点A
- 鼠标拖拽后的点为点B
- 模型的基点是点O
- 模型的旋转轴是单位向量u
首先,我不建议以AP的距离为旋转半径,因为这样容易与旋转物体重合。
所以,我们需要让半径大一些,比如比AP的距离大1.15
ini
r=|AP|*1.15现在有了旋转范围和半径,我们就可以绘制旋转路径。
3-拖拽推拉路径的绘制算法
joint 拖拽推拉路径是一条线,这条线可以告诉用户拖拽推拉的范围和方向。
3-1-关节的拖拽推拉范围
关节基于当前值可以推拉的范围和旋转范围一样,都是推拉限值减去关节当前的推拉值。
在世界坐标系中,已知:
- 模型的推拉轴是单位向量u
- 关节当前的推拉值的θ
- 关节的推拉限值是min1,max1
求:关节基于当前推拉值可以推拉的范围 min2, max2
解:
ini
 min2=min1-θ
 max2=max1-θ
3-2-推拉路径的位置
首先,我们不能直接在点A上绘制推拉路径,因为这样容易与推拉物体重合。
所以我们可以让推拉路径向外偏移出一段距离,如下图中的红黄渐变线。
接下来我们具体说一下其计算过程。
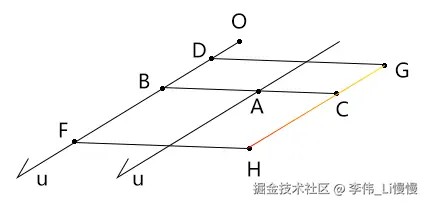
已知:
- 鼠标点击在模型上的点为点A
- 模型的推拉轴是单位向量u
- 模型的变换基点是点O
- 关节基于当前推拉值的推拉的范围是 min2, max2
- 推拉路径的偏移量是s
求:推拉路径的起点G和终点H
解:
1.计算点A在u轴上的正射影B
ini
B=OA·u+O2.将推拉的范围 min2, max2 转化为推拉轴上的坐标:
ini
BD=min2*u
BF=max2*u
3.计算从点A偏移后的点C
ini
C=s*normalize(BA)+A4.从点C向其两侧偏移
ini
G=C+BD
H=C+BF
4-代码实现
1.为了方便管理,我们可以把拖拽路径封装为JointDragHelper 类。
- src/robot/JointDragHelper.ts
php
import { BufferAttribute, Camera, Color, Line, LineBasicMaterial, Quaternion,  Vector3 } from "three";

const _quaternion = new Quaternion();

class JointDragHelper extends Line{
  material=new LineBasicMaterial({vertexColors:true})
  colorMap:[Color,Color]=[new Color(0xff0000),new Color(0xffff00)]
  frustumCulled=false

  // 应用拖拽路径
 applyPrismaticPath(point:Vector3,origin:Vector3,pivot:Vector3,lower:number,upper:number,value:number){
    const {colorMap:[cs,ce]}=this
    // 变换基点origin到point的向量
    const originToPoint = point.clone().sub(origin);
    // 从origin 向point 方向外扩一个比较小的值,避免辅助线与模型的重叠
    const outPoint=originToPoint.clone().normalize().multiplyScalar(0.02).add(point);
    // 顶点集合
    const positions :number[]=[]
    for(let limit of [lower,upper]){
      // 基于当前变换量的拖拽上下限
      const currentLimit = limit - value;
      // 基于outPoint取辅助线的两端
      const {x,y,z}=pivot.clone().multiplyScalar(currentLimit).add(outPoint)
      positions .push(x,y,z)
    }
    this.geometry.setAttribute(
      "position",
      new BufferAttribute(new Float32Array(positions ), 3)
    );
    // 顶点颜色集合
    this.geometry.setAttribute(
      "color",
      new BufferAttribute(new Float32Array([
        cs.r, cs.g, cs.b,
        ce.r, ce.g, ce.b
      ] ), 3)
    );
  }
  // 应用旋转路径,以关节当前弧度为基准向两侧画圆弧,正负方向需要根据行列式计算
  applyRotatePath(point:Vector3, origin:Vector3, pivot:Vector3, lower:number, upper:number, value:number, camera:Camera, domElement:HTMLElement){
    const {colorMap:[cs,ce]}=this
    // 变换基点origin到point的向量
    const originToPoint = point.clone().sub(origin);
    // 基于当前变换量的拖拽上下限
    const curLower = lower - value;
    const curUpper = upper - value;
    // 路径圆滑度,即每多少弧度做一次分段
    const step = 1 / (Math.PI * 2);
    // 弧度集合
    const angles:number[] = [];
    for (let angle = curLower; angle <curUpper; angle += step) {
      angles.push(angle);
    }
    angles[angles.length-1]=curUpper

    // 放大旋转半径
    originToPoint.multiplyScalar(1.15)
    // 根据弧度集合生成旋转路径的顶点集合,并做颜色映射
    const positions :number[]=[]
    const colors:number[] =[]
    const len=angles.length
    angles.forEach((angle,ind) => {
      _quaternion.setFromAxisAngle(pivot, angle);
      const { x, y, z } = originToPoint.clone().applyQuaternion(_quaternion).add(origin);
      positions.push(x, y, z);
      const inter=ind/len
      const {r,g,b}=cs.clone().lerpHSL(ce,inter*inter);
      colors.push(r,g,b)
    });

    this.geometry.setAttribute(
      "position",
      new BufferAttribute(new Float32Array(positions), 3)
    );
    this.geometry.setAttribute(
      "color",
      new BufferAttribute(new Float32Array(colors), 3)
    );
  }
}
export {JointDragHelper}
2.在URDFDragControls类中实例化JointDragHelper,并在变换关节时,绘制相应路径。
- src/robot/URDFDragControls.ts
typescript
/* URDF 模型拖拽类 */
class URDFDragControls extends EventDispatcher<any>  {
  // ...
  // 关节拖拽路径,辅助拖拽
  jointDragHelper = new JointDragHelper();

  constructor(camera:CameraType,domElement: HTMLElement,robots: URDFRobot | URDFRobot[] = []) {
    //...
    this.jointDragHelper.visible = false;
    this.resourceTracker.track(this.jointDragHelper)
  }
  // ...

  // 鼠标按下时
  pointerdown({button}:PointerEvent) {
    // 只适配左击
    if (button !== 0) {
        return
    }
    const { curHover, enabled, camera,jointDragHelper,domElement } = this
    // ...
    // 拖拽状态
    this.dragging = true
    // 拖拽辅助对象可见
    jointDragHelper.visible = true
    // ...
    // 变换限值
    let {
      userData: {limit:{lower,upper} },
    } = joint;
    if(type=='prismatic'){
      // ...
      // 应用推拉路径
      jointDragHelper.applyPrismaticPath(point,origin,pivot,lower,upper,value)
    }else{
      // ...
       // 连续旋转关节的拖拽旋转范围是关节当前弧度所在的圆
      if(type=='continuous'){
        const n=Math.floor(value/(Math.PI*2))
        lower=PI2*n
        upper=PI2*(n+1)
      }
      // 应用旋转路径
      jointDragHelper.applyRotatePath(point,origin,pivot,lower,upper,value,camera,domElement)
    }
    // ...
  }
  // 鼠标抬起时
  pointerup({button}:PointerEvent) {
    // ...
    const { dragging, enabled, jointDragHelper } = this;
    //...
    // 隐藏拽辅助对象
    jointDragHelper.visible = false;
    // ...
  }
  // ...
}

export { URDFDragControls };
3.在RobotVisual 类中,将路径添加到scene场景
- src/robot/RobotVisual.ts
csharp
// URDF拖拽变换辅助对象
scene.add(urdfDragControls.jointDragHelper)
现在,我们就完成了拖拽变换辅助路径的绘制,不过还有点瑕疵需要优化一下。
5-优化旋转路径的半径
旋转路径在鼠标距离旋转轴太近的时候会很小,如下图所示:
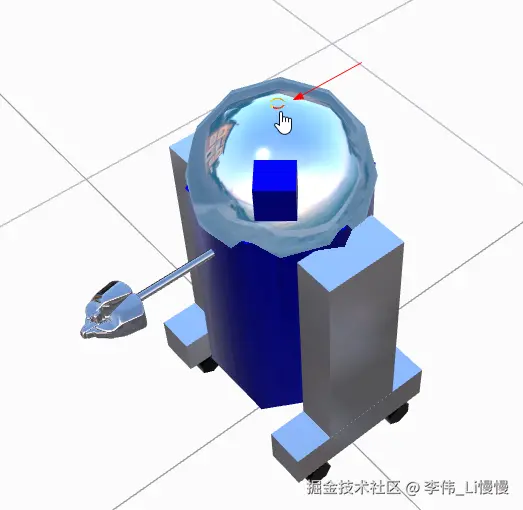
我们需要给旋转路径的半径一个限值,当它小于这个限值的时候,就不能再小了。
旋转路径的小是基于屏幕像素尺寸的小,所以我们需要根据旋转路径在屏幕中的尺寸判断其是否达到了限值。
5-1-判断旋转路径像素尺寸
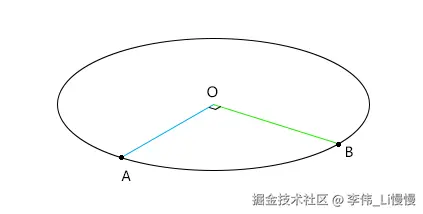
已知:
- 鼠标点击的位置是点A
- 旋转路径的圆心是点O
求:衡量旋转路径像素尺寸的方法
解:
1.将点A绕旋转轴旋转90度,得点B。
2.将点A、B、O的世界坐标转屏幕坐标A'、B'、O'
3.线段O'A'和线段O'B'的长度之和可作为衡量旋转路径像素尺寸的方法
ini
sum = O'A'+O'B'比如当sum小于100时,我们就可以在sum和100 之间区一个值,作为旋转路径的半径计算标准。
5-2-计算旋转路径的半径
知道了sum 后,我们就可以定义一个限值,当sum 小于限值时,就为旋转路径的半径计算一个合适的半径。
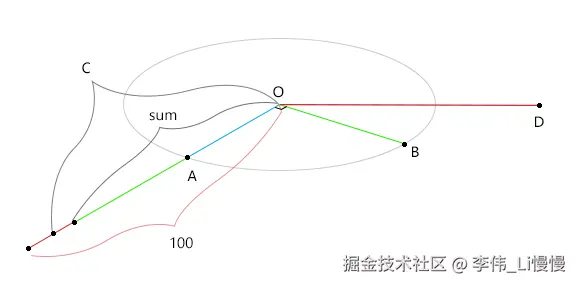
设:限值为100
求:当sum小于限值时,旋转路径的半径
解:
1.在sum和100间取一个中间值c
2.让O' 的x值加上sum
bash
D'=(O'.x+sum, O'.y, O'.z)3.将D' 从屏幕坐标转为世界坐标D
4.OD 的长度就是旋转路径的半径
5-3-代码实现
在JointDragHelper 类的applyRotatePath方法中,写入旋转半径的计算逻辑。
scss
// 应用旋转路径,以关节当前弧度为基准向两侧画圆弧,正负方向需要根据行列式计算
applyRotatePath(point:Vector3, origin:Vector3, pivot:Vector3, lower:number, upper:number, value:number, camera:Camera, domElement:HTMLElement){
  const {colorMap:[cs,ce]}=this
  // 变换基点origin到point的向量
  const originToPoint = point.clone().sub(origin);
  // 基于当前变换量的拖拽上下限
  const curLower = lower - value;
  const curUpper = upper - value;
  // 路径圆滑度,即每多少弧度做一次分段
  const step = 1 / (Math.PI * 2);
  // 弧度集合
  const angles:number[] = [];
  for (let angle = curLower; angle <curUpper; angle += step) {
    angles.push(angle);
  }
  angles[angles.length-1]=curUpper

  // 设置v的长度,此长度决定旋转弧的半径
  // origin的屏幕坐标
  const originInScree=worldToScreen(origin,camera,domElement)
  // point 的屏幕坐标
  const pointInScree1=worldToScreen(point,camera,domElement)
  // origin 到point 的屏幕距离
  const distanceInScreen1=new Vector2().subVectors(pointInScree1,originInScree).length()
  // 绕轴旋转90°的四元数
  _quaternion.setFromAxisAngle(pivot, Math.PI/2);
  // point 绕轴旋转90°
  const point2=originToPoint.clone().applyQuaternion(_quaternion).add(origin)
  // point2 的屏幕坐标
  const pointInScree2=worldToScreen(point2,camera,domElement)
  // origin 到point2 的屏幕距离
  const distanceInScreen2=new Vector2().subVectors(pointInScree2,originInScree).length()
  // 2个屏幕距离之和
  const allDistanceInScreen=distanceInScreen1+distanceInScreen2
  // 用于监察的屏幕距离
  const checkDistanceInScreen=100
  if(allDistanceInScreen<checkDistanceInScreen){
    // 在allDistanceInScreen 和checkDistanceInScreen 间按比例取个值
    const currentDistanceInScreen=allDistanceInScreen+(checkDistanceInScreen-allDistanceInScreen)*0.2
    // 基于originInScree 偏移currentDistanceInScreen
    const pointInScree3=new Vector3(originInScree.x+currentDistanceInScreen,originInScree.y,originInScree.z)
    // 在屏幕上偏移后的世界位
    const pointInWorld3=screenToWorld(pointInScree3,camera,domElement)
    // 上面的世界位到基点的距离就是旋转弧的半径
    const distance=pointInWorld3.sub(origin).length()
    originToPoint.setLength(distance)
  }else{
    // 放大旋转半径
    originToPoint.multiplyScalar(1.15)
  }
  // 根据弧度集合生成旋转路径的顶点集合,并做颜色映射
  const positions :number[]=[]
  const colors:number[] =[]
  const len=angles.length
  angles.forEach((angle,ind) => {
    _quaternion.setFromAxisAngle(pivot, angle);
    const { x, y, z } = originToPoint.clone().applyQuaternion(_quaternion).add(origin);
    positions.push(x, y, z);
    const inter=ind/len
    const {r,g,b}=cs.clone().lerpHSL(ce,inter*inter);
    colors.push(r,g,b)
  });


  this.geometry.setAttribute(
    "position",
    new BufferAttribute(new Float32Array(positions), 3)
  );
  this.geometry.setAttribute(
    "color",
    new BufferAttribute(new Float32Array(colors), 3)
  );
}
总结
这一章我们说了拖拽推拉路径和拖拽旋转路径的绘制,这种辅助路径的绘制方法并不唯一,只要实现了辅助功能,让用户用着方便即可。
下一章我们会创建一个机器人的信息提示面板。