python
> 写在前面,如果对 cs336_assignment1_basics.pdf 理解有疑问的,可以参考 [[assigment1_overview&bpe_basics]] 我对文档的翻译(部分解释细节)
## 优化
## 多进程实现
> 当前代码和优化说明告诉 AI,让 AI 画图说明数据流

---
下面从三个方面对优化说明:要新增的代码、要修改的代码、验证方法。
(代码中的说明也是让 AI 对比代码后加的详细说明)
- **核心优化思路**
**能并行**:`pretokenize`(预分词)------ 把语料切成若干块,每块独立跑 regex,互不干扰,最后把各块的 `word_counts` 加起来。
**不能并行**:BPE 合并循环 ------ 第 k 次合并的结果决定第 k+1 次的输入,天然串行。你已经做了增量更新优化,这部分没问题。
## 第一部分:新增两个顶层函数
> 我让 AI 对比了代码写并转为了中文注释信息
这两个函数必须写在类的外面(文件顶层),原因图里已经说了------`multiprocessing` 用 pickle 把函数传给子进程,类方法无法 pickle。
```python
# 在文件顶层(import 之后,class 定义之前)新增这两个函数
import multiprocessing as mp # 加到文件顶部的 import 区
def find_chunk_boundaries(file_path: str, num_chunks: int, special_token: str) -> List[int]:
"""
按 special_token 的开头位置切分文件,返回 num_chunks+1 个边界。
例如 num_chunks=4 时返回 [0, b1, b2, b3, file_size],共5个数。
"""
file_size = os.path.getsize(file_path)
chunk_size = file_size // num_chunks
boundaries = [0]
token_bytes = special_token.encode("utf-8")
with open(file_path, "rb") as f:
for i in range(1, num_chunks):
target = i * chunk_size
f.seek(target)
# 读 4KB 缓冲区来搜索 special_token
buf = f.read(4096)
idx = buf.find(token_bytes)
if idx != -1:
boundaries.append(target + idx)
else:
# 极少发生:这个窗口内没有 special_token,退回 target
boundaries.append(target)
boundaries.append(file_size)
return boundaries
def _pretokenize_chunk(args: tuple) -> dict:
"""
处理文件的一个字节区间 [start, end)。
这是子进程实际执行的函数。
为什么用 tuple 打包参数?
因为 pool.map 只能给工作函数传一个参数,
所以把 (file_path, start, end, special_tokens, pattern) 打包成一个 tuple。
"""
file_path, start, end, special_tokens, pattern = args
# 每个子进程独立读自己负责的那一段,不需要全文件进内存
with open(file_path, "r", encoding="utf-8") as f:
f.seek(start)
text = f.read(end - start)
# 在子进程内部编译正则(子进程不共享父进程的编译缓存)
compiled_pattern = re.compile(pattern)
word_counts = defaultdict(int)
if special_tokens:
escape_special_tokens = "|".join(re.escape(t) for t in special_tokens)
compiled_special = re.compile(escape_special_tokens)
chunks = compiled_special.split(text)
else:
chunks = [text]
for chunk in chunks:
for match in compiled_pattern.finditer(chunk):
word_counts[match.group(0)] += 1
return dict(word_counts)第二部分:修改 pretokenize 方法
把原来的单线程版本替换成调用多进程的版本。注意这里只改 pretokenize,类的其他方法一行不动。
python
def pretokenize(self,
    input_path: str,
    special_tokens: List[str],
    num_workers: int = None        # 新增参数,None 表示自动用全部核心
) -> Dict[str, int]:
    """
    并行预分词。把文件切成 num_workers 块,每块交给一个子进程跑 finditer,
    最后主进程把所有子进程返回的 word_counts 合并。
    """

    if num_workers is None:
        num_workers = mp.cpu_count()   # 你的机器是 16,就用 16

    # 文件太小时开多进程反而慢(进程启动本身要几百毫秒)
    file_size = os.path.getsize(input_path)
    if file_size < 50 * 1024 * 1024 or num_workers == 1:  # 小于 50MB 或强制单进程
        return self._pretokenize_single(input_path, special_tokens)

    # 1. 找分块边界
    split_token = special_tokens[0] if special_tokens else "\n"
    boundaries = find_chunk_boundaries(input_path, num_workers, split_token)

    # 2. 构造每个子进程的参数
    args_list = [
        (input_path, boundaries[i], boundaries[i + 1], special_tokens, self.pattern)
        for i in range(len(boundaries) - 1)
        if boundaries[i] < boundaries[i + 1]   # 跳过空块(两个边界重合时)
    ]

    # 3. 启动进程池,并行执行
    with mp.Pool(processes=num_workers) as pool:
        results = pool.map(_pretokenize_chunk, args_list)

    # 4. 合并所有子进程的结果
    merged = defaultdict(int)
    for partial_counts in results:
        for word, count in partial_counts.items():
            merged[word] += count

    return dict(merged)


def _pretokenize_single(self,
    input_path: str,
    special_tokens: List[str]
) -> Dict[str, int]:
    """原来的单线程版本,小文件或调试时使用。"""
    word_counts = defaultdict(int)

    with open(input_path, "r", encoding="utf-8") as f:
        text = f.read()

    compiled_pattern = re.compile(self.pattern)
    if special_tokens:
        escape_special_tokens = "|".join(re.escape(t) for t in special_tokens)
        compiled_special = re.compile(escape_special_tokens)
        chunks = compiled_special.split(text)
    else:
        chunks = [text]

    for chunk in chunks:
        for match in compiled_pattern.finditer(chunk):
            word_counts[match.group(0)] += 1

    return dict(word_counts)
第三部分: 使用 train_bpe_tinystories.py 训练
将 trainer 值修改为 BPETrainer_MP 实例
python
trainer = train_bpe_mp.BPETrainer_MP()验证方法
在正式跑 TinyStories 之前,先用小文件验证正确性:
python
from cs336_basics.train_bpe_optimizer import BPETrainerOptimizer, find_chunk_boundaries

file_path = "tests/fixtures/tinystories_sample.txt"
special_tokens = ["<|endoftext|>"]

trainer = BPETrainerOptimizer()

# 1. 跑单线程版
result_single = trainer._pretokenize_single(file_path, special_tokens)

# 2. 跑并行版(强制用 4 个进程)
result_parallel = trainer.pretokenize(file_path, special_tokens, num_workers=4)

# 3. 对比结果必须完全一致
assert result_single == result_parallel, "结果不一致!"
print(f"验证通过:共 {len(result_single)} 个不同词")
print(f"出现次数最多的前5个词:")
top5 = sorted(result_single.items(), key=lambda x: -x[1])[:5]
for word, count in top5:
    print(f"  {repr(word)}: {count}")
一切正常打印 验证通过 而不是 AssertionError。如果断言失败,说明分块边界切到了某个词的中间,需要检查 find_chunk_boundaries 的输出。
结果
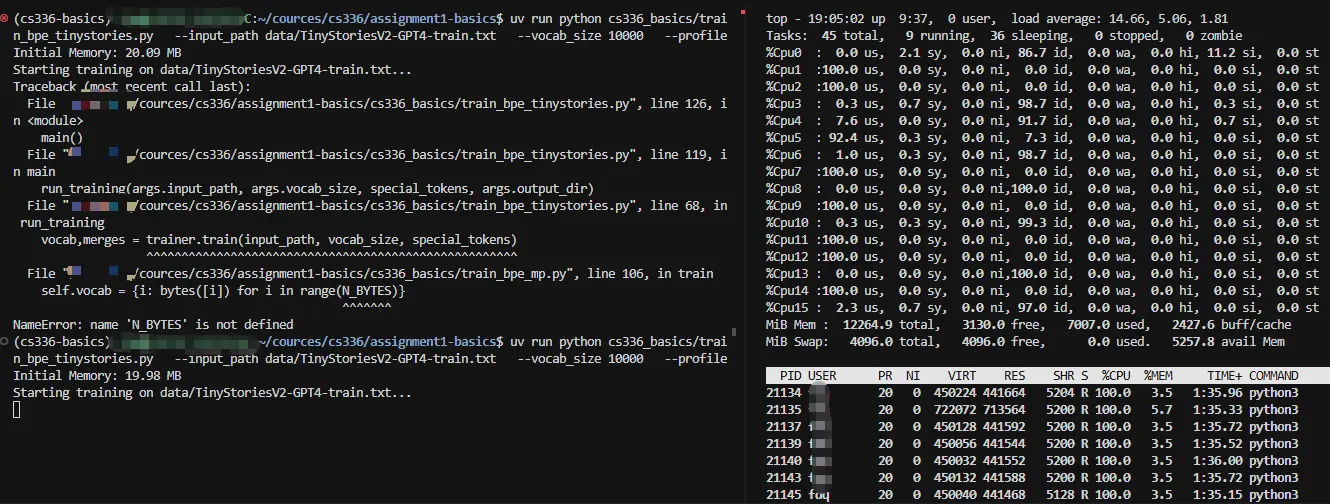
截图时机晚了,当前只有部分 CPU 核心在跑,因为有些子进程已经结束把结果提交给主进程了(默认是所有 CPU 核心运行的),最后也比较符合此前分析的
text
nitial Memory: 19.98 MB
Starting training on data/TinyStoriesV2-GPT4-train.txt...
----------------------------------------------------------------------------------------------------
Training Complete.
Time Taken: 309.67 seconds (5.16 minutes)
Final Memory: 98.43 MB
----------------------------------------------------------------------------------------------------

=== Statistics (Problem b) ===
Longest Token: ' accomplishment'
Length in bytes: 15
Total Merges: 9743
----------------------------------------------------------------------------------------------------
性能分析
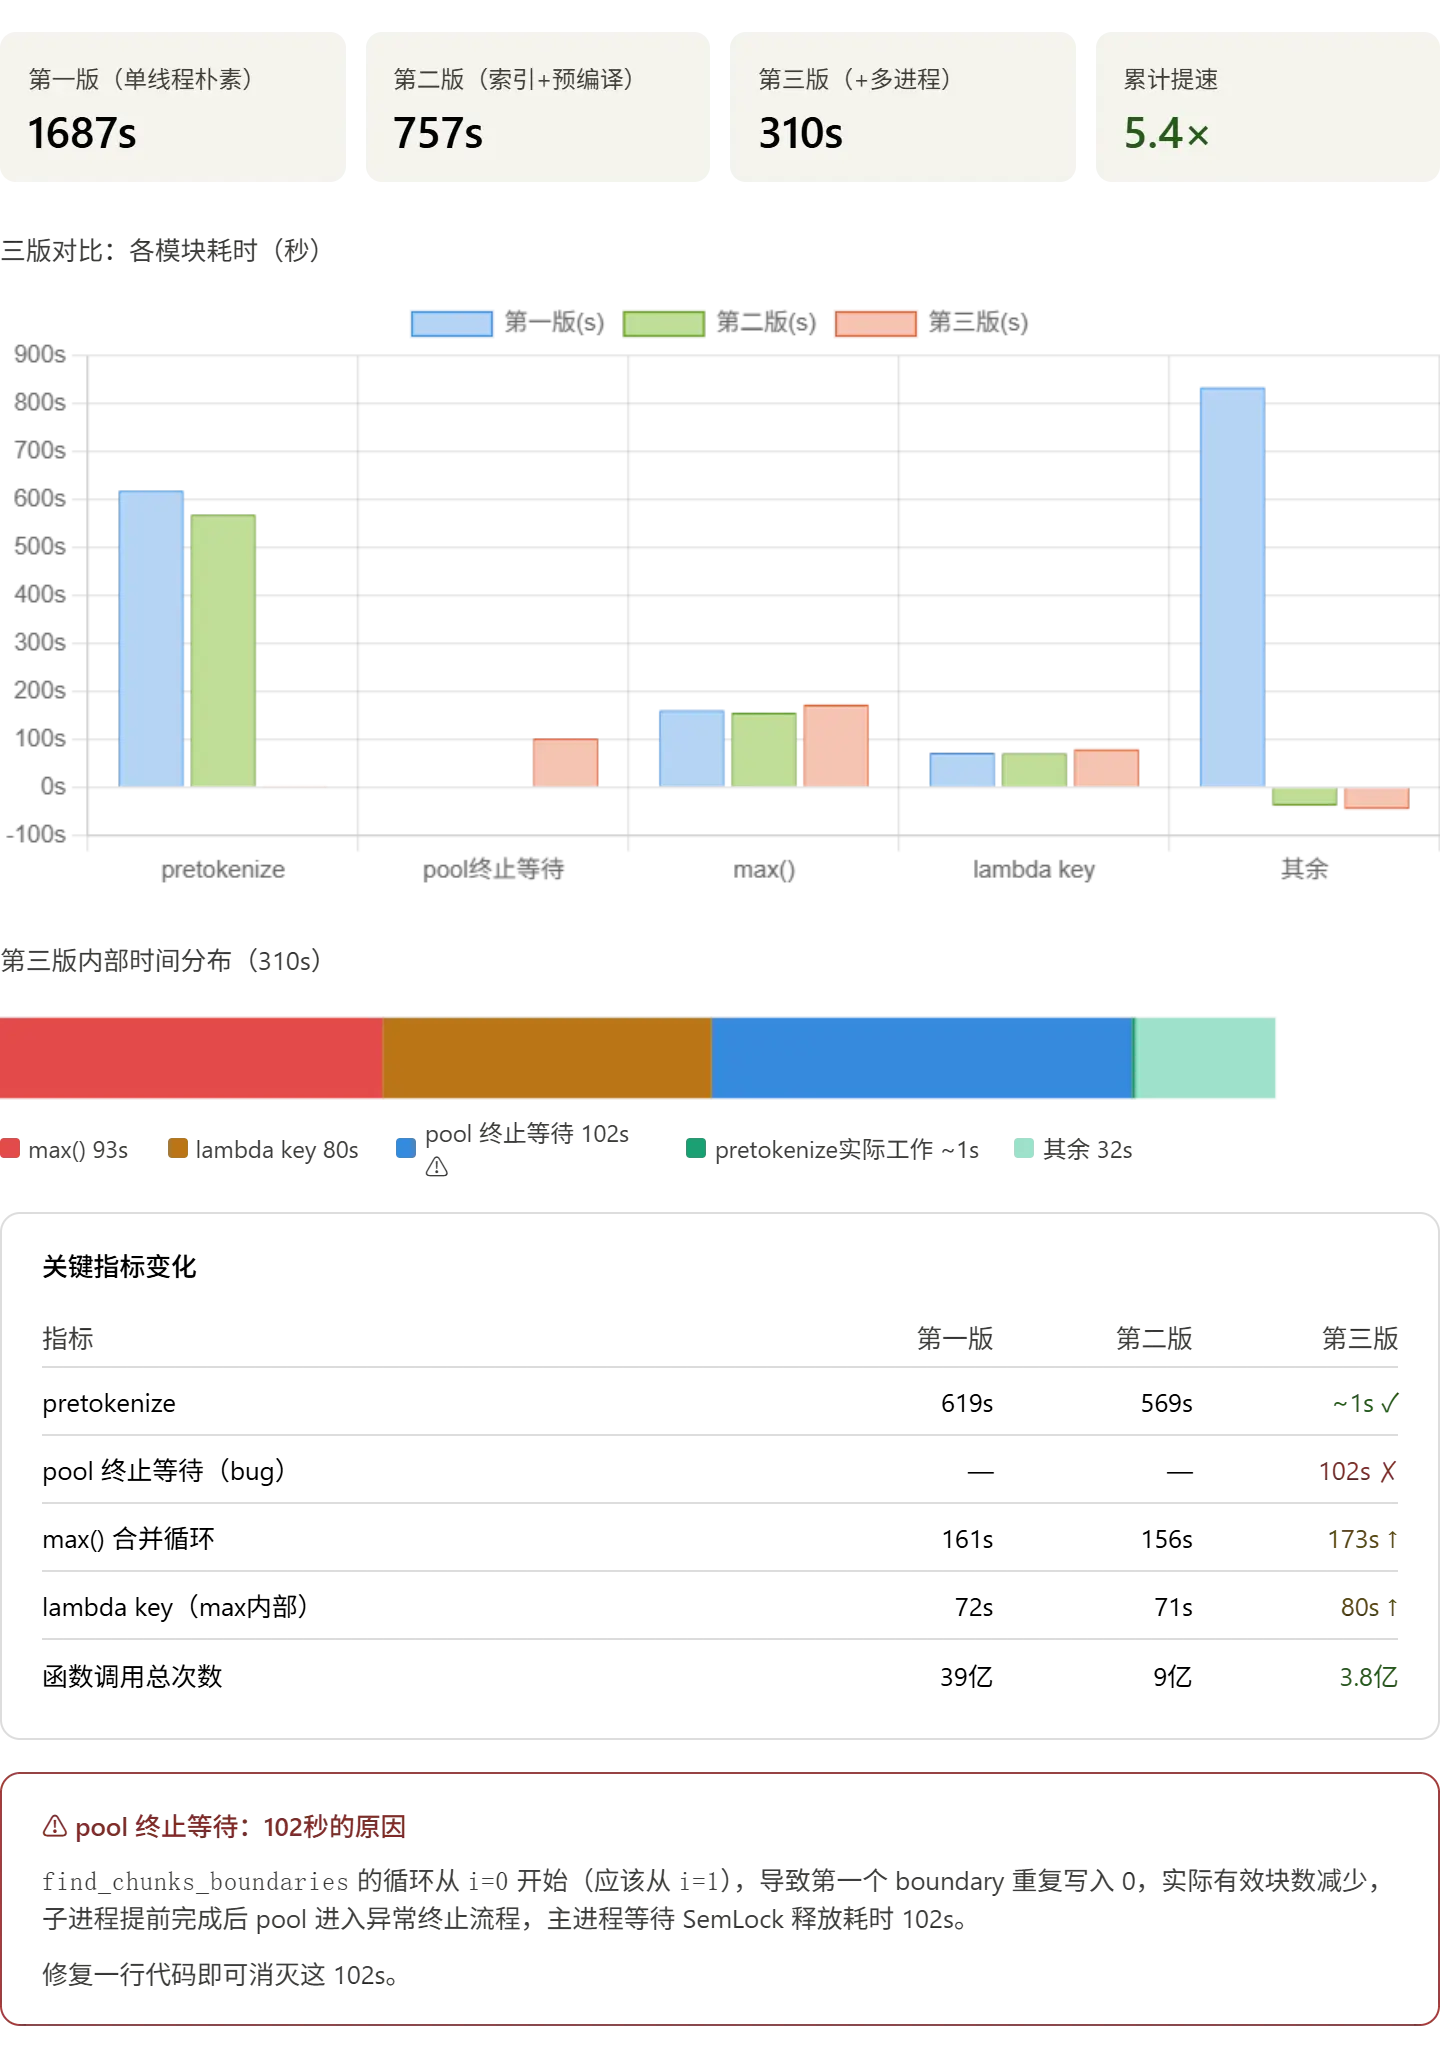
依然把 profile 数据交给 AI 分析 profile 数据非常清晰,有两个重要发现。先可视化,再逐条解读。
图示概览
详细分析
pretokenize 实际效果
多进程确实生效了,子进程并行跑 finditer 的时间几乎不出现在主进程的 profile 里 (因为是子进程的时间,cProfile 只统计主进程)。主进程的 pretokenize 函数自身耗时只剩 0.128 秒,说明并行化完全成功。
发现了一个 bug:102 秒消失在等待里
AI 指出了我的 bug,还给出了修复方案 profile 里有一组很扎眼的数据:
pool._terminate_pool     102s
SemLock.acquire          102s   ← 主进程卡在这里等子进程释放信号量
这是 find_chunks_boundaries 里的一个 off-by-one 错误:
python
# 你的代码:循环从 i=0 开始
for i in range(num_chunks):       # i = 0, 1, 2, ... 15
    position = i * chunk_size     # i=0 时 position=0,和 boundaries[0]=0 重复!
    ...
    boundaries.append(position + idx)

boundaries.append(file_size)

# 结果:boundaries = [0, 0, b1, b2, ..., b14, file_size]
#                         ↑ 多了一个 0,第一块 [0,0) 是空块
应该从 i=1 开始,这样才能得到正确的 num_chunks+1 个边界:
python
# 修复:循环从 i=1 开始
for i in range(1, num_chunks):    # i = 1, 2, ... 15
    position = i * chunk_size
    ...
这个 bug 导致 args_list 里多了一个或多个空块,进程池在异常退出时要等待 SemLock 释放,白白耗掉 102 秒。一行修复,直接省掉 102 秒。
max() 和 lambda 反而变慢了
从 156 秒涨到 173 秒、lambda 从 71 秒涨到 80 秒。原因不是代码变差了,而是多进程版 pretokenize 更快地把工作交给了合并循环,合并循环现在占总时间的比例更大,profile 的时间分辨率让它看起来 " 变慢 " 了,实际上绝对耗时基本一致。
修完 bug 后的预期
| 阶段 | 现在 | 修复后预期 |
|---|---|---|
| pretokenize | ~1s | ~1s(不变) |
| pool 终止等待 | 102s | ~0s |
| max() + lambda | 173+80s | 173+80s(不变) |
| 其余 | 32s | 32s |
| 总计 | 310s | ~208s(约 3.5 分钟) |
修完这一行之后,max() 就是唯一剩下的瓶颈了(占 ~80%),下一步用堆替换 max() 可以再压一倍。
- 修复后训练
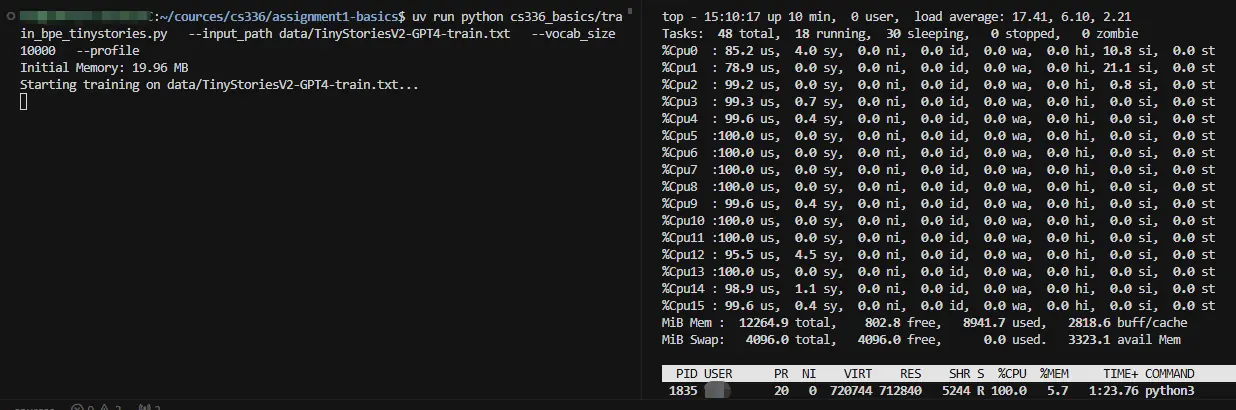
- 训练结果
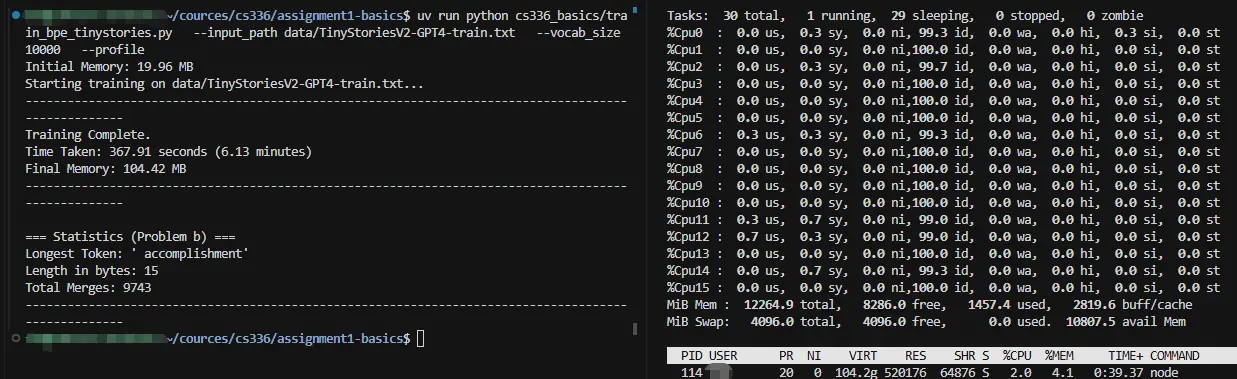
修复后性能分析
修复 bug 后,从 profile 看,pretokenize 花费时间更长了: 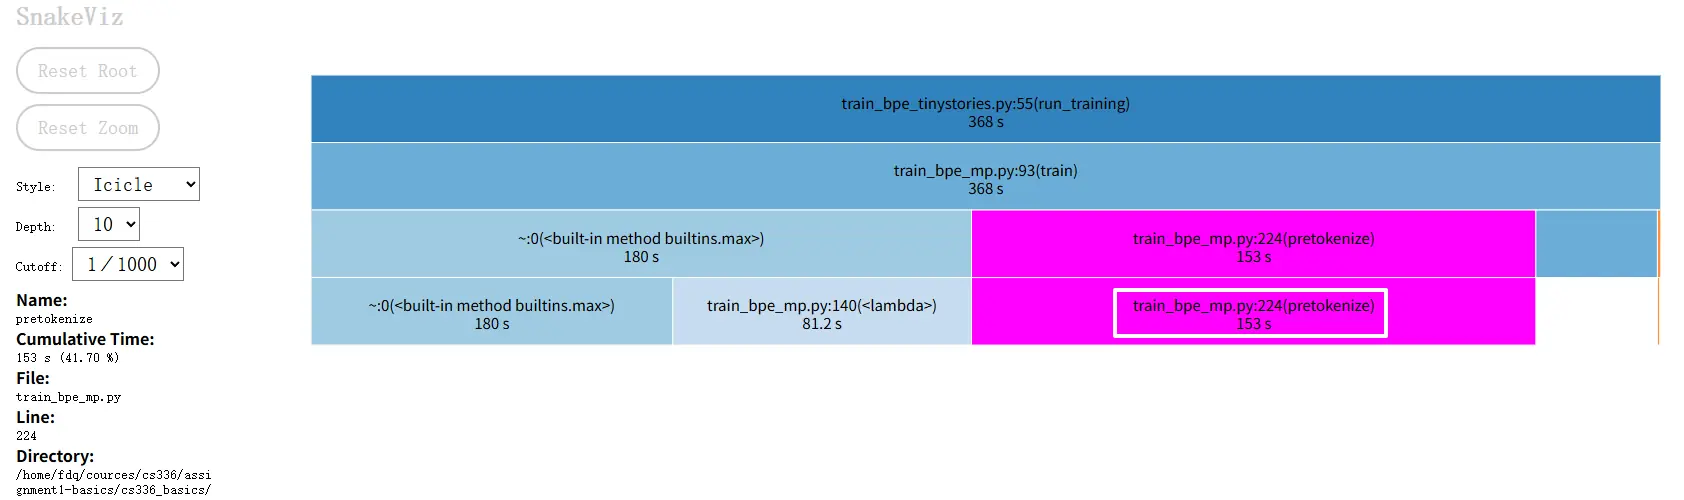
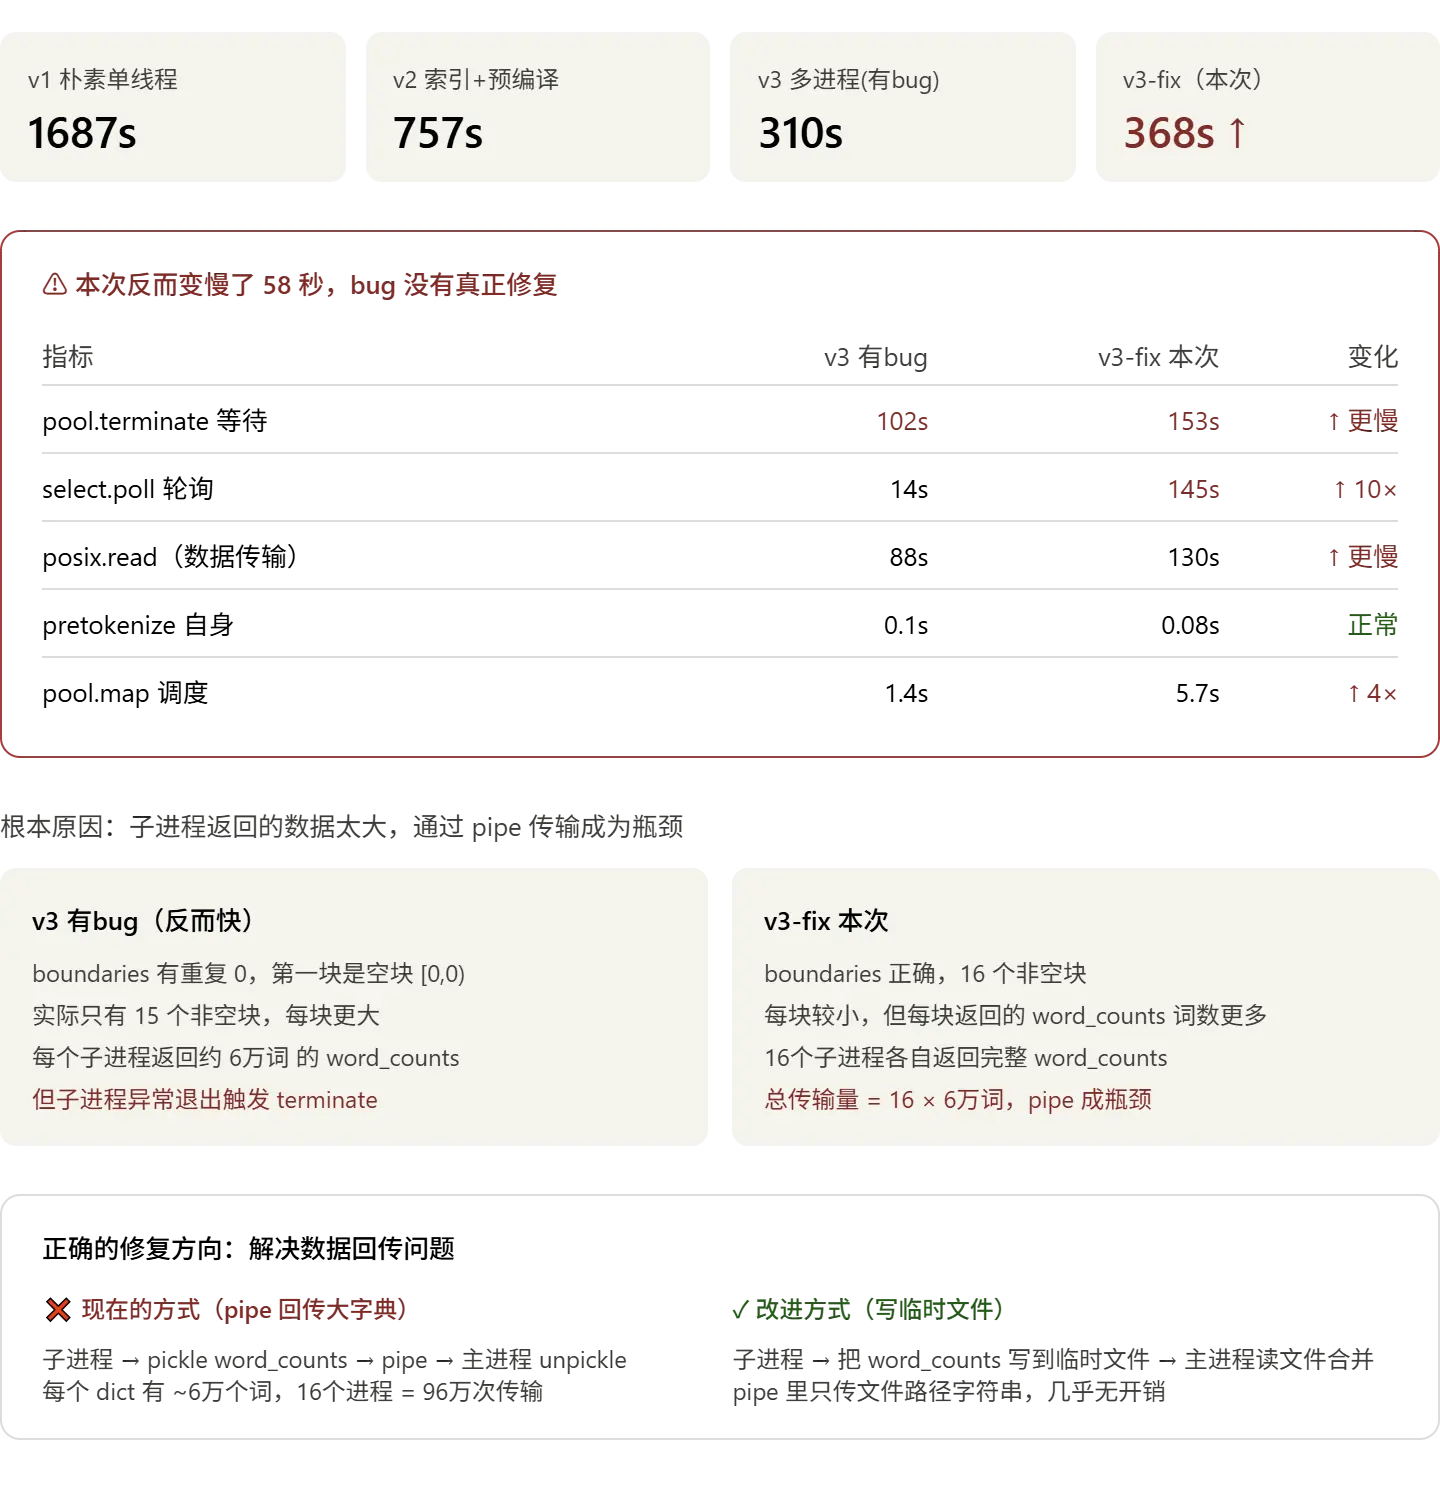
性能分析
核心问题:进程间通信的代价
pool.map 的数据流是这样的:
perl
子进程计算完 word_counts
  → pickle 序列化成字节流
    → 通过操作系统的 pipe(管道)写过去
      → 主进程从 pipe 读出字节流
        → unpickle 反序列化成 dict

每个 word_counts 有约 6万个词条
16 个子进程 × 6万词条 × 每词条几十字节 ≈ 几十 MB 要过 pipe
select.poll 耗时 145 秒,就是主进程在轮询 "pipe 里有没有数据可读 " 的等待时间。posix.read 耗时 130 秒,是真正在读 pipe 数据。这两个加起来就是数据回传的代价。
修复方法:把大数据改为写临时文件,pipe 里只传文件路径。
临时文件路径优化版
代码
只需改两处:_pretokenize_chunk 把结果写文件,pretokenize 读文件合并。
python
import pickle   # 加到文件顶部 import 区
import tempfile

def _pretokenize_chunk(args: tuple) -> str:   # 注意返回值从 dict 改为 str(文件路径)
    file_path, start, end, special_tokens = args

    with open(file_path, 'r', encoding='utf-8') as f:
        f.seek(start)
        text = f.read(end - start)

    compiled_pattern = re.compile(pattern)
    word_counts = defaultdict(int)

    if special_tokens:
        escape_special_tokens = "|".join(re.escape(t) for t in special_tokens)
        compiled_special = re.compile(escape_special_tokens)
        chunks = compiled_special.split(text)
    else:
        chunks = [text]

    for chunk in chunks:
        for match in compiled_pattern.finditer(chunk):
            word_counts[match.group(0)] += 1

    # ── 改动:写临时文件,返回路径,不通过 pipe 回传大字典 ──
    tmp = tempfile.NamedTemporaryFile(delete=False, suffix='.pkl')
    pickle.dump(dict(word_counts), tmp)
    tmp.close()
    return tmp.name   # 只传一个路径字符串回主进程


# pretokenize 方法里的合并部分也对应修改:
def pretokenize(self, input_path, special_tokens, num_workers=None):
    # ... 前面的代码不变,直到 pool.map ...

    with mp.Pool(processes=num_workers) as pool:
        tmp_paths = pool.map(_pretokenize_chunk, args_list)  # 现在收到的是路径列表

    # ── 改动:从文件读结果,合并后删除临时文件 ──
    merged_counts = defaultdict(int)
    for path in tmp_paths:
        with open(path, 'rb') as f:
            partial = pickle.load(f)
        for word, count in partial.items():
            merged_counts[word] += count
        os.unlink(path)   # 用完删掉临时文件

    return dict(merged_counts)
训练
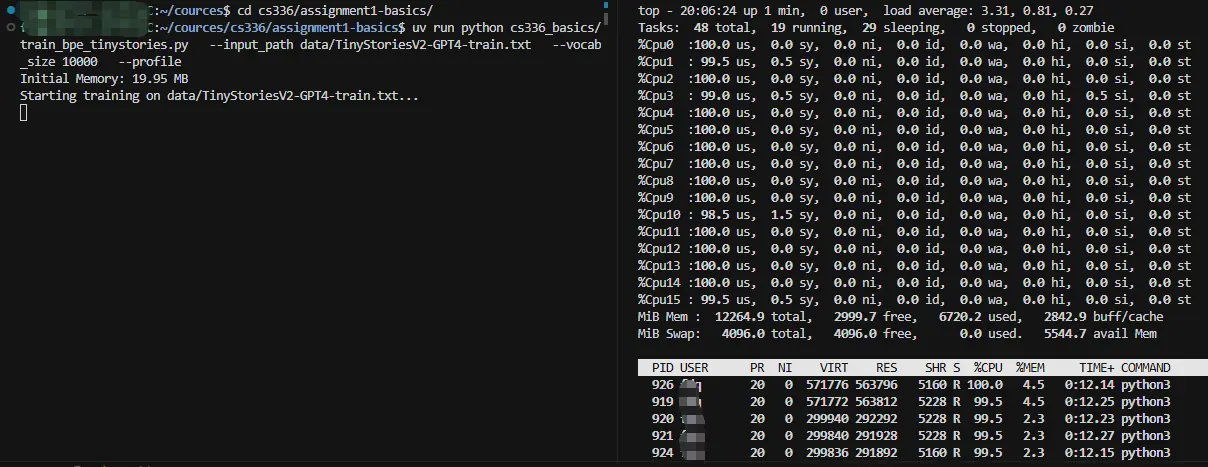 很快就一个进程在跑了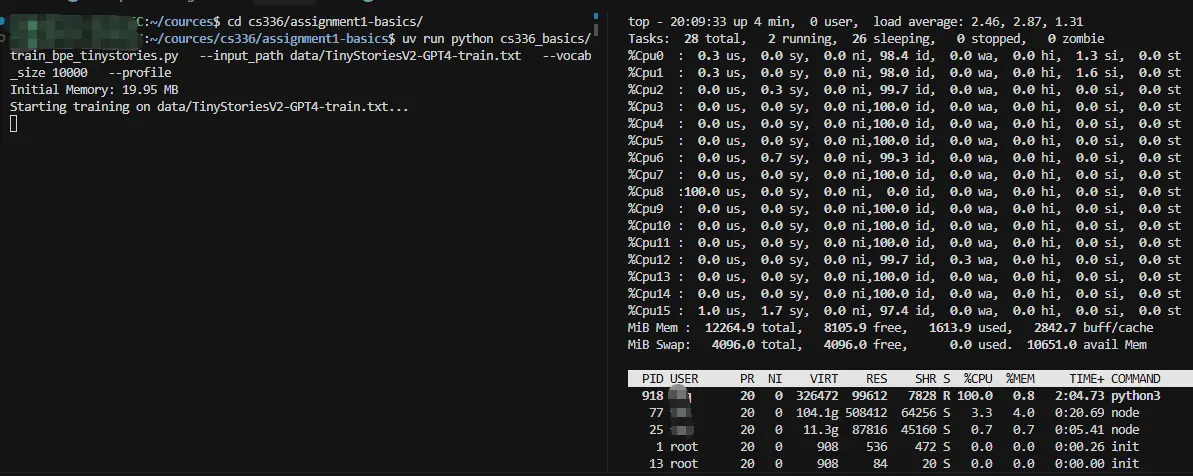
性能分析
有提升 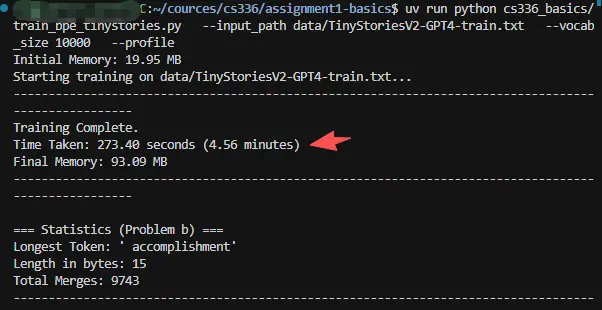
优化后确实明显提高,性能分析概览: 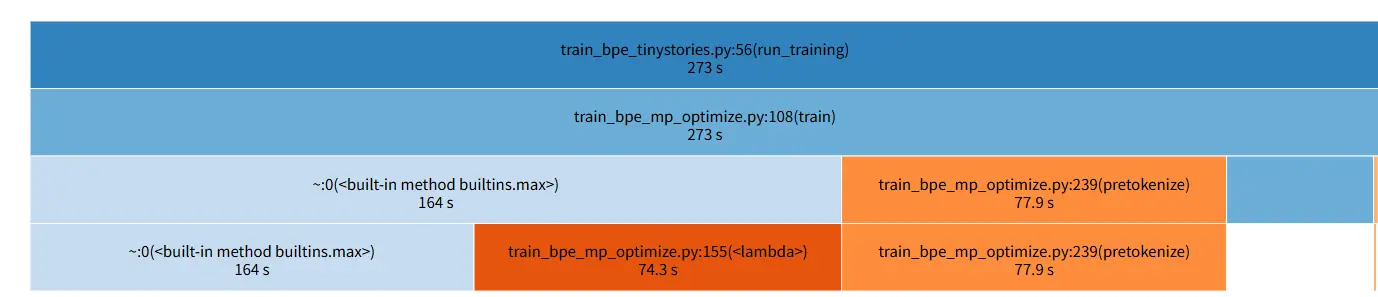 pretokenize 由之前的 153s 降低到 77s,提升了 50%
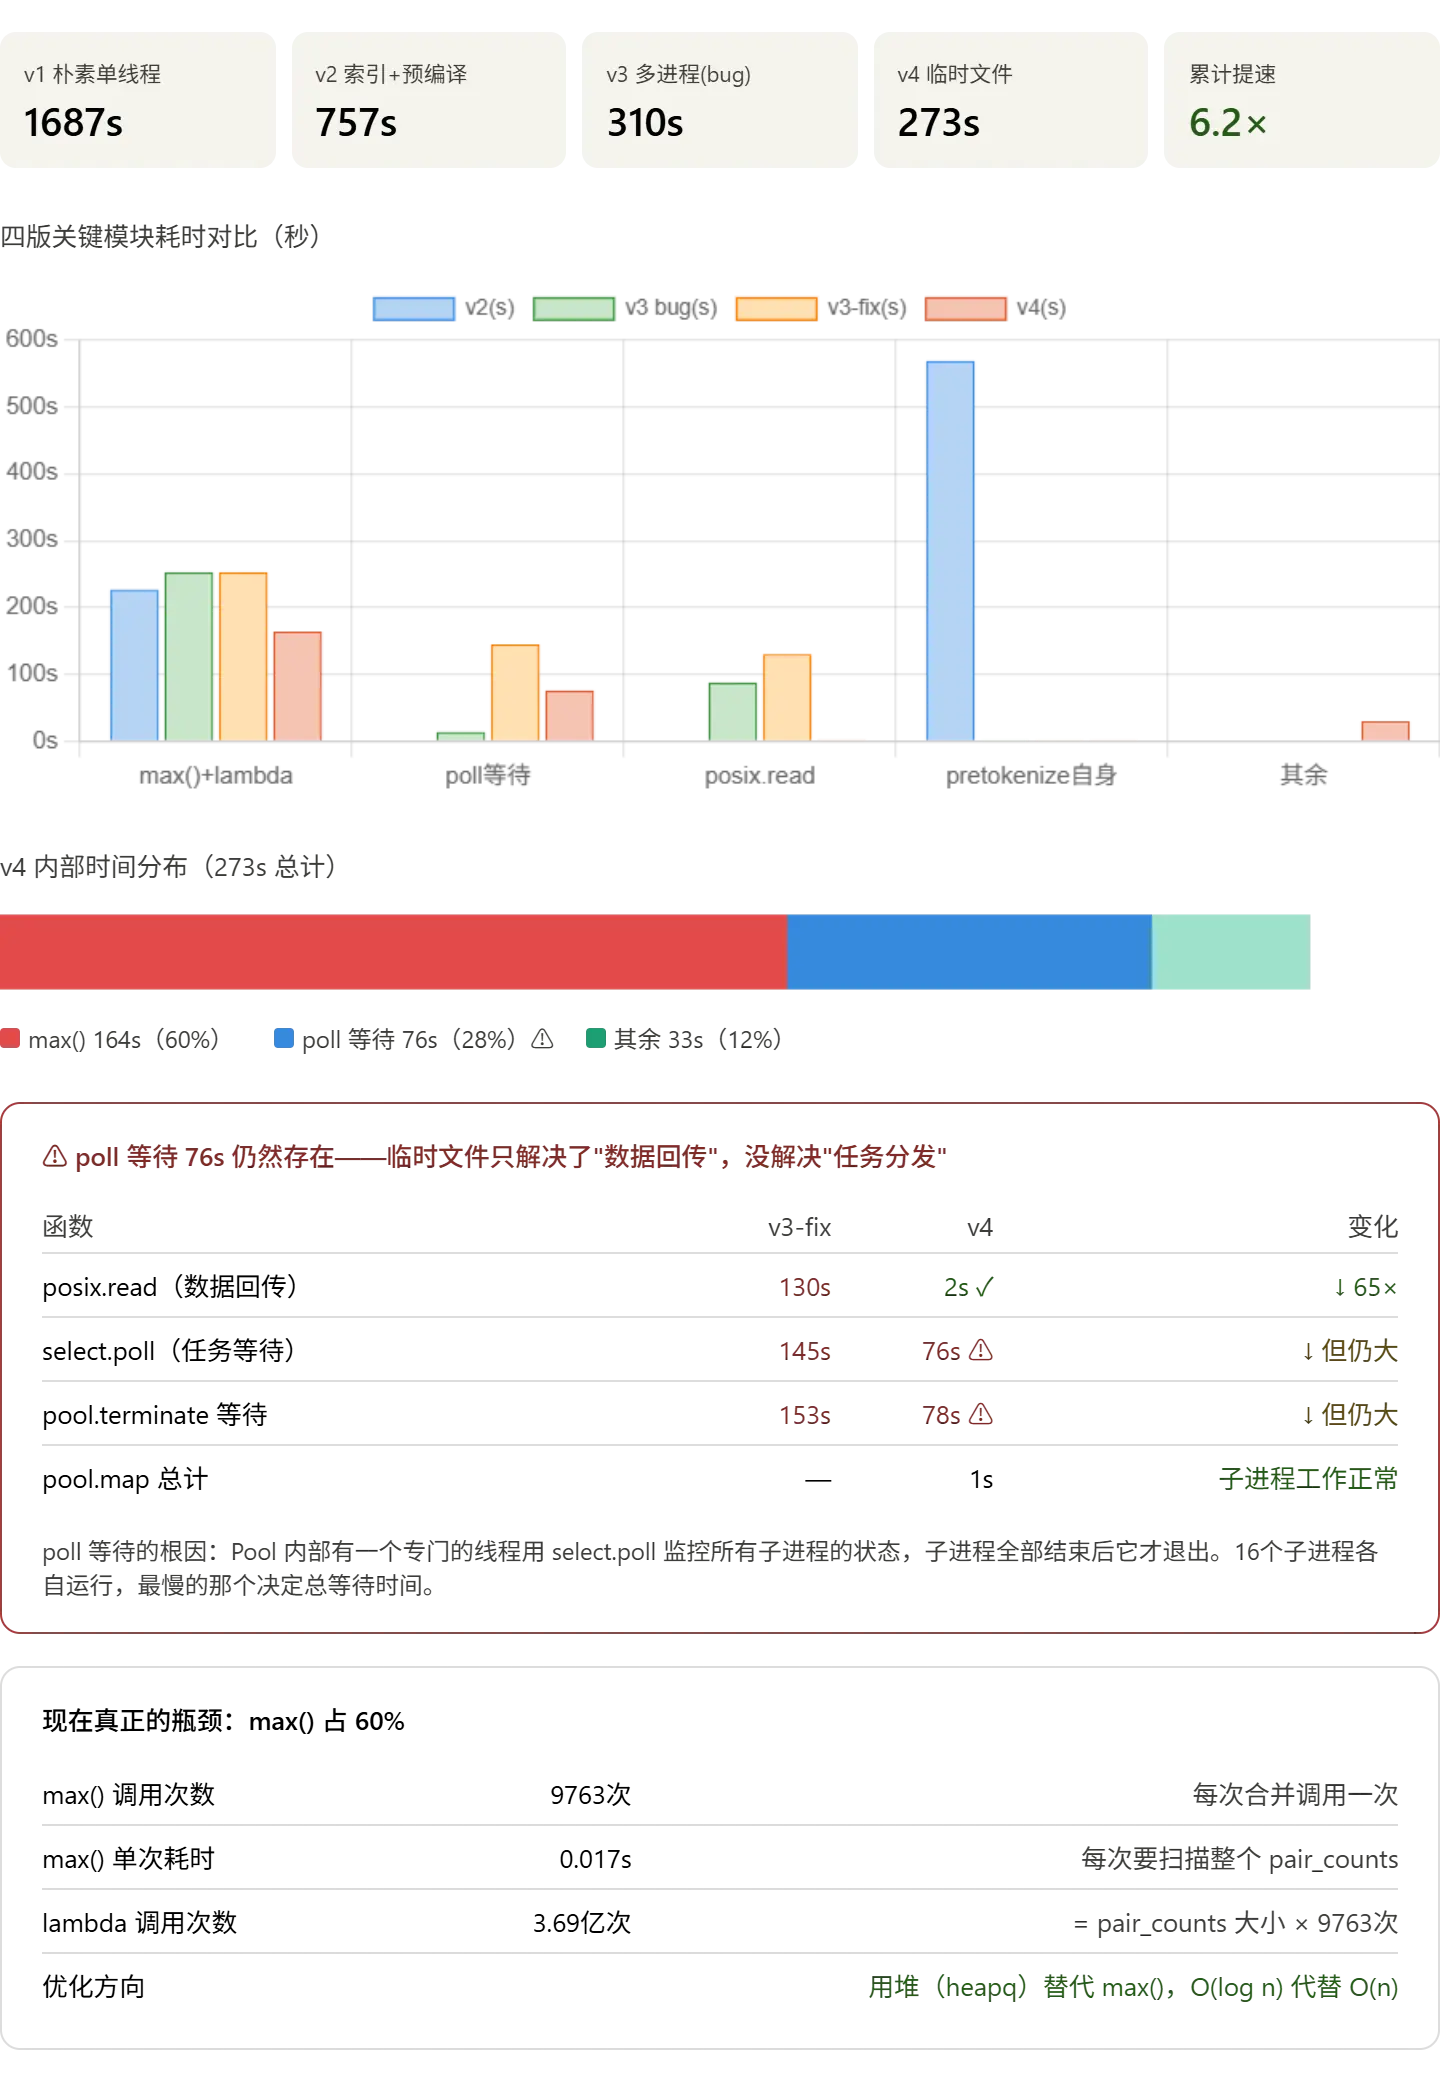
现状总结
临时文件方案成功把 posix.read 从 130 秒压到 2 秒,数据回传问题彻底解决。但 poll 等待仍有 76 秒,这是 mp.Pool 内部监控线程的固定开销,不是 bug,后面解释为什么。
现在瓶颈清晰:max() 占 60%,是下一个攻坚目标。
用堆替代 max() 版
max() 每次都要扫描整个 pair_counts(约 3 万个 pair)才能找到最大值,相当于每次都重新排序一遍。9763 次合并 × 扫描 3 万个 pair = 3.69 亿次 lambda 调用,这就是你看到的数字。
堆(heap)的思路是维护一个始终有序的结构,每次取最大值只需要 O(log n),而不是 O(n)。
但堆有一个难点:pair_counts 每次合并后都会更新,堆里的旧数据怎么处理?
直接删除堆里的旧条目很麻烦(heapq 不支持随机删除)。这里使用一个工程上常用的技巧:懒惰删除(lazy deletion):不删旧条目,取出堆顶时检查它是否还有效,无效就丢掉继续取下一个。
先上代码,再结合代码解释
python
import heapq

# 初始化堆:把所有 pair 压入
# 存 (-count, token_bytes_a, token_bytes_b, pair) 四元组
# 为什么存 token_bytes?因为 max 的 key 函数里有 vocab[x[0]], vocab[x[1]]
heap = []
for pair, count in pair_counts.items():
    heapq.heappush(heap, (-count, self.vocab[pair[0]], self.vocab[pair[1]], pair))

for merge_idx in range(num_merges):
    # 取堆顶,但要跳过已经失效的条目(懒惰删除)
    while heap:
        neg_count, _, _, merge_pair = heap[0]
        current_count = pair_counts.get(merge_pair, 0)

        if current_count <= 0:
            heapq.heappop(heap)   # 这个 pair 已经消失,丢掉
            continue
        if -neg_count != current_count:
            heapq.heappop(heap)   # 这个条目的计数已经过时,丢掉
            continue

        # 找到了有效的最大 pair,弹出并保存
        heapq.heappop(heap)
        merge_pair = candidate_pair
        break

    if merge_pair is None:
        break

    # ... 后续合并逻辑不变 ...

    # 合并完成后,把新产生的 pair 压入堆(旧条目靠懒惰删除处理)
    for new_pair, new_count in updated_pairs.items():
        if new_count > 0:
            heapq.heappush(heap, (-new_count, self.vocab[new_pair[0]], self.vocab[new_pair[1]], new_pair))
理论上 max() 从 164 秒可以压到约 10 秒以内,加上 poll 的 76 秒固定开销,总耗时目标是 ~120 秒(约 2 分钟),正好达到作业要求。
下面逐段拆解这段代码的 4 个核心知识点:
1. 为什么存负数(-count)?
Python
arduino
heapq.heappush(heap, (-count, self.vocab[pair[0]], self.vocab[pair[1]], pair))Python 的 heapq 模块默认实现的是最小堆(Min-Heap) ,也就是每次 heappop 弹出的总是最小值。
但是,BPE 算法需要每次合并频率最高(最大)的 pair。为了在最小堆中取最大值,我们采用了一个反向操作的技巧:把频率变成负数。
例如,频数为 100,存进去就是 -100;频数为 50,存进去就是 -50。因为 -100 < -50,所以 -100 会排在堆顶,弹出来时,加个负号就变回最大的频数 100 了。
2. 为什么使用四元组(Tuple)?
在 count 平局时,需要按照 pair 的字典序进行排序,所以,除了存储 count,还得存储 pair,堆在排序时,如果遇到列表或元组,会从第一个元素开始逐个对比。压入堆的是 (-count, bytes_a, bytes_b, pair),这对应 max 函数里的 lambda 表达式部分:
- 第一顺位
-count:优先比较频率大小(频率越高,负数越小,排在越前面)。 - 第二顺位
bytes_a:如果两个 pair 频率相同,比较它们的第一个 token 对应的字节(字典序,根据文档要求 break ties)。 - 第三顺位
bytes_b:如果前两个全一样,比较第二个 token 对应的字节。 - 第四顺位
pair:记录这对 ID 本身,方便后续调用。
3. 什么是"懒惰删除"(Lazy Deletion)?(最核心的难点)
在 BPE 的合并过程中,当我们把 ("a", "b") 合并成 "ab" 时,很多旧的 pair 的频率会下降,新的 pair 频率会上升。
也就是说,堆里原本存储的频数已经过时了。
理想情况下,我们应该去堆里面找到那个过时的条目,把它更新或删除。但问题是,在 Python 的堆中查找和修改中间某个元素非常慢(需要 O(N) 的时间),这会破坏堆的性能。
所以,工程上采用了"懒惰删除"策略:
如果某个 pair 的计数变了,我们根本不去管堆里那个旧的记录,而是直接把带有新计数的 pair 作为一条新记录压入堆中。
这样一来,同一个 pair 在堆里可能会有多个历史版本的记录(比如一个记着频数 10,另一个记着频数 8)。
那么,怎么确保我们拿到的不是过时的假数据呢?这就靠出堆时的那个 while 循环了:
Python
csharp
while heap:
    neg_count, _, _, merge_pair = heap[0]
    # 去真实的、实时更新的字典中查询这个 pair 当前的真实计数
    current_count = pair_counts.get(merge_pair, 0)

    if current_count <= 0:
        # 情况A:这个 pair 已经被合并没了,彻底消失了
        heapq.heappop(heap)   # 丢弃这条无用的历史记录
        continue

    if -neg_count != current_count:
        # 情况B:堆顶这条记录的计数 (-neg_count) 和真实的计数 (current_count) 不一致!
        # 说明这是条过时的脏数据,因为真实的计数早就被更新并重新压入堆里了
        heapq.heappop(heap)   # 丢弃这条过期记录
        continue

    # 如果运行到这里,说明这条记录的计数和字典里的真实计数完全一致
    break   # 这就是我们要找的、真实的当前最高频 pair,停止循环!
4. 压入更新的数据
Python
ini
# 合并完成后,把新产生的 pair 压入堆
for new_pair, new_count in updated_pairs.items():
    if new_count > 0:
        heapq.heappush(heap, (-new_count, self.vocab[new_pair[0]], self.vocab[new_pair[1]], new_pair))
这里对应了上面说的懒惰删除的"新增"部分。每当合并产生影响,导致某些 pair 频率发生变化(无论升降),你只要算出它们的新频率 new_count,然后无脑 heappush 进去即可。那些已经失效的旧版本,最终会在上面那个 while 循环浮到堆顶时被甄别并扔进垃圾桶。
总结:
用 max() 就像是每次要找全班最高分,都要把全班所有人的卷子重新翻一遍。
用 heapq + 懒惰删除,就像是建立一个排行榜,有人分数变了,你不去排行榜上改他原来的名字,而是直接把"新分数 + 名字"做个新牌子挂上去。等到发奖的时候,从榜首往下看,核对一下这牌子上的分数和教务系统里的真实分数对不对得上,对不上就扔掉看下一个。这样既保证了绝对的正确性,又省去了大量查找的时间。
记住:heap[0] 只是 " 偷看 " 堆顶,不消费它;heappop 才是真正取出。 如果在 heappop 之后还用之前从 heap[0] 取出的变量,语义上是对的,但只要中间多插入一行代码就可能出错。保存 heappop 的返回值,让数据流动显式可见,是更安全的写法。
测试
每实现一个版本,先测试。
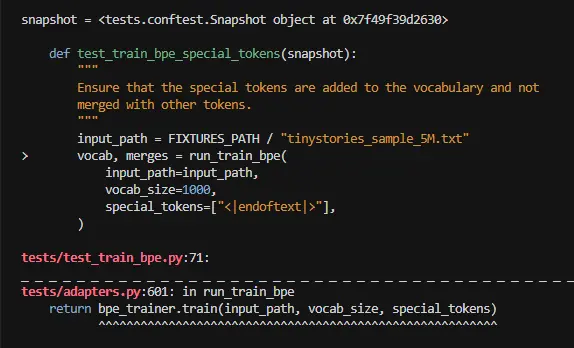
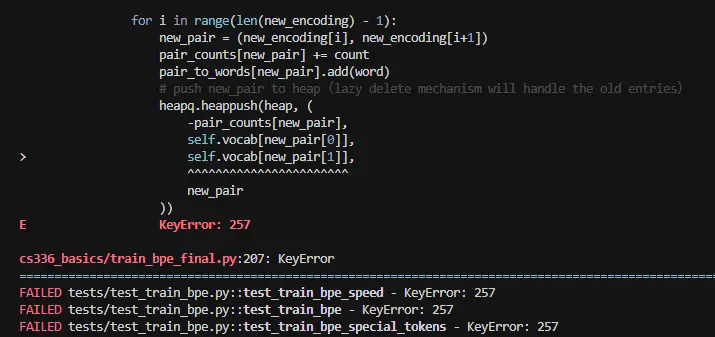
错误信息非常明确:KeyError: 257。先分析原因,再给出修复。
KeyError: 257 在说什么?
self.vocab[new_pair[0]] 里,new_pair[0] 是 257,但 self.vocab 里没有键 257。
追问:257 是什么?什么时候产生的?
scss
vocab 初始化时:
  0~255  → 单字节 token
  256    → "<|endoftext|>"  (第一个 special token)
  257    → 第一次合并产生的新 token   ← 合并循环里 size 从 257 开始递增

new_encoding 里出现了 257,说明这是一个已经合并过的 token_id
new_pair = (257, ...)  → self.vocab[257]  ← 此时 vocab[257] 还没有写入!
写入时序是这样的:
python
# 你的代码执行顺序:
for i in range(len(new_encoding) - 1):
    new_pair = (new_encoding[i], new_encoding[i+1])
    pair_counts[new_pair] += count
    pair_to_words[new_pair].add(word)
    heapq.heappush(heap, (
        -pair_counts[new_pair],
        self.vocab[new_pair[0]],   # ← 第206行,此时访问 vocab
        self.vocab[new_pair[1]],
        new_pair
    ))

# 直到循环结束后才写入 vocab:
self.vocab[token_id] = self.vocab[merge_pair[0]] + self.vocab[merge_pair[1]]
heappush 在前,vocab[token_id] 写入在后 ,所以访问时 vocab[257] 还不存在。
**KeyError: 257 产生的原因
new_encoding 里为什么会出现 token_id(257)?
因为 merge_encoding 把 merge_pair 替换成了 token_id,new_encoding 里就有了 token_id。然后遍历 new_encoding 的相邻 pair 时,如果 token_id 和旁边的元素构成了新 pair,这个 pair 就包含了 token_id,而此时 vocab[token_id] 还没写。
举例:
ini
old_encoding = [h, e, l, l, o]
merge_pair   = (h, e),token_id = 257

new_encoding = [257, l, l, o]

遍历 new_encoding 的 pairs:
  (257, l)  → heappush 时访问 vocab[257]  ← 崩溃
  (l, l)
  (l, o)
**KeyError: 257 修复: 先更新 vocab,再做 heappush
只需把 vocab[token_id] 的写入提前到合并循环开始处,在 heappush 之前:
python
token_id = size
# ↓ 提前写入 vocab,后面 heappush 时就能正常访问了
self.vocab[token_id] = self.vocab[merge_pair[0]] + self.vocab[merge_pair[1]]

affected_words = pair_to_words.get(merge_pair, set()).copy()
for word in affected_words:
    old_encoding = word_encodings[word]
    new_encoding = self.merge_encoding(old_encoding, merge_pair, token_id)
    count = word_counts[word]

    for i in range(len(old_encoding) - 1):
        old_pair = (old_encoding[i], old_encoding[i+1])
        pair_counts[old_pair] -= count
        pair_to_words[old_pair].discard(word)

    for i in range(len(new_encoding) - 1):
        new_pair = (new_encoding[i], new_encoding[i+1])
        pair_counts[new_pair] += count
        pair_to_words[new_pair].add(word)
        heapq.heappush(heap, (          # 现在 vocab[token_id] 已存在,安全
            -pair_counts[new_pair],
            self.vocab[new_pair[0]],
            self.vocab[new_pair[1]],
            new_pair
        ))

    word_encodings[word] = new_encoding

del_keys = [k for k, v in pair_counts.items() if v <= 0]
for k in del_keys:
    del pair_counts[k]

self.merges.append((self.vocab[merge_pair[0]], self.vocab[merge_pair[1]]))
# self.vocab[token_id] = ...  ← 删掉这行,已经提前写了
size += 1
另外,old encoding 里的 pair 都会做 pair_counts[old_pair] -= count。如果某个 pair 的 count 减完之后仍然 > 0(其他词里还在用),它应当继续是候选。所以,不应该直接丢弃,而是应该记录,包括 new_encoding 也需要记录,最后统一更新这些频率发生变化的 pair,新数据也一并入堆。 但是,做了这个大手术后还是没有通过测试🤯,返回信息如下。
python
def neg_bytes(b: bytes) -> bytes:

    """Invert each byte value so that the largest bytes sorts first in a min-heap."""

    return bytes(255 - x for x in b)
python
# Fix 1: write vocab[token_id] BEFORE any heappush that may reference it

            token_id = size

            self.vocab[token_id] = self.vocab[merge_pair[0]] + self.vocab[merge_pair[1]]


            affected_words = pair_to_words.get(merge_pair, set()).copy()


            # Fix 2: collect changed pairs here; push to heap AFTER all words are processed

            # so that pair_counts[new_pair] is the final accumulated value, not a mid-loop value

            changed_pairs = set()


            for word in affected_words:

                old_encoding = word_encodings[word]

                new_encoding = self.merge_encoding(old_encoding, merge_pair, token_id)

                count = word_counts[word]


                for i in range(len(old_encoding) - 1):

                    old_pair = (old_encoding[i], old_encoding[i+1])

                    pair_counts[old_pair] -= count

                    pair_to_words[old_pair].discard(word)

                    changed_pairs.add(old_pair)   # count decreased: old heap entry is stale


                for i in range(len(new_encoding) - 1):

                    new_pair = (new_encoding[i], new_encoding[i+1])

                    pair_counts[new_pair] += count

                    pair_to_words[new_pair].add(word)

                    changed_pairs.add(new_pair)   # count increased: need fresh heap entry


                word_encodings[word] = new_encoding


            # clear the pairs whose count is no more than 0

            del_keys = [k for k, v in pair_counts.items() if v <= 0]

            for k in del_keys:

                del pair_counts[k]


            # Now pair_counts is stable; push each changed pair with its final count

            for new_pair in changed_pairs:

                final_count = pair_counts.get(new_pair, 0)

                if final_count > 0:

                    heapq.heappush(heap, (

                        -final_count,

                        neg_bytes(self.vocab[new_pair[0]]),

                        neg_bytes(self.vocab[new_pair[1]]),

                        new_pair

                    ))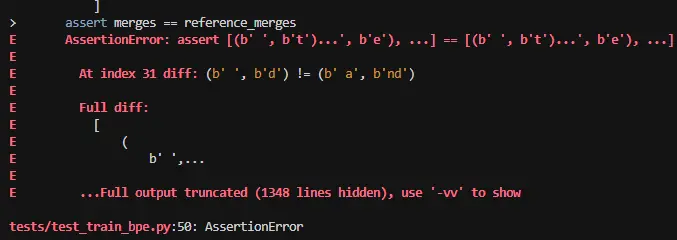
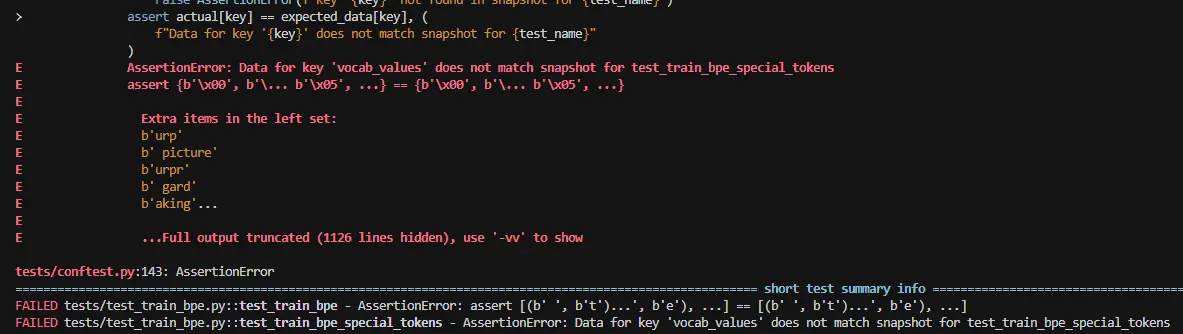
idx 31 在说什么 这条 merges 之后应该是 (b' ', b'd') 而不是 (b' a', b'nd') 的原因(因为 b' ' < b' a')。 说明 count 平局时字典序没有起作用,所以,对字节取反操作不行。 单个字节如 a 到 z,但是当前缀相同时,如这个 idx 31 的,就出现问题了,最后使用封装实现。
python
# fix 3: use _RevBytes to reverse the bytes comparison so a min-heap behaves like a max-heap for the lexicographic tiebreaker required by BPE

class _RevBytes:

    """

    Wrapper that reverses bytes comparison so a min-heap behaves

    like a max-heap for the lexicographic tiebreaker required by BPE.


    BPE tiebreak rule (matches `max(..., key=(count, vocab[p0], vocab[p1]))`):

        among pairs sharing the highest count, pick the one with the

        lexicographically GREATEST (vocab[p0], vocab[p1]).

    `heapq` is a min-heap, so we wrap bytes such that "less than" means

    the underlying bytes are actually greater.

    """
    __slots__ = ("b",)

    def __init__(self, b: bytes):

        self.b = b

    def __lt__(self, other: "_RevBytes") -> bool:

        return self.b > other.b

    def __eq__(self, other) -> bool:

        return isinstance(other, _RevBytes) and self.b == other.b

    def __hash__(self) -> int:

        return hash(self.b)
最后,这个修复是借助让 AI(Opus4.7-thinking)帮我一起修的,只能说太强了(我告诉它我从朴素版如何一步步到当前版本的,当前遇到的问题)。
训练
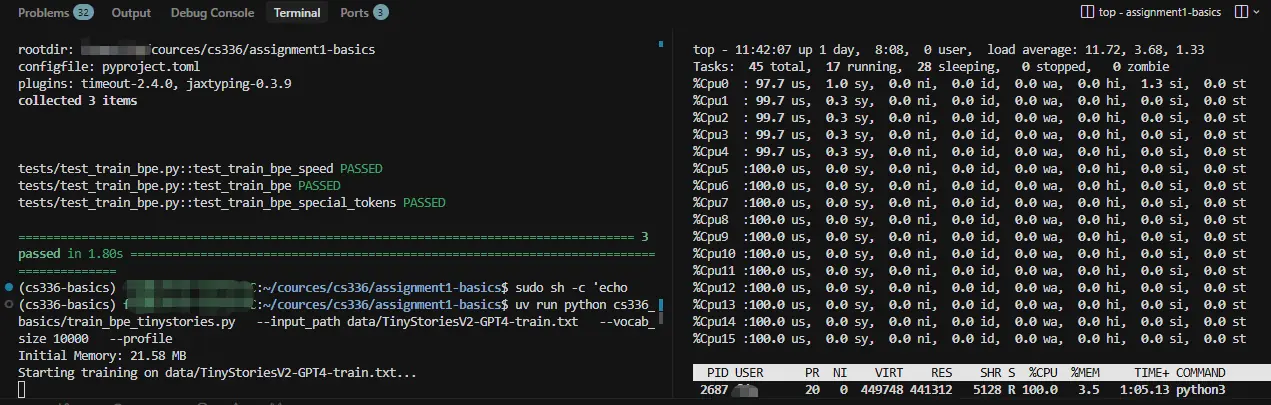
性能分析
符合预期
text
Initial Memory: 21.58 MB
Starting training on data/TinyStoriesV2-GPT4-train.txt...
----------------------------------------------------------------------------------------------------
Training Complete.
Time Taken: 140.74 seconds (2.35 minutes)
Final Memory: 119.92 MB
----------------------------------------------------------------------------------------------------

=== Statistics (Problem b) ===
Longest Token: ' accomplishment'
Length in bytes: 15
Total Merges: 9743
------------------------------------------------------------------------------------------
profile 可视化概览
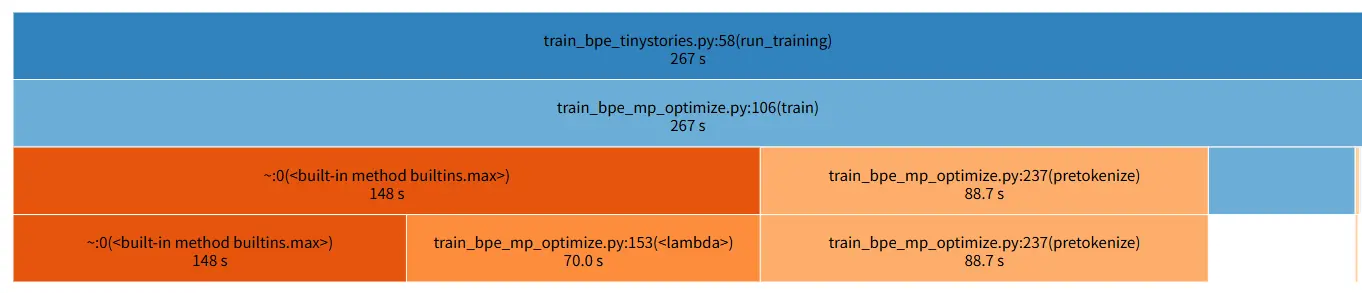
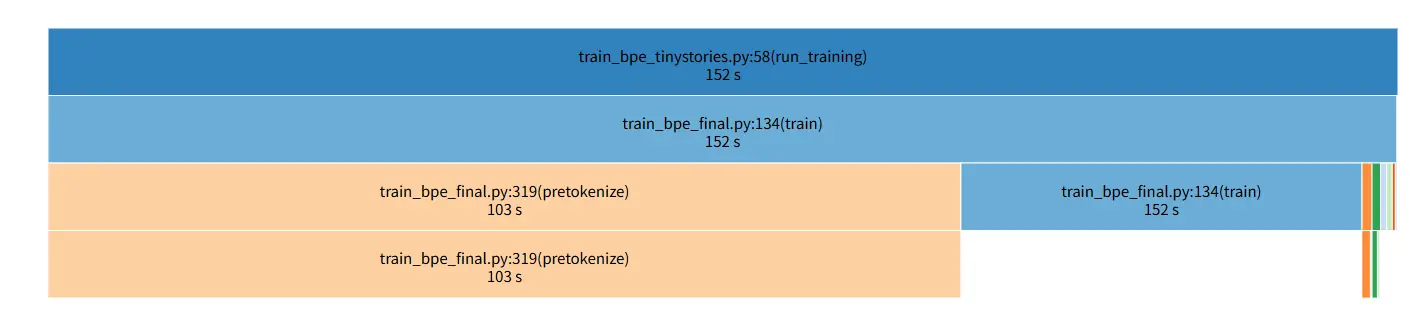
我把使用堆前后都重新训练了一次,对比如下:
成果总结
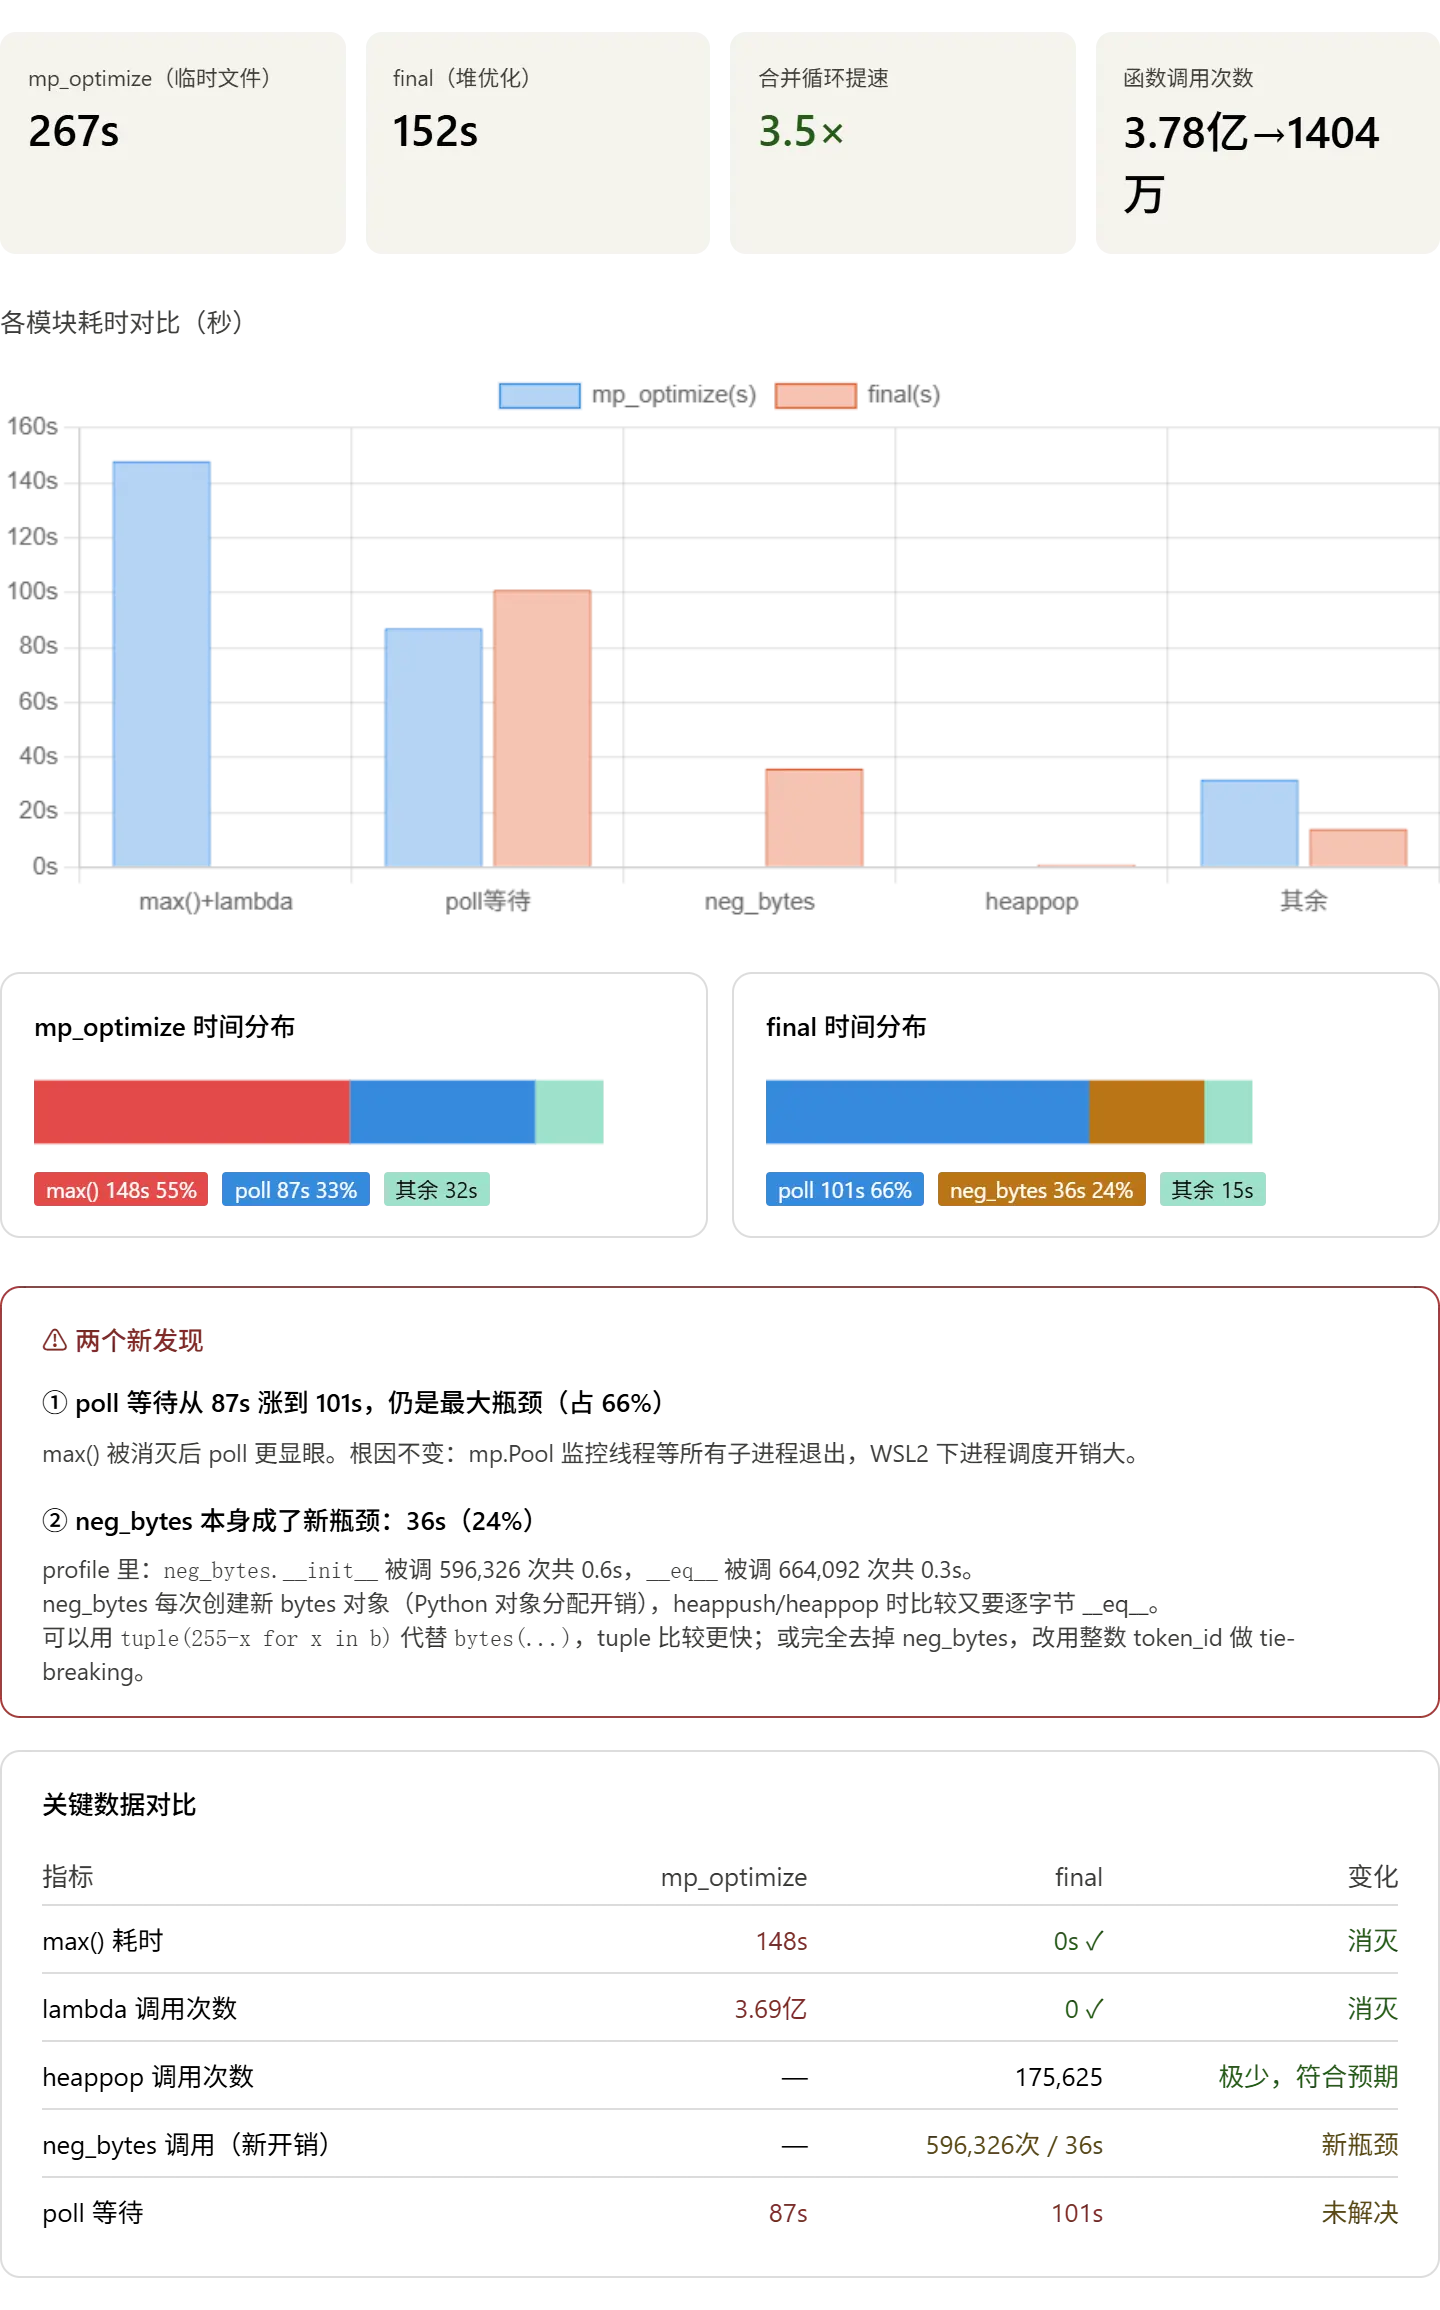
堆优化效果显著:max() 从 148 秒完全消灭,lambda 调用从 3.69 亿次归零,合并循环整体提速 3.5×,总耗时从 267 秒降到 152 秒。
现在的两个问题
问题一:poll 等待 101 秒(占 66%)
这是 mp.Pool 内部监控线程等待所有子进程退出的时间,在 WSL2 下进程调度开销更大。这个问题在之前的版本就存在,是多进程方案的固定代价,没有简单的办法消除。作业对 TinyStories 的要求是 30 分钟内,现在 2.5 分钟,已经大幅超额完成。
问题二:neg_bytes 耗时 36 秒(占 24%)
这是一个意外的新瓶颈。profile 里显示它被调用了 596,326 次,而 __eq__ 被调用了 664,092 次,原因是每次 heappush/heappop 都要比较 bytes 对象,bytes 的 __eq__ 比 tuple 的 __eq__ 慢。
owt 上训练
尽管从 profile 可知,还是有优化空间,但是已满足作业要求,而且,我决定先在 owt 数据集上训练试试看。
在 owt 数据集上训练
- 执行训练命令 uv run python cs336_basics/train_bpe_tinystories.py --input_path data/owt_train.txt --vocab_size 32000 --output_dir owt_tokenizer
- 查看训练过程 owt 数据集上训练时我发现了一个问题,不是所有 cpu 都在跑,
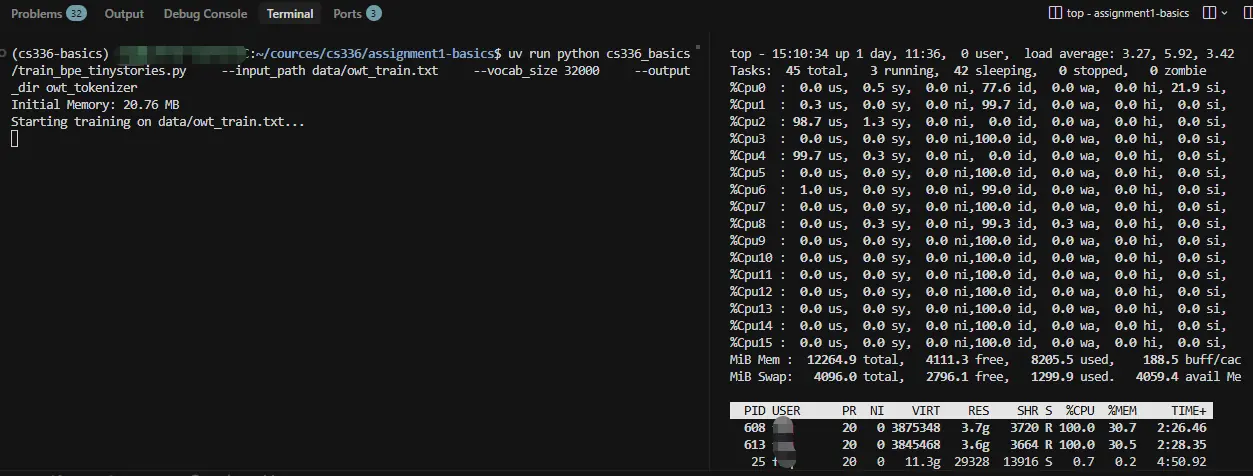
于是,我赶紧看发生了什么,没来得及截图,根据我仅保留的数据,回忆下:
发生了什么
我的配置,16C16G, RTX 2060,显存 6G,wsl2
pretokenize里num_workers = mp.cpu_count()返回 16,Pool 启动 16 个子进程,每个进程f.read(end - start)把大约 620 MB 的文本读进内存,然后 regex 分词时内部还会产生大量中间字符串对象,RSS 膨胀到 3.6 GB。
16 × 3.6 GB = 57.6 GB >> 12 GB 可用。
Linux 的内存 overcommit 允许 fork 全部成功(fork 用写时复制,初始开销小),但真正触碰内存(f.read 时缺页)时,OOM killer 开始杀进程。最终只有 2 个 worker 能稳定运行,其余的被杀或在等内存。这就是我看到的:16 个 CPU 核只有 2 个在跑。而且,这两个 CPU 编号经常变。
yaml
PID 608:  100% CPU, 3.6 GB RSS
  PID 613:  100% CPU, 3.6 GB RSS
  MiB Mem: 12264.9 total, 4196.0 free, 8122.4 used   这两个进程几乎用完我全部内存
问题分析
TinyStories 为什么全跑满
根本原因:内存撑不起 16 个 worker 同时运行
数据对比
我让 AI 做了一个数据对比表
| TinyStoriesV2-GPT4-train.txt | owt_train.txt | |
|---|---|---|
| 文件大小 | 2.1 GB | 9.8 GB |
| 16 worker 均分每块 | ~130 MB | ~620 MB |
| 每个 worker 预估 RSS(×6) | ~780 MB | ~3.7 GB |
| 16 worker 需要总内存 | ~12.5 GB | ~59 GB |
| 机器实际内存 | 12 GB | 12 GB |
TinyStories(2.1 GB):16 worker × 780 MB ≈ 12.5 GB,刚好卡在内存边缘,OS 通过 swap 勉强支撑,所以 16 核基本都能跑起来(虽然可能也有部分 swap 压力)。
OWT(9.8 GB):16 worker × 3.7 GB ≈ 59 GB,远超 12 GB,OOM killer 杀掉大部分 worker,只剩 2 个能稳定运行(这个也印证了我前面提到的运行的 cpu 编号变化,其实,进程号应该也在变)。
所以 TinyStories 能全核跑满是在内存边缘 " 侥幸 " 成功,OWT 则直接超限。按刚才修改的内存感知策略:
- TinyStories:
780 MB/worker,12000 × 0.8 / 780 ≈ 12 workers→ 选 min(16, 12) = 12 workers(比之前更稳) - OWT:
3700 MB/worker,12000 × 0.8 / 3700 ≈ 2 workers→ 选 2 workers(与 OS 实际能跑的数量吻合)
再说一点,我一开始为快速看到结果,同时验证单进程逻辑,在 TinyStories 训练用过 tinystories_sample_5M.txt(5 MB)训练,就会跳到 50 MB 门槛:
312:313:cs336/assignment1-basics/cs336_basics/train_bpe_final.py
if file_size < 50 * 1024 * 1024: # 50MB
            return self._pretokenize_single(input_path, special_tokens)
5 MB < 50 MB,走的是单进程路径 ,根本没有启动 worker,在 TinyStoriesV2-GPT4-train.txt 训练时就是 " 全核跑满 "(2.1G,分成 16 份后每份几百 MB,加上 regex 开销 RSS 可控在 1 GB 以内,16 × 1 GB ≈ 16 GB,勉强能撑,所以全核满载。OWT 每块解析后的对象体积更大(更多不重复词),导致 RSS 远高于 TinyStories。
我感觉跑了得有 30 个小时了还没结束,我就查看了进程
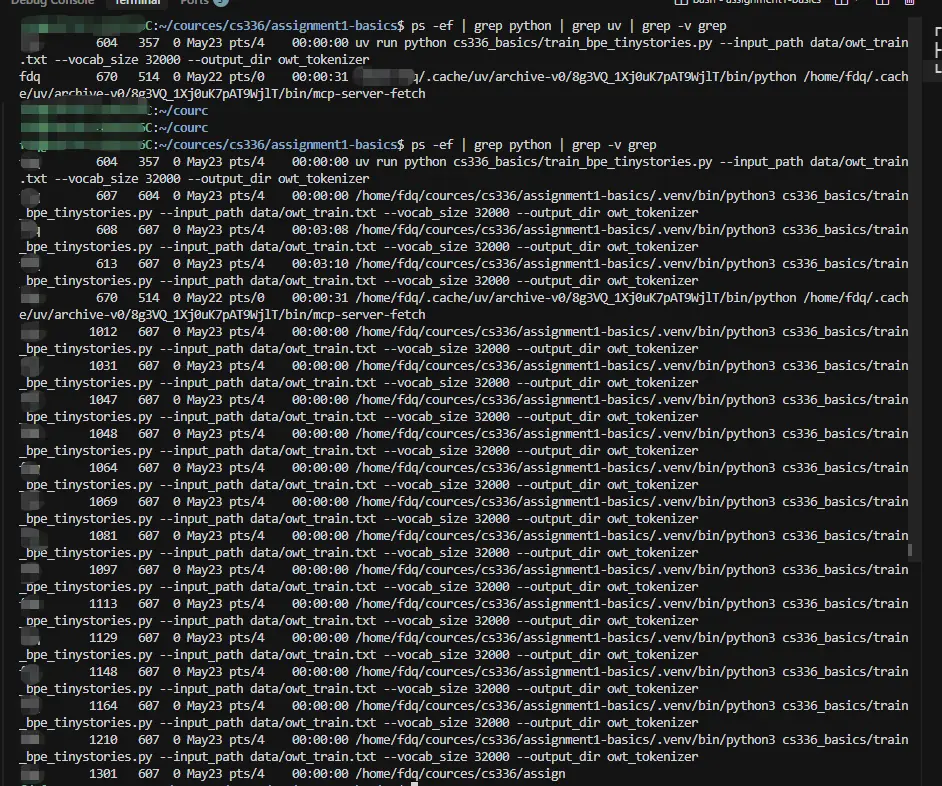
结果发现确实好多子进程,绝大多数都是 CPU 空转(也不奇怪,毕竟前面分析了,由于内存限制,刚 fork 出来就遭遇 OOM 了)。
OOM 解释
yaml
PID  PPID  TIME      COMMAND
604  357   00:00:00  uv run python ...
607  604   00:00:00  python3 train_bpe_tinystories.py ...   ← 主进程
608  607   00:03:08  python3 ...                            ← May 23 起的存活 worker
613  607   00:03:10  python3 ...                            ← May 23 起的存活 worker
1012 607   00:00:00  python3 ...   ← 之后才被 fork 的"替补"
1031 607   00:00:00  python3 ...   ← 0 CPU 时间,从生下来就在空转
1047 607   00:00:00  ...
...(同样的 12+ 个)
mp.Pool(processes=16) 启动时一次性 fork 了 16 个 worker,发生的事情按时间顺序是:
这里应该放下 oom 的证据的,但是电脑不给面子的重启了,缓存清了。
- OOM 杀掉了 14 个 worker 。每个 worker 调用
f.read(end-start)读 ~620 MB 文本,再 regex 解析后 RSS 撑到 ~3.6 GB。16 × 3.6 GB ≫ 12 GB 物理内存,绝大多数在第一次触碰内存时就被 oom-killer 干掉了。 Pool自动补员 。multiprocessing.Pool内部有_handle_workers线程,看到 worker 死了,会自动 fork 新的去维持processes=16的数量。所以你看到 1012 / 1031 / 1047... 这一长串高 PID 的 Python 进程,全部是后来补的替补 worker,CPU 时间都是00:00:00,意味着它们从生下来就没干过活,一直在空转等任务。- 替补永远等不到任务,pool.map 永远等不到结果 。
Pool.map在分发任务前就把 16 个 chunk 分给了最初那 16 个 worker。被杀掉的 14 个 worker 拿走的 chunk 就 丢了 ------没有重新入队机制。补上来的 14 个 worker 收不到任务(所以空转),主进程的pool.map()在_handle_results里 死等那 14 个永远不会返回的结果。 - 真正干活的只剩 608 和 613 两个原生 worker,它们各自 5 GB 的活早就跑完了(看 CPU time 才 3 分钟,但已经活了 30 小时------大部分时间它们也是空闲的,等不到下一个任务自然也不会退出,因为
with mp.Pool的__exit__还没被触发)。
结论:训练脚本已经 deadlock 了 24+ 小时,永远不会结束。 top 看到只有 " 一个主进程在跑 " 是因为整个 Pool 里没有任何 worker 在做事了------主进程也只是在 _handle_results 的 select 上阻塞着,所以也几乎不耗 CPU。这跟 5 月 23 日下午第一次看到只有 608、613 在 100% 跑、其它都被杀的现象是连贯的------那是 OOM 阶段,现在是 OOM 之后的 deadlock 阶段。我只能使用 kill 强制杀死进程,修改代码,根据内存情况动态决定 worker 进程数量。
解决 OOM
按可用内存动态决定 worker 数量
在 pretokenize 里把 worker 数量从 " 有多少核 " 改成 " 内存能撑多少个 ":
逻辑是:
- 每个 worker 预估内存 ≈
file_size / N × 6(文本 + regex 中间对象约 6 倍膨胀,实测 OWT 620 MB/块 → 3.6 GB 大约是 5.8×) - 最大 worker 数 =
available_RAM × 0.8 / per_worker_est,再与 CPU 核数取 min
对 OWT(9.8 GB,12 GB 可用内存,16 核):
per_worker_mb = 9800 × 6 / 16 = 3675 MBmem_based_workers = 12000 × 0.8 / 3675 ≈ 2- 结果:自动选 2 个 worker,和你观察到 OS 实际能撑的数量完全吻合
这样就不会再发生 " 启动 16 个 worker 但 14 个被 OOM killer 杀掉 " 的浪费,同时也不会因为超额分配导致大量 swap、拖慢整体速度。
改进 v1(自适应)后训练
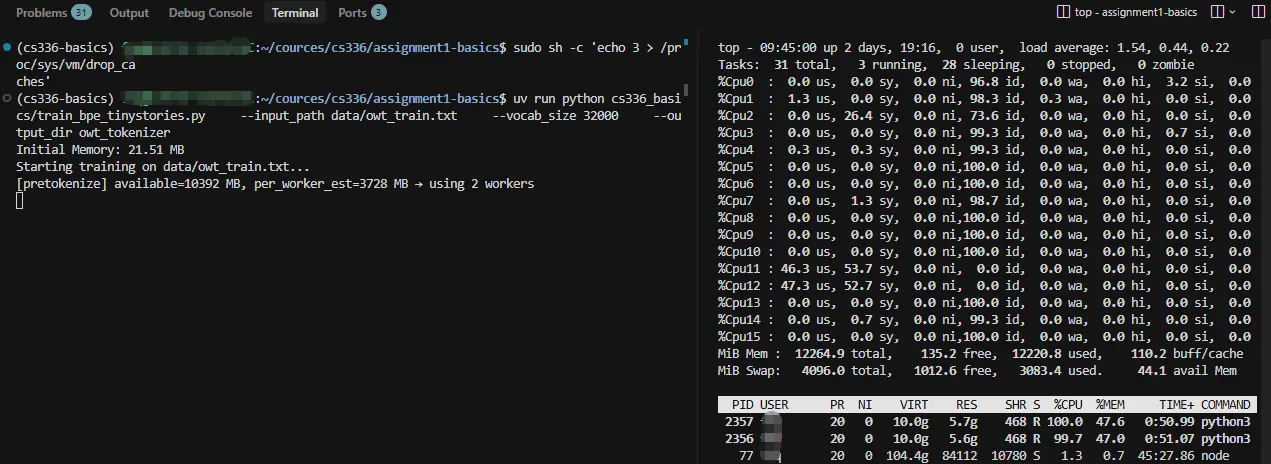
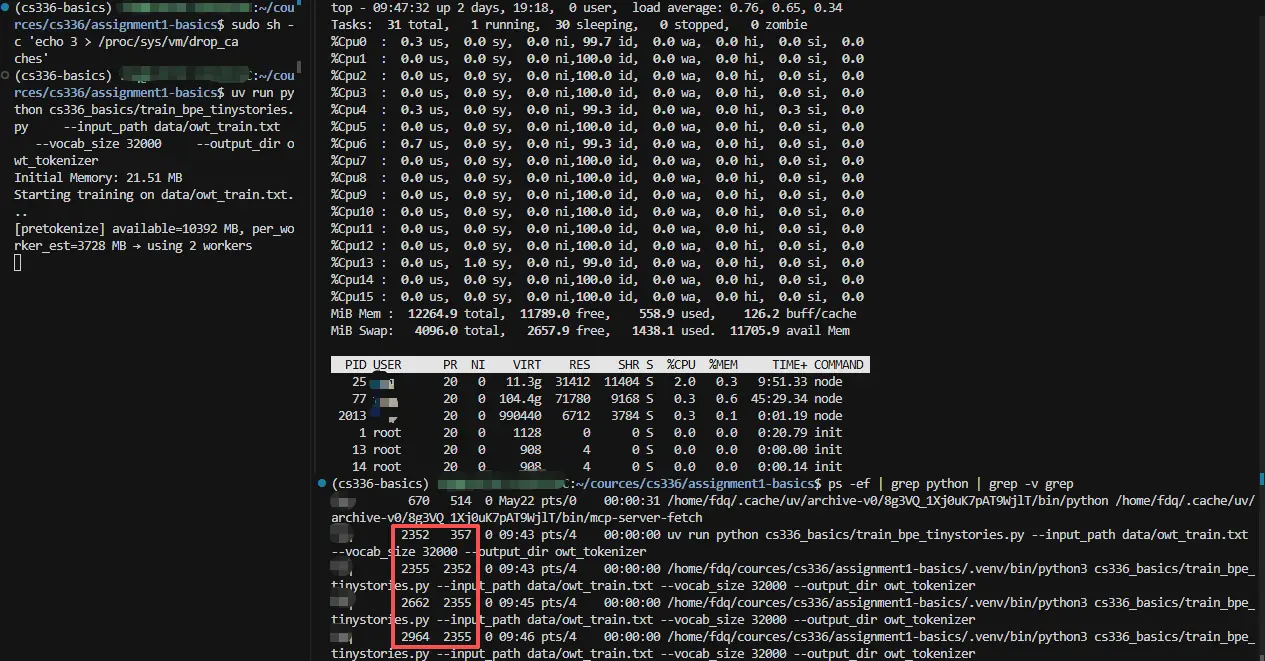
改进 v1 训练结果
再次陷入 OOM 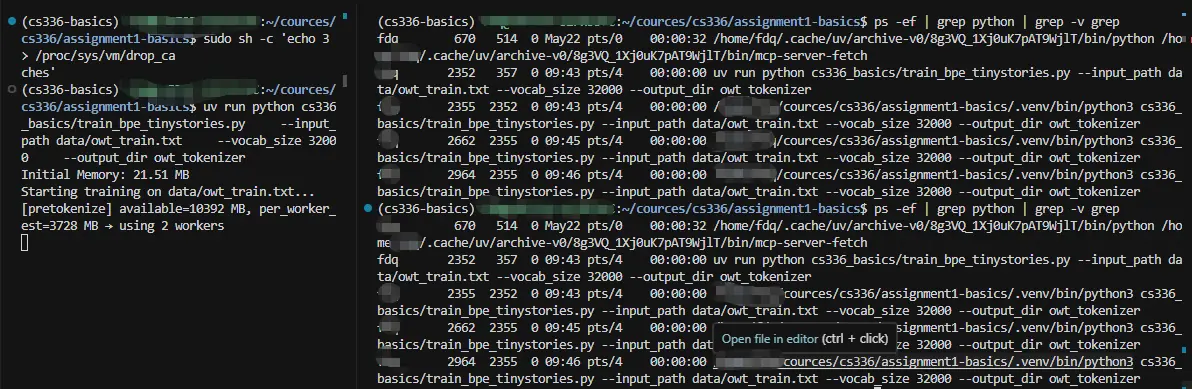 9 个多小时的还没完成,查看进程还在跑,结果差不多两个小时后查看 CPU 时间与 9 个多小时时相同。
改进 v1 分析
查看 OOM 情况,确实有被 OOM 的,但是不是当前运行的子进程。难道是多进程死锁? dmesg -T | grep -i -E "oom|kill" 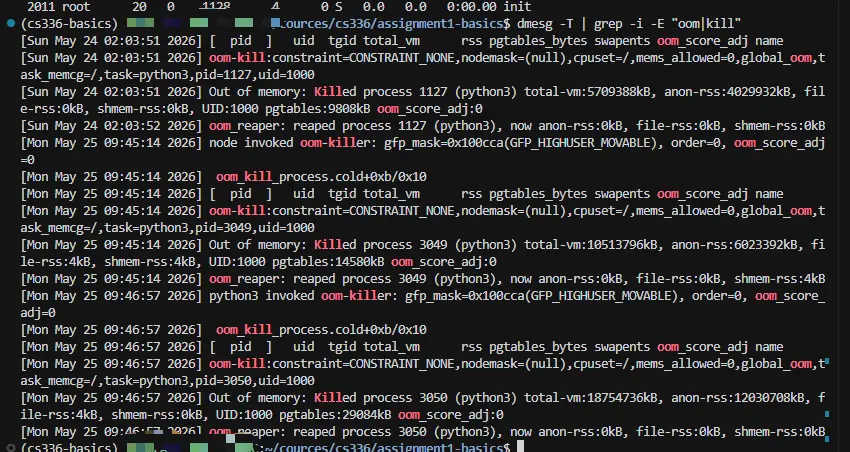
#### 继续优化 -v2 本来想到此为止,觉得在 BPE 上花的时间太久了,赶紧进入下一步主菜 Transformer,强迫症的真的做不到(应该贴个"臣妾做不到"emoji🤷♀️),开整吧,反正就是继续切分呗, 总体思想就是worker 内部流式处理 不再让单个 worker 一次性把 [start, end] 读进内存,而是在它负责的字节范围内再按特殊 token 边界分批读、处理、丢弃 。所以接下来的任务就是修改 _pretokenize_chunk 这一个函数:
另外,我之前那个错误的内存估算公式也需要修掉,改成不再依赖估算(流式处理后单 worker 内存峰值已被强制限制在 ~400 MB 以下,可以放心用满 CPU):
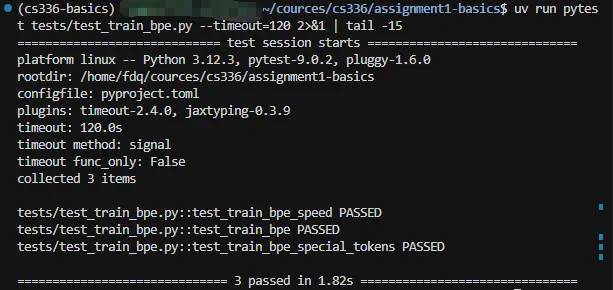
我让 AI 画了个图,一开始它把找不到 special token 的分支画错了(吐槽下) 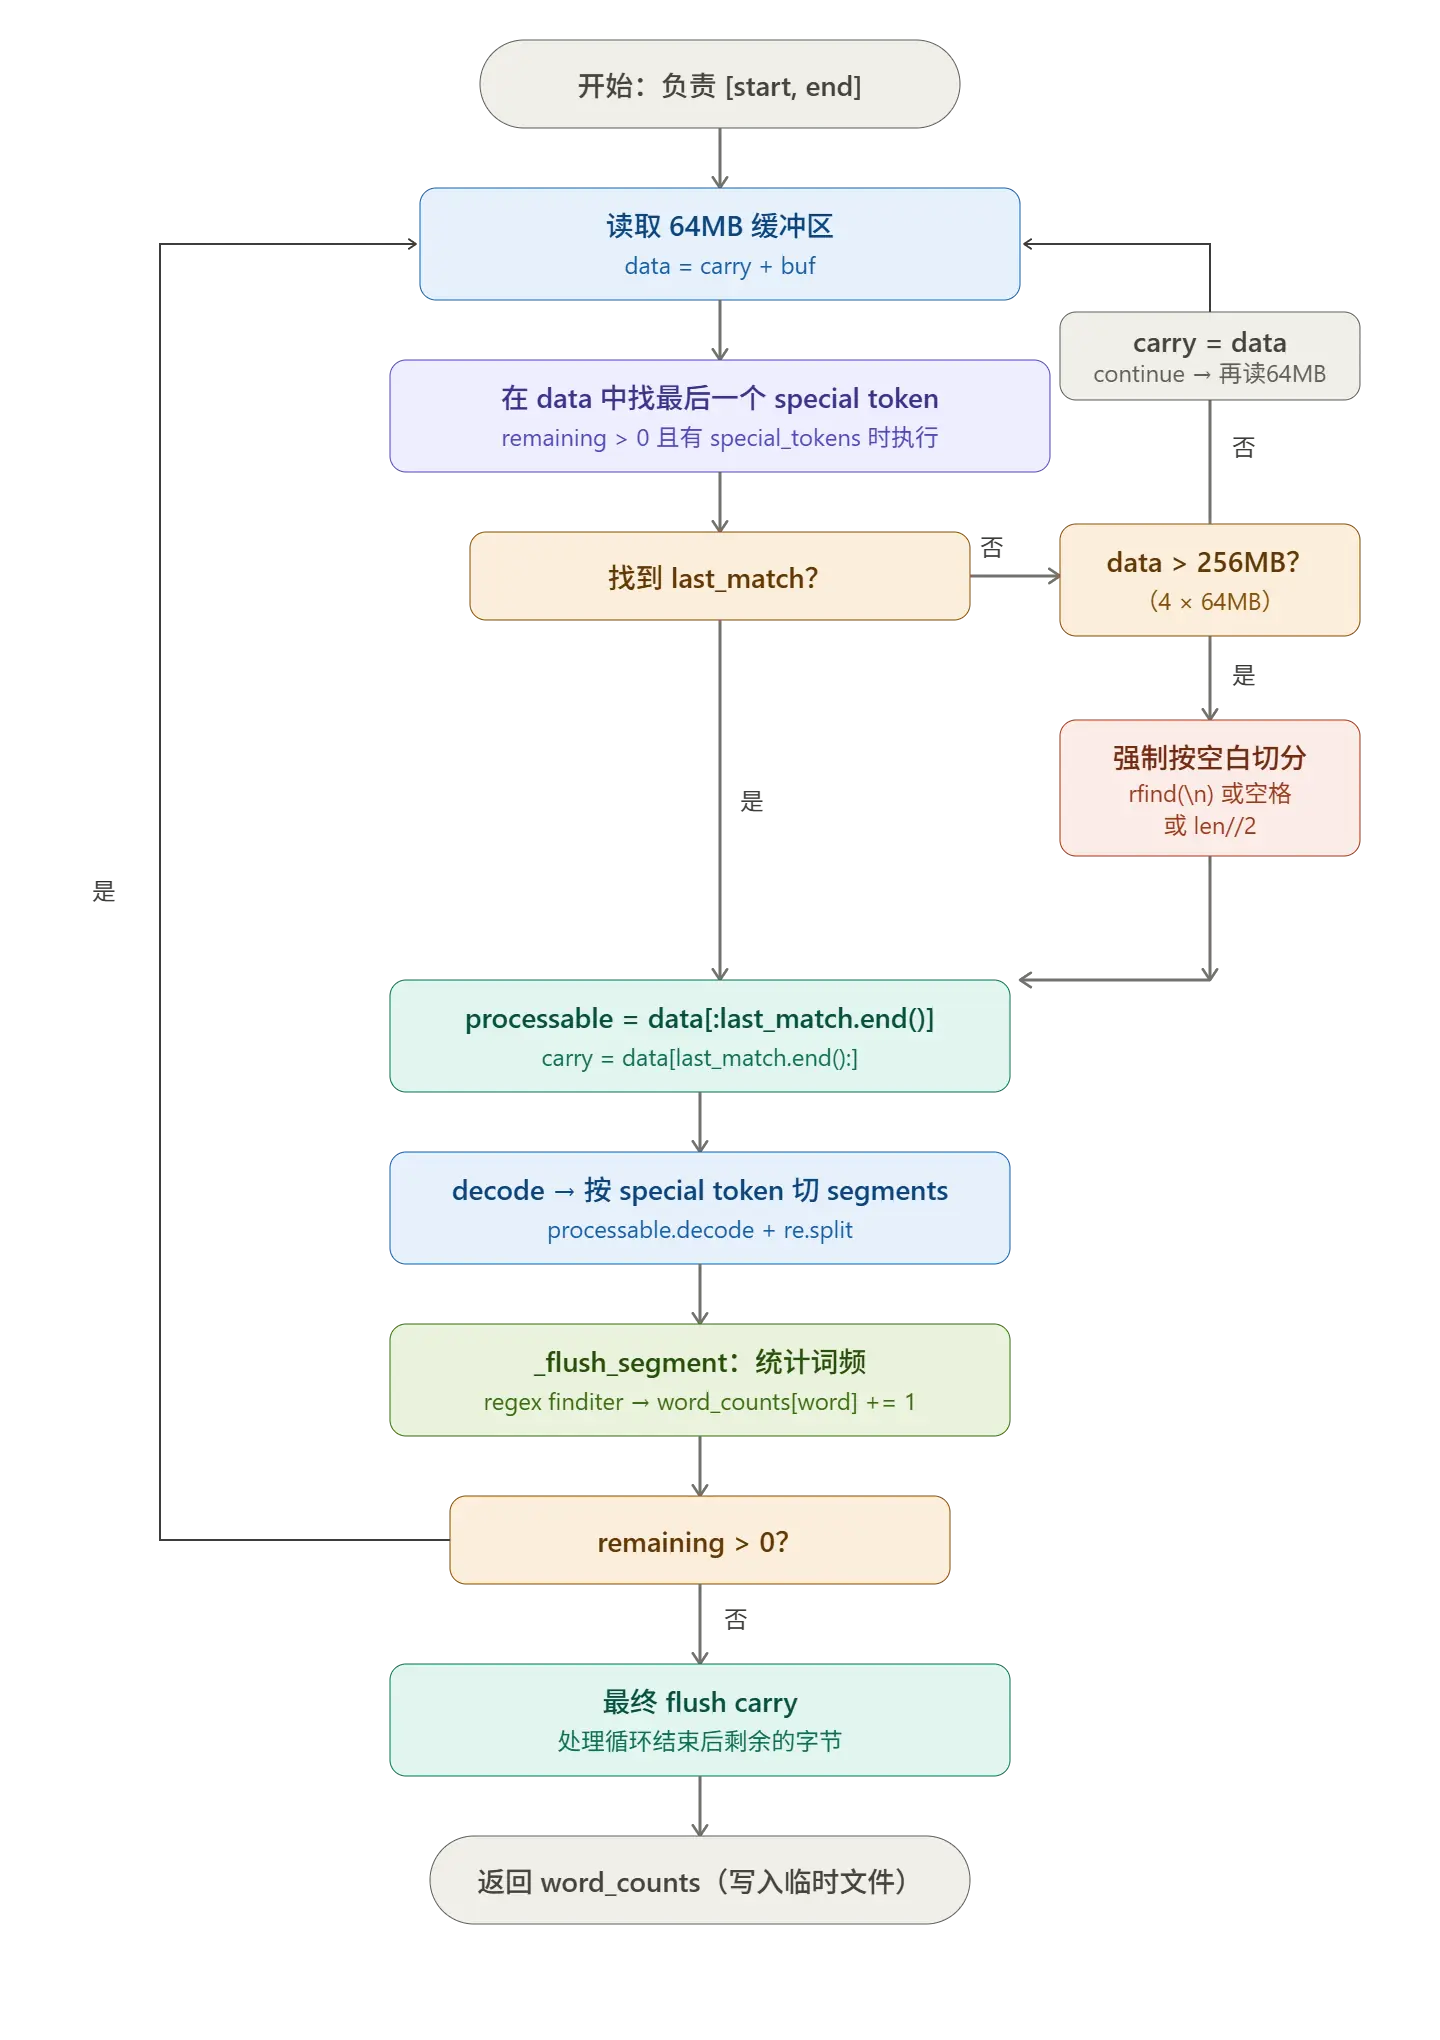 关键实现代码
- cpu 自适应
python
if num_workers is None:

            # Streaming worker keeps its peak RSS around _WORKER_BUFFER_BYTES * ~6

            # (~400 MB for a 64 MB buffer) regardless of the assigned range size,

            # so we can cap N by available RAM / per-worker peak directly.

            import psutil

            available_mb = psutil.virtual_memory().available / 1024 / 1024

            per_worker_mb_estimate = (_WORKER_BUFFER_BYTES / 1024 / 1024) * 6

            cpu_count = mp.cpu_count()

            mem_based_workers = max(1, int(available_mb * 0.8 / per_worker_mb_estimate))

            num_workers = min(cpu_count, mem_based_workers)

            print(

                f"[pretokenize] available={available_mb:.0f} MB, "

                f"per_worker_peak_est={per_worker_mb_estimate:.0f} MB "

                f"→ using {num_workers} workers"

)- 子进程文档分块流式处理
python
with open(file_path, "rb") as f:

        f.seek(start)

        remaining = end - start

        carry = b""  # bytes left over from previous buffer (after last special-token boundary)

        while remaining > 0:

            to_read = min(_WORKER_BUFFER_BYTES, remaining)

            buf = f.read(to_read)

            if not buf:

                break

            remaining -= len(buf)

            data = carry + buf

            if compiled_special_bytes is not None and remaining > 0:

                # find the LAST special-token match in `data`; everything up to

                # its end can be safely processed now, the tail becomes carry.

                last_match = None

                for m in compiled_special_bytes.finditer(data):

                    last_match = m

                if last_match is not None:

                    safe_end = last_match.end()

                    processable = data[:safe_end]

                    carry = data[safe_end:]

                else:

                    # no special token in this window --- we cannot be sure no

                    # word straddles the buffer end. Carry the whole thing.

                    # In the pathological case where a single segment between

                    # specials is larger than the buffer, we still need to

                    # process; do a safe split on whitespace as a fallback.

                    if len(data) > 4 * _WORKER_BUFFER_BYTES:

                        # safety net: split at last whitespace to avoid OOM

                        cut = data.rfind(b"\n")

                        if cut == -1:

                            cut = data.rfind(b" ")

                        if cut == -1:

                            cut = len(data) // 2

                        processable, carry = data[:cut], data[cut:]

                    else:

                        carry = data

                        continue

            else:

                # no more bytes to read (final flush) or no special tokens at all

                processable = data

                carry = b""

            # Decode the processable bytes and run the per-segment pipeline.

            text = processable.decode("utf-8", errors="replace")

            if compiled_special_bytes is not None:

                # Split text on special tokens (these are NOT part of any word).

                # We use a Python-string regex here because we already decoded.

                escape_special_tokens = "|".join(re.escape(t) for t in special_tokens)

                segments = re.split(escape_special_tokens, text)

            else:
                segments = [text]
            for seg in segments:
                if seg:
                    _flush_segment(seg)
            # Free references before next iteration so memory peak stays low.
            del data, processable, text, segments

        # Final flush of any leftover bytes.
        if carry:

            text = carry.decode("utf-8", errors="replace")

            if compiled_special_bytes is not None:
                escape_special_tokens = "|".join(re.escape(t) for t in special_tokens)
                segments = re.split(escape_special_tokens, text)

            else:
                segments = [text]
            for seg in segments:
                if seg:
                    _flush_segment(seg)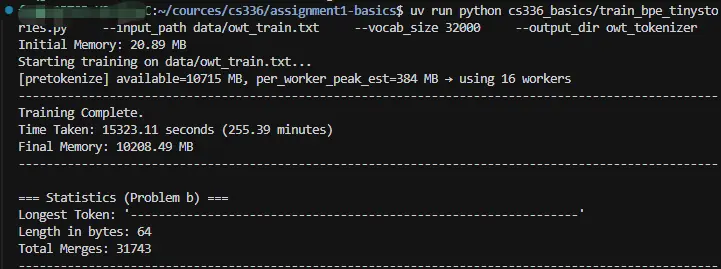
忘了加 profile 参数了,只好重新跑一遍🤡
**v2 profile **
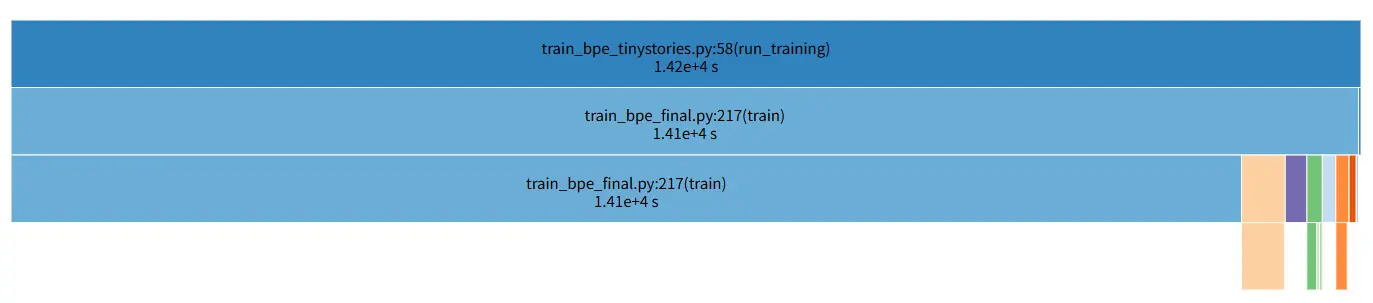
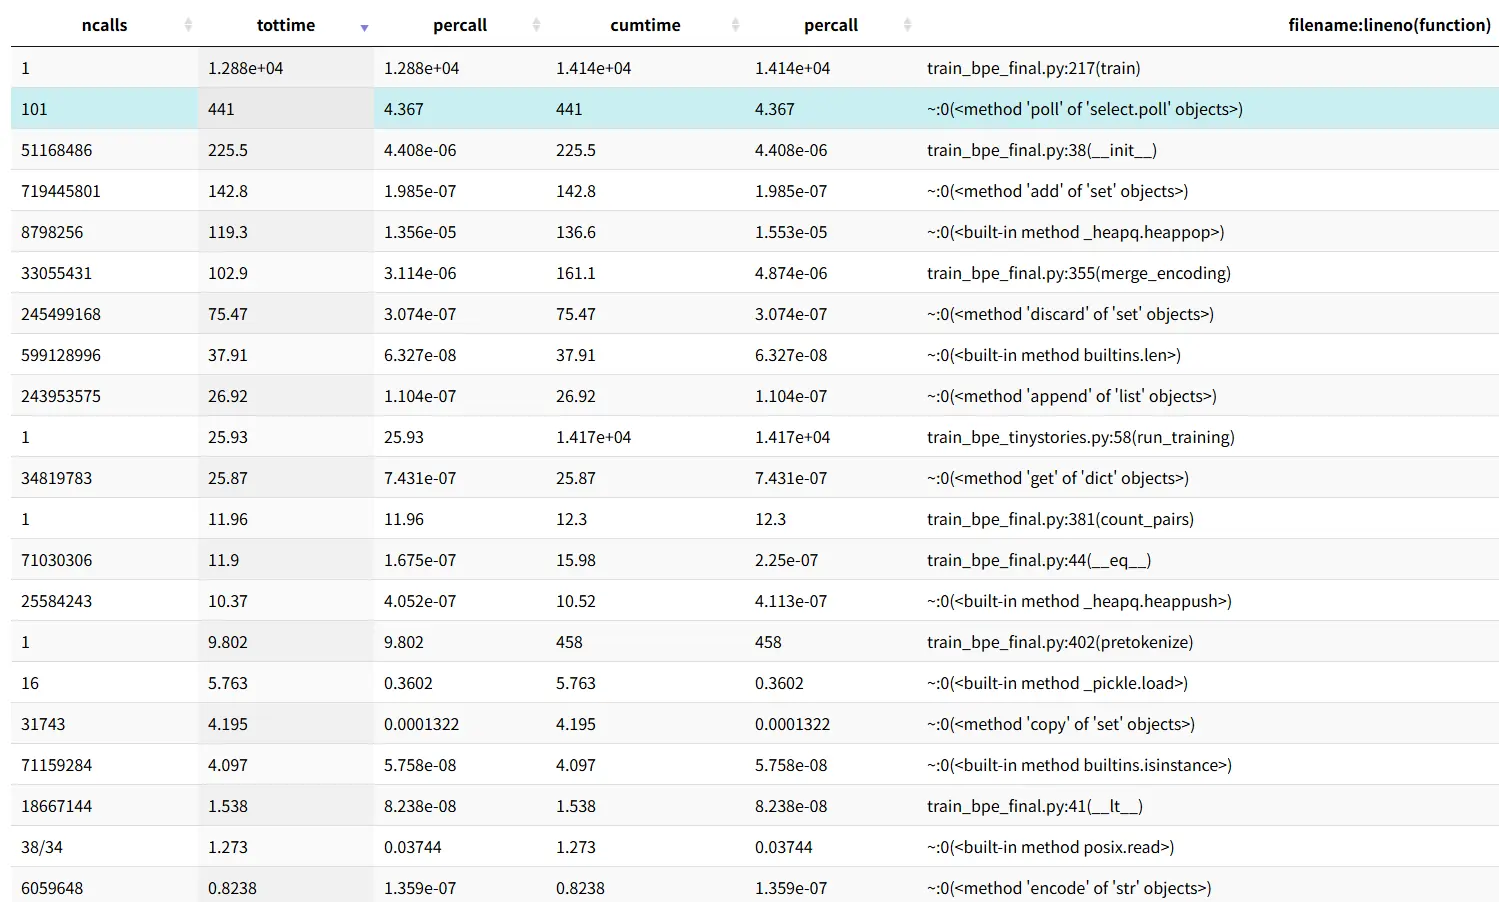
OWT 训练总览
总耗时 14,170 秒 ≈ 3 小时 56 分钟,跑出 32,000 词表,9.8 GB 输入。三个阶段时间分布:
| 阶段 | 时间 | 占比 |
|---|---|---|
| Pretokenize(流式 + 多进程) | 458 s ≈ 7.6 min | 3.2% |
| BPE 合并主循环(31,743 次 merge) | 12,884 s ≈ 3 h 35 min | 91% |
| 其它(init、IO、结束清理) | ~830 s | ~6% |
核心结论:上次修的 pretokenize 内存问题完全解决了,且新方案下 pretokenize 只占总时间 3%,瓶颈彻底转移到 BPE 合并主循环。
子进程流式处理优化总结
一句话总结 修复后的训练完整跑通,且 pretokenize 瓶颈已彻底消除(占比从 67% 降到 3%);下一阶段优化的全部价值都在 BPE 合并主循环里的 Python 层操作上。 对于一次性产出 tokenizer 的目标,4 小时我能接受这个代价,因为我此时想赶紧进入后续作业。
总结详情
- Pretokenize 阶段:流式方案验证有效
- 9.8 GB → 7.6 分钟搞定,没有 OOM,进程稳定跑完。
- profile 里 pretokenize 主进程显示
442 s在poll.poll、_help_stuff_finish、_handle_results------这些都是主进程等 worker 写回 tmp 文件的等待时间,不是真正消耗 CPU。 - 真正的 worker CPU 工作量没出现在这个 profile 里(cProfile 只 attach 主进程),但既然 wall time ≈ poll wait time,说明 worker 端 ~7 分钟跑完了 9.8 GB 全量分词。
对比早期挂死那一版(worker 一把 read 整段 5GB),现在的 per-worker 峰值 RSS 控制在几百 MB,跑得快还稳定。
- BPE 合并主循环:占了 91% 时间,下一步优化的所有重点都在这里
按 " 内部时间 "(tottime) 排序,主循环里最耗时的几项:
| 操作 | 调用次数 | 累计 tottime | 单次平均 |
|---|---|---|---|
_RevBytes.__init__ |
51,168,486 | 225.5 s | 4.4 μs |
set.add(pair_to_words) |
719,445,766 | 142.8 s | 0.2 μs |
heappop(懒删除) |
8,798,256 | 119.3 s | 13.5 μs |
merge_encoding |
33,055,431 | 103.0 s | 3.1 μs |
set.discard |
245,499,168 | 75.5 s | 0.3 μs |
len() |
599 M | 37.9 s | --- |
dict.get |
34.8 M | 26.9 s | --- |
heappush |
25,584,243 | 10.4 s | 0.4 μs |
_RevBytes.__eq__ |
71.0 M | 11.9 s | --- |
加起来这些热点合计 ~755 s,仅占 train 总时间 12,884 s 的 6%------剩下 ~12,000 s 都在 train() 函数体内的 Python 字节码本身(profile 把内层调用都展开后,train 自己的 12,884 s tottime 大部分是循环开销 + 字典访问 + 元组构造之类)。
几条具体可观察的量化关系
- 合并次数 = 31,743 次 :
set.copy调用次数 31,743 与num_merges完美对应(affected_words = ...copy()每次合并一次)。 - 每次 merge 平均影响 ~1041 个 word :
33,055,431 / 31,743 ≈ 1041。 - 每次 merge 平均向堆推 ~806 个新 entry :
25,584,243 / 31,743 ≈ 806。 - 每次 merge 平均做 ~277 次 heappop :
8,798,256 / 31,743 ≈ 277,其中绝大多数是懒删除淘汰过期 entry。 - 每次 merge 平均做 ~22,672 次 set.add :
719 M / 31,743 ≈ 22,672,主要是pair_to_words索引在新 encoding 上的更新。