📌 学习目标
- 掌握PMTiles源和协议的实现方法
- 理解相关API的使用
- 能够独立完成类似功能开发
🎯 核心概念
使用PMTiles插件和协议呈现地图。
💻 完 整 代 码
代码示例
js
// 将PMTiles插件添加到maplibregl全局对象
const protocol = new pmtiles.Protocol();
maplibregl.addProtocol('pmtiles', protocol.tile);

const PMTILES_URL = 'https://pmtiles.io/protomaps(vector)ODbL_firenze.pmtiles';

const p = new pmtiles.PMTiles(PMTILES_URL);

// 这样可以在JS代码和地图渲染器之间共享一个实例
protocol.add(p);

// 首先获取头部信息,以便获取地图的中心点经纬度
p.getHeader().then(h => {
    const map = new maplibregl.Map({
        container: 'map',
        zoom: h.maxZoom - 2,
        center: [h.centerLon, h.centerLat],
        style: {
            version: 8,
            sources: {
                'example_source': {
                    type: 'vector',
                    url: `pmtiles://${PMTILES_URL}`,
                    attribution: '© <a href="https://openstreetmap.org/copyright">OpenStreetMap</a>'
                }
            },
            layers: [
                {
                    'id': 'buildings',
                    'source': 'example_source',
                    'source-layer': 'landuse',
                    'type': 'fill',
                    'paint': {
                        'fill-color': 'steelblue'
                    }
                },
                {
                    'id': 'roads',
                    'source': 'example_source',
                    'source-layer': 'roads',
                    'type': 'line',
                    'paint': {
                        'line-color': 'black'
                    }
                },
                {
                    'id': 'mask',
                    'source': 'example_source',
                    'source-layer': 'mask',
                    'type': 'fill',
                    'paint': {
                        'fill-color': 'white'
                    }
                }
            ]
        }
    });
});
代码示例
html
<!DOCTYPE html>
<html lang="en">
<head>
    <title>PMTiles source and protocol</title>
    <meta property="og:description" content="使用 PMTiles 插件和协议来展示地图。" />
    <meta property="og:created" content="2025-06-25" />
    <meta charset='utf-8'>
    <meta name="viewport" content="width=device-width, initial-scale=1">
    <link rel='stylesheet' href='https://unpkg.com/maplibre-gl@5.24.0/dist/maplibre-gl.css' />
    <script src='https://unpkg.com/maplibre-gl@5.24.0/dist/maplibre-gl.js'></script>
    <script src="https://unpkg.com/pmtiles@3.2.0/dist/pmtiles.js"></script>
    <style>
        body { margin: 0; padding: 0; }
        html, body, #map { height: 100%; }
    </style>
</head>
<body>
<div id="map"></div>
<script>

    // 将PMTiles插件添加到maplibregl全局对象
    const protocol = new pmtiles.Protocol();
    maplibregl.addProtocol('pmtiles', protocol.tile);

    const PMTILES_URL = 'https://pmtiles.io/protomaps(vector)ODbL_firenze.pmtiles';

    const p = new pmtiles.PMTiles(PMTILES_URL);

    // 这样可以在JS代码和地图渲染器之间共享一个实例
    protocol.add(p);

    // 我们首先获取头部信息,以便获取地图的中心点经纬度
    p.getHeader().then(h => {
        const map = new maplibregl.Map({
            container: 'map',
            zoom: h.maxZoom - 2,
            center: [h.centerLon, h.centerLat],
            style: {
                version: 8,
                sources: {
                    'example_source': {
                        type: 'vector',
                        url: `pmtiles://${PMTILES_URL}`,
                        attribution: '© <a href="https://openstreetmap.org/copyright">OpenStreetMap</a>'
                    }
                },
                layers: [
                    {
                        'id': 'buildings',
                        'source': 'example_source',
                        'source-layer': 'landuse',
                        'type': 'fill',
                        'paint': {
                            'fill-color': 'steelblue'
                        }
                    },
                    {
                        'id': 'roads',
                        'source': 'example_source',
                        'source-layer': 'roads',
                        'type': 'line',
                        'paint': {
                            'line-color': 'black'
                        }
                    },
                    {
                        'id': 'mask',
                        'source': 'example_source',
                        'source-layer': 'mask',
                        'type': 'fill',
                        'paint': {
                            'fill-color': 'white'
                        }
                    }
                ]
            }
        });
    });
</script>
</body>
</html>
🔍 代码解析
1. 注册PMTiles协议
使用 maplibregl.addProtocol() 注册自定义协议,使地图能够解析 pmtiles:// 协议的URL。
2. 创建PMTiles实例
初始化 pmtiles.PMTiles 对象并添加到协议中,实现JS代码和地图渲染器之间的实例共享。
3. 获取PMTiles头部信息
调用 p.getHeader() 获取元数据(中心点、缩放级别范围等)。
4. 初始化地图
使用头部信息设置地图初始视图,配置完整的自定义样式对象。
5. 配置PMTiles数据源
在 style.sources 中定义矢量数据源,使用 pmtiles:// 协议URL。
6. 添加图层
创建多个图层(buildings、roads、mask)显示不同类型的地理要素。
⚙️ 参数说明
| 参数 | 类型 | 必填 | 说明 |
|---|---|---|---|
| container | string | 是 | 地图容器ID |
| style | object | 是 | 完整的样式对象 |
| center | number, number | 否 | 初始中心点,默认0, 0 |
| zoom | number | 否 | 初始缩放级别,默认0 |
PMTiles源配置
| 属性 | 类型 | 说明 |
|---|---|---|
| type | string | 必须为 'vector' |
| url | string | pmtiles:// 协议的URL |
| attribution | string | 版权归属信息 |
🎨 效果说明
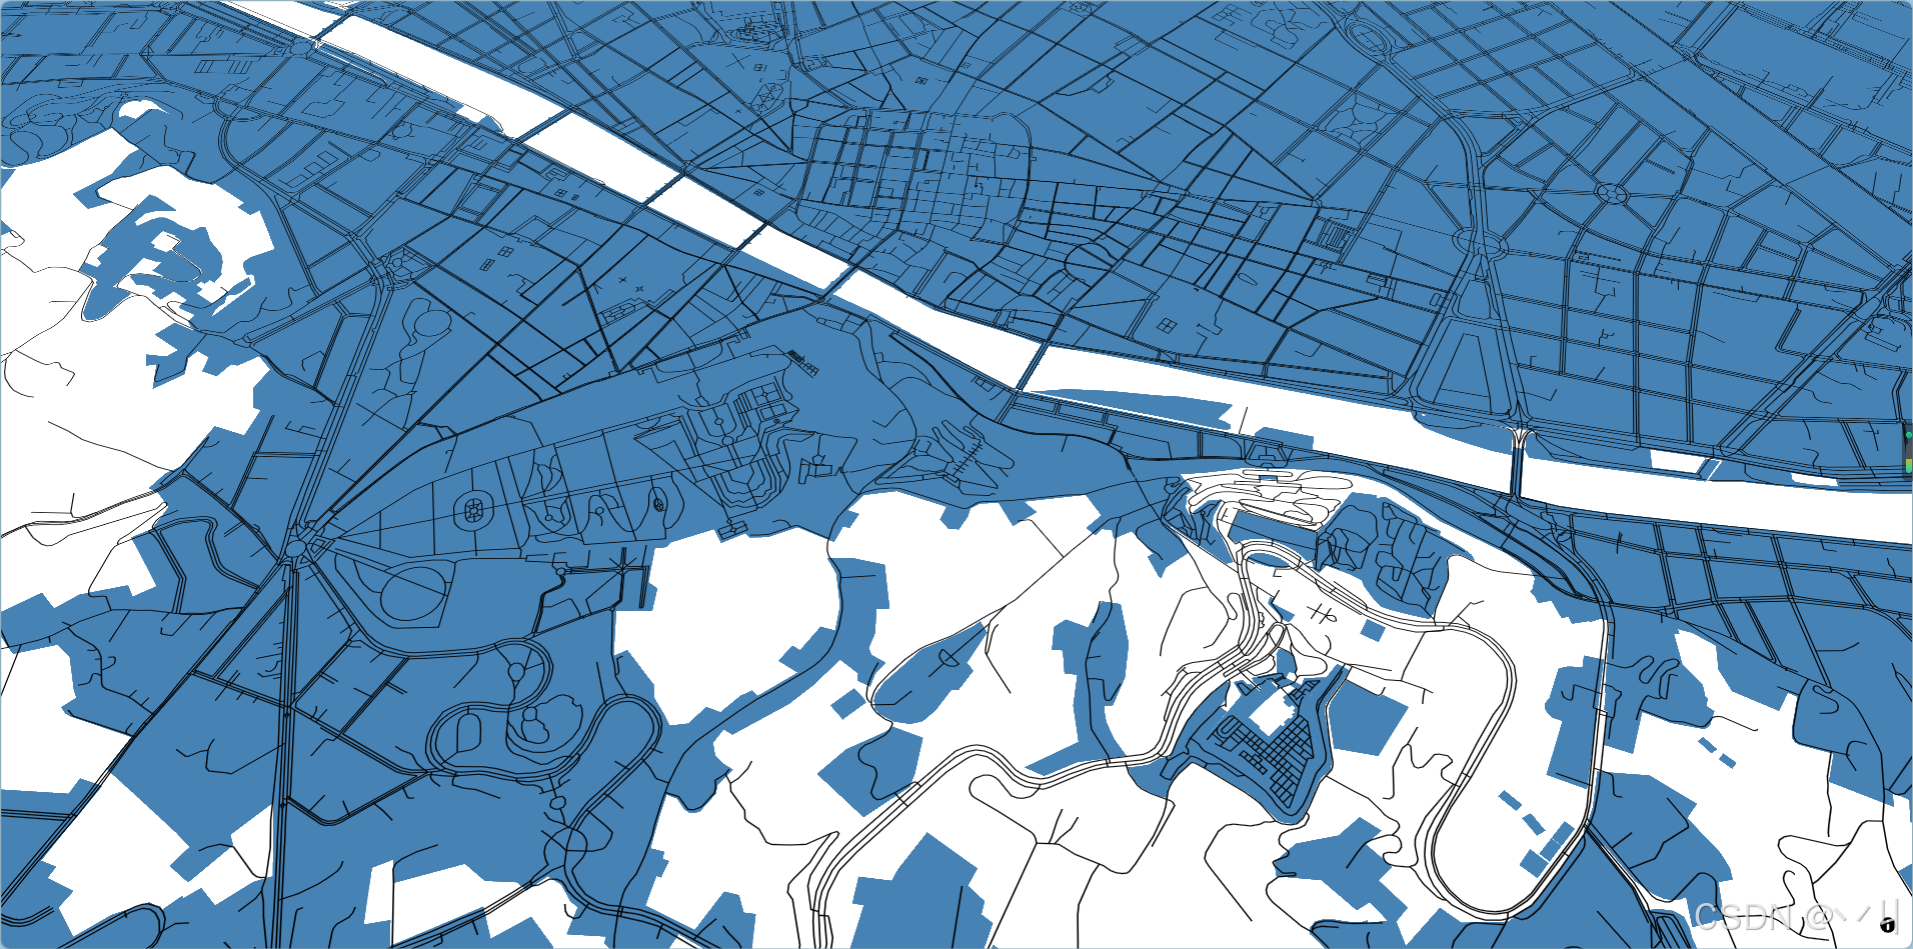
运行代码后:
- 地图显示意大利佛罗伦萨区域(根据PMTiles文件自动定位)
- 蓝色填充显示土地利用区域
- 黑色线条显示道路网络
- 白色遮罩层处理边界
- 用户可正常交互(拖拽、缩放、旋转)
💡 常 见 问 题
Q1: 什么是PMTiles?
A: PMTiles是一种单文件瓦片格式,将所有缩放级别的瓦片存储在一个文件中,便于分发和存储。
Q2: 需要额外引入什么库?
A: 需要引入 pmtiles 库来支持PMTiles协议。
Q3: PMTiles和MBTiles有什么区别?
A: PMTiles是纯文件格式,无需数据库;MBTiles是SQLite数据库格式。
📝 练习任务
- 基础练习:修改PMTiles文件URL,加载其他区域数据
- 进阶挑战:添加更多图层样式(如建筑物、水体等)
- 拓展思考:如何实现本地PMTiles文件加载?
🌟 最佳实践
- 协议注册: 在创建地图前注册PMTiles协议
- 实例共享 : 通过
protocol.add()共享实例,避免重复请求 - 异步处理: 使用Promise获取头部信息后再创建地图
- 版权信息: 正确设置attribution属性
🔗 延伸阅读
-
下一课预告:将继续学习地图图层的基础知识
本文是MapLibre GL JS实践课程系列的一部分,欢迎关注收藏