第42篇|拍摄预览浮层:让用户确认刚拍的成果
相机体验里,"拍完之后发生了什么"非常关键。只把照片默默保存进相册,用户会不确定是否成功;直接跳转相册,又会打断连续拍摄。双镜记忆相机采用拍摄预览浮层,在当前相机页轻量展示刚拍结果。
这一篇看预览浮层如何从 GalleryMoment 读取图片 Uri,并在页面上同时处理单拍和双拍。它不是一张静态提示图,而是连接拍摄回调、相册入库和后续用户动作的过渡层。
这一篇继续围绕 21 天「智能相机开发实战」训练营展开。内容只使用当前项目里的 ArkTS、服务层代码和真实页面截图来讲,不把封面图放进正文。阅读时可以先看截图理解用户侧效果,再顺着函数名回到工程定位实现。
本篇目标
- 理解拍摄成功后为什么需要轻量预览。
- 掌握 showCameraCapturePreview 如何从记录填充浮层状态。
- 读懂浮层 UI 如何处理双镜小窗和操作按钮。
- 把 appendGalleryRecord、预览浮层和相册选择状态串起来。
对应源码位置
entry/src/main/ets/pages/Index.ets
一、预览浮层解决的是"成功感"和"不中断"
用户按下快门后,需要立刻看到成果,确认没有黑图、错位或只拍到一边。但智能相机又要支持连续拍摄,如果每拍一张都跳到相册,会让拍摄节奏断掉。
浮层是两者之间的平衡:它覆盖在相机页上,展示刚拍图片和少量动作;用户可以关闭继续拍,也可以进入相册做更完整整理。
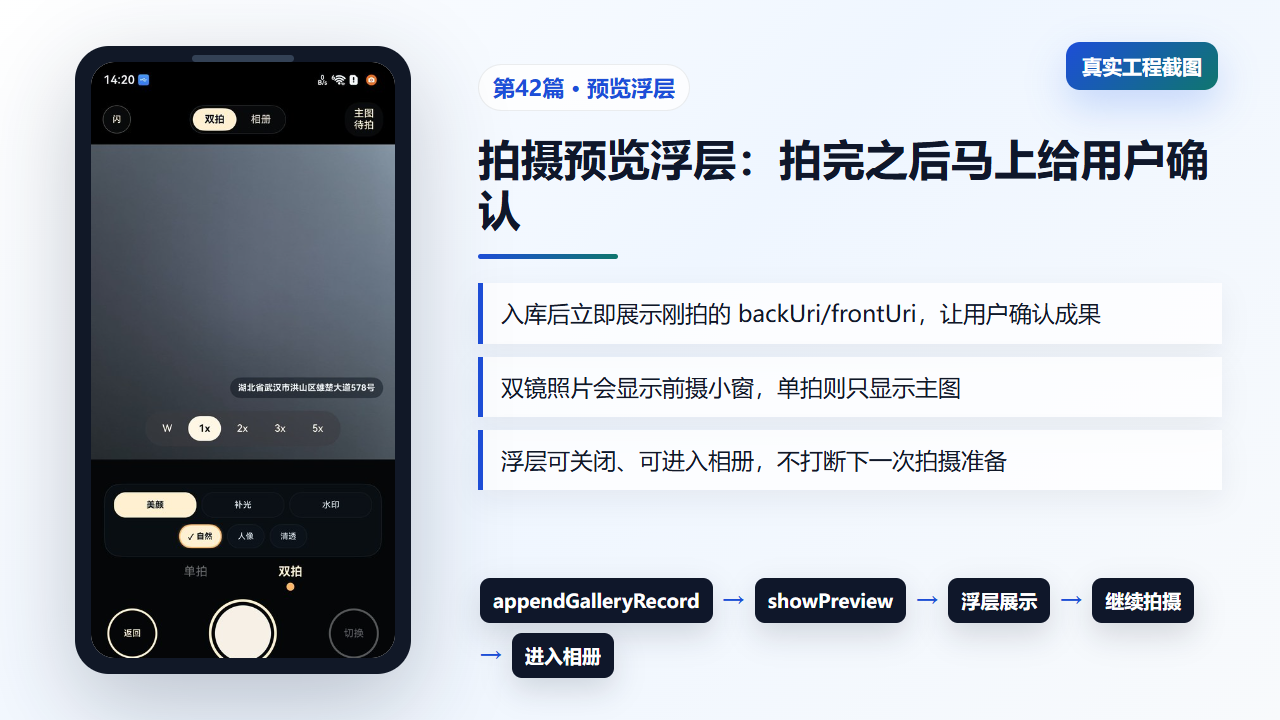
图1 拍摄预览浮层在相机页中的展示位置和状态流向
二、showCameraCapturePreview:从记录填充预览状态
入库记录里已经有 backUri、frontUri 和 createdLabel。预览浮层不重新计算文件路径,而是直接消费 GalleryMoment。这样它展示的内容和相册即将展示的内容完全一致。
双拍时 frontUri 与 backUri 不同,小窗才会出现;单拍时两者可能相同或前摄为空,浮层自然退化为主图预览。
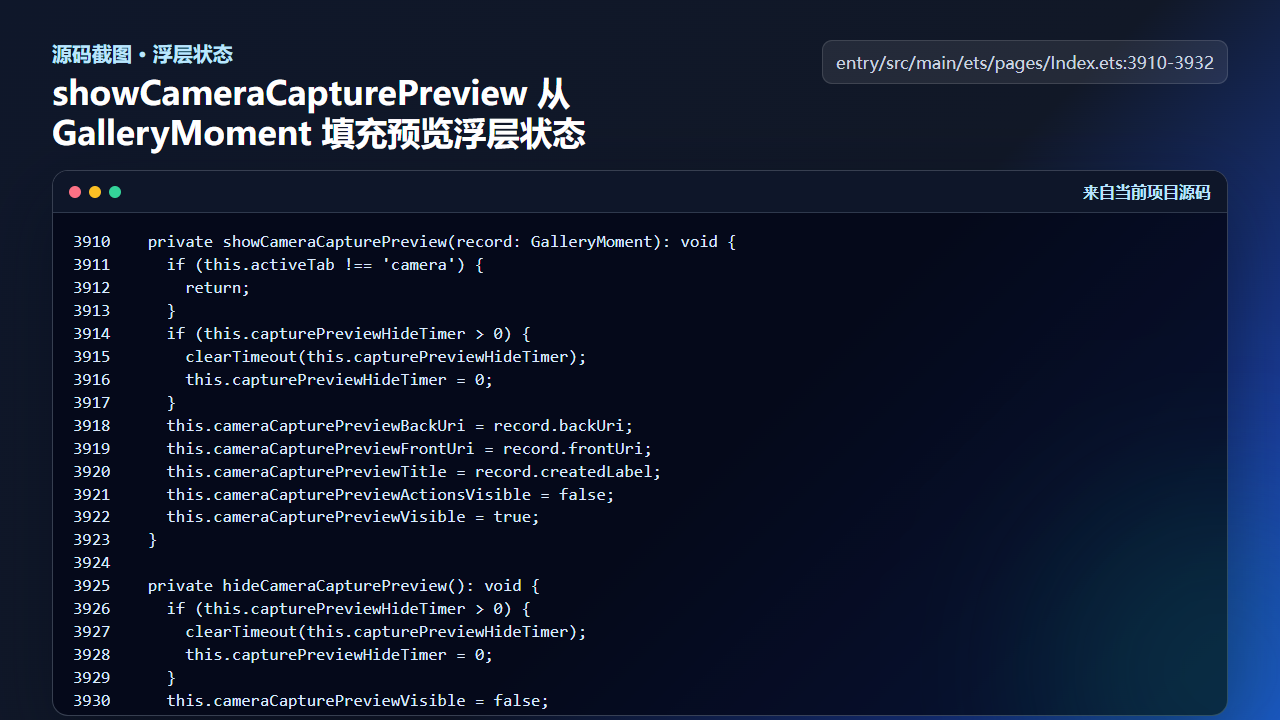
图2 showCameraCapturePreview 从 GalleryMoment 填充预览浮层状态
ts
  private showCameraCapturePreview(record: GalleryMoment): void {
    if (this.activeTab !== 'camera') {
      return;
    }
    if (this.capturePreviewHideTimer > 0) {
      clearTimeout(this.capturePreviewHideTimer);
      this.capturePreviewHideTimer = 0;
    }
    this.cameraCapturePreviewBackUri = record.backUri;
    this.cameraCapturePreviewFrontUri = record.frontUri;
    this.cameraCapturePreviewTitle = record.createdLabel;
    this.cameraCapturePreviewActionsVisible = false;
    this.cameraCapturePreviewVisible = true;
  }

  private hideCameraCapturePreview(): void {
    if (this.capturePreviewHideTimer > 0) {
      clearTimeout(this.capturePreviewHideTimer);
      this.capturePreviewHideTimer = 0;
    }
    this.cameraCapturePreviewVisible = false;
    this.cameraCapturePreviewActionsVisible = false;
  }
这段代码体现了模型驱动 UI 的好处:浮层不关心照片来自单拍、双拍还是导入,只要记录字段完整,就能正常展示。
三、浮层 UI 同时承接主图、小窗和动作
buildCameraCapturePreviewOverlay 根据 cameraCapturePreviewVisible 和图片 Uri 决定是否渲染。主图占主要区域,前摄图在双镜场景下以小窗叠加;操作按钮只有在动作区可见时出现。
这类浮层要特别注意尺寸控制。文章正文里的截图也统一限制宽度,避免图片把内容撑满;应用内则通过固定高度和条件渲染避免遮挡拍摄按钮。
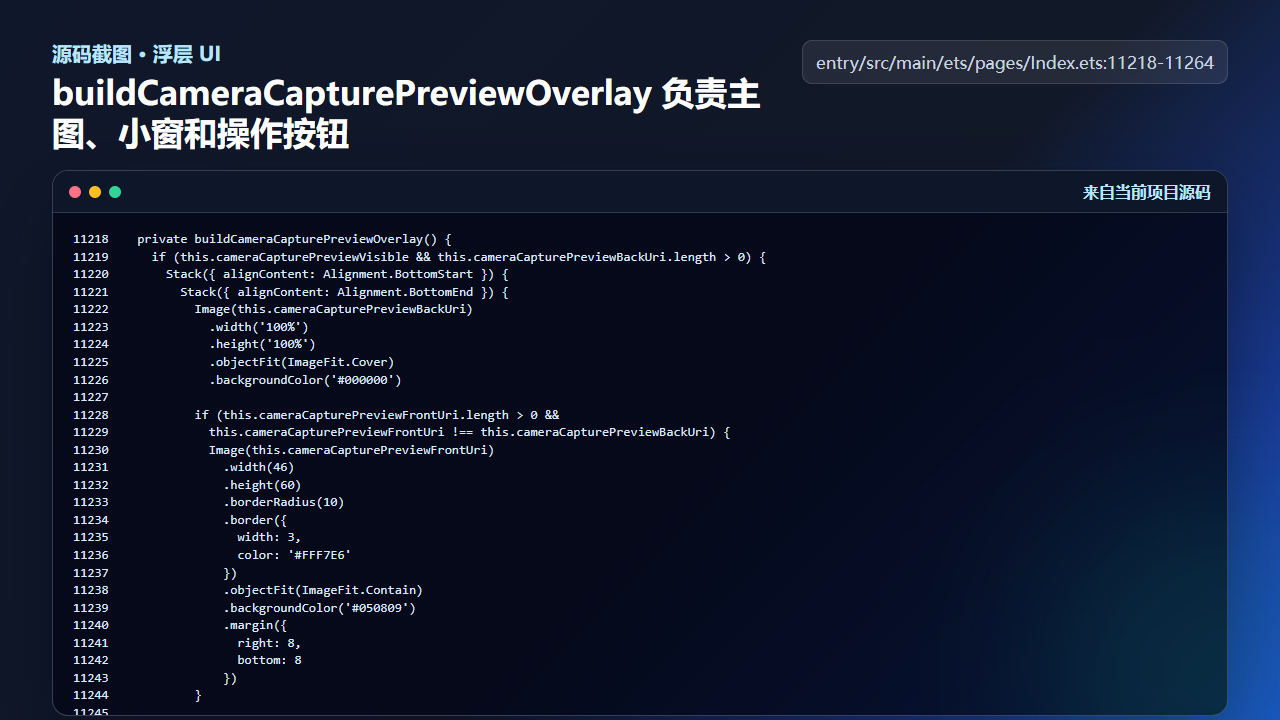
图3 buildCameraCapturePreviewOverlay 负责主图、小窗和操作按钮
ts
  private buildCameraCapturePreviewOverlay() {
    if (this.cameraCapturePreviewVisible && this.cameraCapturePreviewBackUri.length > 0) {
      Stack({ alignContent: Alignment.BottomStart }) {
        Stack({ alignContent: Alignment.BottomEnd }) {
          Image(this.cameraCapturePreviewBackUri)
            .width('100%')
            .height('100%')
            .objectFit(ImageFit.Cover)
            .backgroundColor('#000000')

          if (this.cameraCapturePreviewFrontUri.length > 0 &&
            this.cameraCapturePreviewFrontUri !== this.cameraCapturePreviewBackUri) {
            Image(this.cameraCapturePreviewFrontUri)
              .width(46)
              .height(60)
              .borderRadius(10)
              .border({
                width: 3,
                color: '#FFF7E6'
              })
              .objectFit(ImageFit.Contain)
              .backgroundColor('#050809')
              .margin({
                right: 8,
                bottom: 8
              })
          }

        }
        .width('100%')
        .height('100%')
        .borderRadius(30)
        .clip(true)
        .onClick(() => {
          this.hideCameraCapturePreview();
          this.openLatestCaptureInGallery();
        })

        if (this.cameraCapturePreviewActionsVisible) {
          Row({ space: 10 }) {
            Column({ space: 4 }) {
              Text('已保存')
                .fontSize(15)
                .fontWeight(FontWeight.Medium)
                .fontColor('#FFF7E6')

              Text(this.cameraCapturePreviewTitle)
双镜小窗不是单独的数据源,它只是 frontUri 的另一种呈现方式。这样可以保证详情页、相册卡片和预览浮层都从同一条记录取图。
四、入库后刷新选择项,再展示预览
appendGalleryRecord 把新记录插到列表最前面,更新选中项、分组 key、备注草稿和提示文本,然后调用持久化。它还会调用 showCameraCapturePreview,让用户马上看到新作品。
这里顺序很重要。先整理记录和选中状态,再展示浮层,可以保证用户点进相册时落到刚拍照片,而不是进入旧的选中项。
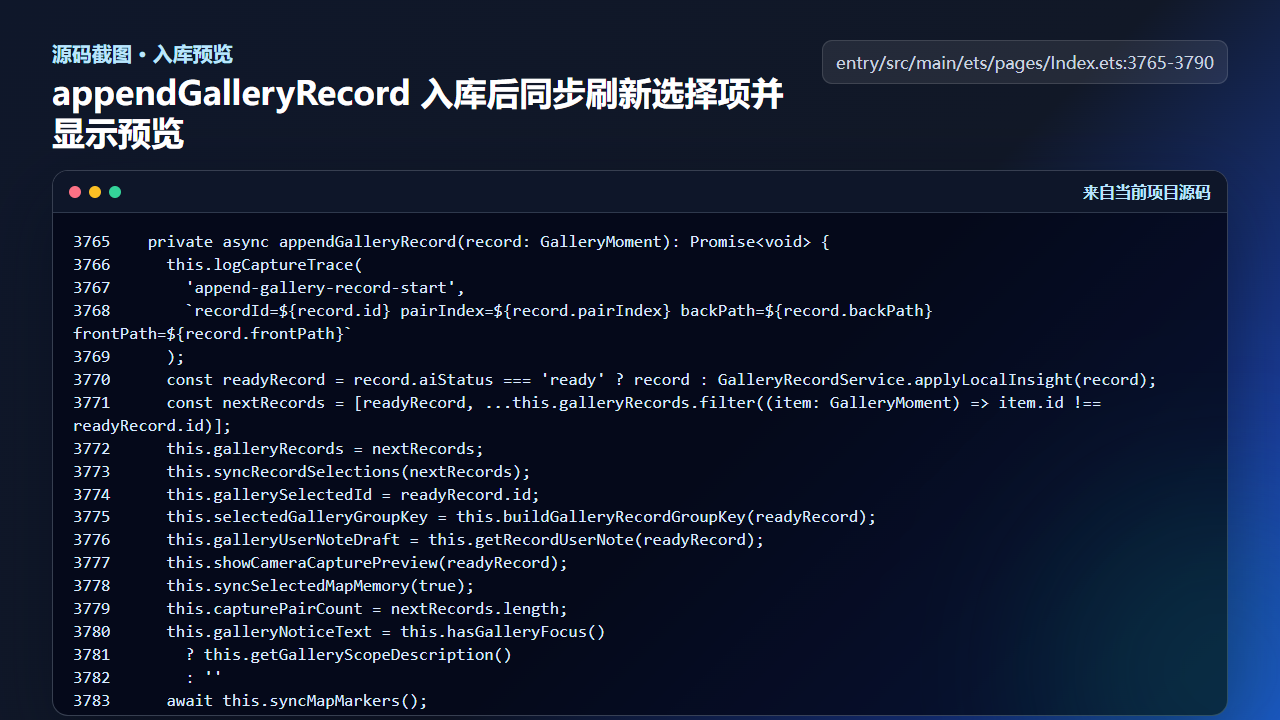
图4 appendGalleryRecord 入库后同步刷新选择项并显示预览
ts
  private async appendGalleryRecord(record: GalleryMoment): Promise<void> {
    this.logCaptureTrace(
      'append-gallery-record-start',
      `recordId=${record.id} pairIndex=${record.pairIndex} backPath=${record.backPath} frontPath=${record.frontPath}`
    );
    const readyRecord = record.aiStatus === 'ready' ? record : GalleryRecordService.applyLocalInsight(record);
    const nextRecords = [readyRecord, ...this.galleryRecords.filter((item: GalleryMoment) => item.id !== readyRecord.id)];
    this.galleryRecords = nextRecords;
    this.syncRecordSelections(nextRecords);
    this.gallerySelectedId = readyRecord.id;
    this.selectedGalleryGroupKey = this.buildGalleryRecordGroupKey(readyRecord);
    this.galleryUserNoteDraft = this.getRecordUserNote(readyRecord);
    this.showCameraCapturePreview(readyRecord);
    this.syncSelectedMapMemory(true);
    this.capturePairCount = nextRecords.length;
    this.galleryNoticeText = this.hasGalleryFocus()
      ? this.getGalleryScopeDescription()
      : ''
    await this.syncMapMarkers();
    this.updateAwarenessRecommendation(false);
    await this.persistGalleryRecords(nextRecords);
    this.gallerySelectedId = readyRecord.id;
    this.selectedGalleryGroupKey = this.buildGalleryRecordGroupKey(readyRecord);
    this.logCaptureTrace(
      'append-gallery-record-finished',
      `recordId=${readyRecord.id} total=${nextRecords.length} selected=${this.gallerySelectedId}`
预览浮层不是孤立组件,它依赖入库闭环。只有相册状态已经更新,预览上的"去相册查看"才是可靠动作。
工程检查清单
- 拍摄成功后立即给用户可见反馈。
- 浮层展示的图片 Uri 来自 GalleryMoment,不重新拼路径。
- 单拍和双拍共用浮层,双拍额外显示前摄小窗。
- 入库后先刷新选中记录,再展示预览。
- 浮层要能关闭,不能阻断连续拍摄。
今日练习
- 找到
cameraCapturePreviewActionsVisible,观察它在哪些交互下变化。 - 把单拍记录和双拍记录分别代入 showCameraCapturePreview,比较浮层字段差异。
- 设计一个"预览后删除"动作,思考它应该先删文件还是先删记录。
训练营后面的内容会继续按"真实页面效果 → 源码定位 → 状态闭环 → 可验证结果"的节奏推进。每一篇都尽量让你能拿着代码直接回到项目里复现,而不是只停留在概念说明。