【 声明:版权所有,欢迎转载,请勿用于商业用途。 联系信箱:feixiaoxing @163.com】
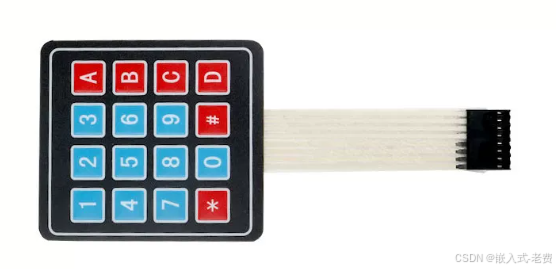
有一种输入是数字输入,在现实生活中用的特别多。如果还需要计算的话,一般要加上+-*/,这样就更好了。当然除了0~9,以及四位运算,剩下就是点和等于,这样基本上就把常用的计算都包含在内了。不过,如果16个按键全部用gpio表示,则需要16个gpio,看上去有一点浪费。因此,人们想出了薄膜键盘的方法,也就是矩阵键盘,一般按下去的时候,对应的行和列就会拉低,通过这个办法就可以知道哪个按键被按下去了。
1、8个输出
如果是4*4的薄膜键盘,一般就是4+4=8个输出信号。推广一下,如果是3*4,也就是12个按键的键盘,就是3+4=7个输出信号。
2、准备8个gpio
前面谈到了需要8个gpio,所以只需要找到8个引脚就可以了。不失一般性,不妨找到gpio12~gpio19这8个引脚。
3、连线
矩阵键盘本身没有电源线和地线,这和之前的传感器不太一样。所以,我们需要做的就是就是把esp32对应的引脚和矩阵键盘连接起来即可。一般连接的时候,采用公对母的连线,公口连接键盘,母口连接esp32。
4、开始ai编程
连接好线路之后,就可以准备ai编程了。比如告诉ai,用esp32的8个pin脚连接薄膜键盘,8个引脚是pin12到pin19。没什么大问题的话,ai就可以帮助我们生成的答案。
#include <stdio.h>
#include "driver/gpio.h"
#include "freertos/FreeRTOS.h"
#include "freertos/task.h"
#include "esp_log.h"
#include "esp_rom_sys.h"

static const char *TAG = "KEYPAD_SCAN";

// ==================== Configuration ====================
#define ROWS 4
#define COLS 4

// GPIO pins for rows (outputs)
const gpio_num_t row_pins[ROWS] = {12, 13, 14, 15};

// GPIO pins for columns (inputs with pull-up)
const gpio_num_t col_pins[COLS] = {16, 17, 18, 19};

// Key mapping table (4x4 layout)
const char key_map[ROWS][COLS] = {
    {'1', '2', '3', 'A'},
    {'4', '5', '6', 'B'},
    {'7', '8', '9', 'C'},
    {'*', '0', '#', 'D'}
};

// Debounce configuration
#define DEBOUNCE_THRESHOLD 3      // Number of consistent reads required
#define SCAN_INTERVAL_MS 10       // Scan interval in milliseconds
#define STABLE_DELAY_US 50        // Delay for signal stabilization
// ========================================================

// Debounce state variables
static uint8_t last_stable_state[ROWS][COLS] = {0};     // Last debounced key state (0=pressed, 1=released)
static uint8_t debounce_counter[ROWS][COLS] = {0};      // Counter for debounce stability

// Key event tracking
static char last_reported_key = 0;                       // Last key that was reported
static uint32_t last_key_press_time = 0;                 // Timestamp of last key press

/**
 * @brief Initialize GPIO pins for matrix keypad
 *
 * Row pins: Configured as push-pull outputs, initial state HIGH
 * Column pins: Configured as inputs with internal pull-up resistors
 */
void keypad_gpio_init(void)
{
    // Initialize row pins as outputs, default HIGH
    for (int i = 0; i < ROWS; i++) {
        gpio_config_t io_conf = {
            .pin_bit_mask = (1ULL << row_pins[i]),
            .mode = GPIO_MODE_OUTPUT,
            .pull_up_en = GPIO_PULLUP_DISABLE,
            .pull_down_en = GPIO_PULLDOWN_DISABLE,
            .intr_type = GPIO_INTR_DISABLE,
        };
        gpio_config(&io_conf);
        gpio_set_level(row_pins[i], 1);  // Set initial state HIGH
    }

    // Initialize column pins as inputs with internal pull-up
    for (int i = 0; i < COLS; i++) {
        gpio_config_t io_conf = {
            .pin_bit_mask = (1ULL << col_pins[i]),
            .mode = GPIO_MODE_INPUT,
            .pull_up_en = GPIO_PULLUP_ENABLE,   // Enable internal pull-up
            .pull_down_en = GPIO_PULLDOWN_DISABLE,
            .intr_type = GPIO_INTR_DISABLE,
        };
        gpio_config(&io_conf);
    }

    ESP_LOGI(TAG, "GPIO initialized: %d rows, %d columns", ROWS, COLS);
}

/**
 * @brief Scan the matrix keypad and return the currently pressed key
 *
 * Scanning principle:
 * 1. Drive each row LOW one at a time
 * 2. Read all column pins
 * 3. If a column reads LOW, the key at that row/column intersection is pressed
 * 4. Uses debouncing to filter out mechanical bouncing
 *
 * @return char Pressed key character, or 0 if no key is pressed
 */
char keypad_scan(void)
{
    // Iterate through each row
    for (int row = 0; row < ROWS; row++) {
        // Drive current row LOW
        gpio_set_level(row_pins[row], 0);

        // Small delay to allow signal to stabilize
        esp_rom_delay_us(STABLE_DELAY_US);

        // Read all columns for this row
        for (int col = 0; col < COLS; col++) {
            // Read column state (0 = pressed, 1 = released due to pull-up)
            int current_state = gpio_get_level(col_pins[col]);

            // Debouncing logic: require multiple consistent reads
            if (current_state != last_stable_state[row][col]) {
                // State changed, increment counter
                debounce_counter[row][col]++;
                if (debounce_counter[row][col] >= DEBOUNCE_THRESHOLD) {
                    // State is stable, update last stable state
                    last_stable_state[row][col] = current_state;
                    debounce_counter[row][col] = 0;

                    // Log state change for debugging
                    if (current_state == 0) {
                        ESP_LOGD(TAG, "Key %c stabilized (pressed)", key_map[row][col]);
                    } else {
                        ESP_LOGD(TAG, "Key %c stabilized (released)", key_map[row][col]);
                    }
                }
            } else {
                // State consistent, reset counter
                debounce_counter[row][col] = 0;
            }

            // Check if key is pressed (active LOW)
            if (last_stable_state[row][col] == 0) {
                // Restore row HIGH before returning
                gpio_set_level(row_pins[row], 1);
                return key_map[row][col];
            }
        }

        // Restore row HIGH before moving to next row
        gpio_set_level(row_pins[row], 1);
    }

    return 0;  // No key pressed
}

/**
 * @brief Task for continuous keypad scanning with event detection
 *
 * This task continuously scans the keypad and reports key press/release events
 * It only reports when key state changes to avoid spamming the log
 */
void keypad_scan_task(void *pvParameters)
{
    char current_key;
    TickType_t last_scan_time = 0;

    ESP_LOGI(TAG, "Keypad scanning task started");

    while (1) {
        // Scan for currently pressed key
        current_key = keypad_scan();

        // Report events only when state changes
        if (current_key != last_reported_key) {
            if (current_key != 0) {
                // Key pressed event
                ESP_LOGI(TAG, "Key pressed: %c", current_key);
                last_key_press_time = xTaskGetTickCount();
            } else if (last_reported_key != 0) {
                // Key released event
                ESP_LOGI(TAG, "Key released: %c", last_reported_key);
            }
            last_reported_key = current_key;
        }

        // Maintain consistent scan interval
        vTaskDelay(pdMS_TO_TICKS(SCAN_INTERVAL_MS));
    }
}

/**
 * @brief Alternative: Simple blocking scan for single key detection
 *
 * This function blocks until a key is pressed and returns it
 * Useful for menu navigation or PIN entry applications
 *
 * @return char The key that was pressed
 */
char keypad_wait_for_key(void)
{
    char key;
    while (1) {
        key = keypad_scan();
        if (key != 0) {
            // Wait for key release to avoid multiple detections
            while (keypad_scan() != 0) {
                vTaskDelay(pdMS_TO_TICKS(SCAN_INTERVAL_MS));
            }
            return key;
        }
        vTaskDelay(pdMS_TO_TICKS(SCAN_INTERVAL_MS));
    }
}

/**
 * @brief Get the current key state without event logging
 *
 * @return char Currently pressed key, or 0 if none
 */
char keypad_get_key(void)
{
    return keypad_scan();
}

/**
 * @brief Check if a specific key is currently pressed
 *
 * @param key The key character to check
 * @return true if the key is pressed, false otherwise
 */
bool keypad_is_key_pressed(char key)
{
    char current_key = keypad_scan();
    return (current_key == key);
}

/**
 * @brief Reset debounce states (useful after deep sleep)
 */
void keypad_reset_debounce(void)
{
    for (int i = 0; i < ROWS; i++) {
        for (int j = 0; j < COLS; j++) {
            last_stable_state[i][j] = 1;  // Default to released state
            debounce_counter[i][j] = 0;
        }
    }
    last_reported_key = 0;
    ESP_LOGI(TAG, "Debounce states reset");
}

/**
 * @brief Main application entry point
 */
void app_main(void)
{
    // Initialize GPIO pins
    keypad_gpio_init();

    // Reset debounce states
    keypad_reset_debounce();

    ESP_LOGI(TAG, "4x4 Matrix Keypad Scanner Started");
    ESP_LOGI(TAG, "Scan interval: %d ms, Debounce threshold: %d",
             SCAN_INTERVAL_MS, DEBOUNCE_THRESHOLD);

    // Option 1: Continuous scanning with event detection (recommended)
    xTaskCreate(keypad_scan_task, "keypad_scan", 4096, NULL, 5, NULL);

    // Option 2: Simple blocking scan (uncomment to use)

    while (1) {
        char key = keypad_wait_for_key();
        ESP_LOGI(TAG, "User entered: %c", key);

        // Example: Simple calculator or menu logic
        switch(key) {
            case 'A':
                ESP_LOGI(TAG, "Function A triggered");
                break;
            case 'B':
                ESP_LOGI(TAG, "Function B triggered");
                break;
            case '#':
                ESP_LOGI(TAG, "Enter key pressed");
                break;
            case '*':
                ESP_LOGI(TAG, "Back/Cancel pressed");
                break;
        }
    }

    // Main loop can do other tasks while keypad is scanned in background
    while (1) {
        // Your main application code here
        // Key events will be printed by the scanning task

        vTaskDelay(pdMS_TO_TICKS(1000));
    }
}
5、验证确认
代码ok之后,就可以编译烧入看一下,确认下是不是我们想要的结果。等到结果ok之后,再回头看看代码的流程,做到心中有数即可。等到真正有需要的时候,再来详细分析也不迟。