Android 系统应用构建指南:android_app 与 app_import
📋 目录
- [APK 构建方式对比表](#APK 构建方式对比表)
- [android_app:源码编译生成 APK](#android_app:源码编译生成 APK)
- 项目结构
- [Android.bp 配置](#Android.bp 配置)
- AndroidManifest.xml
- [Java 源码](#Java 源码)
- 资源文件
- 编译与刷机
- [app_import:导入预编译 APK](#app_import:导入预编译 APK)
- 总结
APK 构建方式对比表
| 应用类型 | 预编译(已有APK) | 源码编译(有源码) |
|---|---|---|
| 普通系统应用 /system/app | ③ app_import | ① android_app |
| 特权应用 /system/priv-app | ④ app_import + privileged | ② android_app + privileged |
| 预编译(Android.mk) BUILD_PREBUILT | ⑤ 旧写法 | --- |
| 可卸载预装 用户可卸载 | ⑥ 装到 /data | ⑥ 装到 /data |
说明:
- android_app:用于从源码编译生成 APK
- app_import:用于导入预编译的 APK 文件
- privileged:标记应用为特权应用,可访问系统级 API
- 旧写法 :指 Android.mk 中的
BUILD_PREBUILT方式 - 装到 /data:表示应用安装在用户数据分区,用户可卸载
**本文只简单讲解 android_app 和 app_import **
源码:AOSP 12
设备:Piexel 3
android_app源码编译生成-apk
在packages/apps/创建HelloWorld文件夹,然后分别创建 res和 src 两个子文件夹,目录结构如下
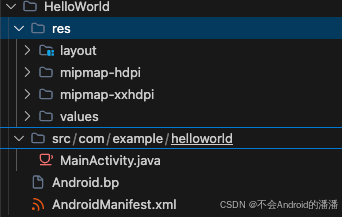
Android.bp文件
bash
android_app {
    name: "HelloWorld",

    srcs: ["src/**/*.java"],
    resource_dirs: ["res"],

    certificate: "platform",         // platform 密钥签名
		// 或 presigned: true,          // 保留原签名

    // 使用公开 API 方法
    sdk_version: "current",
    //platform_apis: true,        或用 platform API,可访问 hidden 资源

    // 不是特权应用,装到 /system/app/
    // (不写 privileged: true 就是普通系统应用)

    // 依赖的静态库(如果不需要可以不写)
    // static_libs: ["androidx.appcompat_appcompat"],
}
AndroidManifest.xml 与普通 Android 应用没有区别
xml
<?xml version="1.0" encoding="utf-8"?>
<manifest xmlns:android="http://schemas.android.com/apk/res/android"
    package="com.example.helloworld">

    <application
        android:label="HelloWorld"
        android:icon="@mipmap/ic_launcher"
        android:supportsRtl="true">

        <activity
            android:name=".MainActivity"
            android:exported="true">
            <intent-filter>
                <action android:name="android.intent.action.MAIN" />
                <category android:name="android.intent.category.LAUNCHER" />
            </intent-filter>
        </activity>

    </application>
</manifest>
MainActivity.java
java
package com.example.helloworld;

import android.app.Activity;
import android.os.Bundle;

public class MainActivity extends Activity {
    @Override
    protected void onCreate(Bundle savedInstanceState) {
        super.onCreate(savedInstanceState);
        setContentView(R.layout.activity_main);
    }
}
packages/apps/HelloWorld/res/values/strings.xml
xml
<?xml version="1.0" encoding="utf-8"?>
<resources>
    <string name="app_name">HelloWorld</string>
    <string name="hello_message">Hello World! 我是源码编译的系统应用</string>
</resources>
packages/apps/HelloWorld/res/layout/activity_main.xml
xml
<?xml version="1.0" encoding="utf-8"?>
<LinearLayout xmlns:android="http://schemas.android.com/apk/res/android"
    android:layout_width="match_parent"
    android:layout_height="match_parent"
    android:gravity="center"
    android:orientation="vertical">

    <TextView
        android:layout_width="wrap_content"
        android:layout_height="wrap_content"
        android:text="@string/hello_message"
        android:textSize="24sp" />

</LinearLayout>
packages/apps/HelloWorld/res/mipmap-hdpi ,这里的图片我从 demo 复制的 使用的 webp格式
编译源码生成apk
apk 产物在
bash
# 如果这里报错一般是源码错误
m HelloWorld
# 确认产物存在
ls out/target/product/blueline/system/app/HelloWorld/
执行增量编译后,将 system.img刷入设备重启即可
app_import导入预编译-apk
目录结构如下:
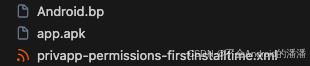
Android.bp
android_app_import {
name: "test",
apk: "app.apk",
certificate: "platform",
privileged: true,
required: "privapp_whitelist_test",
}
// 白名单文件,编译后会被复制到 /system/etc/permissions/
prebuilt_etc {
name: "privapp_whitelist_firstinstalltime",
sub_dir: "permissions",
src: "privapp-permissions-firstinstalltime.xml",
filename: "privapp-permissions-firstinstalltime.xml",
}
预编译的是系统特权 app,我只在 demo 的清单文件 AndroidManifest.xml加了android:sharedUserId="android.uid.system"
xml
<manifest xmlns:android="http://schemas.android.com/apk/res/android"
    xmlns:tools="http://schemas.android.com/tools"
    android:sharedUserId="android.uid.system">
编译
bash
m test随后增量编译 刷入 system.img镜像到设备即可