zabbix-7.4安装
参考文档:官网,zabbix源码下载,mariadb下载,php下载,nginx下载
一、前置准备
-
文档编写时:截至 2026 年 6 月 3 日,Zabbix 最新正式版为 7.4.10(2026-05-06 发布)
-
前置准备
服务 版本 操作系统-内核-架构 中科方德-4.19.113-x86_64 zabbix版本 7.4.10 MariaDB 10.6.27 php版本 8.3.31 nginx版本 1.31.1 -
安装包准备
bash# 全部使用源码编译 mkdir /opt/software ; cd /opt/software wget https://cdn.zabbix.com/zabbix/sources/stable/7.4/zabbix-7.4.10.tar.gz wget https://www.php.net/distributions/php-8.3.31.tar.gz wget https://nginx.org/download/nginx-1.31.1.tar.gz # mariadb用浏览器下载 # 解压 for i in `ls *.tar.gz`;do tar xf $i;done
二、服务编译
2.1、mariadb
-
安装依赖
bashyum install -y gcc make openssl-devel sqlite-devel \ curl-devel libpng-devel libjpeg-devel libicu-devel oniguruma-devel \ libxslt-devel libzip-devel bzip2-devel re2c pkgconfig \ gnutls-devel ncurses-devel bison bison-devel boost boost-devel \ flex flex-devel libxml2 libxml2-devel snappy snappy-devel \ curl-devel lz4-devel pcre2 pcre2-devel pcre pcre-devel -
cmake依赖
bash# 用于解决zstd依赖 # cmake: symbol lookup error: cmake: undefined symbol: archive_write_add_filter_zstd wget https://github.com/facebook/zstd/releases/download/v1.5.7/zstd-1.5.7.tar.gz tar -xzvf zstd-1.5.7.tar.gz cd zstd-1.5.7 # 32是cpu核数 make -j 32 && make -j 32 install wget https://www.libarchive.org/downloads/libarchive-3.7.2.tar.gz tar -zxf libarchive-3.7.2.tar.gz cd libarchive-3.7.2 ./configure --prefix=/usr make -j$(nproc) && make install # 更新库缓存 ldconfig # 最后在看一下 cmake --version cmake version 3.20.2 -
开始编译
-
cmake
bashcd /opt/software/mariadb-10.6.27/ cmake \ -DCMAKE_INSTALL_PREFIX=/opt/mirror/mariadb \ -DMYSQL_DATADIR=/opt/mirror/mariadb/data \ -DSYSCONFDIR=/opt/mirror/mariadb \ -DWITH_MYISAM_STORAGE_ENGINE=1 \ -DWITH_INNOBASE_STORAGE_ENGINE=1 \ -DWITH_MEMORY_STORAGE_ENGINE=1 \ -DWITH_READLINE=1 \ -DMYSQL_UNIX_ADDR=/opt/mirror/mariadb/data/mysql.sock \ -DMYSQL_TCP_PORT=53306 \ -DENABLED_LOCAL_INFILE=1 \ -DWITH_PARTITION_STORAGE_ENGINE=1 \ -DDEFAULT_CHARSET=utf8 \ -DDEFAULT_COLLATION=utf8_general_ci \ -DWITH_ROCKSDB=OFF \ -DWITH_GALERA=1 \ -DGALERA_INCLUDE_DIR=/opt/mysql/mysqlso \ -DGALERA_LIBRARY=/opt/mysql/mysqlso/libgalera_smm.so \ -DMYSQL_USER=mysql \ -DWITHOUT_MYISAM_STORAGE_ENGINE=1 make -j 8 && make -j 8 install -
初始数据库
bashcd /opt/mirror/mariadb scripts/mysql_install_db --user=root --datadir=data/ -
my.cnf
bash# vi /opt/mirror/mariadb/my.cnf [client] port = 53306 socket = /opt/mirror/mariadb/data/mysql.sock [mysqld] port = 53306 socket = /opt/mirror/mariadb/data/mysql.sock lower_case_table_names = 1 character-set-server=utf8 key_buffer_size = 64M max_allowed_packet = 10M table_open_cache = 256 sort_buffer_size = 512K net_buffer_length = 8K read_buffer_size = 1M read_rnd_buffer_size = 512K myisam_sort_buffer_size = 16M max_connections=3000 thread_cache_size=1000 max_connect_errors=200 interactive_timeout=600 wait_timeout=3600 innodb_buffer_pool_size=1000M read_buffer_size = 256K query_cache_type = 1 query_cache_limit = 512K query_cache_min_res_unit = 2k query_cache_size=32M tmp_table_size=64M open_files_limit = 65535 #加载密码复杂度审计插件 plugin-load=simple_password_check.so #密码长度,默认8位 simple_password_check_minimal_length=8 #特殊符号,1代表至少1位 #simple_password_check_other_characters=1 #同时包含大小写 #simple_password_check_letters_same_case=1 #字母数,1代表至少1位 #simple_password_check_letters_same_case=1 #数字数,1代表至少1位 #simple_password_check_digits=1 # 最大生效时间 default_password_lifetime=90 #最大错误登录次数 max_password_errors=5 ############## 这部分在下面要修改 ##### # unix_socket=OFF # log-bin=mysql-bin # binlog_format=mixed server-id = 1 expire_logs_days=30 ############## [mysqldump] quick max_allowed_packet = 16M [mysql] no-auto-rehash [myisamchk] key_buffer_size = 20M sort_buffer_size = 20M read_buffer = 2M write_buffer = 2M [mysqlhotcopy] interactive-timeout -
自启脚本
bashcat >> /usr/lib/systemd/system/mariadb106.service << EOF [Unit] Description=MariaDBserver database server After=syslog.target After=network.target [Service] Type=simple ExecStart=/opt/mirror/mariadb/bin/mysqld_safe --defaults-file=/opt/mirror/mariadb/my.cnf --user=root TimeoutSec=300 PrivateTmp=true [Install] WantedBy=multi-user.target EOF # 启动 systemctl start mariadb106 # 检查端口 ss -tnlp|grep 53306 -
修改root初始不让它为空
-
关闭复杂度
bash./bin/mysql # 不用密码直接登陆 -- 先关闭所有复杂度要求,只检查长度 SET GLOBAL simple_password_check_minimal_length=6; SET GLOBAL simple_password_check_digits=0; SET GLOBAL simple_password_check_letters_same_case=0; SET GLOBAL simple_password_check_other_characters=0; FLUSH PRIVILEGES; -
初始化root密码
bashselect user, host, plugin from mysql.user; SET GLOBAL simple_password_check_other_characters=0; SET PASSWORD FOR 'root'@'localhost' = PASSWORD('12345678'); SET PASSWORD FOR 'mariadb.sys'@'localhost' = PASSWORD('12345678'); grant all on *.* to 'root'@'%' identified by '12345678'; delete from mysql.user where user=' '; select User,Host,Password from mysql.user; FLUSH PRIVILEGES; -
创建zabbix库&用户
bashcreate database zabbix character set utf8mb4 collate utf8mb4_bin; create user zabbix@localhost identified by '12345678'; grant all privileges on zabbix.* to zabbix@localhost; CREATE USER IF NOT EXISTS 'zabbix'@'127.0.0.1' IDENTIFIED BY '12345678'; GRANT ALL ON zabbix.* TO 'zabbix'@'127.0.0.1'; set global log_bin_trust_function_creators = 1; SELECT user, host FROM mysql.user;
-
-
此时再用 ./mysql还是免密进入
bashvi /opt/mirror/mariadb/my.cnf [mysqld] unix_socket=OFF # 把注释打开,禁止用unix_socket登陆 # 重启再登陆 就要密码了 [root@localhost mariadb]# systemctl restart mariadb106 # 验证 [root@localhost mariadb]# ./bin/mysql ERROR 1524 (HY000): Plugin 'unix_socket' is not loaded [root@localhost mariadb]# ./bin/mysql -uroot -p Enter password: # 直接回车 ERROR 1524 (HY000): Plugin 'unix_socket' is not loaded # 在登陆 [root@localhost mariadb]# ./bin/mysql -uroot -p Enter password: # 敲密码 Server version: 10.6.27-MariaDB Source distribution
-
-
截止这里,mariadb就编译完成,我们可以将它压缩方便后续使用
bashsystemctl stop mariadb106 rm -rf mysql-test cd /opt/mirror/ ; tar zcf mariadb106.tar.gz mariadb/
2.2、Zabbix
-
直接编译
bashcd /opt/software/zabbix-7.4.10 ./configure \ --prefix=/opt/mirror/zabbix \ --enable-server \ --enable-agent \ --with-mysql=/opt/mirror/mariadb/bin/mysql_config \ --with-net-snmp \ --with-libcurl \ --with-openssl make -j 8 && make -j 8 install # gettext必须动态编译,需要看 【安装时异常 \ php-gettext \ 处理方式二】 -
zabbix_server.confbashcd /opt/mirror/zabbix/etc grep -v '^#' zabbix_server.conf | grep -v "^$" ListenPort=10051 LogType=file LogFile=/opt/mirror/zabbix/logs/zabbix_server.log PidFile=/opt/mirror/zabbix/zabbix_server.pid DBHost=127.0.0.1 DBName=zabbix DBUser=zabbix DBPassword=12345678 DBPort=53306 StartVMwareCollectors=0 VMwareFrequency=60 VMwareCacheSize=8M ListenIP=0.0.0.0 Timeout=4 LogSlowQueries=3000 StatsAllowedIP=0.0.0.0/0 # 允许接入的地址 EnableGlobalScripts=0 -
sql导入
bashcd /opt/software/zabbix-7.4.10/database/mysql ls ./ # 我们只要这三个sql文件 # 导入顺序 schema.sql,data.sql, images.sql # 先导表,导数据,导图片 /opt/mirror/mariadb/bin/mysql -uroot -p12345678 MariaDB [(none)]> use zabbix; MariaDB [(none)]> source schema.sql; MariaDB [(none)]> source data.sql; MariaDB [(none)]> source images.sql; # 官网要求 # Disable log_bin_trust_function_creators option after importing database schema. MariaDB [(none)]> set global log_bin_trust_function_creators = 0; # 修改配置文件 vim /opt/mirror/mariadb/my.cnf 加到mysqld下面 log_bin_trust_function_creators = 0; -
自启服务
bash# 1、创建 zabbix 专用用户 groupadd zabbix useradd -g zabbix -s /sbin/nologin zabbix # 2、目录权限 chown -R zabbix:zabbix /opt/mirror/zabbix # 3、添加自启 cat > /usr/lib/systemd/system/zabbix_server.service << EOF [Unit] Description=Zabbix Server After=network.target mariadb.service [Service] Type=forking PIDFile=/opt/mirror/zabbix/zabbix_server.pid ExecStart=/opt/mirror/zabbix/sbin/zabbix_server -c /opt/mirror/zabbix/etc/zabbix_server.conf ExecStop=/bin/kill -SIGTERM $MAINPID Restart=on-failure RestartSec=10s User=zabbix Group=zabbix [Install] WantedBy=multi-user.target EOF # 4、服务启动 systemctl daemon-reload systemctl enable zabbix_server systemctl start zabbix_server # 5、检查 ]# ss -tnl | grep 10051 State Recv-Q Send-Q Local Address:Port Peer Address:Port LISTEN 0 128 *:10051 *:* # 6、日志 tail -100f /opt/mirror/zabbix/logs/zabbix_server.log
2.3、php
-
创建普通用户
bashgroupadd nginx useradd -g nginx -s /sbin/nologin nginx # 在进程中以nginx用户展示,也可以改成其它 --with-fpm-user=nginx \ --with-fpm-group=nginx \ -
依赖处理
bashyum install -y \ libxml2-devel openssl-devel sqlite sqlite-devel \ curl-devel gd-devel oniguruma oniguruma-devel \ libpng-devel libjpeg-devel freetype-devel # 也可以忽略 sqlite , 下面的编译加上 --disable-sqlite3 这个参数 yum install -y libjpeg-turbo-devel freetype-devel libpng-devel giflib-devel libwebp-devel php-gettext gettext-devel fontconfig-devel -
开始编译
bashcd /opt/software/php-8.3.31/ ./configure \ --prefix=/opt/mirror/php83 \ --with-config-file-path=/opt/mirror/php83/etc \ --enable-fpm \ --with-fpm-user=nginx \ --with-fpm-group=nginx \ --with-mysqli \ --with-pdo-mysql \ --with-openssl \ --with-curl \ --enable-mbstring \ --enable-bcmath \ --enable-xml \ --enable-sockets \ --enable-gd \ --with-jpeg \ --with-freetype \ --with-webp make -j 8 && make -j 8 install -
服务配置
-
复制默认配置文件
bashcp php.ini-production /opt/mirror/php83/etc/php.ini cd /opt/mirror/php83/etc cp php-fpm.conf.default php-fpm.conf -
修改 php.ini【Zabbix 强制参数,不修改安装页报错】
bashvim /opt/mirror/php83/etc/php.ini # 这四个很关键,如果没有就手动添加 pid = /opt/mirror/php83/var/run/php-fpm.pid error_log = /opt/mirror/php83/var/log/php-fpm.log daemonize = yes include=/opt/mirror/php83/etc/php-fpm.d/*.conf # 搜索修改下面6项 date.timezone = Asia/Shanghai max_execution_time = 600 max_input_time = 300 memory_limit = 512M post_max_size = 32M upload_max_filesize = 16M # 关闭两项 session.auto_start = Off mbstring.func_overload = 0 -
新增 www.conf
bashcat > /opt/mirror/php83/etc/php-fpm.d/www.conf <<'EOF' [www] user = nginx group = nginx listen = 127.0.0.1:9000 listen.allowed_clients = 127.0.0.1 pm = dynamic pm.max_children = 10 pm.start_servers = 3 pm.min_spare_servers = 1 pm.max_spare_servers = 5 php_value[date.timezone] = Asia/Shanghai php_value[max_execution_time] = 300 php_value[memory_limit] = 256M php_value[post_max_size] = 16M php_value[upload_max_filesize] = 2M EOF -
创建 session 缓存目录(PHP 会话存储,zabbix 登录依赖)
bashmkdir -p /var/lib/php/session chown nginx:nginx /var/lib/php/session
-
-
自启脚本
bashcat > /usr/lib/systemd/system/php83-fpm.service <<'EOF' [Unit] Description=PHP8.3-FPM Service(Zabbix) After=network.target [Service] # Type=forking 配合后台daemonize=yes,PIDFile和php-fpm.conf里pid路径严格一致 Type=forking PIDFile=/opt/mirror/php83/var/run/php-fpm.pid # 关键:沿用你原本 -c php.ini -y php-fpm.conf 手动指定配置,不篡改启动参数 ExecStart=/opt/mirror/php83/sbin/php-fpm -c /opt/mirror/php83/etc/php.ini -y /opt/mirror/php83/etc/php-fpm.conf ExecReload=/bin/kill -USR2 $MAINPID ExecStop=/bin/kill -INT $MAINPID Restart=on-failure RestartSec=3 [Install] WantedBy=multi-user.target EOF-
检查服务
bashsystemctl daemon-reload systemctl start php83-fpm systemctl enable php83-fpm # 检查端口是否监听9000 ss -lntp | grep 9000
-
2.4、nginx
-
安装依赖
bashyum install -y gcc gcc-c++ make pcre-devel zlib-devel openssl-devel libtool wget -
编译
bash./configure \ --prefix=/opt/mirror/nginx \ --sbin-path=/opt/mirror/nginx/sbin/nginx \ --conf-path=/opt/mirror/nginx/conf/nginx.conf \ --pid-path=/opt/mirror/nginx/var/run/nginx.pid \ --error-log-path=/opt/mirror/nginx/logs/error.log \ --http-log-path=/opt/mirror/nginx/logs/access.log \ --with-http_ssl_module \ --with-http_stub_status_module \ --with-http_realip_module \ --with-stream \ --with-stream_ssl_module make -j 8 && make -j 8 install -
配置zabbix站点文件
bas# 站点目录 mkdir -p /opt/mirror/nginx/html/zabbix # 拷贝zabbix前端ui(自行替换源码ui路径) cp -r /opt/software/zabbix-7.4.10/ui/* /opt/mirror/nginx/html/zabbix/ # 权限统一nginx chown -R nginx:nginx /opt/mirror/nginx -
配置处理
-
nginx.conf
bashcat > /opt/mirror/nginx/conf/nginx.conf <<'EOF' user nginx; # 四核 #worker_processes 4; #worker_cpu_affinity 0001 0010 0100 1000; # 8核 worker_processes 8; worker_cpu_affinity 00000001 00000010 00000100 00001000 00010000 00100000 01000000 10000000; #error_log logs/error.log; #error_log logs/error.log notice; #error_log logs/error.log info; #pid logs/nginx.pid; events { worker_connections 102400; } http { include mime.types; default_type application/octet-stream; # vhost_traffic_status_zone; #log_format main '$remote_addr - $remote_user [$time_local] "$request" ' # '$status $body_bytes_sent "$http_referer" ' # '"$http_user_agent" "$http_x_forwarded_for"'; #access_log logs/access.log main; client_max_body_size 100m; client_header_buffer_size 32k; proxy_max_temp_file_size 100M; proxy_buffers 4 256k; proxy_buffer_size 128k; proxy_http_version 1.1; proxy_set_header Connection ""; open_file_cache_valid 30s; open_file_cache_min_uses 1; open_file_cache max=204800 inactive=20s; tcp_nopush on; tcp_nodelay on; sendfile on; send_timeout 15; server_tokens off; server_names_hash_bucket_size 128; keepalive_timeout 10000; large_client_header_buffers 4 32k; # gzip gzip on; gzip_min_length 1k; gzip_buffers 4 16k; gzip_http_version 1.0; gzip_comp_level 3; gzip_types text/plain text/css application/x-javascript text/xml application/xml application/xml+rss text/javascript application/json application/javascript; gzip_vary on; # FastCGI 它允许Web服务器与动态应用程序(如PHP、Python等)进行通信 fastcgi_connect_timeout 300; fastcgi_send_timeout 300; fastcgi_read_timeout 300; fastcgi_buffer_size 4k; fastcgi_buffers 8 4k; fastcgi_busy_buffers_size 8k; fastcgi_temp_file_write_size 8k; fastcgi_cache_valid 200 302 1h; fastcgi_cache_valid 301 1d; fastcgi_cache_valid any 1m; fastcgi_cache_min_uses 1; fastcgi_cache_use_stale error timeout invalid_header http_500; #导入外部服务器配置文件存放地址 include /opt/mirror/nginx/conf/conf.d/*.conf; } EOF -
自启
nginx.servicebashcat > /usr/lib/systemd/system/nginx.service <<'EOF' [Unit] Description=Nginx 1.31.1 Web Server After=network.target php83-fpm.service [Service] Type=forking PIDFile=/opt/mirror/nginx/var/run/nginx.pid ExecStart=/opt/mirror/nginx/sbin/nginx ExecReload=/opt/mirror/nginx/sbin/nginx -s reload ExecStop=/opt/mirror/nginx/sbin/nginx -s stop PrivateTmp=true [Install] WantedBy=multi-user.target EOF -
zabbix.conf
bashmkdir /opt/mirror/nginx/conf/conf.d/ cat > /opt/mirror/nginx/conf/conf.d/zabbix.conf <<'EOF' server { listen 80; server_name _; root /opt/mirror/nginx/html/zabbix; index index.php index.html; fastcgi_connect_timeout 600; fastcgi_send_timeout 600; fastcgi_read_timeout 600; location / { try_files $uri $uri/ /index.php?$query_string; } # PHP解析转发至本机php83-fpm:9000 location ~ \.php$ { fastcgi_pass 127.0.0.1:9000; fastcgi_index index.php; fastcgi_param SCRIPT_FILENAME $document_root$fastcgi_script_name; include fastcgi_params; } # nginx状态页 zabbix监控采集 location /nginx-status { stub_status; allow 127.0.0.1; deny all; } } EOF -
校验以及启动服务
bashchmod 777 /opt/mirror/nginx/ -R # 配置语法校验 /opt/mirror/nginx/sbin/nginx -t # 重载systemd systemctl daemon-reload # 开机自启+启动 systemctl enable --now nginx # 查看运行状态 systemctl status nginx
-
三、前台初始化
源码编译包:提取码: fmte
3.1、开始初始化
-
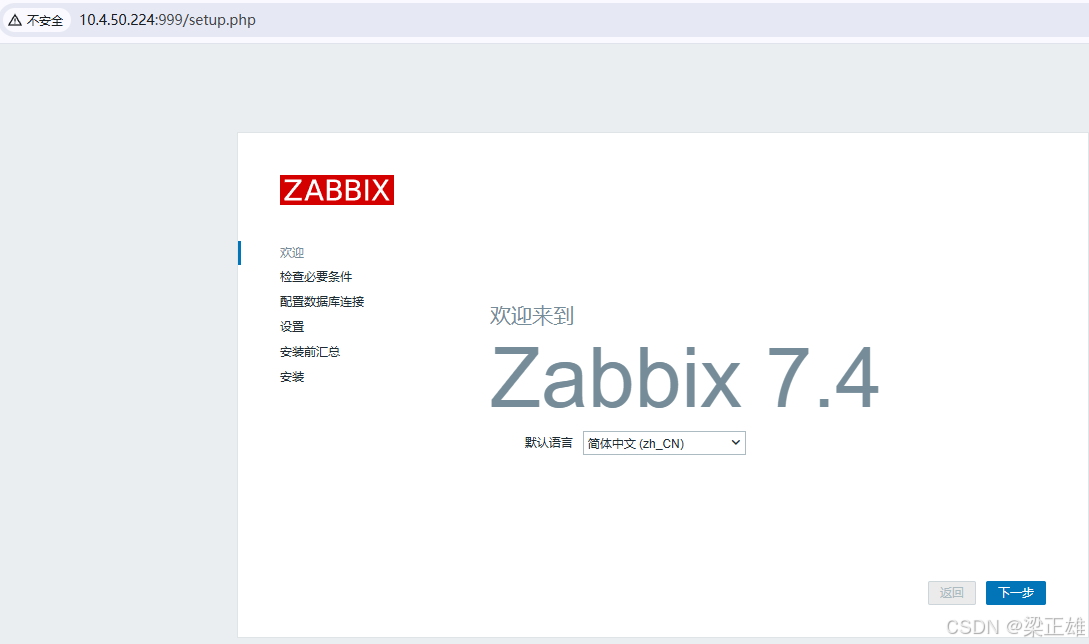
选择中文,如果没处理好这里会有gettext异常
-
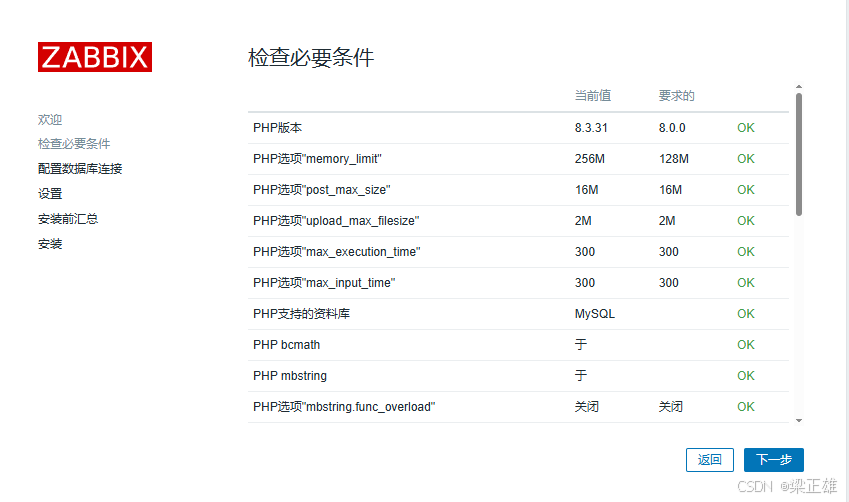
检查必要条件
-
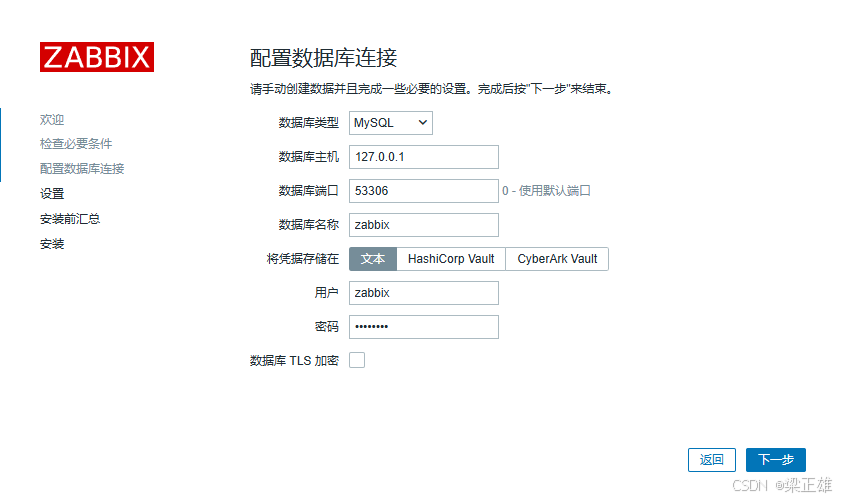
配置数据库连接
-
设置名称

-
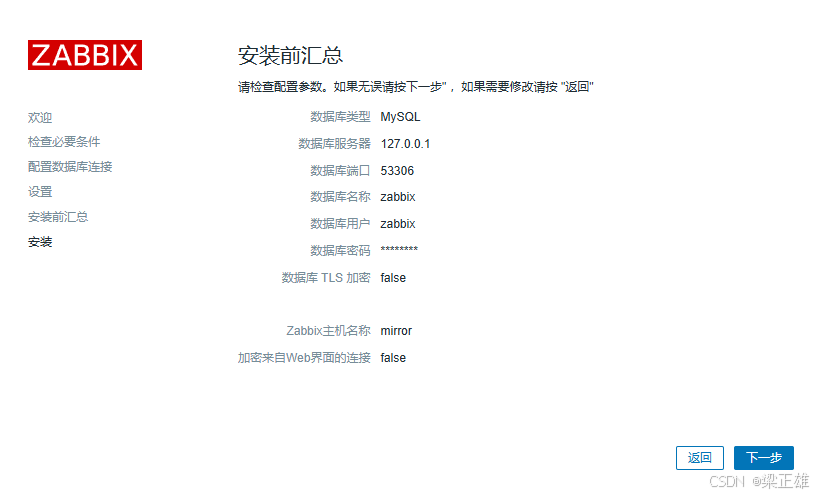
总结
-
完结

3.2、登陆
-
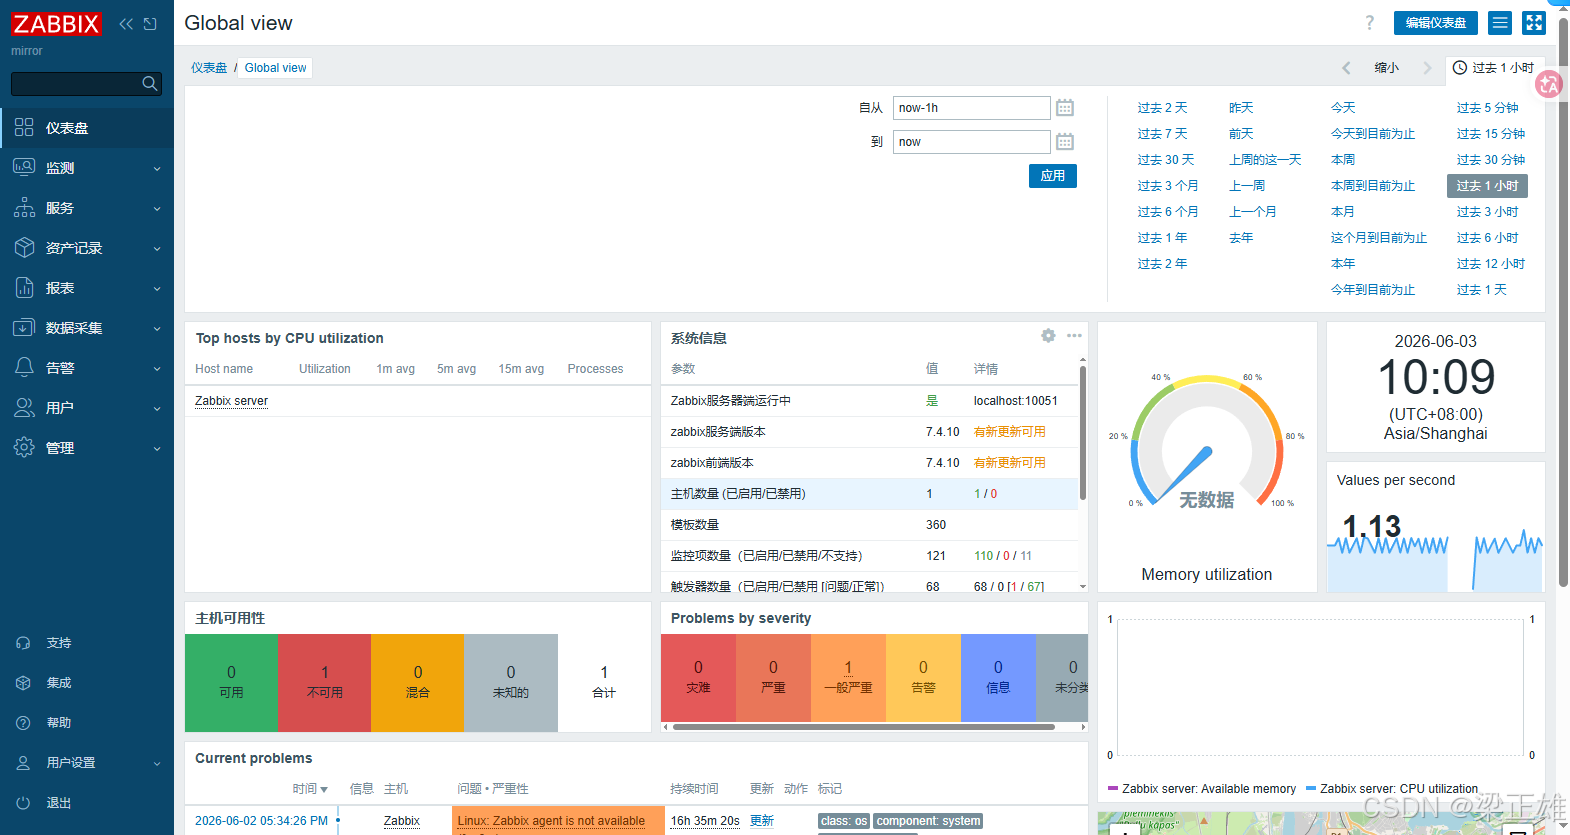
登陆: 用户:Admin 密码:zabbix

-
完成
安装时异常
php-gettext
-
异常描述: Translations are unavailable because the PHP gettext module is missing
-
处理一: 这一步安装依赖时安装
bashyum install -y php-gettext gettext-devel systemctl restart php83-fpm -
处理二::源码安装 gettext 扩展 <--使用这个
bashcd /opt/software/php-8.3.31/ext/gettext # 这两行是一起执行的 /opt/mirror/php83/bin/phpize ./configure --with-php-config=/opt/mirror/php83/bin/php-config # 然后编译 make -j$(nproc) && make install echo "extension=gettext.so" >> /opt/mirror/php83/etc/php.ini systemctl restart php83-fpm