创建uni-app项目
法一:HubilderX创建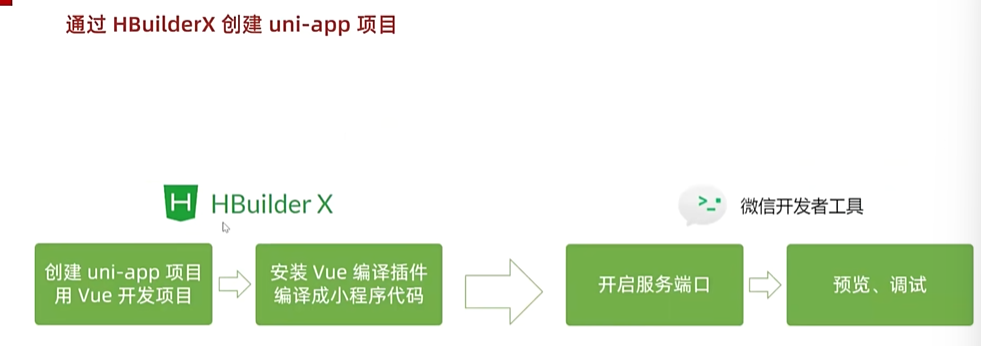
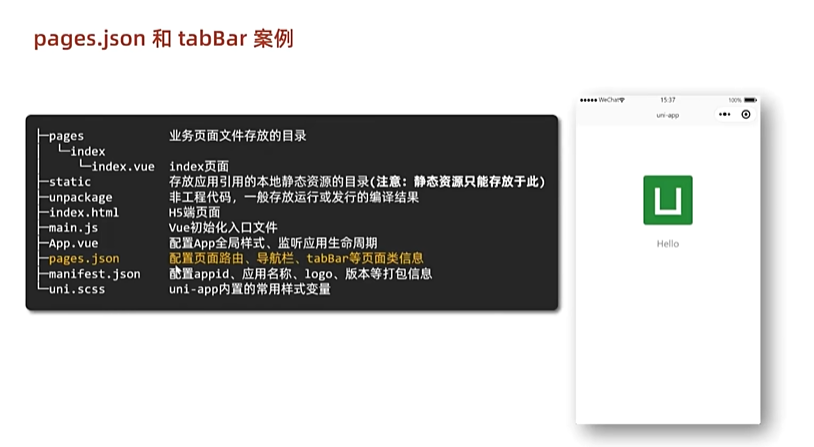
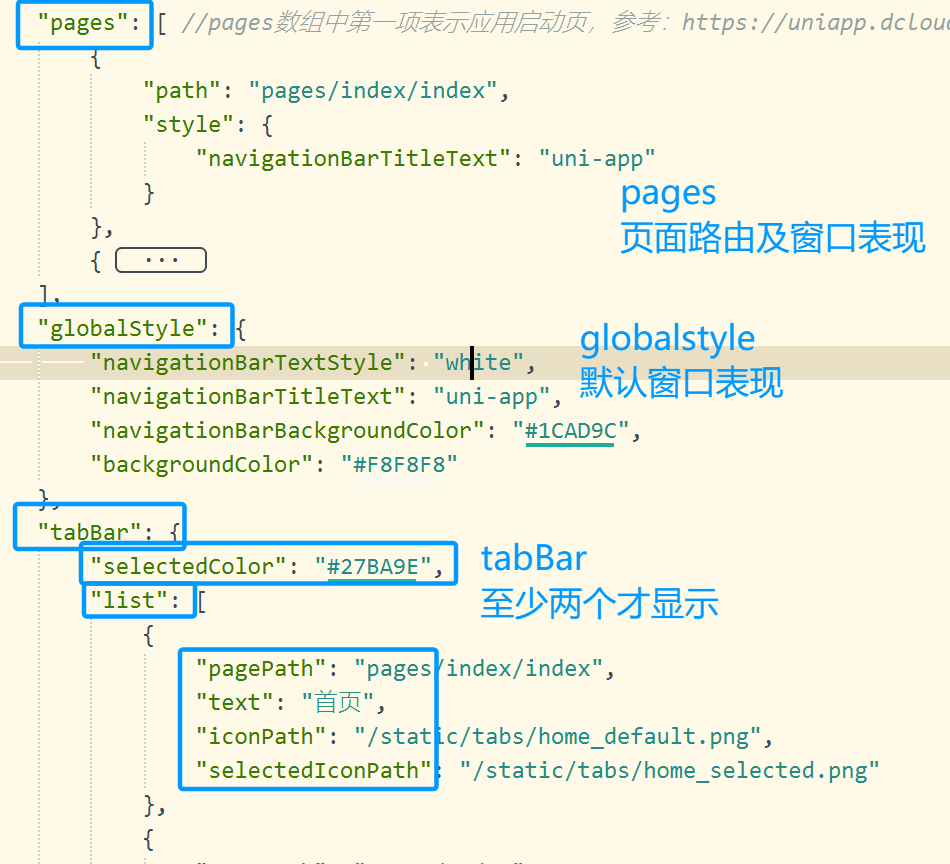
page.json:
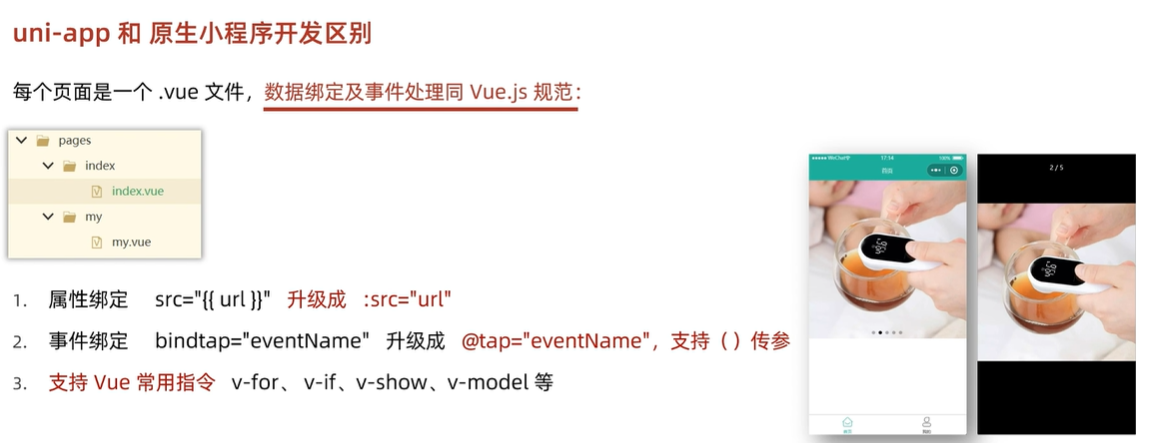
与原生小程序区别
法二:通过命令行创建
npx degit dcloudio/uni-preset-vue#vite-ts项目名称
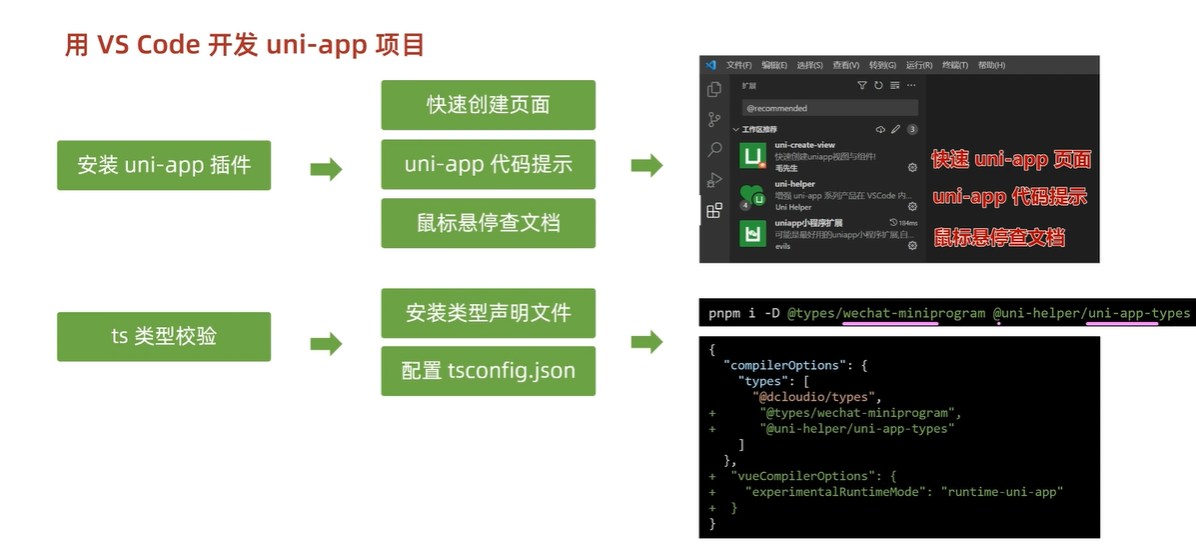
用VScode开发uni-app项目
三个插件:uni-create-view,uni-helper,uniapp小程序扩展
小兔鲜项目
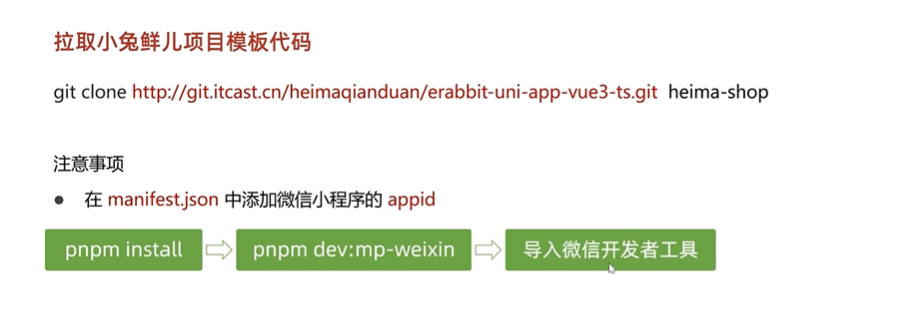
pnpm install然后pnpm approve-builds接着pnpm dev:mp-weixin
然后微信小程序导入dist里内容
基础架构
构建uni-ui组件库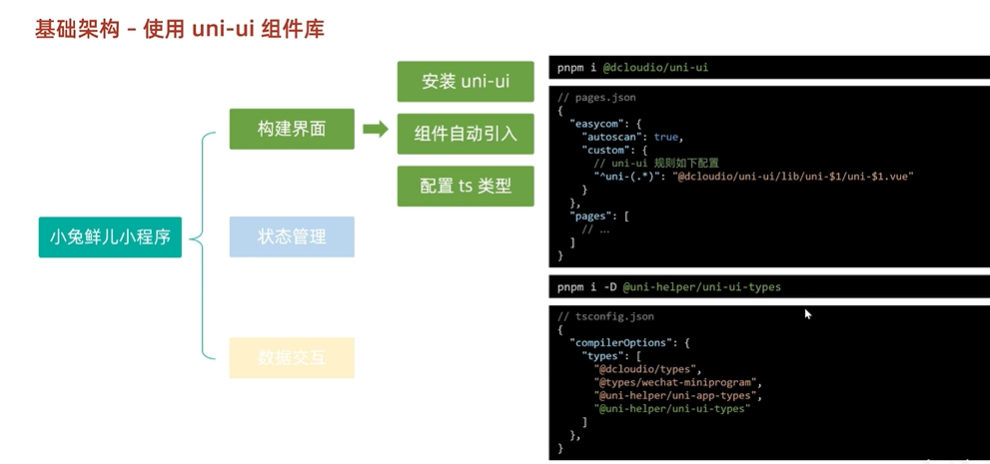
pages.json
/组件自动引入规则
  "easycom": {
    "autoscan": true,//是否开启自动扫描
    "custom": { //以正则方式自定义组件匹配规则
      "^uni-(.*)":"@dcloudio/uni-ui/lib/uni-$1/uni-$1.vue"
    }
  },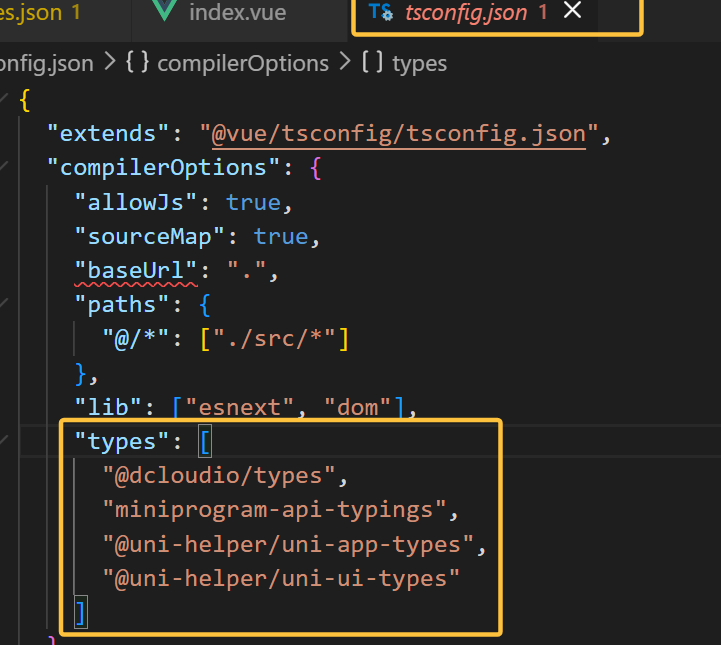
pnpm i -D @uni-helper/uni-ui-type
pnpm i @dcloudio/uni-ui
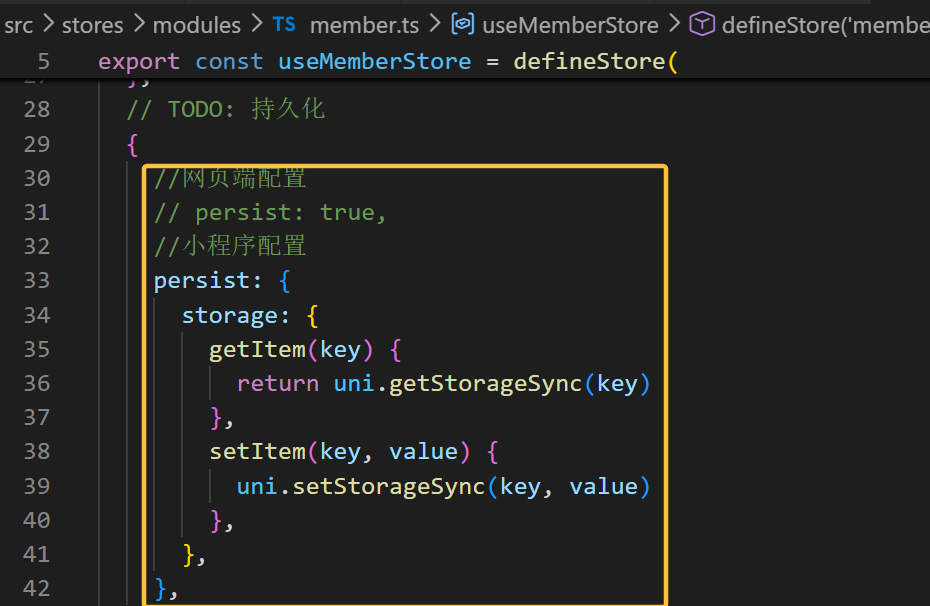
小程序端Pinia持久化
请求和上传文件拦截器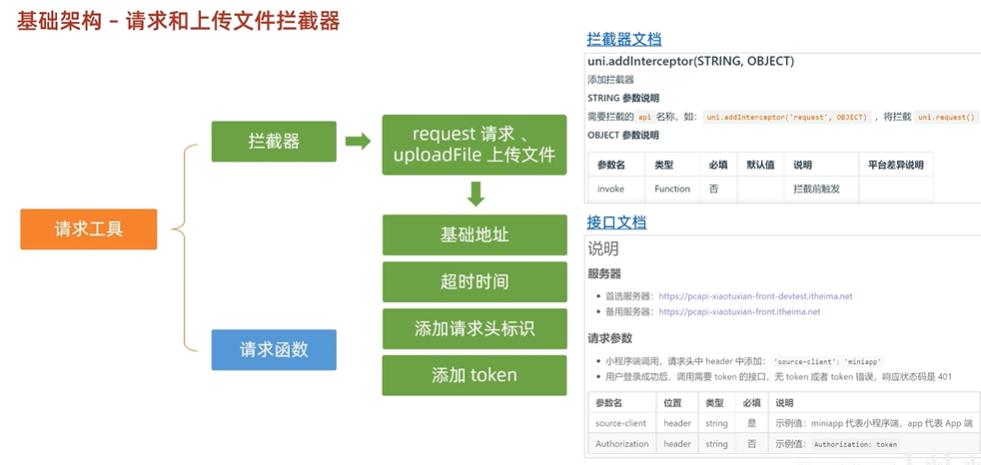
javascript
/**
* 拦截upLoadFile文件上传
*
* TODO:
* 1.非http开头需拼接字符串
* 2.请求超时
* 3.添加小程序请求头标识
* 4.添加token请求头标识
*/
import { useMemberStore } from '@/stores'
const baseURL = 'https://pcapi-xiaotuxian-front-devtest.itheima.net'
//添加拦截器addInterceptor
const httpInterceptor = {
//拦截前触发
invoke(options: UniApp.RequestOptions) {
//1.非http开头需拼接字符串
if (!options.url.startsWith('http')) {
options.url = baseURL + options.url
}
//2.请求超时 改为10s
options.timeout = 10000
console.log(options)
//3.添加小程序请求头标识
options.header = {
...options.header,
'source-client': 'miniapp',
}
//4.添加token请求头标识
const memberStore = useMemberStore()
const token = memberStore.profile.token
if (token) {
options.header.Authorization = token
}
},
}
uni.addInterceptor('request', httpInterceptor)
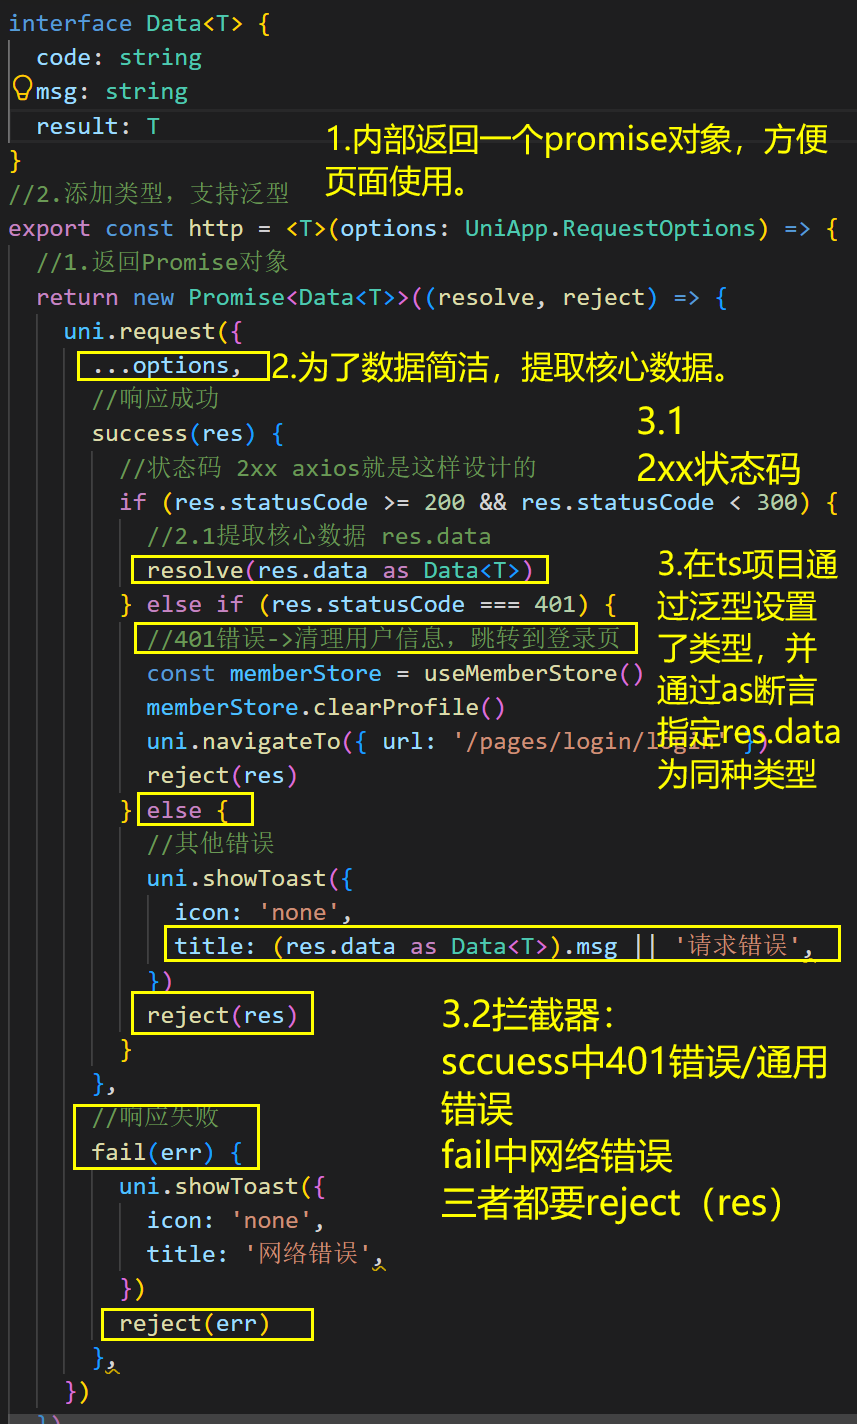
uni.addInterceptor('uploadFile', httpInterceptor)请求函数封装-请求成功-待修...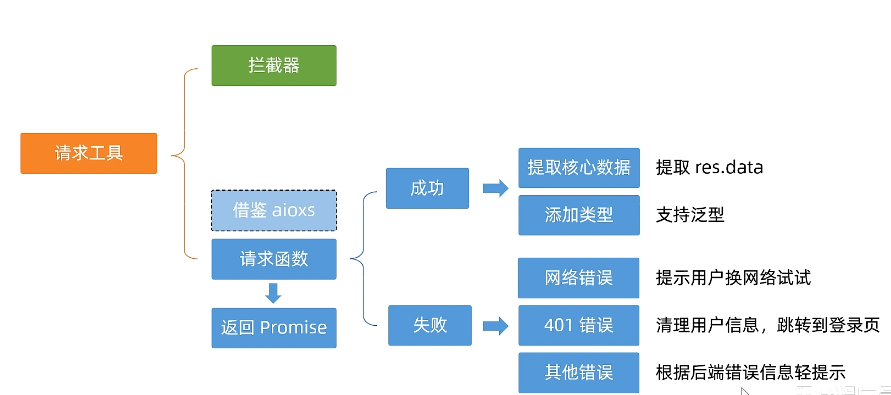
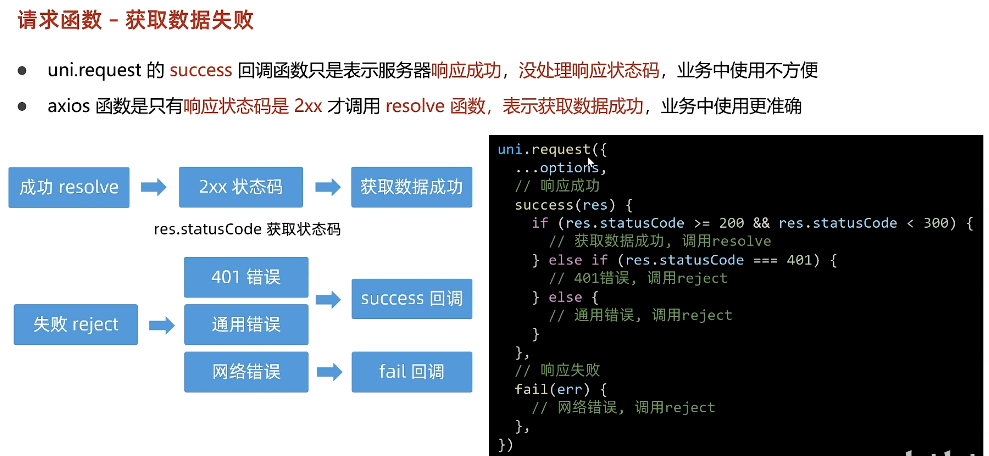
请求函数封装-失败情况
首页
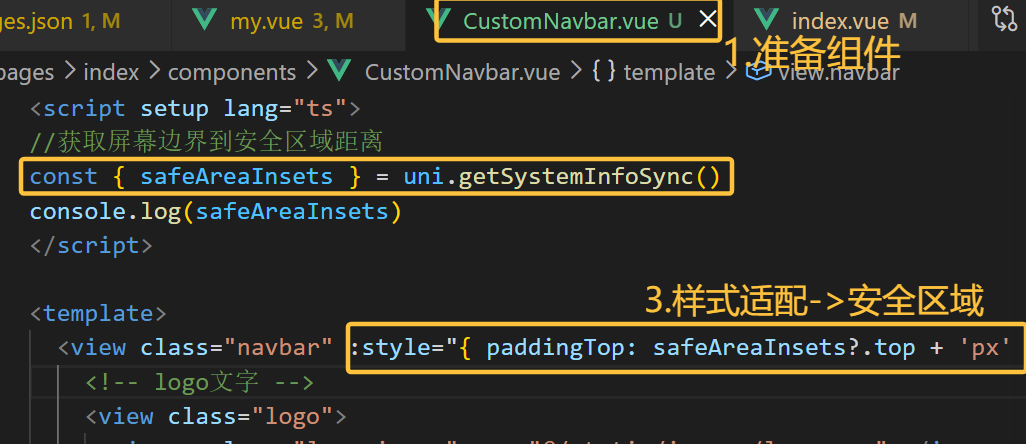
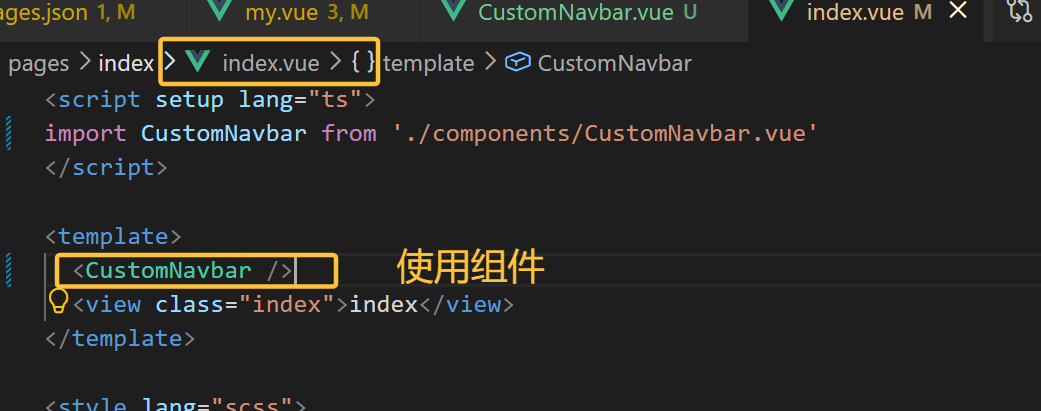
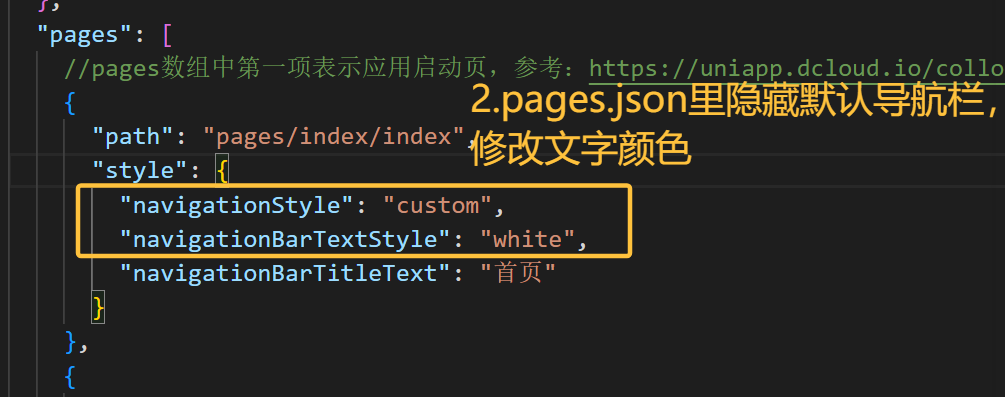
自定义导航栏
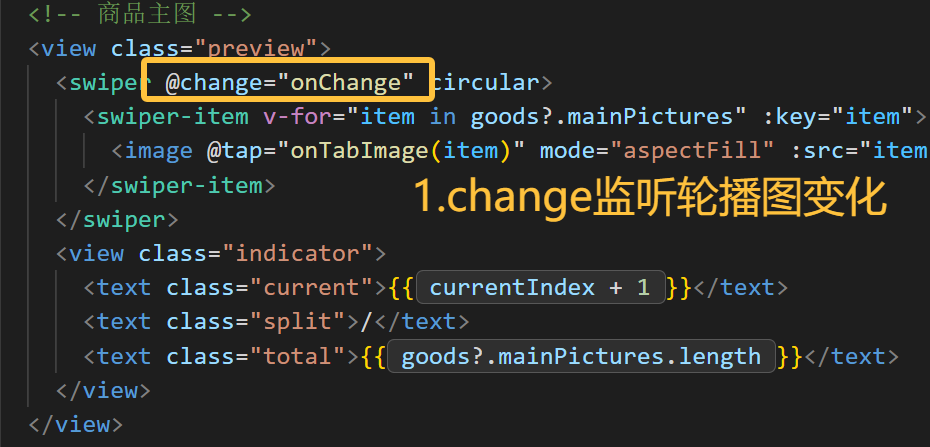
轮播图
轮播图组件需要在首页和分类页使用,封装成通用组件
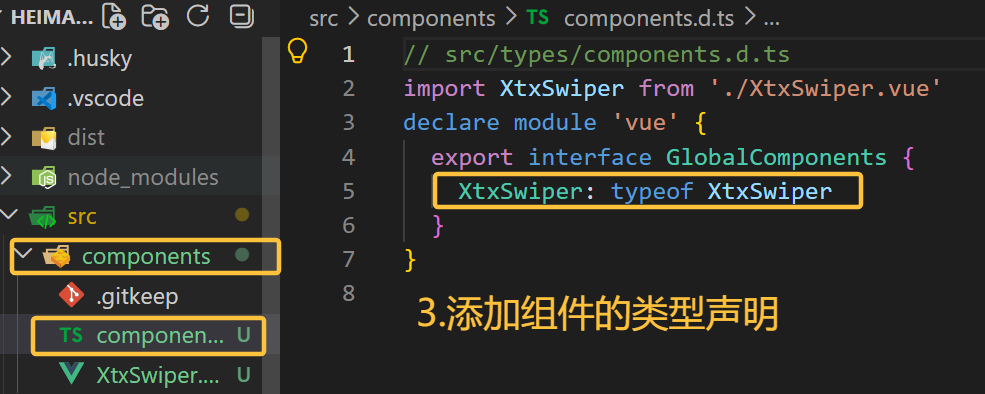
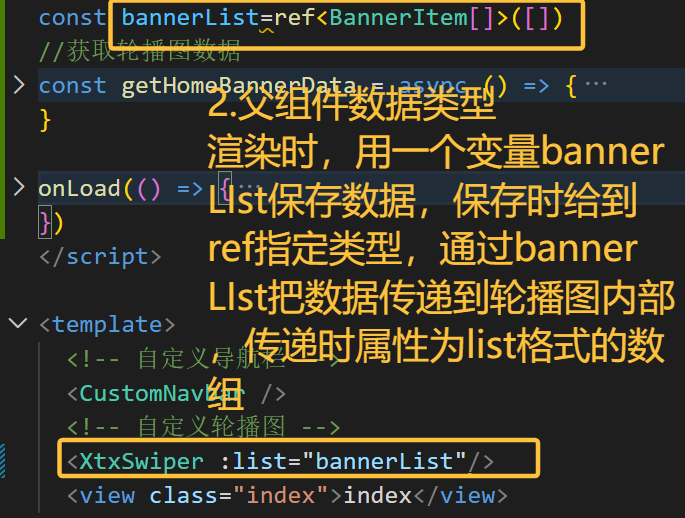
1.准备组件
2.自动导入组件
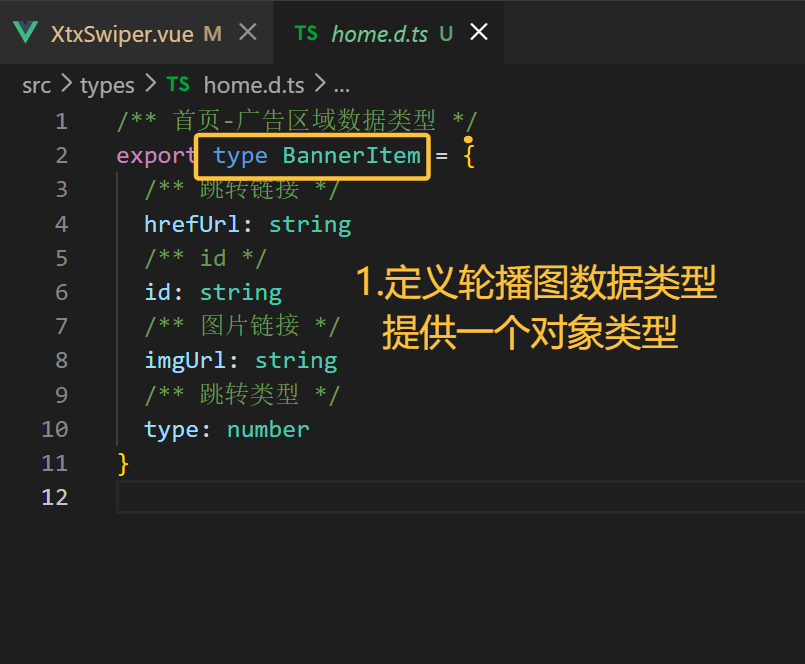
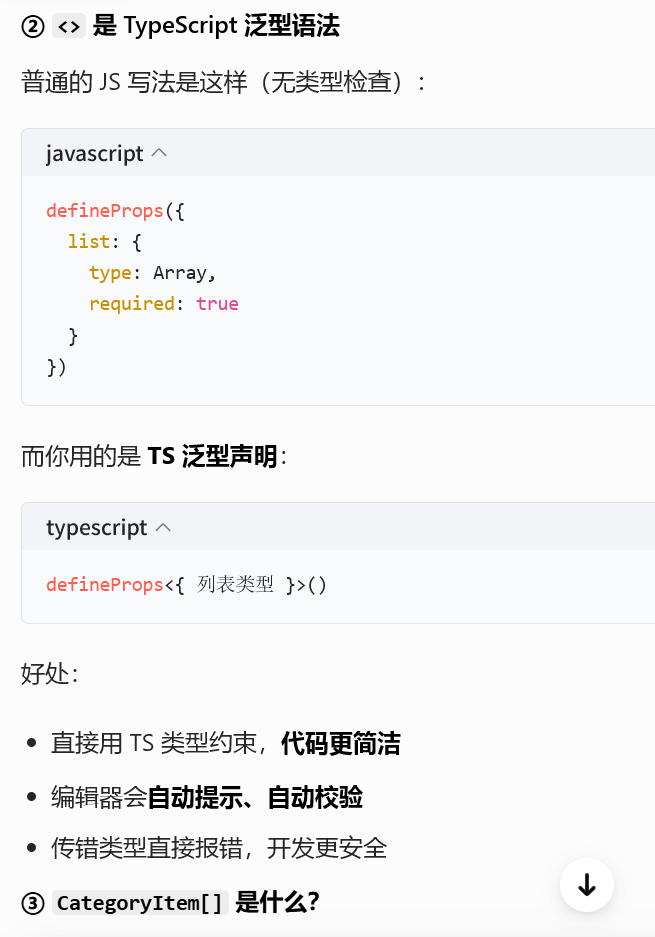
3.添加组件类型声明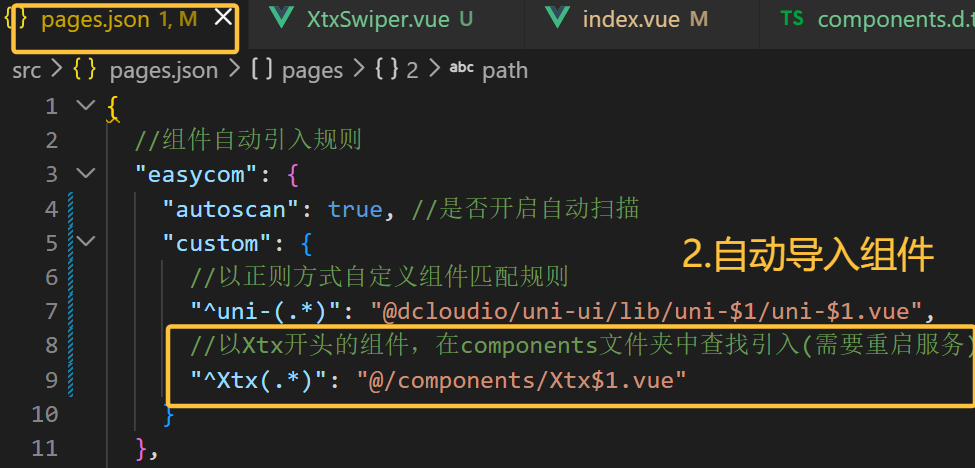
通用组件自动导入

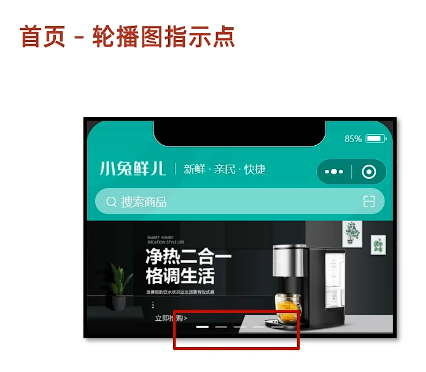
指示点
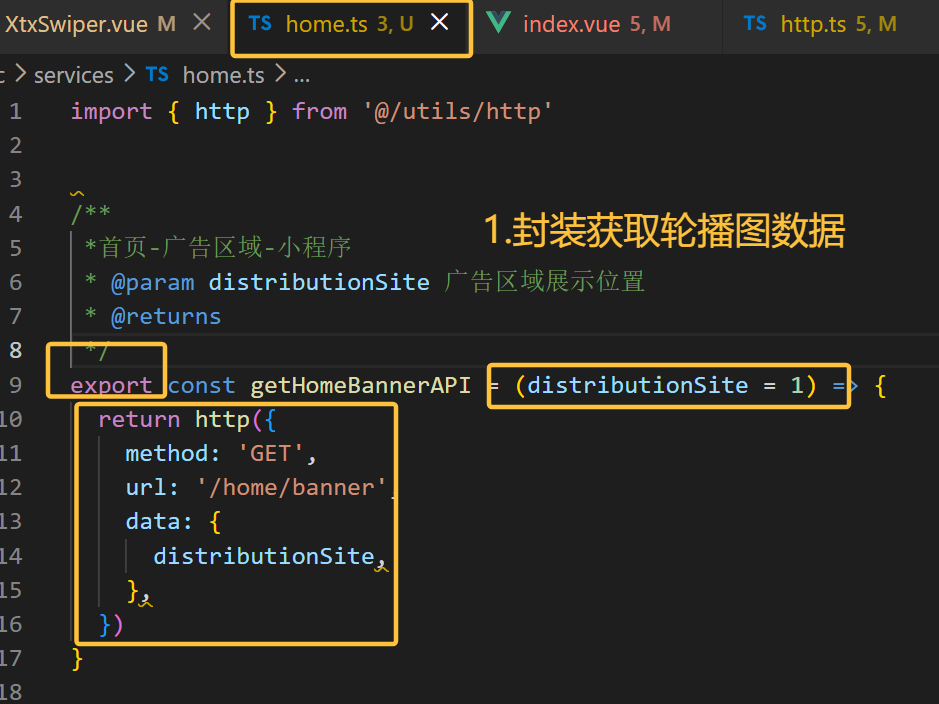
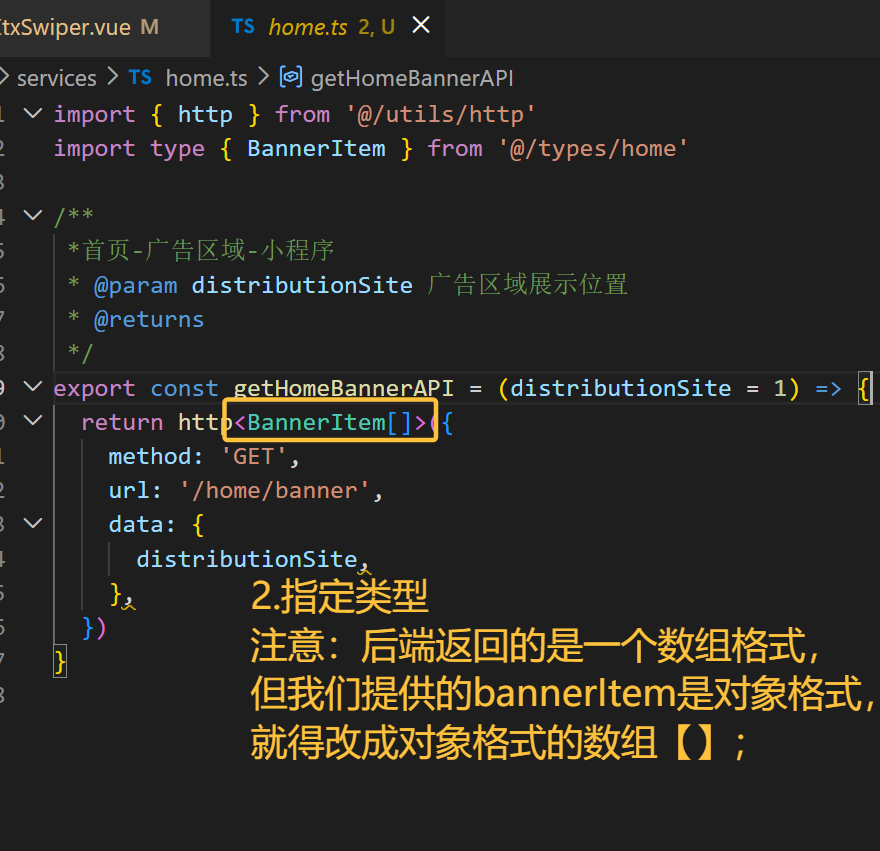
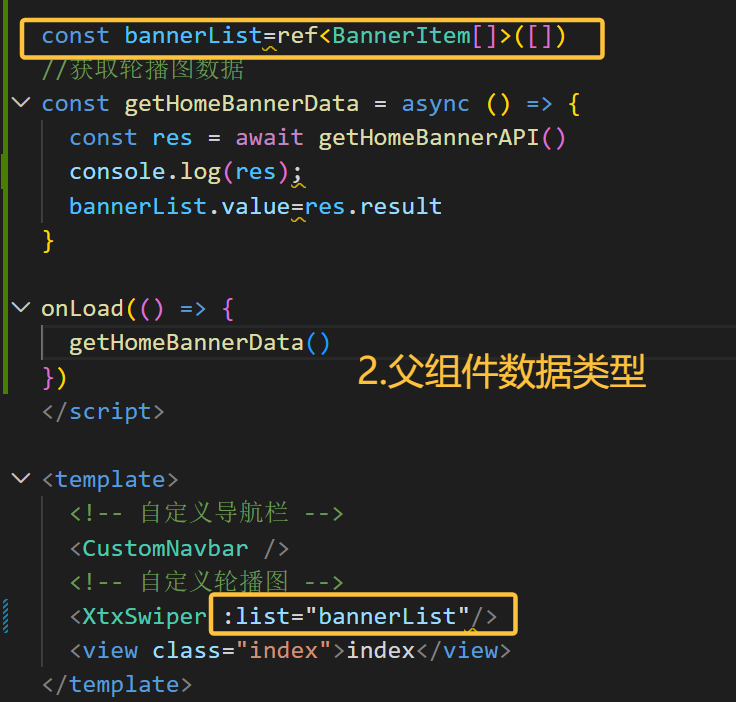
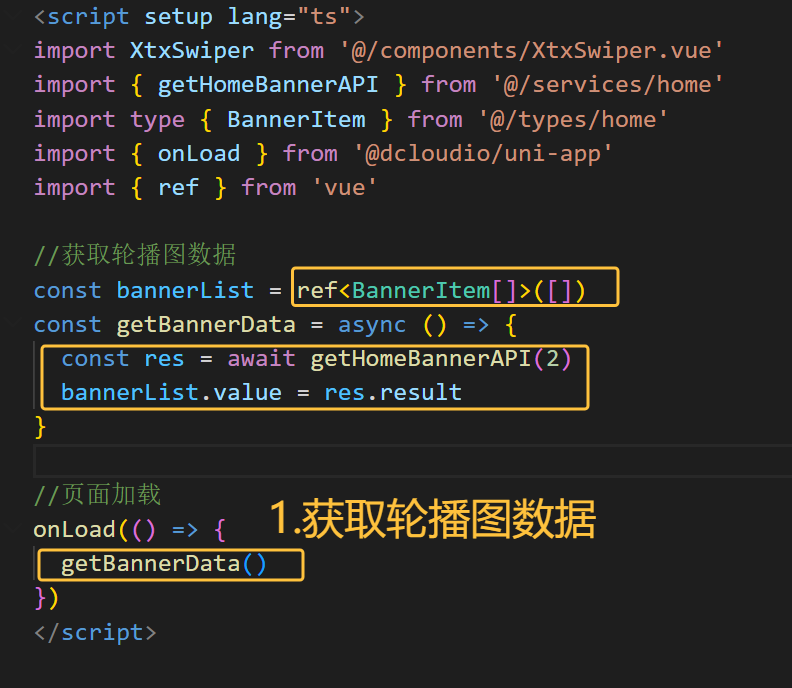
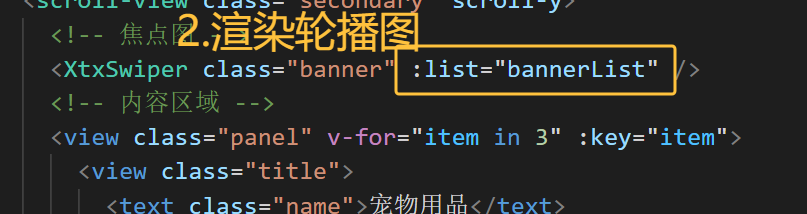
获取轮播图数据
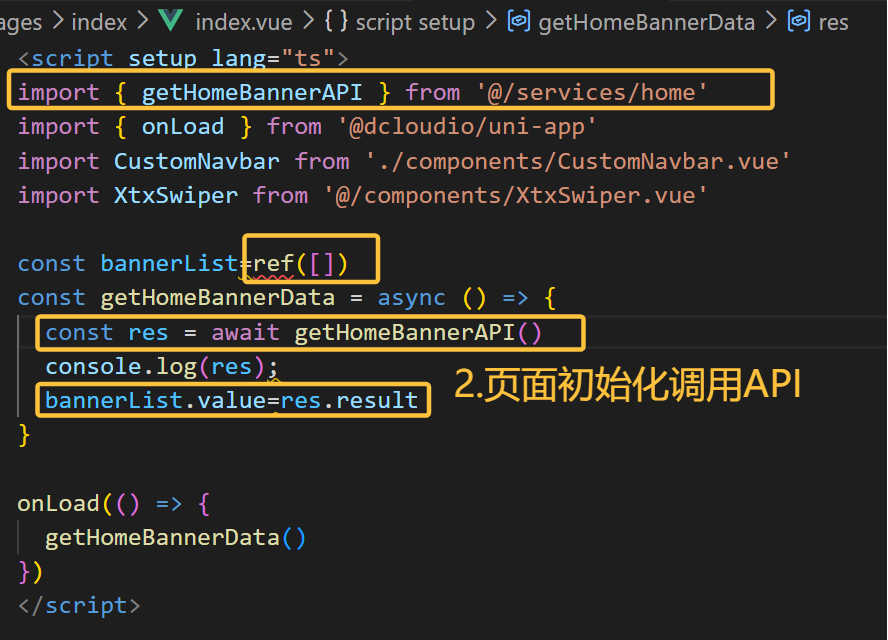
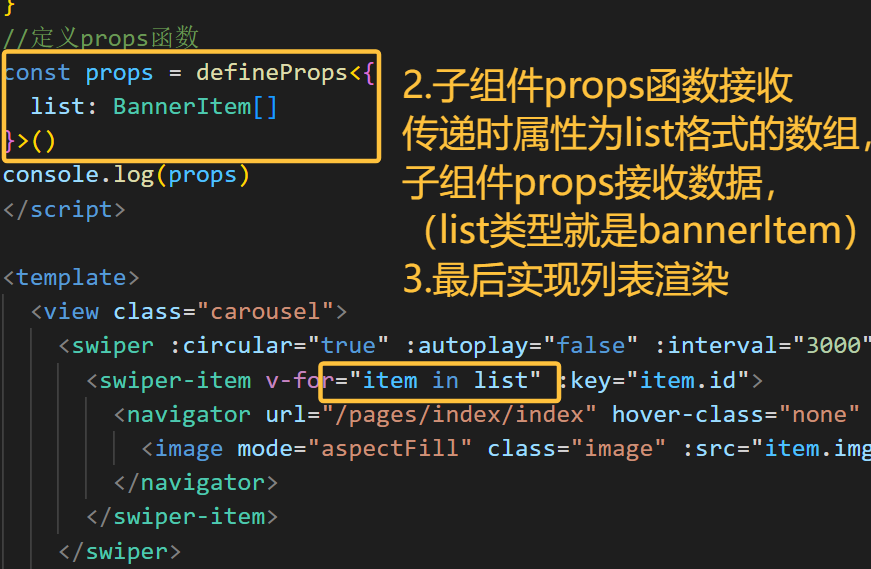
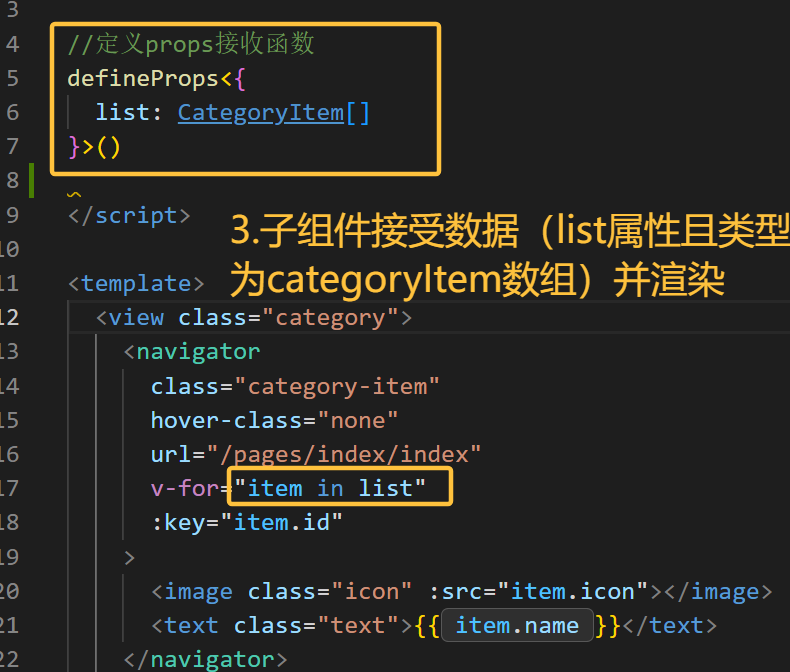
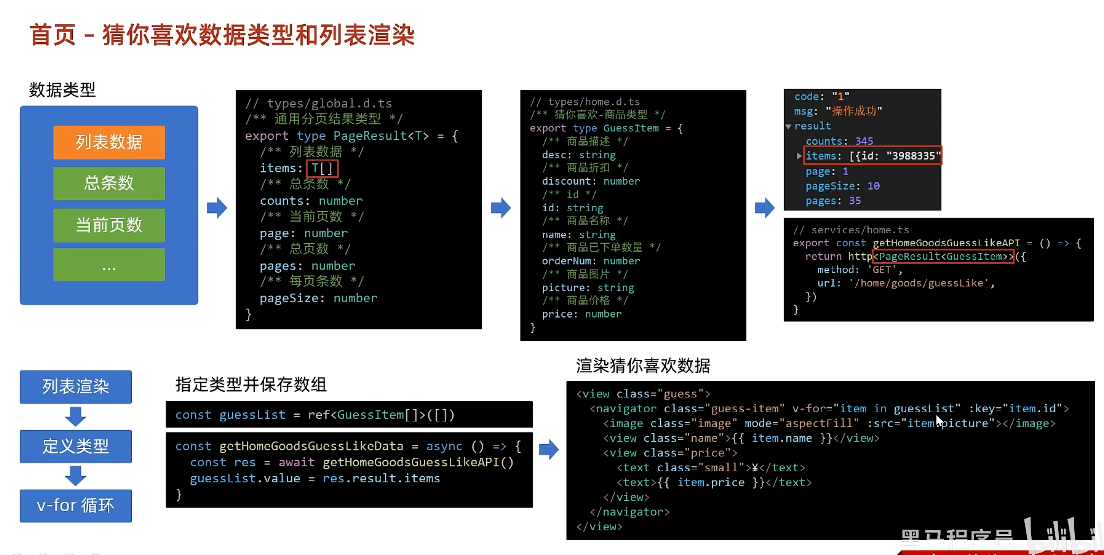
数据类型定义和渲染
注意:后端返回的是一个数组格式,但我们提供的bannerItem是对象格式,就得改成对象格式的数组【】;渲染时,用一个变量bannerLIst保存数据,保存时给到ref指定类型,通过bannerLIst把数据传递到轮播图内部,传递时属性为list格式的数组,子组件props接收数据,(list类型就是bannerItem,)最后实现列表渲染
总结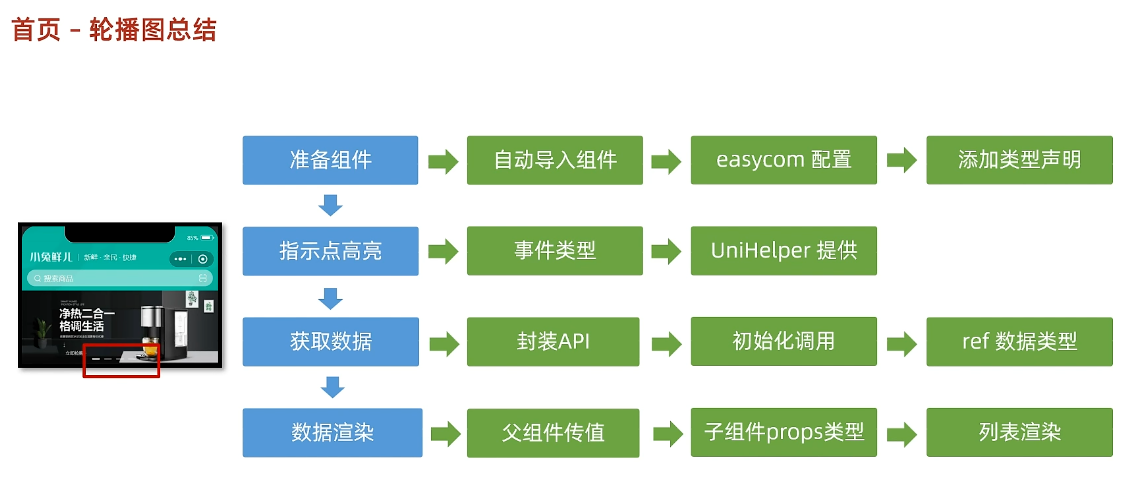
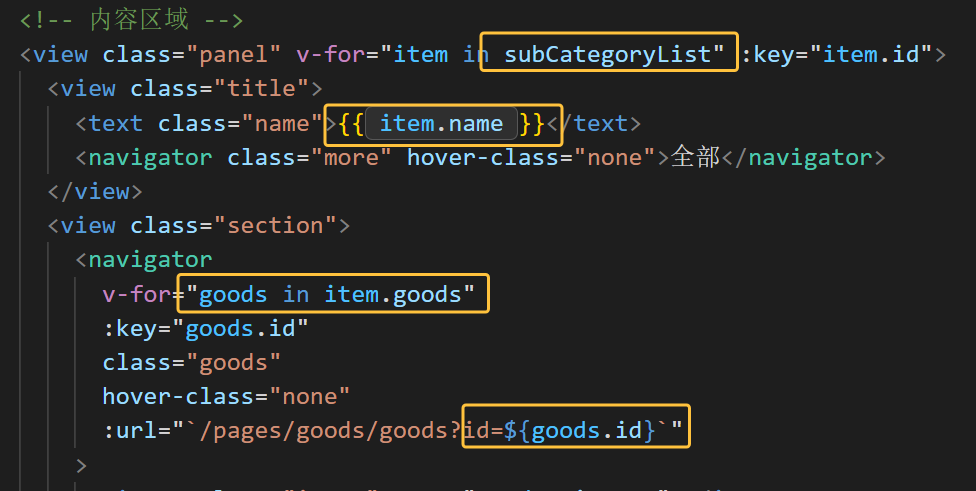
前台分类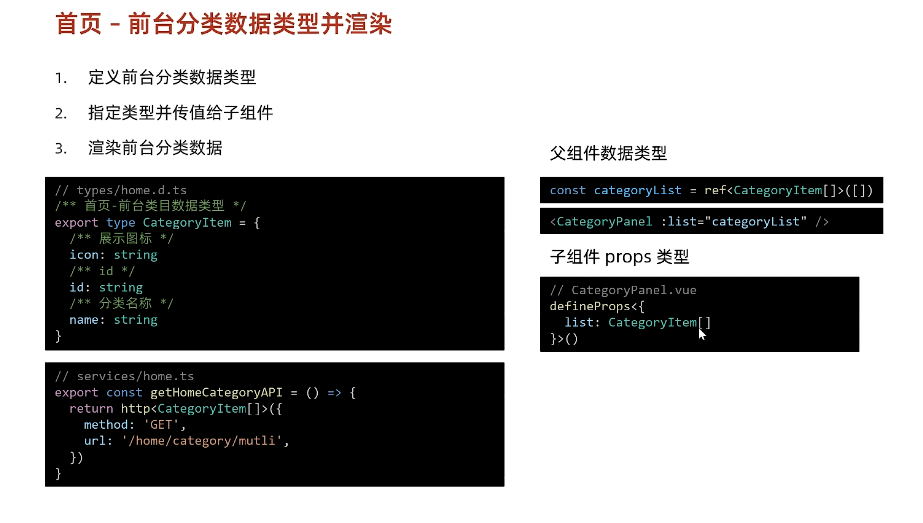
组件封装
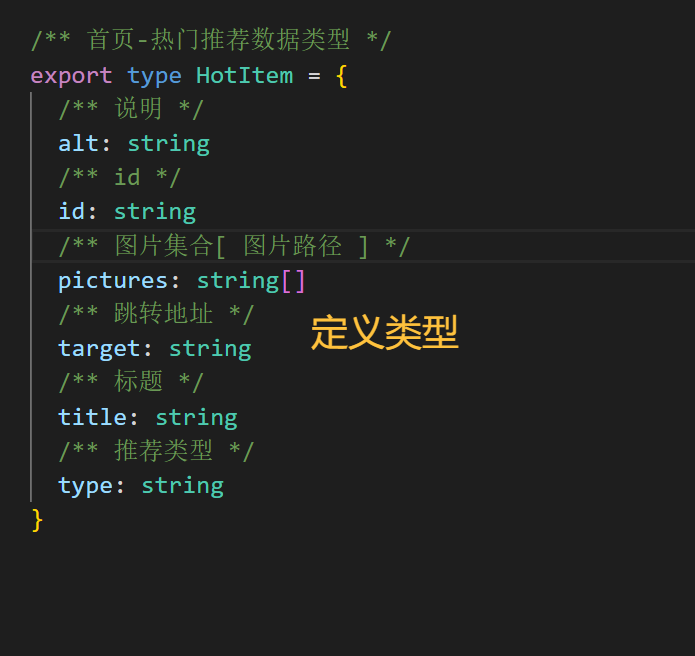
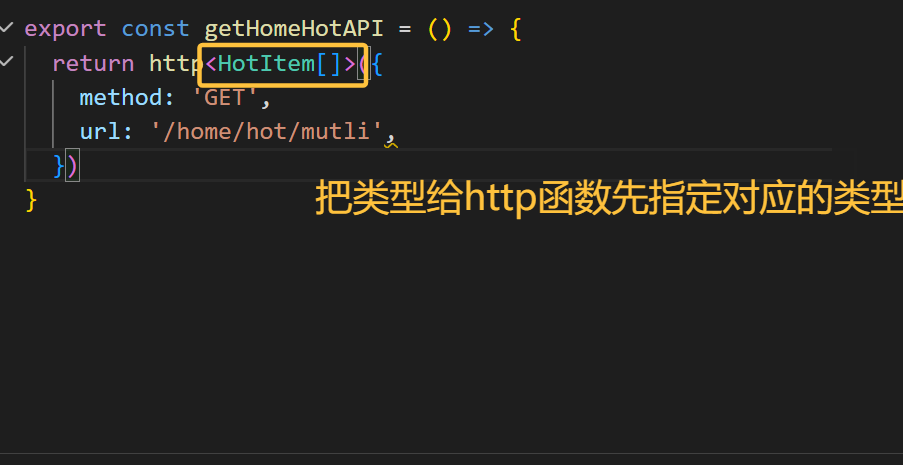
热门推荐

猜你喜欢
组件构建(定义类型+滚动+page和滚动样式)


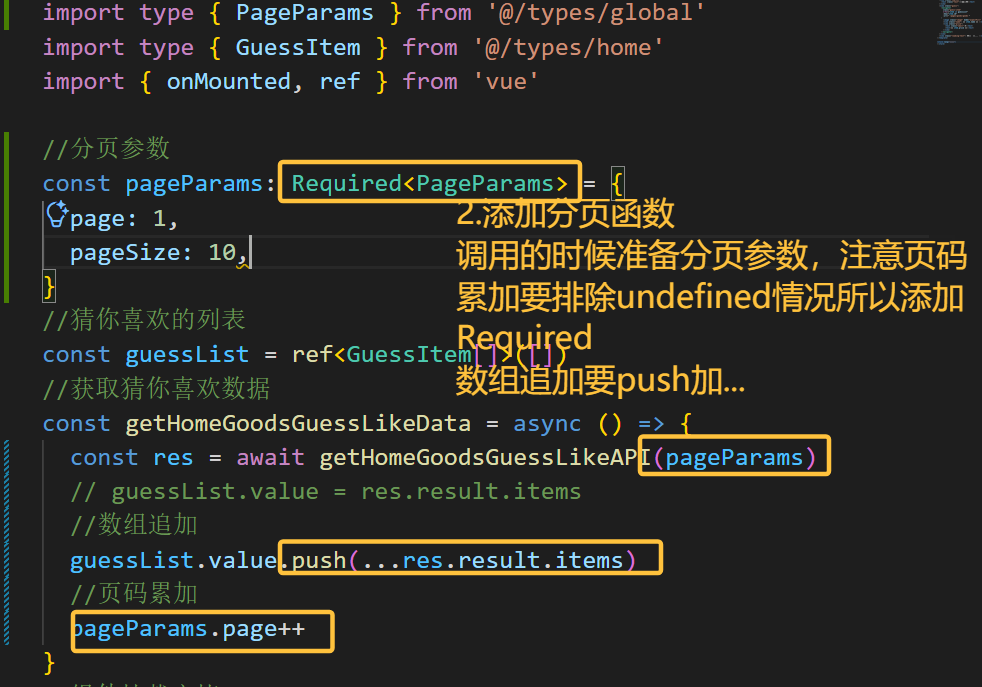
封装获取数据API并挂载后调用API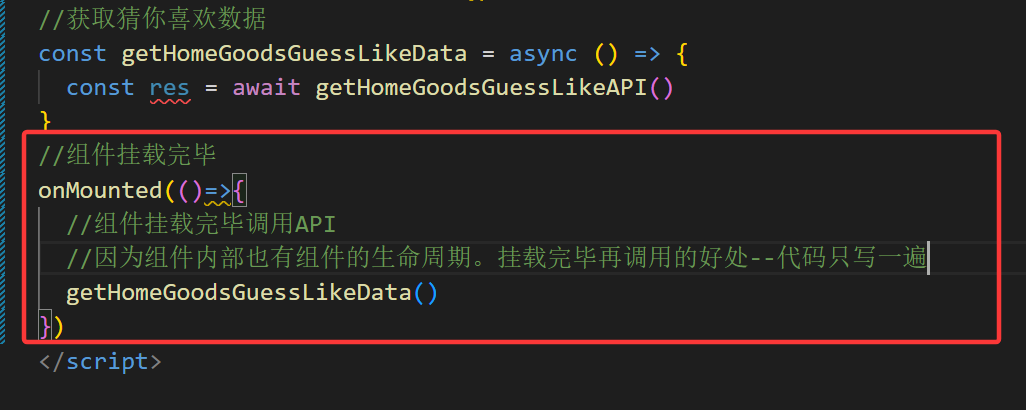
javascript
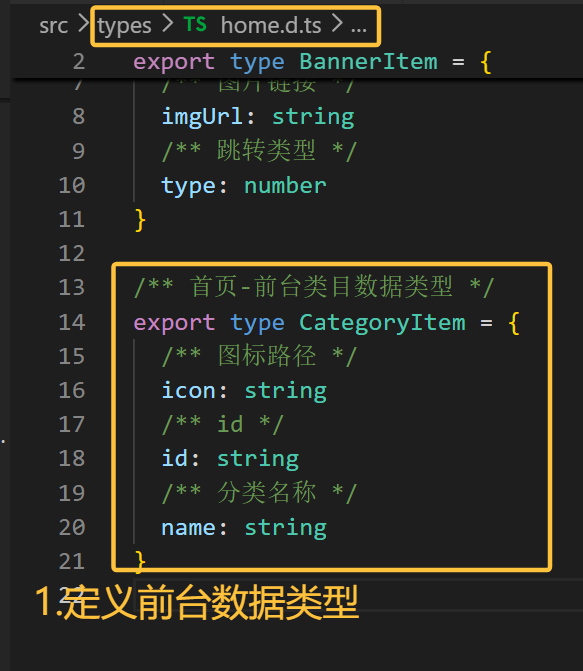
home.d.ts:
/** 猜你喜欢-商品类型 */
export type GuessItem = {
/** 商品描述 */
desc: string
/** 商品折扣 */
discount: number
/** id */
id: string
/** 商品名称 */
name: string
/** 商品已下单数量 */
orderNum: number
/** 商品图片 */
picture: string
/** 商品价格 */
price: number
}
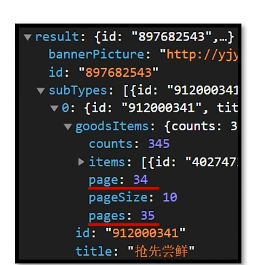
global.d.ts:/** 通用分页结果类型 */
export type PageResult<T> = {
/** 列表数据 */
items: T[]
/** 总条数 */
counts: number
/** 当前页数 */
page: number
/** 总页数 */
pages: number
/** 每页条数 */
pageSize: number
}
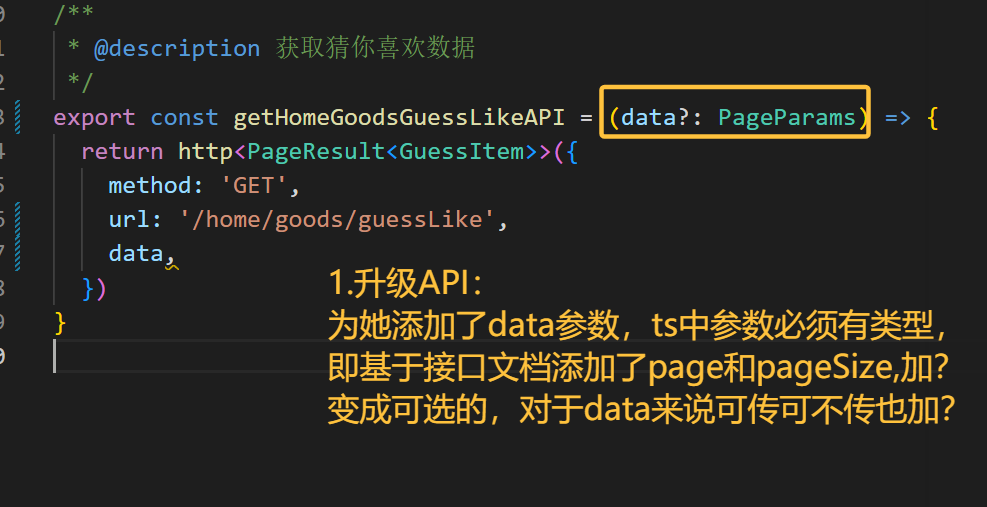
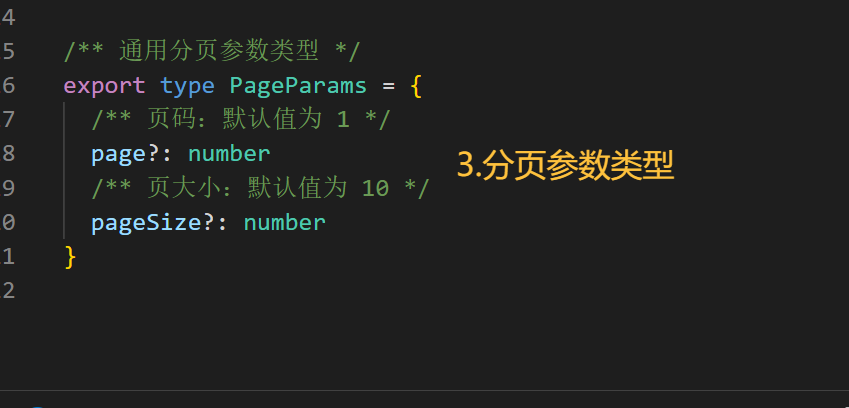
/** 通用分页参数类型 */
export type PageParams = {
/** 页码:默认值为 1 */
page?: number
/** 页大小:默认值为 10 */
pageSize?: number
}
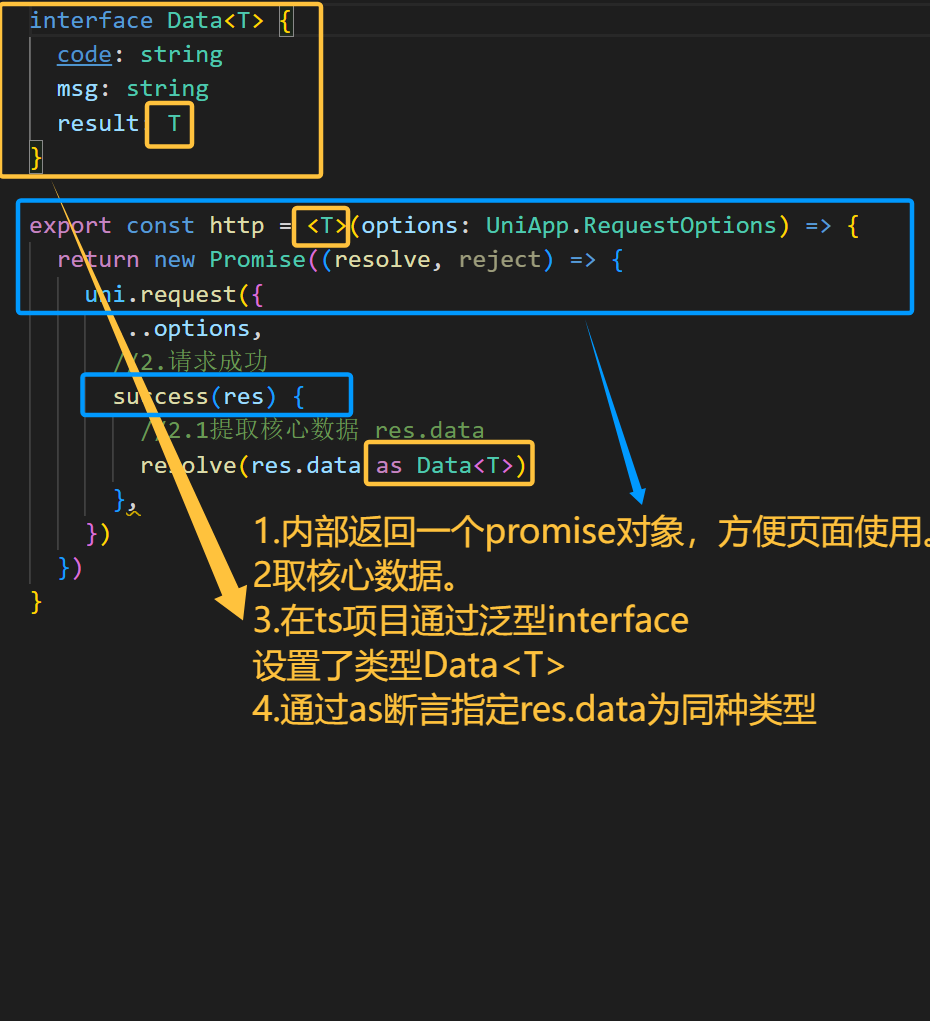
http.ts:
interface Data<T> {
code: string
msg: string
result: T
}数据类型+列表渲染
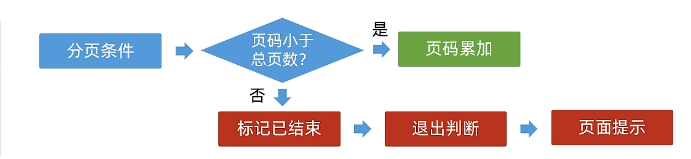
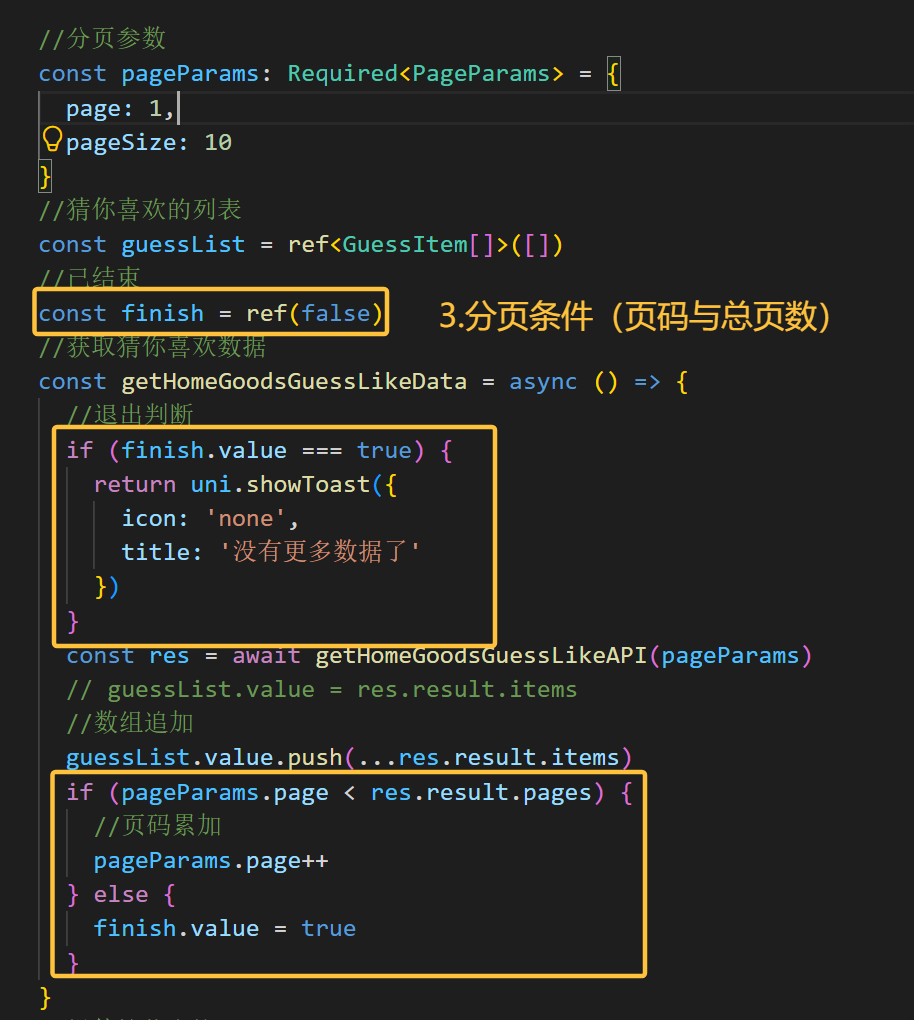
分页条件(重点!!)
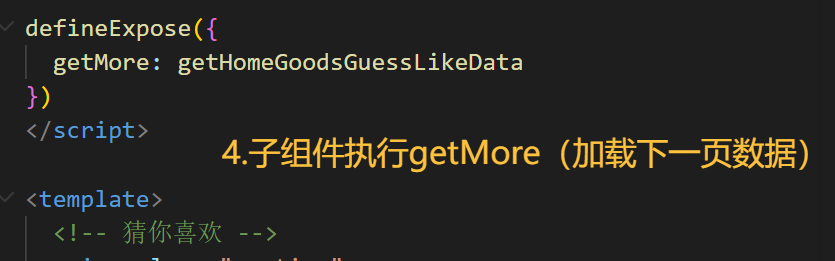
用户滚动到页面底部 → scroll-view 触发 @scrolltolower 父组件的 onScrolltolower 函数执行 → 调用 guessRef.value?.getMore() guessRef 指向子组件实例 → 执行子组件里通过 defineExpose 暴露的 getMore 方法 子组件内部执行分页请求,加载下一页数据
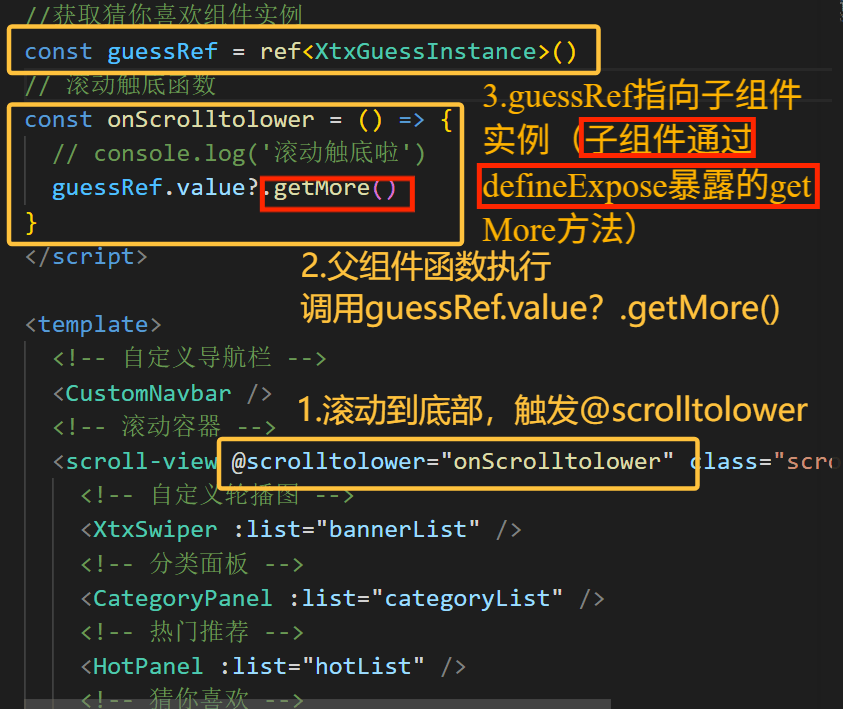
分页条件
首页
下拉刷新
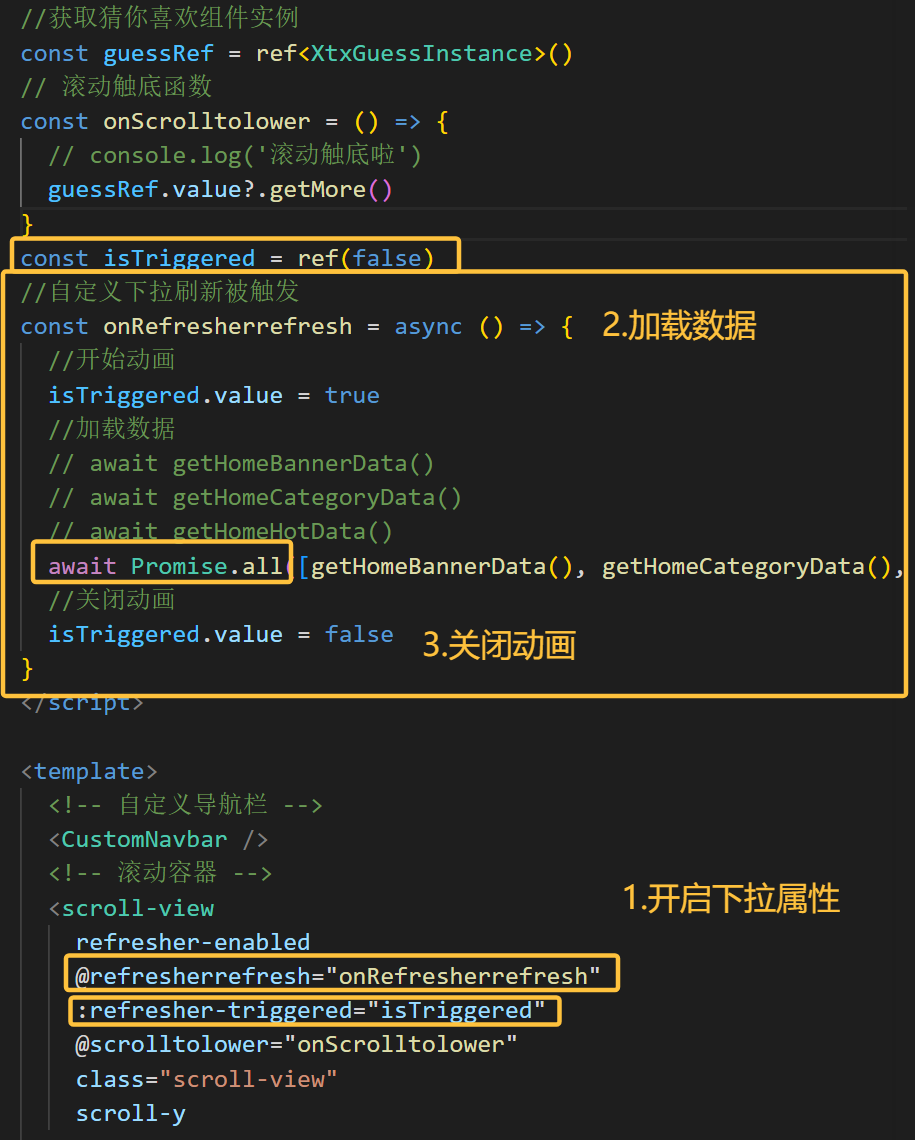
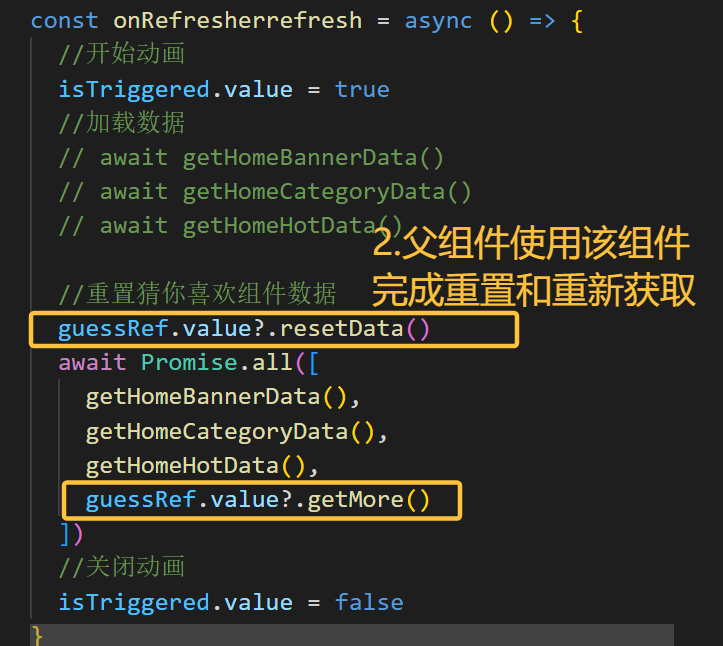
下拉刷新-猜你喜欢数据获取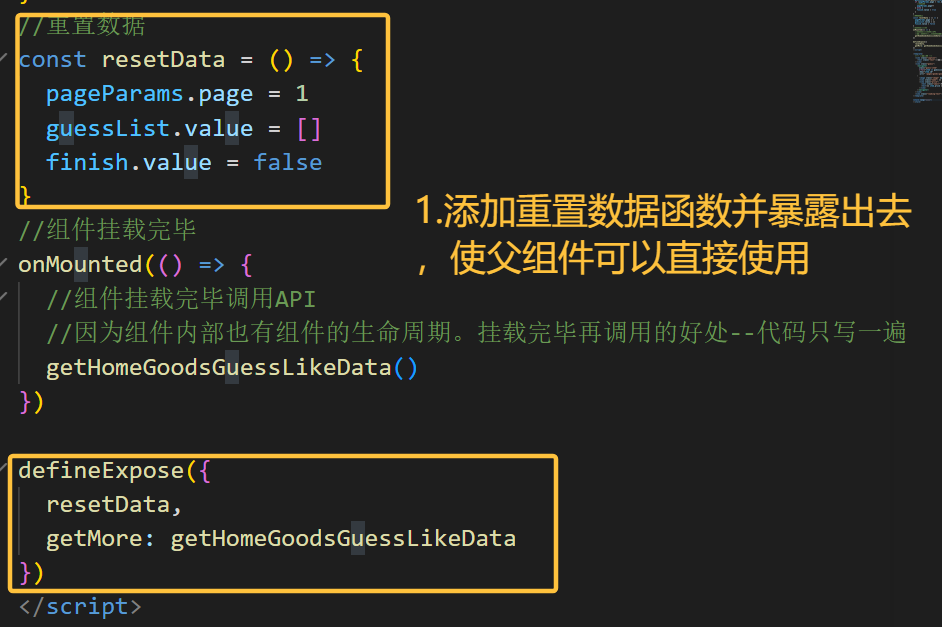
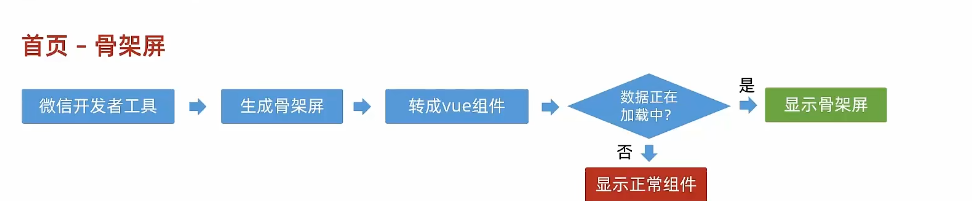
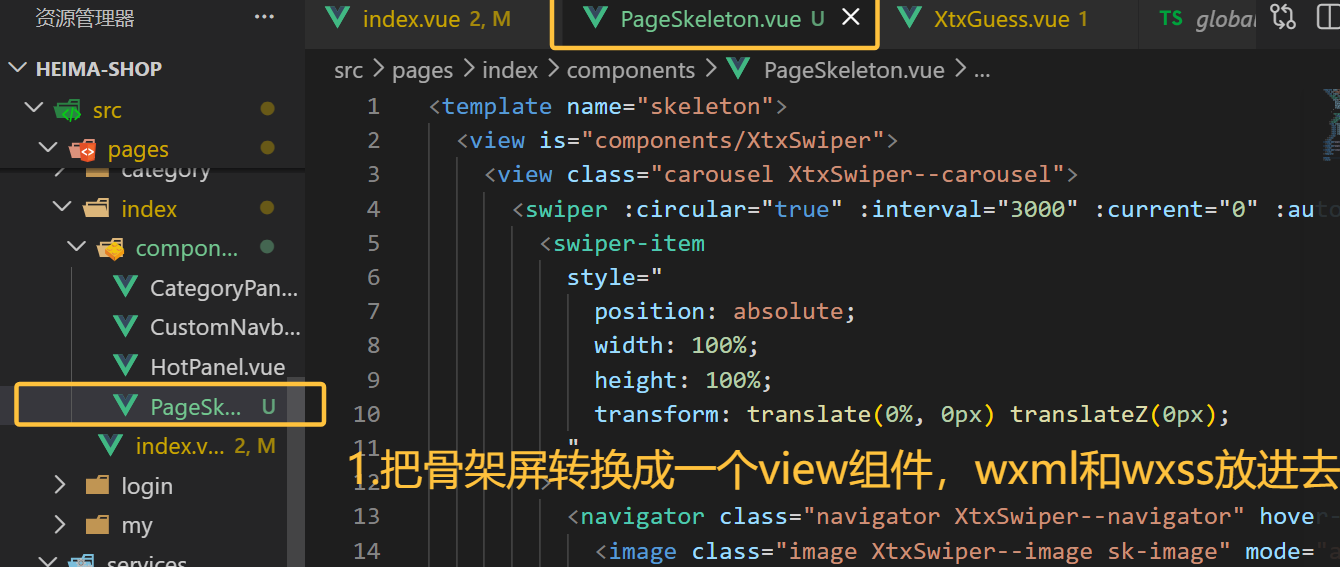
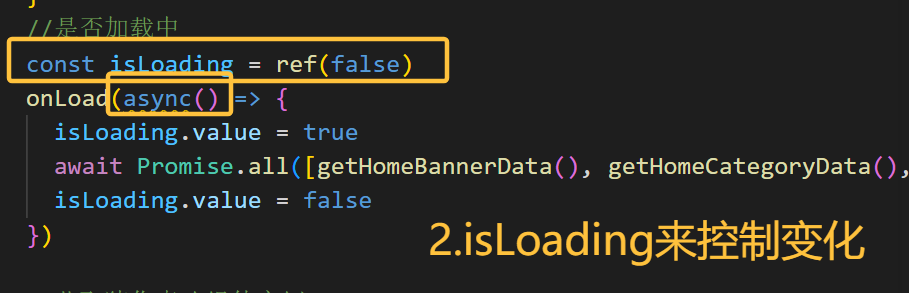
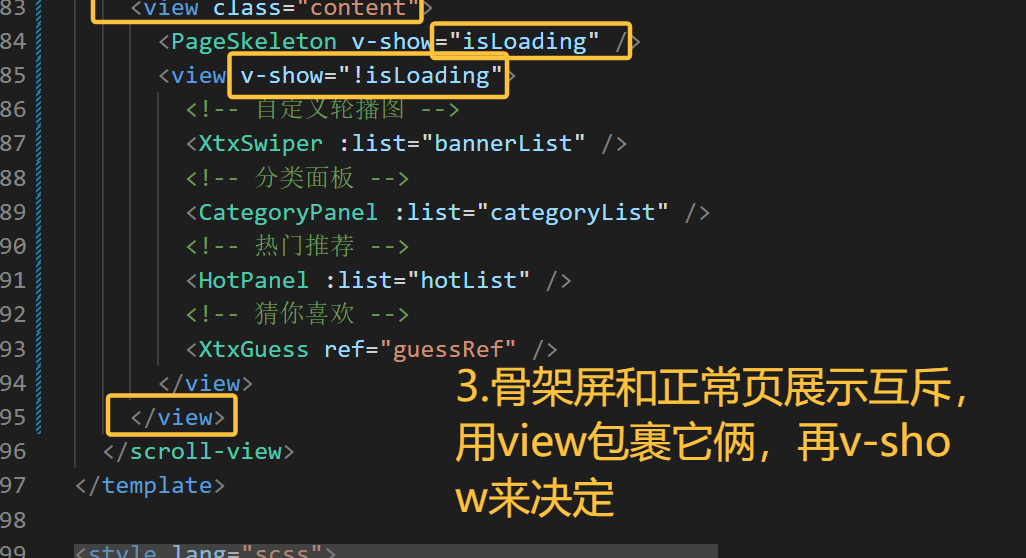
首页-骨架屏
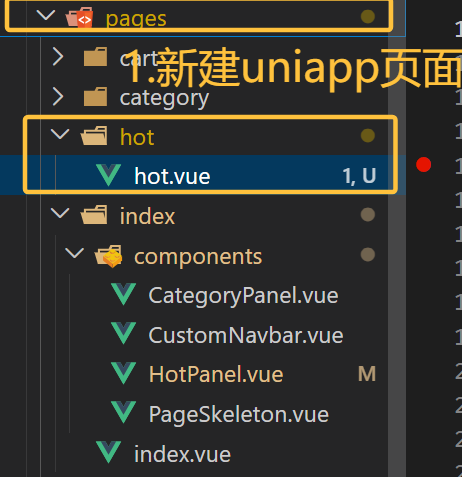
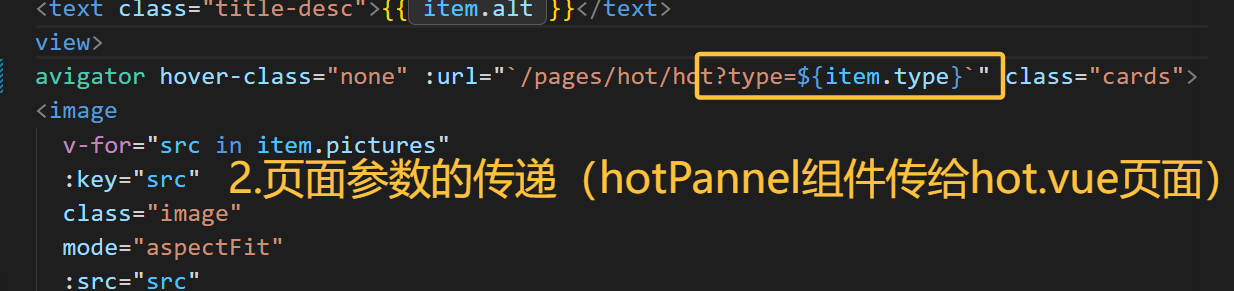
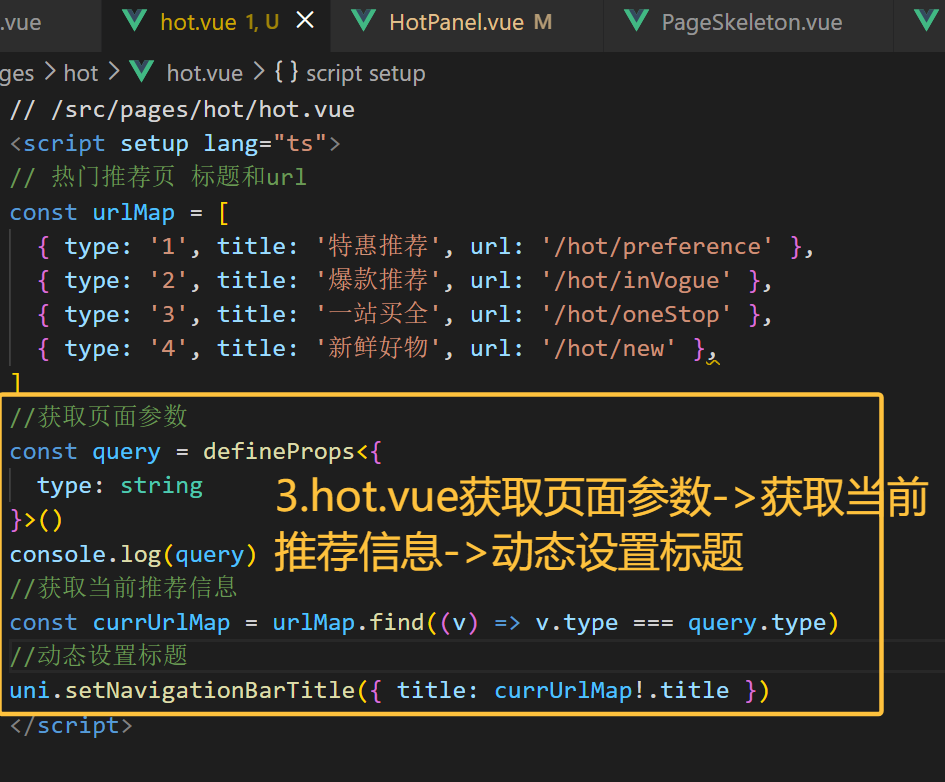
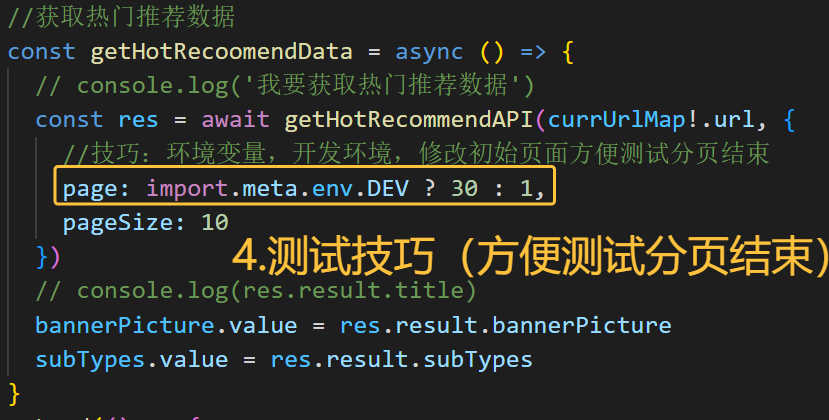
热门推荐
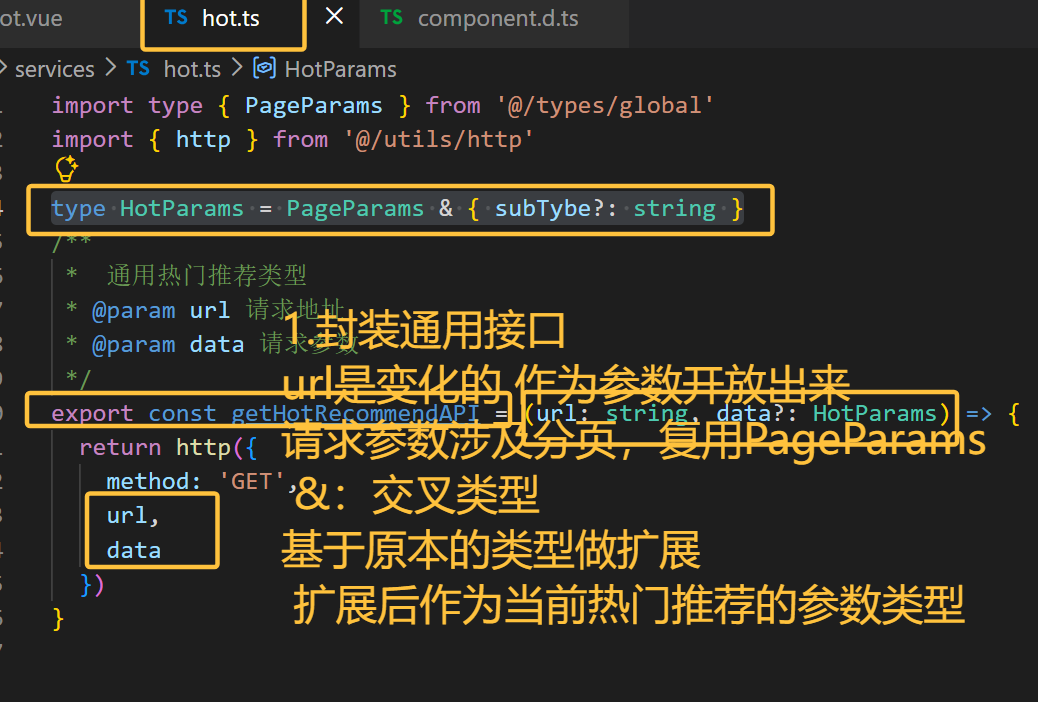
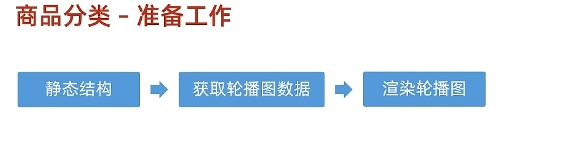
准备工作
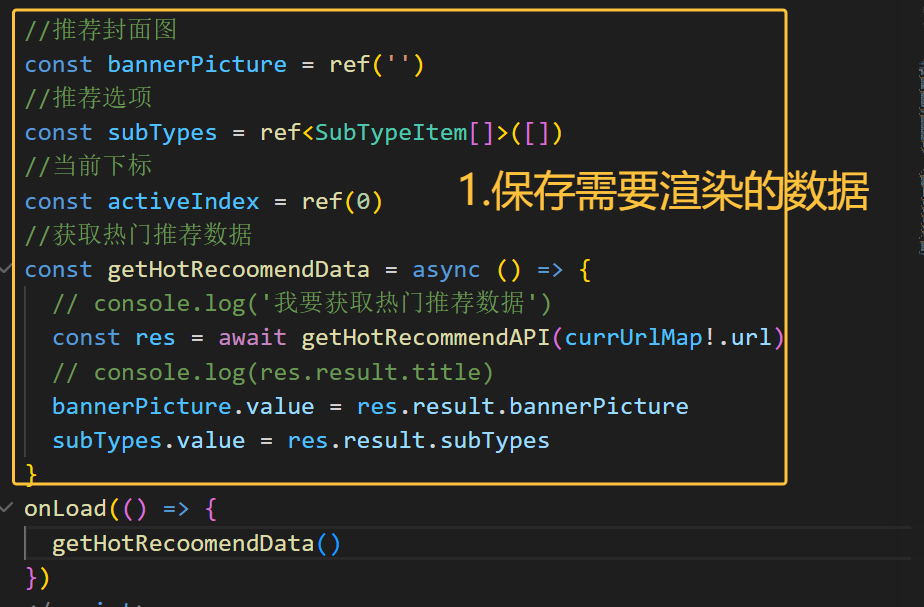
获取数据
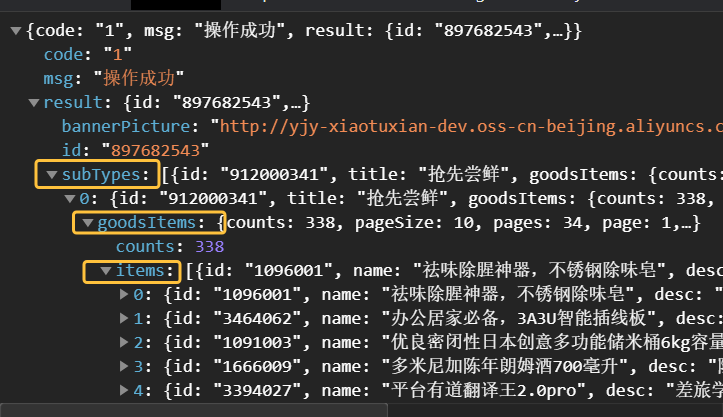
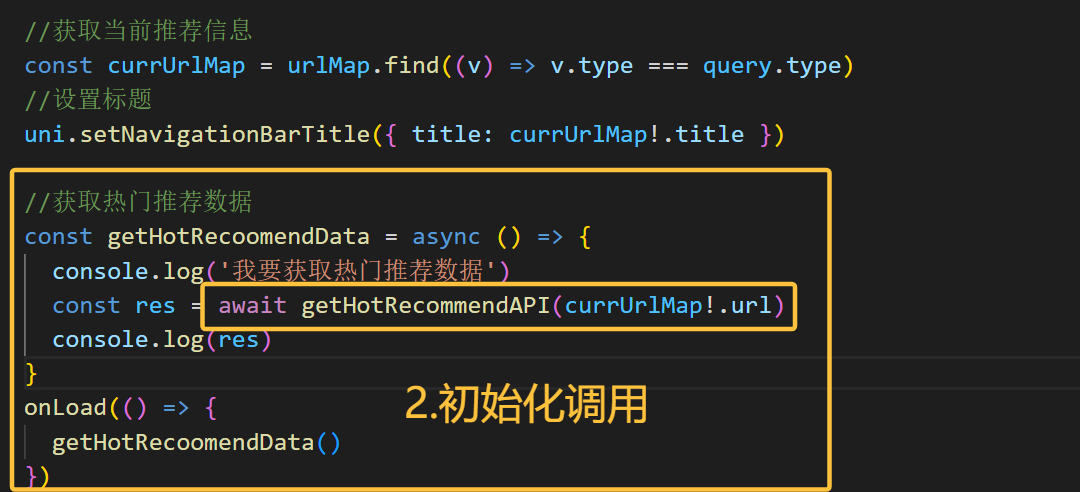
类型定义

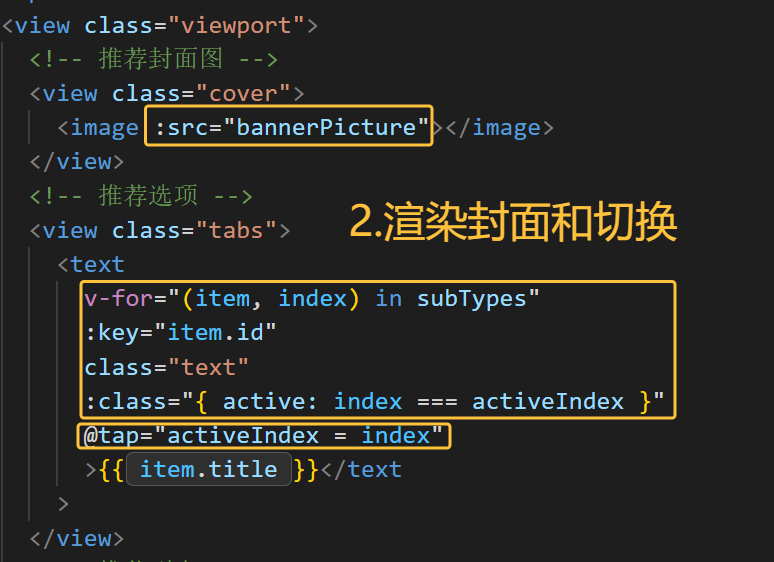
页面渲染和Tab交互
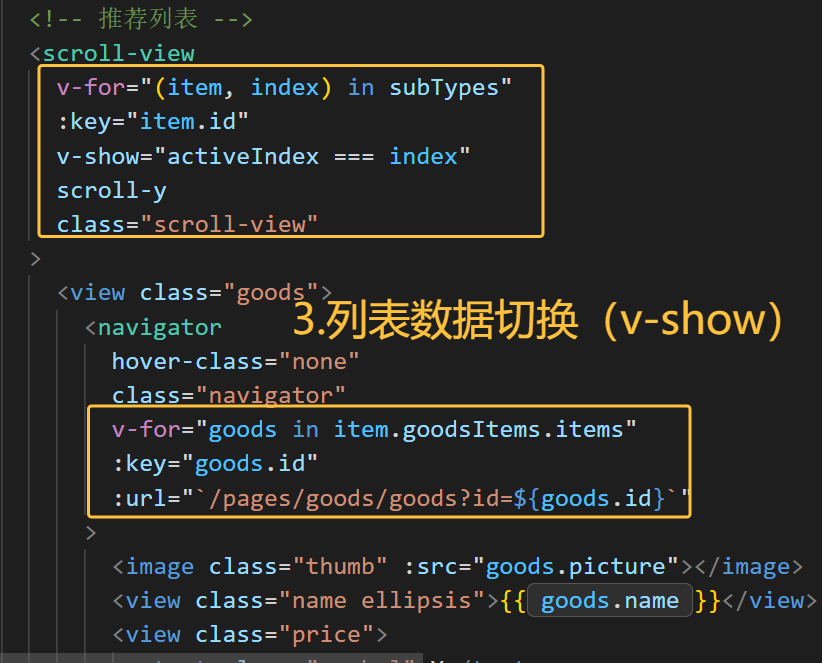
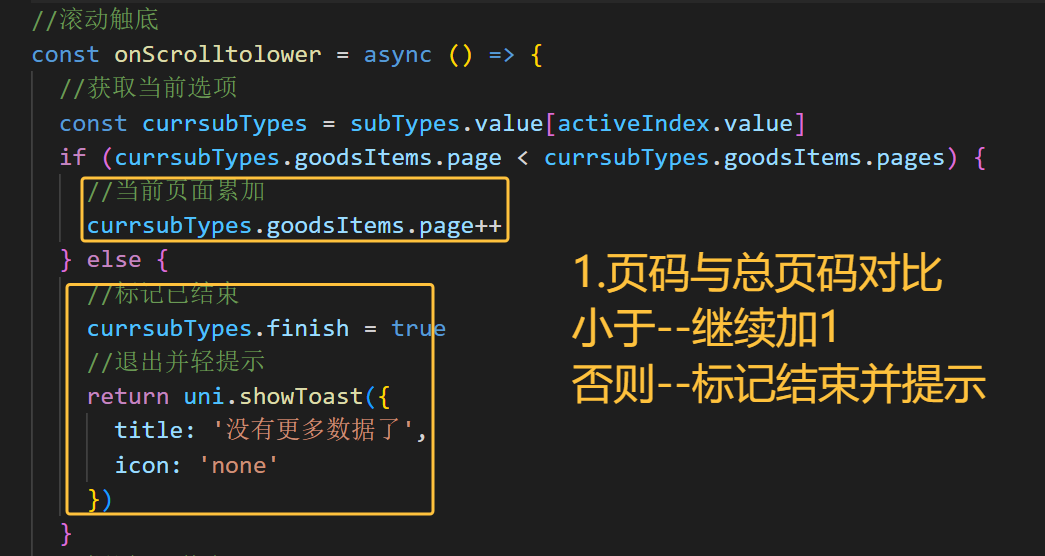
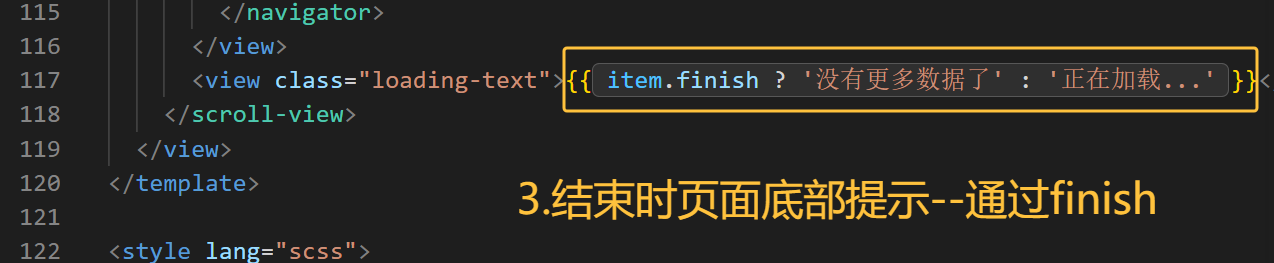
分页加载(重点)
javascript
<script>
//滚动触底
const onScrolltolower = async () => {
  //获取当前选项
  const currsubTypes = subTypes.value[activeIndex.value]
  //当前页面累加
  currsubTypes.goodsItems.page++
  //调用API传参
  const res = await getHotRecommendAPI(currUrlMap!.url, {
    subType: currsubTypes.id,
    page: currsubTypes.goodsItems.page,
    pageSize: currsubTypes.goodsItems.pageSize
  })
  //新的列表选项
  const newSubTypes = res.result.subTypes[activeIndex.value]
  //数组追加
  currsubTypes.goodsItems.items.push(...newSubTypes.goodsItems.items)
}
</script>

<template>
<scroll-view
      v-for="(item, index) in subTypes"
      :key="item.id"
      v-show="activeIndex === index"
      scroll-y
      class="scroll-view"
      @scrolltolower="onScrolltolower"
    >
</template>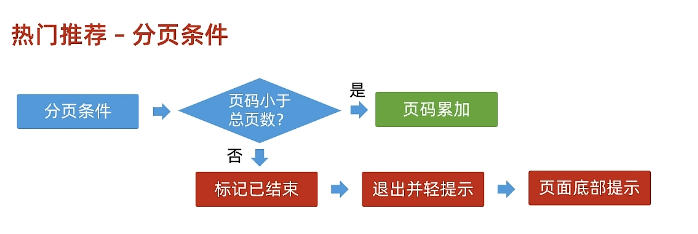

前台分类
分类类型定义和渲染
javascript
//分类列表-小程序
import type { CategoryTopItem } from '@/types/category'
import { http } from '@/utils/http'
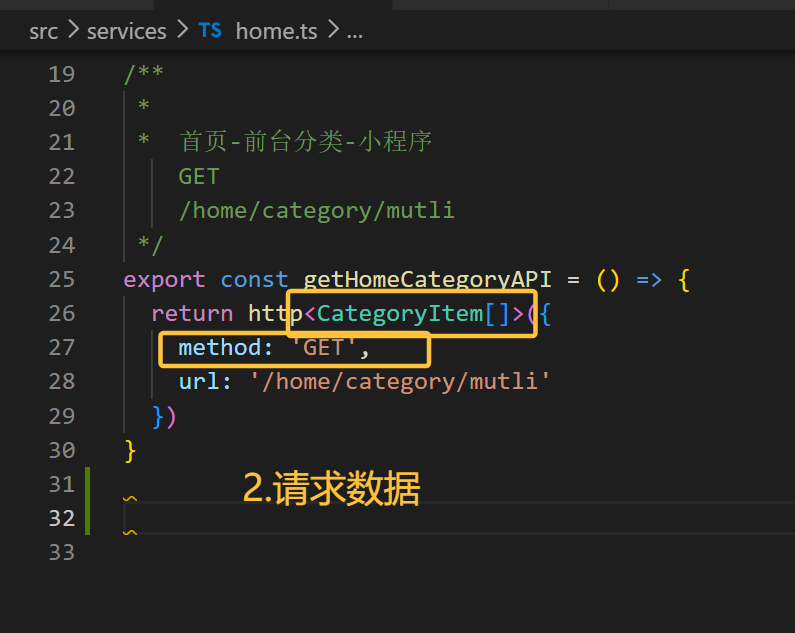
export const getCategoryTopAPI = () => {
return http<CategoryTopItem[]>({
method: 'GET',
url: '/category/top',
})
}
// src/types/category.d.ts
import type { GoodsItem } from './global'
/** 一级分类项 */
export type CategoryTopItem = {
/** 二级分类集合[ 二级分类项 ] */
children: CategoryChildItem[]
/** 一级分类id */
id: string
/** 一级分类图片集[ 一级分类图片项 ] */
imageBanners: string[]
/** 一级分类名称 */
name: string
/** 一级分类图片 */
picture: string
}
/** 二级分类项 */
export type CategoryChildItem = {
/** 商品集合[ 商品项 ] */
goods: GoodsItem[]
/** 二级分类id */
id: string
/** 二级分类名称 */
name: string
/** 二级分类图片 */
picture: string
}
页面:
<script>
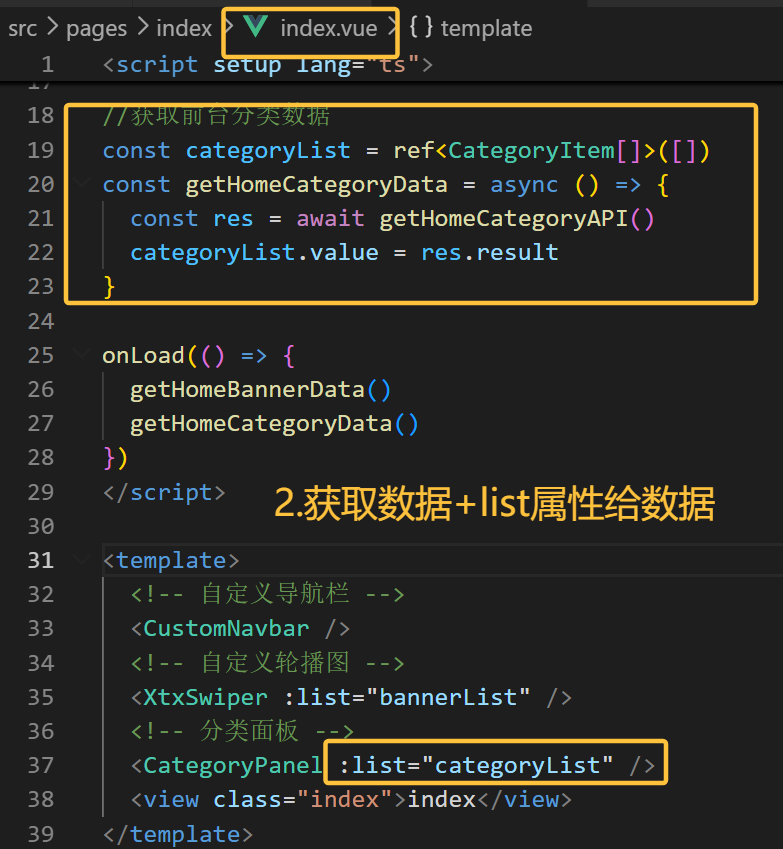
const categoryList = ref<CategoryTopItem[]>([])
const activeIndex = ref(0)
const getCategoryTopData = async () => {
const res = await getCategoryTopAPI()
categoryList.value = res.result
}
//页面加载
onLoad(() => {
getBannerData()
getCategoryTopData()
})
</script>
<templete>
<!-- 左侧:一级分类 -->
<scroll-view class="primary" scroll-y>
<view
v-for="(item, index) in categoryList"
:key="item.id"
class="item"
:class="{ active: index === activeIndex }"
@tap="activeIndex = index"
>
<text class="name"> {{ item.name }}</text>
</view>
</scroll-view>
</templete>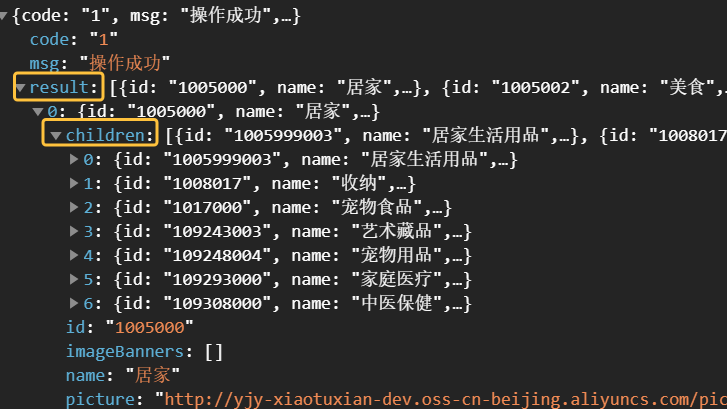

骨架屏(同首页--含注意事项)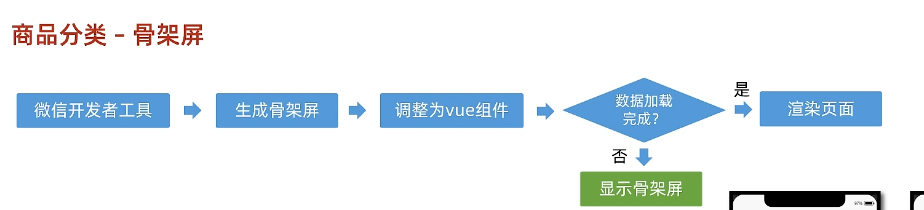

报错的组件加 :
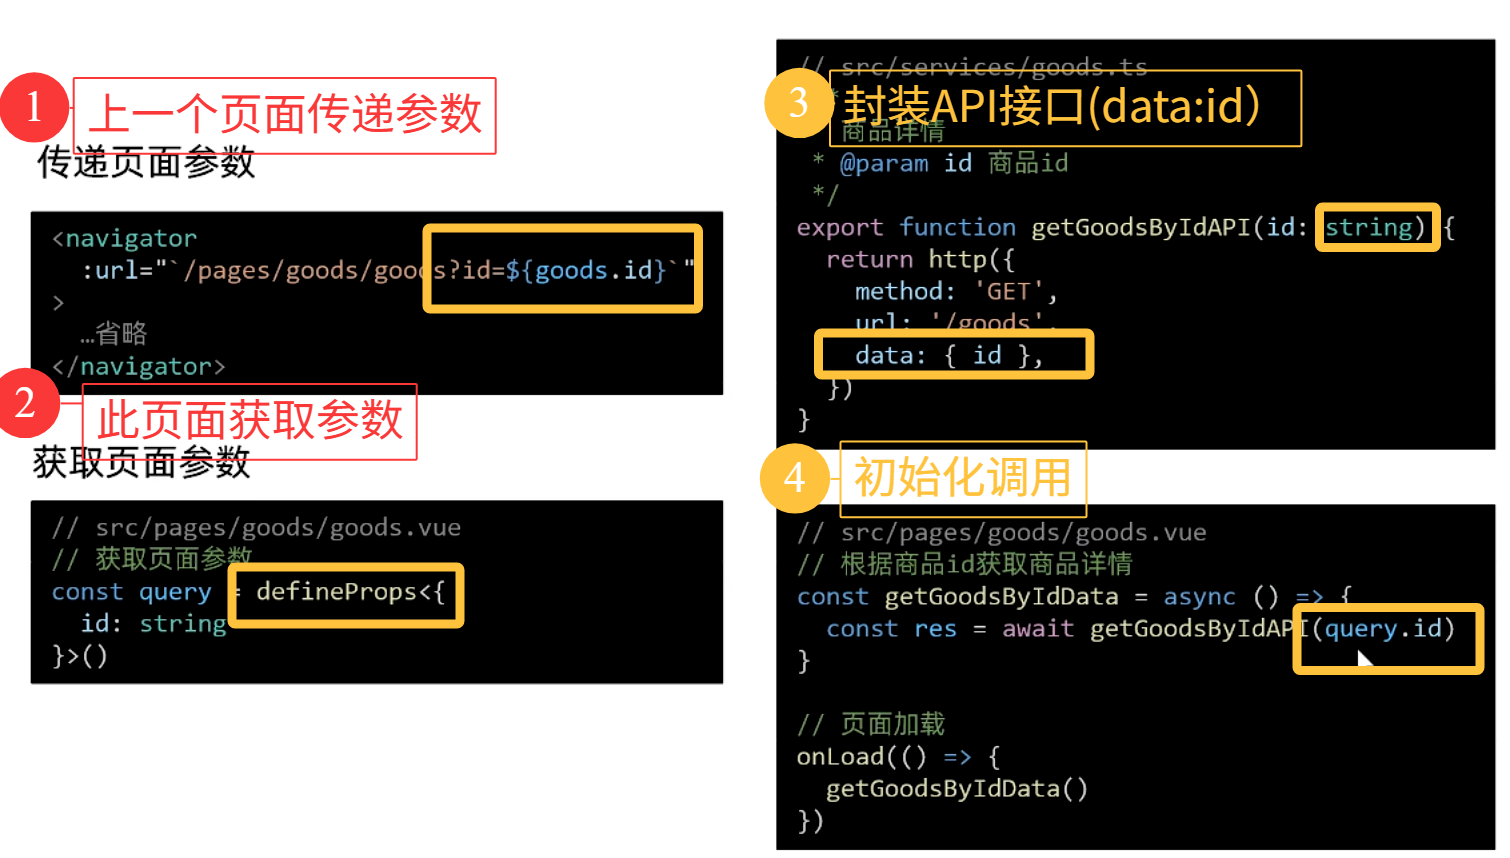
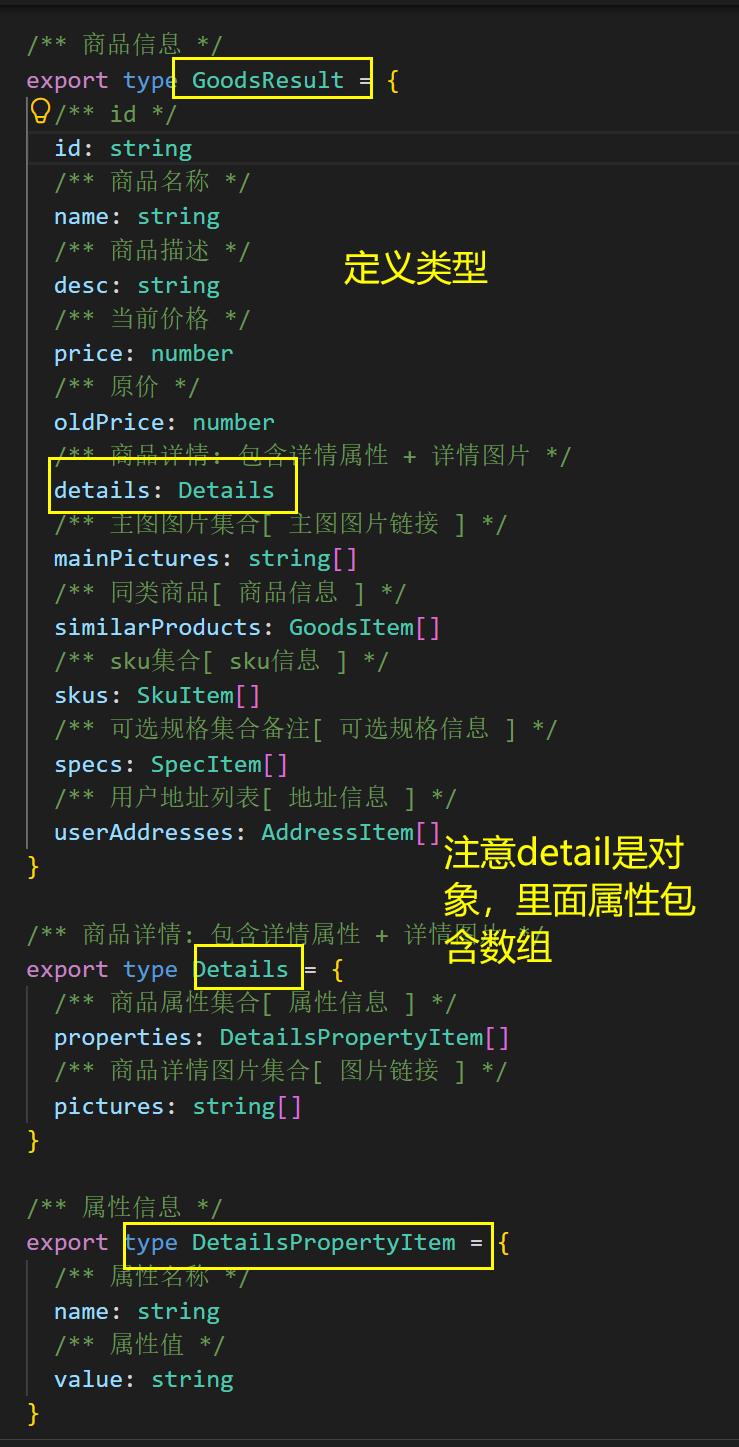
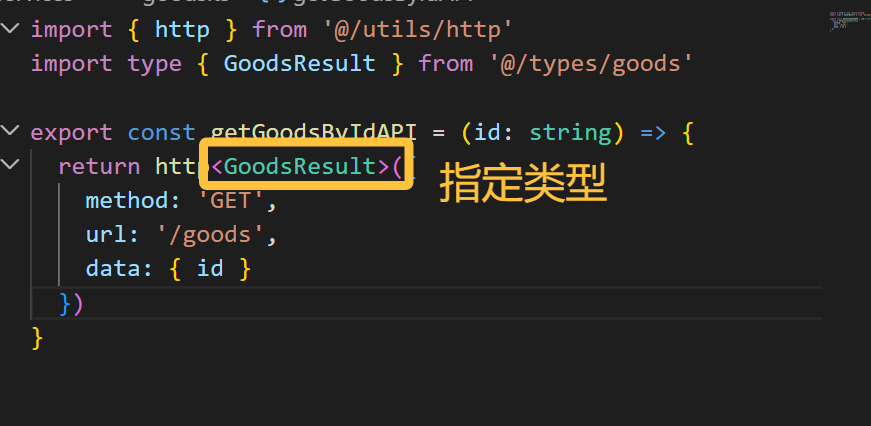
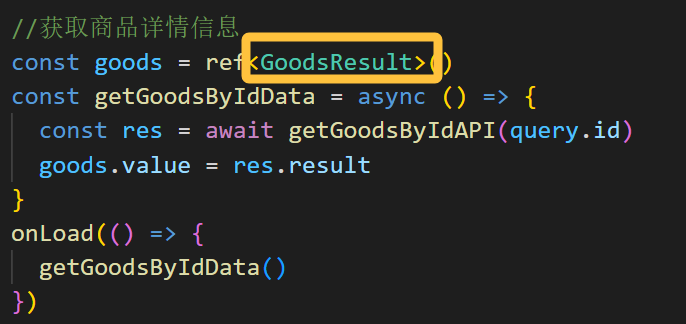
商品详情
准备工作
定义类型+页面渲染
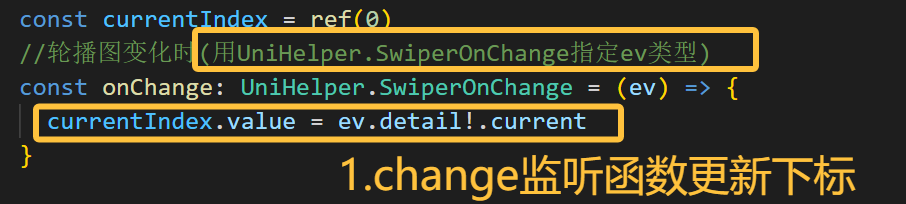
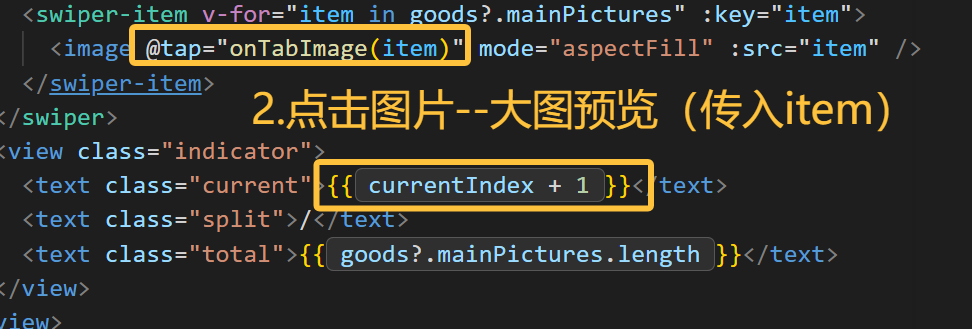
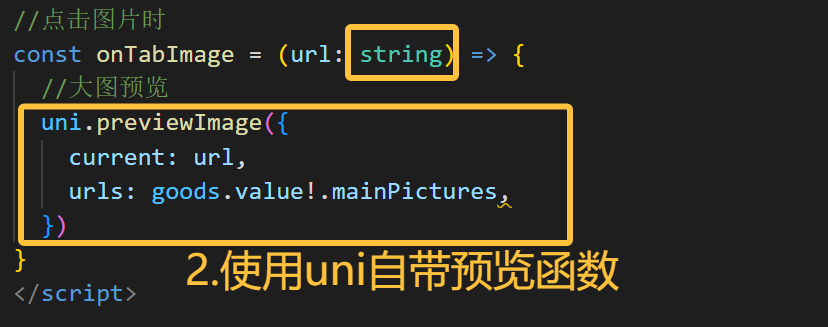
轮播图交互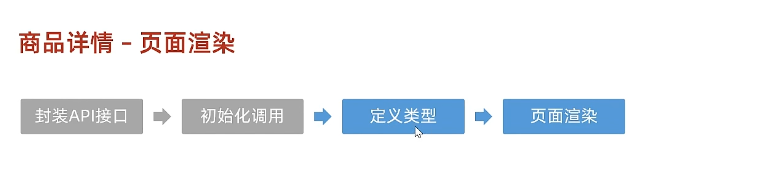
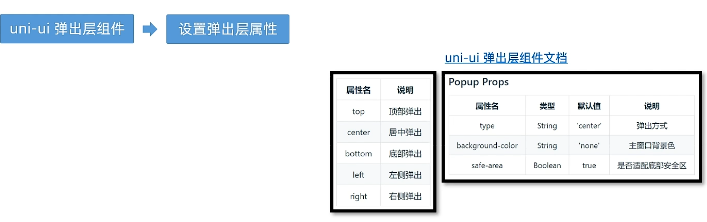
弹出层组件(重点)
javascript
<template>
    <view>
        <button @click="open">打开弹窗</button>
        <uni-popup ref="popup" type="bottom" border-radius="10px 10px 0 0">底部弹出 Popup 自定义圆角</uni-popup>
    </view>
</template>
<script>
export default {
   methods:{
      open(){
        // 通过组件定义的ref调用uni-popup方法 ,如果传入参数 ,type 属性将失效 ,仅支持 ['top','left','bottom','right','center']
        this.$refs.popup.open('top')
      }
   }
}
</script>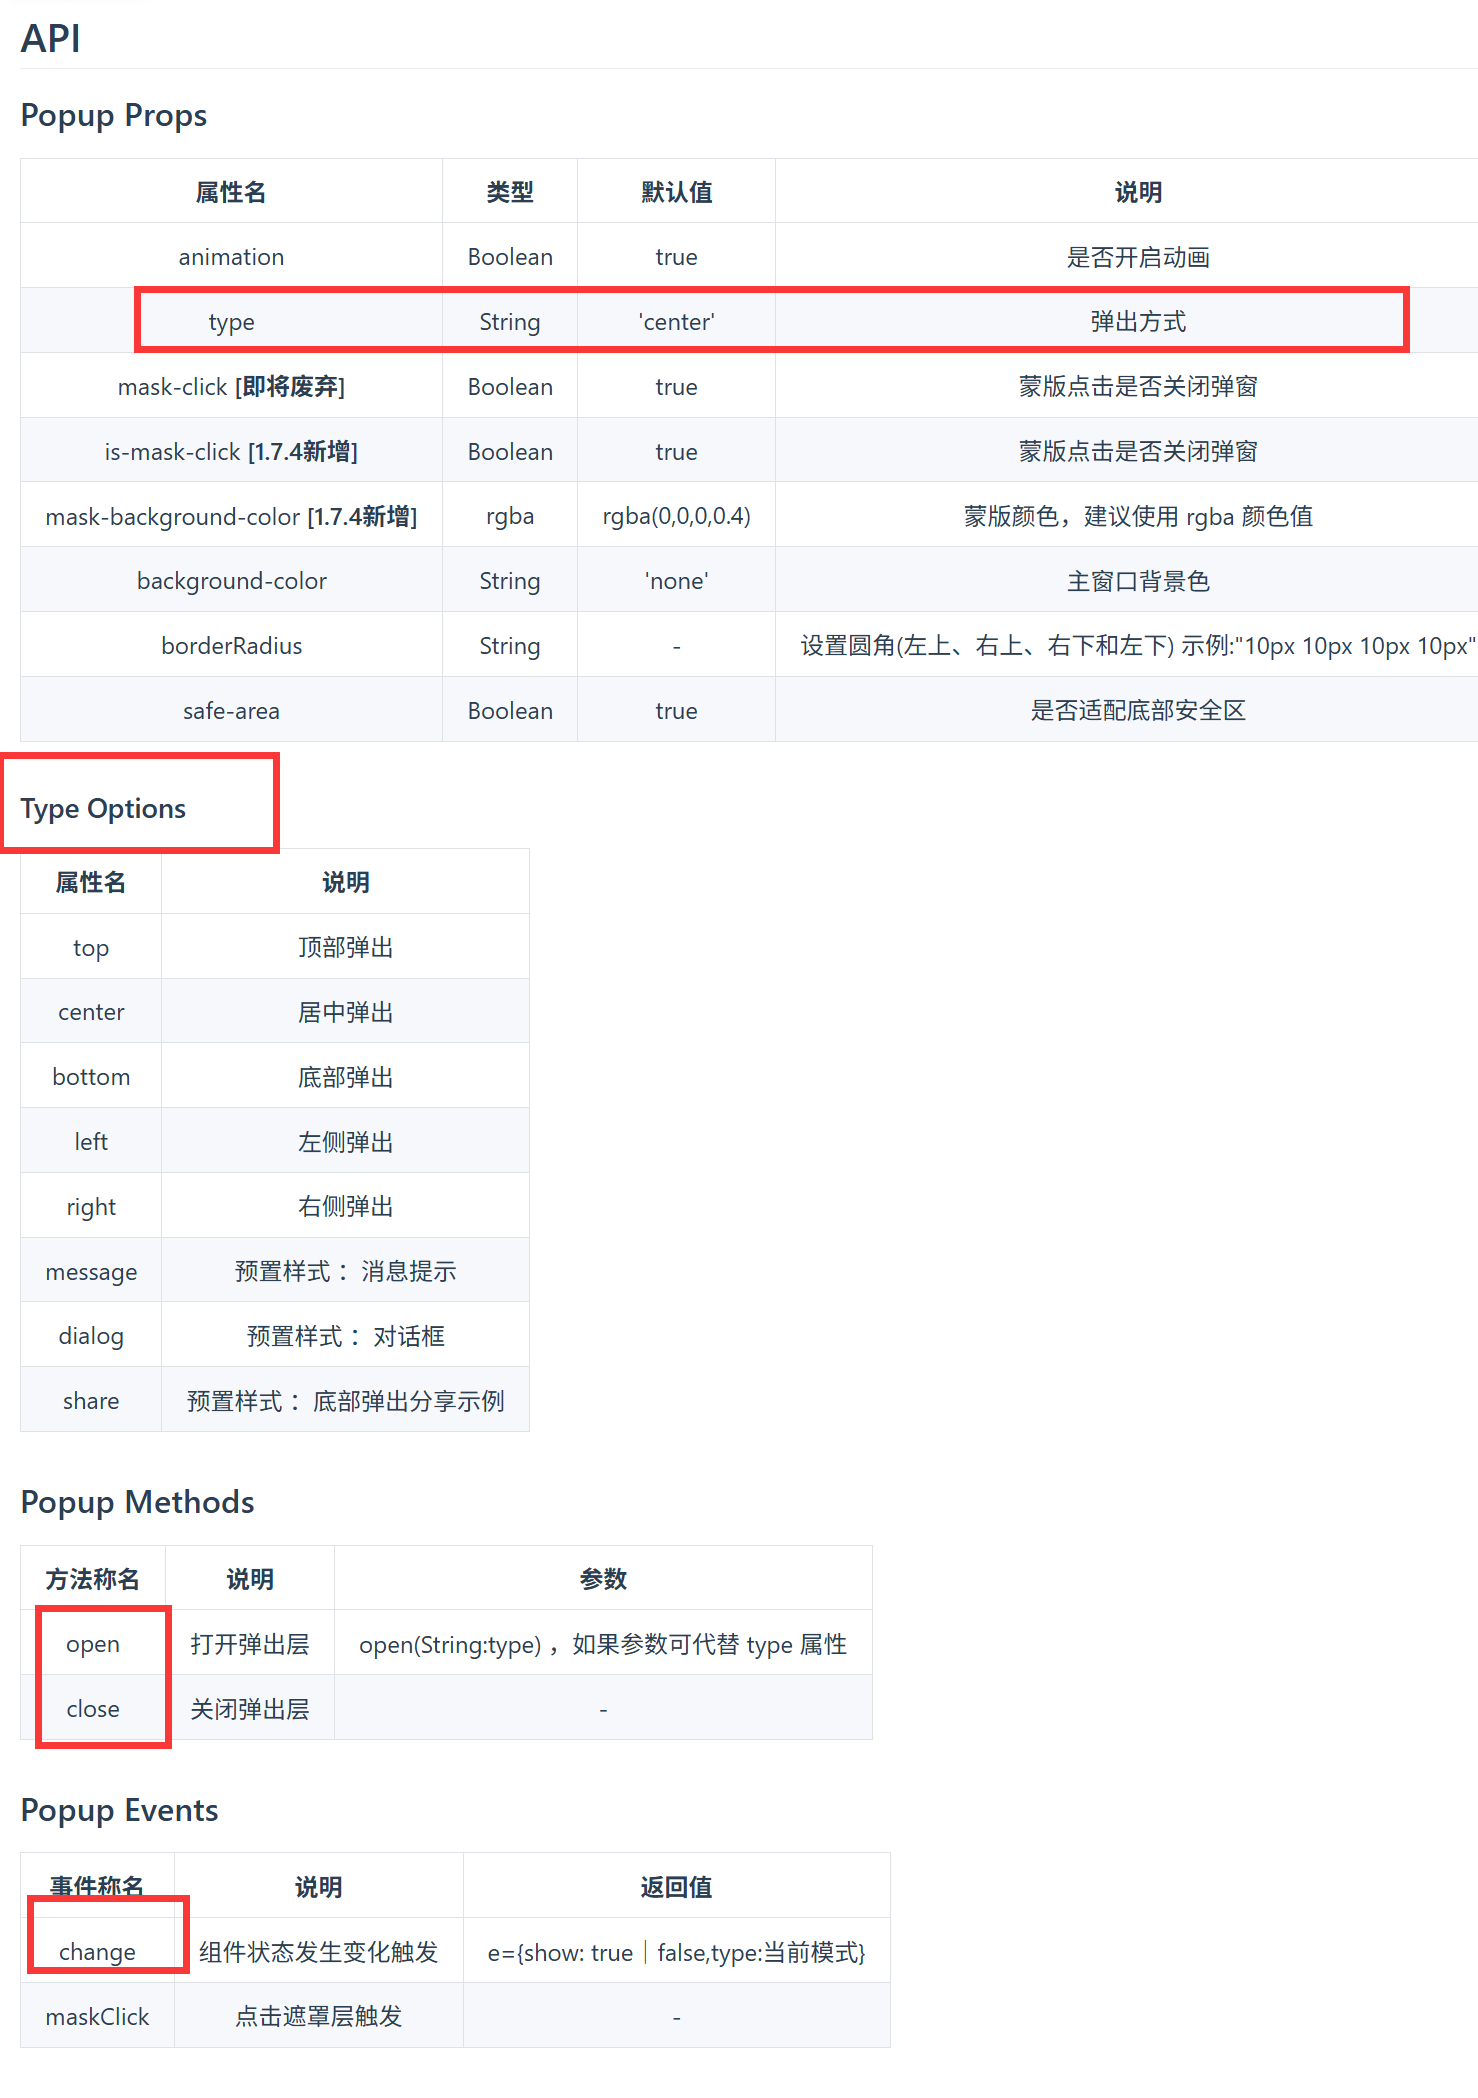
ref:默认情况弹出层看不到,指定ref可查找这个组件,点击的时候调用组件的open方法
给popup指定对应的类型-->书写时有更好的提示
使用uniHelper.UniPopupType,就是字符串的联合类型
两个都同时写(type=''VS popup?.open('')),以方法(后者)为准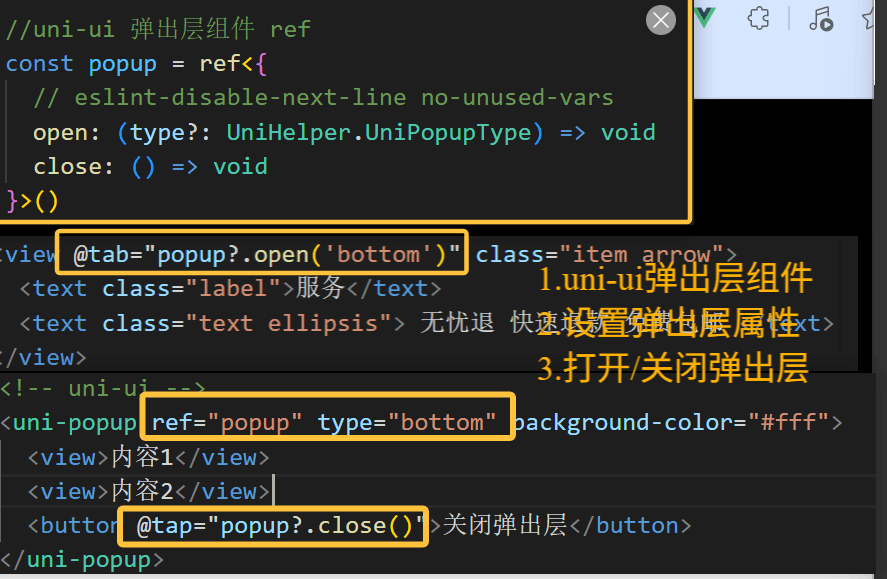
弹出层交互(重点)
核心逻辑:动态条件渲染弹出层
- 初始阶段:组件静态结构与事件绑定 点击事件监听:为"服务"和"地址"选项绑定 @tap事件。
触发方法:调用统一的openPopup(name)方法,传入类型参数('service'或 'address')。
子组件 准备:ServicePanel和 AddressPanel组件内部通过 defineEmits定义 close事件,用于后续通知关闭。
-
中间阶段:条件渲染与弹窗控制 状态管理:使用 ref('address' | 'service')定义响应式变量 popupName ,记录当前需要显示的面板类型。 动态渲染:在 <uni-popup>容器内部,使用 v-if指令进行条件判断: popupName === 'service'➔ 渲染 ServicePanel。 popupName === 'address'➔ 渲染 AddressPanel。 打开弹窗:在 openPopup函数中,修改 popupName.value后,调用 popup.value?.open()显示弹窗。
-
结束阶段:关闭弹出层 触发关闭 :在子组件(如 ServicePanel.vue)中点击"关闭"按钮。 事件通信:执行 emit('close'),向父组件发送关闭信号 。 执行关闭:父组件监听到 close事件后,调用 popup?.close()隐藏弹窗。